Thukydides
-
Posts
1,363 -
Joined
-
Last visited
Content Type
Profiles
Forums
Gallery
Events
Everything posted by Thukydides
-
 It is looking great! I have never regretted taking too much time with something on alert, but I have certainly regretted taking too little.
 -
Awesome job. Two years and one month is pretty good time given the scale of the project. You have accomplished a lot in that time. She looks great.
- 218 replies
-
- 1
-

-
- Victory
- Caldercraft
- (and 1 more)
-
Great job, I like your design choices. The model is certainly something you can be proud of.
-
I am also in favour of sable brushes. I use either W&N series 7 (very expensive) or rafael 8404 (about half the price pretty much just as good). Make sure if you invest in some brush soap. A tub like this will last you many years. If you are going to buy expensive brushes make sure you take care of them. There are lots of videos on youtube to help. I would actually recommend a size slightly larger than 000, what matters is the point and since you don’t have to worry about getting the brush into a tight space, a larger one will hold more paint and not dry out as quickly. That being said try a few sizes and see what works best for you. Acrylic paint is somewhat transparent so when painting a very transparent colour (such as yellow) over a dark colour such as blue you need to build up the layers. Try painting with a brown colour first and then building up to brighter yellows. Good luck
-
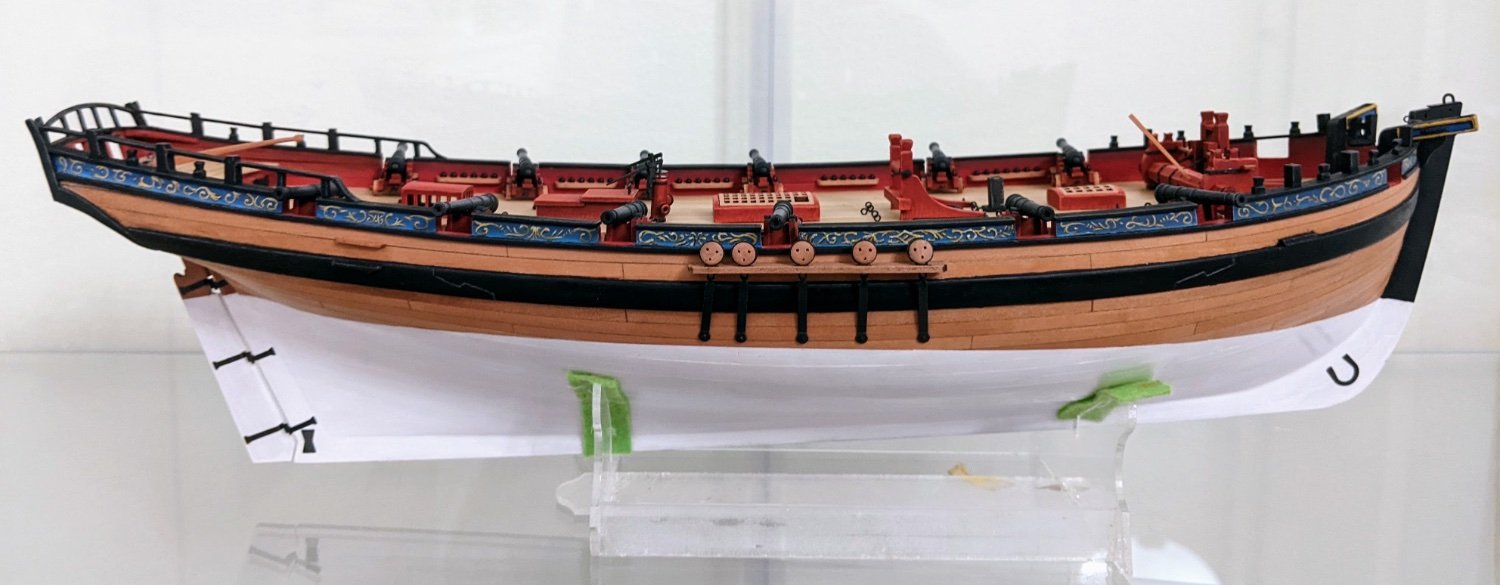
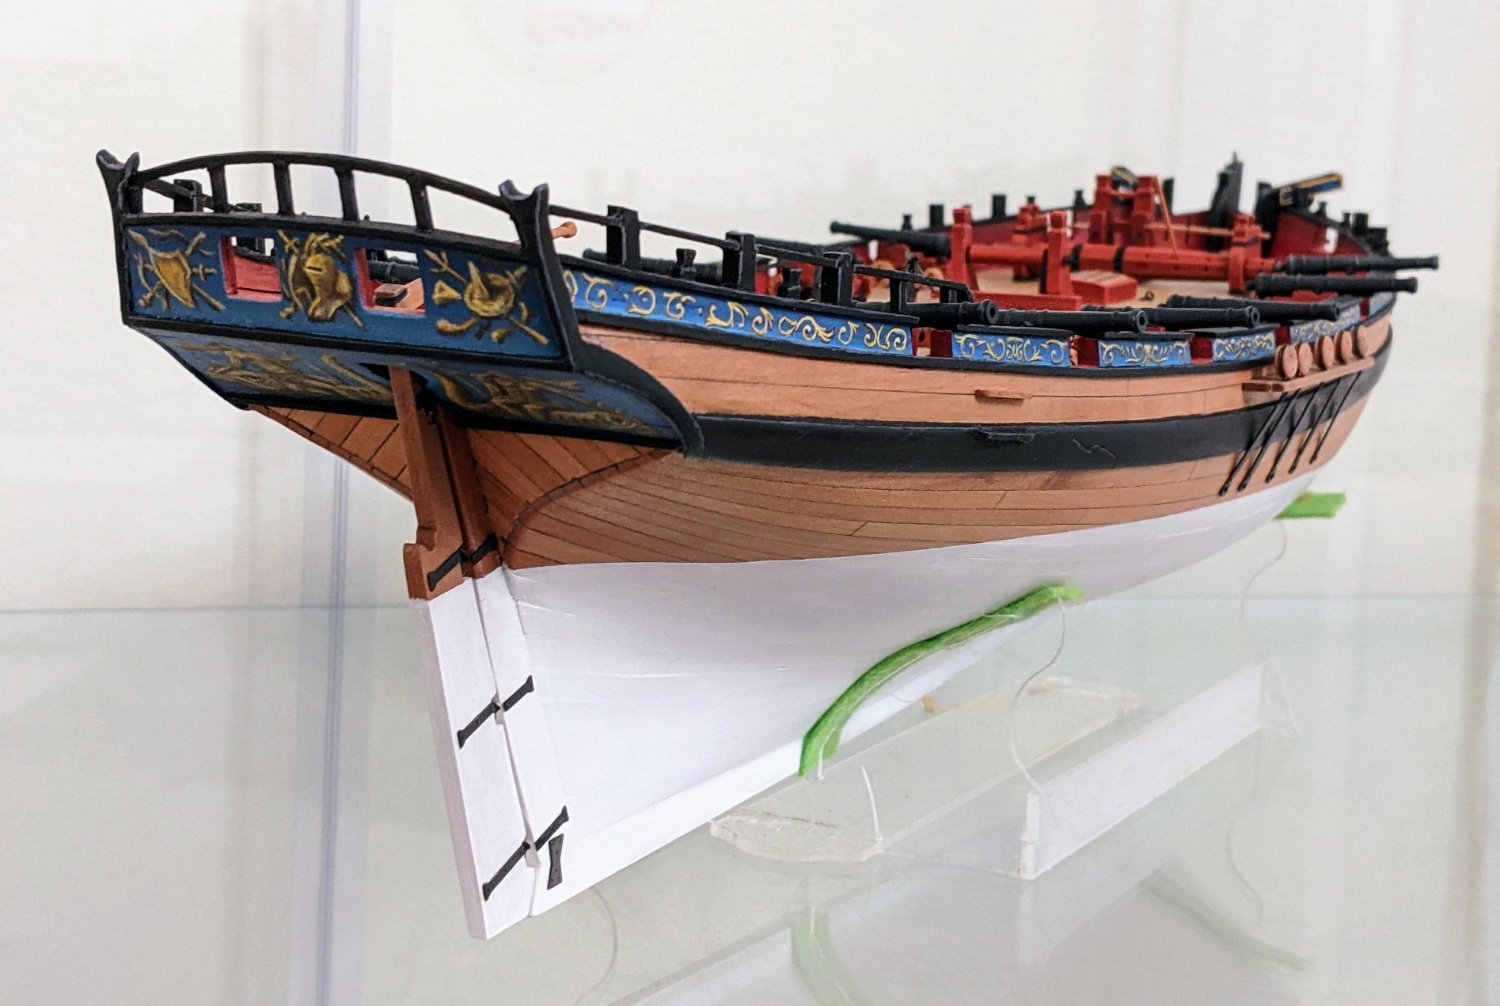
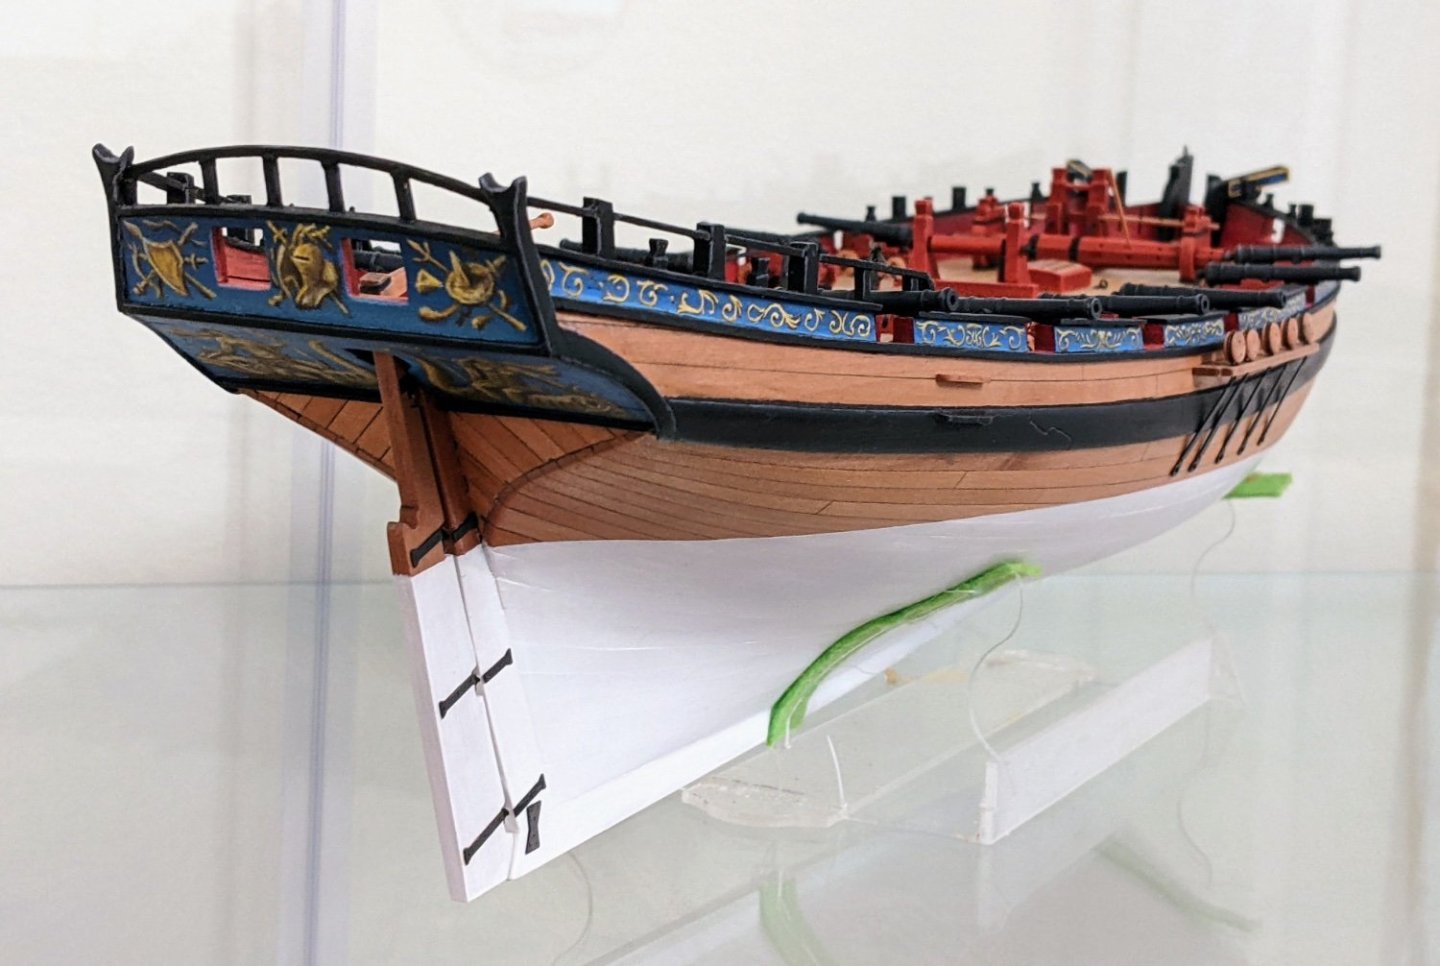
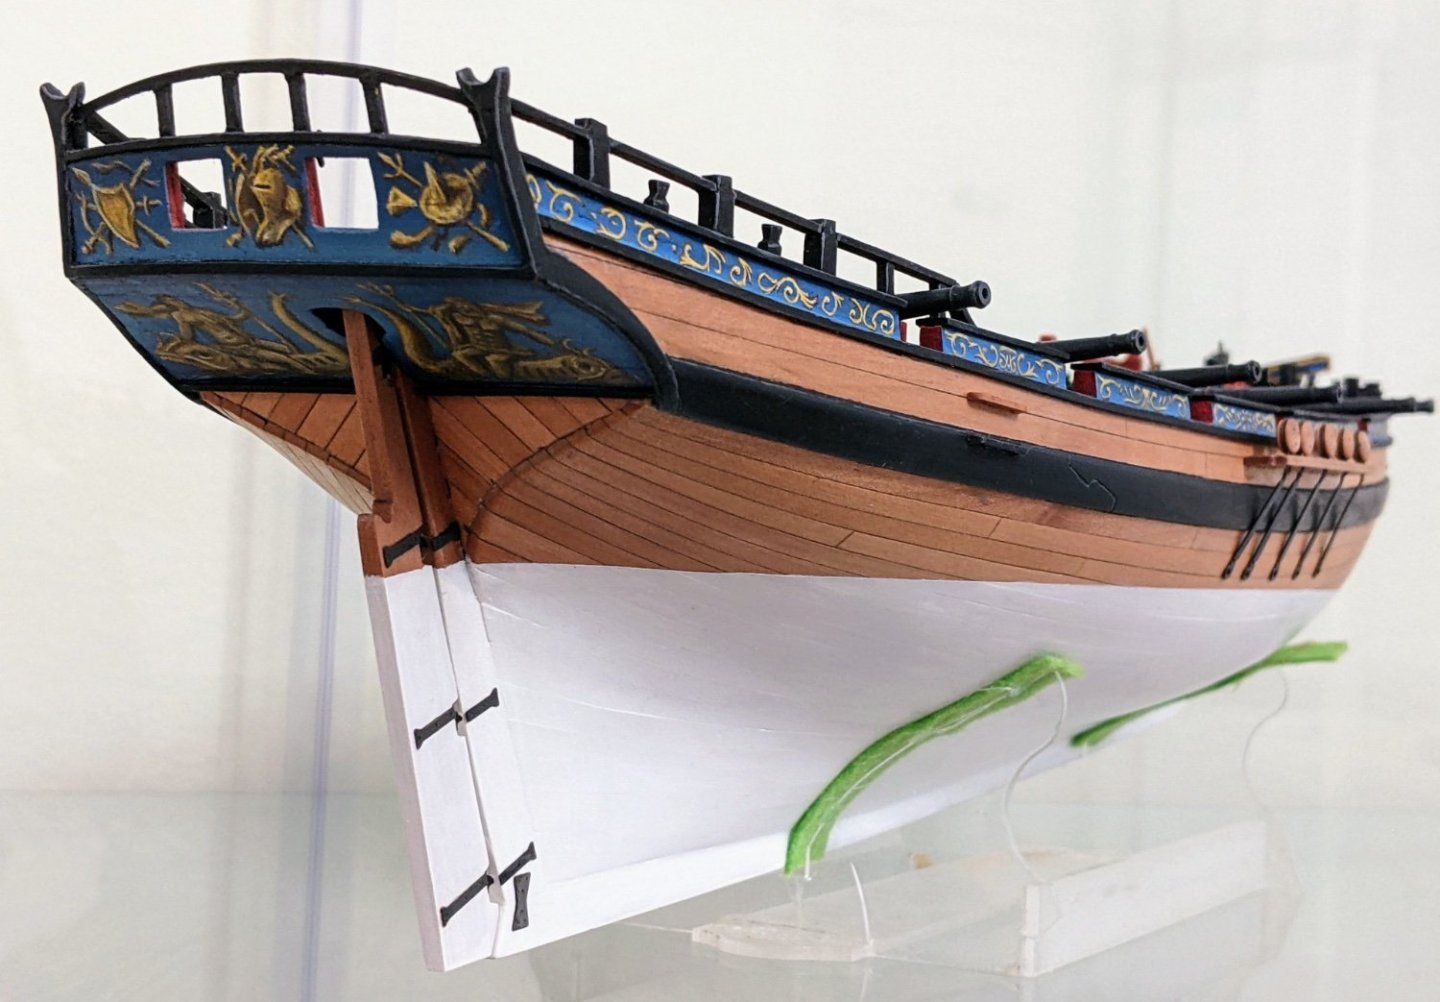
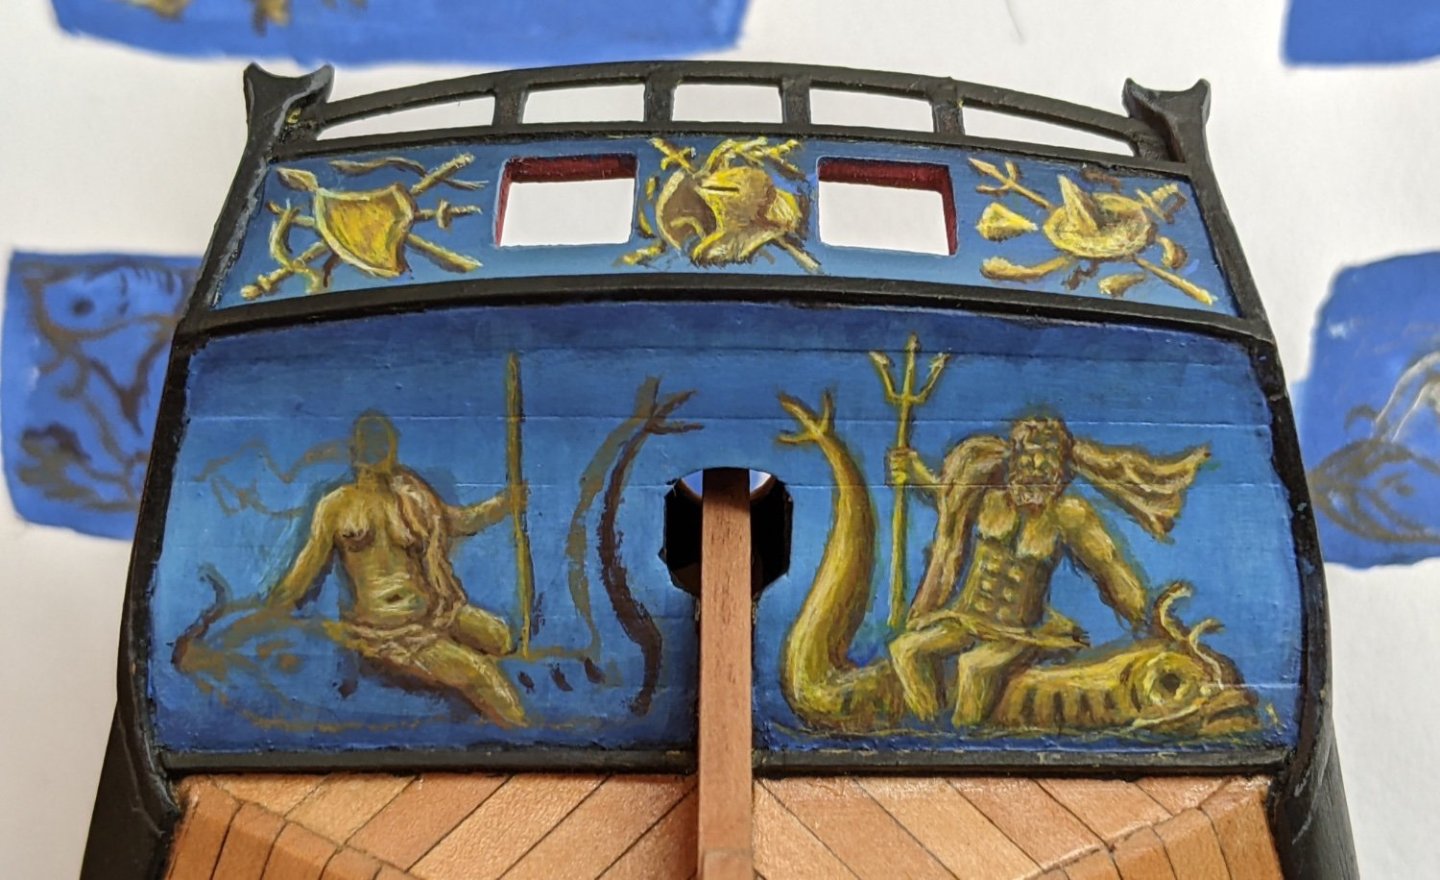
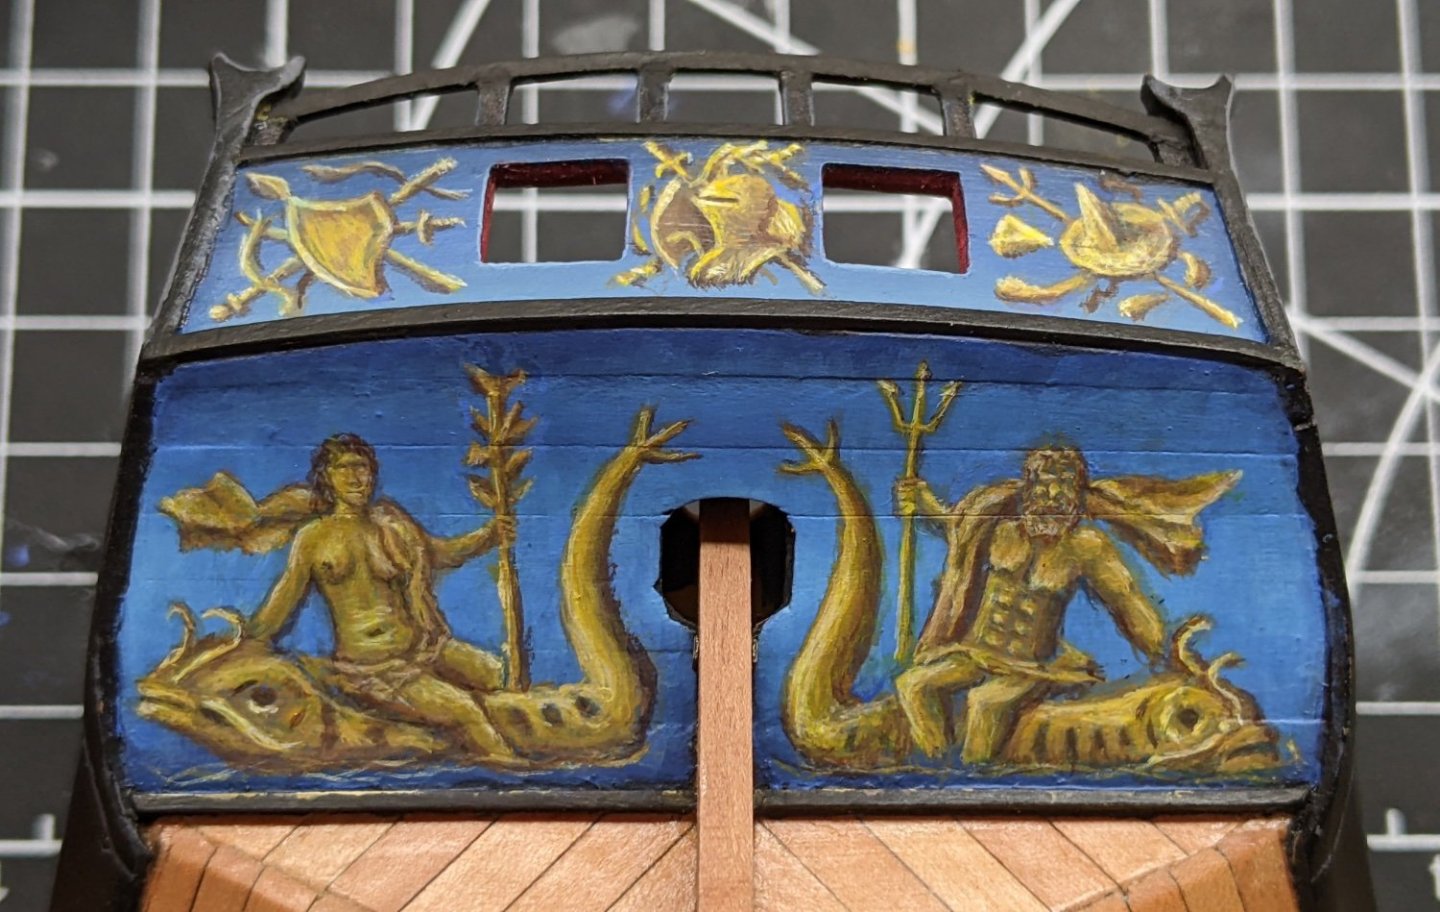
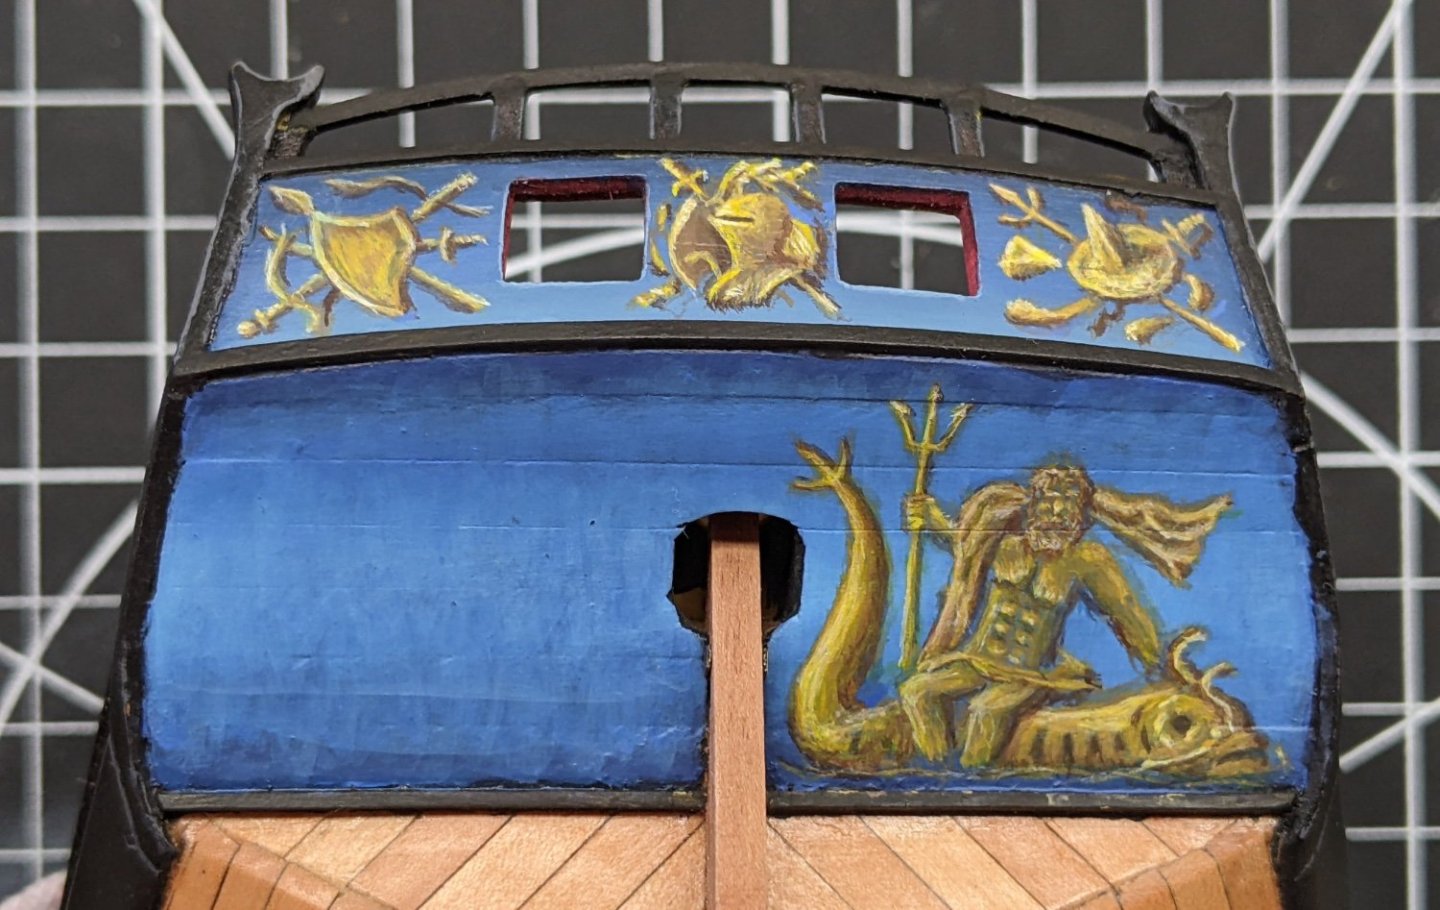
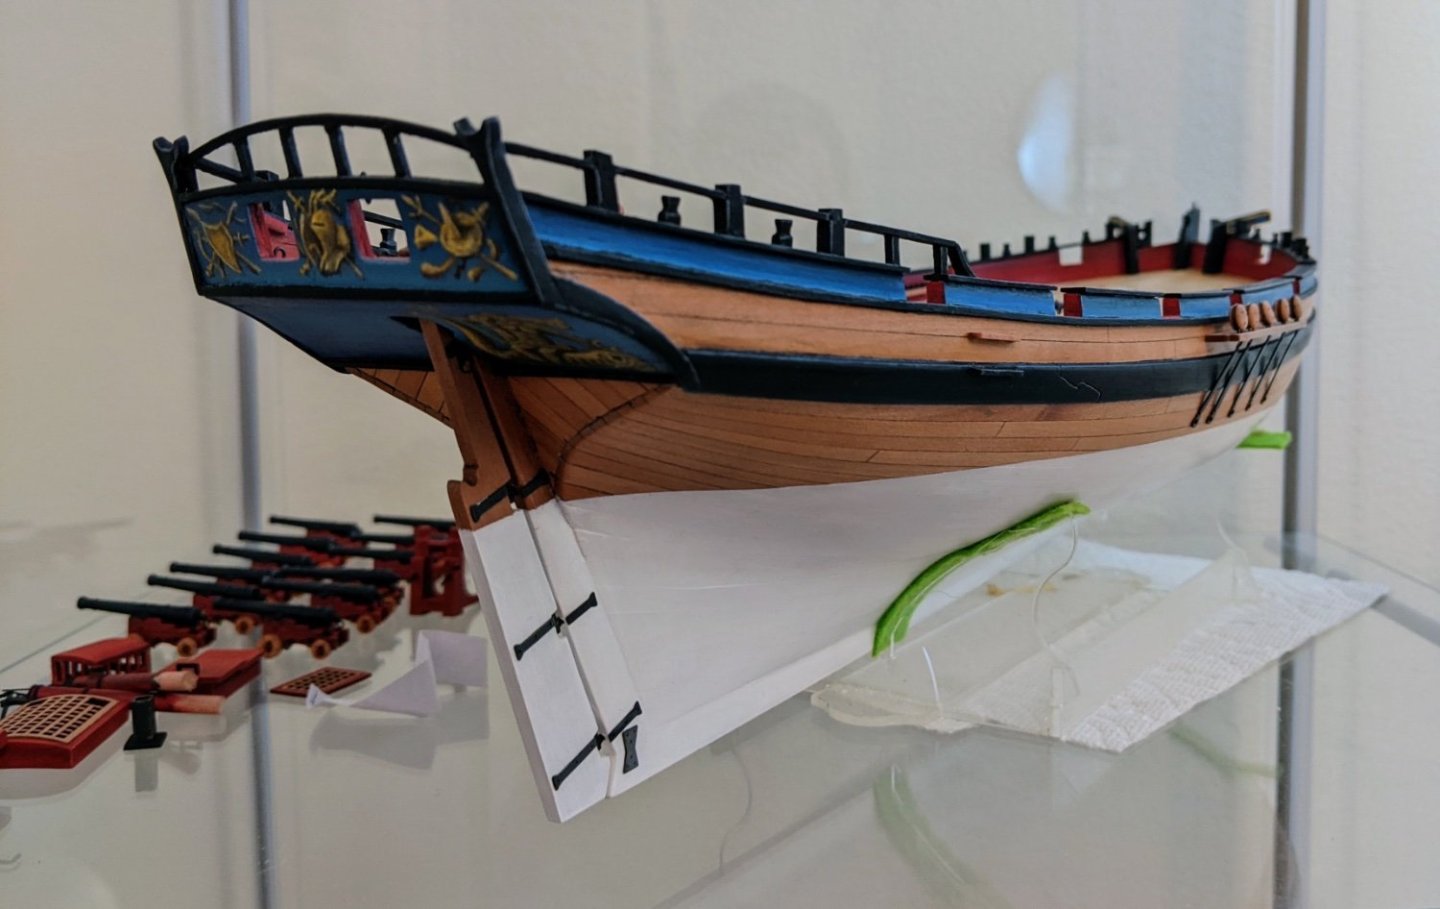
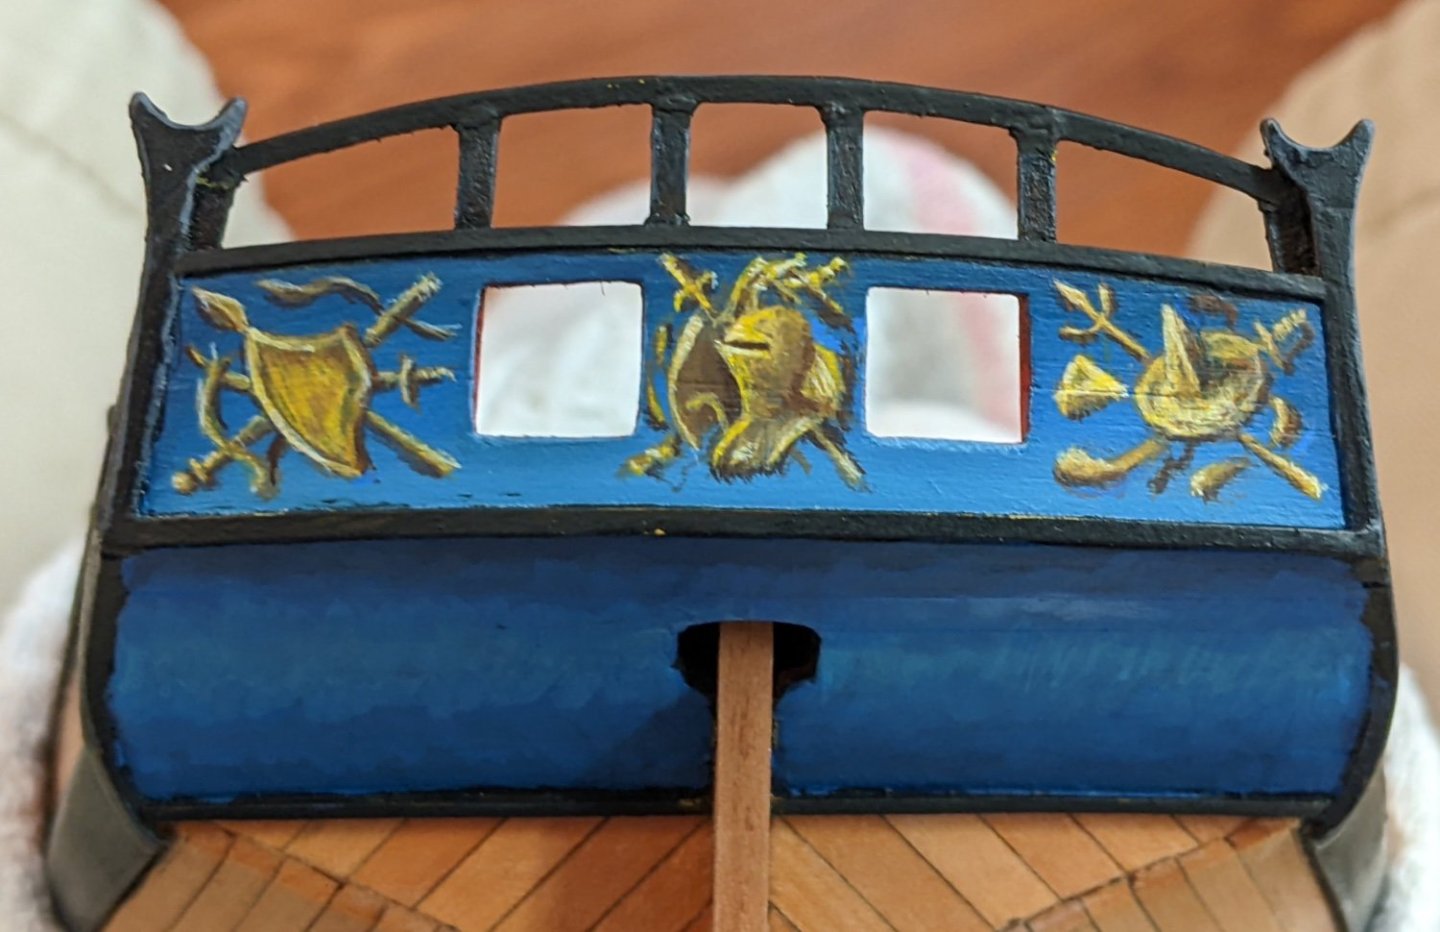
Log #38: Painting Complete I have finally finished with all the painting. The frieze was a challenge at only around 3.5mm of space, there was not much room to add in detail. As I have progressed I have gotten a better handle on the style, but I could definitely do a better job if I was to start over. Below you can see how what I accomplished compares to the alert painting. I think I largely captured the feel, though as I have discussed in previous logs I did make some changes based upon what I felt would better capture Neptune and Salacia. Though not strictly realistic (a ship this insignificant would likely not have had this much decoration), I do like the look. In a sense I am trying to capture the essence of the ship as envisaged by the designer even if the ship itself likely didn’t look like this. Overall I am glad I went down this road. I have learned a lot about painting and I feel the model is finally starting to come to life.

- 562 replies
-
- 32
-
-

-
- vanguard models
- alert
- (and 2 more)
-
You could try filling the gap with milliput or greenstuff. You would need to paint the cannon after doing so, but looking at that gap it shouldn't be hard to fix with a bit of putty.
- 587 replies
-
- 1
-
-
- Indefatigable
- Vanguard Models
- (and 1 more)
-
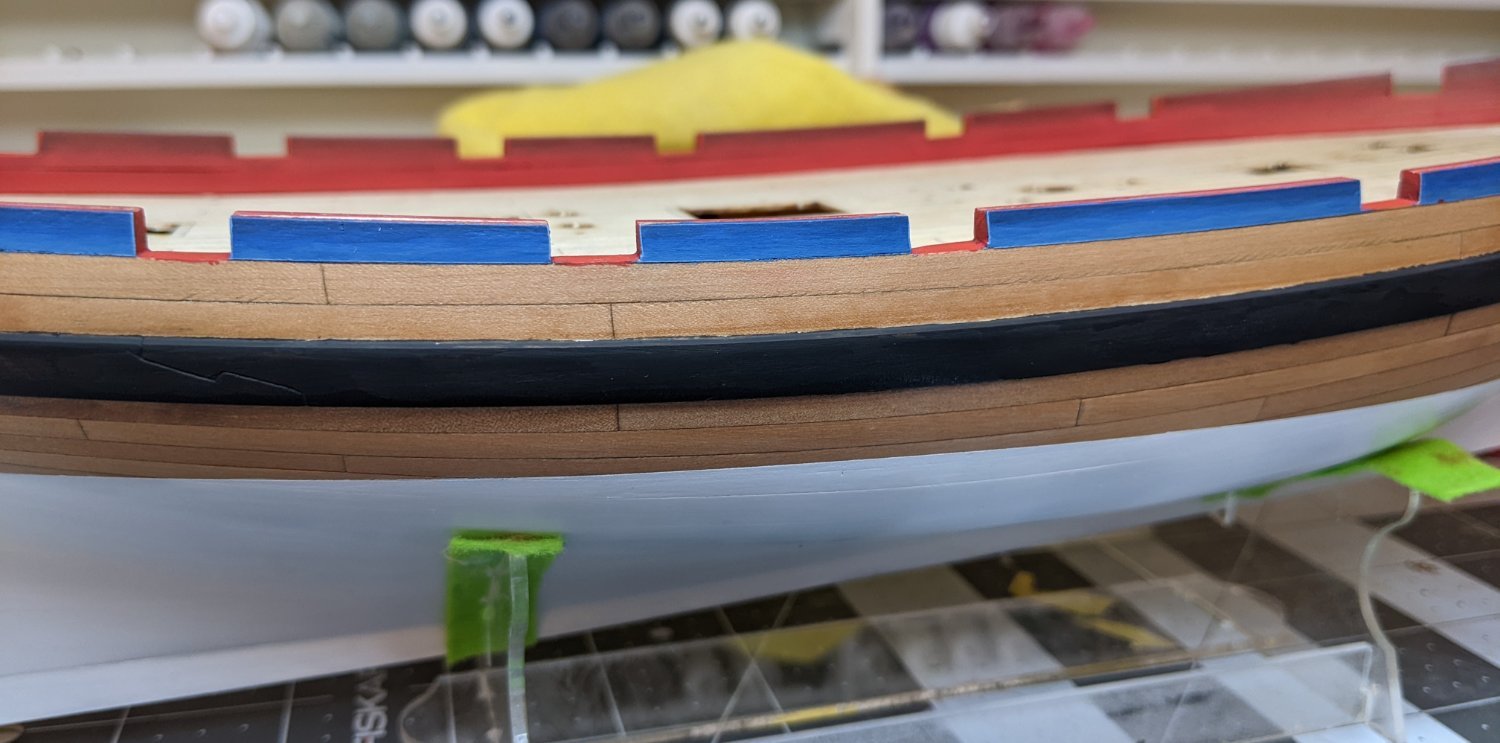
Time for another minor update. The frieze is almost done. Just one more section to paint (on each side) and the little bit by the catheads.

- 562 replies
-
- 15
-
-
- vanguard models
- alert
- (and 2 more)
-
Thank you, it is the only part of this whole endeavor that I didn't have to learn all the skills from scratch . The hardest part of shading and highlighting is just understanding how the light falls on something. Some people have a natural eye and it comes easy to them. For others (like me) take lots of practice and looking at pictures. At the moment my biggest problem is I only have a few nights a week available for hobby time and I can't both paint mini as work on Alert... Thanks. Just to be clear (as I am not sure if you mean I was suggesting painting it off the model) I was just referring to the point before all the moldings started obstructing my access. Around this point:

- 562 replies
-
- 7
-
-
- vanguard models
- alert
- (and 2 more)
-
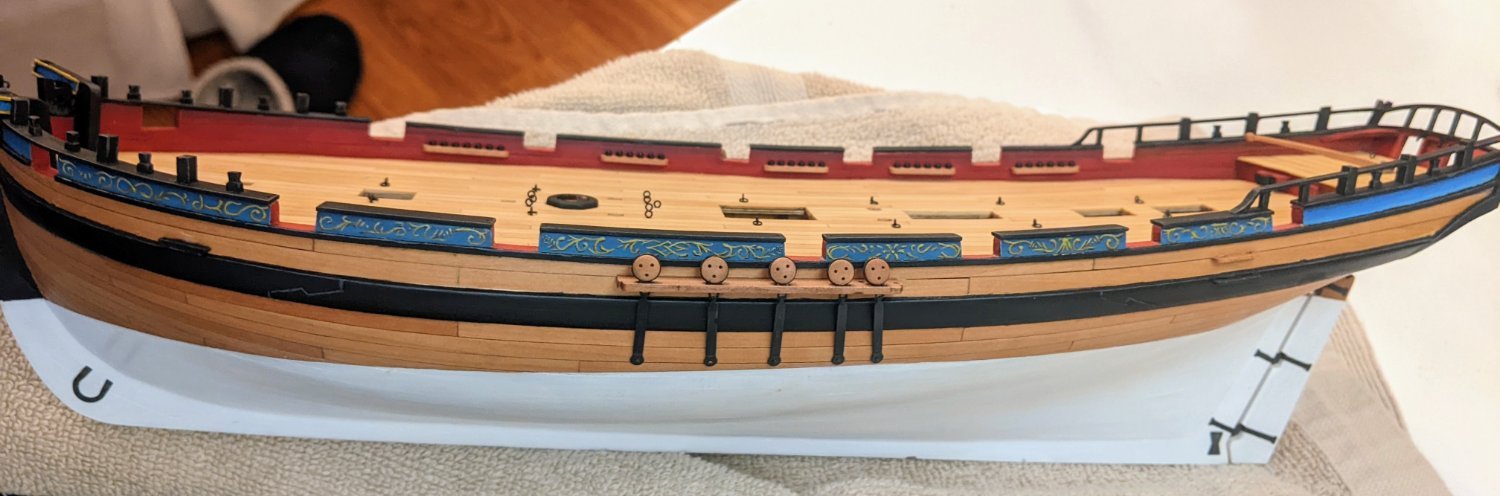
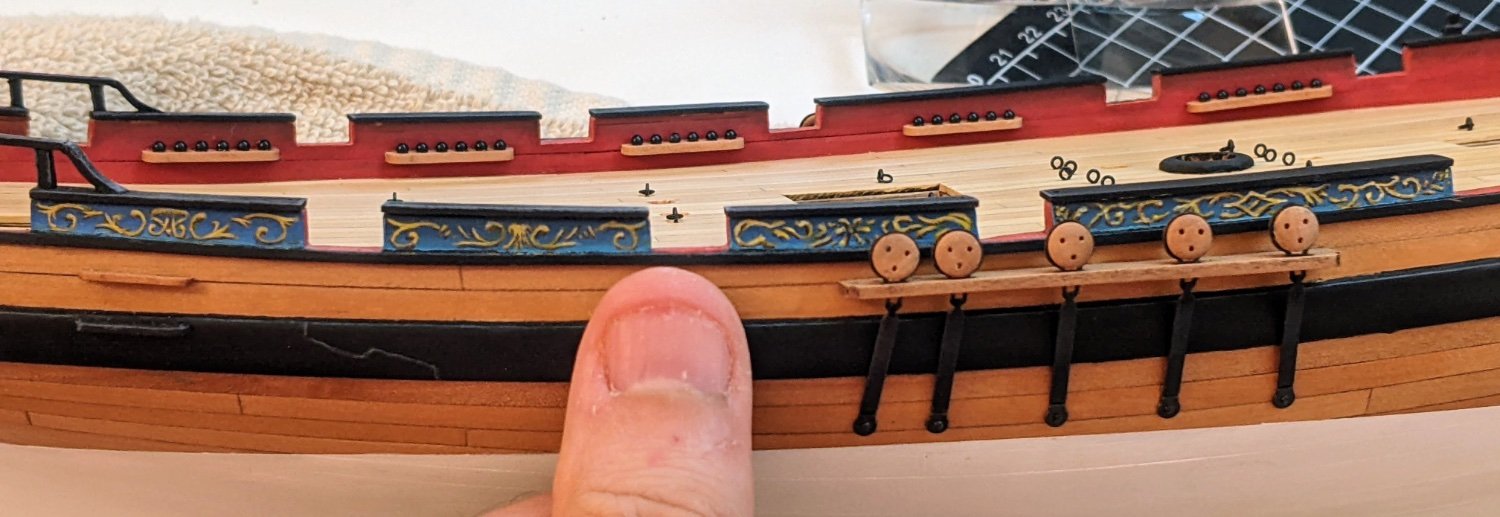
Thanks to everyone for all the likes and encouragement. One week later I am still picking away at the frieze. Below you can see my progress so far. To try and help with consistency I have been doing each section on both sides of the ship before moving onto the next one. The tiny scale is particularly problematic for these flowery flowing shapes as you can’t use some of the tricks I used with the transom and counter to fudge things as it is all thin lines. My thumb is included for scale. Because of this I ended up painting over in blue a number of attempts that weren’t good enough. I do feel that I could have done a better job if I had done this before attaching the railing and the moulding, but that is what this project is about, pushing myself to try and learn skills and gain experience of what not to do for next time :).

- 562 replies
-
- 13
-
-
-
- vanguard models
- alert
- (and 2 more)
-
Looks fantastic BE. Really you are flying through this build. I am looking forward to seeing how using the boxwood as the yellow stripe turns out once you have everything sanded and painted.
- 648 replies
-
- 2
-
-

-
- Indefatigable
- Vanguard Models
- (and 1 more)
-
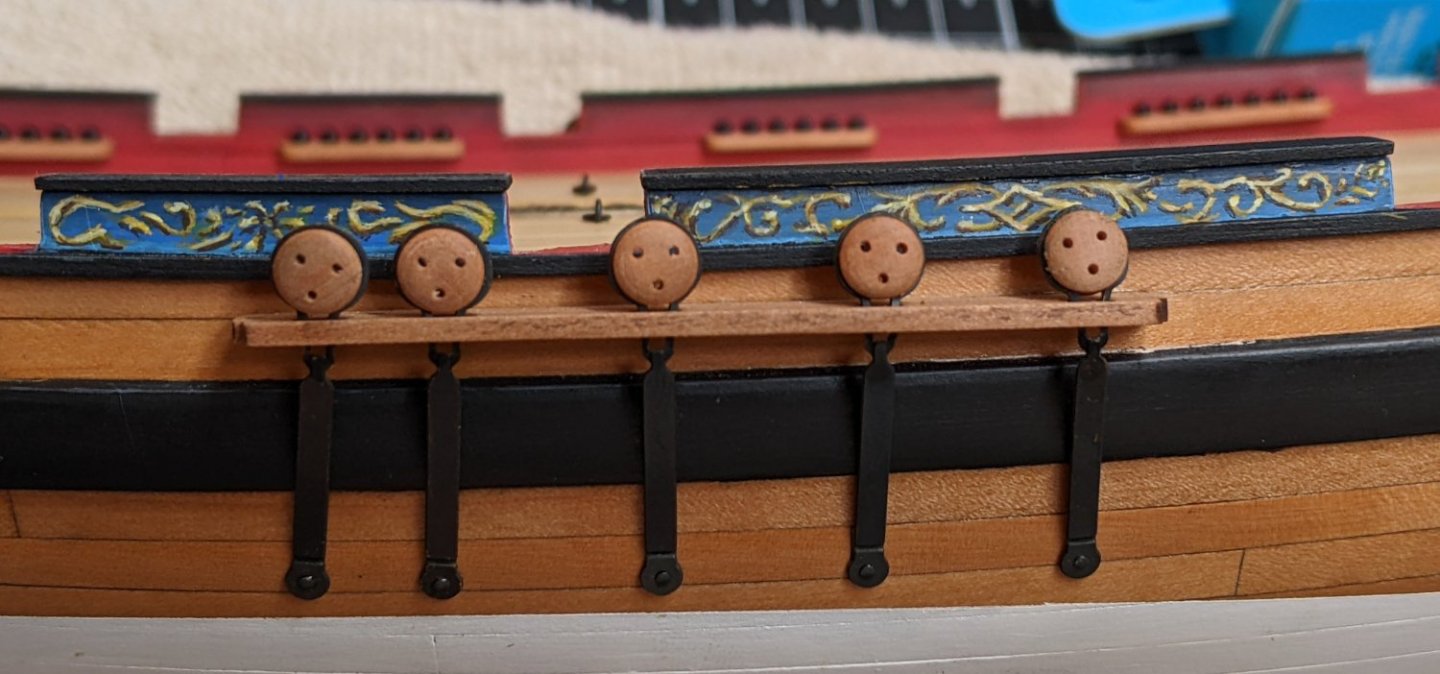
I continue to pick away at the frieze on the side of alert. The sections below were a bit more tangly to do as I had already installed the channels and the deadeyes. I had to break out the magnifying glasses as I only have about 3.5mm of width to work with.
- 562 replies
-
- 16
-
-
-
- vanguard models
- alert
- (and 2 more)
-
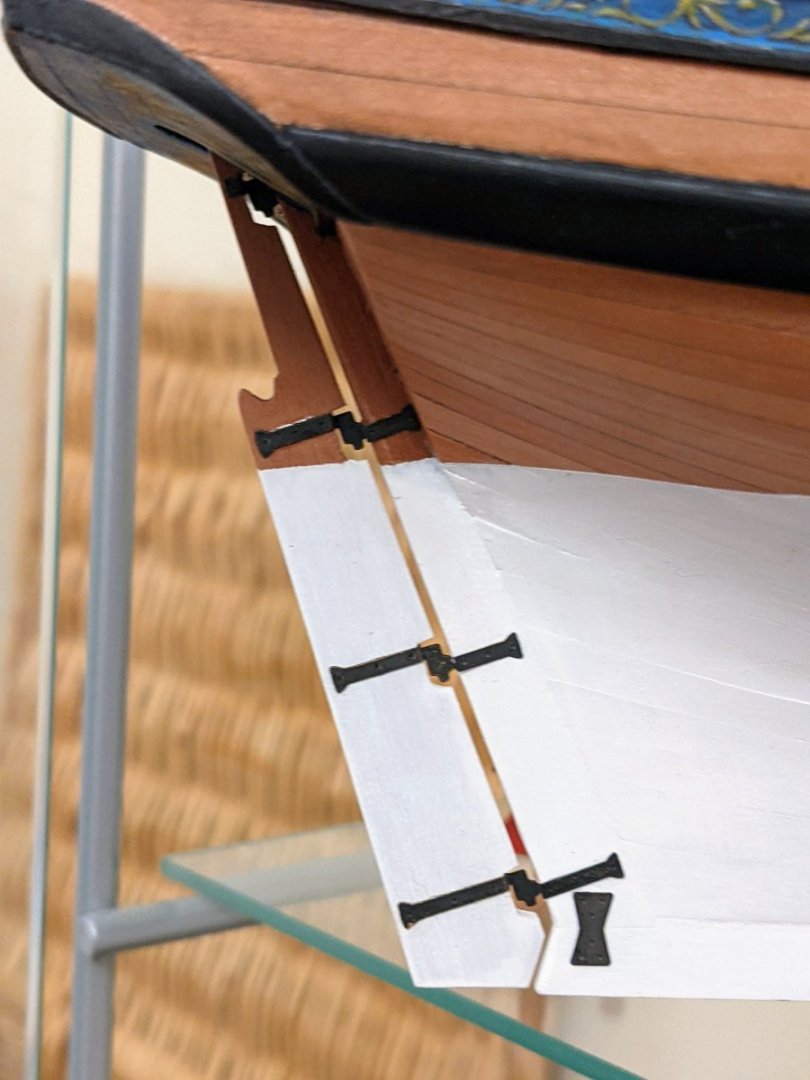
Great progress. Just a minor comment. It appears to me that you are missing one of the hinges (the very top one) on the rudder. There should be one in that indent right where the rudder enters the counter. Also it is hard to tell from the photo but it looks like they might be upsidedown and not in far enough (though I may be mistaken on this as the resolution on the photo is too low to be sure). See below for a close up picture of my alerts rudder.
- 59 replies
-
- 4
-
-
- Alert
- Vanguard Models
- (and 1 more)
-
Chris has some great kits for beginners. I suspect alert would actually be easier than the lady nelson due to the higher quality materials in it. I believe he also has another cutter he is releasing soon which looks like a great starter kit. Then finally he has a whole bunch of fishing boats if you are looking for something smaller.
- 16 replies
-
- 3
-
-
- Lady Nelson
- Victory Models
- (and 1 more)
-
@allanyed I am not sure I understand what you mean by first vs second squadron. Can you elaborate? Also how do you print on silkspan, do you attach it to another piece of paper? By triple printing one side you mean you would only use a single layer of silkspan for the flag?
-
How do you get that nice wood texture on the card? Did you mention it in a previous post? In any case it is looking good.
-
Congrats, it looks great.
-
That is pretty frequent. If you go look at the forum section for new members there is a post discussing the significant number of people who start a build log and never get the model finished. That is why starting with something small (as you have done), is a good idea. I think even in my relatively short time here I have seen a number of build logs I was following just stop posting. Life happens or people just loose interest. I myself had a period of several months where I made no progress on Alert due to a combination of life being busy and being unsure how to proceed with a problem I had with the model. This lead to me feeling unmotivated to work on it and it took some effort to push through that. You will likely have a similar moment and the key is to find little tasks on the model you can get done. I find that having progress to share helps me to want to do more.
- 562 replies
-
- 3
-
-
- vanguard models
- alert
- (and 2 more)
-
Enjoy, there are a lot of good logs on the lady nelson which will help you on your way.
- 16 replies
-
- 2
-
-
- Lady Nelson
- Victory Models
- (and 1 more)
-
Nice, which one? Cutters are a great first model. Take it slow and read as many build logs as you can. It is always better to learn from others mistakes 😃.
- 562 replies
-
- 2
-
-
- vanguard models
- alert
- (and 2 more)
-
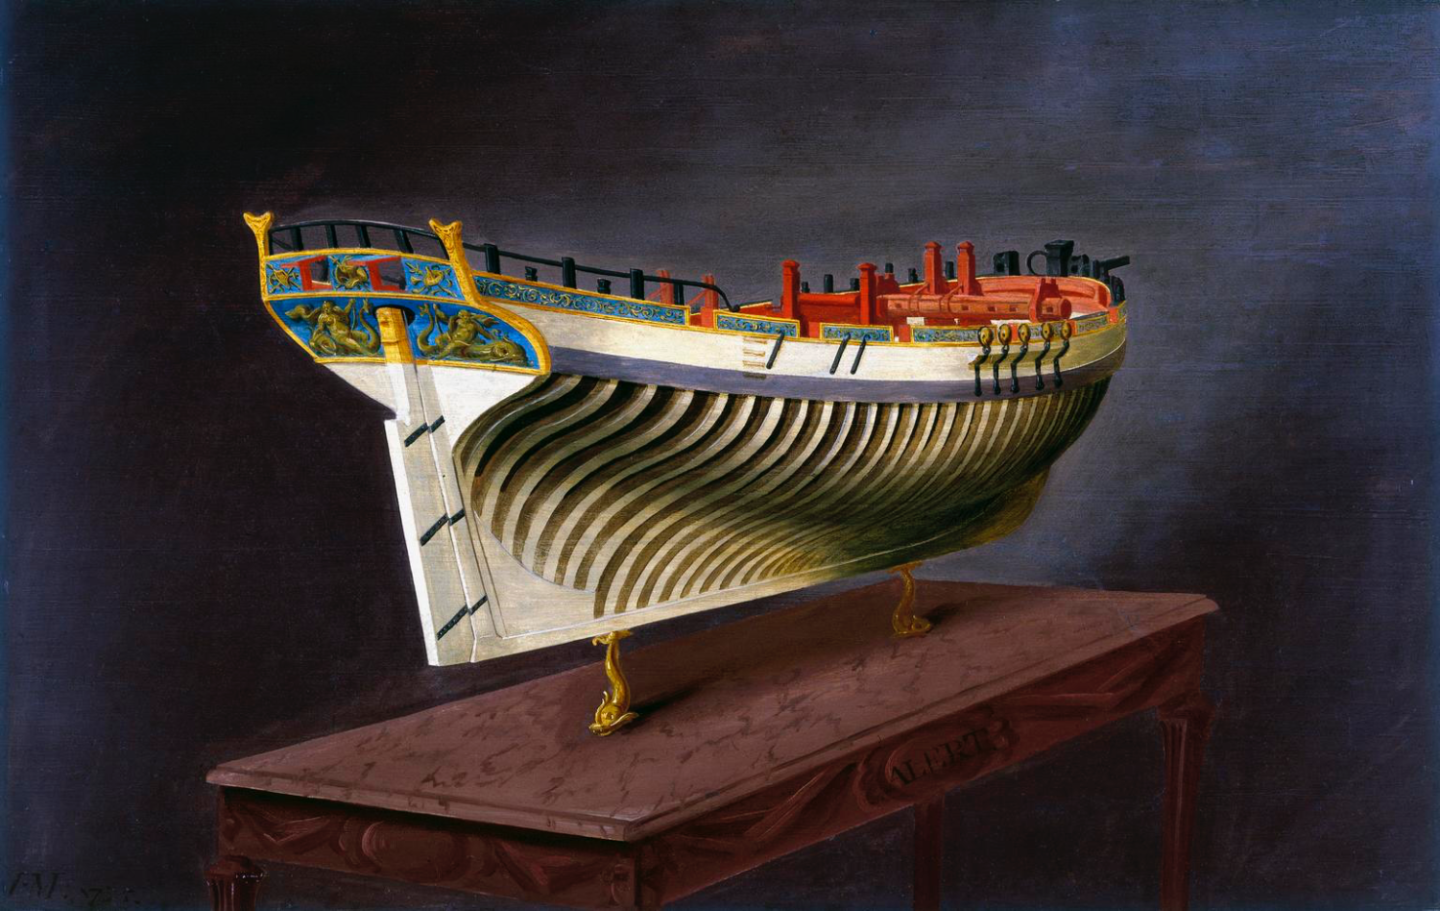
Time for another work in progress picture. I have been slowly working on Salacia (the wife of Neptune). After a few test versions, mostly to try and plot out the layout, I dived in. One thing I have found is that it helps to have a lot of reference photos of the subject. These come in two types: 1) On model pictures (such as the Marshall painting) for getting down the colour and style: https://collection.sciencemuseumgroup.org.uk/objects/co521412/cutter-alert-oil-painting 2) The subject depicted in other artwork to help with context: https://en.m.wikipedia.org/wiki/Salacia#/media/File%3AAffreschi_romani_-_nettuno_anfitrine_-_pompei.JPG https://www.encirclephotos.com/wp-content/uploads/Belgium-Antwerp-Salacia-Goddess-Statue-954x1440.jpg This is my progress to date: I feel much better about the cloth on her than I do about Neptune. I plan to depict her holding the stick wth the leaves as she is portrayed in the statue I referenced above. I think this will add balance and contrast where they are both mirroring each other holding an object, but the objects better represent who they are. EDIT: And i got the counter done. I also adjusted neptune a little. Next on to the sides.
- 562 replies
-
- 19
-
-
-
- vanguard models
- alert
- (and 2 more)
-
Nice fix. I had a similar problem planking alert, but I caught it a bit earlier before it had become so pronounced and was able to just adjust the thickness of the planks to compensate.
- 648 replies
-
- 3
-
-
-
- Indefatigable
- Vanguard Models
- (and 1 more)
-
I have now finished painting Neptune for the most part. I may go back and make some minor adjustments smoothing some of the transitions more, but it is good enough I think for me to move on to Salacia on the other half of the counter. The toga flowing over his shoulder is the part that I am least pleased with and depending on how I feel about it in a few days I may try to redo that part. I also figured I would show a picture from further away as the zoomed in photos in some ways make it look much more rough than it appears in person.
- 562 replies
-
- 17
-
-
-
- vanguard models
- alert
- (and 2 more)
-
it is looking good glenn, enjoy your holiday.
- 587 replies
-
- 4
-
-
-
- Indefatigable
- Vanguard Models
- (and 1 more)
-
Another quick update, I got some more time today to do some painting so I finished the transom. I added an extra wavy thing to the image as it looked a bit empty without somthing to fill in the space above the shield. I also have started blocking in the highlights for the blue background on the counter. Still lots of work to make the transitions nice and smooth, but it should give you the general idea of what I am going for. I also decided to get rid of all the yellow edges as I felt that either I need to go all ocher (as in the marshall painting) or all black. Once I have the main painting done I will touch up a bit and add the edge highlights.
- 562 replies
-
- 16
-
-
-
- vanguard models
- alert
- (and 2 more)