BETAQDAVE
-
Posts
5,364 -
Joined
-
Last visited
Content Type
Profiles
Forums
Gallery
Events
Everything posted by BETAQDAVE
-
 My 2 cents worth would be that scribed plywood decking just looks like plywood with lines drawn on it. Individual boards found on a real ship have much better definition than that! Having done woodworking for many years, I tend to notice right away that the wide grain pattern of the plywood crosses over all of the seams and that's a dead giveaway that it's just a sheet of plywood and not individual planks. If putting in individual decking boards looks like too much work there is still another option. I once modified the 1/96 Cutty Sark by Revell many years ago in which I replaced the plastic decking with some 3" x 22" sheets of .05" thick basswood decking boards that were 1/16" (aprox. 1.6 mm) wide glued up with black glue to represent the caulking. It was a little bit of extra work but I thought well worth the effort to eliminate the seams in the plastic deck and add that extra definition to them. Micro Mark still offers this product for about $17. (It's also available in 3/32", 1/8", and 3/16" wide planks.) For your reference I have also attached some photos of the deck of the Cutty Sark as it actually appears today. But, as it's your ship it really is your personal preference, so just have fun with it! As you can see, the decking is narrow and very light, so the 3 mm Mahogany would be both too wide (judging by the aprox. length of the feet of the tourists they must be about 6" wide, so @ 1:96 the planks should be about 1/16") and a poor color choice for decking but a good choice for the deck structures.
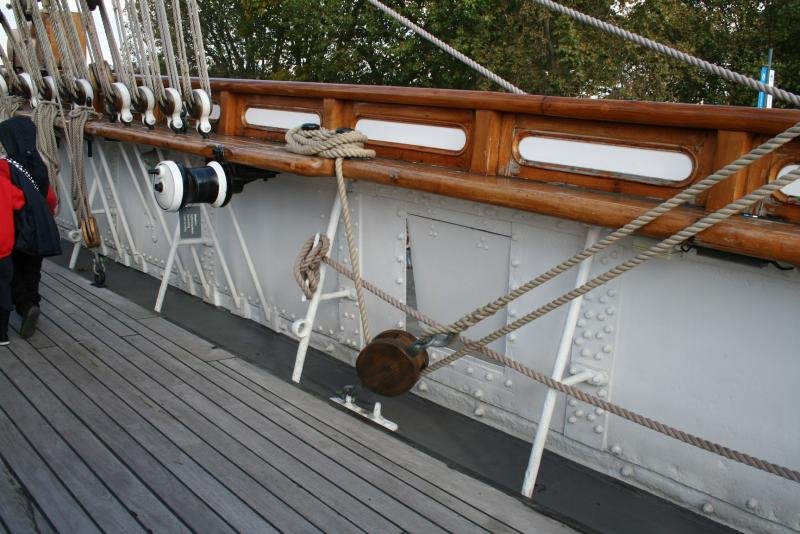

-
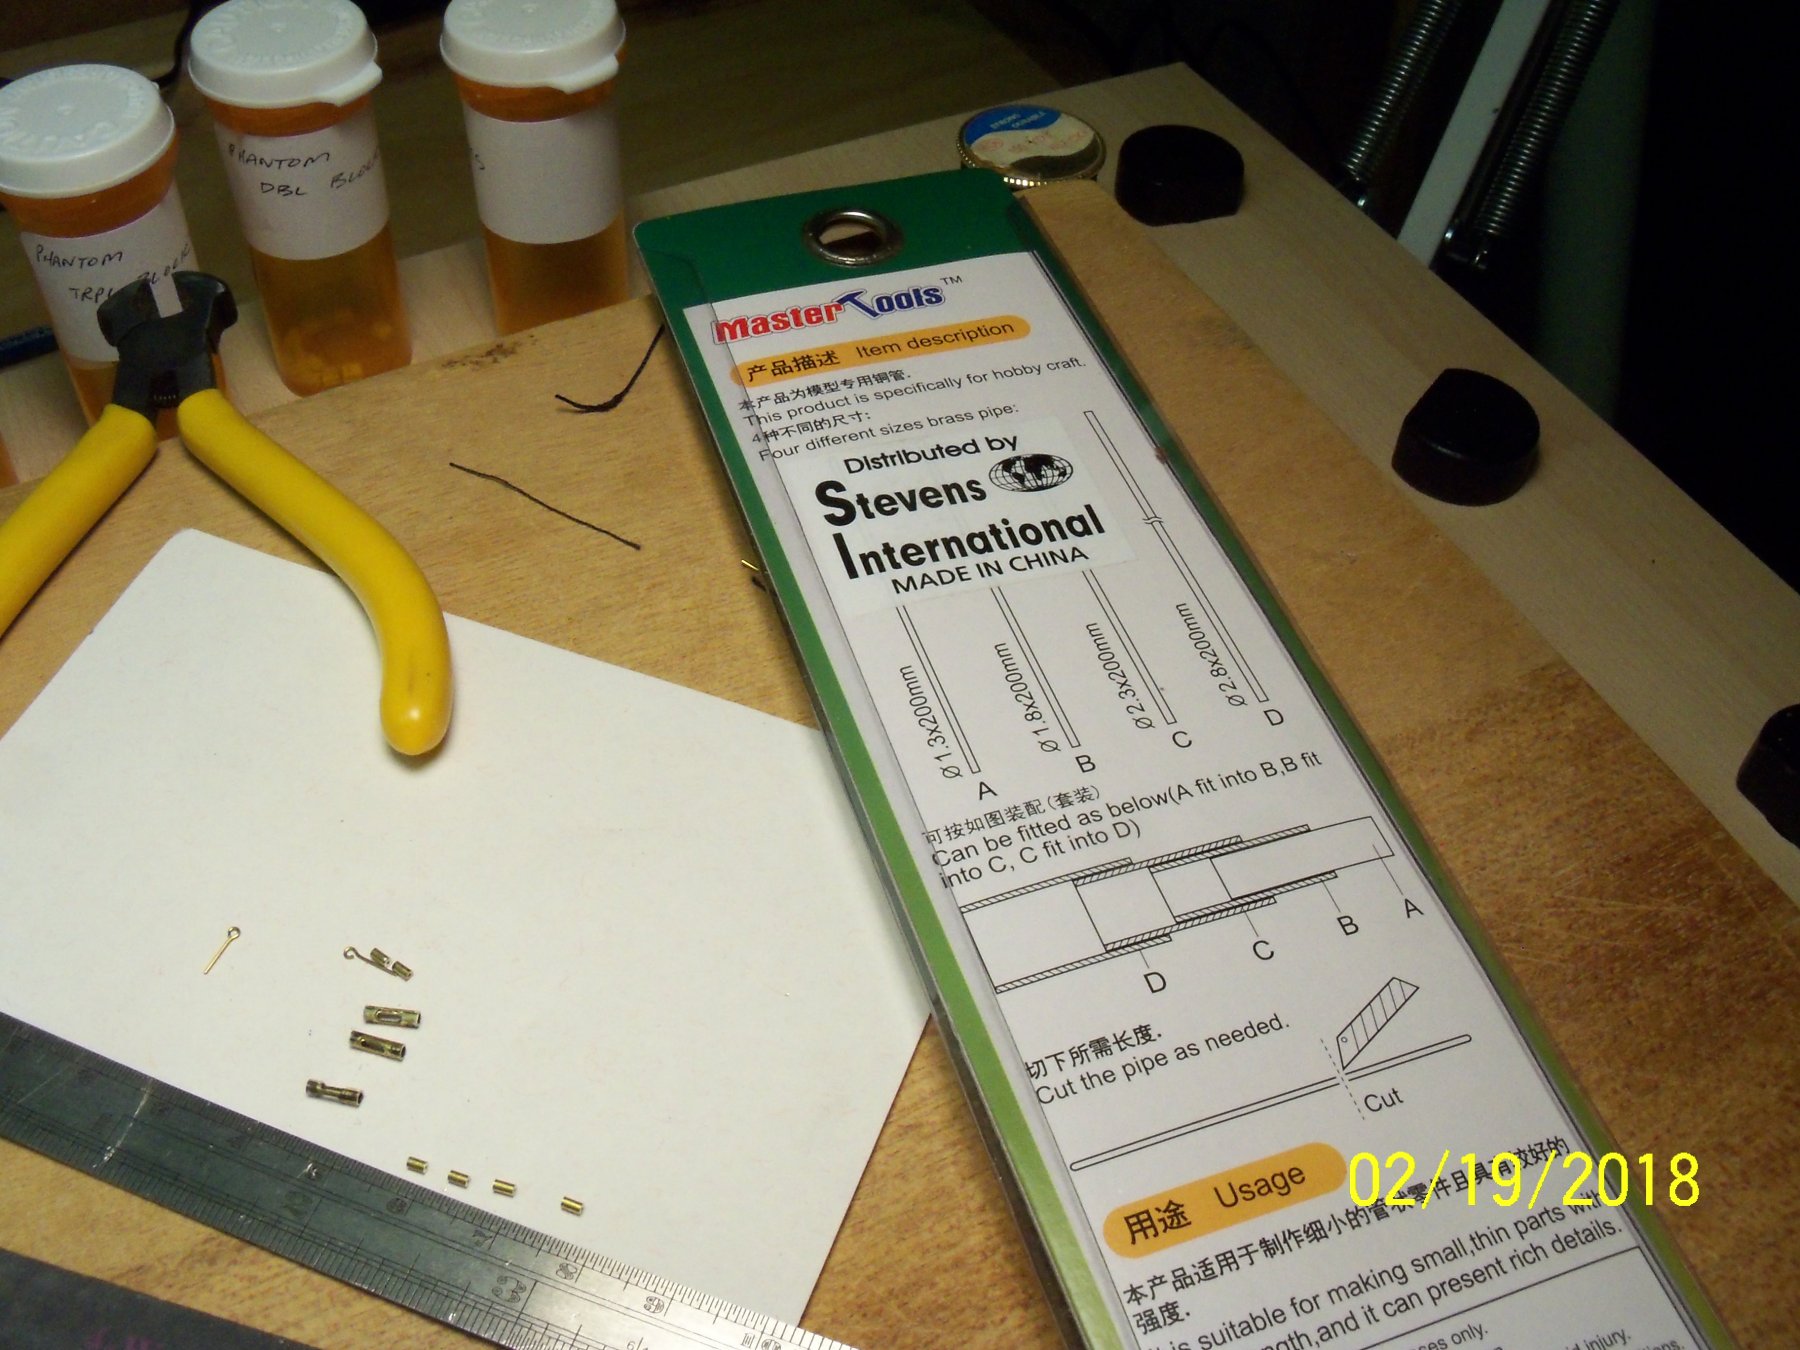
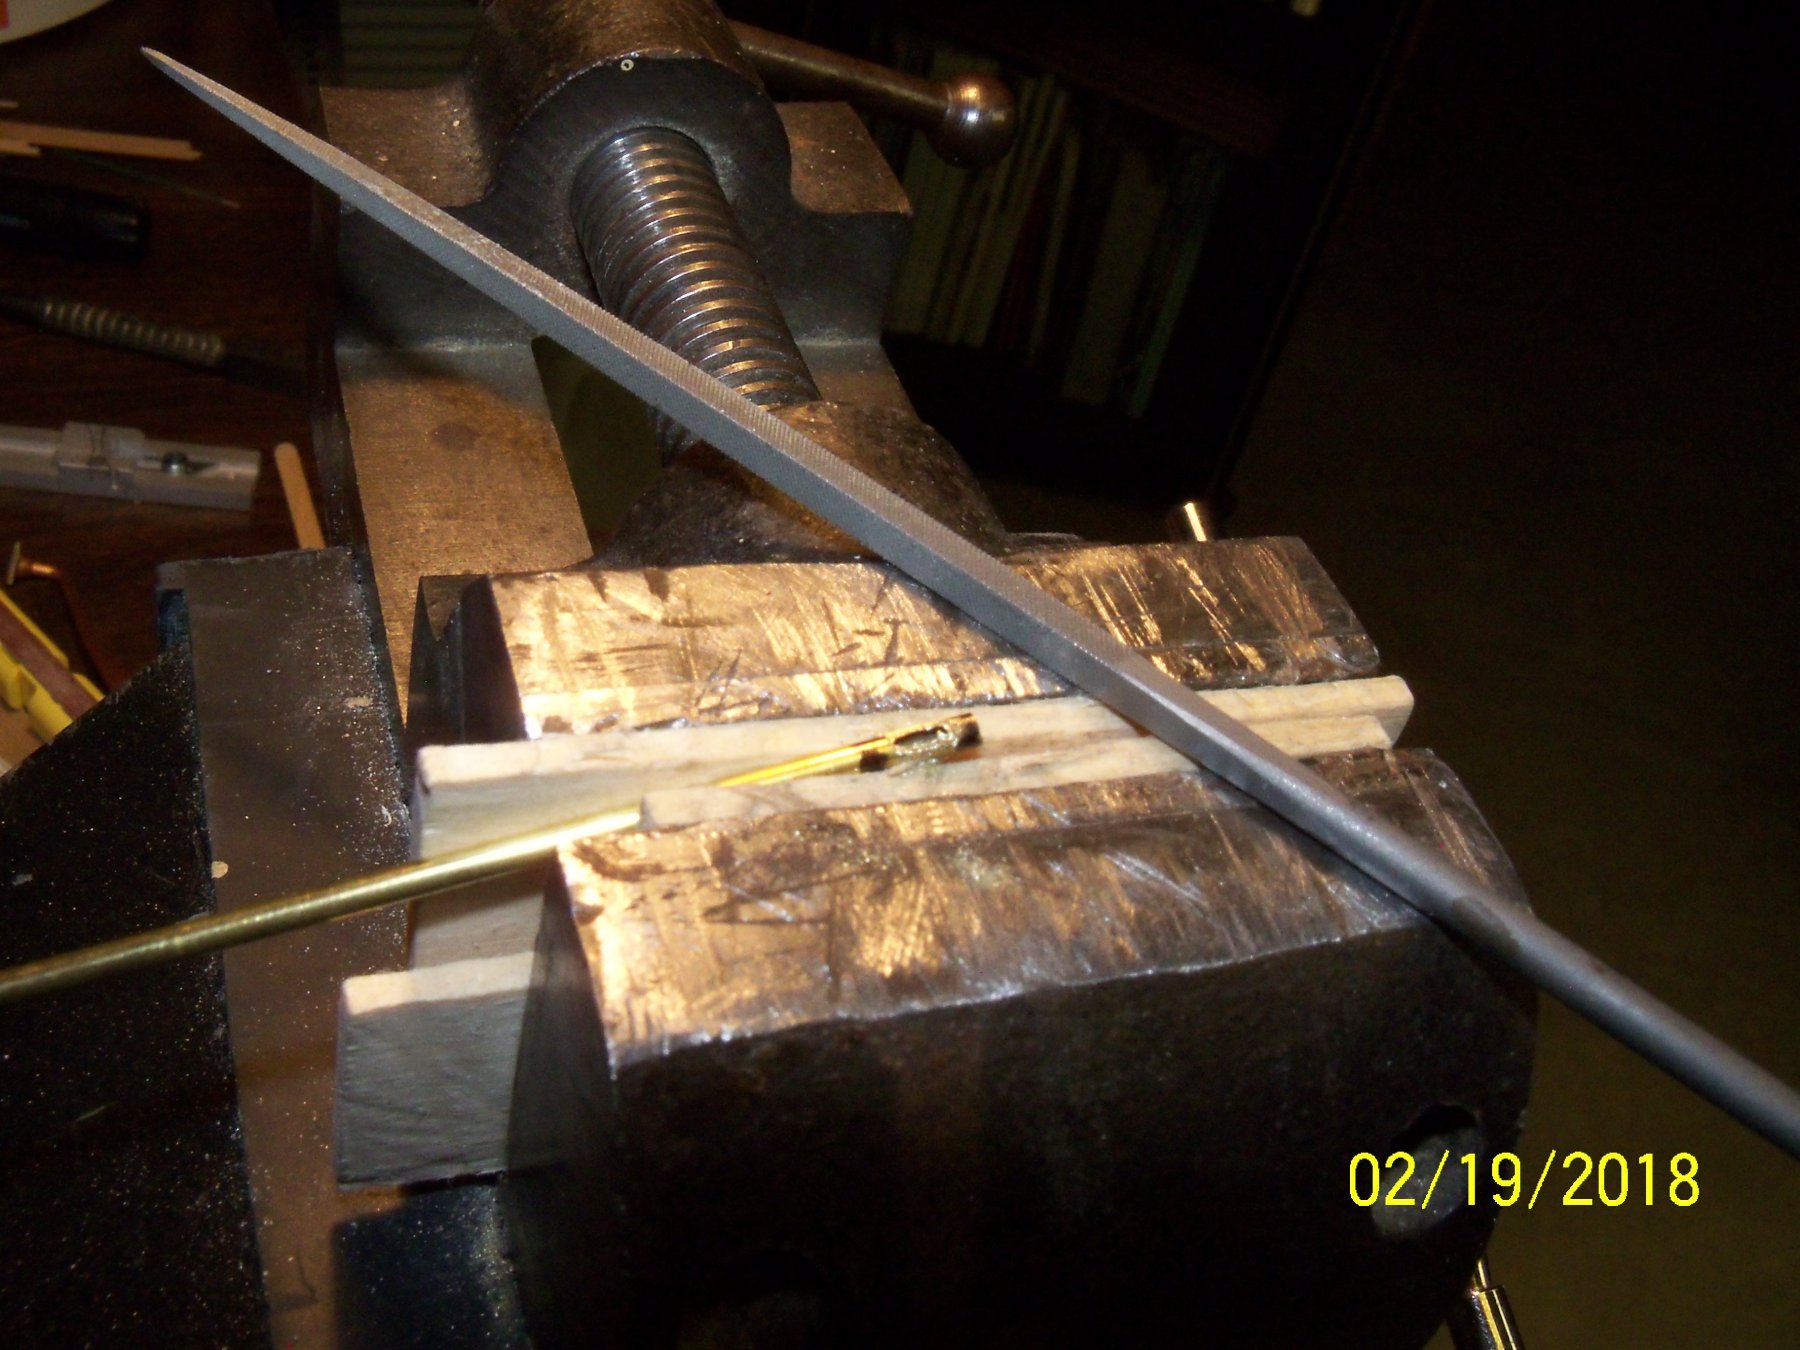
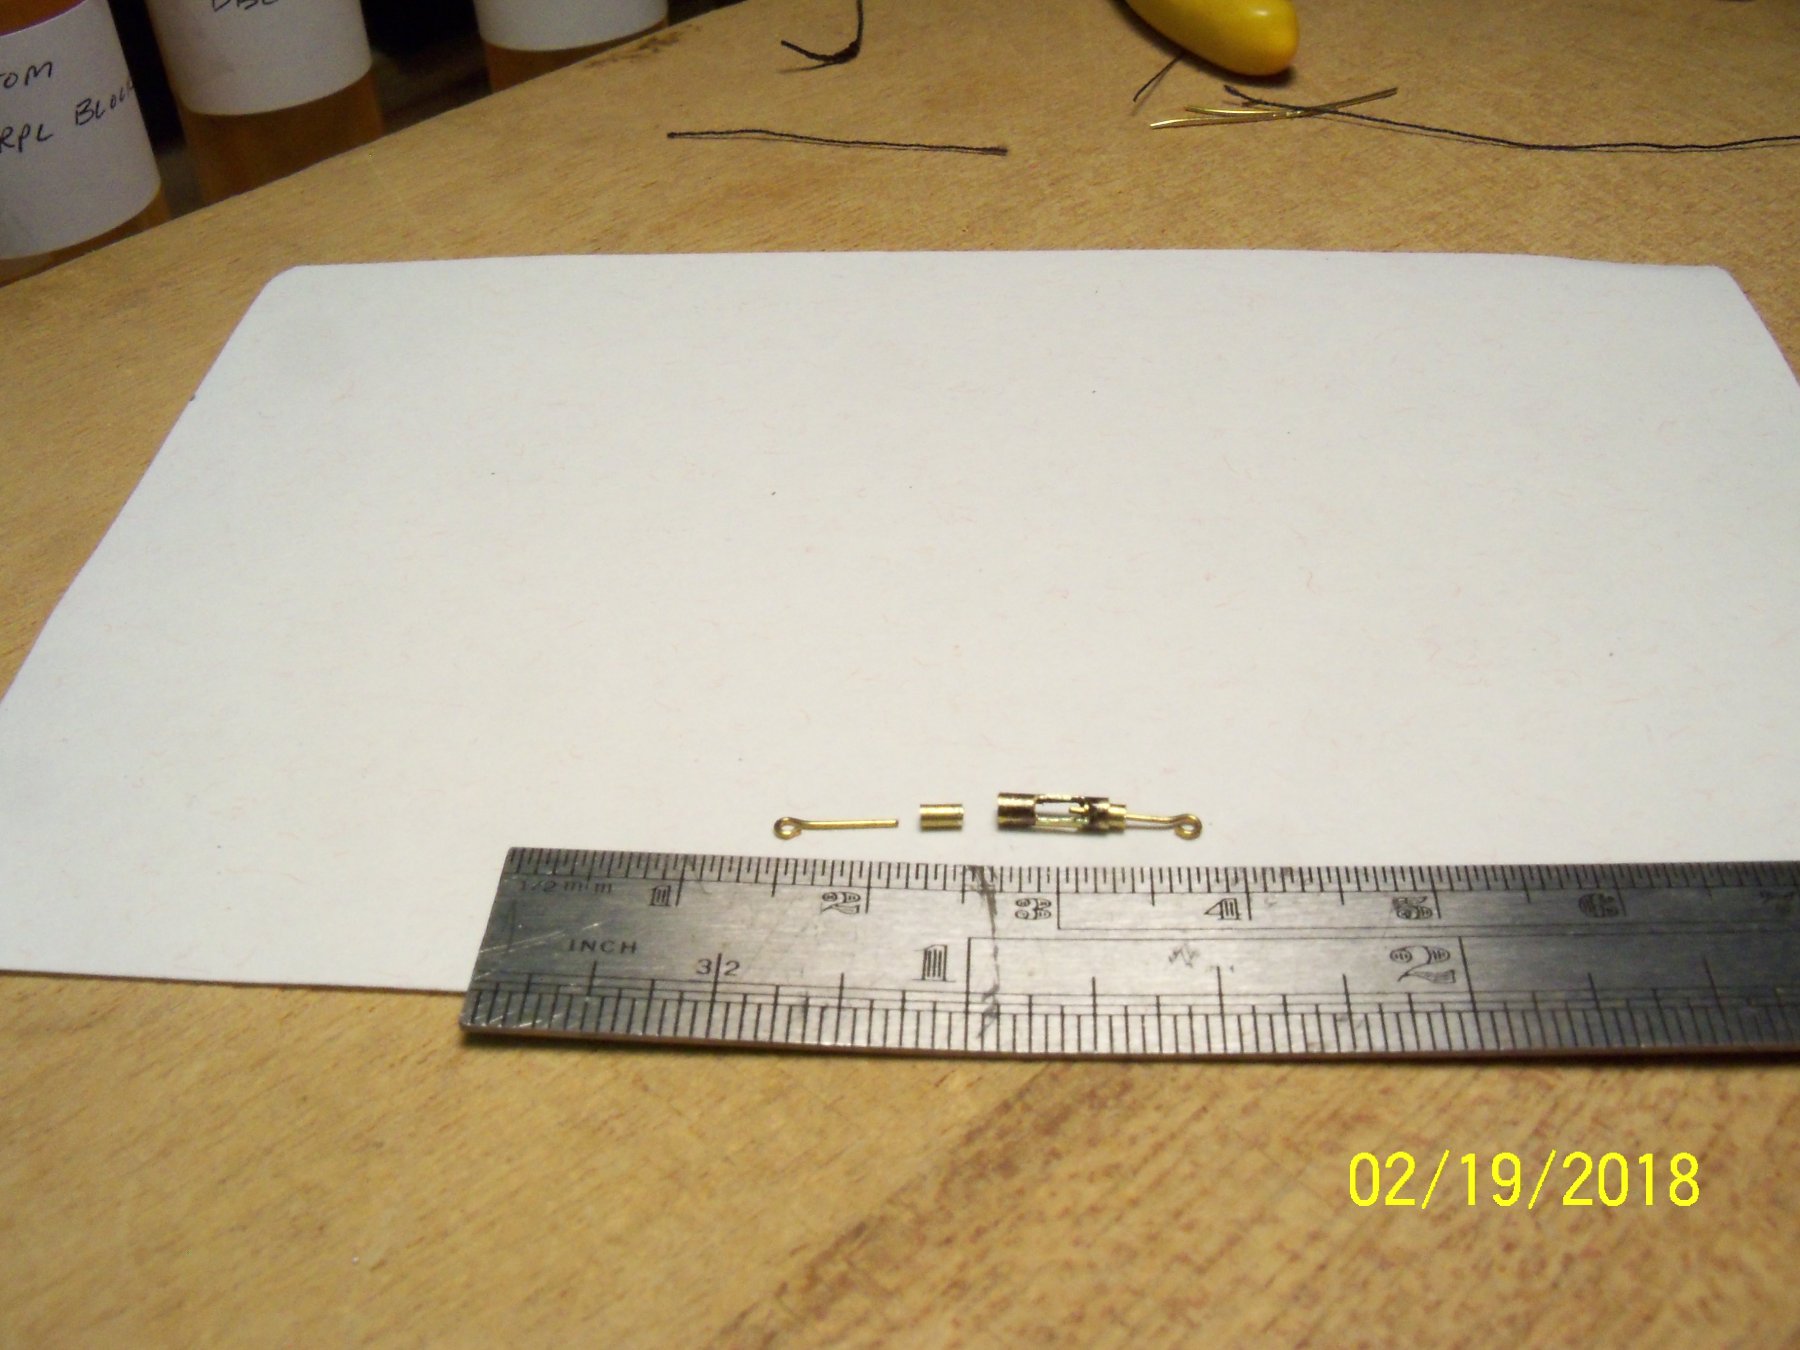
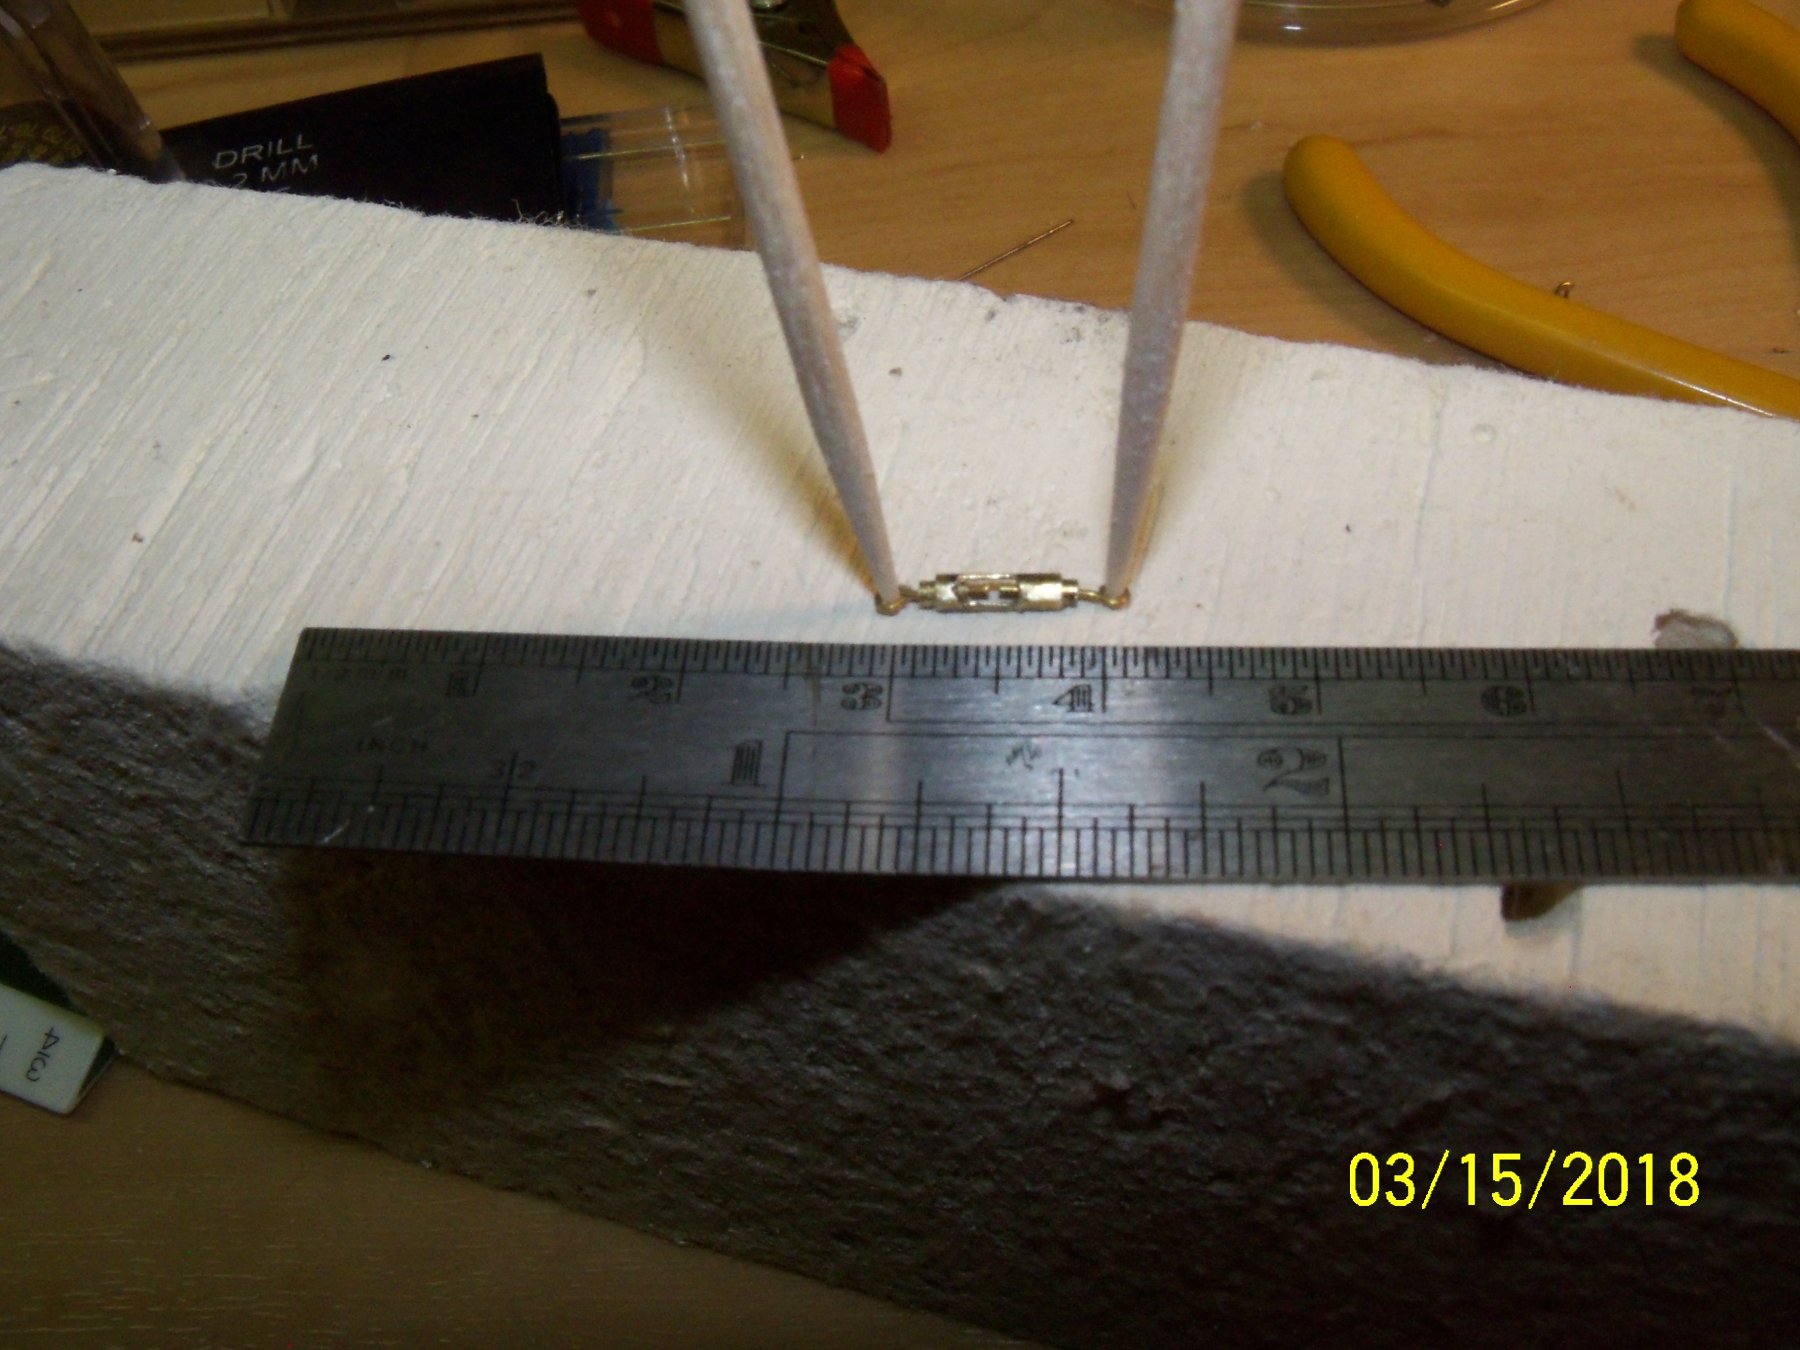
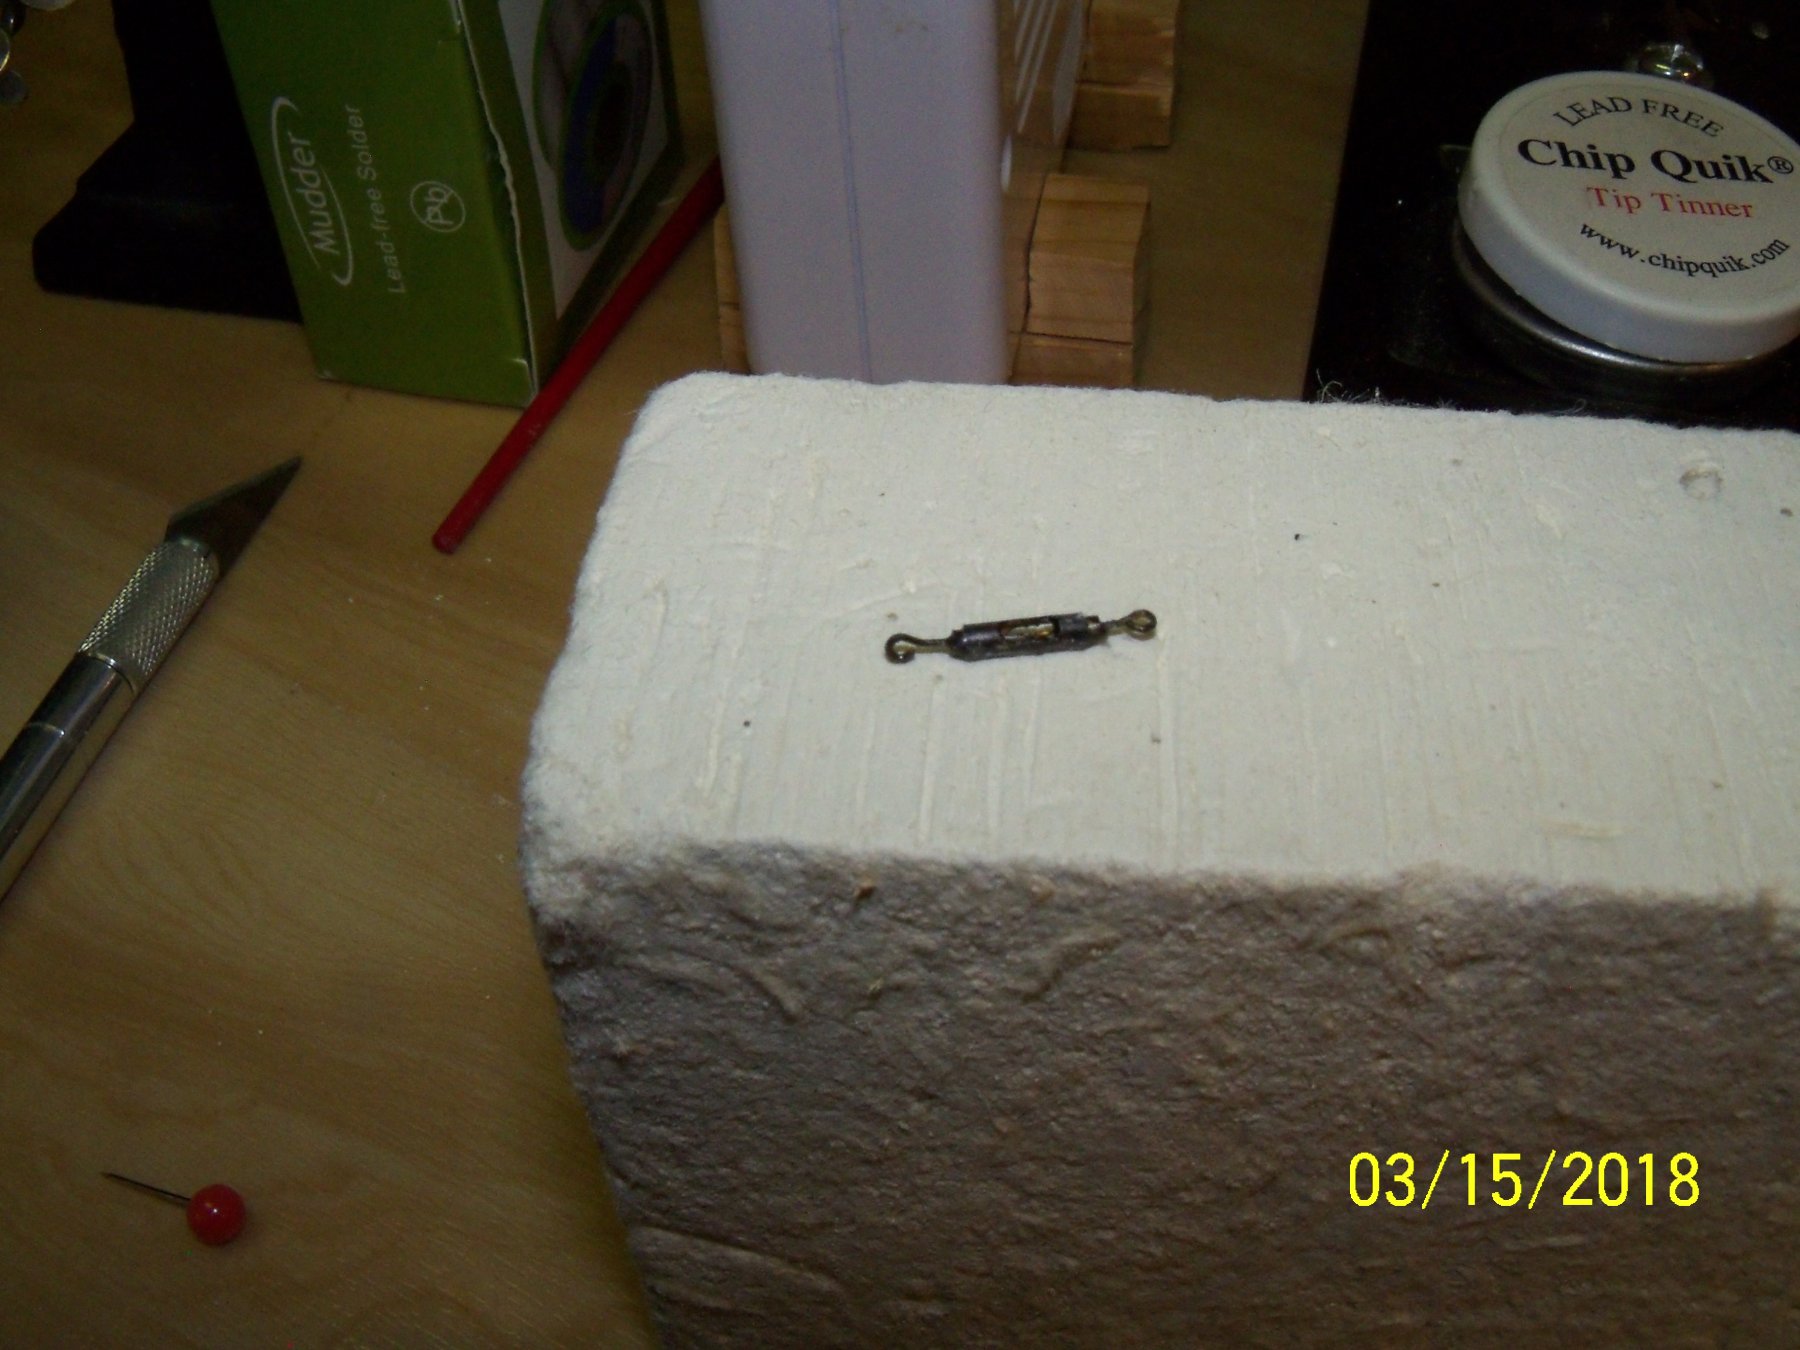
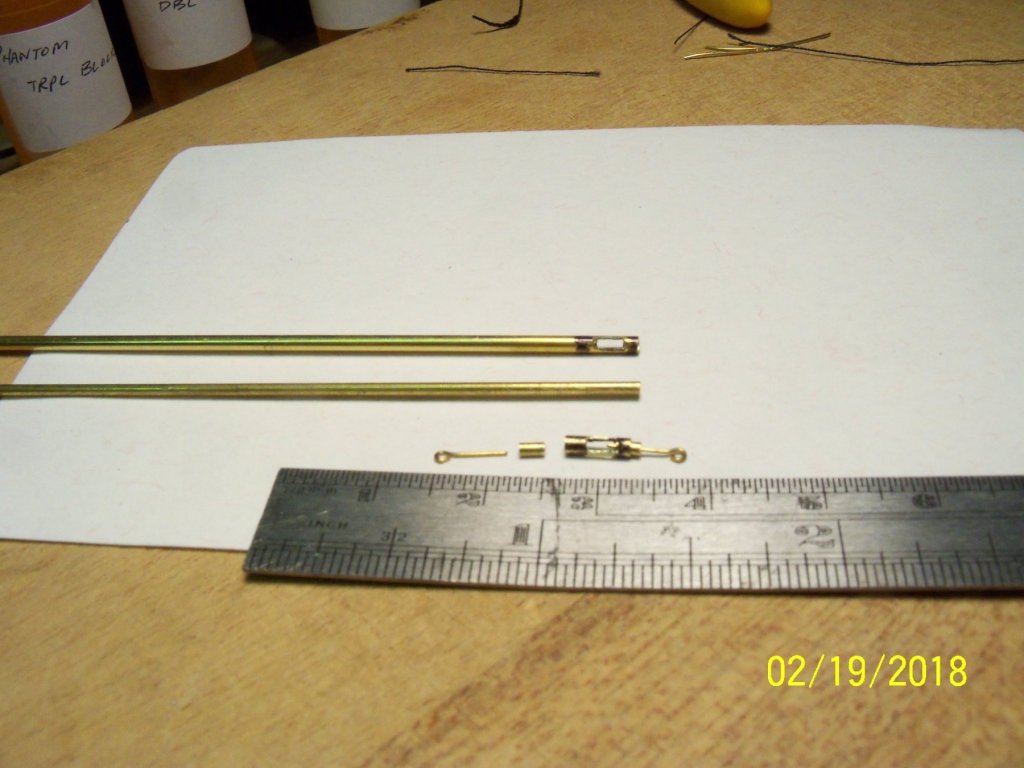
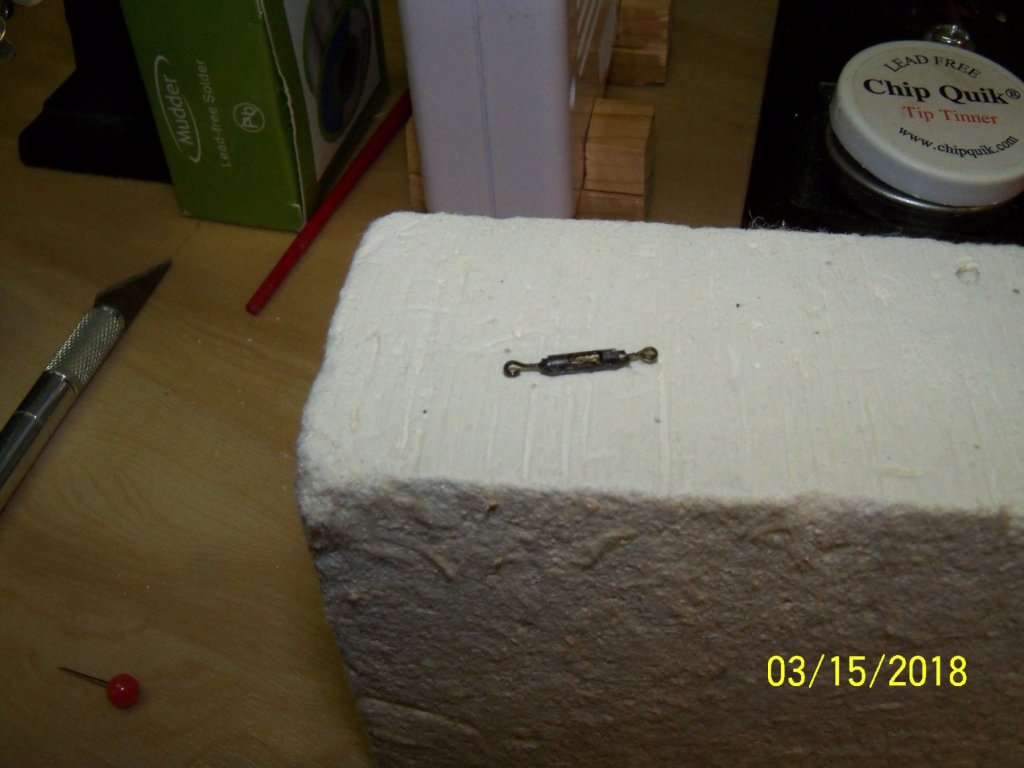
While working on my modified MS 1:96 scale version of the “Phantom” I found that I needed to make three very small turnbuckles. (They were referred to as stretching screws on the plan.) I had bought some brass telescoping thin wall tubing previously for making yard bands and thought up a way to use them to make a fairly realistic fitting. I took some 1.3 mm brass tubing that was just big enough to allow an eye bolt that came with the kit to slip into it. Then I used the 1.8 mm brass tubing (the next size up) that the 1.3 mm tube could be slipped inside of that for the main body of the turnbuckle. I marked the length of the 1.8 mm tube and the length of the opening with a felt pen. Taking the 1.8 mm tube to my vise, I cut out the open areas on both sides with a fine narrow file. I cut the 1.8 mm tube to length for the main body and cut a pair of short lengths of the 1.3 mm tube for the inside ends of the turnbuckle. Taking the five pieces to my soldering block, I applied flux to the shortened eye bolt stems and the outside of the 1.3 mm tube. The pieces were then assembled together and stretched out on the block with a couple of toothpicks stuck through the eye bolt holes to hold it steady. I cut some small flakes of solder and placed them at the ends of the turnbuckle body and applied my soldering iron to the 1.8 mm tube. After it cooled off I just cleaned up the ends with a fine file and blackened it. While the fitting still seemed a little large to me, I was quite satisfied with it. By varying the size of the components the size of the turnbuckles can readily be adjusted for various other scales.


-
Man alive Ed, you sure are doing an enormous amount of ironwork on this ship. Do you blacken the ironwork in place or before it's installed? If this is done in place, how do you prevent the woodwork from being stained? I have a hard time making the some of the complex ironwork fit in place only to have to remove it to blacken it and then reapply it. Your ironwork looks to be done quite neatly! The overall workmanship on this model is something way beyond what I can ever expect to achieve! (Maybe you should write a book about it someday.)
- 3,596 replies
-
- 3
-

-
- young america
- clipper
- (and 1 more)
-
That's not too surprising when you stop and think about it. Basically they're taking out all of the voids in the wood cells, adding a binder and putting it under tremendous pressure when it's rolled out, making it much denser. While one sheet of paper seems to weigh nothing by itself, just try lifting a ream of 500 sheets! Your ship is very well detailed for being a card model. The wood graining varies enough to make it look like individual wood planks. That's one reason that I like to build solid or built up hulls with individual planks applied to them. Hopefully your two feathered assistants don't get too interested in your ship and try to add their own touches to it. Our Parrotlet would like nothing more than to gnaw that paper up a bit. Hope you're feeling better soon.
- 1,035 replies
-
- 4
-
-
- royal katherine
- ship of the line
- (and 1 more)
-
Announcing the Model Ship World Ship Kit Database Project
BETAQDAVE replied to SkerryAmp's topic in Wood ship model kits
Tim The Master Korabel kits do look very impressive. I watched some of the video tutorials of the construction of the brig, and although it's in Russian, I still found them to be very informative. The laser precut parts seem to be exceptionally precise. Although I prefer individual deck planks, the scribed decks included in the kit are also very precisely done! I guess that the videos would be a necessity, as I wouldn't be able to read the Russian directions. I must say though, that the modeler does not spare the adhesive. -
Main Boom Jaws Plan Phantom Pilot Boat Model SHipways
BETAQDAVE replied to Jaeon's topic in Masting, rigging and sails
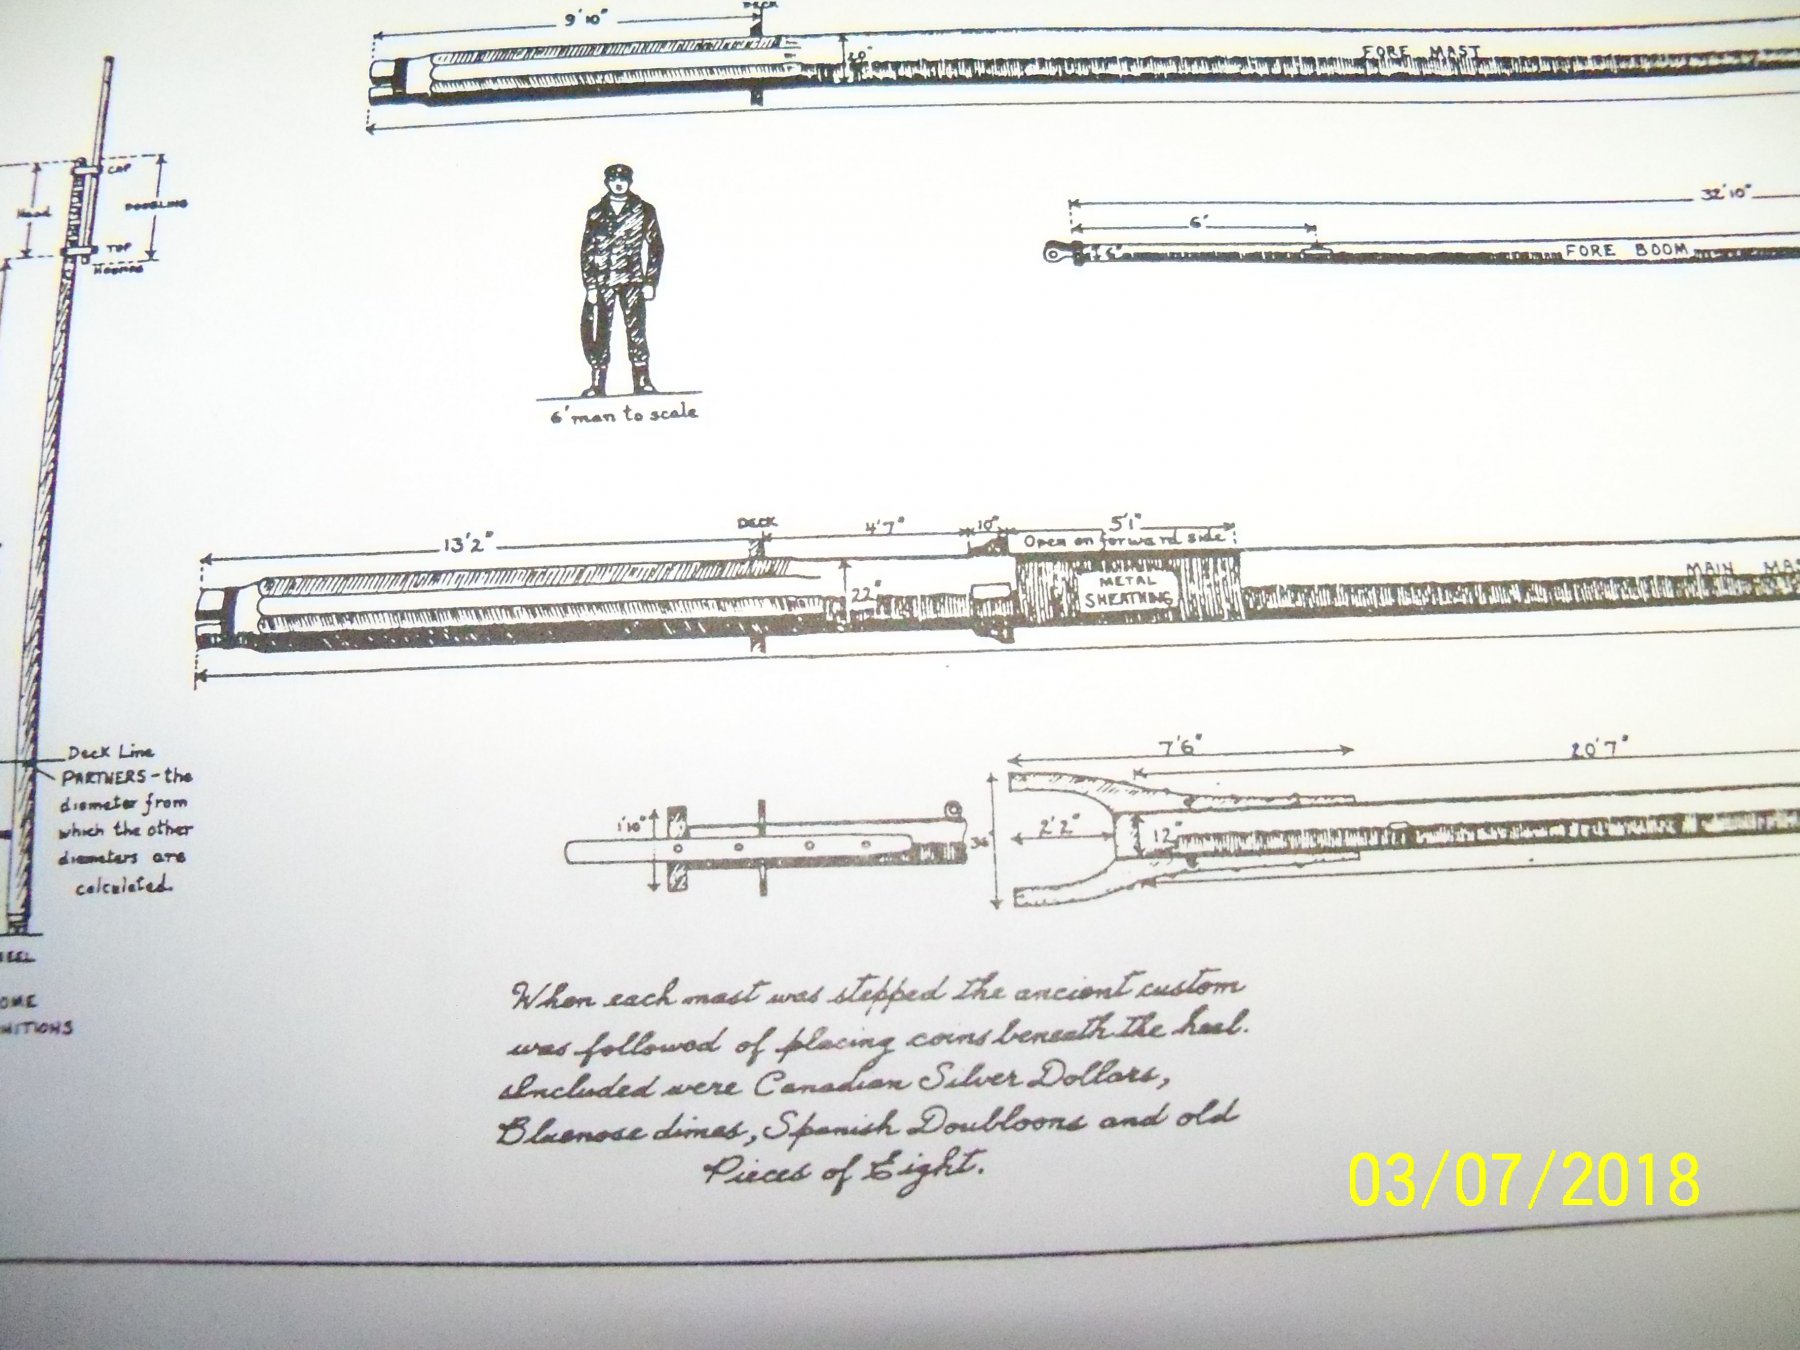
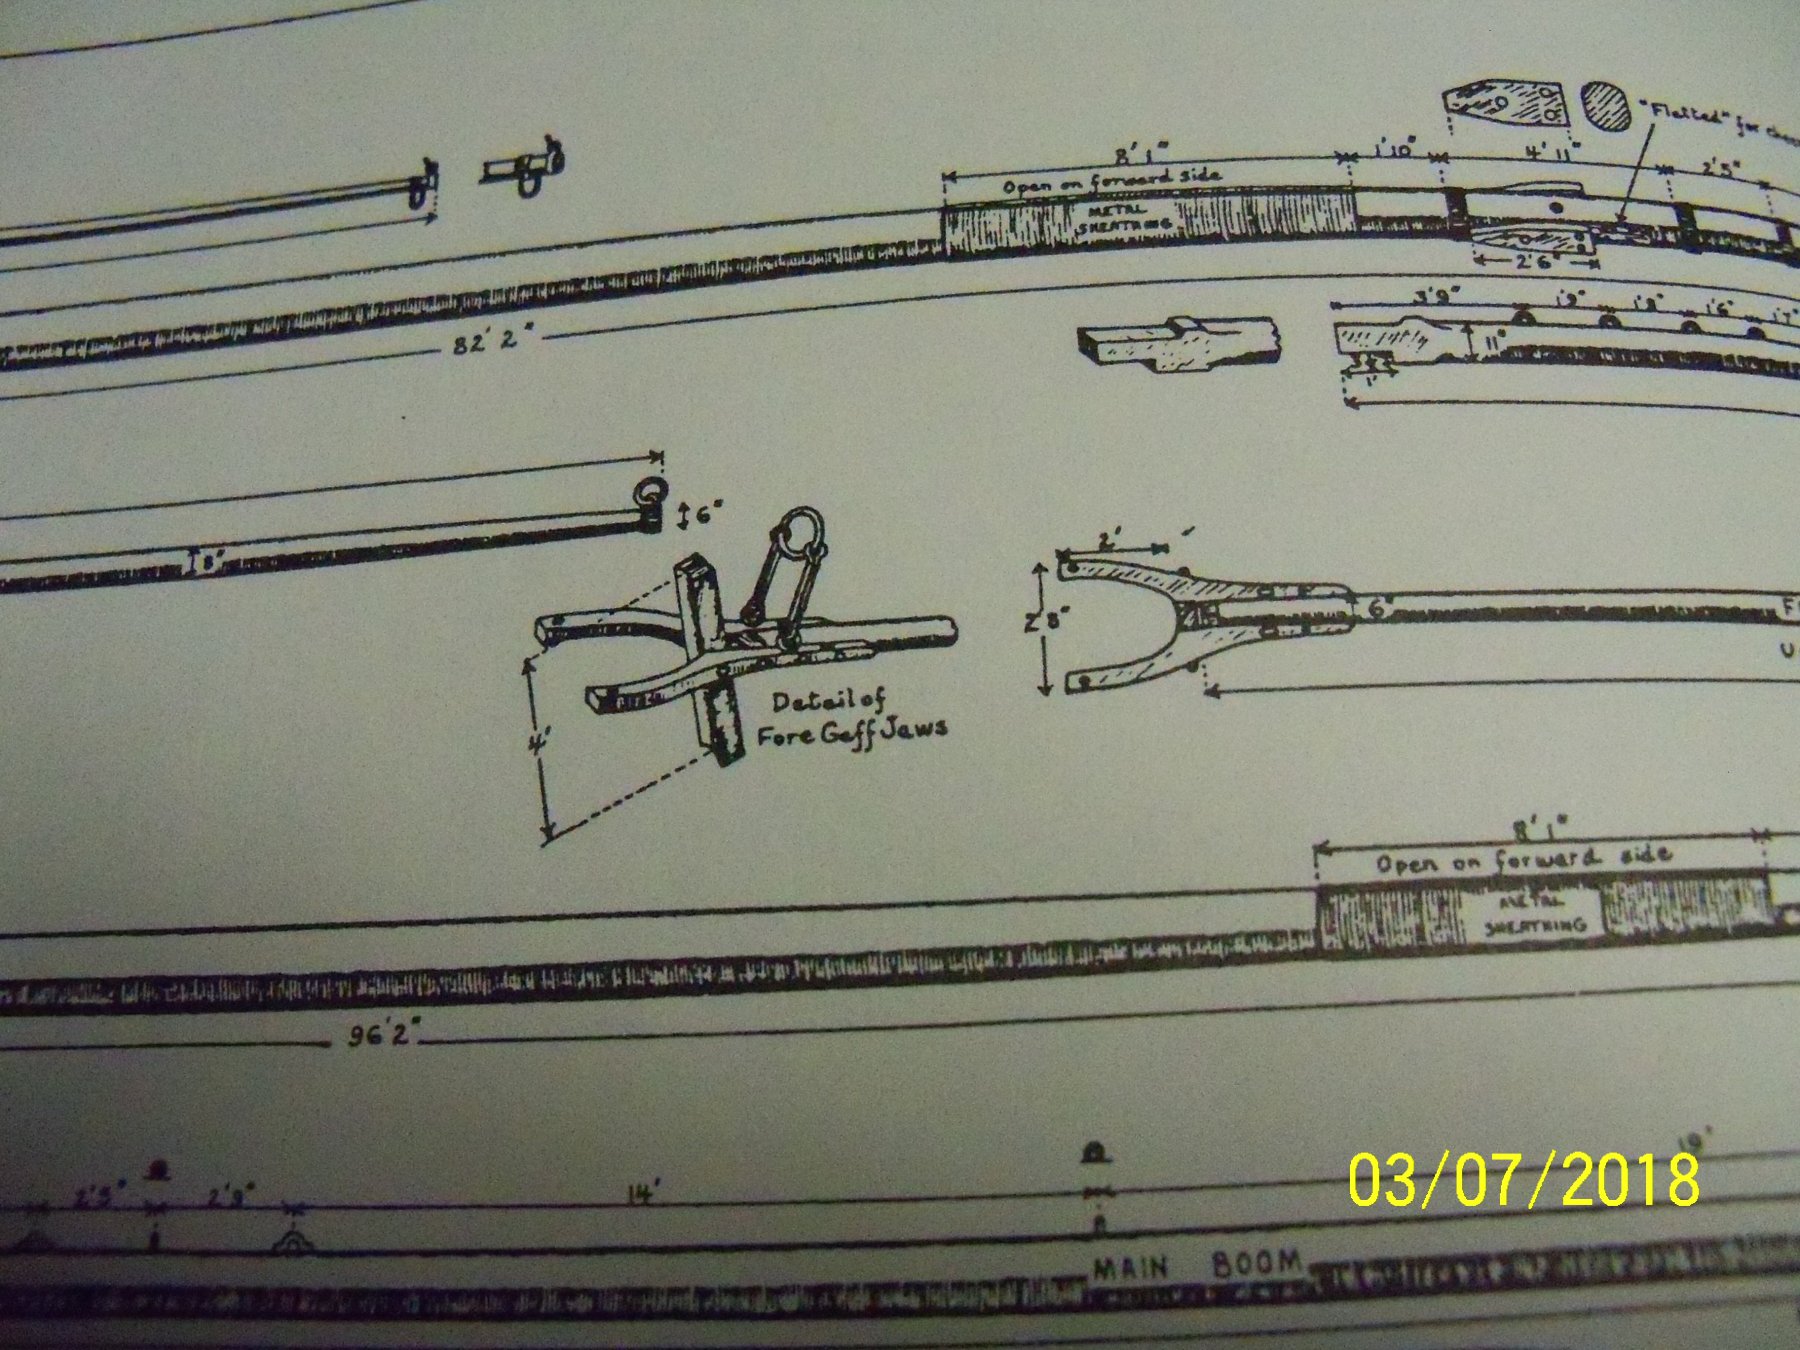
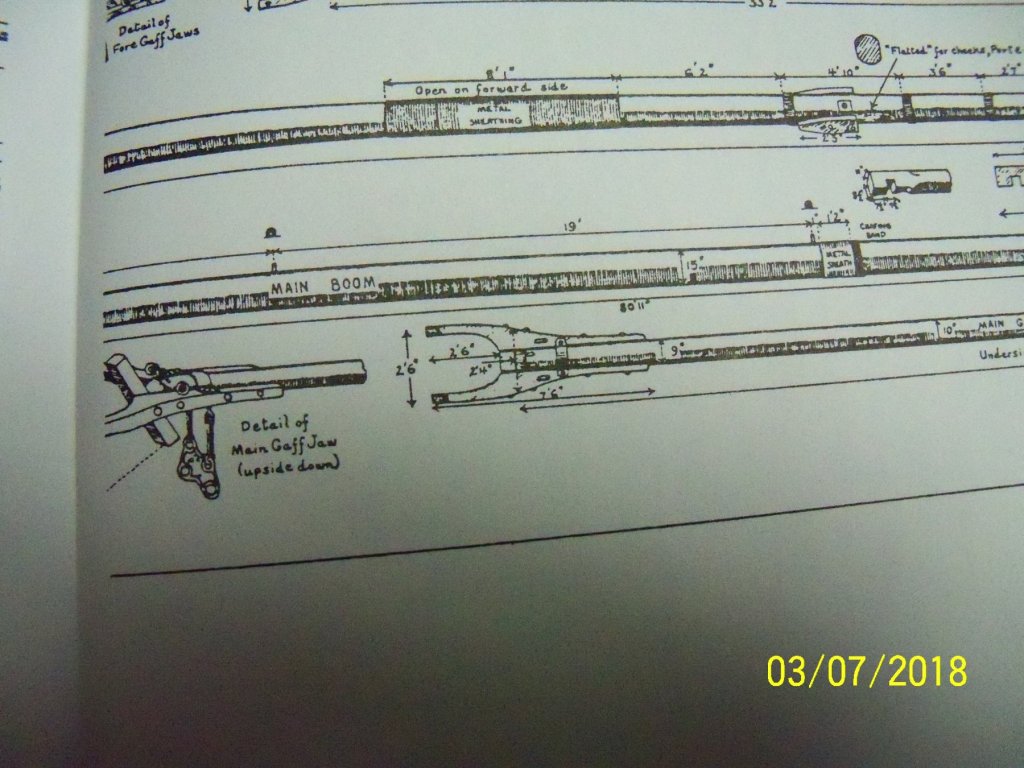
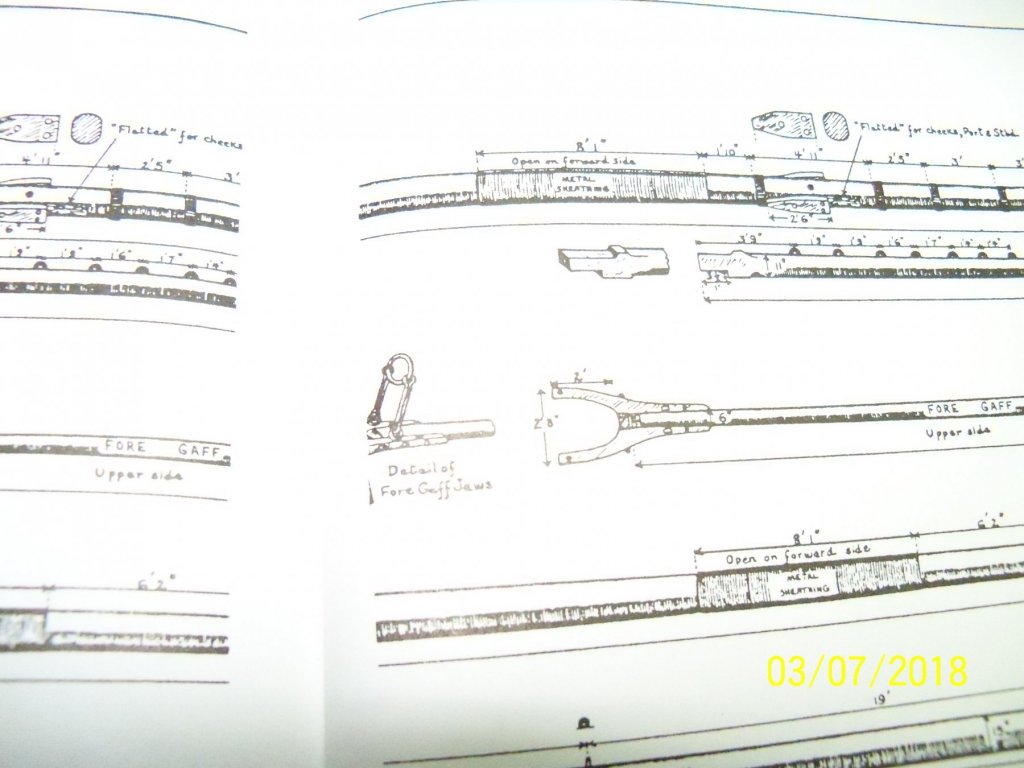
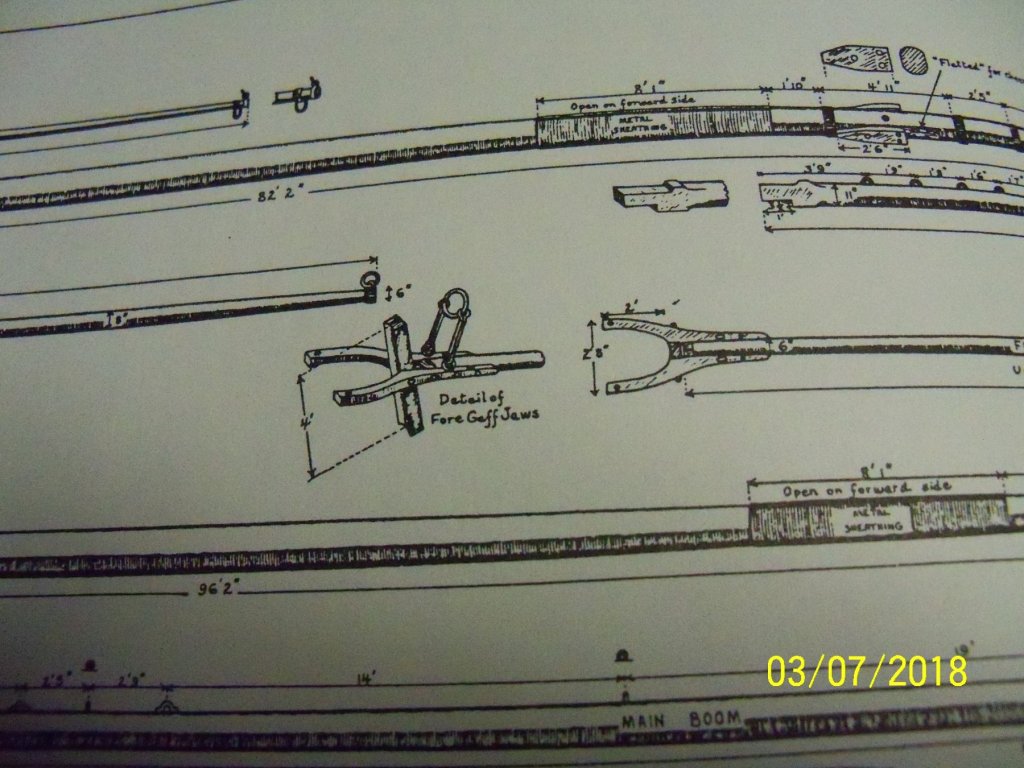
For my Phantom build, I just followed my copy of the measured drawings by J.B. Jenson of the Bluenose II. The drawings are for a ship larger than the Phantom, so I just used it for the proper proportions. See the pics below.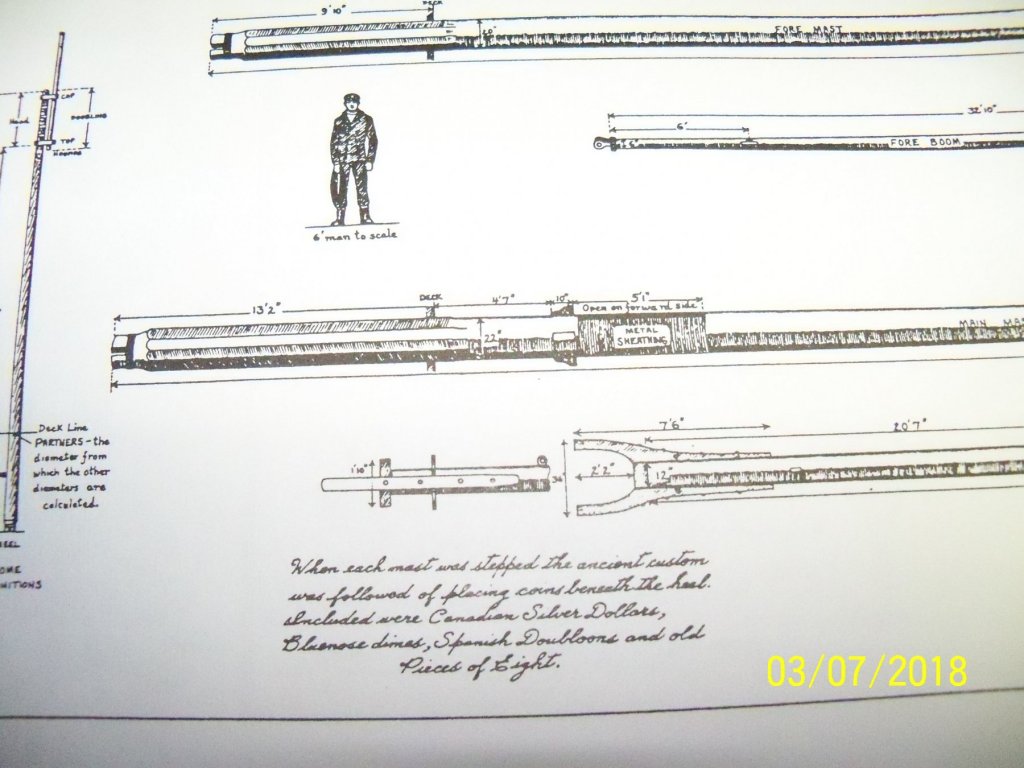
-
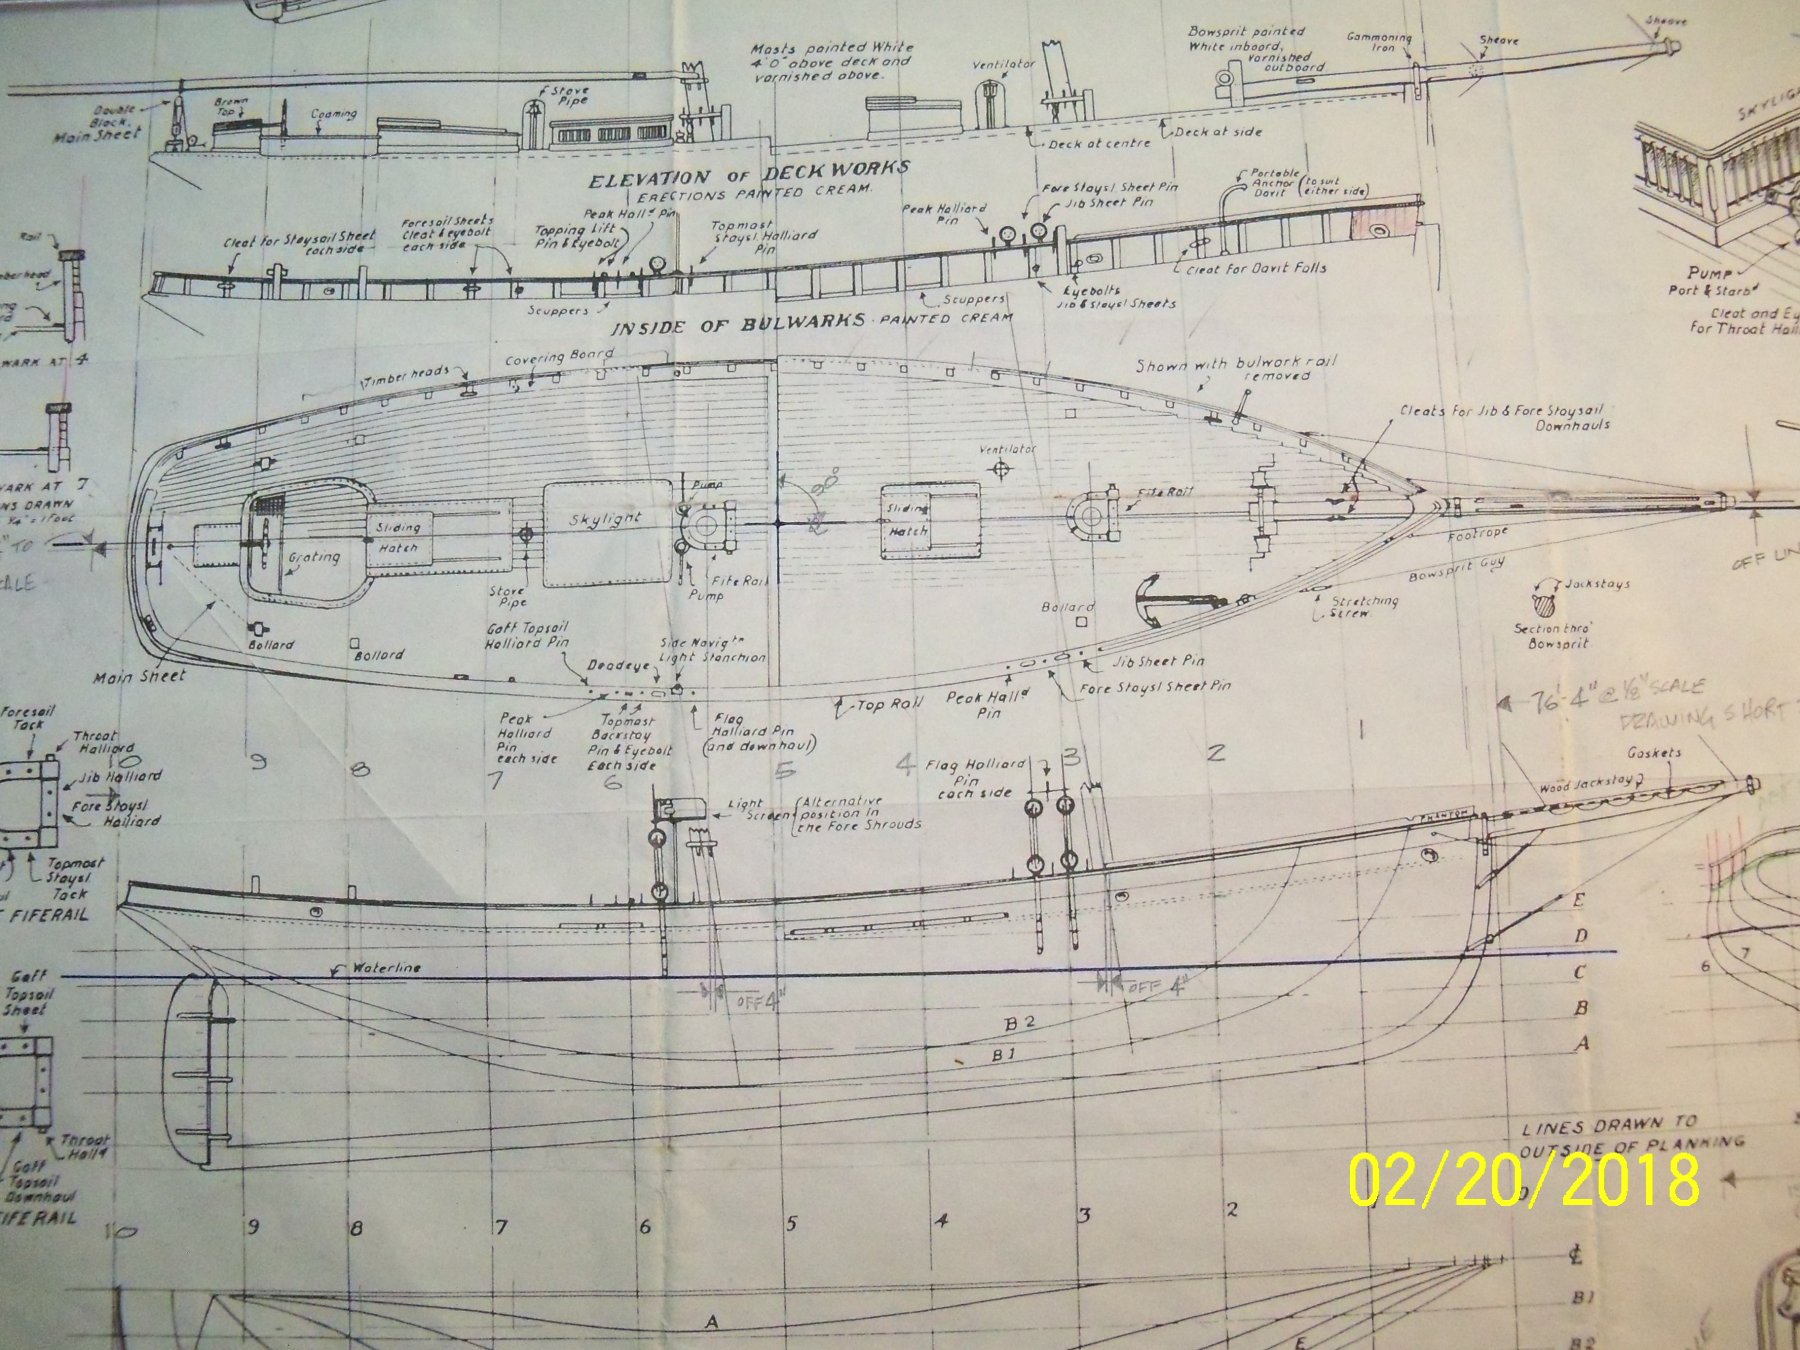
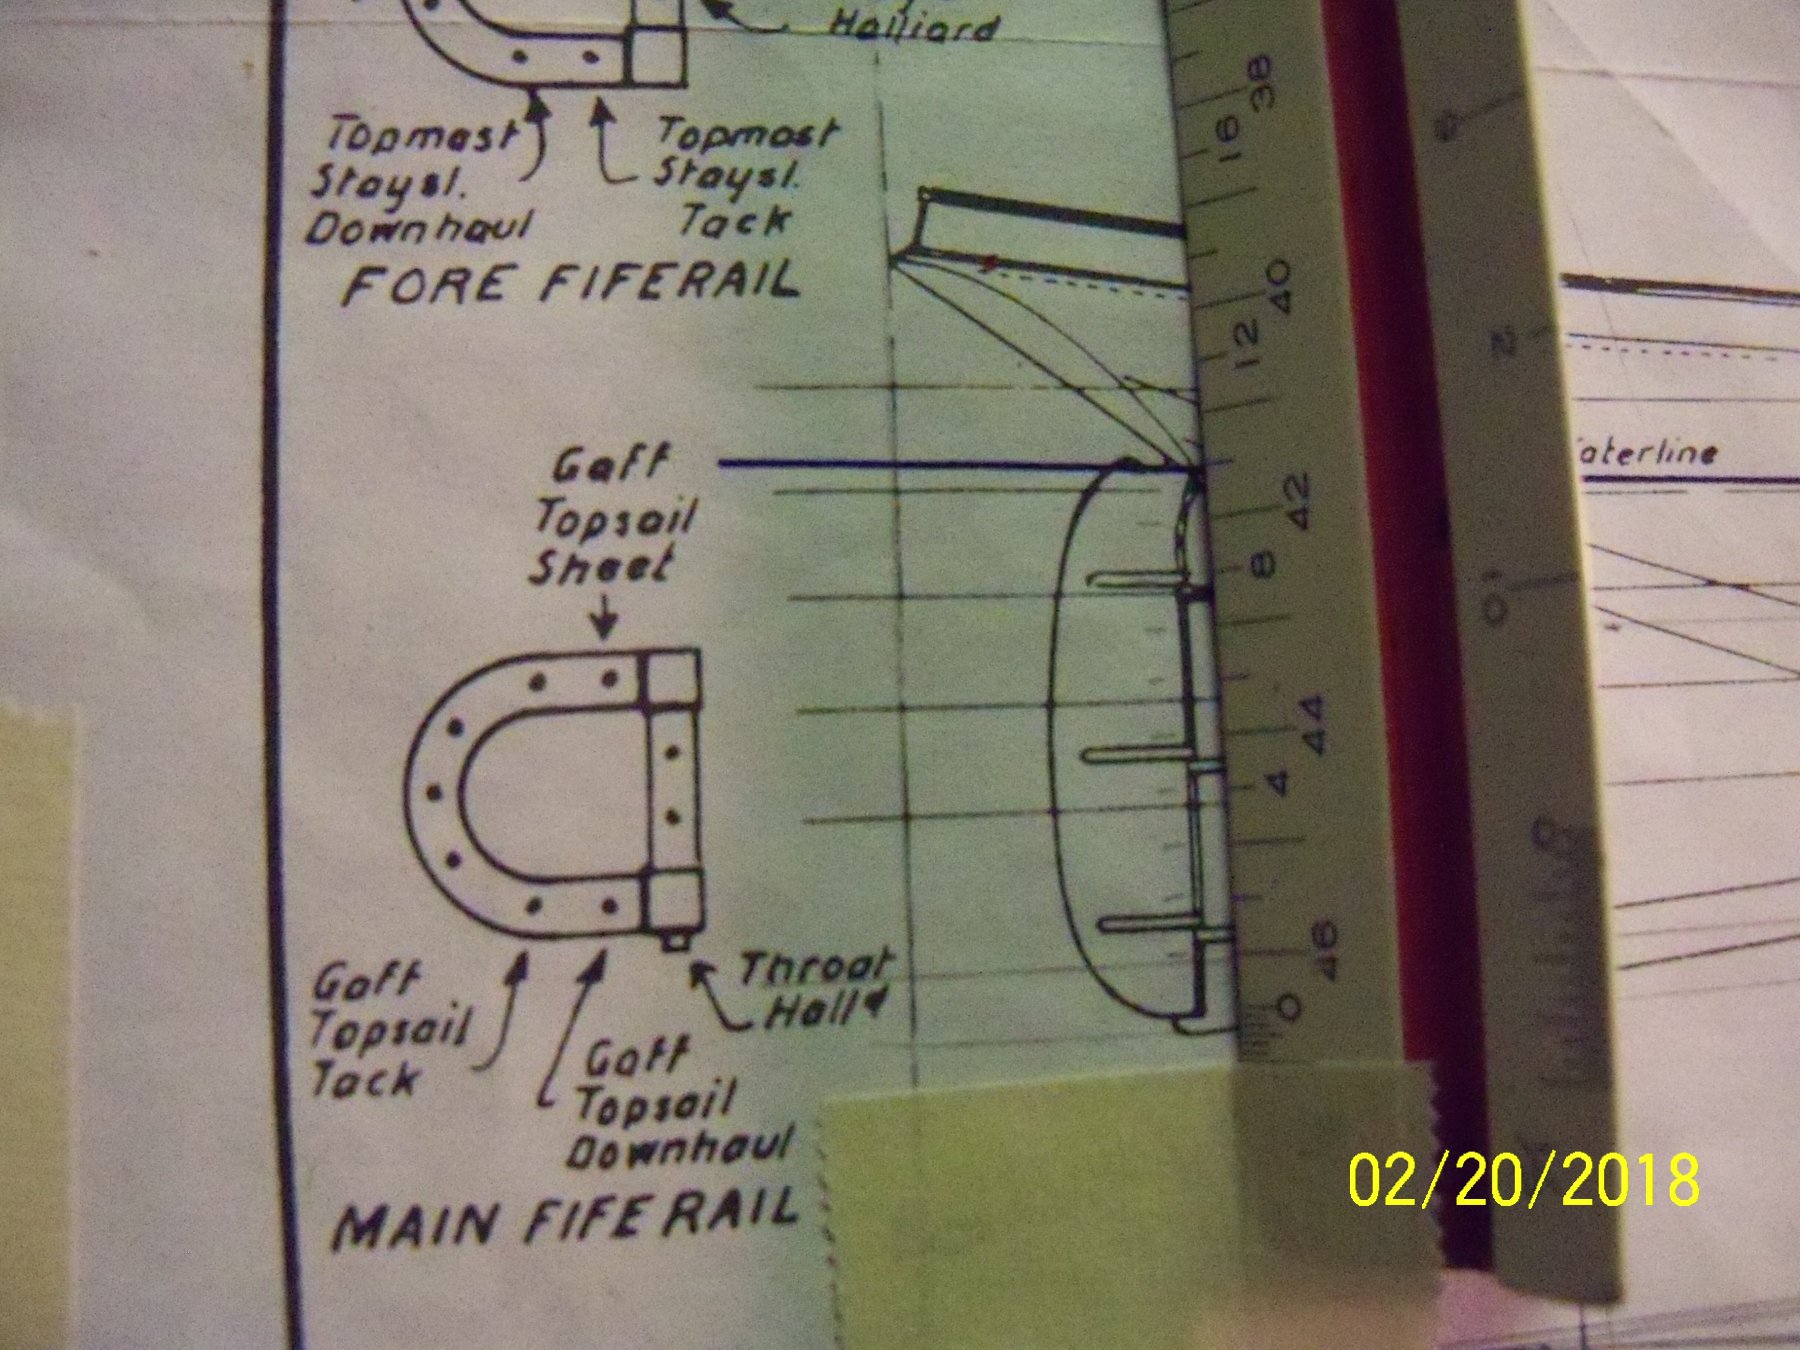
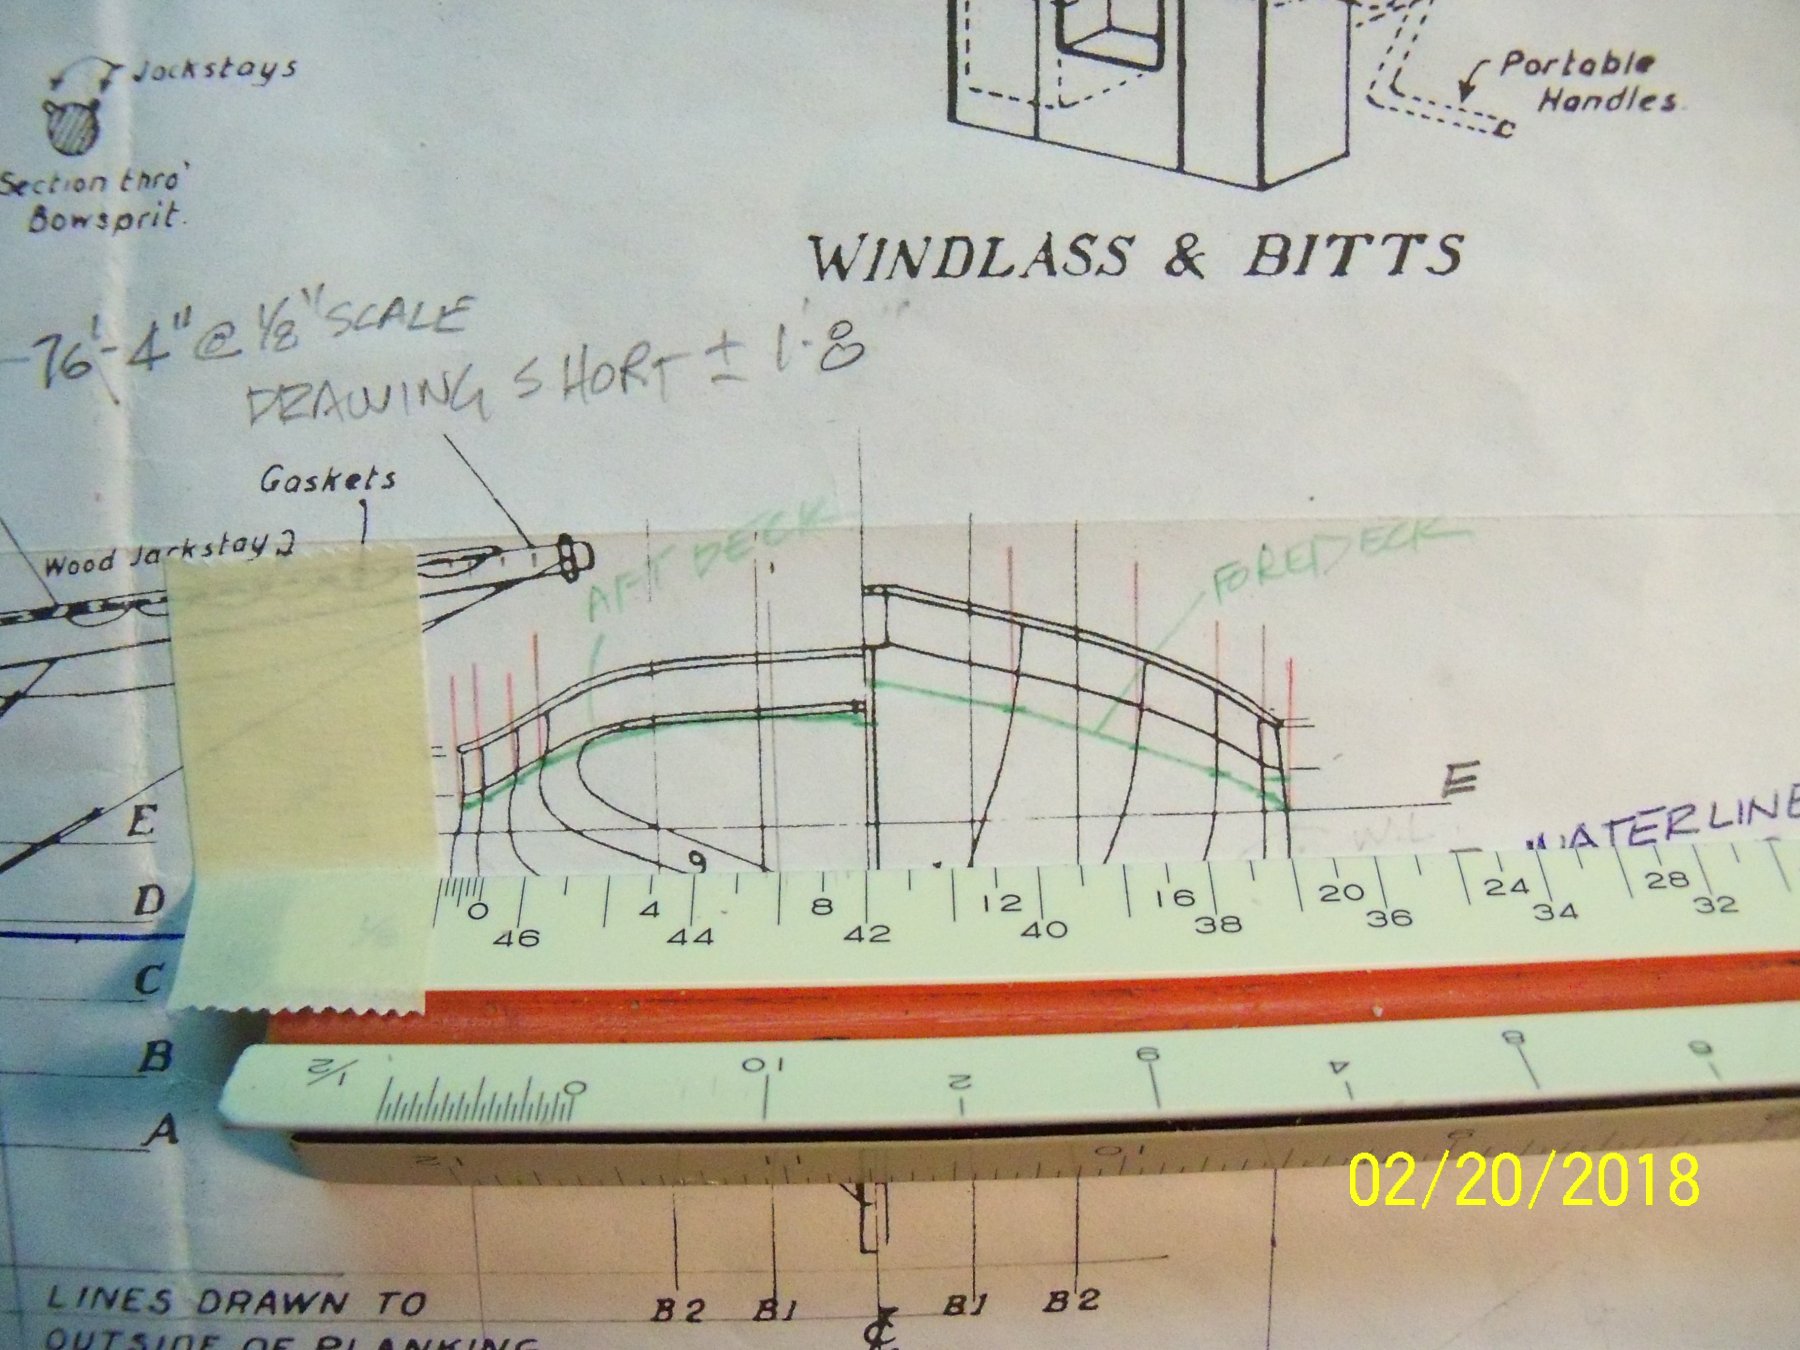
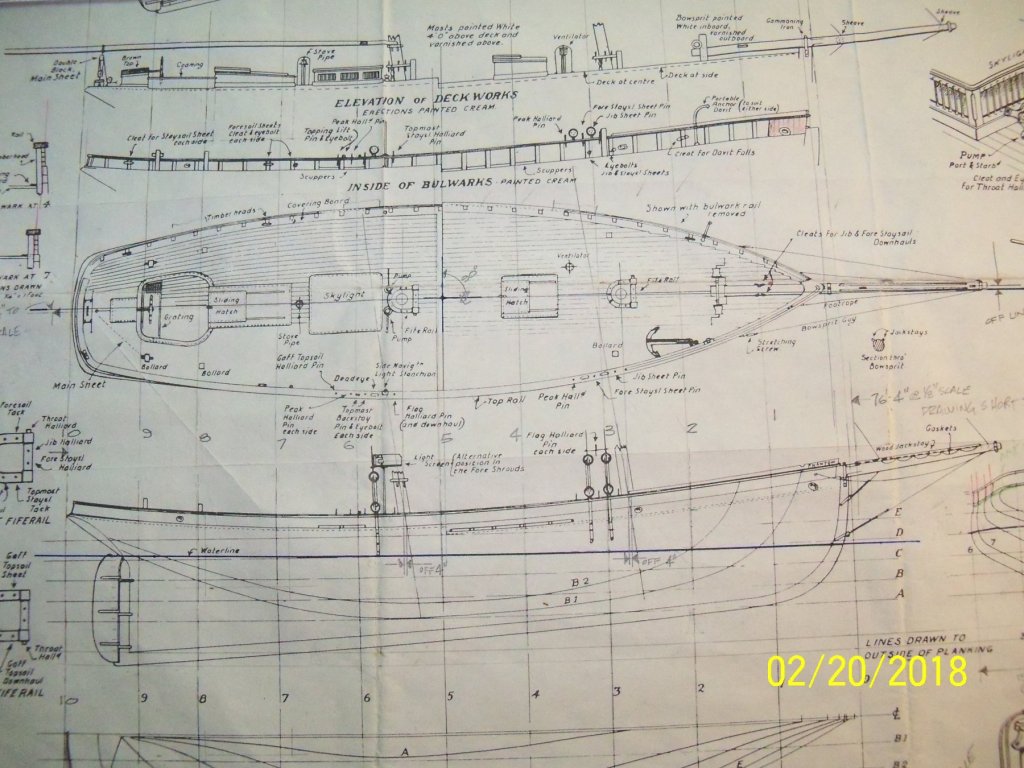
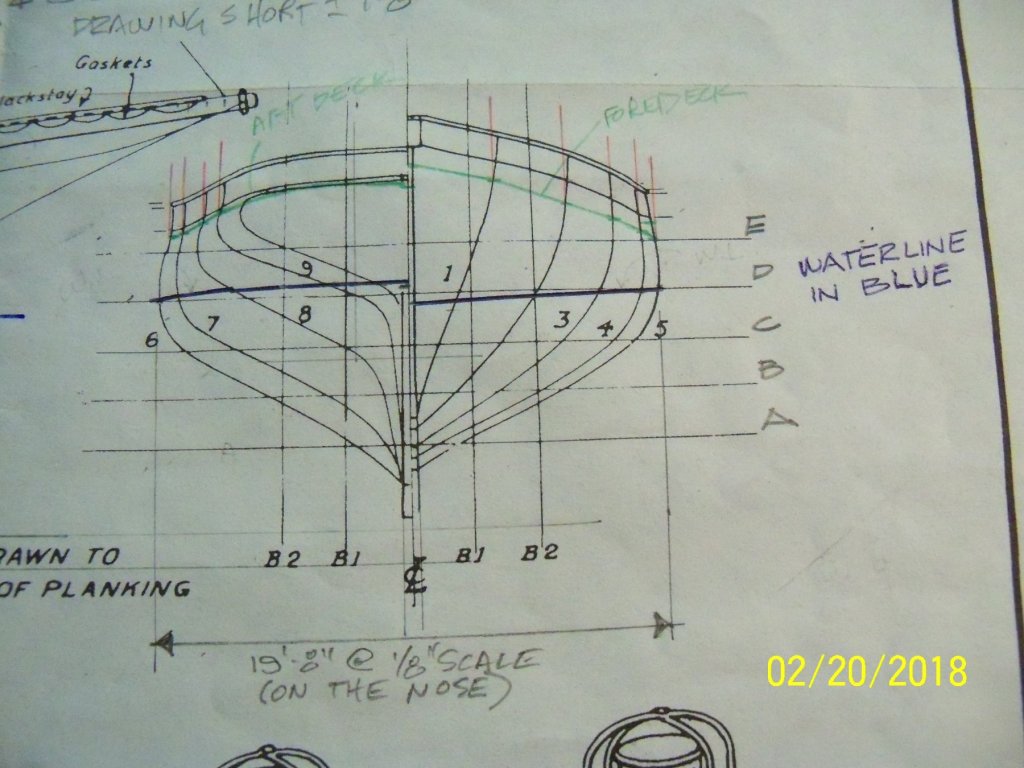
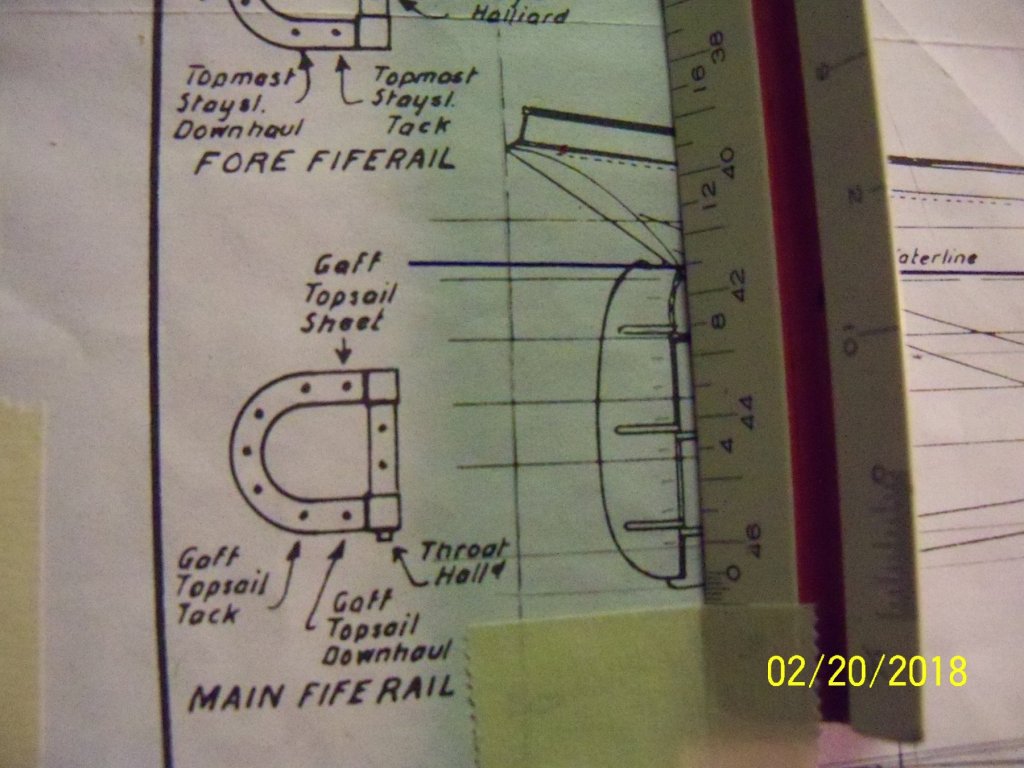
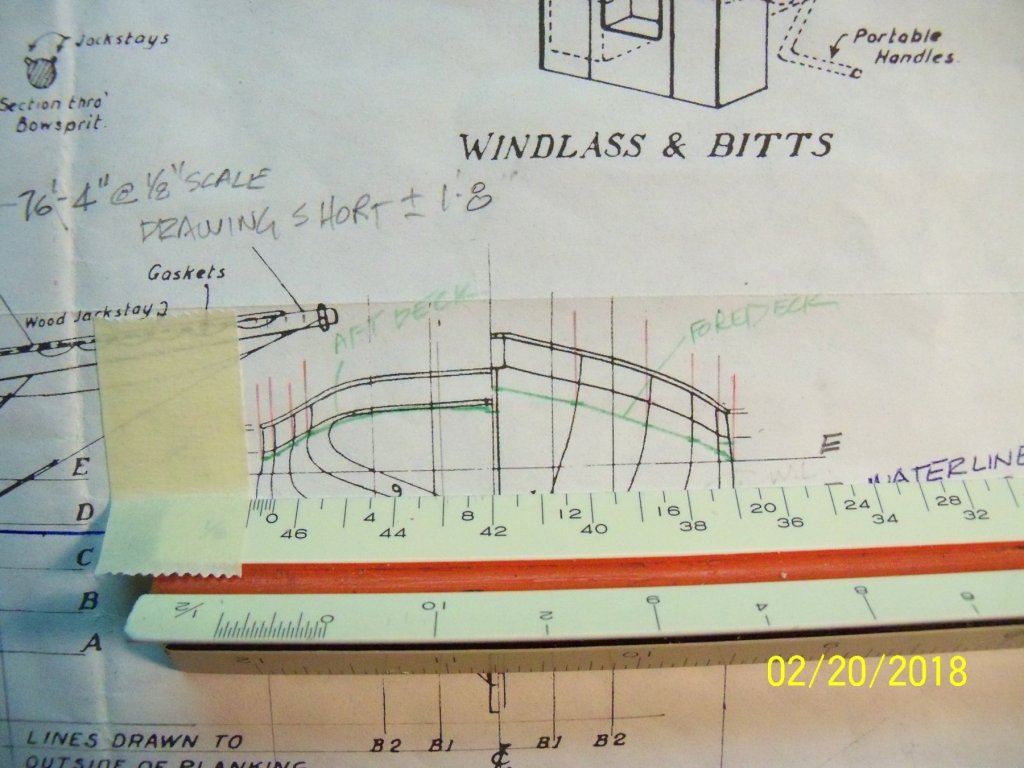
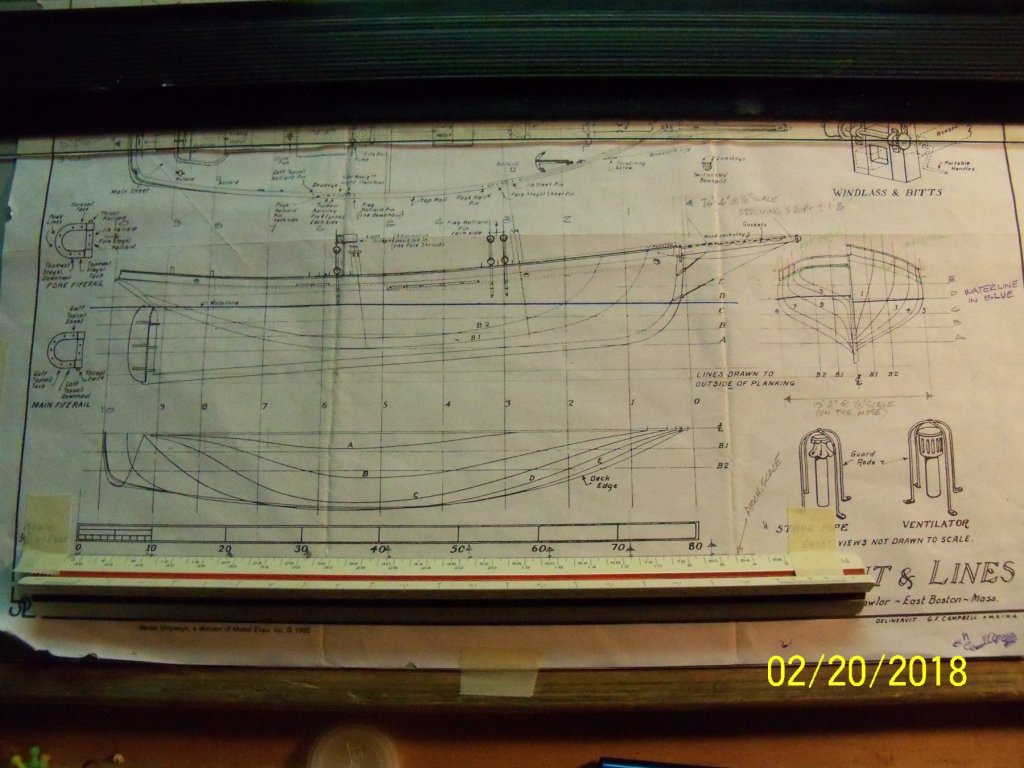
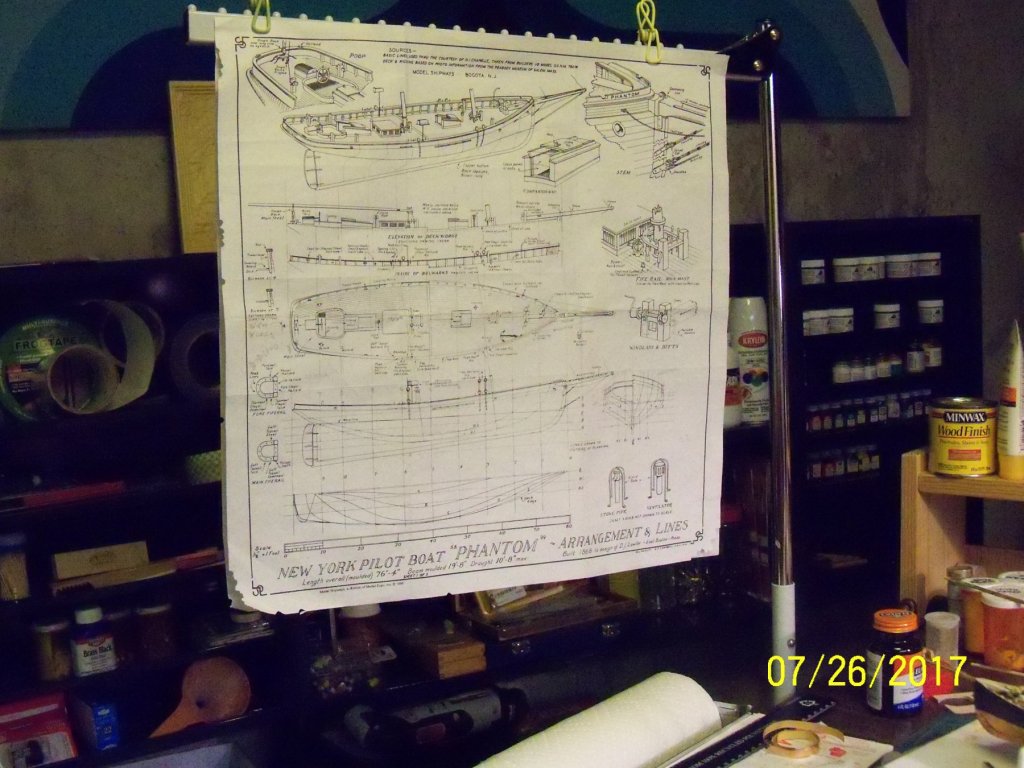
When the dimensions of a ship are given, they are stated as moulded dimensions. For example, the New York Pilot Boat "Phantom" is listed on Model Shipways plans as shown here: Length overall (moulded) 76'-4" (Assuming that this is measured from the face of the stem to the stern end of the deck.) Beam moulded 19'-8" (Assuming this is the maximum width) Draught 10'-8" max. (Assuming this is measured from the waterline to the bottom of the keel.) Here are some photos of the ship plans to help illustrate my confusion with several discrepancies that I have come across. I have put notes on the plans where I have come across some errors, but the first and most glaring error (shown above) is that the overall length on all of all the deck and side elevation views measures about 1’-8” short of the previously stated dimension. One might say that the error is in the reproduction of the print, but if you measure the beam dimension off of the same drawing of the deck plan, it is very close to the stated dimension. Stretching out the length of that drawing would now make the beam dimension incorrect! There is also a scale drawn below the waterline plan. When I put my 1/8” architectural scale on this printed scale, (shown below) you can plainly see that they don't come close to matching either! If I put the same architectural scale on the waterline, profile elevation, or deck plan I have the same situation, and yet when measuring the beam section drawing below, the scale matches exactly! Now that I have decided to build this ship @ 3/16” scale, I obviously need to have the plan enlarged some more. However, all of the plans seem to be drawn at different scales. If I enlarge one, the others also get enlarged the same amount. So the error would continue, but just at a larger size. Having made the decision to use a somewhat modified bread and butter method of construction, the accuracy of the profile section drawing becomes quite important, and when my scale is used to measure this drawing you can see that it is right on the money. Oh but wait a just a minute here. That would mean that the ship is really wider than what the other drawings show! This leaves me a little confused as to which drawings are drawn correctly and which ones are not. Oh, and by the way, this also brings up yet another question. If the ship length is short.............. does this missing 1’-8” need to be added to the bow, the stern, or somewhere in between?
-
Well, apparently no one has an answer for this question so I guess that it's up to me. As this build has been modified already, I guess my choice is to go with a ships boat and will just refer to whatever information that I can come up with.
-
Very well done! Your work is very clean and precise! I also like your selection of the type of ship that you're building. It's a good change of subject, as too many of us go for warships.
-
Aftermarket yards and Masts for plastic kits
BETAQDAVE replied to William-Victory's topic in Masting, rigging and sails
My 1/96 scale Constitution that ended up in drydock after losing out in battle with the garage floor was a Revell plastic kit that I replaced the deck, masts, and spars with wood. It was fairly easy to do, as I had the plastic parts to use for patterns to copy. I was more satisfied with the results than I was with the originals. The masts being hollow plastic were a great improvement in solid wood. The deck I made with some panels made up from glued up individual narrow wood planks with dark glue to represent caulking. This eliminated the plastic seams that were way too obvious on the original ! It was a lot of extra work but the results were quite satisfing ! :-D -
Dust control in my model shop is limited to a small shop vac that hooks directly to my bench tools as I use them. Unfortunately, my tool dust ports are not sized consistently, so I am currently making some custom fittings for each of them. I just picked up an I-socket 110m Tool and Vacuum Switch for about $35. You insert the switch into any standard outlet, plug your vacuum into the vacuum outlet and your tool into the other one. When you turn on your tool, the vacuum also will start and stay on for 7 seconds after your tool turns off to clear the dust out of the hose. It saves you from having to remind yourself "dust bad, vacuum good".

-
Schooners are one of my favorite ships for modeling as they are a simple rig and not overly large, making them well suited to make in larger scales. I have built mostly in 1/8" scale and details are very hard to reproduce to my satisfaction. Having recently picked up a copy of this book, I am very happy to find so many of the finely drawn details shown in it that allow me a better shot at making them look more complete. While it is true that trying to find a particular detail is sometimes difficult, when you do find it it is usually worth the extra effort.
-
My wife and I have made ten trips to Hawaii prior to my life in a wheelchair and we really would like to return, but air travel would really be tough now. One of the things that I always admired was some of the woodworking projects that I saw when we were there made of Hawaiian Koa and some of the other native woods. I would love to incorporate some of them into my modeling projects but, unfortunately have not seen any offered thru any of our wood suppliers. Is there any source that you are aware of that can supply them? I like that you have been able to come up with the some of the woodworking properties of the various woods also.
-
$10 Electric Pen Sander
BETAQDAVE replied to JohnB40's topic in Modeling tools and Workshop Equipment
That's what I like to see, re-purposing a tool to do something that it was never originally intended to do! I have also tried it with one of my new Sonic Pop Dental units that my wife picked up from QVC as one of their special picks. I didn't like it for my teeth but after reshaping the head with a bend added to it, it makes a good vibrating sander. I don't know about you but, I can't sand by hand at 30,000 vibrations per minute! As it has a very compact stroke it can really get in some tight spaces. The only drawback is your hand seems to keep vibrating after you finish. -
Welcome to MSW Angel! You do very fine work, something to be proud of. Ever thought of selling your models? I have sold almost all of the ships that I have made. I seldom made much more than the price of the kits but display space is limited and it was usually enough for me to afford the next model, so it was like getting it for free. To me the object was just to have the fun of building them, not to keep them on a shelf. (Our watch bird doesn't seem much interested in them anyway.)
-
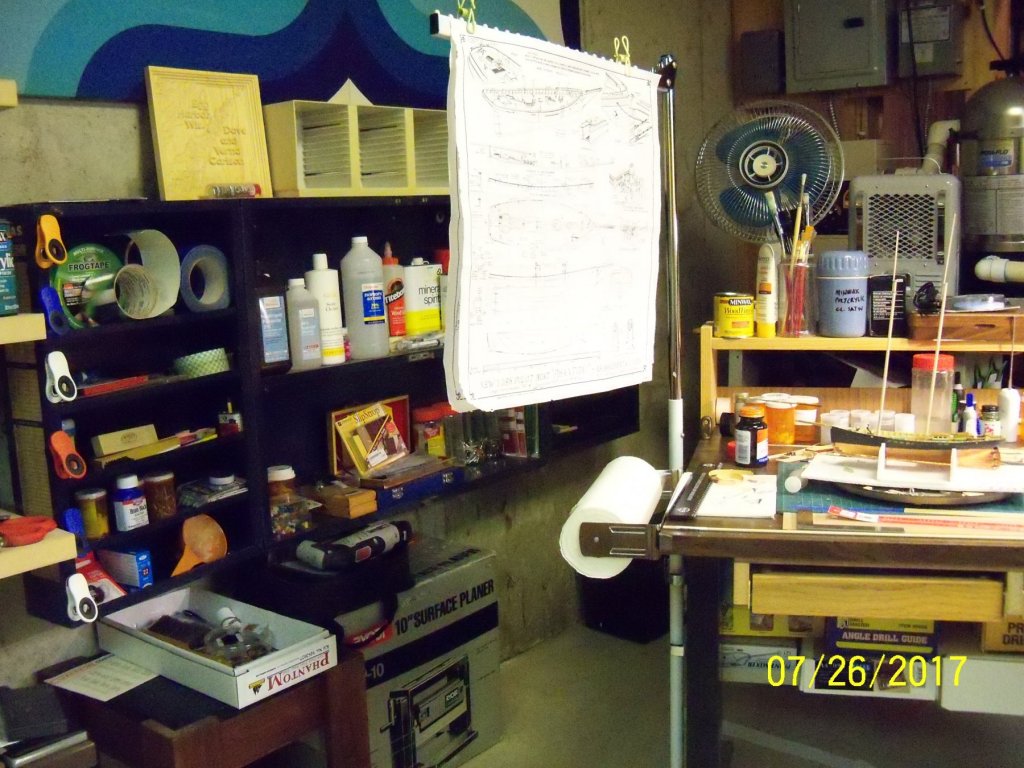
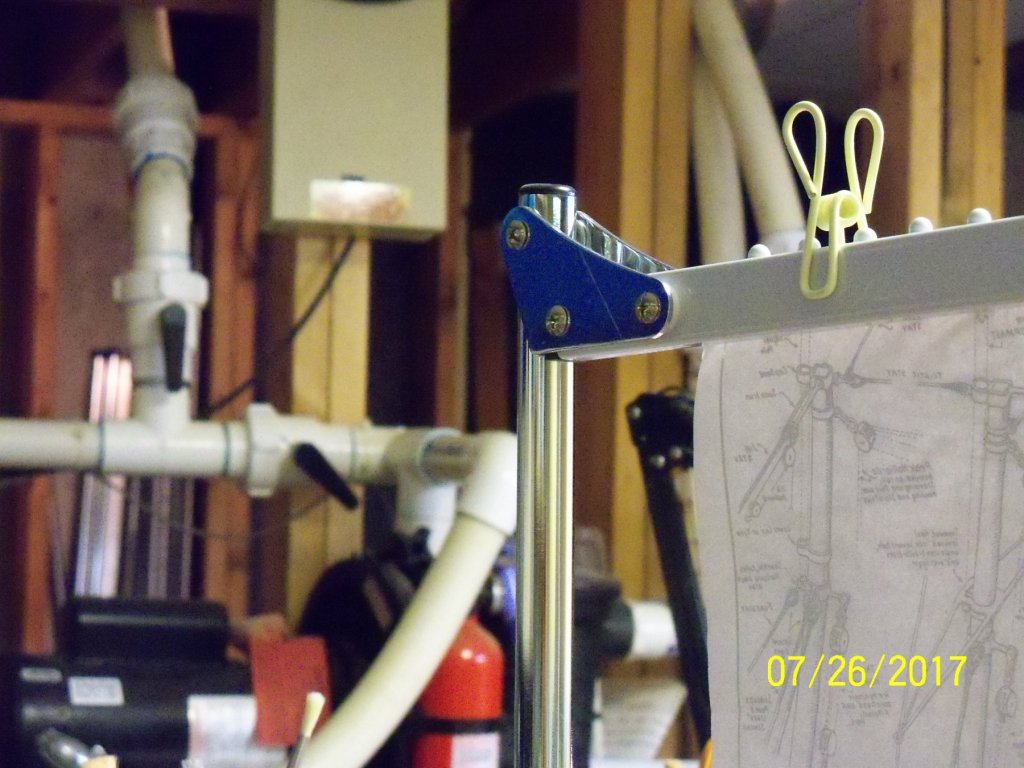
Antonio C. Mendez (a scratch builder extraordinaire in Mexico) was a man after my own heart in that he was very adept at making his own tools and jigs out of whatever was at hand. He often took one tool and converted it into another; like making an old rotary shaver into a ropewalk, or an old pencil sharpener into a miniature precision planer. That was the mindset I used to come up with my plan holder. I had an old no longer used adjustable clothes drying rack that I took apart and remounted onto the side of my assembly table with a few spring clamps used for hanging brooms and mops. As you can see, it can be very easily adjusted or removed without tools. If I have a larger plan sheet to mount, I can raise the cross bar, attach an extension to the bar, or both. Being in a wheelchair, my reach is very limited, so having it within easy reach was very important to me. By the way, Antonio wrote a book titled William Frederick’s (1874) Scale Journey: A Scratchbuilder’s Evolutionary Development, in which he provides detailed info with many photos and drawings describing his techniques. I would highly recommend getting his book, as it’s full of ideas for model ship scratch builders.


-
Is there a true POF kit in the market?
BETAQDAVE replied to Ulises Victoria's topic in Wood ship model kits
Mark is correct. One of the sponsors, Bluejacket Ship Crafters , has a 1/4" and a 1/8" scale kit of the 2 masted schooner yacht America. They also offer a 5/32" scale kit of the 2 masted Baltimore clipper type revenue cutter Jefferson Davis. -
Your craftsmanship in both the wood and metal fabrication is just fantastic!! Unfortunately the workmanship you employ is well beyond most of us, but just gazing at the results is something to behold!!
-
Jason......Don't worry so much about such minor imperfections. After all, the original ship wasn't built by master finish carpenters with power tools and the materials available today. It was all done by hand and the joints were not perfect, thus the caulking of the joints! Any such minor imperfections on your model only add to the illusion of realism, which is part of the reason we build our models in the first place. Your model is quite an impressive piece of art by most anyone's standards!
-
Thanks for all the suggestions guys! I considered substituting metal for it but I would have a hard time tapering it. Cutting it into two pieces and inserting a metal rod on such a thin piece of wood would be tough also, as end drilling a 1/32" dowel would require much more precision to drill than I could handle. The top mast will be a varnished finish so I may just try a few coats of varnish and see how much strength is gained. The wood I have is beech which has a fairly high rating for bending strength, but I have some hard maple which has a little higher strength rating and similar appearance. Maybe I can locate some hickory which has a much higher strength rating but a very inconsistent coloring. If I'm picky in my selection I can select a piece that has a similar appearance to the beech. Does any one have a source for some hickory or any other wood that could qualify?
-
When you have a very thin upper mast, is there something that will make a wood mast stronger? I have a topmast dowel that is only 1/32" at its fattest and thus much thinner as it tapers. I'm afraid that the least little tug on the rigging would snap it off. I had thought of soaking it in some kind of varnish or similar product that may harden the wood. Anyone with any other suggestions? Dave
-
Your hands may seem too big , but you obviously have a fine touch!
- 214 replies
-
- 2
-
-
- agamemnon
- caldercraft
- (and 1 more)
-
Nice job! Quite a handsome collection of all three ships in Columbus' exploration fleet.
") How long did it take to make all three? I'm assuming that they are all made to the same scale.
How long did it take to make all three? I'm assuming that they are all made to the same scale.
-
I recently ordered Rigging Period Fore-And-Aft Craft by Lennarth Petersson. I picked it up from Amazon in the paperback edition for about $24.00. I would highly recommend this book, especially for anyone new to ship modeling that may be confused by the multitude of rigging lines. It’s 111 pages long with about 200 diagrams that clearly show you where each separate item of both standing and running rigging lines are fitted, led, and belayed. The book is divided into three 18th century ship types. The first one is an English 18 gun naval cutter similar to the Expedition. The second section is a French 8 gun 3 masted lugger similar to the Le Coureur. The last section deals with a 2 masted American schooner similar to the Experiment. The book clearly illustrates the details of the connections of the various lines including their attachment points and tackle arrangements. I found it to be well worth the investment. As a matter of fact I plan on getting a copy of his previous book Rigging Period Ship Models.