HOLIDAY DONATION DRIVE - SUPPORT MSW - DO YOUR PART TO KEEP THIS GREAT FORUM GOING! (Only 13 donations so far - C'mon guys!)
×


BETAQDAVE
-
Posts
5,386 -
Joined
-
Last visited
Content Type
Profiles
Forums
Gallery
Events
Everything posted by BETAQDAVE
-
When I did mine I used some thin wall brass tubing cut to the width of the ring on the spar. The tubes came as a set that had several different diameters that telescoped into each other so there was usually a suitable size that will fit tight. Here are two options here. You can take some hardwood strips of the approximate size, cut to approximate length, glued in place on the face of the spar, and when the glue has set take a fine file and shape as needed. I remember that there was someone with a log on WSM (can't remember who offhand) who drilled a few holes through the spar for the ones on both sides of the spar , squared out the holes and slipped a strip of hardwood of the appropriate size thru the squared out holes. After the glue set he filed the protruding ends of the wood strip to the shape needed. For the ones near the center, just don't drill all the way through. I would definitely recommend the use of maple or birch in either case. Hope one of these methods works for you as well as it did for me.
-
 I haven't posted in quite a while due to elevator problems, but I had the time to decide one thing. The main hatch will now be left open and therefore I plan on suspending the inner deck at a scaled 6' below the main deck. This did however bring up a question about the inner deck. I assumed that the inside deck had a matching hatch opening going into the bottom of the hull to store the casks of oil. My question is: did this inner hatch have a combing with hatch covers, a grating, or was it just left open? I made a search on the internet for info on both the Wanderer and the C.W. Morgan and found several cross sections that show this inner hatch but none of them indicate that it even has a cover of any kind. Sounds a bit risky leaving it open just waiting for some crewman to fall in, or did they just rope it off somehow? There is a cutaway view drawn of the Morgan from Mystic Seaport which clearly shows a coaming and hatch cover on the main deck but nothing on the inner hatch. True, the Wanderer was a different ship, but I think they would have been similar. Does anyone else have any more info on this? I was thinking of trying to contact someone there who could answer the question, but not sure how to go about it Also, rechecking my overall hull width measurements revealed that the deck beams were not such a good fit after all. They were made a bit too long and thus widened the hull! Well, needless to say, not happy to find that out since the deck would no longer be wide enough to fill it in. So all of the beams were removed and I am now in the process of trimming them down for a more precise fit. One bright side to this development was that installing the inner deck will now be easier without too many of the other beams in my way. As to fixing the transom, I am still trying to determine if the poor fitting raised seam in the center could somehow be repaired or if I should remove it and replace it with wood. I guess that I'll give it a bit more thought while I finish installing the inner deck.
 -
Alexander, what can I say to such a fine job of modeling except magnificent! I went all the way through your log of the schooner La Jacinthe and could only marvel at your workmanship. It looks like a fine piece of furniture. You will be a most welcome member of MSW, as after modeling for only 10 years, you have many unique methods of doing things, like your shaping of your belaying pins and the use of staples to do your planking. As you will find out by going through the various topics you will find that alot of us also have pet assistants (although you seem to have the only rabbit so far) to keep an eye on us during our work (?). I'm sure all of us will be looking forward to your next ships log.
-
It looks like your method of building your small ships could easily be employed to make any of the small auxiliary boats on larger ships.
-
Model Shipway's Paints
BETAQDAVE replied to Worldway's topic in Painting, finishing and weathering products and techniques
They are one and the same. -
Are these photos showing your entire workshop? Do you have an actual room to yourself or is this in a common area? And some of us that build in a closet think that they have a small workshop!
-
That is an ingenious little clamping system you've got there for making your frames! And while most people using those layout forms actually try to cut notches for the frames, you just use spacer blocks. It appears that by leaving the smooth curve of the hull form intact makes it easier to get your frames to also remain aligned in a smooth curve. Smart!
-
He must have hundreds, if not thousands, of hours invested in making this model. Or should I say work of art!
-
German WW2 Armor Models by nickbud - PLASTIC
BETAQDAVE replied to nikbud's topic in Completed non-ship models
I agree, makes it look an armored vehicle of the Africa Korps plucked right out of the desert! -
Must be quite a bit of noise with such a big crew. Our parotlette can make plenty on his own when he gets going! At least his messes are pretty small and I don't have to take him outside for a walk to do his business.
-
Had my model shop moved into our basement a few years back. (Wi winters a bit too nippy in garage!) After I installed a sump pump, wiring for the pump, and drain line for the pump, I no longer have free water down there. (Builder put in sump pit but skipped all the most important components!) I did a little surface wiring, put in a white ceiling system, and a bit of soundproofing. Then I added a small radiant heater and a dehumidifier and was good to go. It's a snug harbor for modeling now. (check out my shop in the so where do you do yours then topic) It would be very good situation if not for having to replace my elevator that's lately kept me out of my shop now for an extended time. (I'm stuck in a wheelchair now.)
-
As things have worked out it seems you were prophetic about the time required and the actual time available. But, while you haven't gotten to the masting and rigging yet, perhaps if you just installed some lower mast stubs and presented it as the admiralty models were done, that would suffice for now. Just present it as a work in progress that you could finish and give it to the school after completion. After all, we are just talking about five or six year old kids. I think at that time in my life, I would have been impressed with that much. After all, it was enough for the admirals, way back when!
-
Tools, tools and more tools....
BETAQDAVE replied to CPDDET's topic in Modeling tools and Workshop Equipment
We have the same problems when buying locally from home improvement lumber/hardware yards Menards and Home Depot. I once bought a tripod mounted halogen shop light from Menards that apparently was made in China. (Where else?) While attempting to assemble the unit, the weld on the cross bar support for the lights just flat out failed. (Looking closely at the weld revealed that the metal underneath the weld was already rusted!) To avoid the hassle of trying to return it to the center, I just drilled a hole for a lag bolt in the cross bar, force fit a wood dowel into the vertical support pipe, and screwed the bolt in tight. Problem solved! Too bad this is seldom the case. Perhaps this is a just another case of: you get what you pay for, or perhaps put crap in, get crap out. -
Tools, tools and more tools....
BETAQDAVE replied to CPDDET's topic in Modeling tools and Workshop Equipment
Speak of the devil! I just got a new catalog from Micro-Mark in the mail today sporting another new offering called the Doctor DRYBooth. For a mere $199.95 you too can own this 10 5/8" w. x 18" h. x 8" deep metal box. (basically a small oven) Claims it will cut painted part drying time in half. I don't know about you but with just a little patience I believe that I'll just save the $200. -
Tools, tools and more tools....
BETAQDAVE replied to CPDDET's topic in Modeling tools and Workshop Equipment
Oh, you mean like the sliding table for their MicroLux table saw? I easily made one from some scraps of tempered hardboard, pieces of pine, and some small recycled screws from my shop. Cost me nothing but an hour or so of my time. -
Tools, tools and more tools....
BETAQDAVE replied to CPDDET's topic in Modeling tools and Workshop Equipment
I always liked getting gift certificates from Micro-Mark for X-mas presents, I can always find something on their web site that I can use. I have one right now that is burning a hole in my pocket! -
Another New Guy Introduction
BETAQDAVE replied to Petes Shipyard's topic in New member Introductions
I did the same thing about 20 years ago when a hobby shop that I frequently visited in Door County was going out of business. I guess that I spent close to a grand there when we luckily happened be vacationing up there and found the owner in the process of a clearance sale. I picked up six wooden sailing ship model kits. I bought every hand tool, clamp, piece of literature that he had left, and his whole remaining stock of paint. I even bought his entire stock of milled basswood including the display case. (That I recently modified for my handicap accessible model shop.) Boy, was he happy to see me come in! I bought so much stuff that we had trouble packing the car to go back home. -
I would have to agree with that assessment. While I am sorry that he gave up so fast, perhaps the first things that he needs to hone up on are his patience and perseverance. It seems to me that they are two essential traits we all have to have lots of to work on our projects. When ever I start to loose my patience, I know that it's time to take a break before I do something that I'll quickly regret! (Don't ask me how I know this.)
- 87 replies
-
- 11
-

-
- scottish maid
- artesania latina
- (and 1 more)
-
I'm not sure, but wouldn't that just be gluing paint to paint? The Testors cement essentially welds the plastic and thus would create a much stronger bond. But then again how much stress is actually applied to the canons?
-
Love your sailing ships! Keep em coming.
-
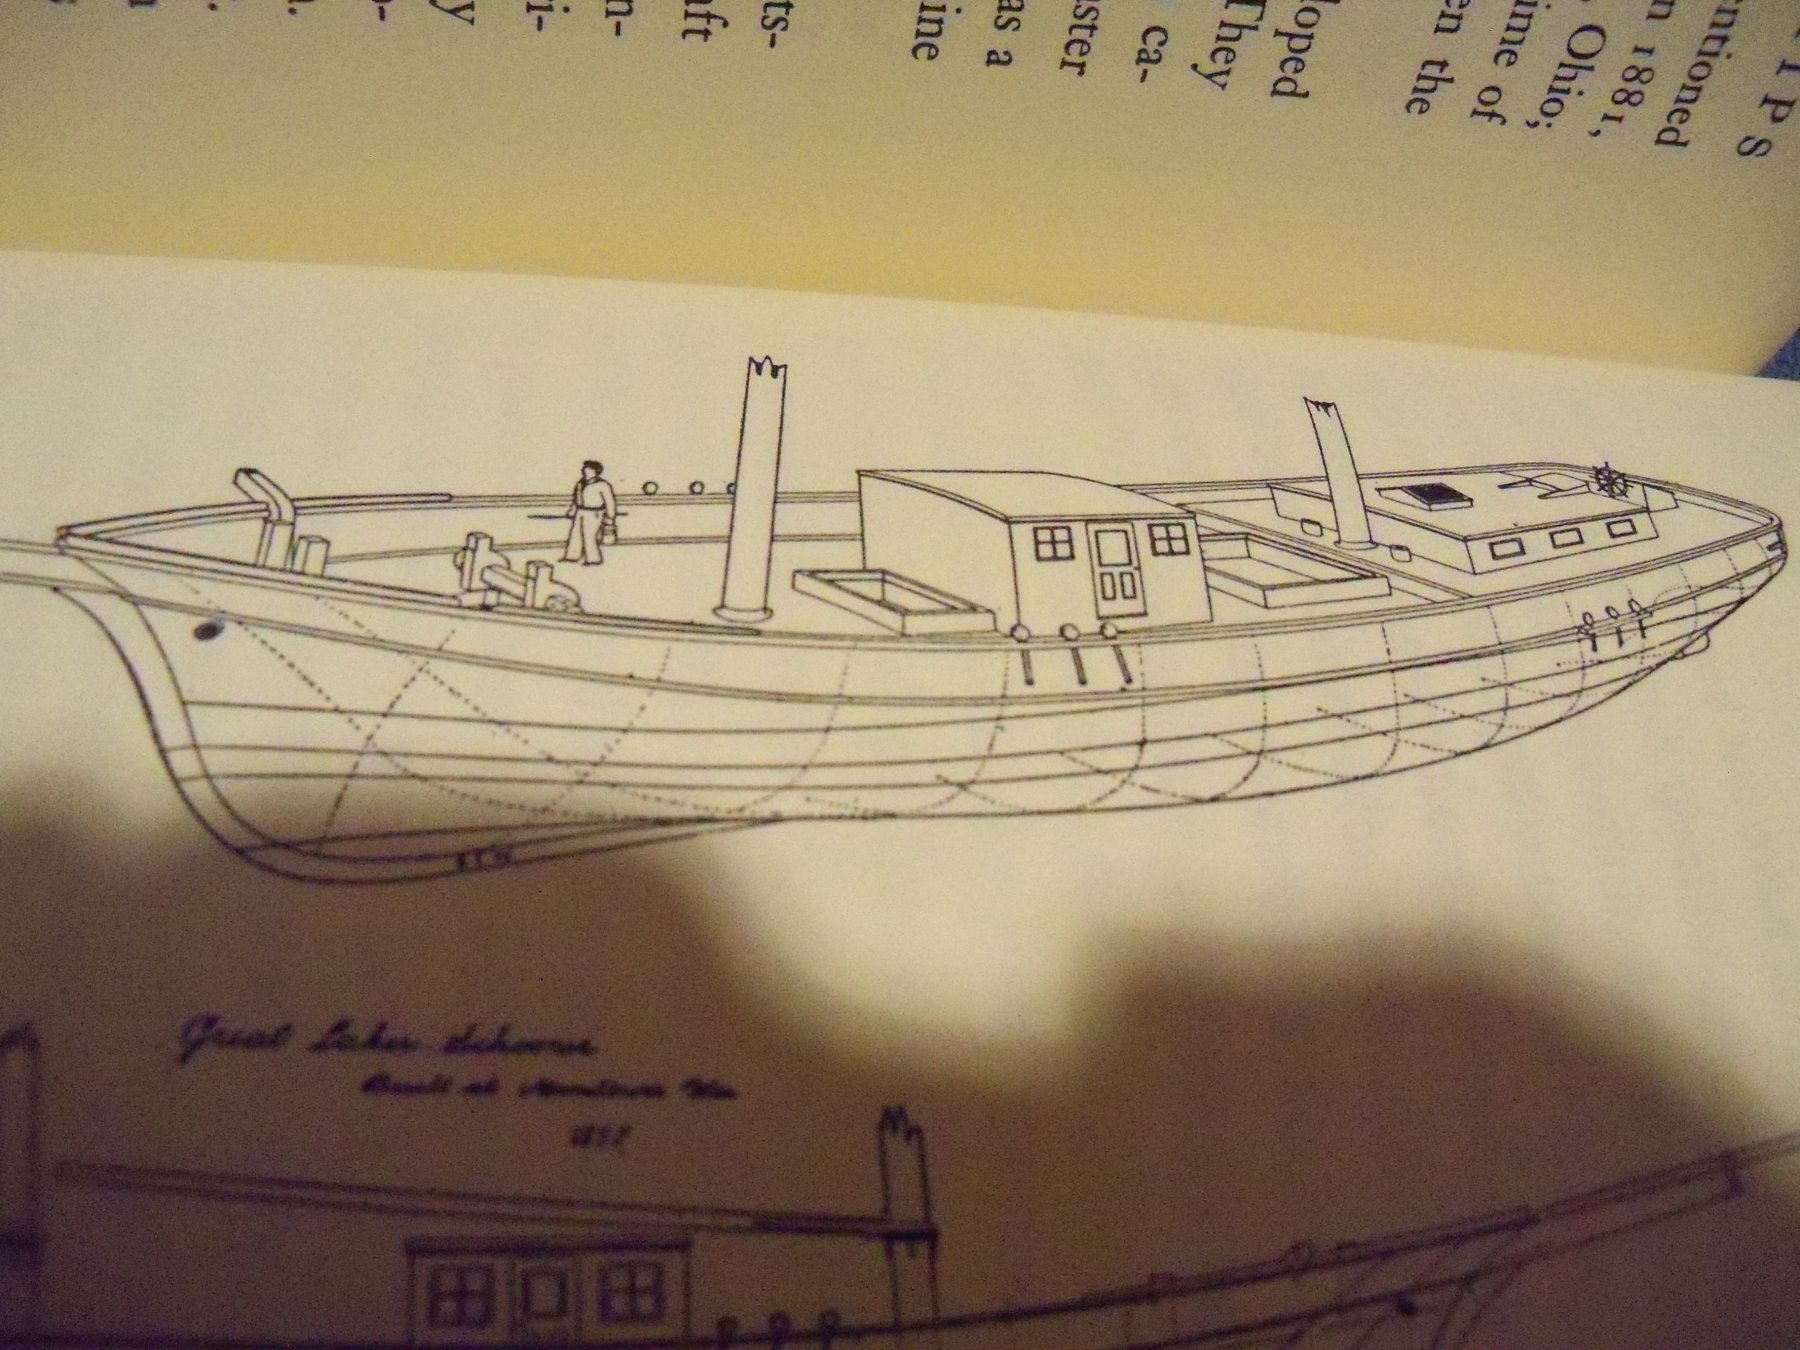
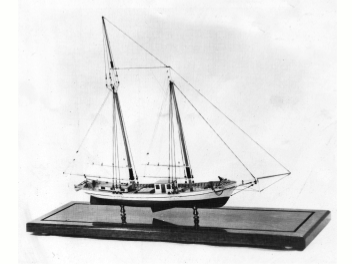
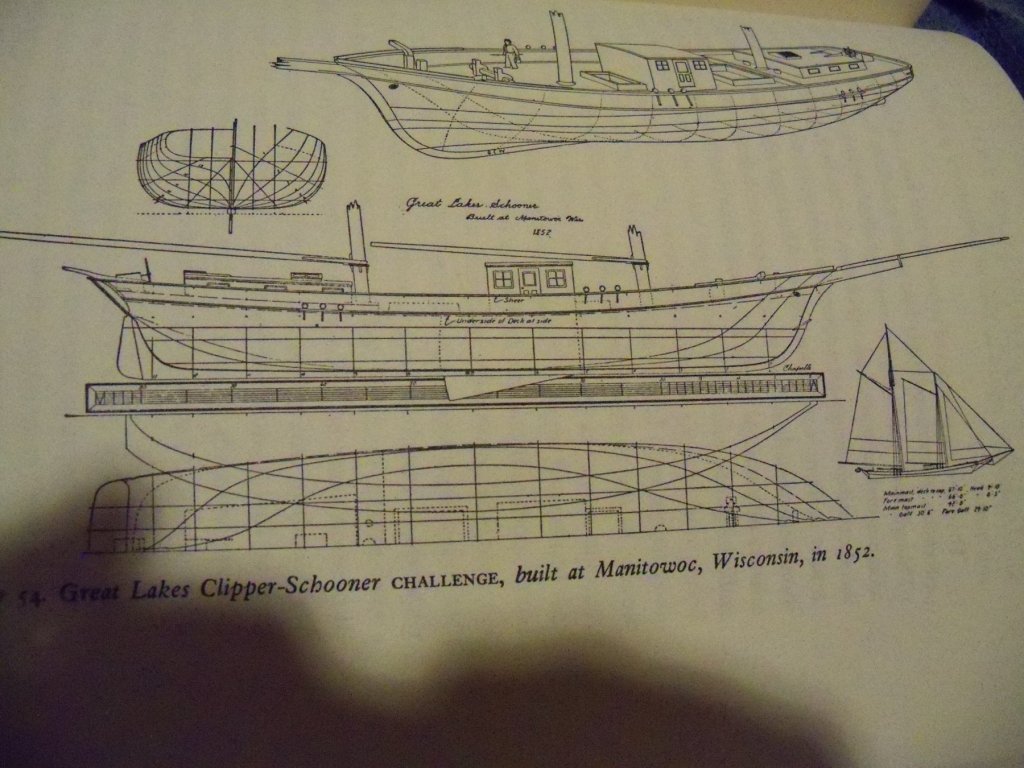
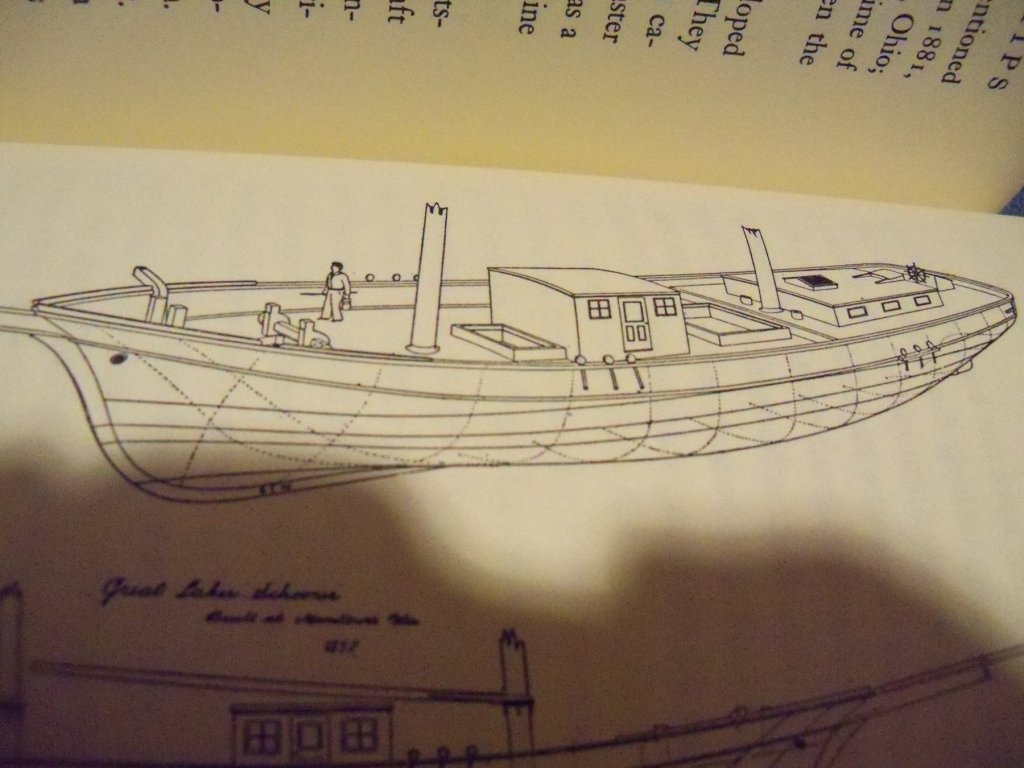
Maury, your ship reminds me of one of my first solid wood hull kits from A.J. Fisher from back in the 60's called the Challenge. Her centerboard was smaller and did pass right thru a thickened keel, as druxey mentioned above, that cleared the base of the masts allowing them to remain centered. She was a shoal, flat-floored, sharp-ended, two masted great lakes clipper-schooner built in Manitowoc WI. in 1851-2. She reportedly could easily make and maintain a speed of 13 knots. Here is a photo of her below. Admittedly it was a much simpler and smaller model (1/8" scale) than yours but back then my skill level was not that good yet. (As a mater of fact the boat at the stern was actually taken from an old plastic ship kit.) According to the blueprints the deck house was not always a common feature, but I thought it looked pretty good anyway. I built her for a former coast guardsman (that had been stationed on the Great Lakes) turned policeman for just the price of the kit so I could buy the next one. I also found these two illustrations (note the deck house is shown) of the ship in my copy of The History Of American Sailing Ships by Howard Chapelle that are shown below. As you can see their were a lot of similarities between the ship designs. Good luck with your build. Looks like you will be busy with her for quite some time yet.
-
I really like those adjustable handscrew clamps shown above! Are they homemade? While I inherited some larger versions of them and they were quite handy for furniture making, they are way too big for model making. I have seen small versions of them on the market but they are usually quite expensive.
-
Doris, while you do have some good sculpting technique, I feel that you must have more than that. You seem to have a very artistic flair when it comes to making these figures. Did you ever have any formal artistic schooling or is this a skill that you come by naturally? In either case you are very accomplished at it. While your ship models themselves are excellent, your skill at sculpting is really exceptional! Personally, I have had a bit of art schooling, but it is more of the two dimensional variety, while your work in three dimensions is another thing entirely. I think one has to have some natural talent to see and shape things in 3 rather than 2 dimensions. Sadly I don't, but none the less I can see by your work that you do. Keep up the good work, I really enjoy seeing your progress on your ship, as I'm sure the rest of us at MSW would agree.
- 1,035 replies
-
- 7
-
-
- royal katherine
- ship of the line
- (and 1 more)
-
That is a truly spectacular illustration! It looks like someone in a time machine went back in time with some advanced photo equipment and took the picture at just the right moment as a witness to the actual battle. An illustration like this can really bring history to life.