
HOLIDAY DONATION DRIVE - SUPPORT MSW - DO YOUR PART TO KEEP THIS GREAT FORUM GOING! (Only 13 donations so far - C'mon guys!)
×

Stevinne
-
Posts
333 -
Joined
-
Last visited
Content Type
Profiles
Forums
Gallery
Events
Everything posted by Stevinne
-
Just curious, would Model Expo sell kits not acceptable on this site? I've always figured buying from them means I'm buying a kit from a reputable manufacturer. If not, things are very confusing.
-
 I used to love the Aurora tanks when I was a kid. They were pretty high-quality models for the time.
 -
Hello and welcome to the group. Don't be too intimidated, people have been building wooden ships for hundreds of years. They did it, so can you. Someone here has a signature that says something along the lines of "The wood is patient," and I've always taken that to mean that no matter how bad things are going, with a wooden ship model there is the chance of salvaging it. Before you start, I'd recommend getting your hands on Frank Mastini's "Ship Modeling Simplified," which is a great book for the beginner modeler and really lays out in easy-to-understand terms and illustrations a step-by-step guide for building a wooden ship model. It's a great resource, particularly for someone who is starting to build a wooden ship kit where the instructions might not be translated too well into English. I've given a couple of ship models as gifts to family members and always included this book. Each time the ship has been built. You've also come to the right place. This site is filled with folks who are pretty much experts in the field and are more than willing to offer advice. Do start a build log, so folks can follow along and see how you are progressing. That way, they will have a better idea of what problems you might encounter. I'm interested in seeing how your ship turns out. I love vessels from this period, and we don't have many logs for this particular kit, so good luck, enjoy the journey and remember, everyone started out like you.
-
Thanks!
-
Very nice. It seems the Hunley is no longer available as a card model, which is a shame. I've visited the museum in Charleston, S.C., a couple of times and watched as they restored her and converted the museum from basically a warehouse to a really nice facility. I would have liked to do her in card.
-
The Nautical Research Guild has plans for the Washington Galley, one of Arnold's fleet and, while not a gunboat, not a bad-looking two-masted vessel. https://www.thenrg.org/the-galley-washington.php
-
Welcome aboard, I'd love to see some photos of the yachts.
-
What is this taping method of which you speak?
-
Let me start by saying welcome aboard! It's a great hobby and this is a very good site full of knowledgeable and helpful folk. I've never scratchbuilt, but I think the definition is building something that didn't come in a kit, which usually contain precut frames or bulkheads and other parts. You can definitely use plans drawn from the original ship, most people here do that and they can probably steer you in the direction of good places to find them. I think things get a bit more tricky when you are building from plans that were originally from other model kits, particularly if you are buying them off ebay, since you don't know where the person who is selling them got them. I think it's one thing if a friend passes on plans after he or she is done with a model, and a totally different one if there is some guy with a printer in his basement, so to speak, churning out copies of other people's work and selling it for his benefit. But I am sure folks here who are more knowledgeable can give you a better idea.
-
If the parts are too damaged to salvage, Model Shipways is very good about replacing them. Great customer service there.
-
Welcome aboard! Good luck with the Jolly Boat.
-
My first bit of advice is to get yourself a copy of "Ship Modeling Simplified" by Frank Mastini. It's a great introduction to modeling and guides you through all the steps of building a ship in clear, easy-to-understand language. There is a chapter on choosing a first kit. One of the best bits of advice in there is to look for a kit that is double-planked - the first layer is the thickest and gives the model its strength, the second layer is paper thin, making it much easier to cover up any imperfections you might have encountered in the first layer. If you are from the states, my second bit of advice is to get on the Model Expo mailing list. They are one of the top kit suppliers, have great customer service and their own line of quality ship kits. Their regular prices are competitive, but if you are on the mailing list you will see that they almost constantly run sales on all the manufacturers they carry, which can save you a nice bit of change. You can also go to the site and download the instruction booklets for several kits. This is only about 1/4 of the instruction you need, most of the direction comes from the drawn plans that come with the kits, but it will give you the start of an understanding of what you'll be doing. You didn't say if you wanted a solid hull or plank-on-bulkhead kit. The Model Shipways Sultana is an attractive, solid-hull kit that can be had for a reasonable price when on sale. It's a good starter kit. There is a great free tutorial (called a practicum) that can be downloaded here that shows how to turn what is a good kit into a really eye-catching model. You have to buy some extra wood, because it shows how to plank the solid-hull and build some items so they look better than the kit-supplied pieces. Even then, if you get it on sale it's a great bargain. The practicum is worth looking at even if you aren't considering the model, since Chuck Passaro is a master of the craft and you can learn a lot that can be applied to other models. If the Sultana isn't your cup of tea, there are a variety of other Model Shipways kits that are good first builds. Whatever you choose, good luck and enjoy. This is a great site with lots of helpful folk, so don't be shy about asking for advice.
-
In my book "Mary Rose: Owners' Workshop Manual," the illustrations don't show any breeching ropes, though I can't imagine you'd want great guns rolling all over the place. One photo shows a modern wrought-iron replica with a securing rope, but no tackle to allow for traversing or running in and out. I wonder if this is because they have yet to find any indications of how the guns were rigged, so they just omitted the info?
-
Hello, welcome aboard. This is a great site with lots of knowledgeable and helpful folk. What kit are you working on? My one bit of advice to all new builders is to check your local library system (my wife's a librarian) for Frank Mastini's "Ship Modeling Simplified," which I think is a great book that is good to have on hand when you are building. I see it's listed on Amazon as costing less than $10 if you go through alternative sellers. It does a really good job of laying out in clear language and illustrations a step-by-step approach to building wooden ship models. https://www.amazon.com/Ship-Modeling-Simplified-Techniques-Construction-ebook/dp/B00ARHCE5U/ref=sr_1_1?keywords=ship+modeling+simplified&qid=1554935417&s=gateway&sr=8-1 Of course, this site is also a great resource, and I don't think I've yet seen someone ask a question that wasn't answered by someone who knew what they were doing.
-
I'm interested in this one, too. I'm hoping for an update. I was very disappointed to see that Billings canned its plan to produce a kit modeled on the Geoff Hunt paintings. I'm not sure which version is more accurate, but I like the big, old-style forecastle as depicted in the Anthony Role. A lot like the Great Harry, which was one of my favorite Pyro kits when I was a kid. I'd love to see how a colorful version of this kit turns out.
-
Very nice. I've been dropping in on the build over the last couple of years and was very impressed by your work. The display cabinet looks great.
- 1,348 replies
-
- 4
-

-
- constitution
- model shipways
- (and 1 more)
-
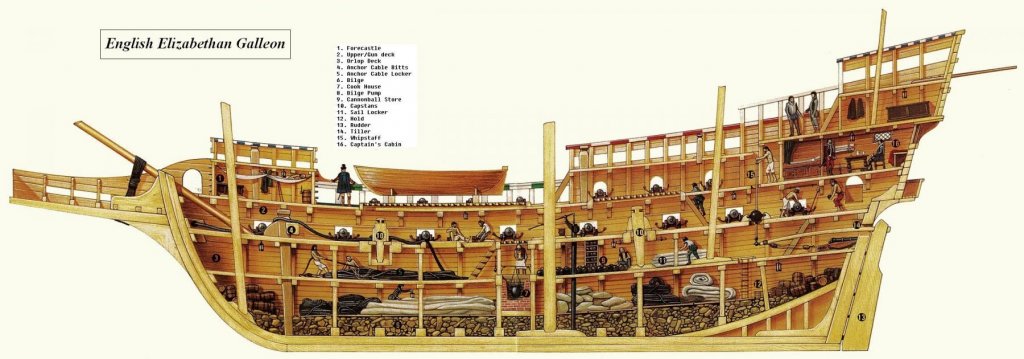
Here a picture I found on the internet. Number 15 shows the guy operating the whipstaff. Your build is looking good.
-
This discussion got me interested and I went back and watched "The Ghosts of the Mary Rose" documentary from a couple of years back about what could be learned from the skeletons of the crew members. There was mention of how a ship full of Spanish soldiers had gotten stuck in England about a year before the sinking, and there was some evidence that at least some of these guys were on the MR on the day she sank. Given Spain's history with the Moorish conquest, it wouldn't surprise me if some of those guys had DNA from all over the African continent. On a side note, it's amazing what DNA shows. My background is mostly Irish and German, but my brother had one of those ancestry DNA tests done, and it showed some traces from Spain and the Mid-East. I tell my kids, who have sailed with me before, that this is proof that my poor sailing abilities were inherited from shipwrecked survivors of the Armada. My wife, who actually is descended from one of the old Dutch explorers, rolls her eyes and says history is no excuse.
-
Matt, I really can't tell from looking at your photos - so you're probably the best judge of how it looks IRL. I believe the Virginia is double planked, which also hides a multitude of sins, and allows for liberal use of sandpaper and wood filler before you put down layer No. 2. I for one always worry about tearing things apart, since I always wind up taking more wood off pieces I don't want to damage than I intend. One thing I always do when talking to folks who are working on their first build is recommend they track down a copy of "Ship Modeling Simplified" by Frank Mastini. I see you can pick it up used on Amazon for less than $3 plus shipping. It was the book that convinced me I could build a wooden model ship and proved invaluable when I was building Constructo's "Enterprise," which was a nice-looking build with really, really bad instructions. Mastini does a great job of guiding you through the building process, explaining things, illustrating things and generally giving you the information and confidence you need to build a nice model. https://www.amazon.com/Ship-Modeling-Simplified-Techniques-Construction/dp/0071558675/ref=sr_1_1?crid=3EIIXUN6HJA2H&keywords=ship+modeling+simplified&qid=1553395033&s=gateway&sprefix=Ship+modeling+s%2Caps%2C339&sr=8-1 One thing not to do is to get discouraged. Someone here has a signature that says something along the lines of "the ship modeler is slow, but the wood is patient," which I always took to mean that there is nothing that can't eventually be made to look good. I personally think your model is looking good.
- 68 replies
-
- 4
-
-
- virginia 1819
- artesania latina
- (and 1 more)
-
In one of the books I'd read on the MR, it mentioned that it was thought a portion of the crew were from southern Europe - hence the "knaves I cannot rule" comment just prior to the sinking. Based on that, and the fact as Thunder mentioned above that England was already trading with Africa, Asia and the Middle East, it's not surprising the crew were genetically diverse. But who is going to watch a special, or feel compelled to visit a museum that advertises "New findings are surprisingly mundane!"
-
Welcome aboard. It looks like you are making a good start!
- 68 replies
-
- 2
-
-
- virginia 1819
- artesania latina
- (and 1 more)
-
I too built a lot of the Pyro kits as a kid, including this one, the Revenge (my personal favorite), the Ark Royal, The Bounty, The Constitution, The Cutty Sark, The Charles W. Morgan and the Henry Grace Adieu. I also built a few of the larger Pyro ships, too. I have to say, I'm impressed with the work you are doing. Good job!
- 90 replies
-
- 3
-
-
- bomb ketch
- pyro
- (and 1 more)
-
I agree on the forecastle. I'm not a big fan of the Caldercraft kit. It doesn't look renaissancey enough for me. Billings had at one time said they were producing a kit, that I believe, looked more like the Geoff Hunt painting. Unfortunately, that project stalled. It's good news that they found more of the ship, I hadn't heard about it, so now I'll have to Google it. I'm currently reading Margaret Rule's book on excavating the MR and one of the questions I had is if anyone had looked beyond the immediate area for wreckage. Now I guess I have my answer.
-
Welcome aboard!
-
Welcome!
