allanyed
-
Posts
8,149 -
Joined
-
Last visited
Content Type
Profiles
Forums
Gallery
Events
Everything posted by allanyed
-
 You are absolutely correct EZ, but unfortunately, many kit builders are not very experienced thus a little naïve as would be expected, so they do not know that many kits are loaded with mistakes. For some, the research is as much fun and definitely as satisfying when there is the VOILA moment that you find a mistake and know you can fix it! There are a couple kit makers that do a much more credible job of it and they too are in business to make a profit, so it can be done. All anyone has to do is look how many kits are in the various build logs and which manufacturers continue to gain more customers and which are not thanks to the former having high quality products. Allan
 -
Daniel, As it is a predominant part of the finished model, you may want to consider buying some replacement strips of wood and remaking the deck. At your scale, acrylic paint or black tissue paper are great ways to indicate the tarred seams. I tried several methods when we were working on the Euryalus project and included the following: From Volume 2 of Frigates of the Royal Navy, HMS Euryalus page 10 .........The first is to use tinted glue. In requires only a single small drop of black or burnt umber gouache or acrylic artist paint to a puddle of aliphatic glue. We recommend making a batch with a small bottle of glue rather than many small batches. Add enough paint to give a dark tint to the glue and keep track of the ratio of paint to glue. In this way, additional batches can be made with the same tint level. Using this method, glue must be carefully applied to the entire edge of a plank without breaks. If the builder has concerns about the glue being weak, untinted glue can be used where the plank fays to the frames and tinted glue on the edges of the planks. The next method is to paint the edge of the plank. Acrylic artist colors are readily found and one small bottle will be enough for the entire model. Use this right out of the bottle or tube, do not thin it. Once the paint has dried, the plank is glued in place. Any paint that may get on the outboard face of the plank will be scraped or sanded away once the hull is finished. The edges can be darkened with a pencil in place of the paint. This is far easier and presents a similar result. The last method that we used was simulating the caulking with tissue wrapping paper that is often used inside gift boxes. The material is found in most craft stores in a variety of colors and is much thinner than craft or construction paper. Black craft paper is far too thick for ⅛″scale, and may appear a bit heavy to some even for ¼″ scale. Once the plank is ready to be installed, a bead of thinned white glue is run on one edge. Allan
- 5 replies
-
- 1
-

-
- Polaris
- first build
- (and 1 more)
-
EZ, I hope Clementine, who has done an admirable job on his build, would agree that you should not be afraid to research each part before you put it in place. Some kit makers do not appear to spend much time on research before putting out a kit, or, if they do, they ignore it, but fortunately many of their mistakes can be fixed as you move along on the build. Allan
-
Techtonic There have been a few nice looking cloth sail sets in recent logs and it would really be super if those builders prepared a short write up on their methods that could go into the articles data base. Sadly, there have also been many that look awful, including pre-sewn sails from most kit makers. Bad sails plus the fact that most of the rigging is blocked from view is possibly why so many model makers from the 17th through the 21st centuries leave off the sails. In the end, of course we should all go with what makes us happy😁 Allan
- 366 replies
-
- 1
-
-
- bellerophon
- victory models
- (and 2 more)
-
This entire topic has been fascinating and extremely informative. I truly hope I never have to go back to this string for using the information. 😀 Allan
- 16 replies
-
- 2
-

-
-
- hull repair
- Hudson Bay Company
- (and 2 more)
-
Maybe hammock battens on the sides of the deck beams where they were normally secured and a few hammocks hung from those battens? Allan
-
PEGASUS MODELS LTD 88 CATTON GROVE ROAD NORWICH NORFOLK UNITED KINGDOM Zip:NR33AA Phone: 44-1603-419515 Email: sales@pegasusmodels.co.uk WebSite: www.pegasusmodels.co.uk I don't know if this is current but they are a distributor for SIG, which makes silk span. https://sigmfg.com/products/sig-silkspan-tissue Allan
- 366 replies
-
- 1
-
-
- bellerophon
- victory models
- (and 2 more)
-
Your model is really looking good. I fully realize there are proponents of using cloth sails that are not so concerned with scale and the choice is always that of the model builder. Keep in mind that at 1:72 there is no cloth in existence or sewing method that will be to scale and many feel will detract from all the beauty you have put into your model to this point. Maybe consider non-woven materials. The $7 booklet on making sails by David Antsherl from SeaWatch books is a great guide on making realistic sails. Tom Lauria has a two part video on sail making that you may find helpful as well.
- 366 replies
-
- 4
-
-
- bellerophon
- victory models
- (and 2 more)
-
If you consider 3D printed barrels, the price is very low. Figure about $0.30-$0.50 each. All you need is an appropriate drawing in STL or other format that is 3D printer friendly. Check out the below for more details and a couple pics. These happen to be 17th century barrels (note the tapered trunnions for this era) but others are certainly doable as you can see in responding posts. Allan
- 366 replies
-
- 3
-
-

-
- bellerophon
- victory models
- (and 2 more)
-
Assuming the round holes, which really should be six or eight sided, are for the pumps and the square holes are for the bitt pins, why would you want to block them? Your photo shows you have the contemporary drawings. Do you have the deck drawings as well? https://www.rmg.co.uk/collections/objects/rmgc-object-86459 has all of them. Allan
-
You are absolutely correct. This is the reason to check everything before putting it permanently in place, whether scratch built or kit supplied. There are thousands of contemporary plans and models to check against that are available for free on line at RMG, Wiki Commons etc. so why not use them? There is a myriad of books available based on contemporary information for those that wish to expand their library as well. Allan
-
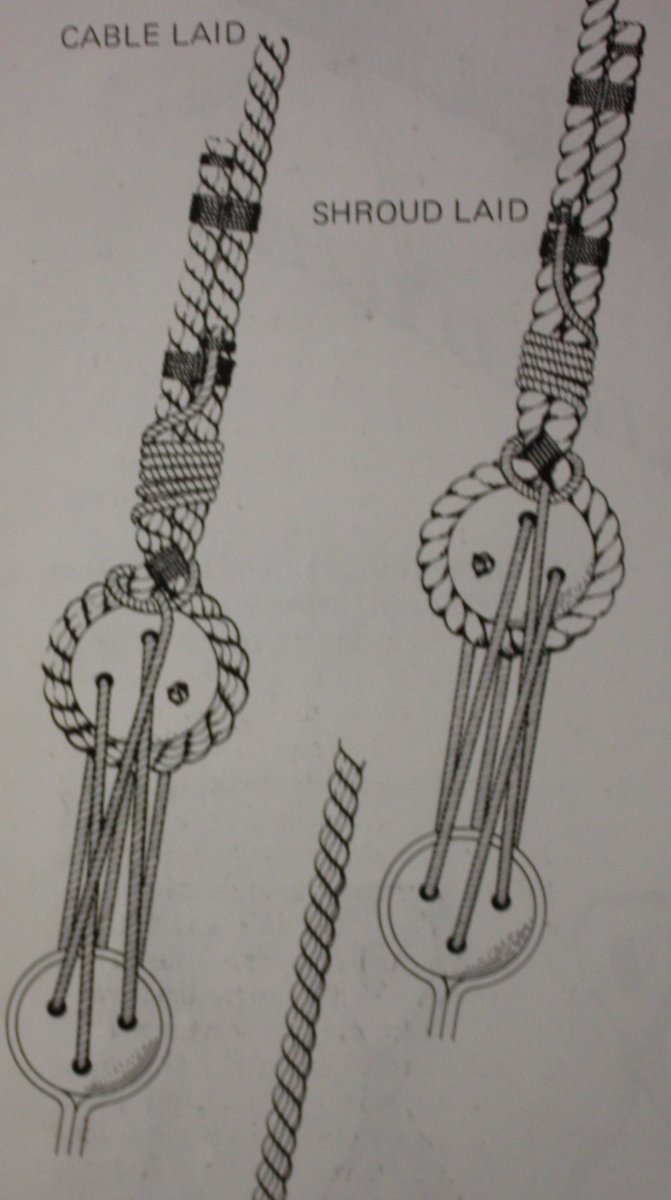
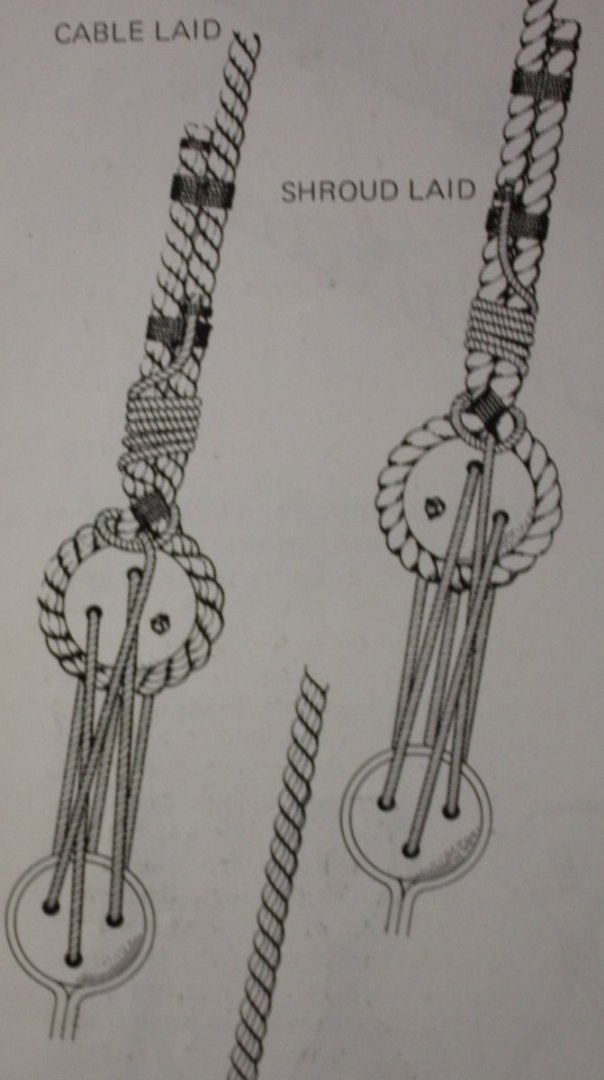
Below is text and a picture from David Lees' Masting and Rigging of English Ships of War, page 42. "A deadeye was turned in the end, left handed if shroud laid rope was used, right handed if cable laid." I think this would have the ends finishing up aft on the port side and forward on the starboard side for cable laid rope as Henry mentions. This view is from inboard.
-
You may get more responses on particular methods for the different parts from corroded guns to moldy deck if the pictures were all right side up. 😀🤪🤪 I got dizzy looking at them. When was the model built? With all the other issues, it is good to see the rigging seems to have held up regarding aging. Matching this is something to watch for regarding material and color, making sure it is miniature rope, not thread from the local craft center. Good luck. Allan
- 16 replies
-
- 3
-
-
- hull repair
- Hudson Bay Company
- (and 2 more)
-
Shipaholic I agree based on a few sources mentioned above. Hopefully you have others you can share. The truss pendants replaced parrels on the lower yards and were around much longer than in the Endeavour era, lasting from 1760 to 1850. The rope pendants did change in that they rove downwards from 1760-1810 then upwards to blocks in the trestle trees from 1810 to 1850 and finally replaced with chain pendants from about 1850 on. Allan
- 79 replies
-
- 2
-
-
- Endeavour
- Artesania Latina
- (and 1 more)
-
No offense at all, just curious if that is what your friends call you. I have been called far worse over the years so no worries using Weedboy 11😀 Allan
-
Peter, This may not apply to a collier like the Earl of Pembroke, but according to The Masting and Rigging of English Ships of War by Lees, page 66, parrel rigging on the lower yards was superseded by truss pendants by about 1760. As Earl of Pembroke was launched in 1764 and acquired and renamed Endeavour in 1768, if she followed the RN methods she would never have had parrels on the lower yards. Marquardt's expertise was used in the construction of the replica so it seems odd they did not use parrels but he shows them in his book. Obviously Marquardt and Lees did a LOT of research on rigging in general so choose your poison on this one. Allan
- 79 replies
-
- 2
-
-
- Endeavour
- Artesania Latina
- (and 1 more)
-
My First Kit Pick Ups.... Beginners Kit Recommendation?
allanyed replied to DeHammer's topic in Wood ship model kits
What GRSJAX says! Best series for beginners to come along in our lifetime designed by one the most accomplished model builders and authors on ship modeling who also happens to be an active member here. Allan -
Congratulations on your first build!!!! You should be proud of your accomplishment. We ALL make mistakes in the beginning and most of us still make some (hopefully fewer) as we gain experience. Neither. You might benefit by looking at the kits from Vanguard, MS, and Syren via the build logs here at MSW before making a decision. Look at the quality of the little things like their blocks, gratings, sails and rope which are higher quality and more realistic in appearance. Allan
-
Welcome Daniel, I have had the very good fortune visit Grindelvald several times, including taking the tram to First. BEAUTIFUL BEAUTIFUL country, even for those of us who do not ski. I know freight is expensive these days, but the three model beginner series designed by David Antscherl and available through Model Shipways is possibly the best way to begin and learn good methods. Study the many build logs here at MSW and do some research on the actual vessels that you are considering so you can which best suit your desires. Not all kits are created equally when it comes to realism and quality. Allan
-
Nicely done Ted, Do you have a new project in the works? Allan
-
There is an excellent article on putting the names on the sterns of British ships covering a wide period of time by David Antscherl in the new Spring 2022 NRJ, pages 73-79. It points out dates and types of lettering, and common errors including several incorrect versions that had once been on modern day Victory and modern day models. It would be great to see this posted at MSW for folks that are not members of NRG. Allan.
-
- 9
-
-
Practically speaking, this is true, but as the keel tapers from midships both fore and aft, there is slight bending but not really enough to cause much aggravation. I may off base on this , but it seems most kits forgot to include the taper so it not a factor anyway. Just as an FYI, the taper varied slightly with time and maybe nationality. This example is from the 1719 RN Establishment - The width for a keel about 90 feet long would be 12" midships, 10.5" wide forward and 7.5" wide at the sternpost. For the Mayflower, if these were close dimensions of her keel, at a scale of 1:60 this would be about 0.2" (5mm) at midships, 0.125" (3.2mm) at the rabbet of the sternpost, and 0.18" (4.5mm) at the bow. Allan
-
What, no Amazon Prime next day free delivery in Trinidad & Tobago?😀 Congrats on your new treasure chest of goodies. Allan
-
This plank looks spot on! Drying in the sun or however will work, but an inexpensive hot air gun from your local hardware store is a great way to dry them. Allan
-
What's a good kit for learning rigging?
allanyed replied to Mark m's topic in Masting, rigging and sails
I totally agree with you Mike. If you look closely at the closeups of the model mentioned, you will see there is nothing that will further the abilities of the builder as there is virtually nothing right about the rigging. Better to start with good information to form good habits and not have to un-learn something. There are indeed a few good kit brands out there. If you look at the the most recent page of build logs for kits from 1751-1800 which covers the period for Bounty note the kit brand names and the number of each listed. Maybe there is a lesson there. Allan