


allanyed
-
Posts
8,149 -
Joined
-
Last visited
Content Type
Profiles
Forums
Gallery
Events
Everything posted by allanyed
-

What's a good kit for learning rigging?
allanyed replied to Mark m's topic in Masting, rigging and sails
Looking at the model in the kit you mention, I would not pay $1, let alone $100 if I wanted to learn about rigging. From their ad photo I could not find one block or dead eye on the entire model and the lines look to be thrown on with no rhyme or reason for where they are run. There appear to be 7 lines made fast on each foreyard yardarm!!! I think there are much better choices out there. I am anxious to see other opinions after zooming in on the photo here: https://modelexpo-online.com/Corel-SM104-HMS-Bounty--Solid-Carved-Wood-Hull-Kit--Scale-1130--Length-13-14_p_3125.html Allan -
She is a beauty! Are there are areas where the deck is "rough" to provide non skid surface? Had this situation on an Islander 36 model many years ago and could not figure a way to do this to scale for a while. Finally came up with using powdered glass in the fiberglass molds where these areas were to be. The positives that came out of the mold were a perfect replication. I am sure a similar treatment could work on the positive versus the mold if you need to have such an area. Again, your workmanship is great! Allan
-
Welcome aboard Gizmo2K2, Do you prefer Gizmo, Gizmo2K2 or a regular name? Looking forward to pictures of your uncle's models. Not sure the new member forum is the right place to post them, but hopefully a moderator will direct you to the right forum here at MSW. Allan
-
I wish I could visit you to see the model in person and chat about ship modeling over some of the fantastic foods I remember having in Seoul and Pusan. I can never get 낙지볶음 (Nakji Bokkeum) here that is as good as we had in Korea although there are a few in Manhattan, including Miss Korea BBQ that do a great job. I look forward to your next posts. Allan
- 77 replies
-
- 2
-

-
- Santa Maria
- Artesania Latina
- (and 1 more)
-
You have a LOT of company. Why bother posting dozens and dozens of "no image online" icons? If it is to let us know they have them in storage, will they send these if requested individually in low resolution so one can decide which to purchase in high resolution? I realize museums do not have deep pockets, and RMG is still an unbelievably great source for all of us, even with the changes. Worse than the changes in the Collections is the fact that what few models they had on display were put in storage. Maybe they put them back out, it has been a few years now, but if not I wonder what they put in their place. Allan
-
I have always been about wooden ships but I am excited to see more about this kit so will be checking in on your build log. Good luck!! Allan
-
Flyer, I agree that the Renaissance period was full of artistry in many ways, not just the works of Michelangelo and Da Vinci. It seemed to have carried over to vessels of most, if not all, seafaring nations including the two you mention. Whatever the reason, it is a wonder to see. Even the carvings on the contemporary models continue to amaze us. Allan
-
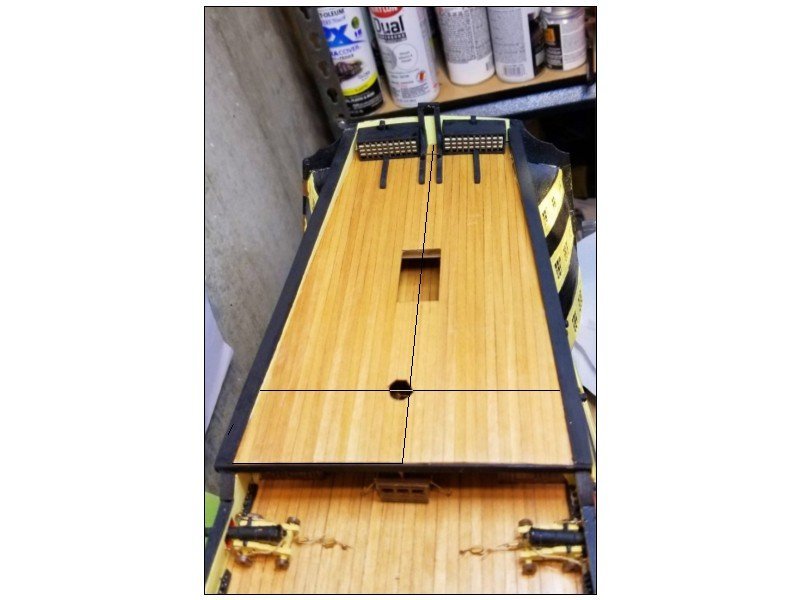
David, The deck planking looks great and at 1:72 it is sooo nice to NOT see oversized and obtrusive treenails. Very nice work! Probably the camera angle in the pic, but is there something amiss with the alignment of the openings in the deck? Allan
- 218 replies
-
- 1
-
-
- Victory
- Caldercraft
- (and 1 more)
-
How was a ship's launch boat prepped to sail?
allanyed replied to Peanut6's topic in Masting, rigging and sails
Great points across the board Roger. The only one that MAY be a problem is not taking the removable thwarts as then rowing at those stations would be problematic. I suppose the odd cask or other jury rig could be made, but an interesting point either way. Allan -
I thought that might be the case. Nothing wrong with taking things into your own hands, so to speak. Your build log continues to be a joy to follow. Allan
-
Hi Yves The drawing from AOTS that you posted shows the rudder taper which was pretty normal. Does the kit and/or the book show the taper of the knee of the head from the stem moving forward which reduced by about half? Thanks Allan
-
If you look at the shape of the garboard strake on a plank expansion plan it may help you to shape the strake. While it tapers along its length in some cases, the key is for the forward end not to go too far up the rabbet at the stem. One example is https://www.rmg.co.uk/collections/objects/rmgc-object-83495 The upper is the ceiling planking and the lower is the hull planking. Allan
-
Your following the tutorials for planking has resulted in one of the finest planking jobs in the kit build logs here at MSW. It can serve as a lesson to others that no one is relegated to using the erroneous methods shown by some kit makers where many the planks fail to end at the rabbet as they should. With this being your first build, the build log is even more impressive. Allan
-
Chimp, I agree that "artistic license" is a good term, albeit much too kind in some cases. Thanks for posting the drawing. Like you I would trust the research done by Marquardt in the AOTS book before the kit. Allan
-
How was a ship's launch boat prepped to sail?
allanyed replied to Peanut6's topic in Masting, rigging and sails
Kev, Your questions are great and I am very curious to see the answers posted based on contemporary information. If you rig your launch model as a double lug sail boat like it is thought that Bligh rigged her, I don't think there is a bow sprit about which to worry which would not be the case if cutter rigged. I have been unable to find a contemporary drawing or model, so far, of a lug rig with a sprit. Perhaps if there are any detailed contemporary plans and/or models showing the rigging up close, that would help get an idea on how things were done. I for one am very interested to see if there are any rigging plans based on contemporary information. Aside,,,, a golf buddy who works for BMW just spent two days driving three of the hottest Beamers around the Indy short track, full road course, and main track. He said it is really pretty country where you are and of course the driving was absolutely thrilling. Allan -
The Anatomy of Nelson's Ships book is fantastic and you are to be complimented for not using any information in the kit without verifying it first. But to know what applies and what does not would take hours of research to compare each item in a more complete book on rigging such as Lee's Masting and Rigging English Ships of War which covers a range of sizes and years. With the investment in money and time you have already made, Lees' book is a worthwhile incremental investment to consider for this project and future projects. Allan
-
Welcome to MSW. What name would you prefer to be called unless Weedboy 11 is what you want. I am sure there is an interesting story there. 😀 You might want to consider writing a post in the new member section and give a little background about yourself. Welcome again, and good luck on your build!! Allan
-
What's a good kit for learning rigging?
allanyed replied to Mark m's topic in Masting, rigging and sails
Mark, Good for you on the first builds! I would consider investing in a couple books as well as vetting which model to buy to be sure of the kit accuracy and some "how to" advice. A quick start is to look at the build logs and see what the various kits offer. Check little things such as if the kit offers cheap string instead of miniature rope, realistic looking blocks, realistically scaled belaying pins, accurate belaying points, etc. Once you have narrowed it down, post here and ask for opinions. For details on actual rigging, Lees' Masting and Rigging English Ships of War is hard to beat. A lot of folks recommend Petersson's book Rigging Period Ship Models which unfortunately is limited in scope and gives no information on how to actually do anything. Then again, if you happen to be building a fifth rate vessel from about 1785, it will be very useful. For actual "how-to" practices, Volume IV of The Fully Framed Model series is helpful even though it is centered around Swan class vessels. Of course there are hundreds of pieces of great information here at MSW on how members do things that are extremely helpful for both what they have done that works and what they have done that does not work so well. Allan -
Thanks Clementine. Are these supplied with the kit? If so, does the kit give these items a name? Hal, you bring up a good point on the number of hammocks as two hammocks were issued to the crew members starting in 1804. Consideration should also be taken regarding which watch system was used as the three watch became the fashion in the 19th century. If 1/3 of the crew was sleeping at a given time there would be about 100 hammocks not in use, but the model shows 200. If you compare contemporary drawings and paintings, including the one above and the one at https://www.rmg.co.uk/collections/objects/rmgc-object-113120 at RMG, there is a vast difference with those from the kit. I go with the contemporary information based on the fact that the belaying pins in the kit are triple or quadruple the diameter they should be and the hammocks (if that is what they are supposed to be) much too small. Allan
-
Hi Clementine What are the white cylinders in the pic below? I thought maybe hammocks but there are about 100 of them on each side and the crew was only 65 plus they are about the same size of the belaying pins. There is something similar in the drawing from Darwin's Journal (1890 edition), but there are only about 25 on each side, so maybe hammocks in the drawing? Just curious to see what these represent. Thank you. Allan

-
The devil is in the details BE. I sometimes envy those that are not into the details as it alleviates a lot of frustration, but there is something positive to be said for the fun of the research into the little things. I just did a double check and you are right, I mistook a line that I thought was an additional spoke, my apologies. The sixth rate models that I found all have 8 or 10 spokes. https://www.rmg.co.uk/collections/objects/rmgc-object-66436 is one example. Allan
- 857 replies
-
- 2
-
-
- Sphinx
- Vanguard Models
- (and 1 more)
-
The ratlines look great. It is great to see the detail of having them end at the second shroud from aft except where every sixth went to the swifter when there was an odd number or aftermost shroud when there was an even number. Kudos! Allan
- 476 replies
-
- 3
-

-
-
- sphinx
- vanguard models
- (and 1 more)
-
David, Thank you for posting the silk information. Do they/you have these sizes in tan colors for running rigging as well? Tx!! Allan
-
Allen, I can think of no reason why it would be a bad idea to not use the same methodology. Allan