


allanyed
-
Posts
8,149 -
Joined
-
Last visited
Content Type
Profiles
Forums
Gallery
Events
Everything posted by allanyed
-
 For the future, consider that there was no rule that the butts were to be symmetrical on each side of the king plank. Planking was laid in either four butt and three butt shifts for the decks to assure the planking did all start or end on the same beams. There are diagrams showing this on page 58 in Goodwin's The Construction and Fitting of the English Man of War 1650-1850. Perhaps the American Navy did it differently, but for the British, the decks that were open to the elements were laid out in the four butt shift system, not the three butt system. Allan
- 36 replies
-
- 3
-

-
- Harvey
- Artesania Latina
- (and 1 more)
-
Super warm welcome from a bit SW of you. Allan
-
Nicely done Dlowder! Does the kit provide the parts for the gun carriages? The reason I ask is that among other oddities it appears the rear trucks are the same diameter as the front trucks rather than being a smaller diameter as they should be. Thanks Allan
-
La Palme by Tobias - 1:36 - POF
allanyed replied to Tobias's topic in - Build logs for subjects built 1501 - 1750
I was about to hit the like button, but had to make a comment. Your having started scratch building only two months ago and your success so far has been fantastic and your build log is a pleasure to follow! Allan -
Welcome to MSW Mark, glad to have you on board. Hopefully some member will have gone through this kind of scenario and can help. Have you researched paintings by Aldous, Turner, Crepin, et al that show this kind of thing? Not sure they would be much help, but maybe..... With the ships fighting and sailing, lines that parted would be flapping in the breeze along with the sail and very hard to depict on a model. I hope you succeed as I for one would love to see such a model. Where in Southern Cal are you? I had the pleasure of living in Orange County back in the day. Allan
-
Mark IMHO you have started with the best beginner kits available so have already jumped far ahead of the majority of ship modelers with minimal experience. Go with the least complex and work up as Chris has suggested, that is the fewer the parts the simpler the kit but still letting you gain experience without a lot of frustration. Allan
-
RMG Collections is a wealth of information. Cheers Allan
-
Hi Bedford You may be right about the little bit of knowledge as that seems to be the situation with some, not all, kit makers. But, based on the contemporary models and photos of others that I have seen, the plans in this case are correct. Most contemporary models that I checked out at RMG and Preble Hall do not show the top angled piece at the top at all, but those that do invariably face aft. Whether round or square the top pieces of the chimneys could be adjusted for the heading and direction of the wind. Interestingly I found no contemporary plans or models with the stack the way you show it but perhaps some other member can post a photo of a contemporary model or plans with the stack facing forward. Lavery goes into a lot of detail on the Charlie Noble (chimney) including their design and adjustments in The Arming and Fitting of English Ships of War on page 200. Allan

-
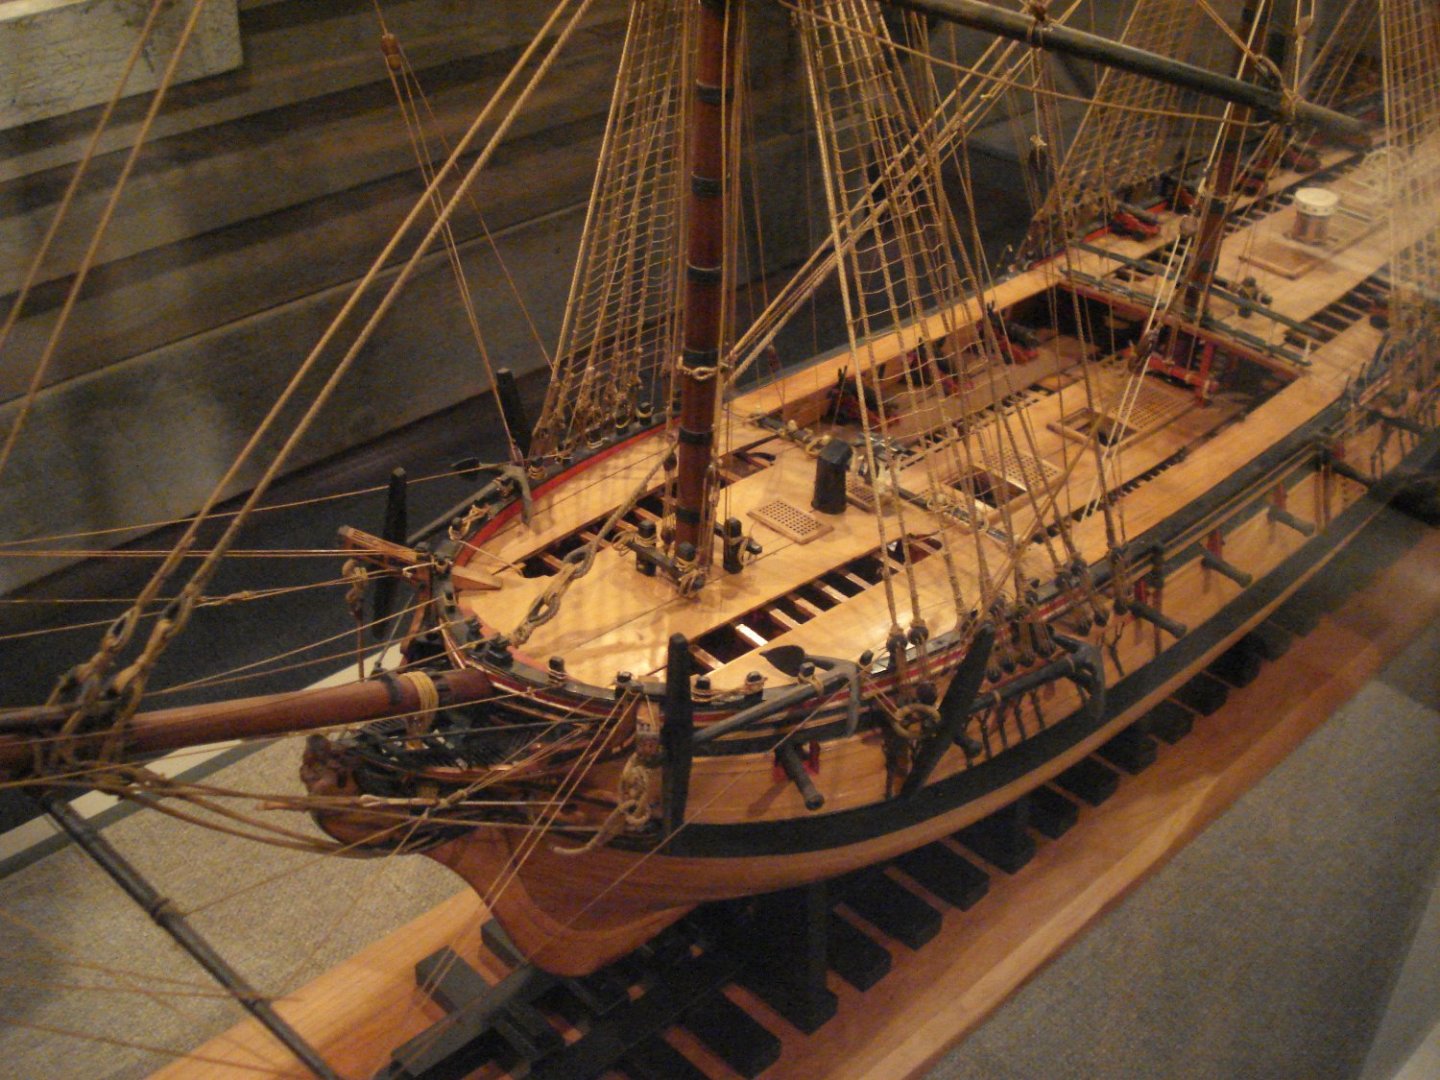
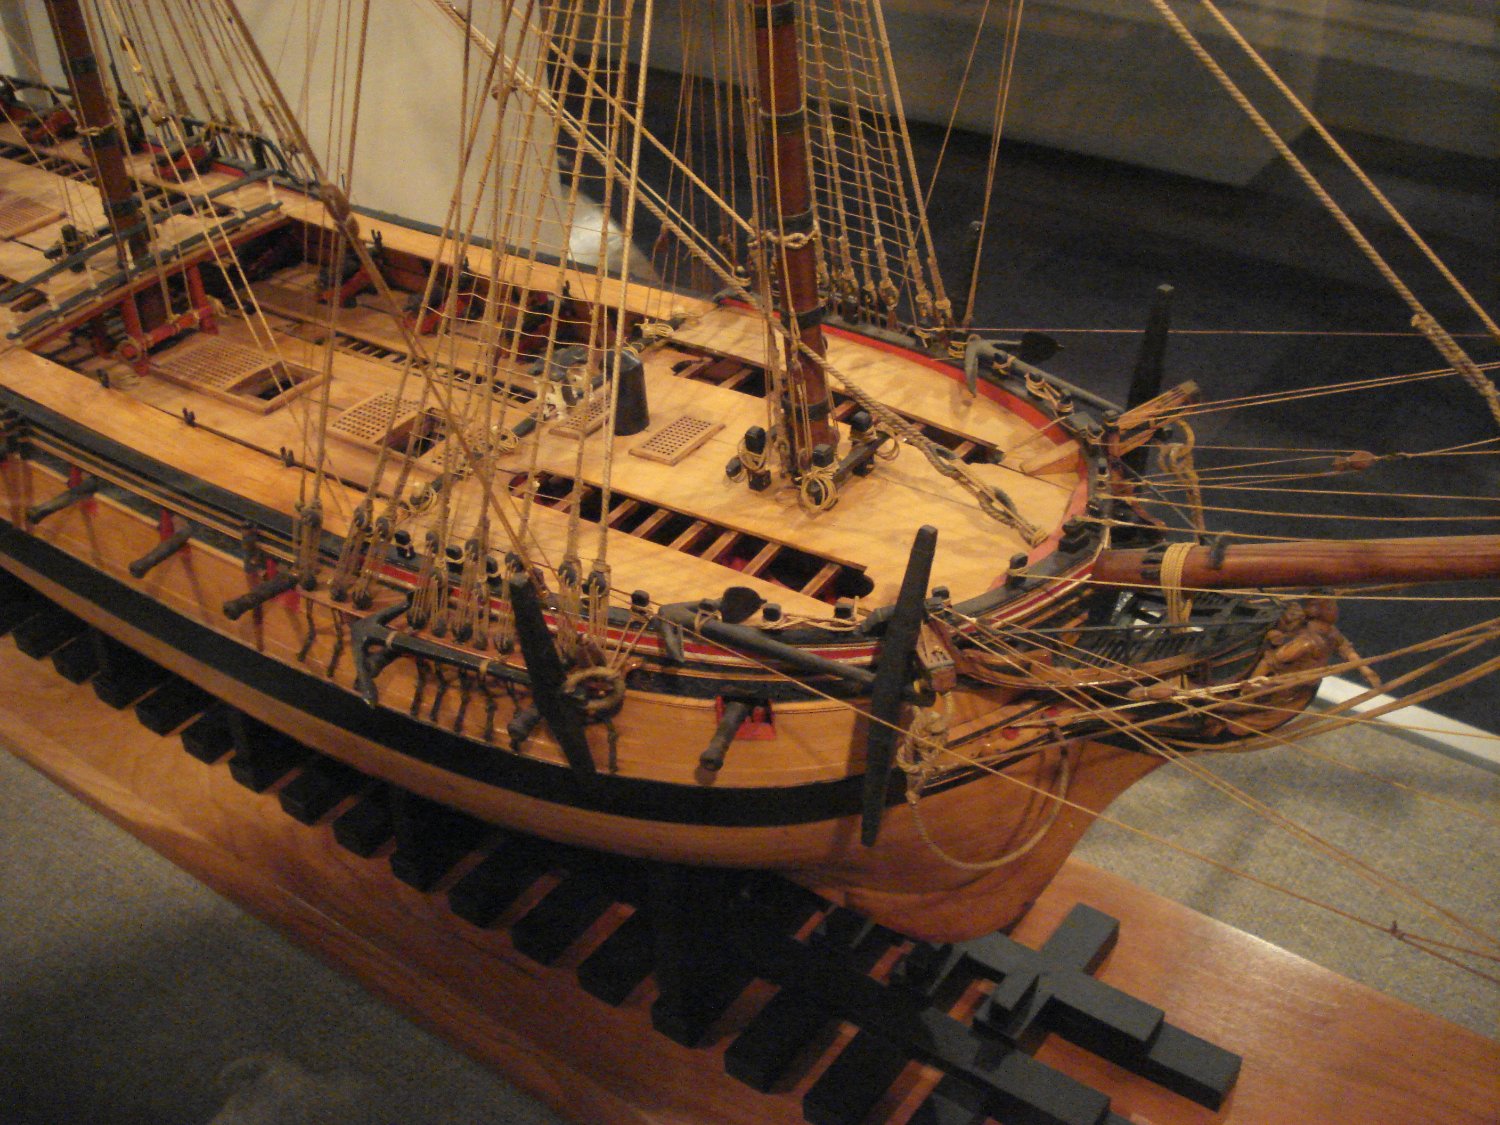
I have never had a problem using European boxwood, maple, or castello for the gratings, head ledges or coamings. I have gone to Swiss pear for the coamings and head ledges in lieu of painting them red on several occasions. Allan
-
This is great advice. You can also do this with initial clear coat spray to seal the edges before spraying color. One other thing that I learned from a lab techie when I worked for PPG Industries coatings and resins division ----do NOT ever start the spray on the object. Start next to, but off the item to be painted then move steadily laterally across the item and continue until you are PAST the item. If you start and/or stop on the object the spray will be uneven. Allan
-
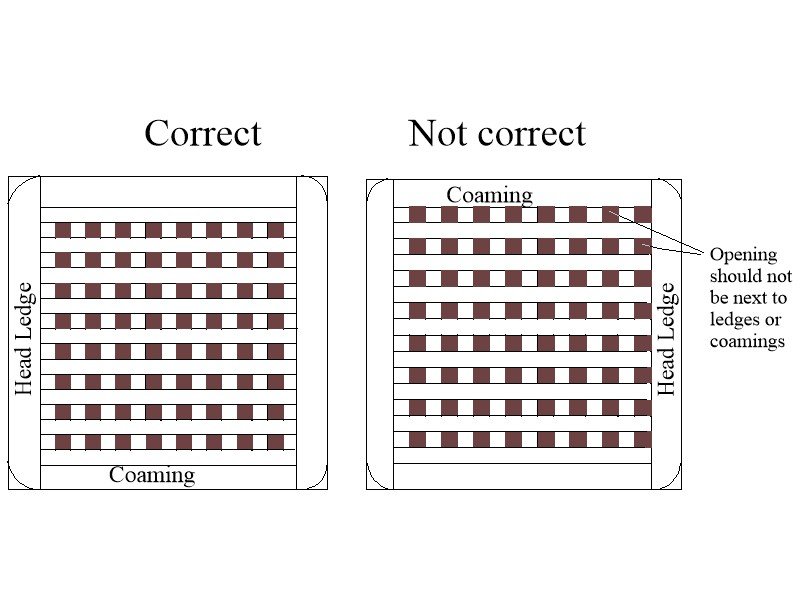
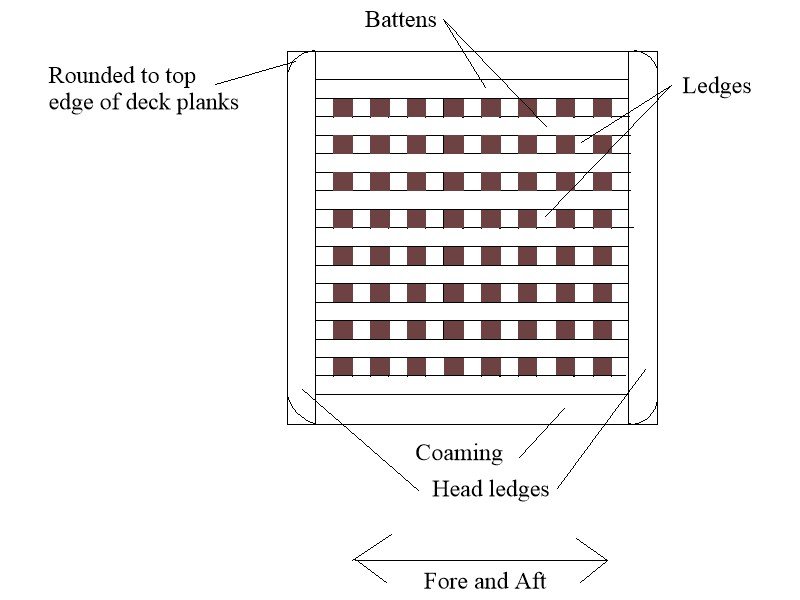
No matter the method you wind up using remember the gratings need to be solid on the periphery. This sometimes ends giving slightly different overall dimensions than the plans, so make the gratings first, then make the head ledges and coamings to suit rather than trying to adjust the grating dimension to fit into the coaming. Also, the battens should run fore and aft, not the ledges (not to be confused with the head ledges) Allan
-
An inexpensive hot air gun will speed up the drying process and I find it holds its shape as well or better than air drying. I THINK it has something to do with setting the elasticized lignan in the wet wood. There are far more knowledgeable members regarding the chemistry and the whys and why nots on this. Wood of course swells so gluing it before it is completely dry is problematic as it will shrink as it dries. Allan
- 66 replies
-
- 2
-
-
- 18th Century Armed Longboat
- Model Shipways
- (and 1 more)
-
Great thinking, as none of us are immune to a failed attempt or two or fifty on any given project. Sometimes it is better to rip it out and go with a do-over, but sometimes a cover up is a lot more inviting. Allan
-
Love your thinking and attitudes! These go a long way, not just for youngsters like you, but even for us oldsters. If you are ever in SW Florida, lunch is on me. Allan
- 129 replies
-
- 1
-
-
- Bounty Jolly Boat
- Artesania Latina
- (and 1 more)
-
Kev, Just a general comment. Your stick to-itiveness has been great to see and you have made a very nice model especially considering what you had to work with. I imagine this project has been a great learning experience and I hope to see you follow up with a new project when this one is complete. If you do go with a kit, caveat emptor, there are two or three really good kit makers and a lot that are pretty awful as you have seen with this project. Allan
-
Welcome to MSW Nemo. For a first build you are to be commended, especially that you studied the ship and building techniques and learn from any mistakes. A few kit makers have really done their homework so kit bashing is not really needed to a great extent, if at all, but there are many others like yours that will require a lot of design and material changes depending on your interests. It is a never ending learning curve so enjoy the ride! There are many of us that are well into a half century of model making and we are all still learning something new on a regular basis thanks to the many members here at MSW. Allan
-
Bedford, Very neat work, congrats. For the boats, there are contemporary drawings, many in high resolution, of ships' boats on the Wiki Commons site. https://commons.wikimedia.org/wiki/Category:Ship_plans_of_the_Royal_Museums_Greenwich There are also pages of text, drawings, and scantlings in W.E. Mays' book that you may also find helpful. There is a used copy at Abe Books for $3 but shipping may be prohibitive. https://www.abebooks.com/9781840674316/Boats-Men-W-E-1840674318/plp Regarding the oars, the following is from David Steel. I am sure here were variations in these dimensions, but these might also be a helpful guide. Breadth of boat Oar Handle Loom Body Blade Loom Square Blade Breadth BladeThickmess Diam Lengths Inner Outer Inner Outer of handle Feet feet ft. in. ft.in ft.in. ft.in. in. in. in. in. in. in. 7-0 20 0-10 6-0 6-10 6-4 4 3 1/8 6 1/8 2 7/8 7/8 1 ¾ 6-0 19 0-10 5-0 7-2 6-0 3 7/8 3 6 2 ¾ 7/8 1 ¾ 5-0 18 0-10 4-0 7-6 5-8 3 7/8 3 6 2 ¾ 7/8 1 ¾ 4-6 17 0-10 3-6 7-4 5-4 3 ¾ 2 7/8 5 2 ¾ 7/8 1 ½ 4-0 16 0-10 3-0 7-4 5-4 3 ¾ 2 7/8 5 2 ¾ 7/8 1 ½

-
FWIW, the order (as far as I can remember) in which I built up my tool nest. Other than the first two, these came into the collection over a period of 30 years or so. Table saw (had this for other carpentry work as well) Scroll saw Mini table saw - An oldie but goodie from Micro Mark, but one of these days will get a Byrnes Mini drill press Planer Thickness sander (Byrnes) Lathe Mill The mill was added in the past year or so as I used the mini press for years. Mill work is NOT for the drill press as the bearings are not set up for lateral forces, but when you have a budget, you do what you must. I had a band saw that was rarely used and is long gone. Coping saw, chisels, scalpels and all the usual suspects will suffice in a pinch, it is just a matter of taking more time as Druxey points out. Allan
-
Hi Ken, is the line on the davits holding your boat from the kit? For the future, keep in mind the planking on the boats was similar to that on the ship, that is, the strakes were tapered and end at the rabbet. For the oars, Steel gives dimensions of the parts of the sweeps and oars for various size boats that you may find interesting. Breadth of boat Oar Handle Loom Body Blade Loom Square Blade Broad BladeThickmess Diam Lengths Inner Outer Inner Outer of Feet feet ft. in. ft.in ft.in. ft.in. in. in. in. in. in. in. 7-0 20 0-10 6-0 6-10 6-4 4 3 1/8 6 1/8 2 7/8 7/8 1 ¾ 6-0 19 0-10 5-0 7-2 6-0 3 7/8 3 6 2 ¾ 7/8 1 ¾ 5-0 18 0-10 4-0 7-6 5-8 3 7/8 3 6 2 ¾ 7/8 1 ¾ 4-6 17 0-10 3-6 7-4 5-4 3 ¾ 2 7/8 5 2 ¾ 7/8 1 ½ 4-0 16 0-10 3-0 7-4 5-4 3 ¾ 2 7/8 5 2 ¾ 7/8 1 ½
-
I think the Caldercraft kit is based on the 1797 Cruizer Class. There is a wealth of information on Snake and Cruizer et al. There is also the revival series of the Cruizer class in 1828. Snake 1797 was launched as a ship sloop then converted in 1811 to a brig sloop. There are contemporary plans of Cruizer and Snake and others on the RMG Collections site that should help you. There are differences in rigging covering the years involved starting with the lengths and diameters of the mast and yards, and subsequently with the standing and running rigging circumferences. Lees information is probably the most accurate available barring contemporary rigging plans or model, but you can also go to the Masting and Rigging spreadsheet by Dan Vadas (RIP) in the Articles data base here at MSW. It is based on the Lees formulas except for the period of 1670-1710 for which period his figures are incorrect. If you do go with the kit, compare the dimensions on the spread sheet with the kit and see how they compare. Whatever you decide, HAVE FUN!!! Allan
-
Hi Rob, I would trust Longridge and McKay but the top view does not show how many rows, Four seems excessive compared to just one row down the centerline. As far as the railings, I would never trust Mamoli nor a few other kit makers without first confirming by checking contemporary based sources including Longridge and McKay as well as contemporary plans such as those on the Wiki Commons site and RMG Collections site. Thanks for sharing your build, it is delight to follow! 😀
-
Hi Rob, Do you or does anyone here know if railings. metal or otherwise, were set around the waist on Victory or any other ship other than now as a museum? I suspect these were installed due to modern day safety laws and fear of lawsuits. So far I cannot find one contemporary model with a railing around the waist in the Preble Hall collection or the RMG collection. Same for the pillars under the skid beams. I have seen some contemporary models with single row on the center line but never four rows. Am I correct in that these are from the kit instructions or are they from the contemporary plans? As an example there is a high resolution inboard profile on the Wiki Commons sit of Glory 1788, a 98 gun ship. The plan shows the pillars for all deck, but there are none in the waist area. A portion of the plan is below. Thanks Allan
INBOARDPROFILEmidships.thumb.png.f5c4d9f9bcc07807bbcb9491ed3b7eed.png)
-
Yeah, Every time I pick up my HMS Snake I get discouraged a bit as well. Lots of scratch built replacement's and aftermarket parts needed. You've done well despite the kit's limitations. If you aver feel like building another ship model look at some of the Vanguard kits. They have much better instructions, parts, and wood. https://vanguardmodels.co.uk/ Love the honesty in both your posts. Fortunately there are several great kit makers that save the day. Hopefully other members will give honest opinions about both the kit makers that put out a great product like Vanguard and as well as those that put out kits that barely resemble a real ship. Allan
- 1,144 replies
-
- 2
-
-
- snake
- caldercraft
- (and 1 more)
-
Good morning from the banks of the Ohio River
allanyed replied to Mike James's topic in New member Introductions
Welcome aboard Michael. Thank you for that great introduction. Allan -
Sluicemaster Bravo on the third layer of planking!!! It is a delight to see planking done properly. Mike, I have spiled castello and other hard woods that are as much as 0.17" thick with no problems at all. Using the method in the articles data base here at MSW on spiling planking and/or using the methods in the videos prepared by Chuck Passaro on You Tube work like a charm. Allan


INBOARDPROFILEmidships.png.6dd039b4d9e6a6dab5dabe6472e05a96.png)