kruginmi
-
Posts
629 -
Joined
-
Last visited
Content Type
Profiles
Forums
Gallery
Events
Everything posted by kruginmi
-
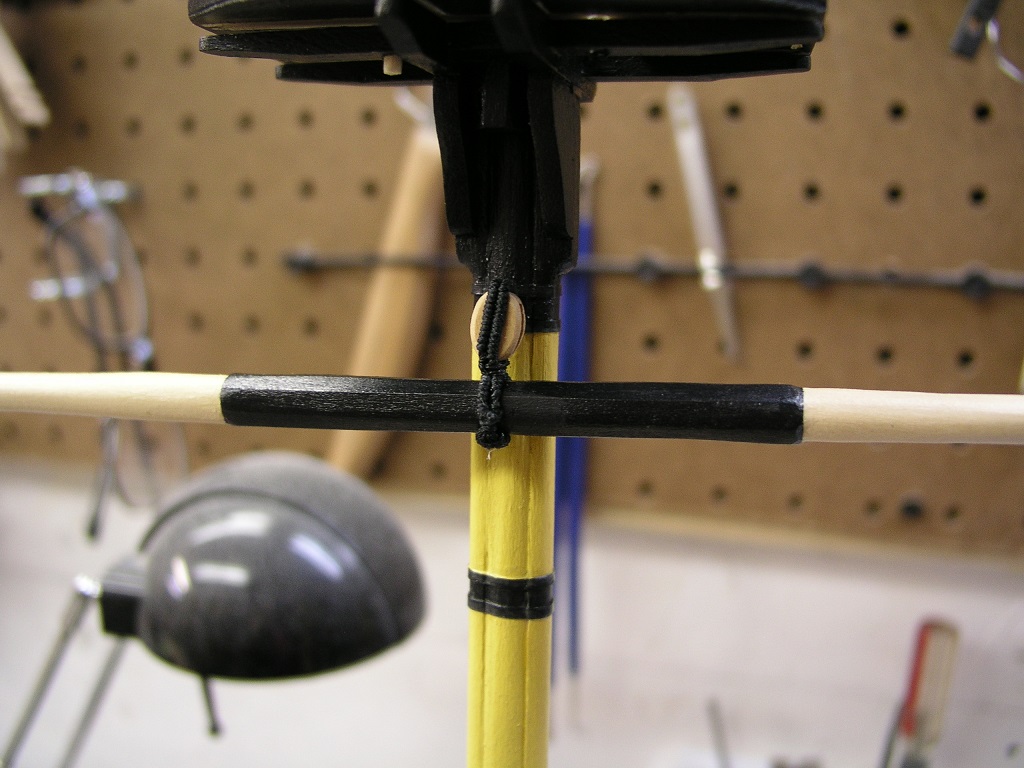
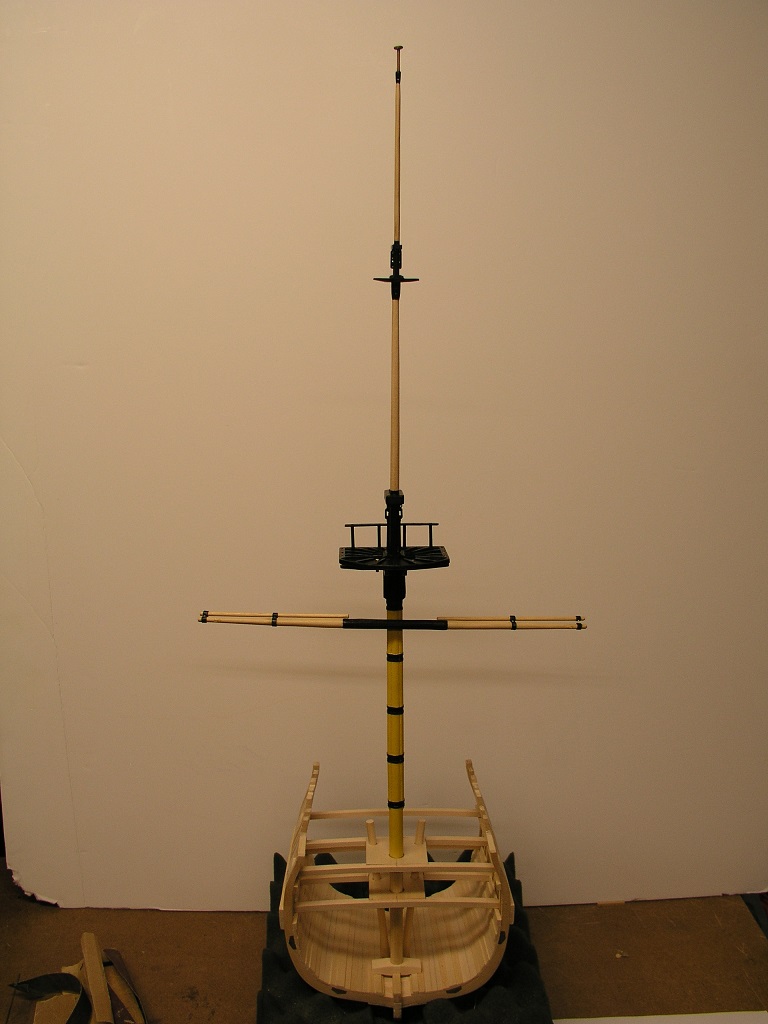
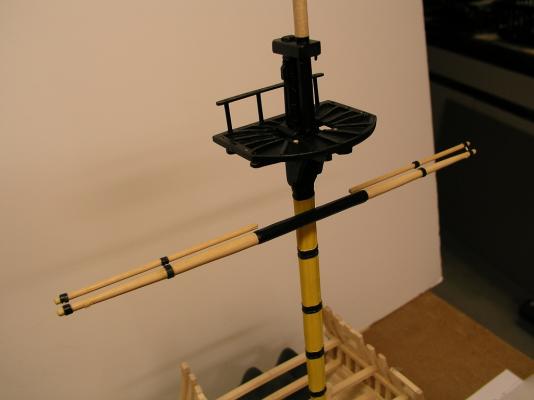
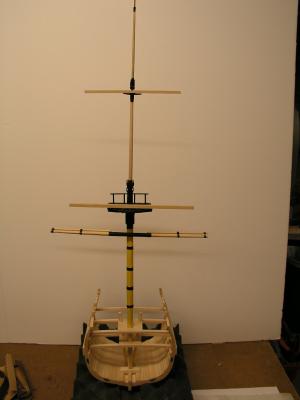
 With the deck starting to come together I opted to tackle the Mast / Deck area next. The kit envisioned a very pain affair (pic 1). This would never do. So after marking the angle of the deck on the mast, also the required height required for the lower boom it was off to the races for adding the basswood addition. The mast was cut into a rectangular area where the connection area was and basswood pieces glued in (pic 2). After shaping the basswood to insure a snug fit to the deck (quite a rake to the mast) I then measured the mast wedges and removed the wood to allow the wedge pieces to be introduced (pic 3). After some initial shaping and refinement the mast was test fit and the effect verified (pic 4). I think some additional thinning could be good but overall a good couple hours of work. Now for the foremast. For the eagle eyed people out there, the question must be waiting to be asked: "Why wasn't the boom shelf added above the new additions prior to these being glued in?" Excellent question / point. As soon as I figure out how I will get that done I will proudly state why I did it that way - LOL. Stay Building My Friends - Mark
.JPG.fab6796498273a1d585a03ac5bfb5292.JPG)
.JPG.184d12d13a59b31c46e3d754a11227fa.JPG)
.JPG.bfc89dfbc2675620fcc833e889493e68.JPG)
.JPG.6b6b3d6e631d4b3d1e16648231510184.JPG)
- 128 replies
-
- 5
-

-
- artesania latina
- Finished
- (and 2 more)
-
First up was the main cabin. I had a couple previous attempts that never quite fit the bill. Being the Captain (and not replicating a specific ship so naysayers handcuffed) I mulled it over and jumped in. A couple of hours later and I stand back to a finished piece. I opted for the sliding top with a panel that slides up and out to reveal the stairwell. A couple of 1/48 friends have joined the build to insure everything works. All the deck furniture is still removable. Next up is to get stuff nailed down. - Mark
.JPG.23193959ad91136600de91a0ca6c1673.JPG)
.JPG.9539aac328a5be9fc2c48d99fea65a29.JPG)
- 128 replies
-
- 6
-
-
- artesania latina
- Finished
- (and 2 more)
-
A little over a year, not too bad. The workshop is reconfigured and the Lady Anne finds itself once again on the bench. It took awhile to find all the bits (including those new belaying pins) but I think I am back to the status quo. Deck house undergoing major redo (very little is glued). Accounting for over a 100 deck tie down requirements (not counting belaying pins). The second image identifies these points are cross references to the procured Pride of Baltimore plans upon which the rigging will be based on. Excited to get back at it. I can't predict how much time will be available but someone has said the wood always waits, and that has been proven many times. Time for that deckhouse Stay building my friends, Mark.
.thumb.JPG.9d31438ee189d09a1b06601e0083de5e.JPG)
.thumb.JPG.02076fdaba52fb04902889e99eefb560.JPG)
- 128 replies
-
- 6
-
-
- artesania latina
- Finished
- (and 2 more)
-
Well this has come back from a time gone by...... The kit still waits in the stack. I have been pulled away from the hobby the better part of this year (still a lurker). Nils - it is not a waterline kit. There are some pretty thick hunks of of balsa under this plate for use on the bottom curve, however, it is however still pretty flat on the keel. I have purchased a plastic model of the Jeremiah O'Brian for pondering the changes required for a build as a liberty ship but I need life to settle down a bit (still 4 of 6 kids at home, two of which are teens). Also have the Druid Cross Section, the Lady Anne Baltimore Clipper Ship in process. Some day, some day. Not too much out there on the build of this ship. I really appreciate the look and comments. Stay Building My Friends, - Mark
-
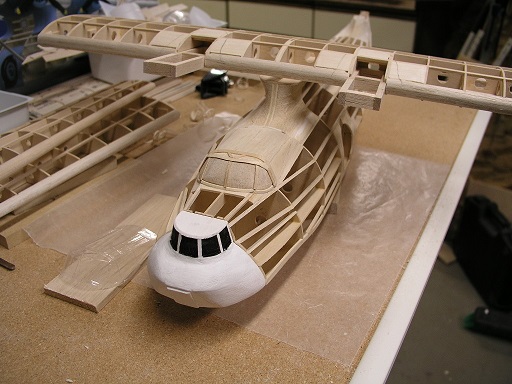
Last statement on the PBY (to avoid the moderators 'Eye of Sauron' - hah hah). It is a Guillows series 2000 static build - no flight. Of course heavily kit bashed (and thus improved IMHO). Like the plastic nose section has been replaced with a scratch wood replacement. The wife said she didn't know of enough vertical surfaces to display the ships so I went horizontal. It will be covered with silkspan. Mark
- 172 replies
-
- 3
-
-
- druid
- sloop of war
- (and 2 more)
-
Hey, still alive (hah, hah). Still very much intend on finishing this (as well as multiple other projects in the future). I have been slightly side tracked lately with another project (still nautical though!) (and still wood!) - a PBY Catalina float plane. 45" wing span. The ship waits patiently. I have become a lurker lately. Thanks to everyone for their progress shots that keep the creativity fires burning! Mark
- 172 replies
-
- 10
-
-
- druid
- sloop of war
- (and 2 more)
-
Could you provide more details on how you approach 'splicing' two served lines together? I am looking at your shrouds over the mast. Thanks in advance, Mark
-
I still would ask that you give some progress shots. New year, new wood, new skills. Glad to see you hadn't dropped off the Earth and the drive is still there. Great story on your grandpa. I am sure his reaction was fantastic. Say thank you for his service (especially in torpedo bombers!). Mark
-
I love seeing these type of subjects. I will definitely be following along. Mark
- 641 replies
-
- 3
-
-
- greenwich hospital
- barge
- (and 1 more)
-
So many plans, so little time.....I finally forced myself into the workshop in a little break (who needs sleep) to accomplish something. This something was to start the rigging. I have attached the jeer block with a served double strop. As usual, the black on black on black tends to obscure all that hard work, but I know it is there (we won't mention the sail that will eventually obscure most everything else): Pretty proud of that. I also was able to get the two sections of line served for the quarter blocks: Hoping for tomorrow to get both of those also set up (no promises). Stay Building My Friends, Mark

- 172 replies
-
- 10
-
-
- druid
- sloop of war
- (and 2 more)
-
You seemed motivated going into 2016. I try not to compare to my progress! Looking great Mark
-
While we are on the subject of improvements......your workspace is WAY too clean. If my wife was to catch a look she would draw an obvious comparison to my space (with me on the negative side). Please, throw some random tools / wood / clamps around for my sake (at least when taking pictures). Humbly, Mark
-
Since I am the source of the 'issue' I feel I must respond. As always, the ultimate decision is yours being the captain. My input would be to leave the foremast alone. Maybe look at trying to trim some of the nubs closer (if possible). The foremast will be consistent to itself. Once you add all the running and standing rigging I doubt if 99% of anyone looking at the ship would even notice the difference. Even if they do, you can just talk about evolution of a ship modeler and leave it at that. Sorry about the incident. These shrouds are your line in the sand. Keep at it, the result will be / is fantastic. Mark
-
John, you are very kind. I still do smile when I walk past the model in my house. Funny thing is revisiting this build album. There are several pics where I am left scratching my head and trying to remember how I did that - hah hah. As I tell visitors, it wasn't a build of a ship - it was hundreds of builds of hundreds of items that put together, made a ship. Looking forward to what tomorrow will bring. mark
-
Wow, Patrick. Great progress. Love your innovative approach for building. Happy New Year, Mark
-
Yes, John for the Magnus Hitch I was referring to both ends should end up on the inside (if you have the Ashley book of Knots, my go to source, it is #1736). I am coming up on my first true set of ratlines. Looking forward to the challenge! Probably be hitting you up for some sage advice when I am under way. Also a safe and prosperous New Year to you and your family. Mark As for the 'Bama remark, I am a Univ of Mich Alum so we had some gator for dinner. I do wish the MSU game was closer just for better watching but the tide sure rolled in on that one!
-
So, did you count how many knots you have done (hah, hah). If you decide to redo the futtock shrouds with smaller thread may I offer a suggestion? Use the smaller thread on the main mast and see how it looks. That way, if you decide to keep it as is you do not have to redo all those knots. As a side note: Are you aware of the magnus hitch? For the ratline ends, it makes the cut off line end point back inwards for a cleaner look. Looks great, shows a lot of dedicated work! Mark
-
I can just imagine what you were thinking as it dawned on you what you had. So sorry. Hoping you get it put to right quickly! (and without cost!). I would also be scouring Ebay for partially built / incomplete kits to save $$ and get some extra parts. I wish I could help (I do have 3 Revell full size Constitutions!). Mark
-
Thanks Patrick. A little spurt of energy / progress here and there. Probably no tri's this year, focusing on getting this and the other projects in the work shop OUT of the workshop: a case for my Swift, completing my Lady Anne, Billings Boats Regina (wife picked), my Dad's Revell Constitution, restore my Dad's Mayflower, and others. Whew. Might be two years..... I do feel a weight off my shoulders with the paint straightened out and the rigging process (supplies and procedures) straight in my head. Now to get the two other yards ship shape. Mark
- 172 replies
-
- 4
-
-
- druid
- sloop of war
- (and 2 more)
-
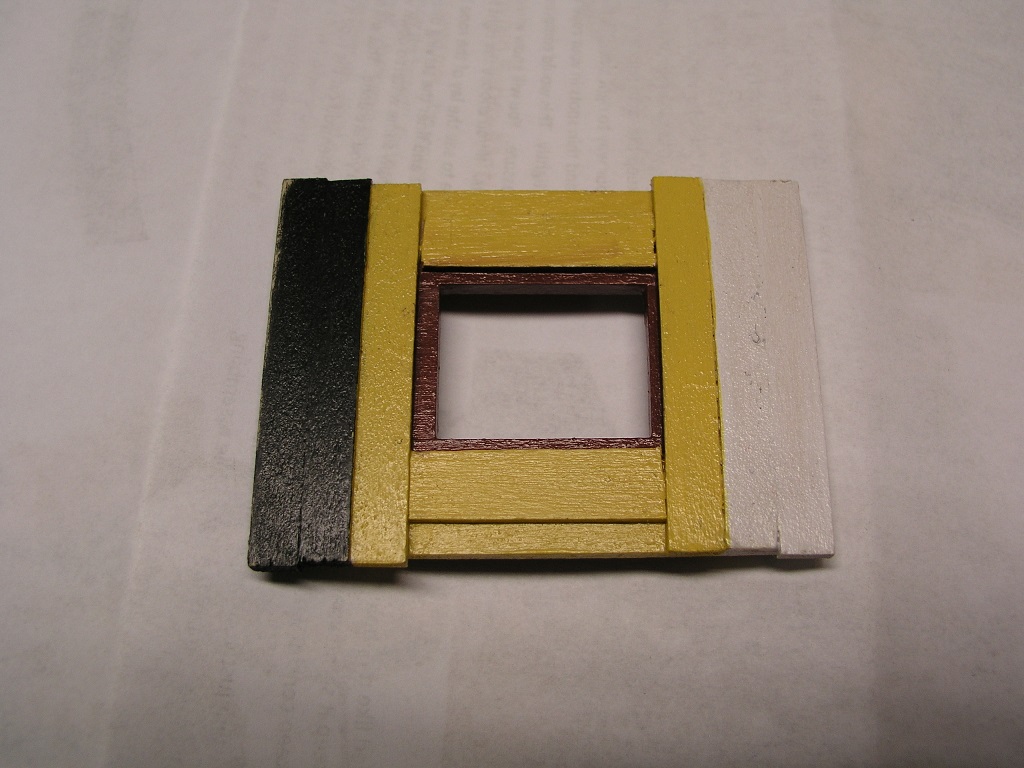
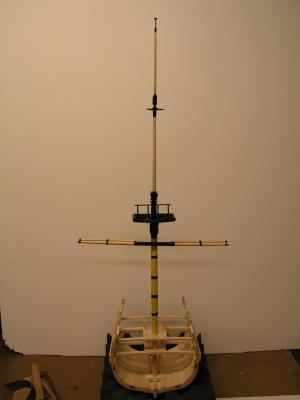
With the painting decisions made it was time to take the plunge. After many trips to the workshop and back for the many coats I am quite pleased with the result. The yellow is quite muted in the photos, seems a little more yellow in person: I intend to keep the outer yards as well as upper masts in the natural wood color as is shown. As a side note, most everything you see can still be disassembled. I also did a raw cutout of the remaining two yard arms which still have to be shaped: Looking forward to serving some strops and trying out this rigging thing. I do have to get back to that hull eventually..... Mark
- 172 replies
-
- 11
-
-
- druid
- sloop of war
- (and 2 more)
-
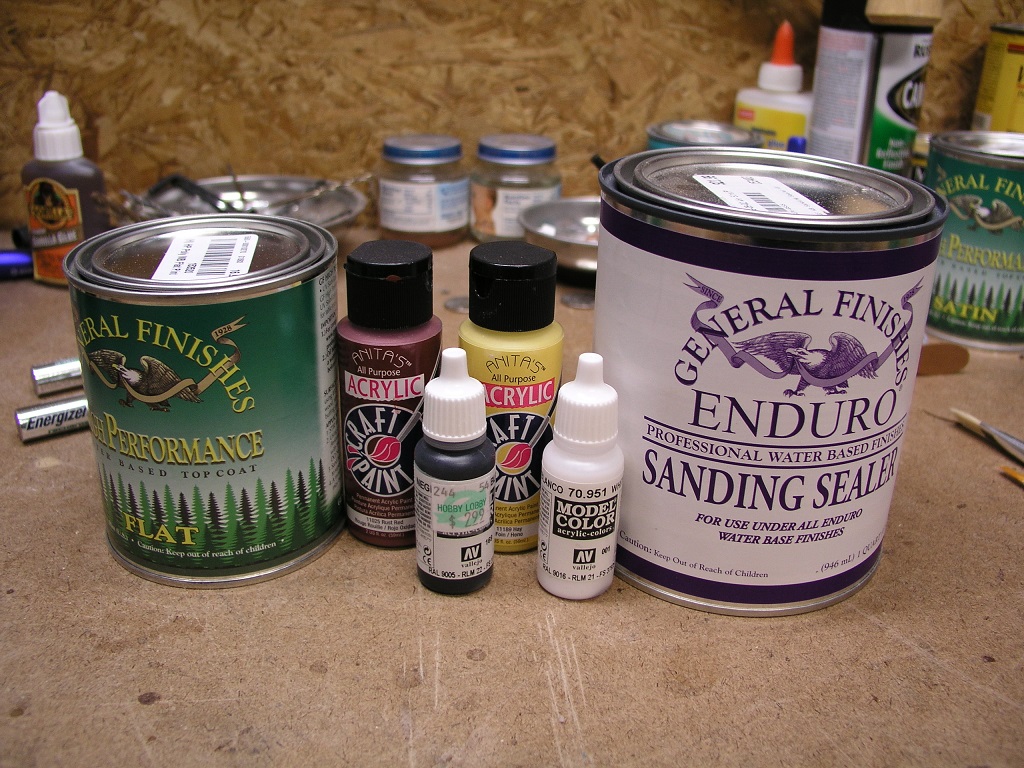
With all my tests this is my palette for painting the Druid-X (all wood is basswood): A nice sanding sealer, acrylic paints and then a top coat. I originally chose a satin coat but that proved way too glossy over the paint. The flat looks great, but the camera shot still looks a little shiny. I used both off the shelf 'craft' acrylics and more expensive ones (model colors). I used generally three coats for each. Coverage seemed good for all. I did some light sanding after the applying the sealer. Tomorrow I actually put brush to my mast and main yard arm. Hoping it meets my expectations. Mark

-
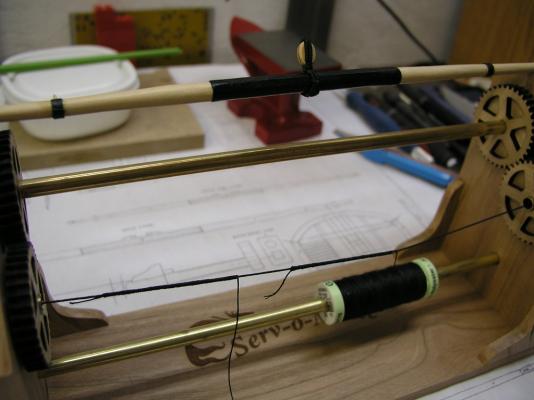
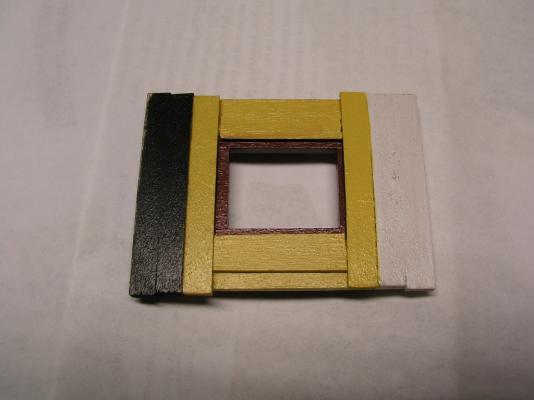
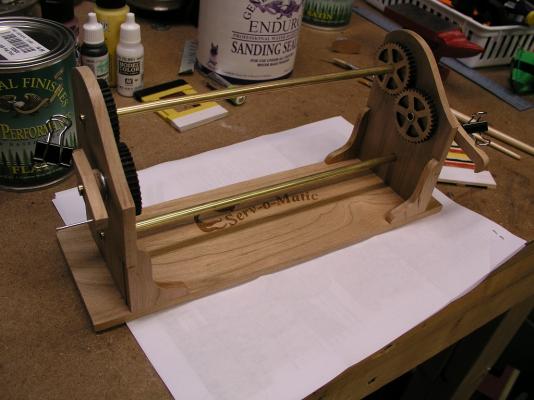
I have been doing several samples and think I have finally hit upon my solution set for the Druid-X. First off, my palette: I use sanding sealer prior to the acrylic paints, topped off with a top coat. My original thought was a satin top coat, but that proved a no go. I used a flat and that seemed to do the trip, though the camera shot shows it with a more of a gloss than it does. The white will be the lower hull (no copper), black for the wales and yellow for upper hull and lower masts. The red is a darker one that I like (no historical research here, just something I found). Finally, being able to paint the masts and yardarm the next step will be rigging. How will I get those lines nice and served? With my new Serv-O-Matic of course: Tomorrow is them treating the main yard and lower main mast. Mark


- 172 replies
-
- 9
-
-
- druid
- sloop of war
- (and 2 more)
-
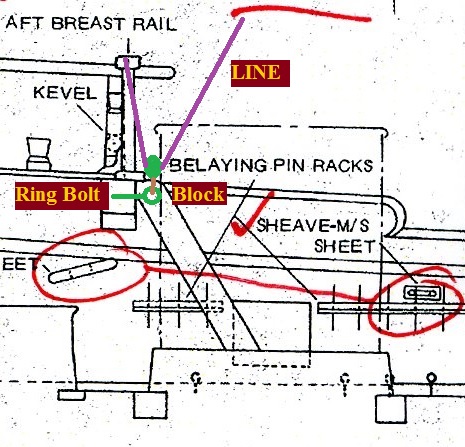
Quarter Deck Railing composition for rigging lines
kruginmi replied to kruginmi's topic in Masting, rigging and sails
After much thinking, egg nog and input from people, I have come to a decision....(drum roll).... I will be adding blocks affixed directly to the deck beam below the deck using ring bolts for those lines of concern (look at added green and purple annotations): The sheets, brace and two clewlines will incorporate these blocks, which equates to two blocks between each railing section. The single halyard will use a double block with the starboard mainsail clew line (though not present on this build). Happy New Year, Mark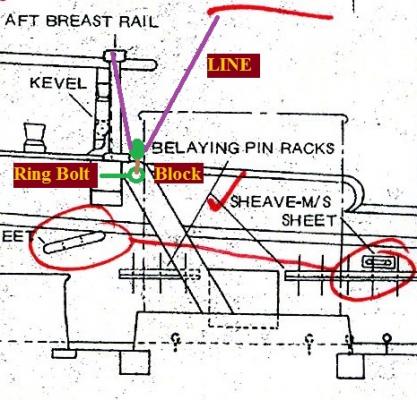
-
Quarter Deck Railing composition for rigging lines
kruginmi replied to kruginmi's topic in Masting, rigging and sails
The rigging plans referenced were prepared for the Smithsonian Institution by Merritt A. Edson, Jr. in 1976. This was for (I believe) a model constructed of the original Brilliant. Mr. Hahn did pull the British drawn conversion plans for his hull model plans and I have no idea if rigging ones also exist. Since it is a Frankenstein ship (a little it of this, a little bit of that) I am not too concerned about exact accuracy, if that is possible at all. This is an exercise in learning all things rigging and how to properly replicate them in scale for me. It is a good mental task to work through all of this stuff and not just accept anything drawn as unquestionable. Mark -
Quarter Deck Railing composition for rigging lines
kruginmi replied to kruginmi's topic in Masting, rigging and sails
Whoops - clarification. The plans shown are BEFORE the deck was extended so.....the railing ended up once converted by the British to be over the fore end of the cargo hatch shown on the plans (but still same size and shape). It would end just before the right side of the snippet shown. I believe the original questions are still valid. I am opting towards adding sheaves for the clews at the lower end of the stanchions. Mark
.JPG.b5ba5d3b249d7038bc0aee524076801f.JPG)
.JPG.0ccb61495f922f9b24e28e76c786ab34.JPG)