MORE HANDBOOKS ARE ON THEIR WAY! We will let you know when they get here.
×


kruginmi
-
Posts
629 -
Joined
-
Last visited
Content Type
Profiles
Forums
Gallery
Events
Everything posted by kruginmi
-

Quarter Deck Railing composition for rigging lines
kruginmi replied to kruginmi's topic in Masting, rigging and sails
Adding to the mix is that this is a deck 'add on.' The British added it upon purchase of the cargo ship to allow the installation of the capstan. They did add two new vertical supports that go through the cargo hatches directly below that support this rail. I will look at moving the mainsail clew lines or introduction of single sheaves just for their use. As for the belaying pins, the plans were for the US cargo ship as built in 1774. I just assumed they were appropriate for the period. Thanks for all the help! Mark -
Quarter Deck Railing composition for rigging lines
kruginmi replied to kruginmi's topic in Masting, rigging and sails
Thanks Henry. I somewhat agree however.....I am thinking (maybe my first mistake) that you add the 17 lines all together and it would add up. The plans seem to show nothing special, just use the belaying pins and only the top rail. I just wondered if there was something I was missing. Mark -
Quarter Deck Railing composition for rigging lines
kruginmi replied to kruginmi's topic in Masting, rigging and sails
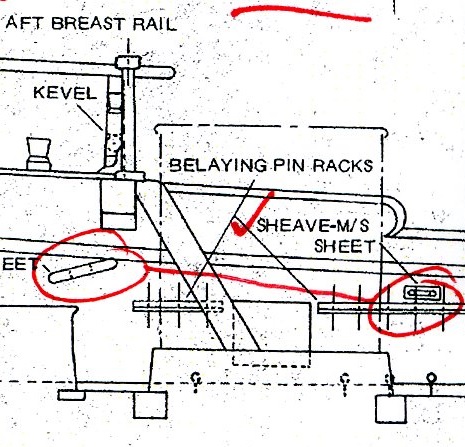
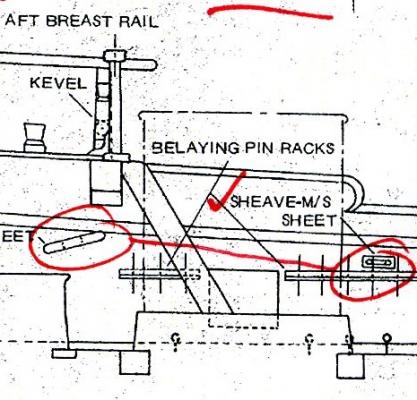
For some more of my source data. These are snippets from the Smithsonian plans for the original HMS Brilliant. This is referencing the AFT BREAST RAIL. You can see how small the posts for the rail are. Not even the width of the pin rail on the bulwark, and looks like not even the same thickness. Hard to believe sheaves are stuck to them. There is a little brace on two of the five posts near the base. The sheave illustrated for the kevel (on the bulwark) shows using a sheave is possible. Ho Ho Ho, Mark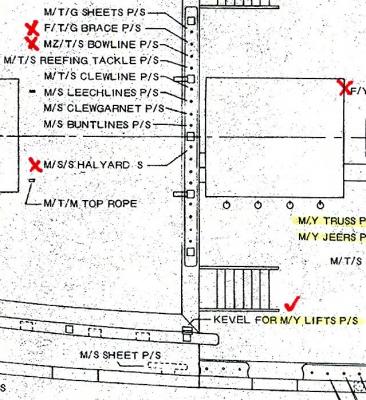
-
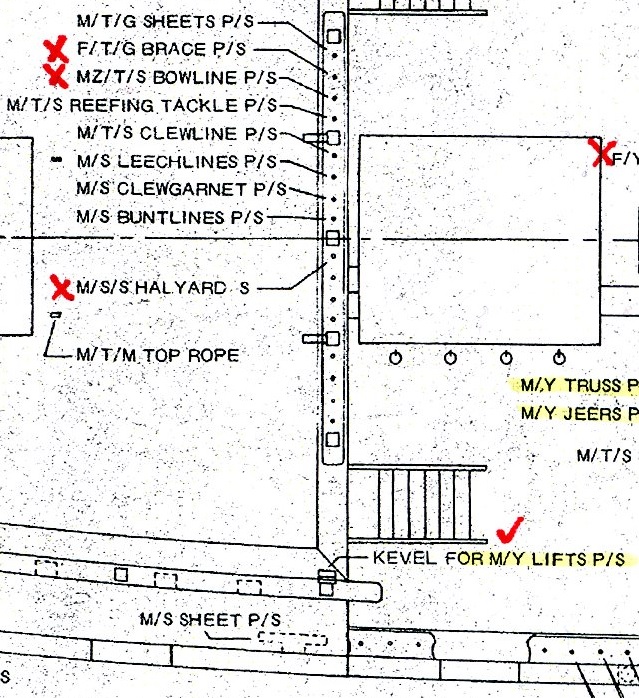
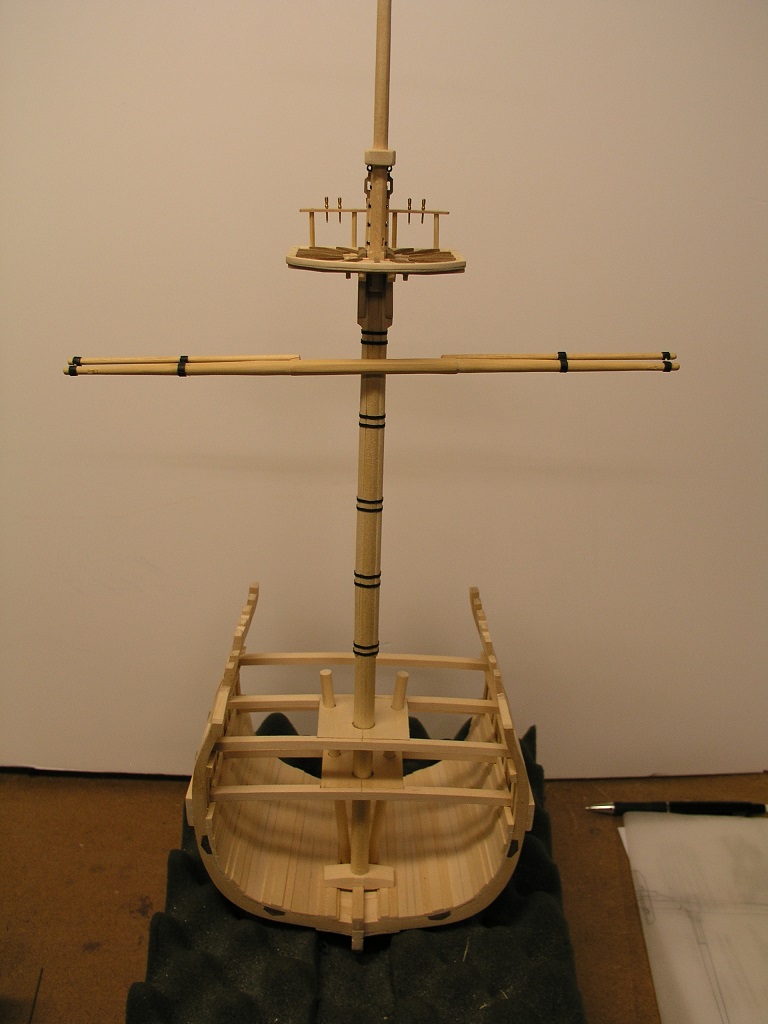
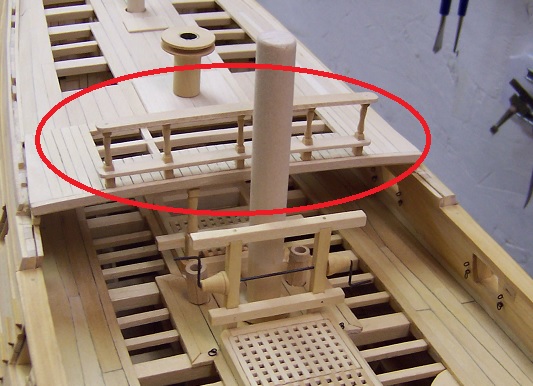
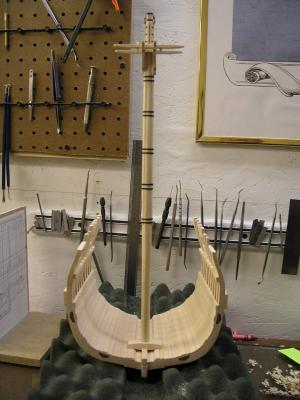
(Pulled this from my build log, seemed a more logical place to ask the question) A future problem to tackle involves the quarter deck rail (pic from full Druid mid-construction): The following lines are connected to this rail: 1. Mainsail clewlines 2. Mainsail buntlines 3. Mainsail Leechlines 4. Topsail Clewlines 5. Topsail reef tackles 6. Topgallant sheets The question is how? Per the plans this rail is not a real 'beefy' one. Tying them all just to the top rail would seem foolhardy given the stresses. Normally you would see some sheaves either attached to, or through the bases of each column but these rails seem too thin for that. At the very least belay pins seem in order (total 16, 4 between each post), but the runs of the lines are in question. With two lines per category (port / starboard) I currently do not have a firm decision. If I was rigging a full ship you would also add: 1. Mainstaysail halyard 2. Mizzen Topsail Bowline 3. Fore Topgallant Brace Any opinions? Mark
-
<<this question moved to the rigging forum section of this site>> Even though I have had little time in the shop, the brain neurons keep firing.... A future problem to tackle involves the quarter deck rail (pic from full Druid mid-construction): The following lines are connected to this rail: 1. Mainsail clewlines 2. Mainsail buntlines 3. Mainsail Leechlines 4. Topsail Clewlines 5. Topsail reef tackles 6. Topgallant sheets The question is how? Per the plans this rail is not a real 'beefy' one. Tying them all just to the top rail would seem foolhardy given the stresses. Normally you would see some sheaves either attached to, or through the bases of each column but these rails seem too thin for that. At the very least belay pins seem in order (total 16, 4 between each post), but the runs of the lines are in question. With two lines per category (port / starboard) I currently do not have a firm decision. If I was rigging a full ship you would also add: 1. Mainstaysail halyard 2. Mizzen Topsail Bowline 3. Fore Topgallant Brace Any opinions? Mark
- 172 replies
-
- 7
-

-
- druid
- sloop of war
- (and 2 more)
-
No, not the 'master.' Just another enthusiast with a similar passion. You haven't seen my waste bin! (or supply of bandages close at hand.....) Mark
-
Sounds like you did the right thing by pushing back for a bit. When things go south, they tend to do that in clumps. Hopefully some rest and renewed vigor will go a long way to setting things right (that and another couple of hours working the shrouds!). Sounds like you are doing the right things, so 'endeavor to persevere" (favorite movie quote) You do have quite the beautiful model. Ho Ho Ho, Mark
-
What about working plumbing? Do we get that also? (Once you see such detail, you have to ask.....). Ho Ho Ho, Mark
-
Thanks for all the looks and likes! This evening success breads motivation. So....I continued on with the population of the main yard arm: cleats and boom irons. I had thought long and hard about the stunsl booms. Carrying on the theme of the main mast I decided to try using black paper and mini-dowels for the irons holding them onto the main yard. I don't think they turned out too bad. Taking a step back I am definitely ready for that topmast yard. Mark

- 172 replies
-
- 11
-
-
- druid
- sloop of war
- (and 2 more)
-
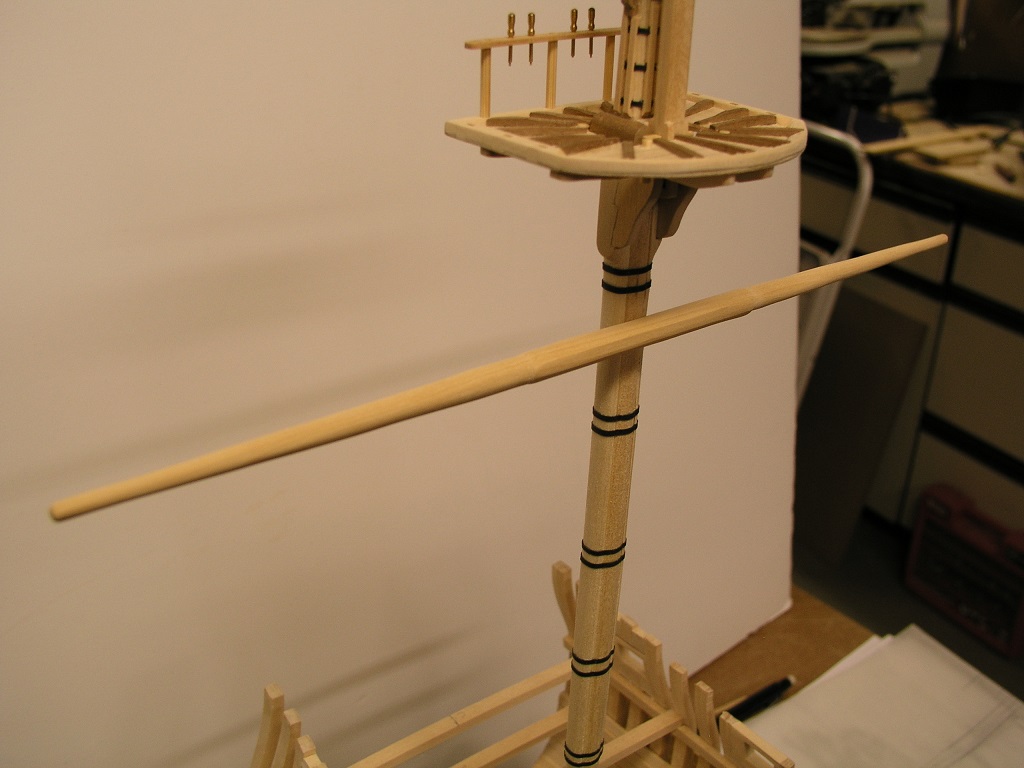
Before the Christmas parties at the house wanted to be able to show the model in its basic form so I moved onto the main yard arm: I used the process outlined in TFFM and don't think I will go back to dowels ever again. A lot easier to get the center 8 sided portion and tapering / rounding the remainder really isn't that bad a process. I still have the cleats and some final shaping but this week I aim for the topyard and topgallant yard rough ins. You can probably guess I have 'pinned' the yard to the mast. This ship will use a truss so all will be hidden. Ho Ho Ho, Mark

- 172 replies
-
- 12
-
-
- druid
- sloop of war
- (and 2 more)
-
Continental Frigate Hancock by wyz
kruginmi replied to wyz's topic in - Build logs for subjects built 1751 - 1800
This is a resounding YES - the admiral is the wife. (also the head of the procurement board) -
Continental Frigate Hancock by wyz
kruginmi replied to wyz's topic in - Build logs for subjects built 1751 - 1800
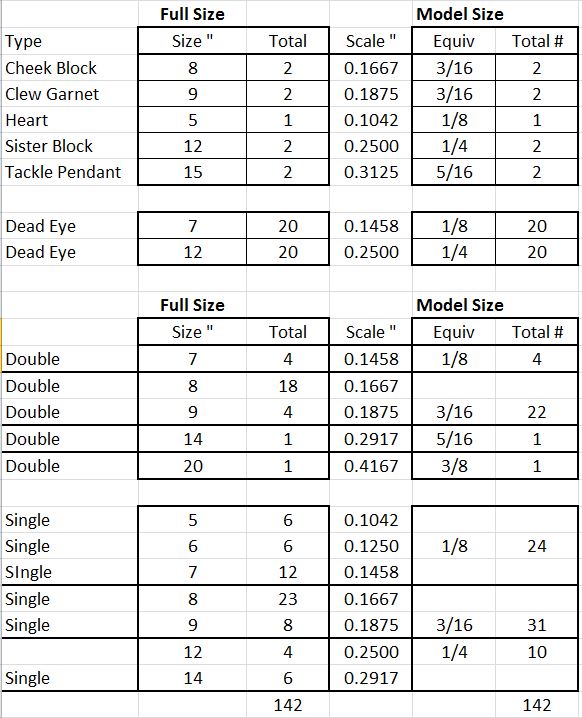
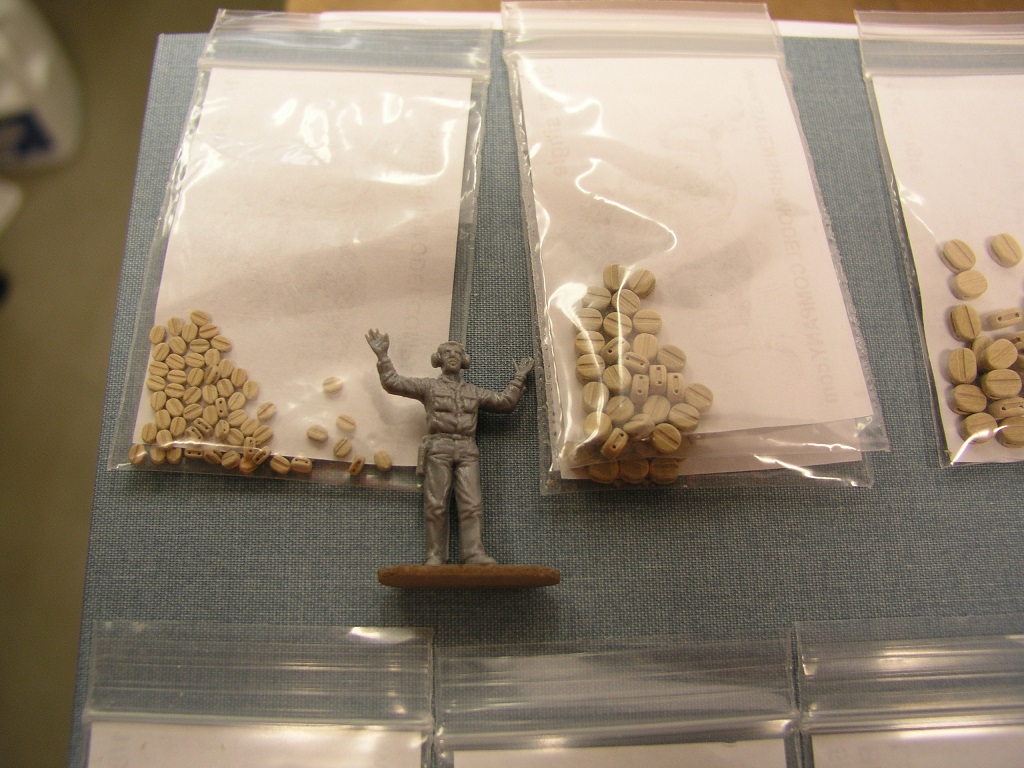
Tom, a point to consider. With my Druid I faced the same dilemma in space. I ended up doing an admiralty model first which is still movable and did find a space in the house. I am now working on a cross section containing the main mast which could sit on a mantle. I still will handle 71 types of lines and require 142 blocks. I am scratching the itch for me and making consideration for the admiral. Mark -
You have been busy! Very neat and clean. It is interesting how order emerges from the chaos. (and for my part usually descends into chaos again). Looks like you are truly understanding the runs of the rigging. The axiom I follow is to understand the why of the rigging. If you know the purpose of each line, your decisions on how to place will be correct. Keep it up, Mark
-
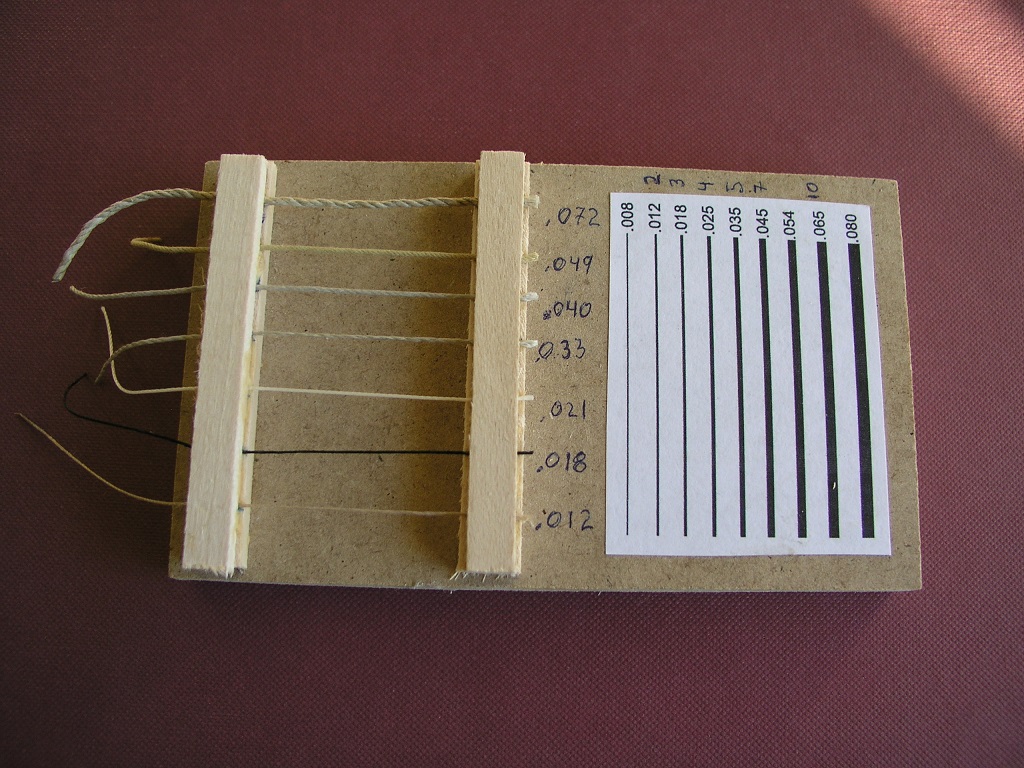
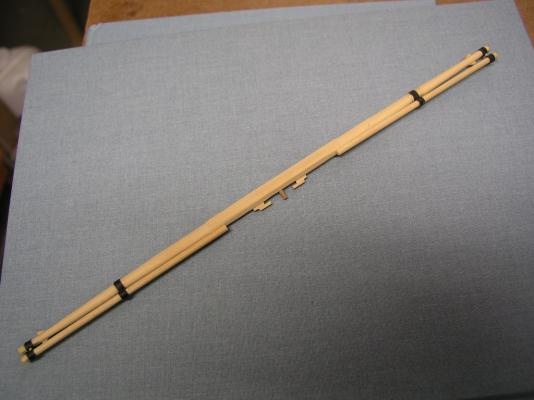
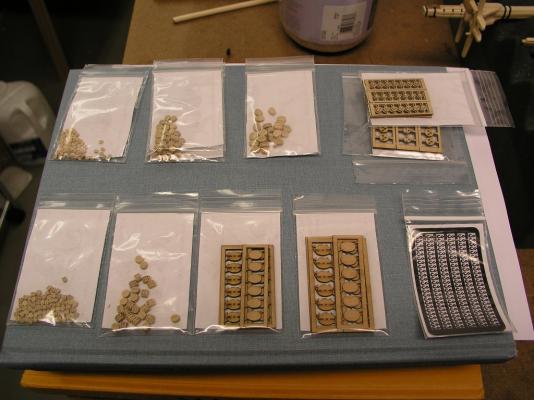
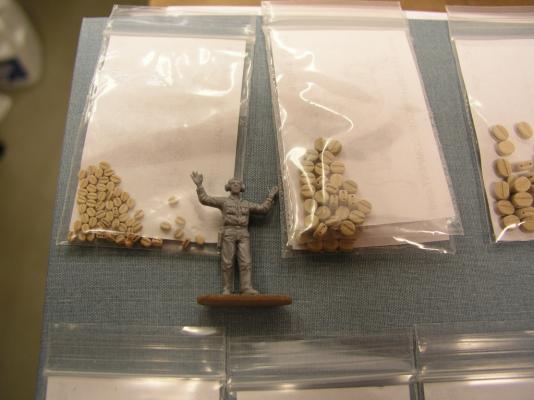
Sanity Check time..... I received my order of blocks for the Syren Ship Modeling Company and they were fantastic....but they stopped me in my tracks. (don't tell the kids, these are my Christmas presents from them) Accurate scaling is a big issue, especially with regards to rigging. Previously I have done kits and my base impressions in sizing are from those. Looking at the 6" blocks scaled down to 1/8" showed my brain had not wrapped itself around this correctly. There was NO way the rigging cord I had chosen would fit into that. I used a rigging sizing chart from Chuck and added some snips of line I had available that was sized and made the following rigging sizing tool (note: line not from Chuck). My goal is to have at least 3 if not 4 different line thicknesses. This showed that the rigging I had selected was more in the 5" scale sizing, not the 2" needed for those small blocks. Well now I know and can make some adjustments before rework is required. I did place the acquired blocks on some 1/48 scale pics in the TFFM and they fit great so my math isn't wrong. My purchasing requirements had been: I have decided that instead of combining the 5,6, and 7" blocks into the 1/8" scale, I am only going to use the 5 and 6". I do have enough 3/16" blocks to cover all the 7, 8 and 9" so that is good. The education of Krug, mark P.S THANK YOU CHUCK!


- 172 replies
-
- 6
-
-
- druid
- sloop of war
- (and 2 more)
-
Continental Frigate Hancock by wyz
kruginmi replied to wyz's topic in - Build logs for subjects built 1751 - 1800
That is an awesome back story. The current view looks great and I will look forward to your pictures of progress! Mark -
I guess the question hinges on whether you use slings or trusses. With trusses , pinning is fine. I do agree most would never know the difference, so do what you want! Mark
-
That is wonderful to hear about the craft store acrylics. That is what I have in house for my testing. Gives me hope! Mark
-
Good and timely topic. I am looking to do the same on my build. I have picked up water based sanding sealer and a water based top coat to protect all. I still need to create some samples and see how it turns out. Sometime over the next couple of weeks. Mark
-
Understand what you are saying, I think we have all been there. A note of caution: continually re-doing items does not a finished project make. You have to decide what is good enough. Your skills will improve and by the time you are coming close to being done you will look at the early stages and probably see how you could do much better. It was hard for me but I force myself to keep moving forward (most of the times). I call my finished ships the evolution of Krug. I can definitely pick the order but few others can. Looking great and my compliments on overcoming adversary. Keep the pics coming! Mark
- 11 replies
-
- 2
-
-
- constitution
- mamoli
- (and 1 more)
-
It is hard to give a hard answer, but I would venture in the 8-10 age group (and plastic). I gave him flush clippers instead of a knife but still needed to be coaxed through how to use them. Also gluing is an ordeal. We spent some time talking about clamping and waiting for things to dry. He really enjoys the application of the decals and after showing him one or two times he took off. I think the hardest part is refraining from jumping in and taking over. There is definitely an ebb and flow (as this build shows) but he proudly shows his friends his completed models on his dresser. I have made a simple put the dowel into the boat shaped 2-D cut out for my five year old.... Anything to keep them off of digital stuff..... Mark
-
Congratulations on passing that milestone! I really like the color contrast between the shroud lines and the ratlines themselves. Starting to get a little busy in-board for those fingers, good luck on the next phase! Mark
-
Great stuff. I enjoy reading about such builds. Almost gives me the push to try one (I say 'almost' so far). Keep the pics coming Daniel! mark
-
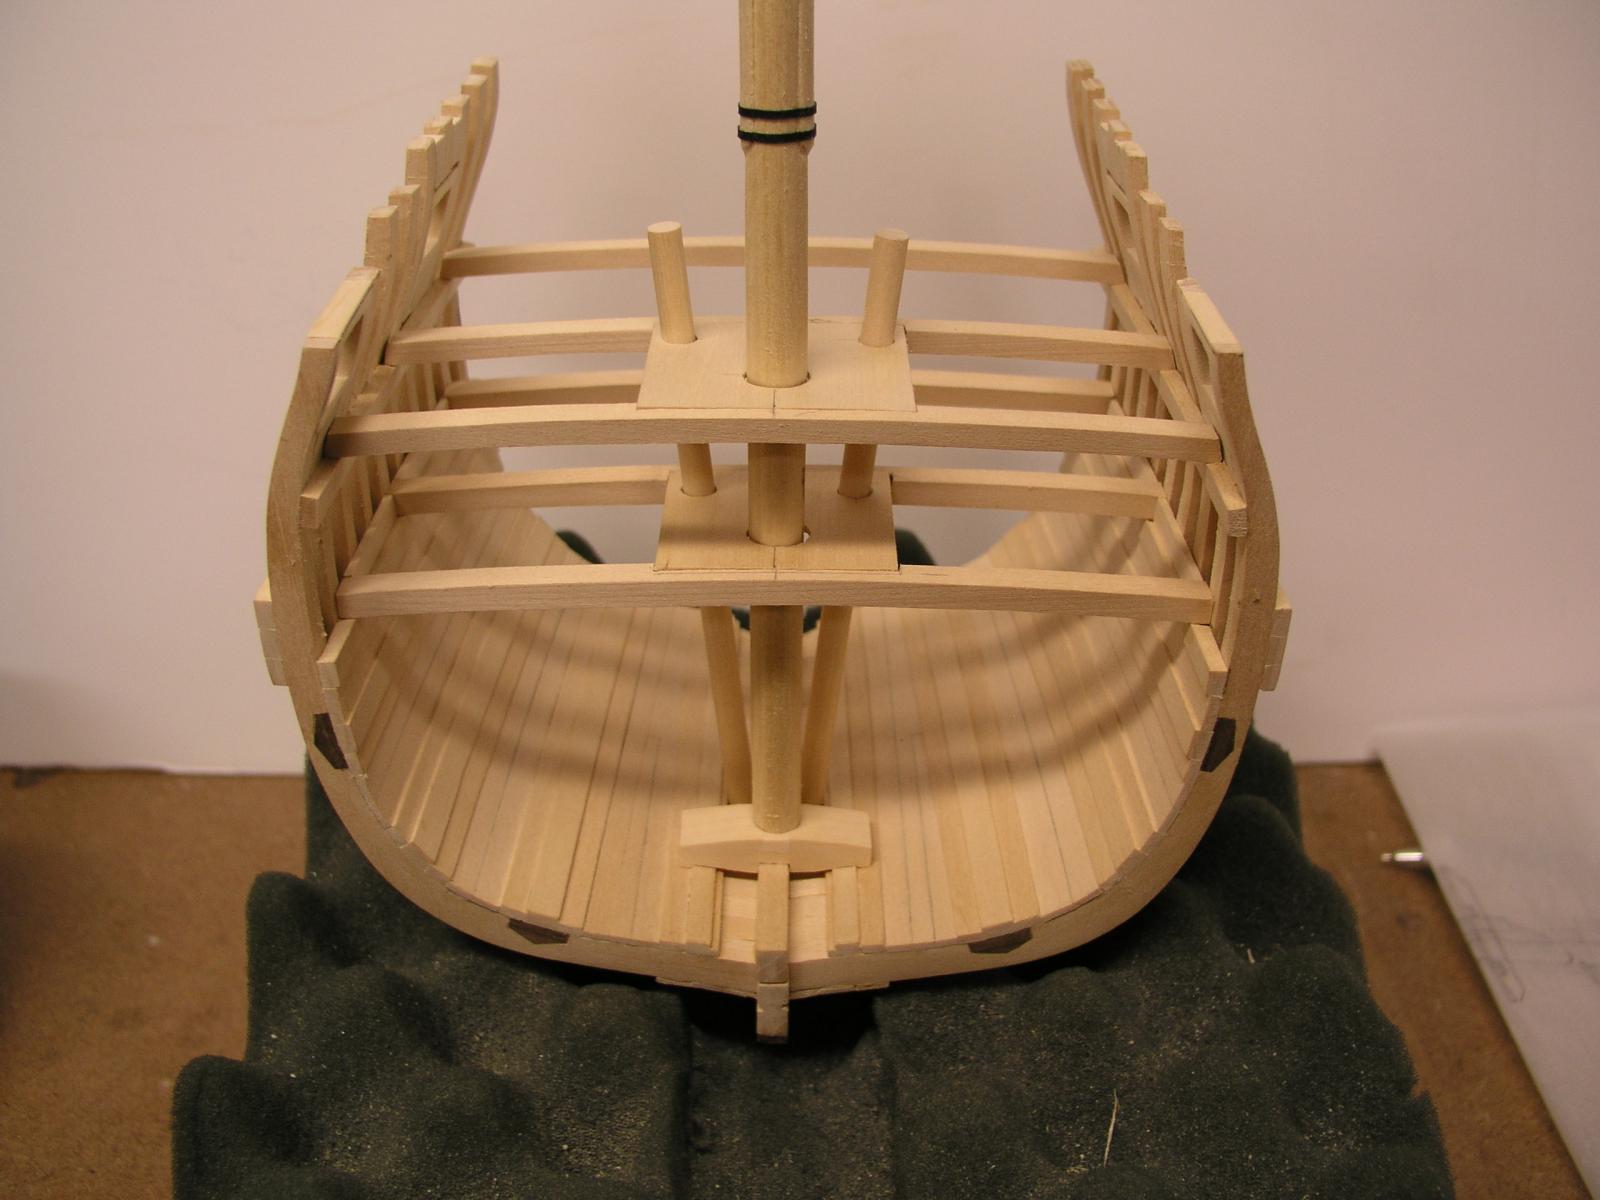
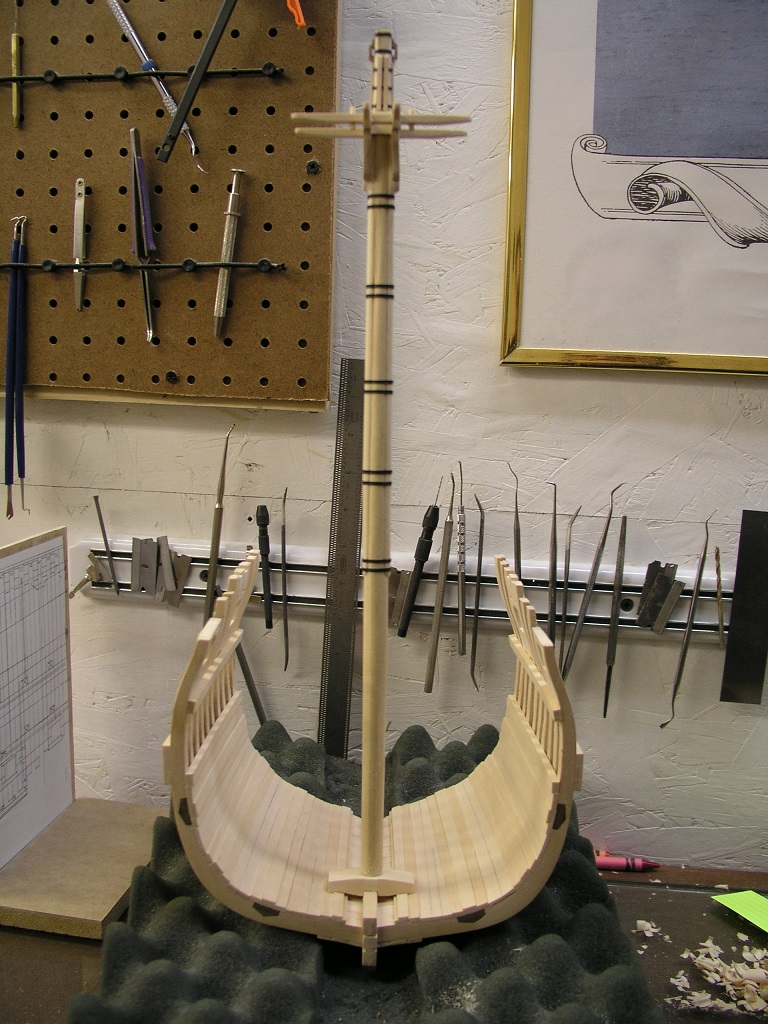
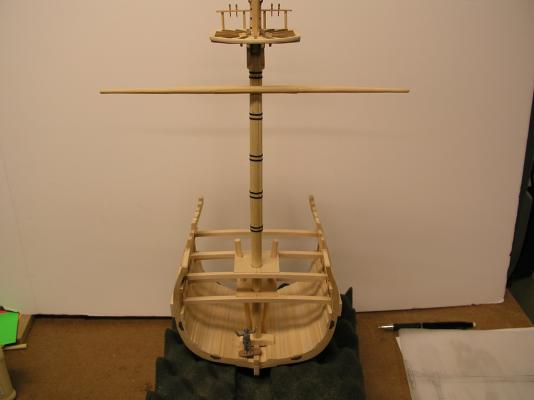
I like roughing in as much as possible to make sure everything lines up and is accounted for - avoid the uh-oh moments when you can't do anything about it. So before continuing on with the planking I wanted to verify the run of the mast and pumps foremost. The plans show the rake of the mast and the pump locations at the gundeck level, so first is to figure that out. The pumps foremost, and mast are on an angle so just duplicating the gundeck position would not work. This is not 'true' build practice, but is very worthwhile. I get model 1:1 templates and insure everything is good to go. My inclination is to replicate the look of true practice on top of the templates made and I would be the only one wise. The pumps are not the final ones, but are smaller diameter ones just for this exercise. The final ones will be octagonal. Next up is defining all the carlings to lock in deck beam spacings so the knees can be started. The hope is to build the decks removable until I decide to lock them in. I also might be 'forced' to rough in the main yard..... I beg forgiveness on yet another status overview: Mark


- 172 replies
-
- 11
-
-
- druid
- sloop of war
- (and 2 more)
-
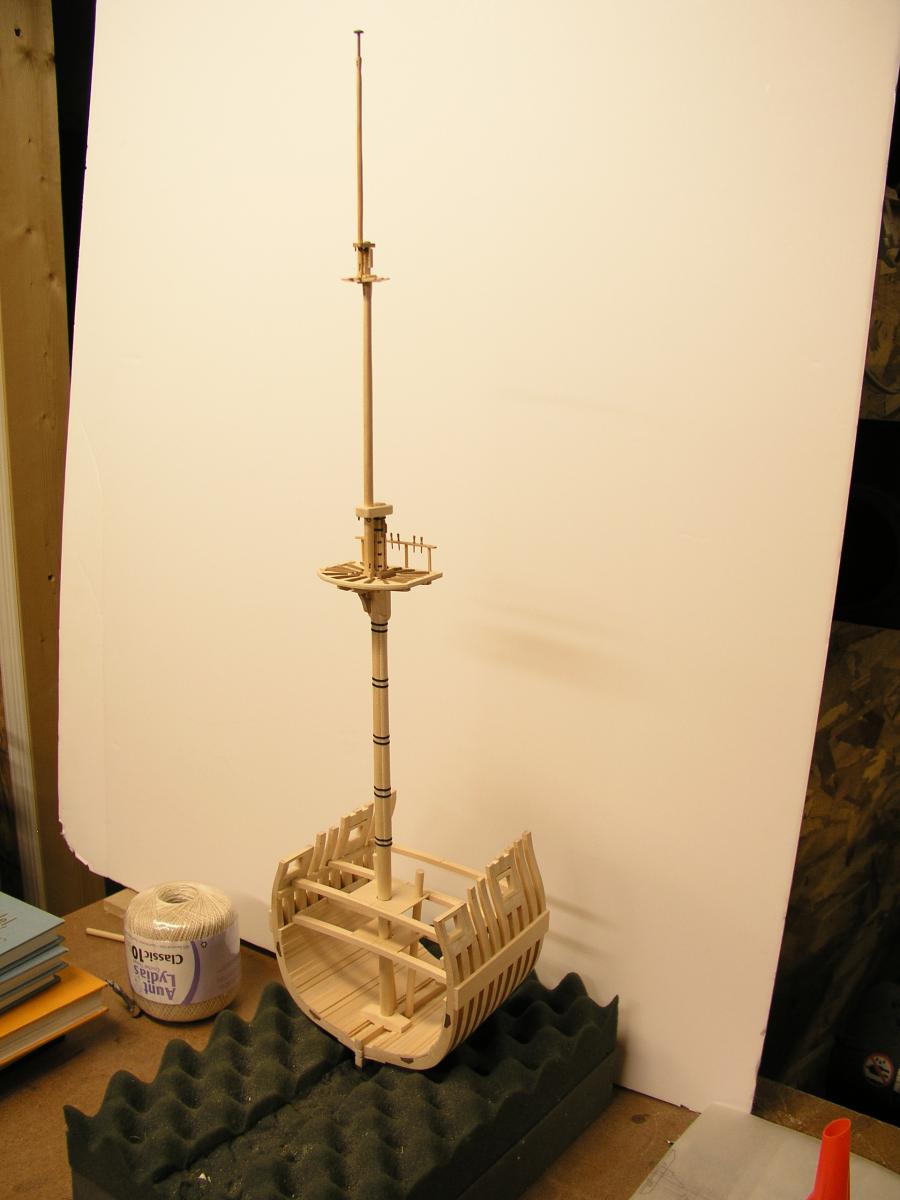
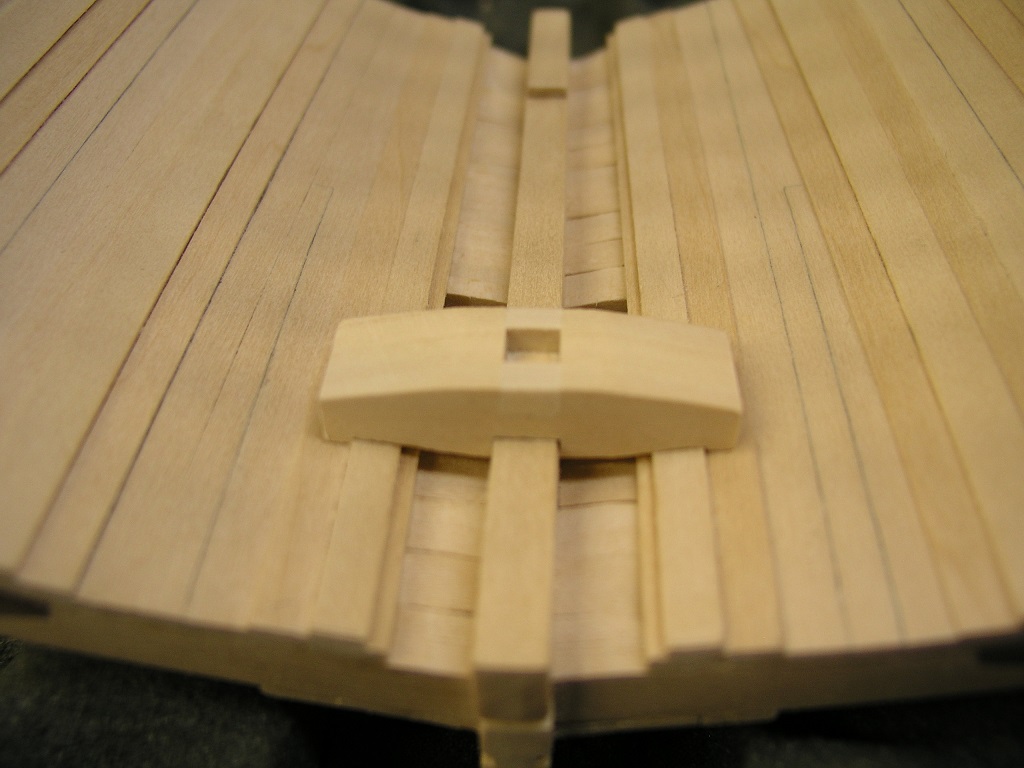
Actually pulled the hull out of mouthballs for the next step, main section of the mast step. A thicker piece of wood with several distinct angles and cuts. I first templated it out with an index card before cutting. Truth be told, it took three attempts to get everything right. I didn't waste too much wood since I had only cut the mating edge, so resetting was simply cutting a new mating edge slightly above the failed attempt. The square cut was achieved as shown above for the mast top shroud cut outs. At the end it was very satisfying to almost click this piece into place - no glue necessary at least for now. I also cut the tenon into the mast bottom and likewise a nice tight fit, allowing it to stand without other assistance. This weekend I will add the positional wedges and the fixed bar. This is different from what I used on the the full Druid but I consider it much more realistic. I need to figure out the well and if I am going to keep anything open to view. It would be a shame to keep all of this hidden. Mark

- 172 replies
-
- 12
-
-
- druid
- sloop of war
- (and 2 more)
-
Love to see the creative process. I can only think of what the sausages I call my fingers would do on a similar project. A whole different set of problems and solutions. Keep the pics coming! Mark