


popeye the sailor
-
Posts
15,993 -
Joined
-
Last visited
Content Type
Profiles
Forums
Gallery
Events
Posts posted by popeye the sailor
-
-
odd OC..........but I do believe there is a kit of one. that would take some research
") ok....research done....I came up with these:
ok....research done....I came up with these:

this one I couldn't find a kit for........would be interesting if there was one.....
-
...Penelope Pitstop maybe??? wonders never cease
I looked for the place I bought the Pro Mod Christine.......Southern Motorsports does have a website....here I found something that struck me funny. earlier I posted a picture of the 1983 'slammers' kit.....it shows a green car. I saw the 'slammers' kit on the site, and it is red......it looks like the original Christine. it has the AMT logo and everything......haven't compared it, but it looks like the same box art. a production date would tell a lot, but since I can't physically look at the kit, it will remain a mystery. the Chrysler 300 I posted earlier as well........there is a kit of it  crazy to think........but it might be interesting
you should build it Lou.......I want a front row seat!
")
-
your very close to Mariupol...has your city sustained any damage? so sad what's going on

your ship is amazing! you've done so much since I last looked in!
- Valeriy V, Keith Black, mtaylor and 1 other
-
 4
4
-
I'm well aware of that..........I didn't even eat paste as a child
 a friend of mine in Canada was using it....he told me that at one time that it was banned from use due to the cancer thing. how he came by it .....he never told me.
ever hear Lenny Bruce talk about the use of glue? funny skit
-
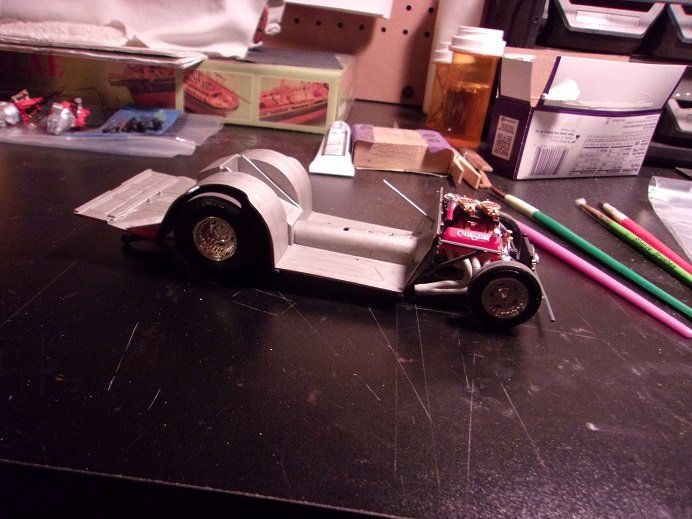
the firewall is now finished and I added it to the chassis.......
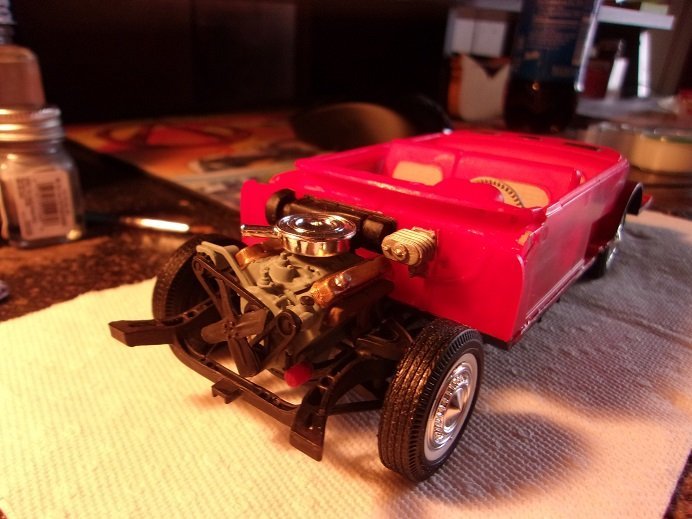

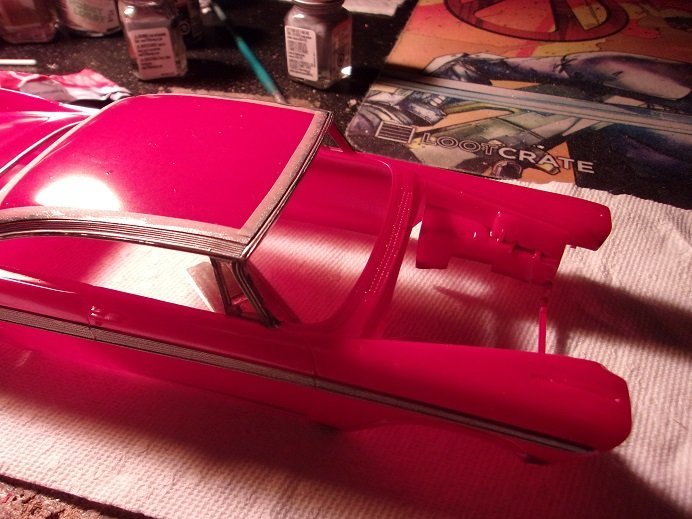
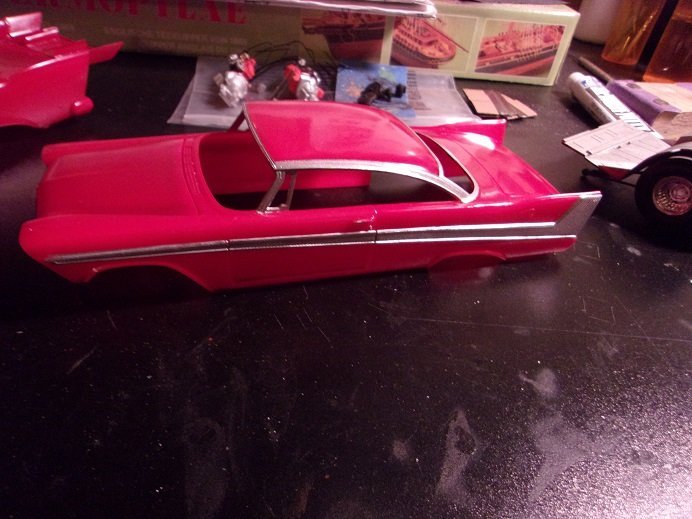
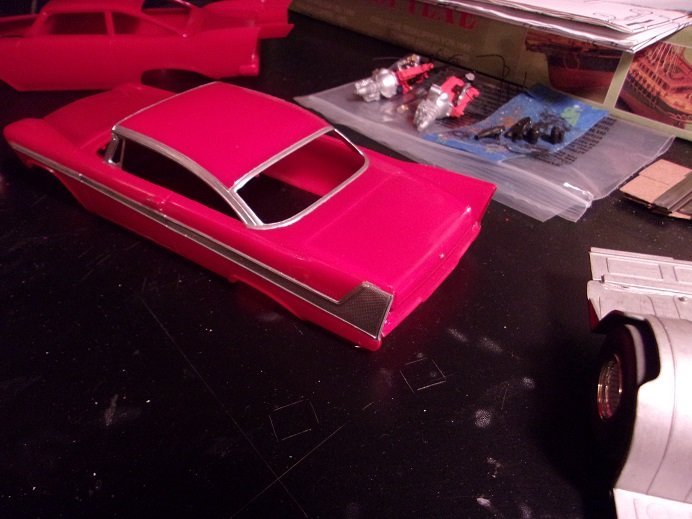
everything depends on the body now.......it's the next part to be added. there is quite a bit of painting to go yet. the driver side was masked to paint the trim on that side.
aside from a couple of really minor fo-pars......they came out fairly decent

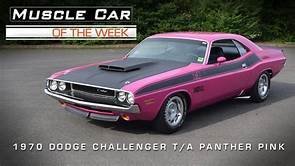
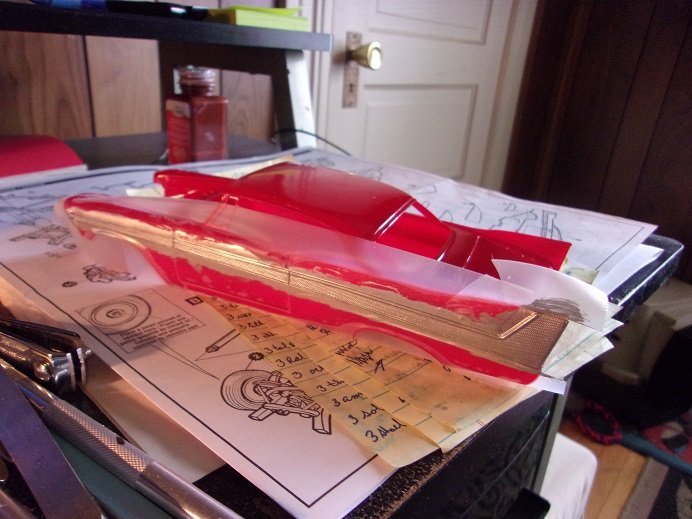
I masked up around the roof.........finger's crossed on this part.......this is where I don't do so well, and this is important for the model. I know that it's hard to look at a pink car........makes one think of Pinkie Tuskidero {what show was she from?}. I didn't paint the inner shell of the body, and I'm sure that accounts for it.
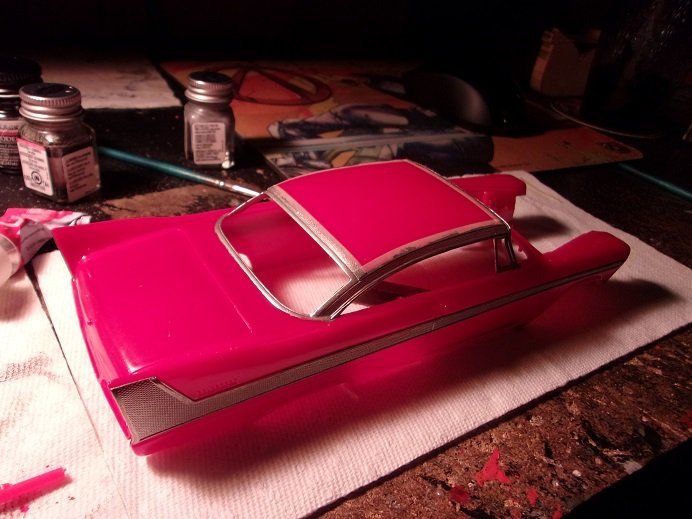
the bottom portion of the rear deck was done freehand.......I may try and mask the front windshield apron.
I don't think the Pro Modified version of Christine requires this bit of paint, so I may be spared from doing this a second time.....I'll have to look. here the body is in a more neutral setting....
- Canute, Old Collingwood, Egilman and 5 others
-
8
-
moving on with this one........the rear tire have been added. I had an urge during the work week, so I got the firewall ready to add to the chassis.
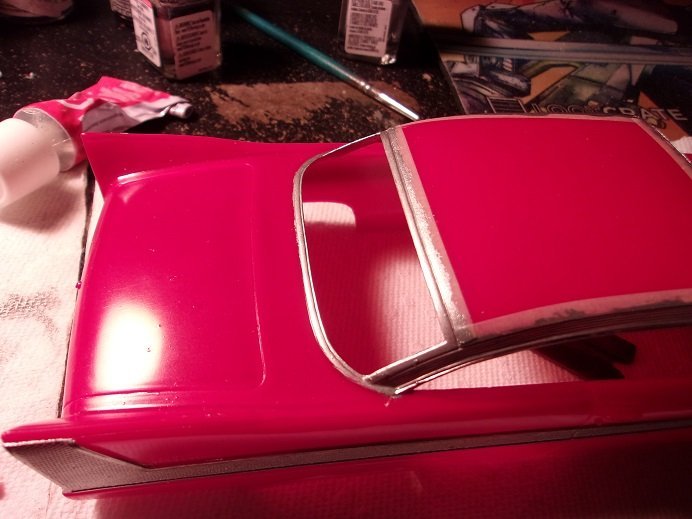
one aspect I thought about is the trim along the sides of the body. some of the image pictures seen online has them in white......but most of them have it in either flat steel or chrome. I used scotch tape to mask up one of the sides and painted it in chrome silver.
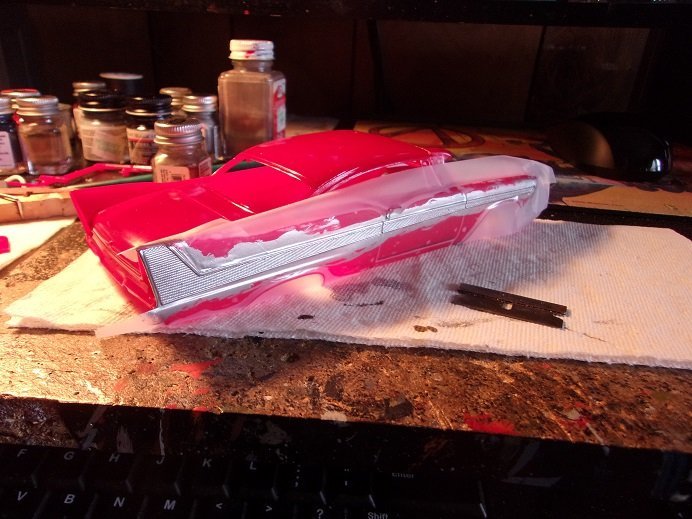
we'll let this dry a bit before I remove the tape......doing trim work is not my forte'

-
-
well deserved my friend.........I love what you did here
another story........I used to work at a nursing home in the neighboring town of Goffstown. I got home one day and was told to go right up to old Bill's house. Dad was already up there helping him work on a truck. I entered the garage to see these two milling up at the front of the truck.........then I looked down and saw a short round bar {of sorts} lying on the floor. I could see someone stepp'in on it and tak'in a ride, so I stooped to pick it up. Man!.....I couldn't let it go fast enough! it was a king pin, and they had just finished removing it from the front end! the king pin connects the spindle to the front bar { forget what you call it}.....they had to heat it up to take it out. my right hand had second degree burns.........I was one unhappy puppy!......an' all Bill could say was "heavy boda.........ya.....heavy! *chuckling to himself* he called everyone Boda.....heck, we even nicknamed him 'Boda Bill' nicest guy you'd want to meet though.
another story involved the misses..........Dot {short for Dorothy} Heino was gruff but very savvy...hard to hide anything from her. one day, her {only} son Willie told her a fib, and when she found out the truth, put a skillet to his butt! they had five girls and one boy.......we had four girls and four boys...
.....age appropriate, we both had the makings of a base ball team {we used to play each other}. anyway........we were playing 'tag' in the front area of their house.......resembled a parking lot, with all the cars parked every which way. this made for the perfect 'maze'. of course, we weren't allowed to play around the cars......someone could get hurt.......but we did it anyway. I was chasing Ruthie, passing by a stack of tires...........she bumped into the stack and let out a shriek! something in the tires had pierced her arm....puncturing a vein....blood was squirting out like a fountain! Dot came out and told Carol to go get some pitch from a pine tree, as she put a finger over the wound. applying the pitch stopped the bleeding and plugged the wound. this put her out of action for the afternoon and pretty much sent us home........oh.......the tongue lashing!
sorry.........I gave ya a two-fer
I have so many..........good times!
- FriedClams, lmagna, Edwardkenway and 6 others
-
7
-
 2
2
-
you better get Dave out of there.......if that turret turns for any reason, poor Dave is toast! look'in pretty cool!....very nice work
- Egilman, FriedClams, mtaylor and 2 others
-
5
-
the use of food stuff in modeling has been around........the most common is using rice or long grain seed to simulate fish in netting. one household {byproduct mostly} is the clear plastic packaging that products come in these days. it comes in different thicknesses, and can be found pre molded to fit the purpose. you've added something else to my list..........thanx!
-
look'in good KP!
- Old Collingwood, lmagna, mtaylor and 2 others
-
5
-
I had to look back to the beginning.........could have sworn I posted on a subject like this a while ago
 I am soooooo guilty........I should be locked away and the key thrown away!!! just an off the cuff guess........I think I have as many as 20 kits in various stages of assembly. I really should do a roster of them....perhaps I will and post it later. I could try and come up for an excuse for it, but it all boils down to whatever is interesting, or if it has ever been attempted. kits or scratch build.......makes no difference to me......it all in the eye of the beholder. a big one for me is looking into the history of kits....it's amazing what you will find. modeling needs thought.......about your subject and what you've read about it.......molding it into flesh. tangible to the touch, and visual to the eye. the question is........do I act on what I've read? I put a lot of information on the back burner......my wish list for future modeling........some don't stay hidden for long though. I have to let some of the monsters out.
for some, it is good. when faced with a problem on one project, switching to another is a good way to stay busy, while thinking of the solution. I'm not one to just sit there and ponder. for others, it may not be......and that's good too. it's not a race and folks like to savor their experiences. it's all in what you expect from the hobby.......whatever rabbit hole you want to go down, you've found the right place
- mtaylor, Canute, Landlubber Mike and 6 others
-
9
-
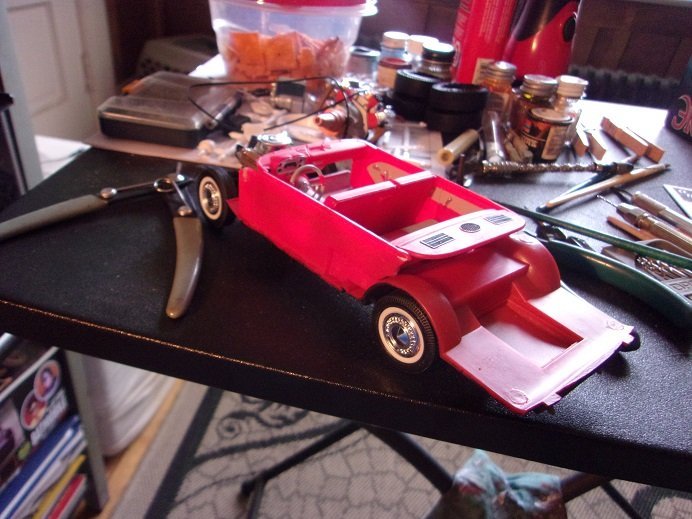
body painting was yesterday.......but to start off this small session, the rear tires were added to get her off the ground.
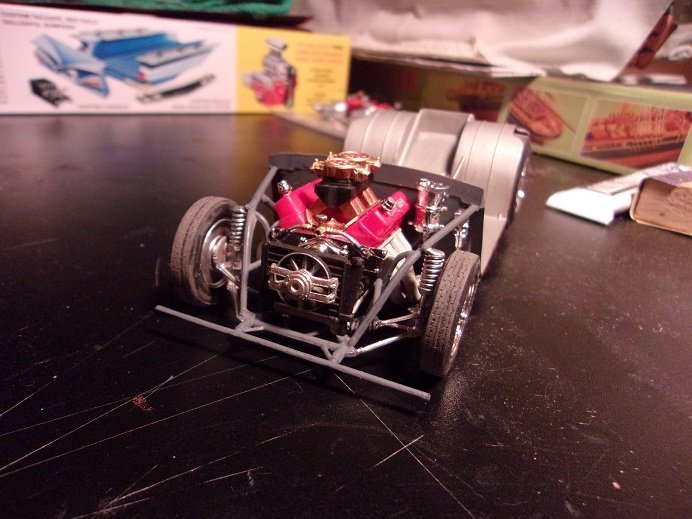
the body and hood...
the one thing I wished for this model, would be that the bumpers were separate. for a comparison, I brought the Jukebox Ford out and put the two chassis side by side. one thing I noticed, was that I had dechromed the parts on Christine, while on the Jukebox, I didn't.......and it shows. I'm using a mix of aluminum, silver, and flat steel, and it adds a bit more contrast to the chassis.

in hindsight, I could have been a bit 'tighter' with the wiring on the Jukebox.......with Christine though, I didn't give it a thought, and so, I didn't do it. I must not have remembered that I had window maker either for the windows.......where I cemented them in has now turned whitish
oh well........second boot to the rear........the decaling wasn't that great either.
- mtaylor, CDW, GrandpaPhil and 5 others
-
8
-
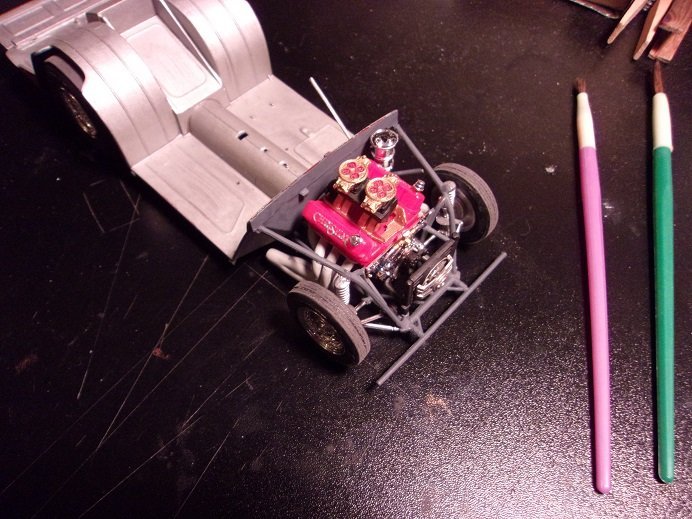
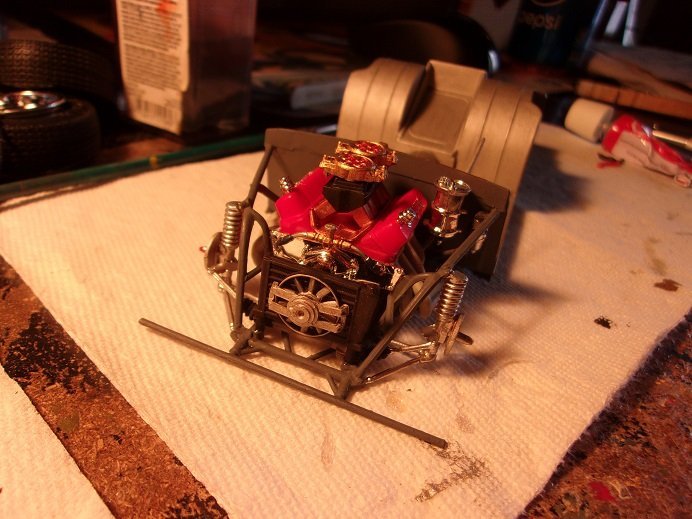
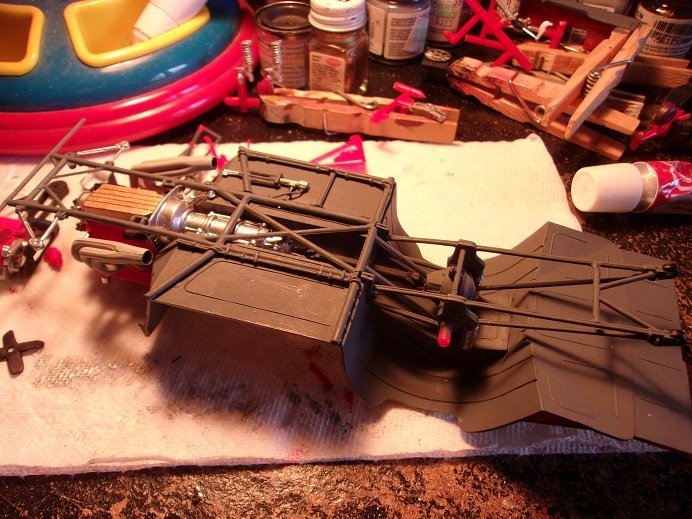
touch ups are done and dried........onward! starting at the front, the engine cage and front suspension will be added. the front part of the chassis is slightly warped........I'm hoping it doesn't create too much trouble. the right side of the cage is added.....
the oil tank and the steering rack were also added........the left side cage was added.....
as I feared...the warp did create some problems........adding the front struts was a bit more involved. with no real way to clamp them, I was forced to hold until set. by then, I figured out a way to set it up on the desk, to put pressure on the lower control arms with sufficient counter weight. I found four paint bottles on the chassis deck did the trick
{should have taken a picture so you could see this}.
the forks of the steering rack fit nicely in the slots in the struts. the steering linkage was added to the assembly.
the accumulator was added to the fire wall, as well as the brake rotors

there are a pair of braces that lead off the sides of the cage, to the firewall down by the chassis frame.......they are usually the worst to install. they proved to be just as tedious, as they were for the Jukebox Ford.
lastly, was the radiator and bottom hose. the upper hose would have been included here, but I seem to misplace it. given that the desk and the little table beside me are black, if I painted it, it may account for it's disappearance. I'll keep an eye out, but in the meantime, I will scratch make one. it was time to finish off the front by putting on the front tires.

more to come
- lmagna, GrandpaPhil, Canute and 5 others
-
8
-
-
-
I wouldn't be too critical with the touch ups on the bogies........it may help with the weathering
you'll likely be adding other stuff to muddie them up. I've never seen split track before.........kinda neat!
- Old Collingwood, Canute, mtaylor and 2 others
-
5
-
the parts look really good....I'm sure that if you went into the history of the kit further, you may find that the molds may have fathered more. of course, this would account for the kits that seem less than perfect, depicting the positioning of the wings {additional molds were created to make the parts for other variants}. you may have trouble seeing the hues your outlining, if you photograph in a room or such. one suggestion would be to give the model a sort of 'green screen' as a back drop. the ambient lighting in a room will reflect hues and colors as light bounces off whatever is in the room. to get a better view of what the finish will reflect, would be to literally take the model outside, and chose a place to display for pictures. asphalt, concrete, wood would be better represented in natural lighting....and you may even get the benefit of blue sky. there were very few of these birds that were camouflaged, so you have a pretty good representative of the finish you want to achieve
- Canute, Old Collingwood, Egilman and 3 others
-
6
-
catching up on the logs I've missed........this one is particularly dear

living in the town of Weare, back in the 60's until the day I left home, I was immersed in the old school mechanics. though a bit more modern, given the time, our workshop was similar........but not as primative as the gent that lived up the hill from us. we used to go up and help Bill from time to time, especially after his son Willie went into the Army. he was an old polish guy........chewed tobacco, spitt'in it in a Pepsi bottle. that's what he did for a living.......working out of a cinder block garage, with one door.....as well as a window. seeing what you've done here, brought me back to those days in a big way. you couldn't be any more spot on, than if you lived back in the day yourself
my hat is off to you........it's an awesome dio
as a epilog.........when Bill Heino died {his wife died before he did}, his daughter Ruth took over the house. she had a direct line to the police because collectors were showing up trying to get a look in the shed next to the garage. in there were parts dating all the way back to the model A......most of the parts still wrapped in the paper they came in. it used to the his original shop before building the cinder block building. there was a bench that line the entire back wall....stairs that lead up into the attic. it was chuck full, all the way to the door! as I recall, there was a cellar too........the door was around the back, centered in the foundation.......it was built on the preface of a hill, so the foundation was exposed.
to me..........you've outdone yourself!
-
chin up Mark....he'll do another........the hanger's not full
just catching up on all the logs I've missed Chris........splendid job on the Spit! she looks superb! I had a poke in at your England log, and I must say.....your doing a spectacular job thus far! I don't think it will fit in the hanger though...soI hold hope that you'll do another .......'jes say'in
I get the same feeling concerning your build frequency.........I churned out boat after boat for a few years there........only to find myself doing what.......only one or two a year now. it's alright though........I have quite a few 'active' projects to show for it
think that's funny........the admiral just figured out why I've been accumulating a stash! {retirement is right 'round the corner }
- Old Collingwood, Edwardkenway, Egilman and 5 others
-
6
-
 2
2
-
considering the age of the log, it just wouldn't do to simply put a like on it.........you did a superb job on this tram!
it makes for a really sweet diorama!
- Canute, Old Collingwood, mtaylor and 2 others
-
5
-
-
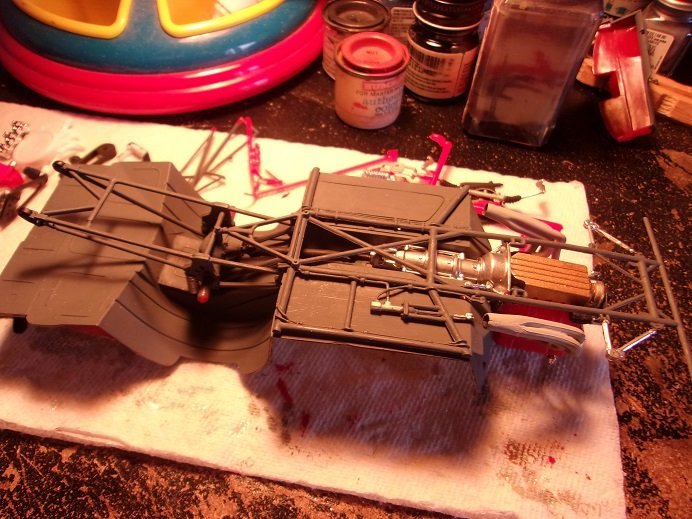
once the interior assembly was dry enough, it was flipped over to fasten the exhaust to the underside. the rear differential was dry fitted here at this time.
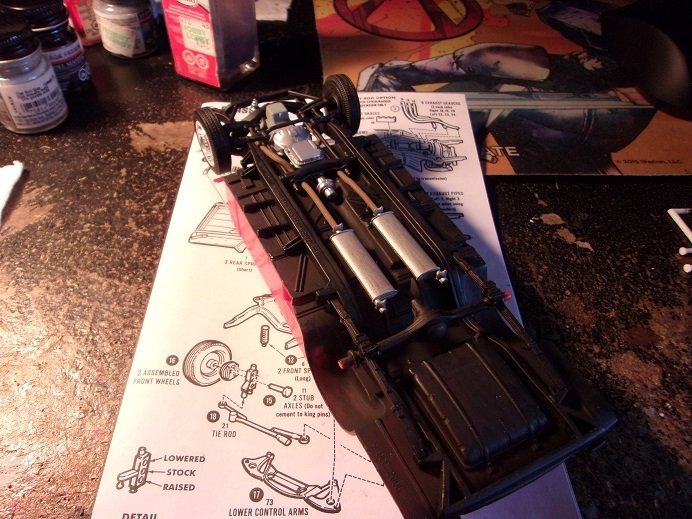
once that had dried, the tail pipes were added, as well as the drive shaft and differential.
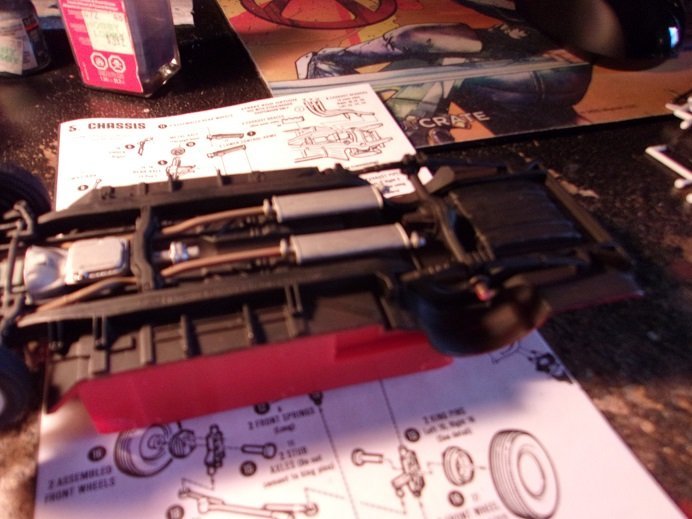
set aside to dry and await touch ups
- mtaylor, Jack12477, Ryland Craze and 5 others
-
8
-
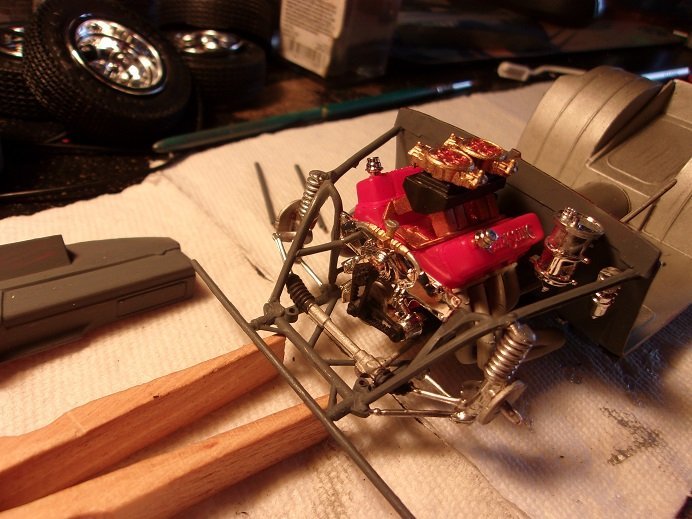
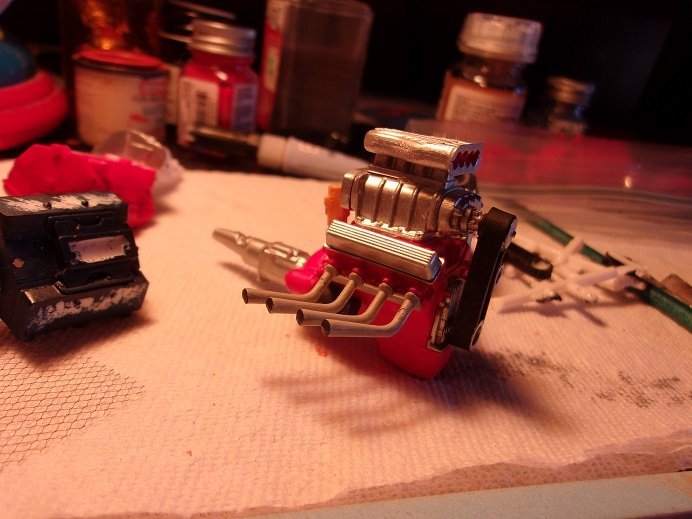
I've been play'in with these engines for a while now........I could post a log on what I've done so far
I've got a 427 that I have no car for........still looking for a recipient
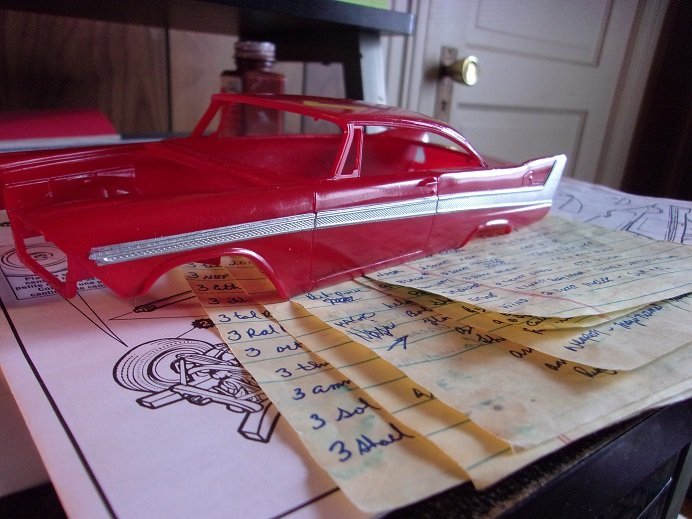
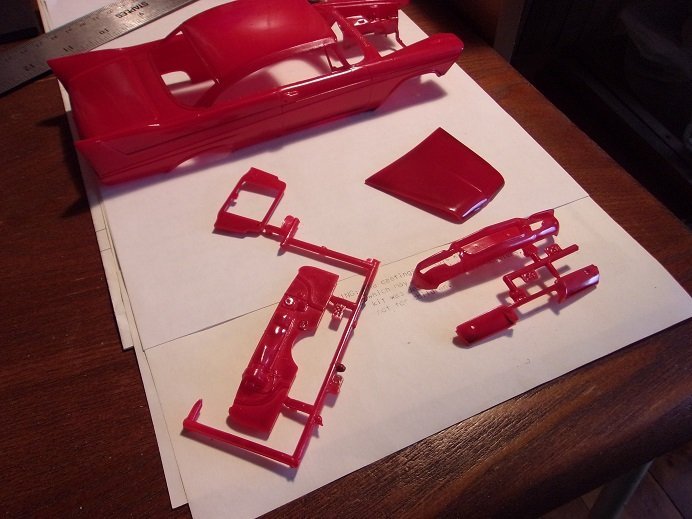
I've added another 1:16 car to my stash.....a 1957 Thunderbird.......another AMT offering produced by Round 2. I've got my rants about them, but they are what they were....and still are. one in particular I have a remedy for.......I've yet to put it in flesh......I'll save it for the log.
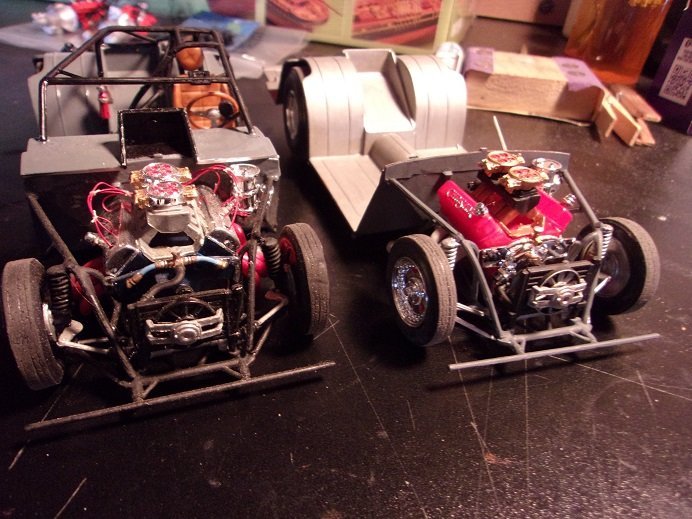
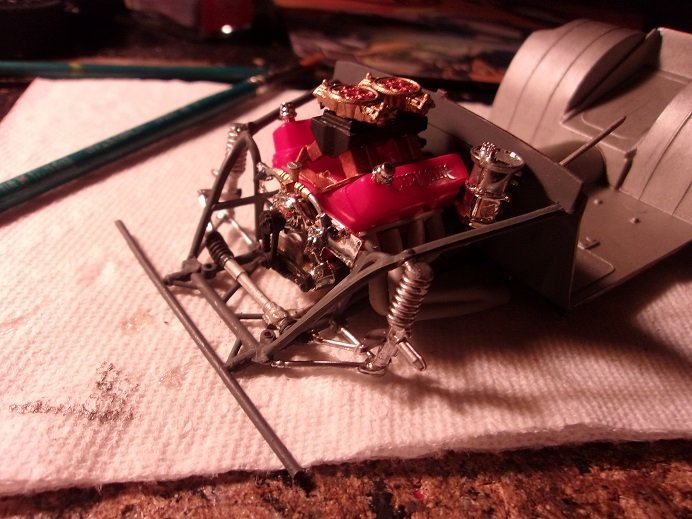
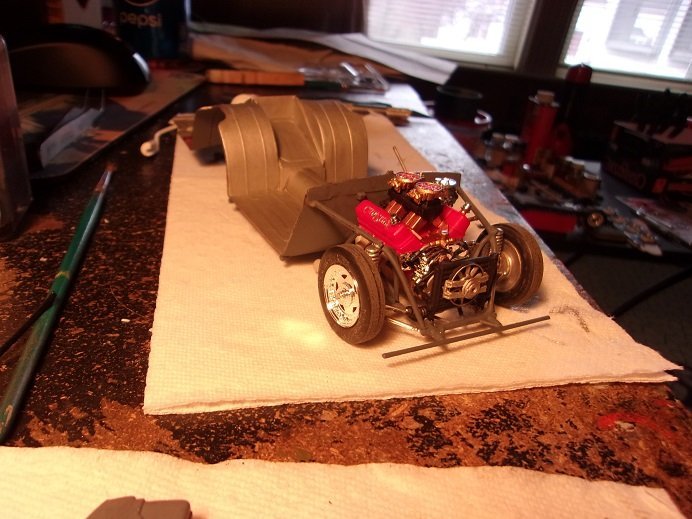
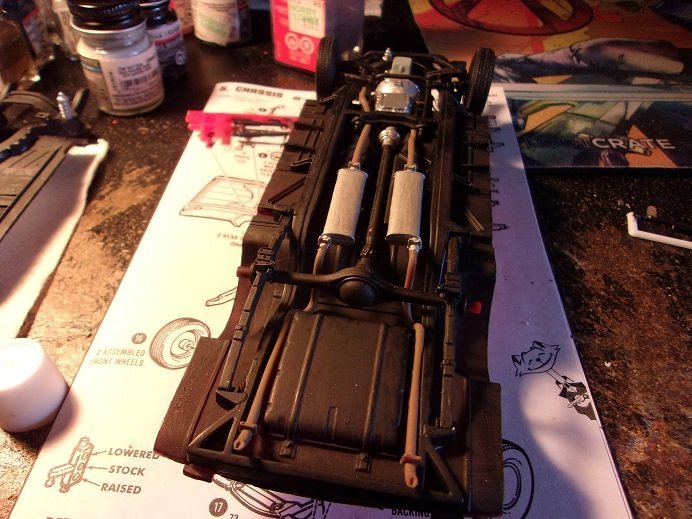
anyway........there is movement on the Christine Pro mod. it's beginning to look like a chassis
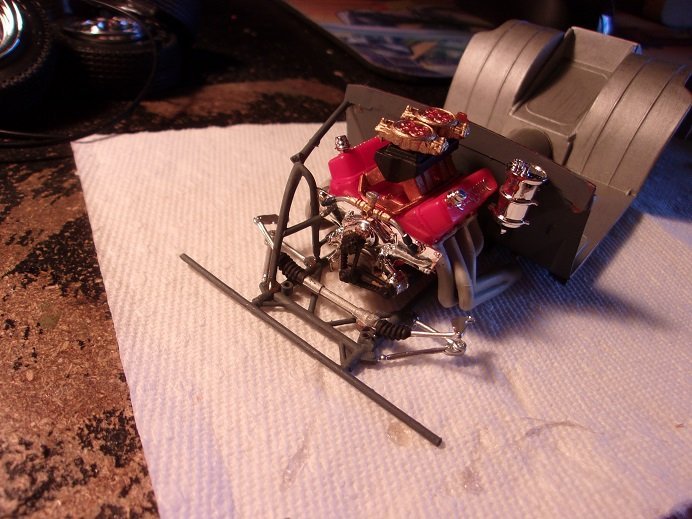
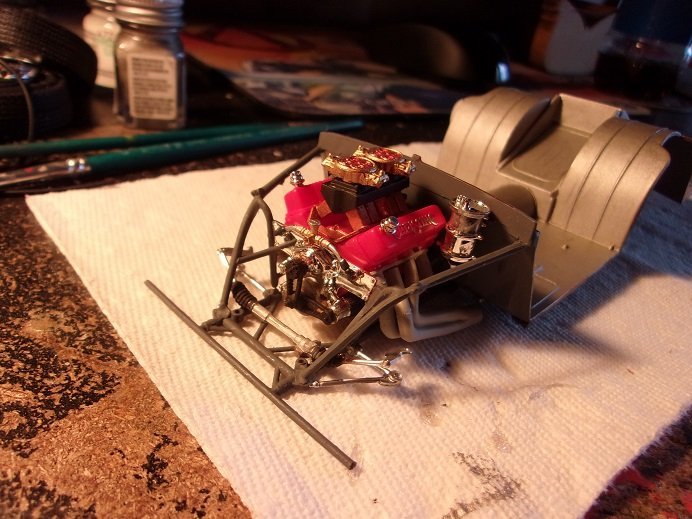
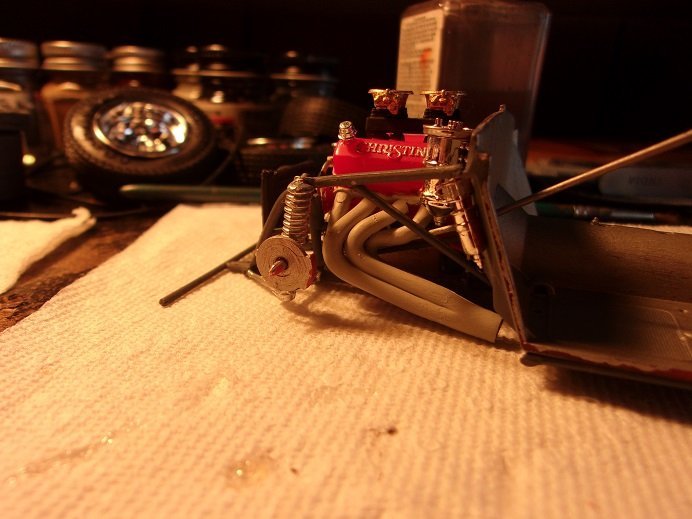
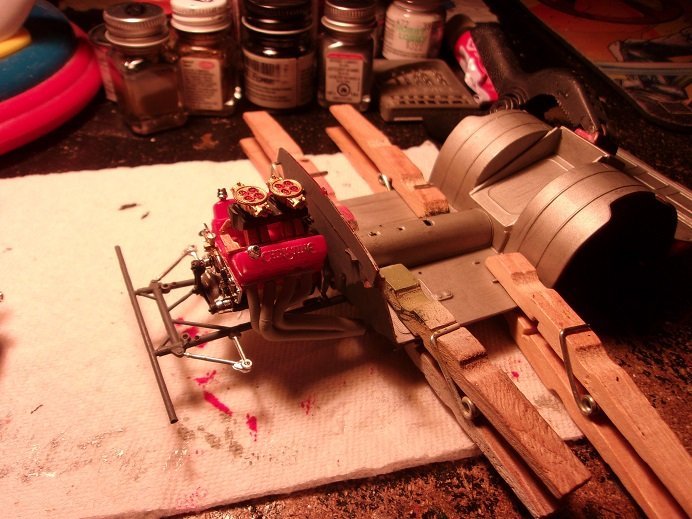
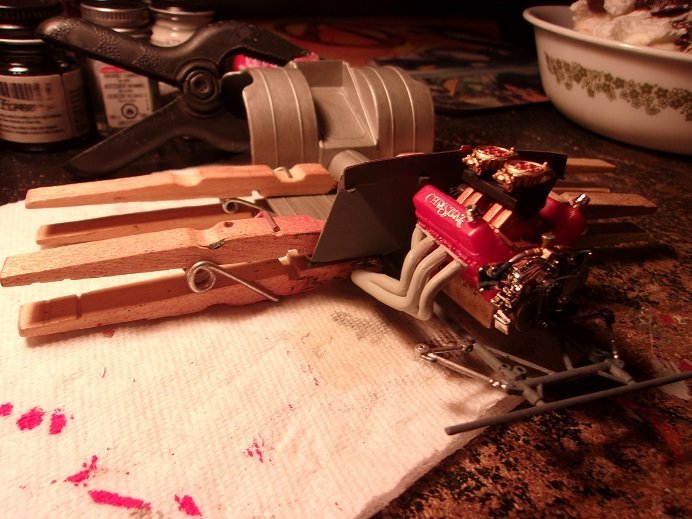
I did a bunch of painting and now it's time to put it all together. the headers were added to the engine {both of them}, and then set in place on the chassis. some detailing was done to the chassis before the deck was also set in place.
once it had set long enough to dry, the driveshaft and differential assembly was added to the chassis.

I've taken a couple of day off from work............I've been doing more painting, and I hope to add more to her soon
- Ryland Craze, GrandpaPhil, mtaylor and 4 others
-
7
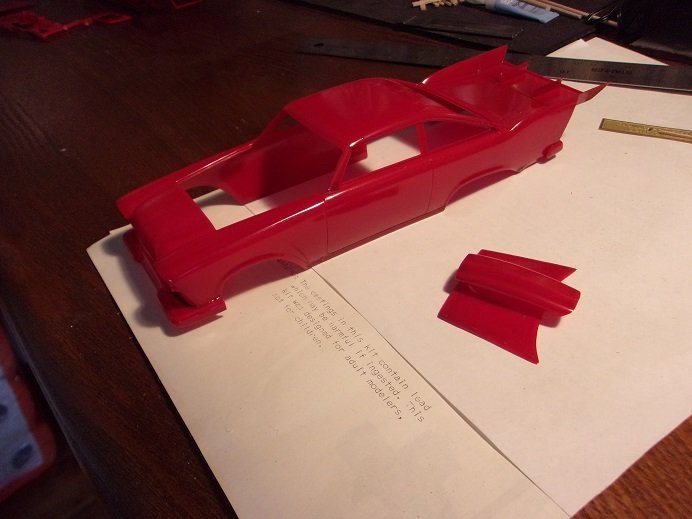
Richard Earle's pro modified "Christine" by Popeye the Sailor
in Non-ship/categorised builds
Posted
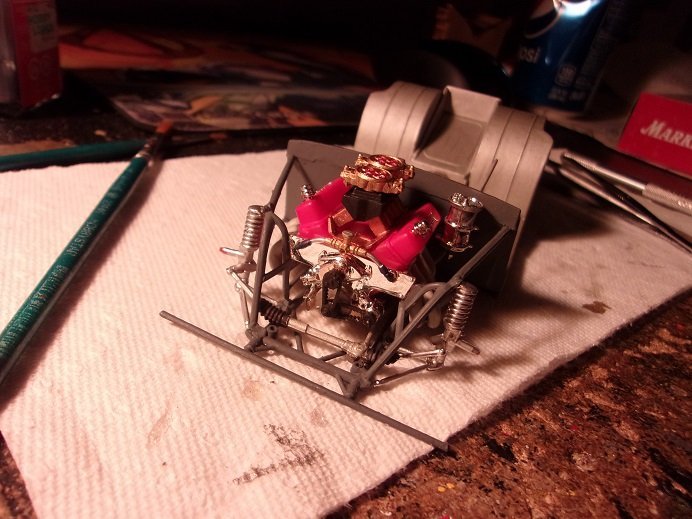
I began to assemble the roll cage and driver's compartment. it begins with the central framework and the pedals. the shifters and levers were also added at this time.
I've also been painting the battery / oxidizer tanks rack
more painting needed. I've added more.....which I will report soon")