HOLIDAY DONATION DRIVE - SUPPORT MSW - DO YOUR PART TO KEEP THIS GREAT FORUM GOING! (Only 13 donations so far - C'mon guys!)
×


popeye the sailor
-
Posts
16,007 -
Joined
-
Last visited
Content Type
Profiles
Forums
Gallery
Events
Everything posted by popeye the sailor
-
 oh...oh
 -
I'll have to get more flat black.......the stuff I got is so saturated with thinner, that if I were to do a wash with it, I'd be afraid that it would orange peel the base color. sounds like some testing is in order......I'm beginning to wish the ties were a separate part. I'd sub them with wood
-
now that the "three steps back" is finished........here's to you do'in a whole shot to the finish! I didn't know you were runn'in a chop shop?!?!?! look'in good!
-
the cockpit looks awesome I never use flash for any of my pictures......
-
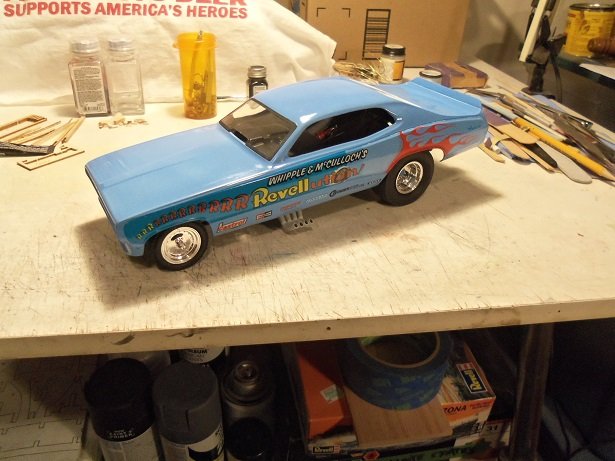
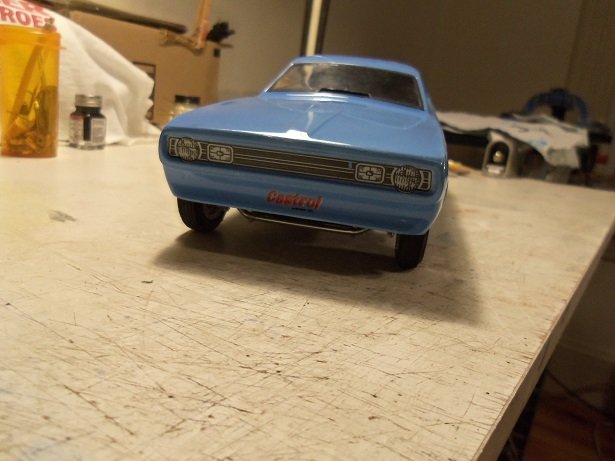
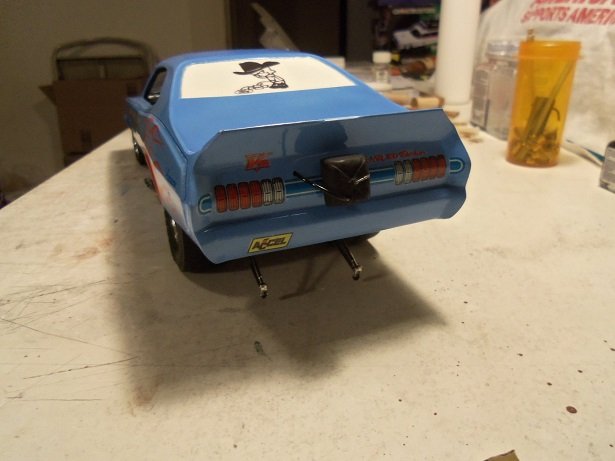
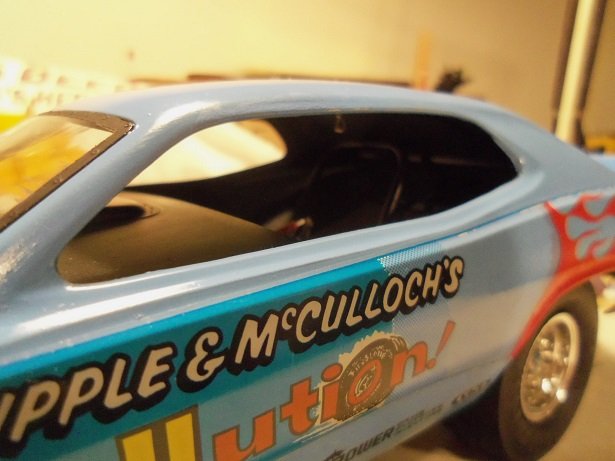
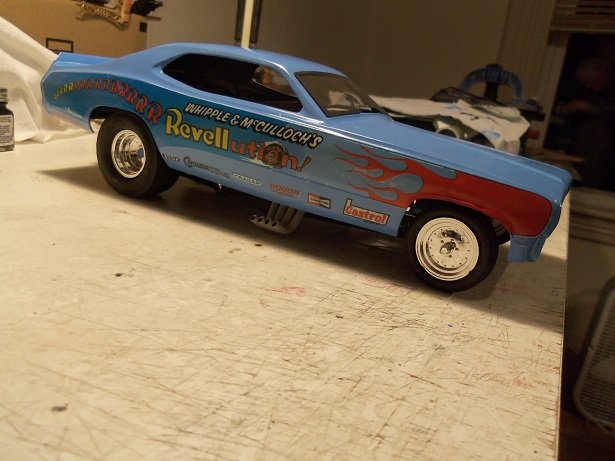
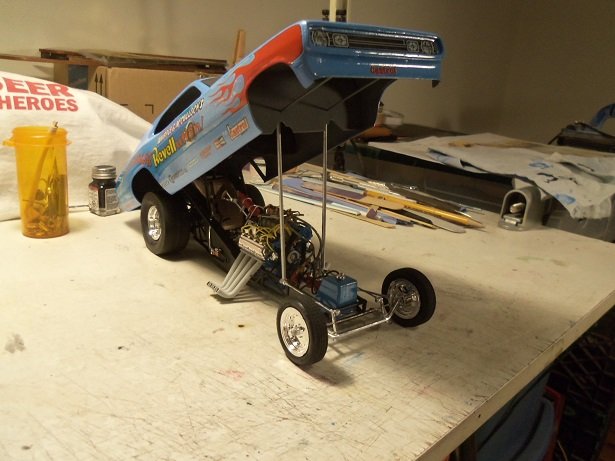
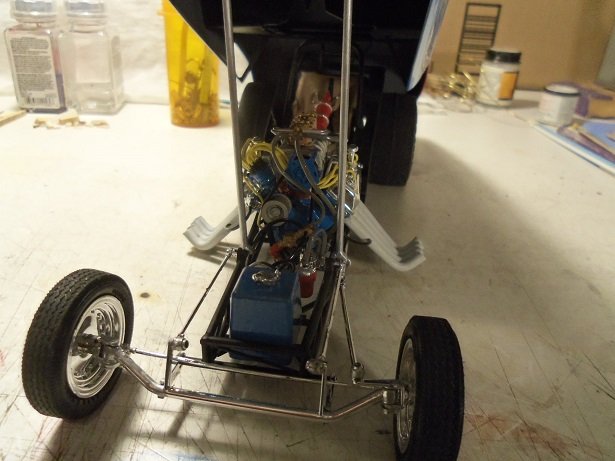
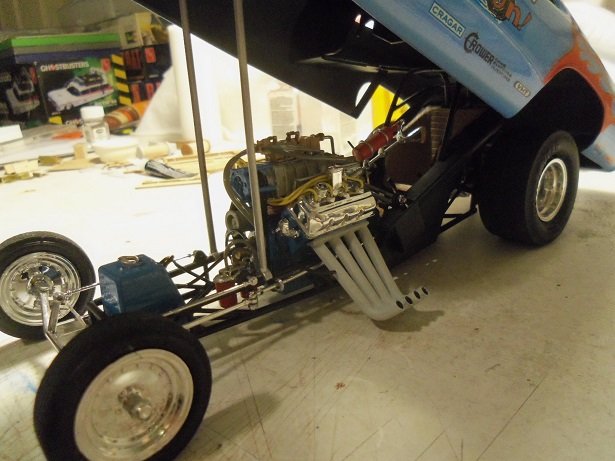
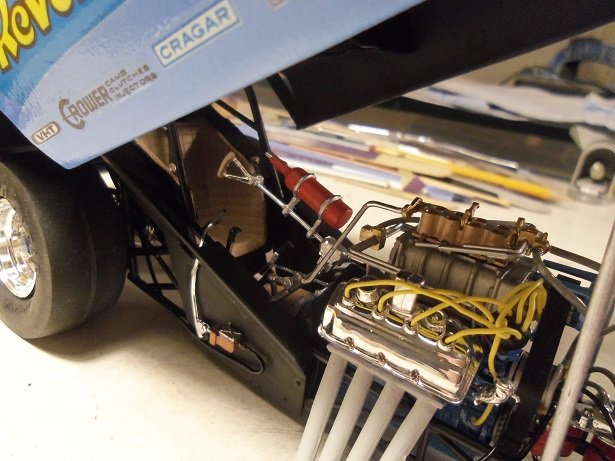
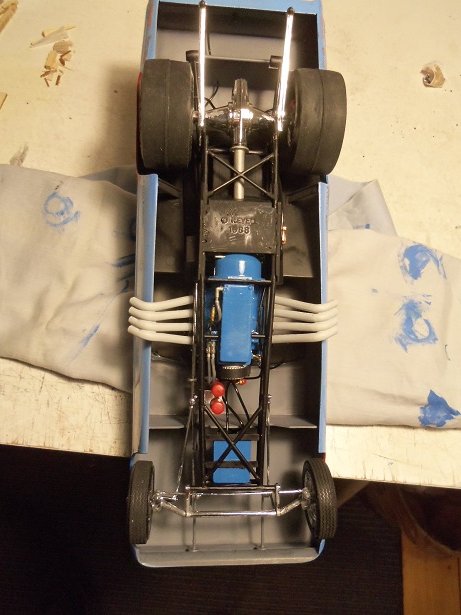
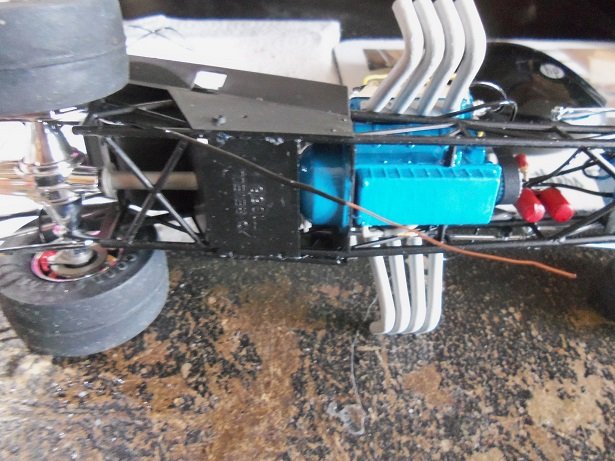
I didn't have to fiddle 'round too much J........drilled the holes in the top of the oil filter bracket and installed the hoses. there was one other hose that went from the bottom of the tank, to the pump. the Revellution is now complete here is the gallery 🏁 ...here's an odd shop of the underside. thanks to all who followed along.....I'm very glad you enjoyed it

- 172 replies
-
- 11
-

-
now that's what I call a detailed kit I love biplanes.........should be a very fun project!
-
sorry....I got carried away with the subject at any rate........the Revellution is finished! pictures soon.
-
wow.........thanks for the suggestions Ron. I have Walther's and a few other train sites bookmarked......I haven't ordered anything yet for the snow plow diorama. the box alongside the track {I really should do a log for it here} has been gutted......hence all the screws off to the right of the picture. on it, I was going to scratch build a small building, to hide it. a manual switch sounds like a very good idea. when I finally pull it back out, I'll do a small log so you folks can see it thanks for the paint tips too........the instructions say to paint the gravel a light gray.......they must mean crushed rock. primer red for the ties.....touched with perhaps a brown and black wash? that was my thought. thanks Ken......they show both types of couplers in this kit......the pin and the knuckle, which was a later modification. and yes.....apparently the kit doesn't show the period drive gear either.......the model is aimed at the later years of the loco it seems. I'll post a picture for you or the couplers...at least they got that right thanks for the ideas about the wood load.......I'm sure I can scrounge up a cord or two...of something. something about the size of my little finger should do it......after all, I gotta split it too. I'll take a poke and see what it looks like one more day and I should get back to it thanks to you as well Jack........mebbie I kin borra yer 'lil friend there ta hep me split tha wood thanks CDW and J...........and thanks for the likes
-
glad you decided to jump in seeing your accomplishment here.........you got me fiddling with mine.
-
the body is look'in really good now! the decals came out great.......and the chassis's coming along nice as well. I guess I'd better get my butt in gear, before you beat me with this second one
-
it was like pull'in teeth......but you did it I had no doubt that you'd win over the decals and paint. your even the first one done...........beat me by a couple of hoses oh well.......I'm just glad you finished and had fun doing it super looking model!
-
I'm not even done with my work week, and your done already you did an extremely nice job on the model......top notch!
- 63 replies
-
- 5
-
-
- revell
- harbor tug
- (and 2 more)
-
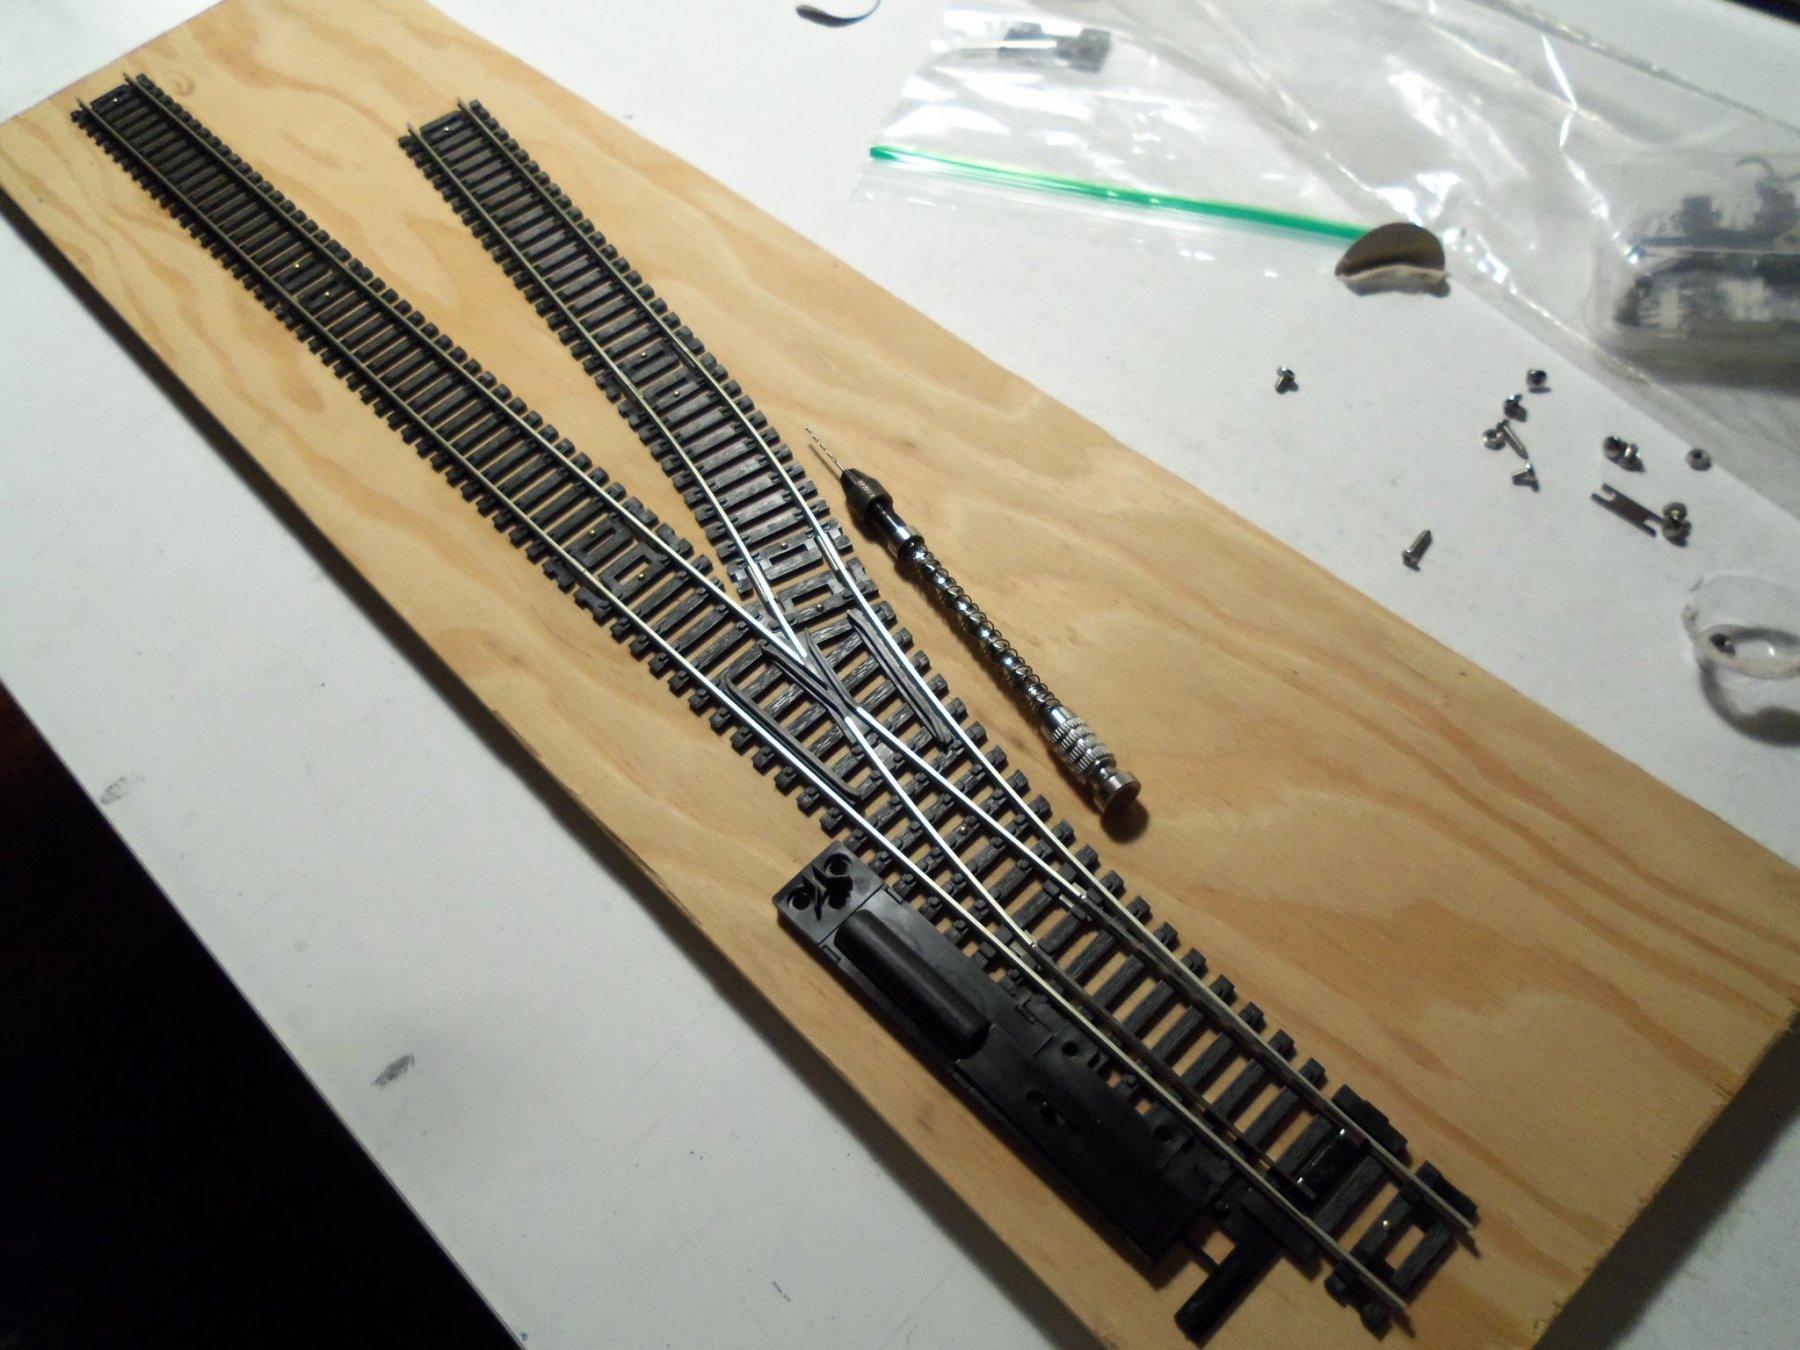
the B&M snow plow is HO scale.......small.......the fact that the kit is old, is what draws me to it. I found the trucks for it, since they and the couplers aren't supplied in the kit. I haven't seen too many of these kits around.......mostly Varney and Rio Grande. as a matter of fact. R.G. has a snow plow too. I don't want to go too crazy......painting the fake wood will suffice. I did mention that later in years, these locos were converted to burn coal.....I won't be going that route either I was looking on old model kits, and they have a kit of the General for sale......I don't think that the admiral paid $145.00 for this kit.......a bit too expensive, so they can hang on to it for a while the box art is different though, so it may be a real MPC kit. mine is a reissue from Round 2 models. I'm kinda hoping that some train folks visit....I look forward to any suggestions on weathering and paint.
-
it has to be how they are printed...probably on very thin film. the decal paper I use {testor's paper} is pretty thin. once printed, I spray them with the decal bonder. they suggest not going to heavy, but I tend to do it anyway. if I go too thin, as they come off the paper, they stretch like elastic. then I cross my fingers that they shrink back to normal. I've also experienced the ink coming off too, which is a very sad state of affairs. I gave the post a like as well.......I know J will come up with something, and pull the rabbit out of the hat
-
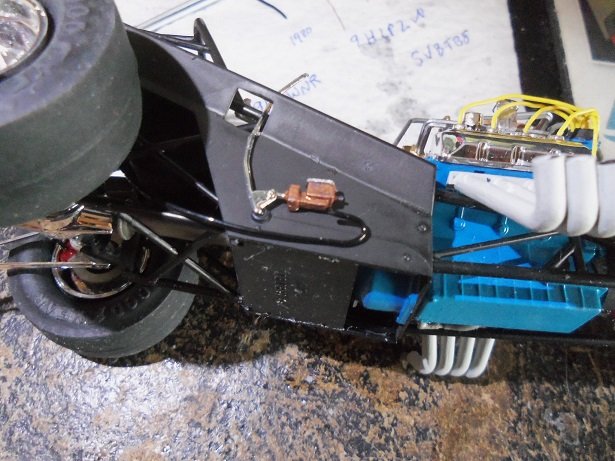
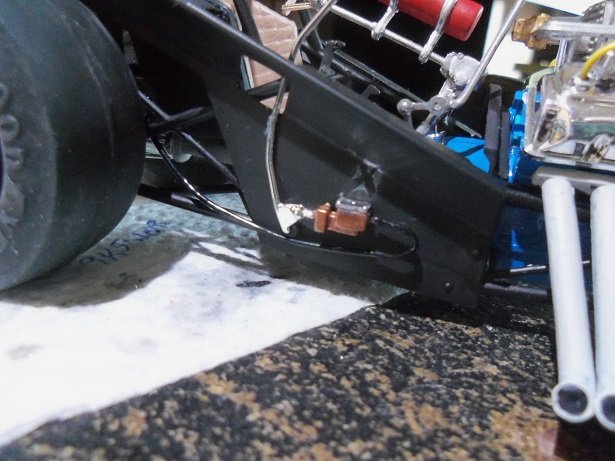
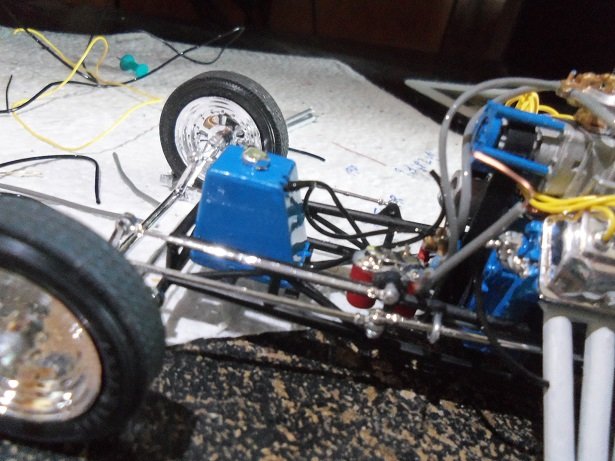
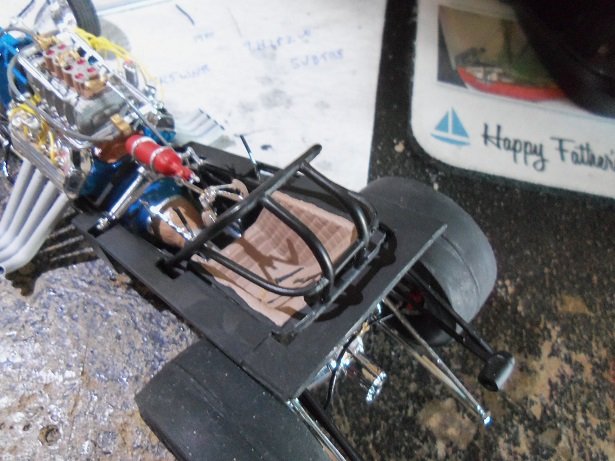
the master cylinder it is .........the first order of business though is the tubing. it's kinda bundled up behind the seat.......I need to get it so it will straighten out. stuffing wire in as far as it would go, it was trimmed off, and then pushed in further with a pick. bending it now was very easy to do. the master cylinder assembly was cemented in place........of course, the lever had to break in the middle. I fixed it though....touch it up later. when dry, the hose was bent to fit.......it was fashioned to meet the pin on the master cylinder. it was attached with a touch of super glue. the next area to finish up is the oil filter....I think there is one other hose too......when these are done, the model will be done note the hoses coming from the fuel tank......they were the ones that were causing the body to not want to sit fully on the chassis.......they are squashed down now .......the few days with the body in place paid off!. around the seat needed to be touched up as well. the flat black paint has too much thinner in it........the common solution.......remove some. what I do.........by now, it has set and separated from sitting around these past few days........I just stuck a rolled up piece of paper towel in the bottle and let some of the thinner soak into the towel. after a few times, the level has gone down enough where I can mix the paint. it's still a dead pan sheen, but the coverage is much better. there are no more plastic parts for the model.......do the last connections and the car is finished. I will try and do this today......
- 172 replies
-
- 11
-
-
look'in good ! all it takes now, is the right color paint. you've definitely got it now!
-
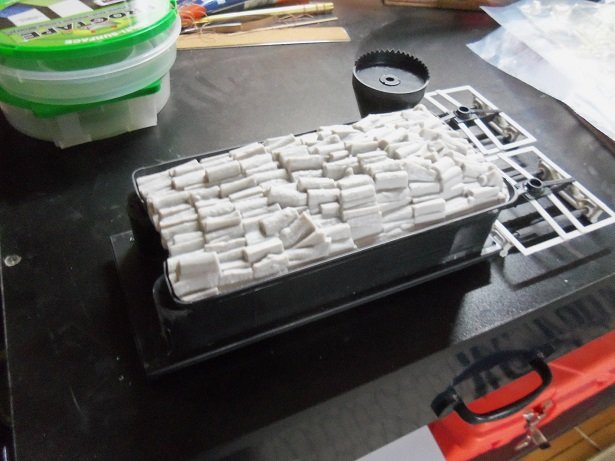
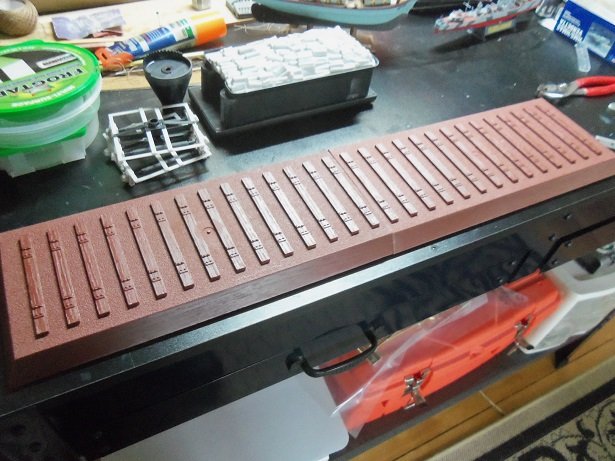
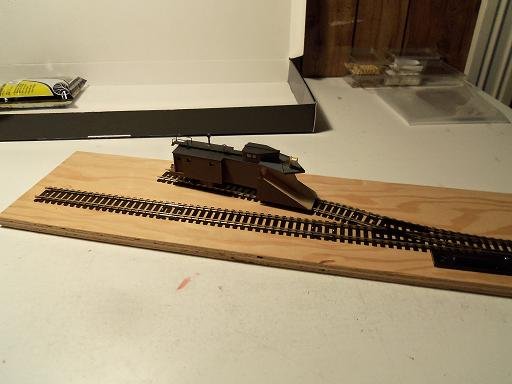
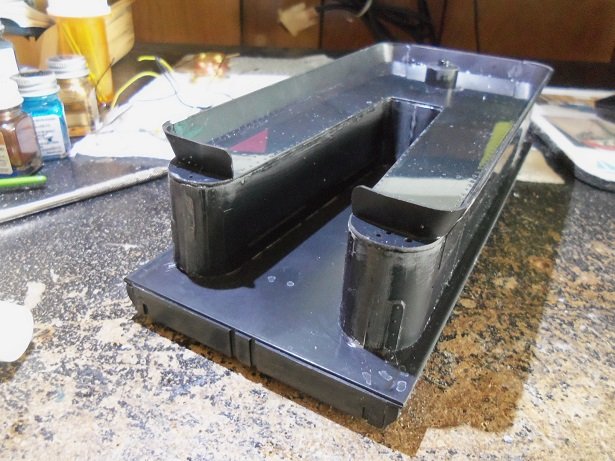
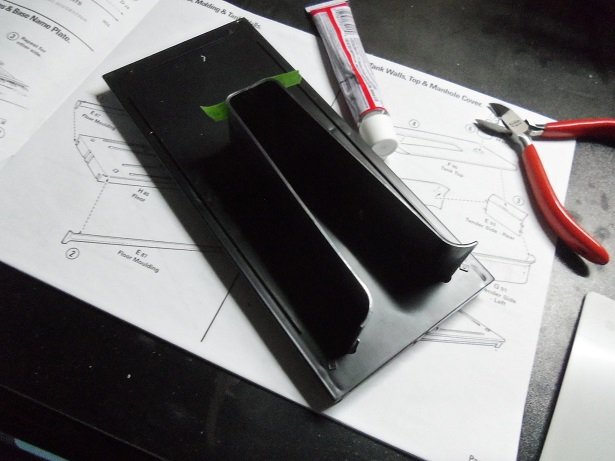
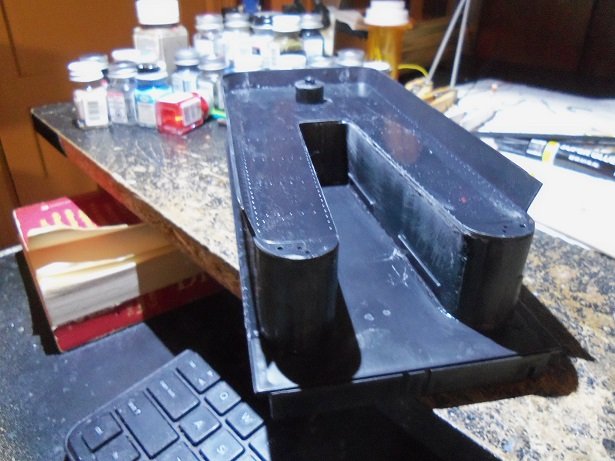
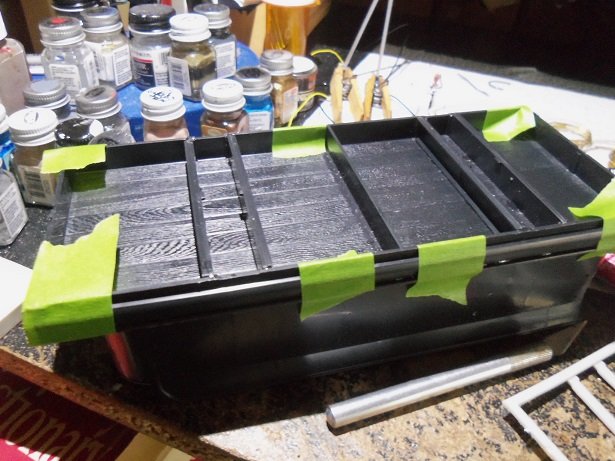
cross your fingers.............. PRESTO!!!!!! the wood load.......gonna take some painting magic to get this look'in good there is a smaller piece that goes in the front. we cross our fingers again....... and there it is.......the display base this is another challenge. I've even though of using sand.....possibly even some HO train scenery.....small bits here and there. it could look rather cool.......we'll see. it reminds me of my project in the closet........the B&M snow plow. I've had it since 2011, when a co worker's wife's grandfather died and they were going through his effects. he saw it and thought of me.....and that's how I got it. it's an old Ambroid kit.......I forget, but I think it was sold around 1950 or so. http://seymore-thebmsnowplow.blogspot.com/ http://seymore-thebmsnowplowplans.blogspot.com/ http://seymore-thebmsnowplowpart1.blogspot.com/ these are the beginnings of the log I have so far on it. the concept I have for it is much like this one.......a section of track, some scenery, maybe a building or two. a friend even suggested adding a dummy loco in the diorama. when Blogger was taken over by Google, they moved in and installed their security to the site. this deleted hundreds of blogs and numerous accounts. I lost a few of my blogs, which led me to begin using Word Press. I looked there.........I was sure I had written six logs on the snow plow.......can't find it. I have the pictures though....here is what the proposed diorama is to look like I hope to get it out one day and finish it. the General base is 26 inches long. the parts for the base are: the two section base the four sections of track rails two pairs of fish plates {to tie the rail sections together name plate - sign your name on it in permanent marker hopefully, I can do something nice with it


- 245 replies
-
- 10
-
-
yea.....why make a premium any higher
-
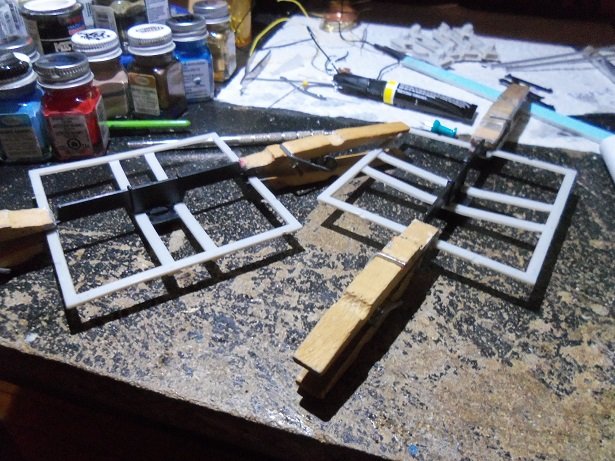
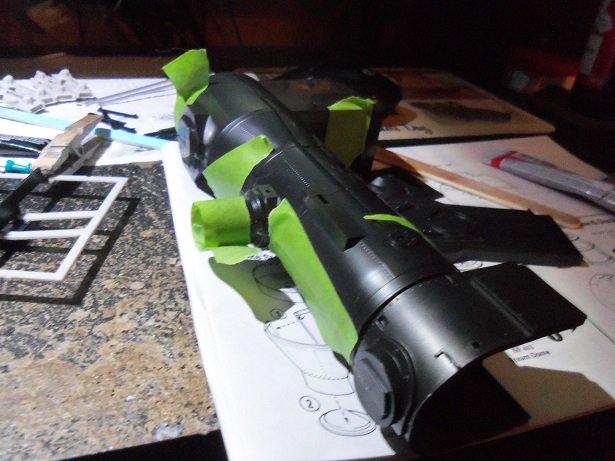
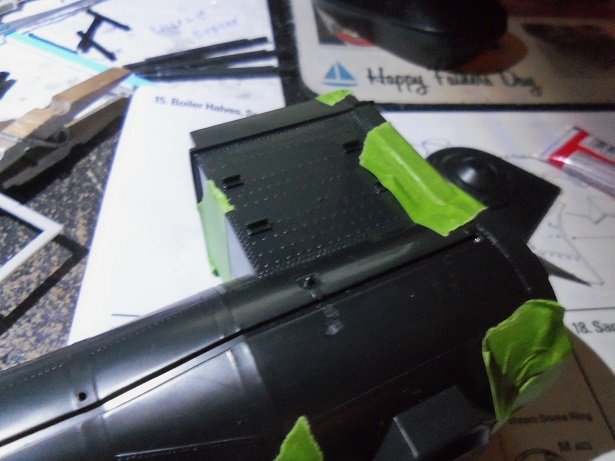
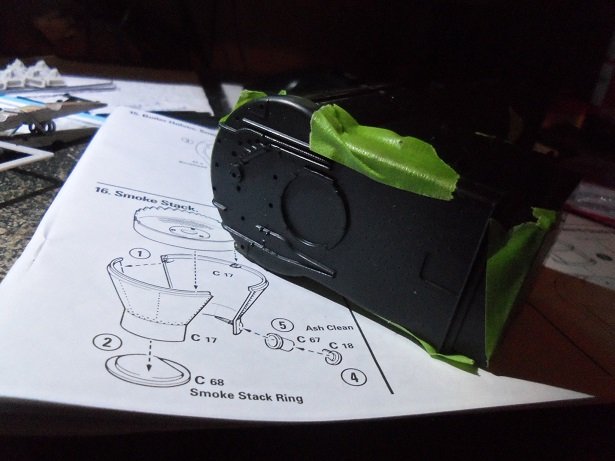
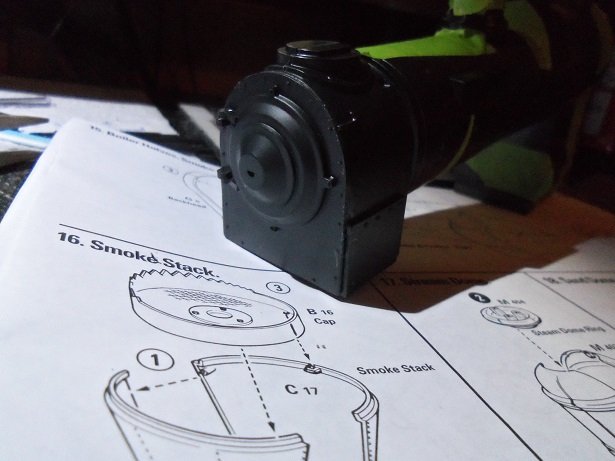
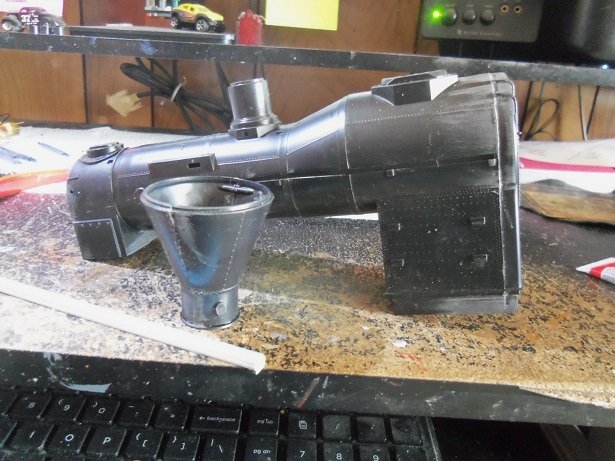
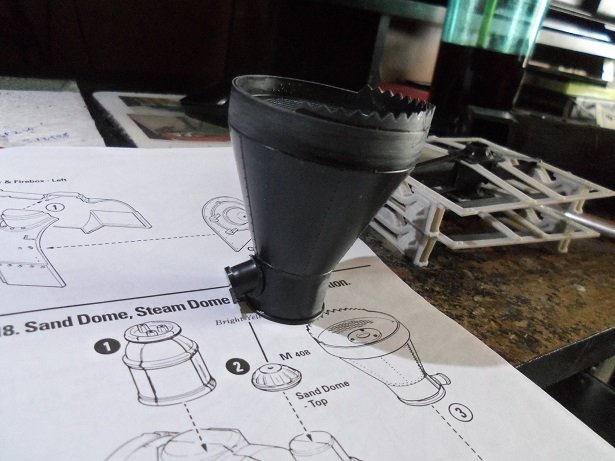
I'm not that familiar with them either.........I was a bit confused at first, but a bit of digging answered a few questions. you see some tender in movies and they appear to be box like..........but then one has to think what the time line is, depicted in the movie. the invention of a reserve tank probably came later you see in movies, where along the trip, they stop at a water tank in the middle of nowhere. this tank is likely self servicing, since it is filled with rain water..........this was a necessity, as train travel began branching out across the country. I just did a bone head move.........I have more to show, but the last picture wouldn't load....so I hit the reload button. it wiped out everything! now I have to redo all that I have done! I'll do this as a condensed post......pointing out what needs to be pointed out. assembly began on the trucks.......I consulted the bones, and they tell me that the trucks won't pivot due to the assembly process. I will need to figure out how to allow them to pivot. I have a couple of ideas in mind........I have a spare parts box I should also mention that the frames for these trucks are warped....a lot of cleaning had to be done to these parts as well. as I assemble the trucks, I will set them up in ways to allow the drying parts to work toward curing the warpage. I hope it works the boiler tank, which makes up most of the locomotive body, was a pain to assemble. the box at the boiler head end was warped....bowed inward, so adding the boiler head fascia would be out of whack along the sides. I found that squeezing the tank near the box, caused the box to bow outward.......so that was me for about 45 mins. I tried clamps, but was afraid that it might cause the mating joints to pull apart, causing gaps. the smoke box front fascia was added later, after the rear issue was somewhat alleviated. there is a small issue still, but it doesn't look too bad. for anyone who buys this kit, make it a point to add tabs to the inner lips along the sides of the back head {G5}, and this issue should be cured by this fix. so far........what I've seen is a downer....this kit is in tough shape. the trucks are assembled by this time..........I found that the axles can be added after the equalizers are cemented in place. my intent here is to paint them as a complete unit. I had two pictures to better show the warpage, but one of them would not upload......I hope you can glean it from this single photo. here is the boiler tank after some sanding......it looks rather messy. I've also started to assemble the smoke stack. to be honest, I'm not a big fan of multi colored plastic.......in some cases, it can complicate painting. I'm thinking of using a different color primer......even a flat black primer. knowing now about adding the axles and wheels at a later step, I think I can use the axles to cure the truck frame warpage. I can leave the wheels free to move, and cement the axles into the equalizers. with a little bit of pressure to level them out, I believe the issue can be sorted out with better results. we'll see what happens. I added the axles to the truck assemblies. the smoke stack received the bottom, the ash dump, and the top...... turning back to the tender, the front rail fenders were added to the body. there is a floor that is to be cemented inside the recess........I want to paint it before it is added, but I may say the heck with it. it won't be seen much anyway. the part is warped too......I might add. there will be more sanding before this sees paint.........you might note the excessive flash on the right side fender. a lot of this detail on the top won't be seen........there is a large part called the 'wood load' that covers the top and in the open area of the front. I will try and upload the picture again.... no........it won't upload. I really need to show you the display base, this 'wood load', and a couple other of these failed pictures.......they are key to the detail factor of this model. thinking about weathering and paint....this might be the most challenging project yet
- 245 replies
-
- 10
-
-
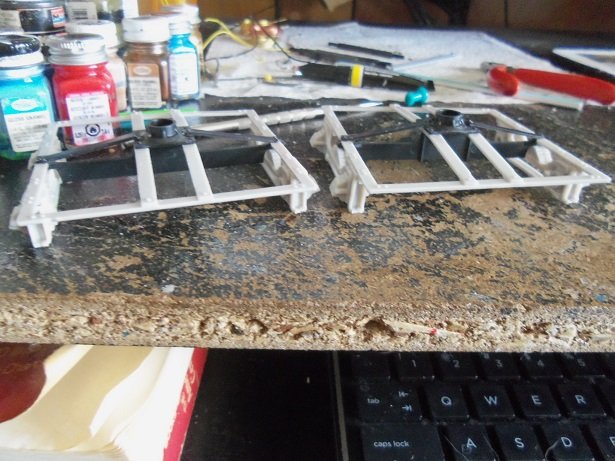
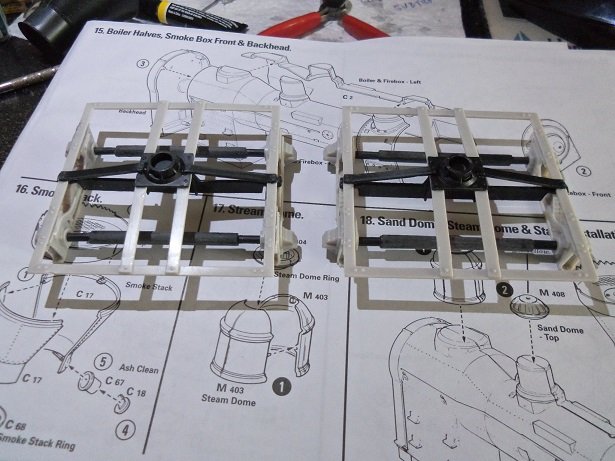
I'll try now to post the missing content pictures. I had the folders in a master folder, instead of separate in my 'pictures' file, as I normally do. it may be causing a problem.......we'll see after trying to post two of them, I see that this isn't the case........so I will move on. the kit starts with assembling the tender....a lot of clean up had to be done on these parts. the edges are slightly flared, along with flashing......a tell tale sign that the molds are not as crisp as they used to be. one thing I notice here, is that this tender isn't shaping up the way I thought it would. the inner walls are cemented in place here.........I would imagine that since wood is the primary fuel for the engine, that the tender would build in the form of a box.........these inner walls give the appearance that this tender is a tank of sorts. I stopped assembly at this time for other things. I got back to it on another occasion and continued to assemble it.........the outer walls. one picture wouldn't upload, but this one did. it shows that I assembled the outer walls and cemented the top inside, creating a tank. in the later years of the General, ........it had been converted to burn coal, as this gives the notion that it had also been converted to burn oil {so sayth the link}. the link also mentioned another attempt to destroy the locomotive. this could also be a tank for water reserve too....but I will still continue to wonder about it. heavy molding issues......quite a bit of sanding was needed here, to get the edges squared up and clean up the mating lines of the parts. I can see that before painting, I will have to give her a damp cloth bath. I'm still looking for a more comprehensive paint chart to go by. giving the new assembly time to dry, I had stopped here, and started back up when I had a bit more free time. during this session with the tender, I added the framework under the car. then I pulled out the parts for the trucks....... the large frames are warped badly....I hope that when assembled, the combined parts will straighten them out enough, the weight of the model will do the rest of the task. cleaning these parts up was time consuming.......every edge had some form of molding marks......from mal-mated corners, flared edges and flash. left uncleaned, these unruly edgings would pose a real problem when it comes time to paint. weathering looks very apparent here the truck equalizers and axles are all in two pieces, and need to be assembled first.......I decided to assemble them, and then clean them up as a unit. something was bugging me about this assembly..........I will consult the bones...........
-
I think it's strange that the kit would have two different couplers.....early Civil war, and then the post Civil war improvement. too bad the kit didn't go the extra mile for the drive wheels, especially if the modification didn't occur early Civil war as well........a sad mistake for the concept of this kit. the only real remedy for this model would be to use the post Civil war coupler, and look up a generic steam loco for the markings. the decal sheet comes with a complete number set, something I have plenty of in my stash of spare decals. another interesting thing about the model, is that they show a wood load in the tender.....later steam locos converted to coal. is there ONE kit out there that is authentically correct? I built the Duke's of Hazard Lou.......a very nice model.....actually I've built both scale kits. the 1:16 kit is just like the Revellution....it has hose detailing, and I think it even had rubber bands for the drive belts. was kinda misleading.........wasn't it I want to get another car though thanks J......glad to have you aboard! no ticket needed I did do a small search for info on her... https://www.american-rails.com/general.html
-
hello Bruce.......you are correct. it mentions that here in the small informational story on it........but it doesn't cover the ensuing argument between the two states. I say give it back to New Jersey.....they're the state that built it! they do give two versions for the couplings, but not being that up to speed with trains, was unaware of this. I could look into it, but I don't think there is much I can do about it........I'm stuck with it >shrug<
-
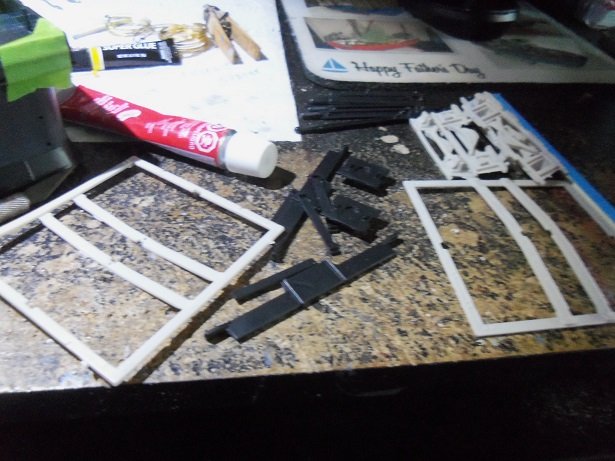
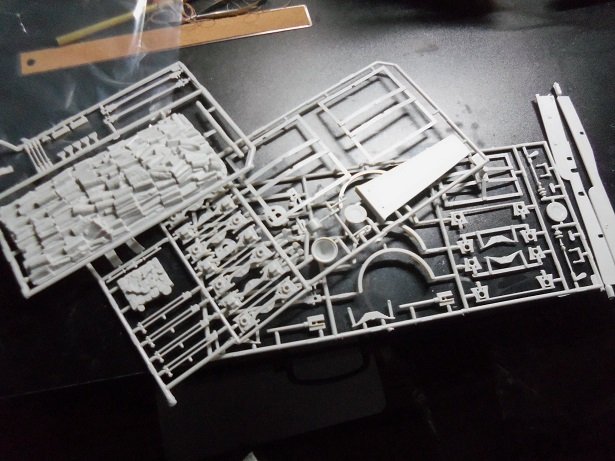
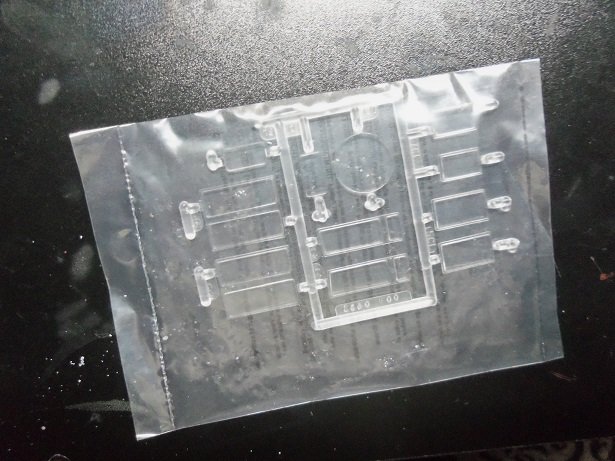
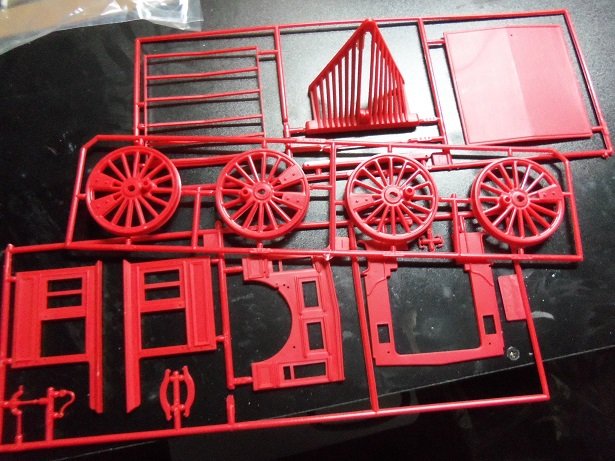
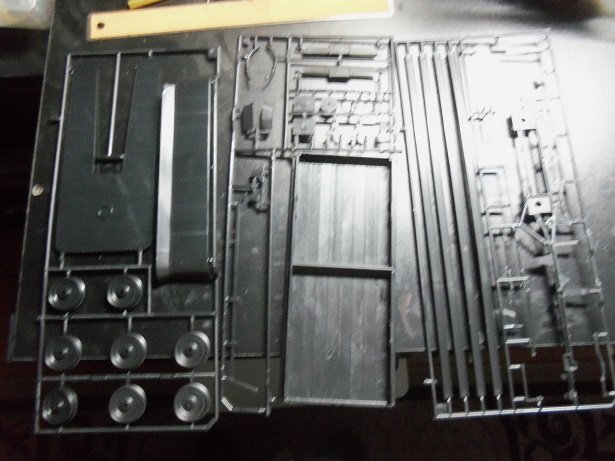
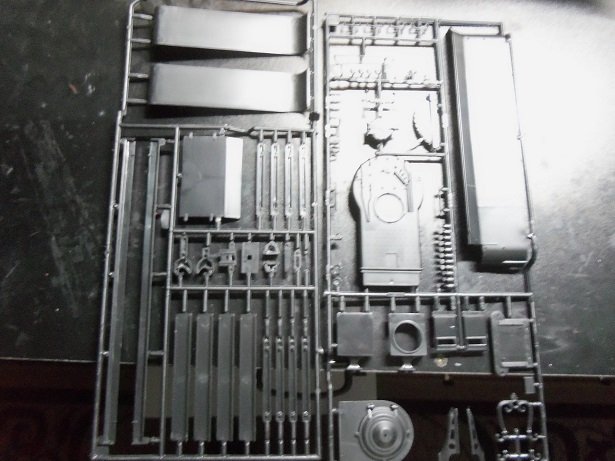
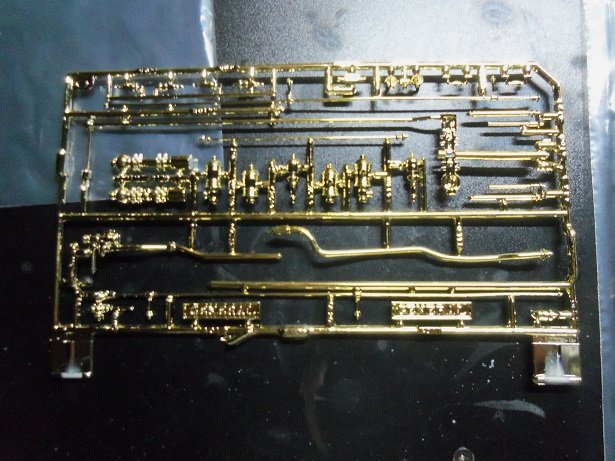
I'v got time before I take the admiral out to dinner for Valentine's day, so I can walk you through the kit contents. this is not the cleanest kit......it has some flash and mold edge issues. I will need to do quite a bit of sanding and trimming, to get parts to fit snugly. the kit is molded in two colors, black and a grayish white. the plastic is much softer than the funny car...I will need to be careful not to gouge as I clean up the parts. first the white parts...... then, a small sprue of clear parts... I keep them in the bag til I need them, so they don't get scratched. part of the Locomotive is red, so there are a couple of sprues of red parts... the majority of the parts are in black......the locomotive and tender car there is two other sprues of black parts, but apparently the picture won't upload {doesn't happen too often for me}. the instructions are pretty straight forward and the decal sheet is really nice. apparently......that one won't up load either. here are the chrome parts.......or should I say brass well.....here's one of them anyway........I believe I saw a thread on this apparently problem earlier. hardly ever happens to me........ the last picture is a section of track I need to assemble and paint.......that should be interesting ..........ah....hem...........doesn't want to up load that one either. guess I need to see what's going on, before I continue. I'll be back
-
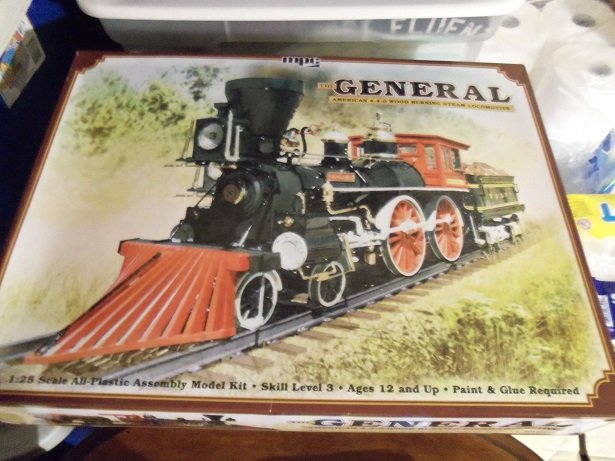
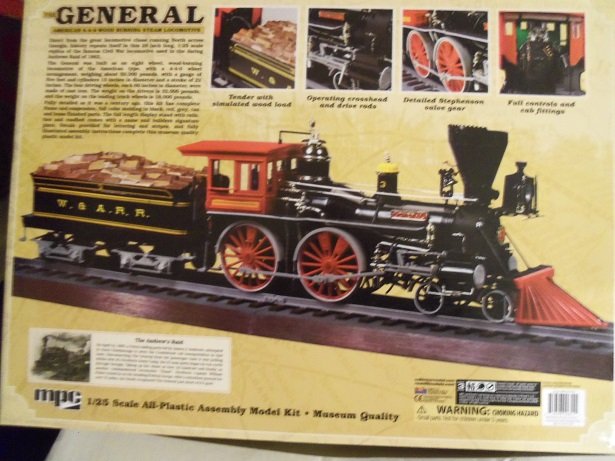
I think this will interest a lot of train enthusiasts.......even I was a bit surprised, when I opened this present on Christmas morning. this is a 2015 reissue by Round 2 models, of the 1980's MPC kit. I had always marveled at these kits......at the time, there were a few on the market......but I shied away from { as I did with wooden kits}, thinking that I couldn't give them the quality job they deserved. trains in the early 1800's were inadequate to the rough terrain, as miles of railroad track were laid down during the fast paced railroad expansion period.the biggest Achilles heel of the American locomotive, was that the driver and idler wheels were all in a fixed position on the train's frame. it wasn't until 1836, that a fellow named Henry Campbell invented the swivel truck for the idler wheels, giving the suspension more maneuverability, so the train could better navigate curves in laid track. this meant, the tighter the radius of the turn, the wheel could flex to accept the curvature..........with the earlier suspension set up, most trains would derail, if the forces were too great for the wheels to stay on the track. this wheel arrangement was so named the 4-4-0 arrangement. by 1885, around 85% of all locomotives were set up with this arrangement. this particular locomotive played a roll in the civil war........comical as it may have looked. the Andrew's raid or also known as The Great Locomotive Chase, happened in 1862, by a fellow named James Andrews. he was a Union raider and came up with the idea to steal a train, cutting rail communications between Atlanta and Chattanooga, and burning a few bridges while they were in the neighborhood. the keen thing here, is that they weren't able to make a clean get-away.....all because of an early security system........a rope tied to the bell cord, attached to a gong at the station. a conductor named William Fuller gave chase on foot...........then by hand cart........and later by commandeering various engines along the chase route.......... in spite of traps to slow the pursuer down along the way failed, Andrews and his group was forced to abandon the train and disperse.......they never were able to complete their mission. they were all eventually captured....eight of them were hanged. I started to tinker with the model about a week ago....figured I'd assemble the the basic parts and paint afterwards. there is also going to be some challenging paint work.....things I don't normally do the kit doesn't give that much of a paint scheme either.........I've been looking online to find any info on it.
-
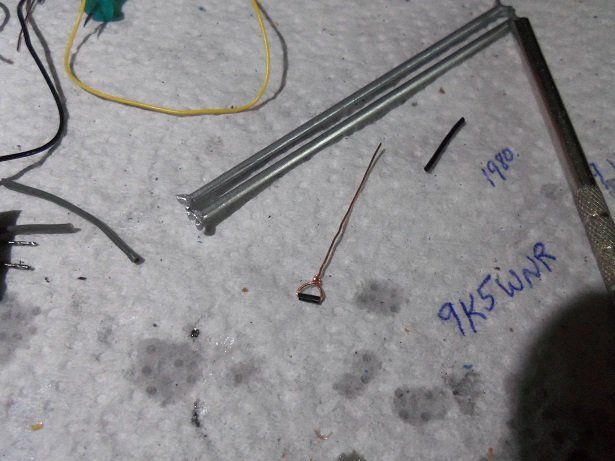
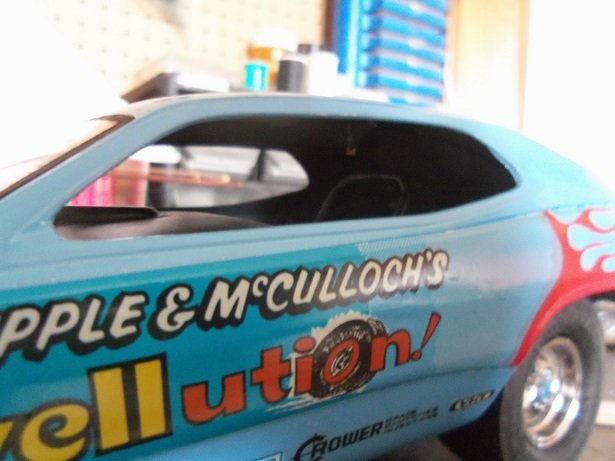
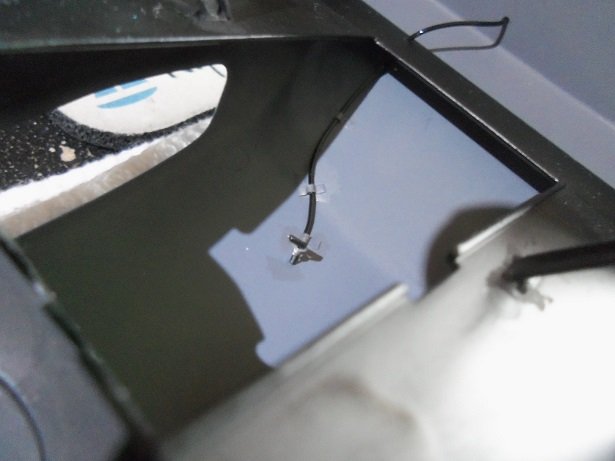
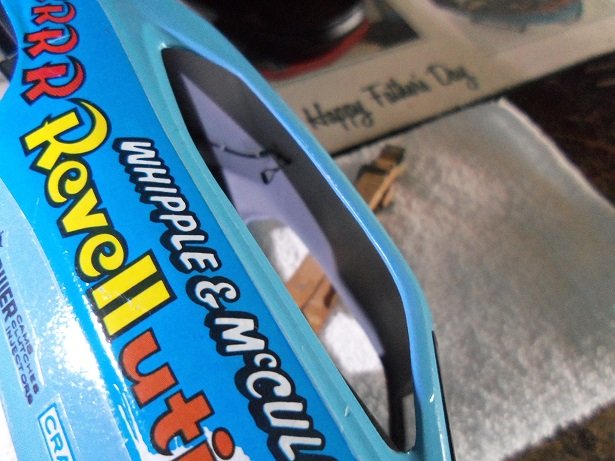
sorry to say........snow was the word of the day over here. I didn't do much on the car, although I'm beginning to wish I hadn't decided to .......well, you'll see it soon enough last night the sidewalk plow went by and practically closed off the driveway.......so this morning I was out there again, doing hard labor. the boulders were so big, I felt like I was working on a chain gang! ...making small rocks from large boulders. once I got back in the house and caught my breath, I began to tinker....threading a very stubby piece of black hose onto a piece of wire. shaping it, it gave me the makings of the pull handle for the chute the support bars for the body have already been painted aluminum. I had decided to run the cable from the roof. getting a good idea of how long the cable needs to be, it was cut to length, a hole was drilled through the cockpit shroud, and the cable was fed through it. it was then fastened in place with some brass brackets that I had made for another of my projects........worked well here. the main part of the pull handle was painted silver......the grab handle part was left black. it was a bit of a pain to thread the pull handle into the tubing.......but once that was done, the brackets and around them was touched up in the flat gray. putting the body on the car, I tried to get a picture her........it's not very good all it shows me, is that I need to touch up around the window again {'cuz I keep pick'in up the body by the roof}. here is another unflattering picture. here's a better one.........I'll try and get a better one once the car is finished next up.........the brake lever / master cylinder....and plumbing. I need to do some various touch ups too.