
HOLIDAY DONATION DRIVE - SUPPORT MSW - DO YOUR PART TO KEEP THIS GREAT FORUM GOING! (Only 13 donations so far - C'mon guys!)
×


popeye the sailor
-
Posts
16,007 -
Joined
-
Last visited
Content Type
Profiles
Forums
Gallery
Events
Everything posted by popeye the sailor
-
 the foil might not add that much to the thickness...but it does make them easier to shape regarding the decals.......your kit would specify if they are water slide or dry transfer.......but Jack is correct. I haven't done a kit with dry transfers. I've read up on them, and saw a video in you tube. they seem like a crap shoot.....if you don't get them right the first time ................😭
 -
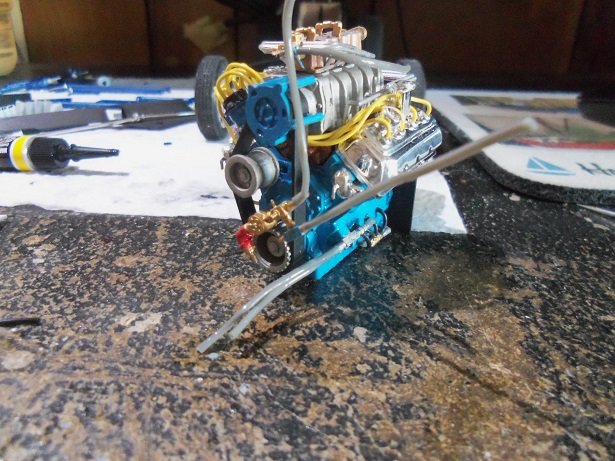
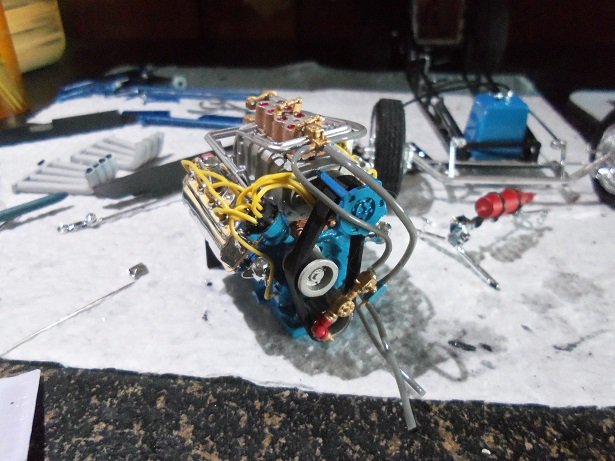
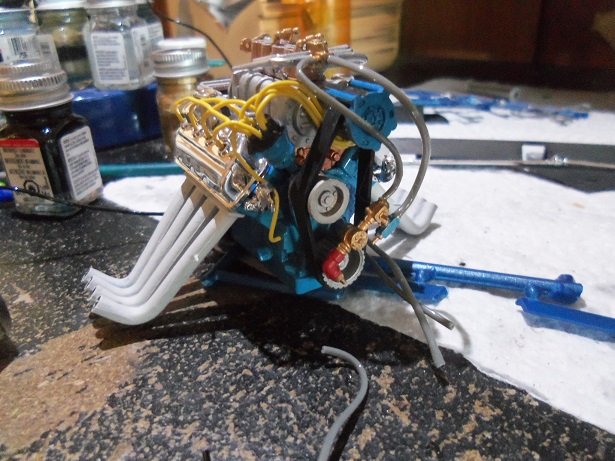
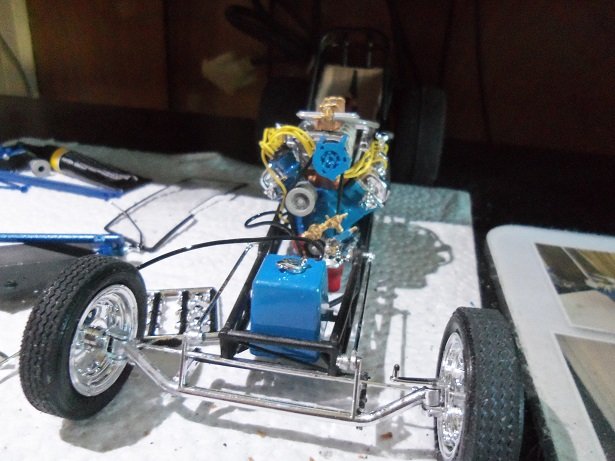
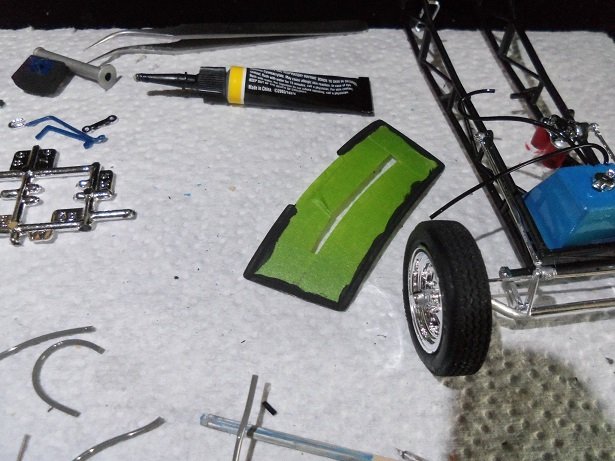
...and it continues all this talk about decals today got me all peckish. considering that this kit is a 1988 production...and the decals look good, it still got me thinking. everything is beginning to hinge on the engine being in place.......I don't want to put the steering assembly in place....might be in the way.......you know, that sort of thing. so I braved putting some of the hoses on.........the oil pump first. I hope they are long enough....some of them weren't and I resized them {cut new ones}. the upper ones are the fuel rail feed and return lines......disaster there.....the pin for the rail broke, and so did the one on the pump. I thinned down the wire I was using to replace the pins.......small gauge brass and they go on much better. to spread out the ends of the hoses, I used a short piece of that mig wire.......I was also using it to make the pins. by thinning down the wire, I can drill smaller holes.........for places like on the fuel pump, there's not a lot of meat there to drill in the first place I got them in place after the repairs were done. I spent some time making the decals.......the Accel decals and the back window dressing...I'll paint some clear lacquer there before it's put on. as for the Accel decals, I'll just fit them in somewhere. I should have taken a picture of the decal sheet, but for some reason or another, I didn't. as like what happened to J.........if it happens here, I'm pretty sure I can come up with something.....the Testor's decal program includes many images and car body designs. they's work best on 1:25 scale........but I think I can enlarge them to work for me. there is a nice big dragon, that I'd love to fit somewhere after cutting up the decal sheet, I started off with the front grille and the rear deck. everything was going fine, until I got a bit too aggressive with the blotting.....yea, these decals are borderline....another year or two, and they'd be trash. the body was on the main table...... before I started with the decals, I did a dry fit of the windshield.......fits really good. I had to take a double take around that passenger window.......don't recall seeing those white blotches. it's just the camera trying to make me look worse than I really am here's the front grille....you'll see the chip maybe I can blot it out with some black wash or something. the rear fared a bit better.....I was a little more careful with how I smoothed it out. I cemented the chute in place, but I held off on the cable routing {it's just black hose}........I may run it up to the driver seat..........although, I could also opt to run it along the roof. I'll need to make brackets from some flat brass......easy enough. it'll give the chute time to dry too. after touching up all the exhaust ports on the headers, they were added to the engine. once they were dry, the exhaust overflow lines were run from the headers to the fittings on the front of each head. I already am seeing a potential problem......the two oil lines. that darn tubing is so stiff, I'll never get them to connect to the oil filter housing without breaking them. they are also going to interfere with cementing the engine in place. I need to pre shape them somehow........if they break off with the engine in place, it going to be tough to fix them. I'll figure something out

-
look'in really really good! the engine looks awesome.......must be a real complex bugger
-
catching up with your build........you've made some nice progress the boats and cranes look great on deck! super idea on the planes.......should look very cool
-
she looks great Jack! very nice.......and yes...the rigging would be a nice bit of detail to add nice tank
- 106 replies
-
- 6
-

-
- trumpeter
- john brown
- (and 2 more)
-
as long as you do all the standing rigging first, you'll be in good shape. my method varies from E.J's a bit, so, I won't confuse you with it. your doing a superb job!
-
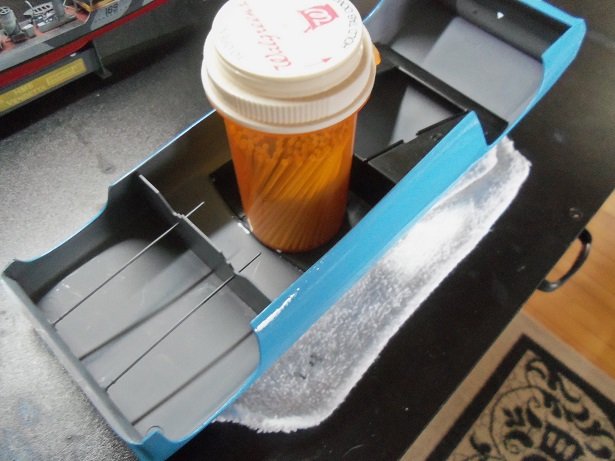
good morning all.........reporting in from a snowy Manchester N.H.! not totally sure, but I think we got 6 inches of fresh powder last night. so, I gotta contend with that after taking Gibbs out {he'll be happy to see it}. sitting here last night, I did play around a little with the model...... the steering wheel assembly has been assembled.....just got to touch it up and paint the brackets. the chassis is partially rolled out from the garage.....I'll tow it out the rest of the way, when I get back from snow blow'in the driveway. the masking tape was removed from the back window......gonna paint it with clear lacquer. I'll make a decal for it, to dress it up a bit. now turned right side up. oh darn..........gotta get moving.... I'll be back!
-
goth! that's the biggest problem with decals.........unless they have been stored in a controlled environment, the chances that they'd be any good is quite slim. I keep all mine in sealed plastic bags and in my little cabinet.........in a drawer and kept out of the light. unless there is a stamped production date on those aftermarket decals, I would suspect them being the same condition. I ordered decals from Revell for the Cutty Sark, to replace the decals that were bad in the kit I got from E-Bay........but even those decals weren't any good! they have an extremely fragile shelf life. this also depends on the decals too......take the decals from my kit here. these seem rather thick, compared to decals from other brands of models, I cut the end tab off the decals the other day and wet it. it looked like an actual decal........likely could have been used for a plaque, if the model was to be cased up........it slid off with no trouble. so, I feel good about them.......but I'm still going to use an air of caution, just in case. micro cracking is a major problem
-
great looking winch Pat.....nicely done I like the face that the ruler has the numbers printed on it..........it would keep me from having that bewildered look all the time, when I try to figure stuff out in my head
- 1,000 replies
-
- 3
-
-
- gun dispatch vessel
- victoria
- (and 2 more)
-
I do ink jet as well....never tried it on a laser printer. a major drawback with it though, is that they don't print white. I cheat by using white decal paper. this also helps with the transparency issue the program has. using white paper, I change the background to the color on the model and them import the image...it's how I did the A.G. hull decals. if you run into problems, let me know. I'd be willing to take a stab at it the model looks super! you did a great job adjusting the ride height
-
look'in superb Kevin! keep up the good work. remember......the more you do, the less that's left
- 1,319 replies
-
- 4
-
-
- caldercraft
- Victory
- (and 1 more)
-
I was the same way.......I did enjoy those types of cars though. they had one in 1/16 scale......I believe that Revell put it out. I built the Bel air and the Nomad. had one favorite comic......Magnus the robot fighter
-
what I usually run into are those pesky injection pin marks. some are raised enough to give a sloppy fit. look'in good though...your fix is coming along nicely
-
Kingfisher by amateur - FINISHED - 1:1 - CARD
popeye the sailor replied to amateur's topic in Non-ship/categorised builds
a very interesting model Jan....came out really nice -
thanks J and Patrick..........appreciate the good word thanks also for all who hit the like button! wish I could give another update, but I haven't gotten any more done. it'll give the body more time to dry, so I guess it's a good thing. should have more soon
-
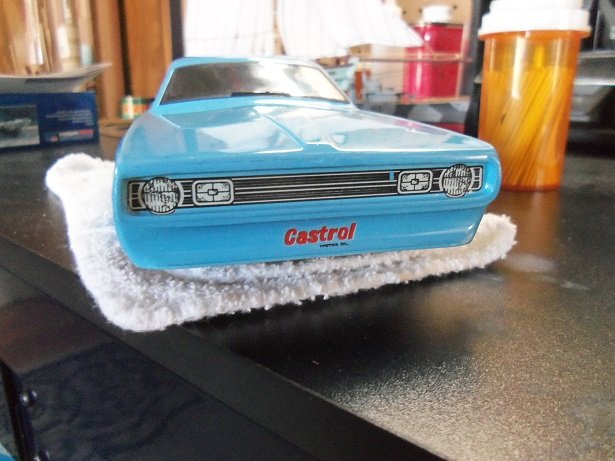
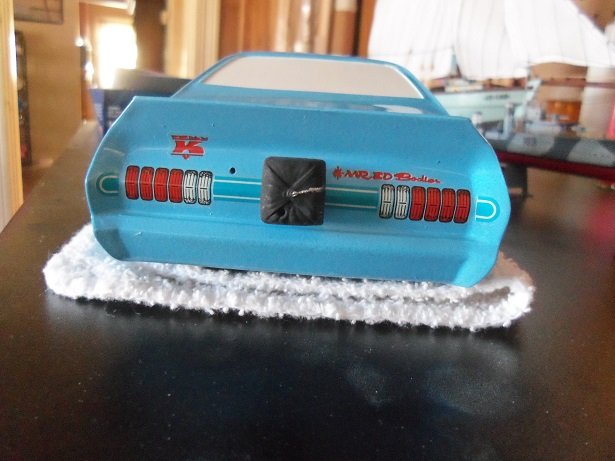
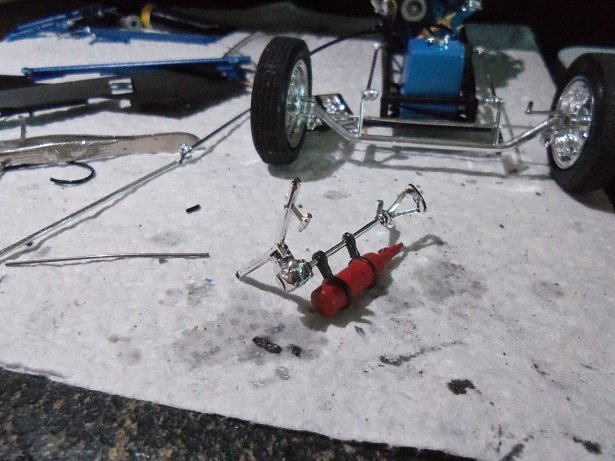
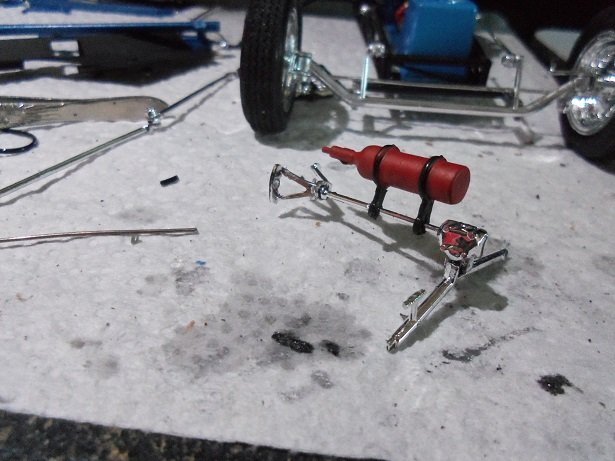
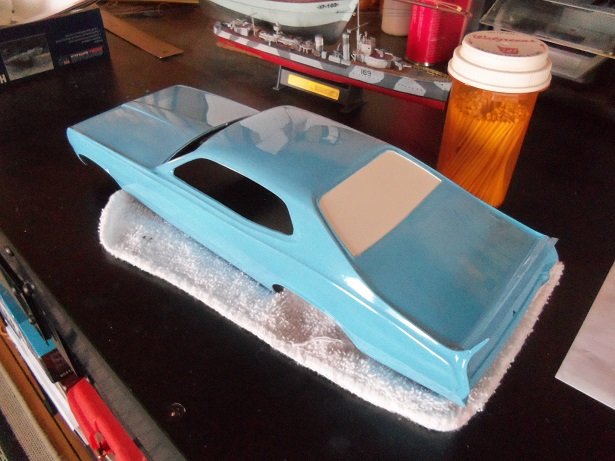
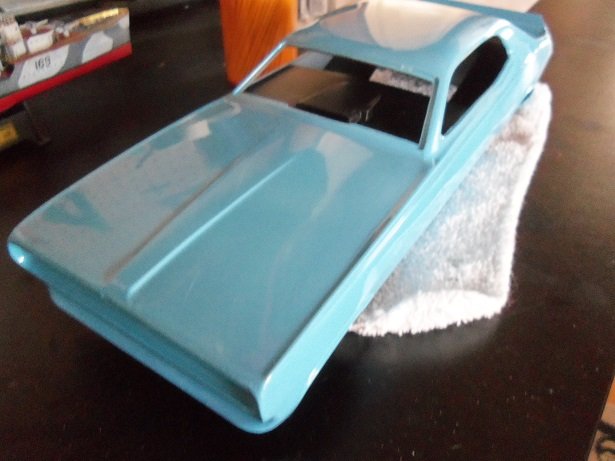
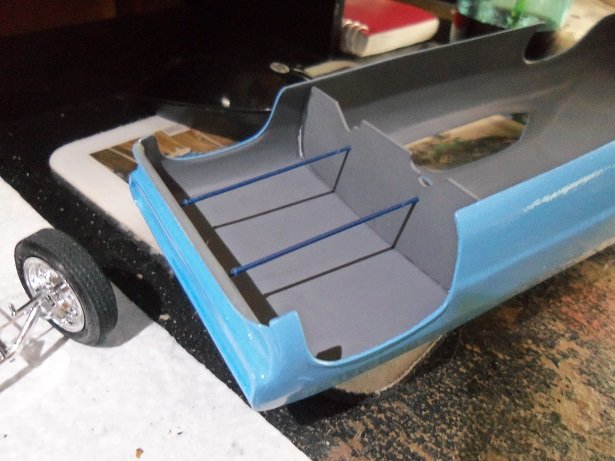
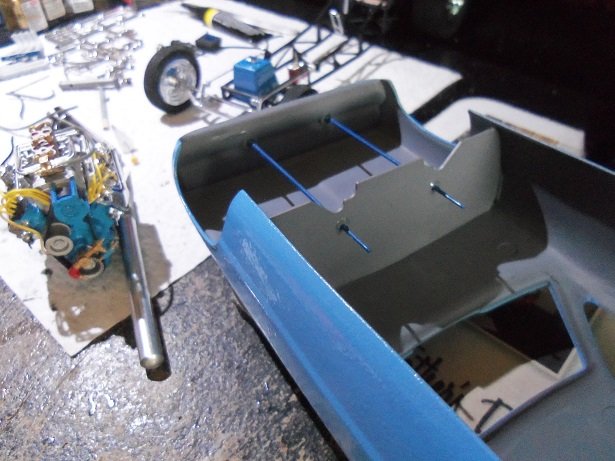
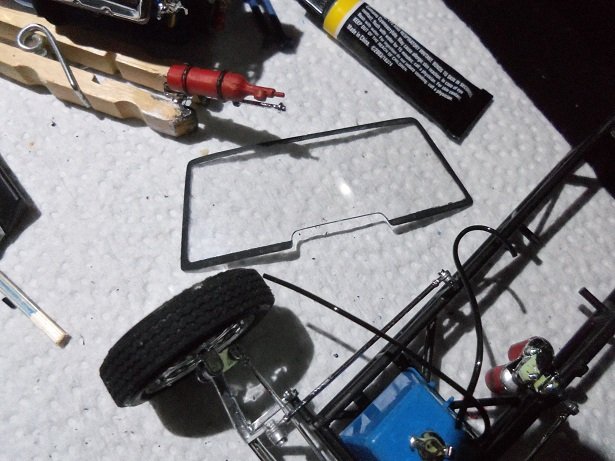
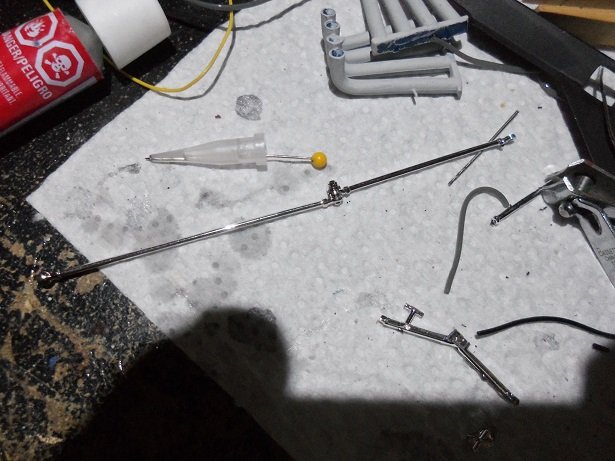
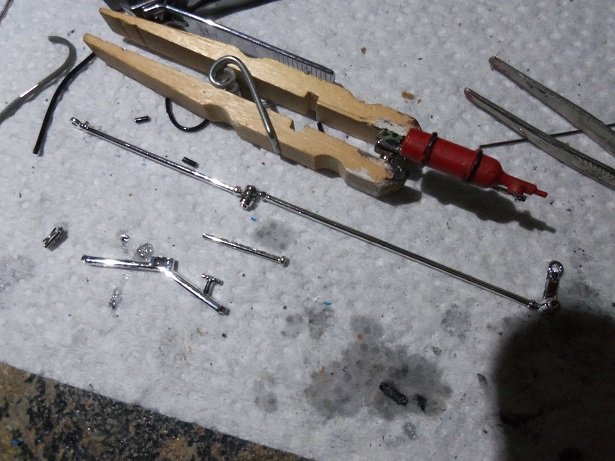
I wish this car was a Chevy............... 🏁 can you imagine this in the rear window field { don't tell Olive.....I'da gone for Jessica, but Roger can be a tough customer} any...who......I did a bit of work on the body.....gluing in the front partition panel first, with the two truss rods. I did a test with gunship gray, to see if it would match. I used Model Master and saw it was much too flat and the hue was a tiny bit off. so, I'll need to decant some touch up paint. the interior is rattle can primer gray. as can be seen, I have the roof sitting on my mouse pad. next was lining up the master cylinder with the brake lever, which is located on the passenger side cockpit panel. the windshield was in a sandwich bag.......meaning that before the folks at old model kits acquired this kit, the windshield was likely loose in the box. there are a few very minor scratches. the frame around the windshield was masked off and painted flat black. I only need just enough gray paint to do touch ups..........obtained a small bottle and did the touch ups. I also touched up around the inner part of the windshield opening, so no blue would be seen........the masking did quite well around the wheel wells and such.......only some minor touch ups in the corner of a side window opening the cockpit / firewall shroud was added next. we took off to go shopping..........when we got back, the rear deck partition panel was installed, gluing the back part of the cockpit shroud in place, seeing that it sort of locks in with the rear partition. originally, I was going to paint the bottom of the cockpit shroud gray, but later figured that it didn't matter. there are two braces that need to be added after all this is dry. the masking was removed from the windshield........ it's not perfect, but it doesn't look bad either. I assembled the drag link, but haven't installed it yet. I've begun to paint the fire extinguisher. once it's painted, I can assemble the steering. all this can then be added. but here is how the movable steering works....we start with the drag link, which is connected to the left side spindle. this joint moves freely..... near it is the cross bar that the steering box sits on. there is a pin, that will be inserted through the drag link linkage, through a mount on the frame, and cemented into the hole in the steering box. this will leave everything free to move, except the pin and box. the linkage also moves freely............I've successfully done it! I usually have a hard time.......something or other usually gets too much glue. it is held in suspension further down the frame {towards the front end} by a U bracket, to keep it from sagging. you'll see it when I finally get it assembled.


-
above and at the base of the seat sounds like logical places to have it.......I just might try for the seat. toughest part will be making the handle
-
are you still having eye problems?
-
superb progress OC.........I would have never thought of gun ports opening like that. just goes to show you........ they look great!
-
very nice job on the yards Jesse........more times than not, I use Ca on the brass too.
- 1,306 replies
-
- 6
-
-
- syren
- model shipways
- (and 1 more)
-
for this model, they just show the cable going from the chute to the rear deck. if I wanted to do it {per Mark's suggestion}, I'd have to make it from scratch. I think it odd that they didn't include it......the model is certainly big enough. I'll see about making one thanks Mark!
-
did you start a build log James? folks here could see and help you if you did Hi there Jerry! hope you and Charlene are well!