
HOLIDAY DONATION DRIVE - SUPPORT MSW - DO YOUR PART TO KEEP THIS GREAT FORUM GOING! (Only 72 donations so far out of 49,000 members - Can we at least get 100? C'mon guys!)
×


popeye the sailor
-
Posts
16,007 -
Joined
-
Last visited
Content Type
Profiles
Forums
Gallery
Events
Everything posted by popeye the sailor
-
 Daniel........the rivet counter in you is showing! what a beautiful stove!.........such detail! very.....very well done
 -
well hello Peter! so glad to see your back at the table. I do hope it wasn't anything serious that kept you from it. Billing had another process for simulated calking between the planks.......I tried it on the Regina build. thin strip mahogany was used on that model.......I've been wanting to try it again and I may have that chance. I've never tried thread.......I may one of these models ....it look good! seeing the mahogany deck platform.....I received another Nordkap kit last Christmas. it has the mahogany parts sheets........give me the hint that our kits might be around the same age. I plan to build another old billing's model from it....the Progress. working on her, I'm reminded of the problems you had in cutting out the parts so far though, it has gone well WOW! it is a pleasant surprise to see your progress.......I hope to see more. be well and fair winds!
- 207 replies
-
- 1
-

-
- billing boats
- cutty sark
- (and 1 more)
-
I see a couple funnel cables...........your right.......it's very hard to see fine thread in pictures she's looking really good Carl.......very nice work
-
lots of folks didn't like the blocks......as well as the eye bolts. I've used them for all of my 1:96 scale models, without any problems at all. I've also heard laments about the masts and how they tend to sag........a lot of these problems though are due to rigging tension. to understand string tension and stretch is the best way to execute the rigging, so it doesn't distort the masts and yards. you wouldn't be doing a disservice substituting wood
- 89 replies
-
- 1
-
-
- constitution
- revell
- (and 1 more)
-
you could add a mural inside........just kidding now you have an idea of how large the case will be.........easier to figure out a suitable place to display her awesome!
- 1,350 replies
-
- 1
-
-
- constitution
- model shipways
- (and 1 more)
-
very nice progress.......very nice use of color she's look'in good.
- 714 replies
-
- 1
-
-
- lady nelson
- victory models
- (and 1 more)
-
bear in mind too that you'll probably be adding margins along the bulwarks........they hide a lot of sin
-
not sure how high the coaming was.......but I haven't seen a hatch or hold yet, that didn't have a cover on it. whether it be of wood or canvas, they were all covered over in the event that water came on board. sometimes less is more........too bad about the problem with the beams and the deck platform. on most wooden models, if there is a deck platform, it is mainly cemented to the bulkheads and that's about it. with a POF model, the beams and framework is laid and the planking is done over it, without the use of a deck platform. if you desire to treat this model like a POF, create the border along the bulwarks and lay the beams and framing. doing the borders will enable you to cement your planking along the bulwarks......do away with the platform. if you chose to use the deck platform, then lay beams as you would see bulkheads, and then lay the platform. modification is a tricky business.........unseen problems can sneak in. I know you want to give this model as much realism as possible.....but sometimes, a shortcut can't hurt........and who knows, it may open up another possibility if your going to leave the hold open, figure out the height of the lower deck, fit in a section of deck platform and plank it over. it will look great! I like what your trying to do.
-
you kinda need to weigh out the pros and cons.........the wood ones will always look the part.......but even though blackened, the brass belaying pins may patina after a time. the wood ones might be more fragile that the brass ones, concerning breakage.........but the wood ones will take more kindly to cement better than the brass ones. there are other things to consider, but overall, the looks of the model must take precedence. then again, I haven't seen any belaying pins made of wood that I liked.......they always look like the tops of a banister post I got some wooden ones supplied in my Thermopylae kit.......that;s exactly what I'm going to use them for I do notice that you next hole is in line of a bulwark post.........did the Bluenose have pinrails?
-
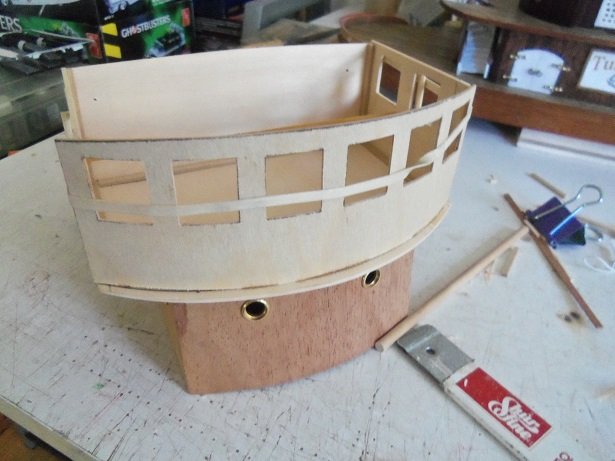
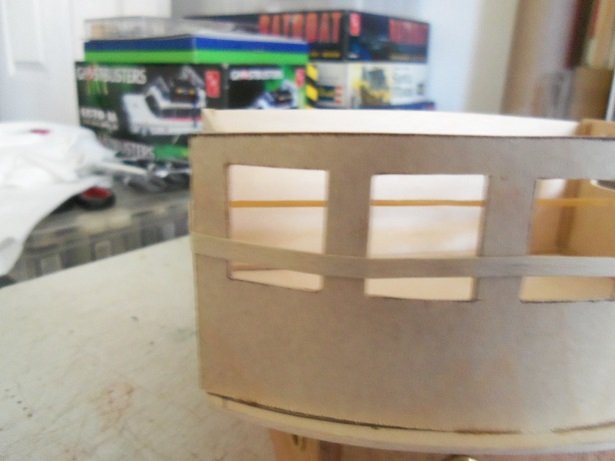
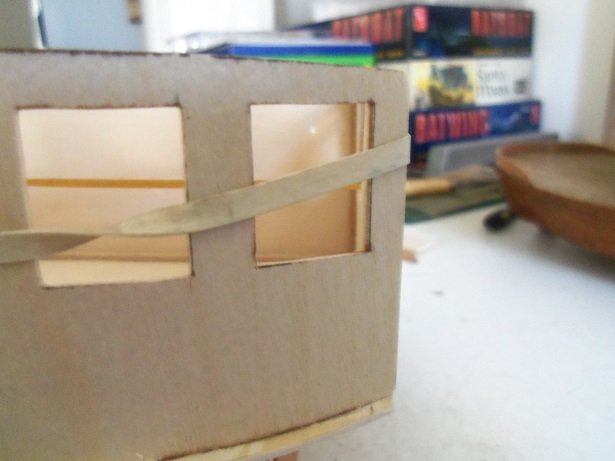
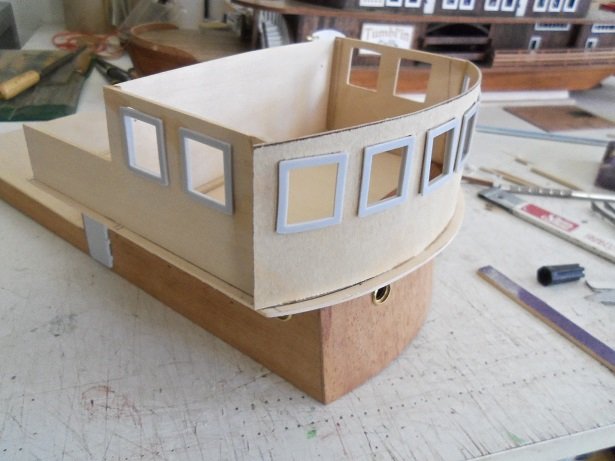
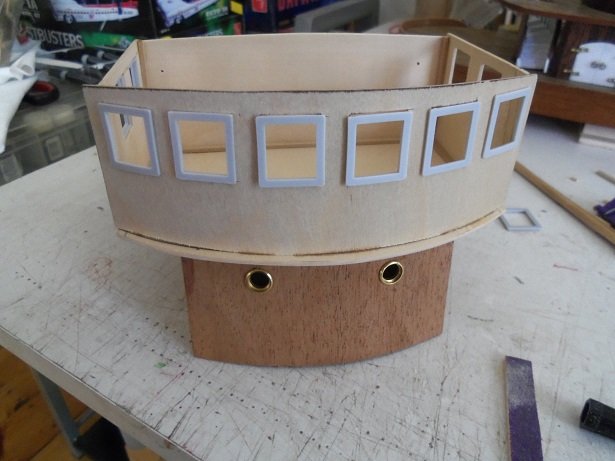
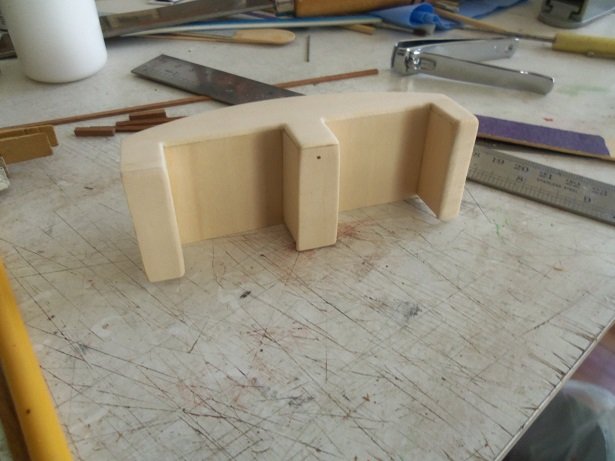
the search for the pictures continued........the admiral joined in the search. with my finger on the shift button, I can right click and send the pictures from the camera, anywhere I want in the computer.......I always put them in the pictures folder. for some reason, the computer was running slow, which caused me to send them to a folder I never use. trying to find it was futile, since where they went off to, I had not made an account to log in....but.....the admiral did since this was her old computer, I went into her partition.....into her user folder........and there they were! I have them now.......set and ready to show you what I did yesterday morning, before I went to the Dentist. oh.........the deed is done, by the way.......the rest of my teeth are gone and I have my new dentures. it's a little rough to say the least.........I still need to go back a few time for adjustments. Friday night, I said the heck with it, and cemented the fascia on the helm structure. I will trim it down when it's dry........but I made sure that both end windows are flush with the sides, rather than make a five window fascia for it. I need to trim the ends, but I did some sanding to the outer windows to insure that they are flush for the window frames. then I started to fit the window frames.......I fitted the starboard side a bit to tight, and it cracked. a quick repair. one thing I noticed about the window frames, is that some have a shallow sill, and some have a thicker sill. checking how many of each I have, will better tell me where they should go. I still need to fit the port side. some may remember this part I made quite some time ago. I believe I made it for the trawler Syborn......I want to see if I can use it for this model, without too much adjustment. the height is too high........need to chop some off of it, but I also saw that I will need to add width to it. the planking is still ongoing........adding a few here and there. by this time though, I had to go make the appointment, so I had to stop here......the rest of the day was a waste.......only adding another plank to the hull. need to get the decorating under way as well........yesterday put the ka-bosh to that too

-
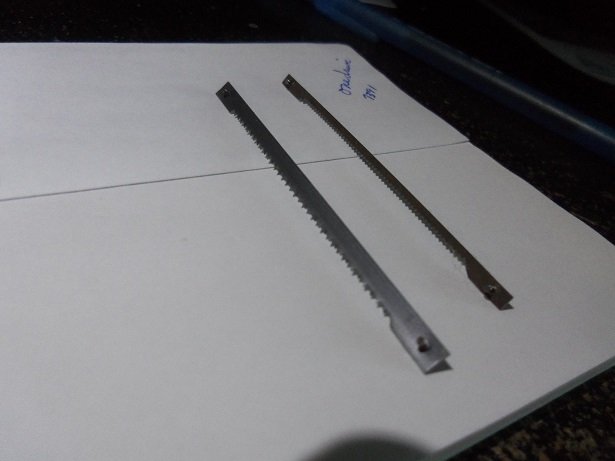
sorry I didn't get right back to you Jack.......I had to run off to my dental appointment. I read something about the sale a while ago.......didn't follow up on it then, but shouldn't be too hard to find info. I was told by a few folks that the last couple of weeks that Sears was open in the mall, was seen as a badly disheveled store. stuff was everywhere........in piles and totally disorganized. I won't even go near the mall at this time of year........they alter the way in and out, and the ordeal took me three hours to leave, the last time I went on a holiday. thanks for reminding me......I have plenty of blades at the moment, but I think they are all wide. the one on the left is the wide blade.........the one on the right is the narrow blade. I like it because I can cut tighter curves with it, without binding or stopping the saw {I've done it before}. I have to do some searching either that, or I'll get another scroll saw..........it's as simple as that. I had some pictures.......an update for the progress, but I lost them. clicking the wrong destination.....they are likely off to never never land. I hope to find them
-
looking really good.........the interior is amazing!
-
thanks Marc great! I made a pair of stair masters
-
thanks for the tip Mark.......I haven't made it over to Sears.......but from what I'm told they are gone. I do still have a package of them, so if I have to go on a scavenger hunt, I'll have something to go on. I can't alter them........the ones I need have a pin on each end, to fit into the saw's jaws. I just looked them up.........saw bird is a bust. they only carry the 5".........I need 3". Olsen Saw is my best bet
-
thanks Michael.......I think it's one of my biggest downfalls. I watch so many projects....many talented modelers is an understatement! good to see your browsing through......your quite the modeler yourself your cutter is amazing!
-
the lighting looks very good Robert gonna look great when you gt the deck fitted together!
-
I saw her in the gallery...........totally missed the drone! fantastic looking model so much detail and very well done.
-
sometimes, inside the hull, the dimples where the holes are located can be seen. looks like you have them correct to me
- 77 replies
-
- 4
-
-
- icm models
- Markgraf
- (and 1 more)