
HOLIDAY DONATION DRIVE - SUPPORT MSW - DO YOUR PART TO KEEP THIS GREAT FORUM GOING! (Only 72 donations so far out of 49,000 members - Can we at least get 100? C'mon guys!)
×


popeye the sailor
-
Posts
16,007 -
Joined
-
Last visited
Content Type
Profiles
Forums
Gallery
Events
Everything posted by popeye the sailor
-
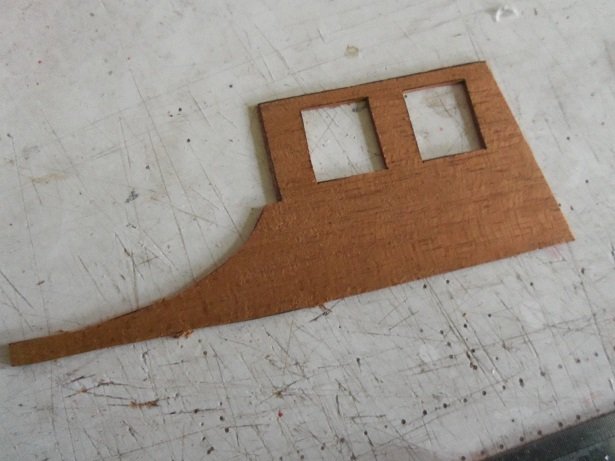
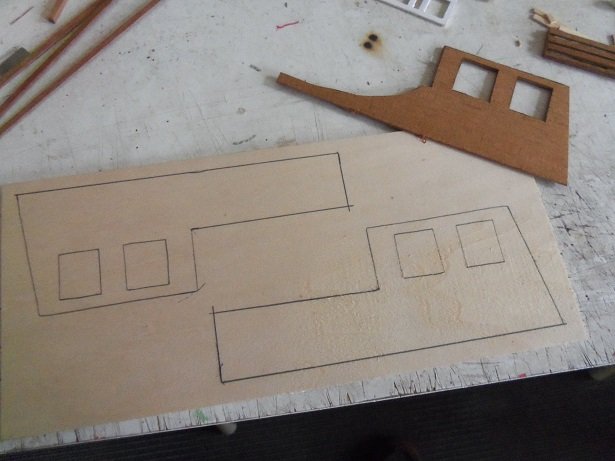
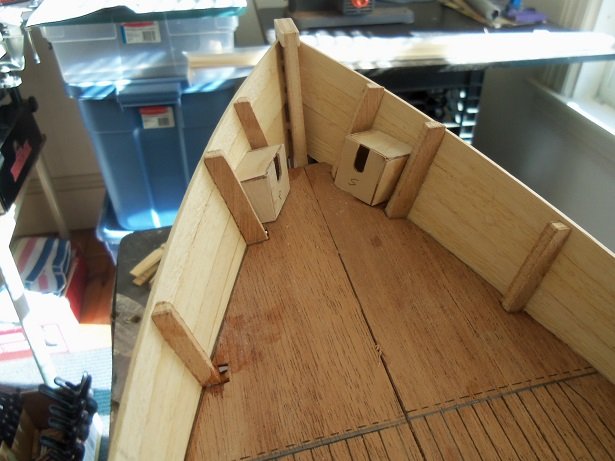
 I need to hurry.........errand time, but the admiral is taking Gibbs out. anyway........I almost have the 5 mm strakes added to the hull. the other side got the reinforcements for the deck platform tabs. just two 5 mm planks more to go, and then I can continue with the 7 mm. the stern begins to get filled in....this makes it better terminating at this point. as I work on the planking and the Tumbl'in Dice {as a fill in}, I'm allotting time to do a few things to this build off to the side. the helm room need to be modified......the Progress doesn't have some of the finesse that the Nordkap has. so I need to do away with the sloping curves bulwark, that border along the sides of the helm room. I will straighten them out and level the height. but I need to trace the new parts first. taking the best side to trace, the windows were cut out for reference. .....and then traced on a piece of 1/8 flat stock. the bulwark part won't be as long.....but it's good to have extra. they were then cut out...........still needing to cut out the windows. on the helm deck platform, the walls were measured 1/8 th from the edge, as they are on the original platforms, and traced out. the arc of the front is not totally exact, but it's close enough. not sure if I will need the back line, but I added it anyway. well folks......she back inside.........errand time is at hand. I will be back
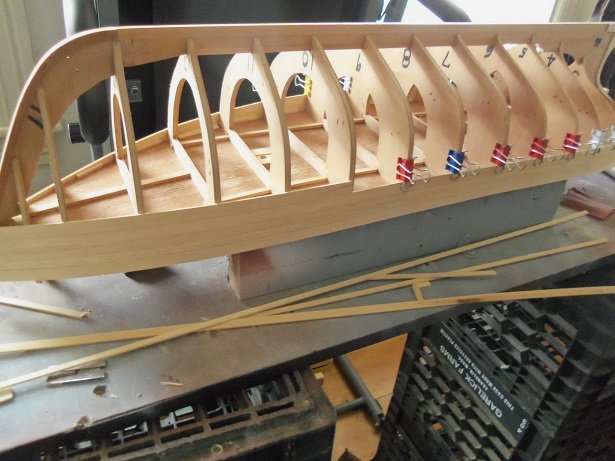
-
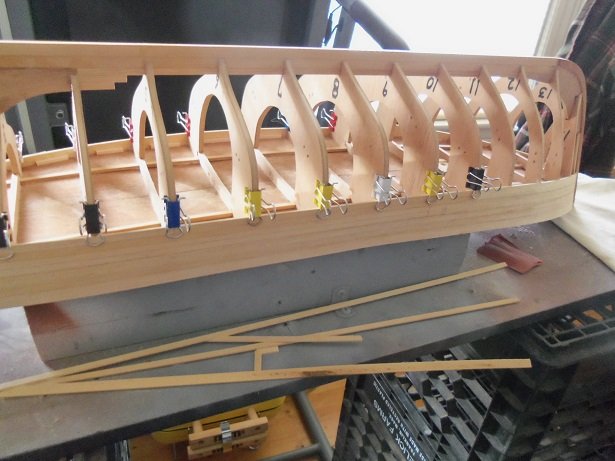
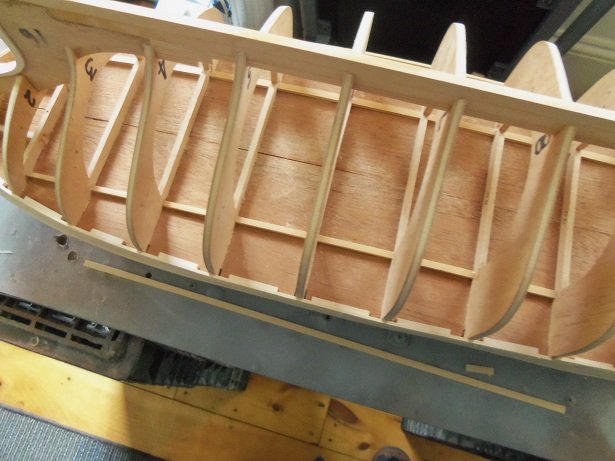
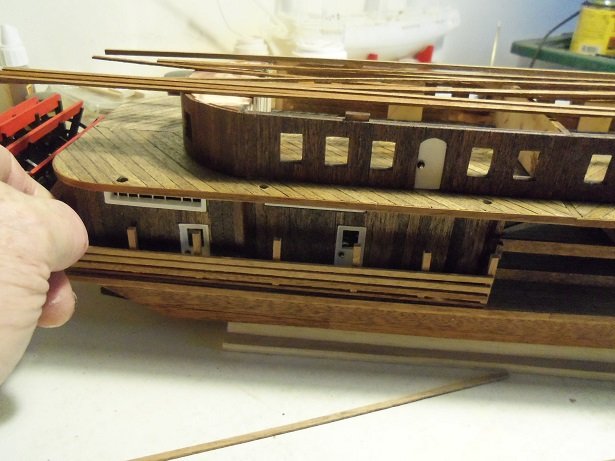
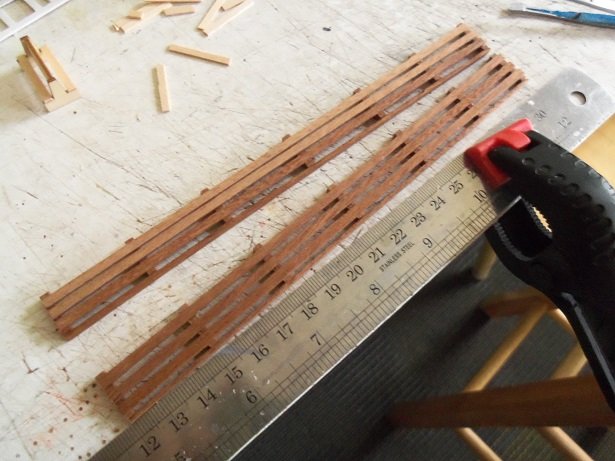
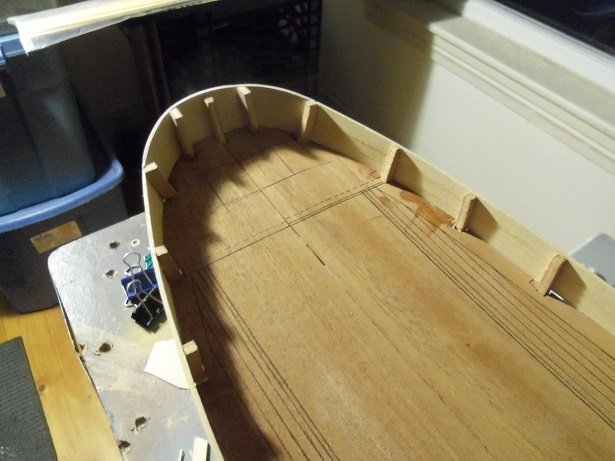
hey there! I have some progress to report........not much though. kinda boring during the planking process. I did a few more things on her, on the 9th of this month........first was to get that light in place so I can see! so, after filling in the bulwarks with the two strakes of 7 mm, I ran two more strakes of 10 mm, about 1/3 down the length of the hull and staggered. from these, I will run 5 mm to fill them in....all this just so the bow will be totally filled in. after running the first 5 mm strake, the tabs for the deck platform aftward, were reinforced with 1/8 short pieces. when I do the other side, it will get the same treatment.....no more running the risk of breaking those tabs. especially during deck planking.
-
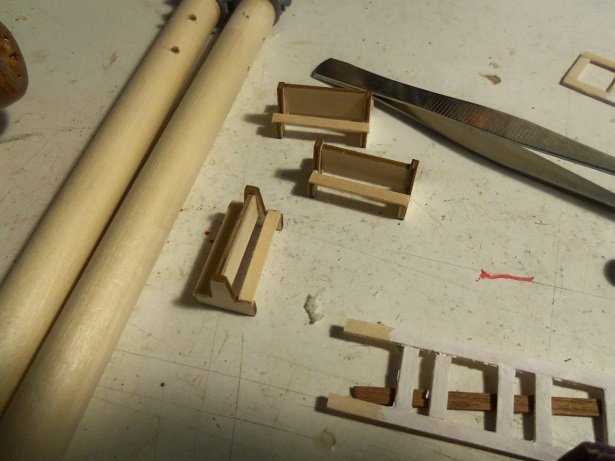
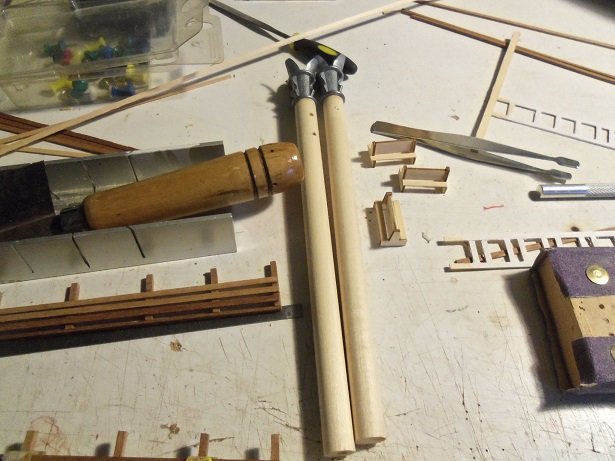
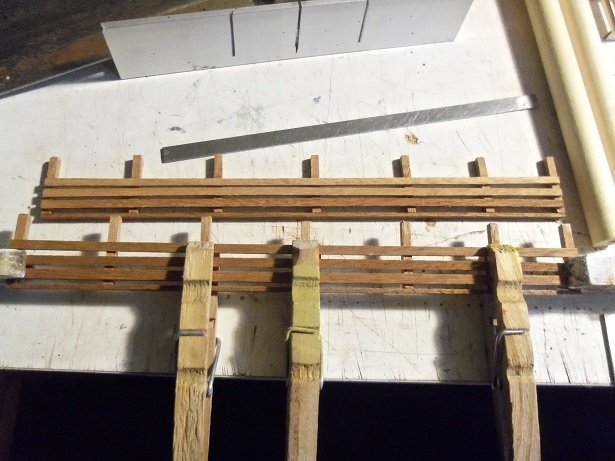
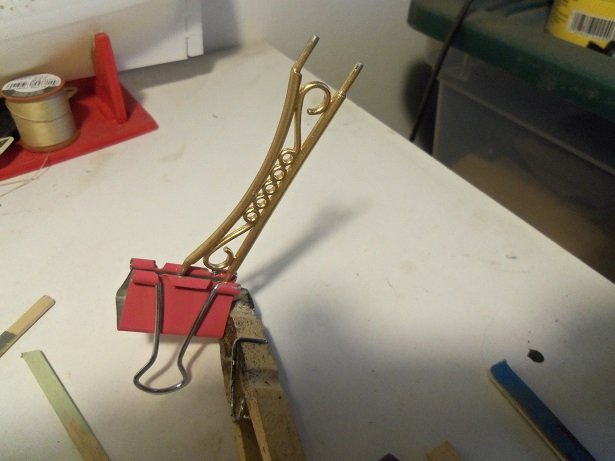
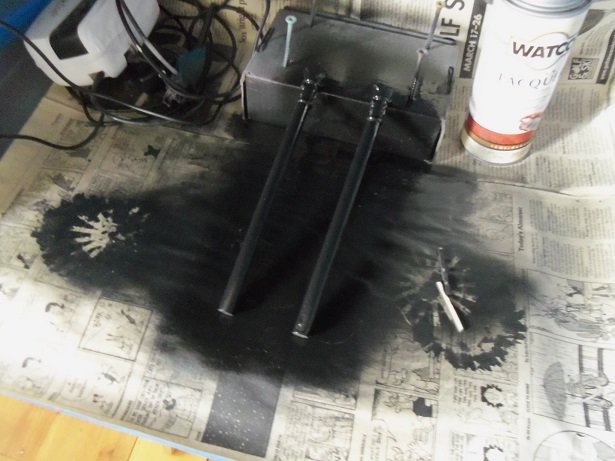
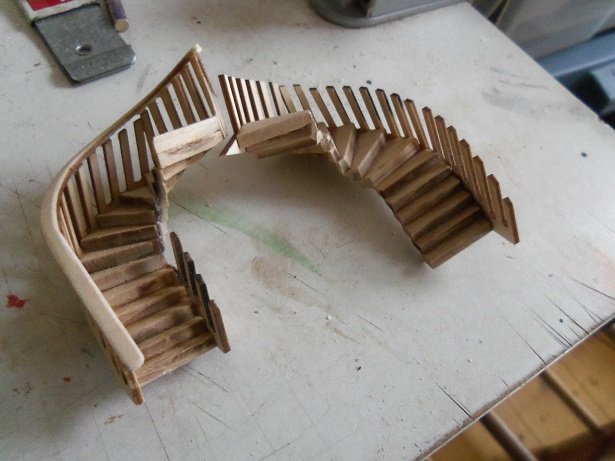
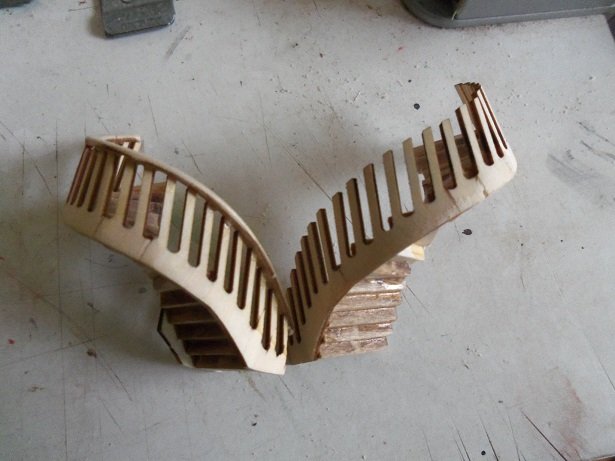
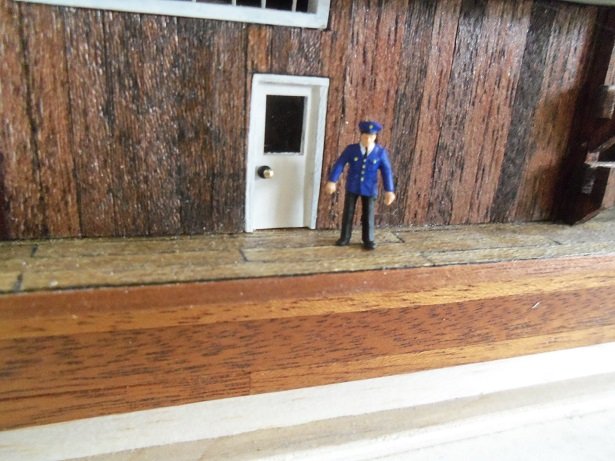
I've been tinkering with her here and there.........ideas are spread all over the table. I hardly have room to do anything with the Progress.......it's like I need another table {like a hole in the head}. I started to assemble the benches.......there are only three in the kit. as can be seen, I've also been working on the smoke stacks. the holes are drilled for the decoration that separates them. ....which leads to the railings in question. I think they are too high.........shouldn't be a huge deal, since other aspects of this model are out of scale, but it is. fitting them to the model........this is quite evident. this is only part of the whole idea. there is more to them......idea in progress the decoration that separates the smoke stacks needed a real good cleaning up.......quite a bit of flash. after all the mold lines were filed off, it got a coat of gold paint. the smoke stacks were taken to the booth and given a coat of flat black. I used a spray can.....the paint was really thin. with the stacks set up this way, a few runs developed, so I trimmed the runs off with a razor blade, sanded them, and gave them another coat. I drilled holes in the base and fitted small diameter dowels in them, setting them up in a different way to dry. not liking how the railings were going, excess wood was cut off the posts, making them look a bit better. a cap will be added to the railings before they are cemented in place....but before I reveal how I didn't listen to myself........here is the progress report on the stairs. I know your all anxious to find out. not that great, I'm afraid........the first one still fits odd, and the other side is looking to follow the same trend. the outer banister broke in just about the same amount of places, forcing me to cobble it together...........still the same bunching near the top of the staircase. sad but true........I like Brian's outcome a lot better..........................I will still try, but don't be surprised if I do an about face now I was told that it was the worker's day off..........but I caught one of them hang'in around. very kind of 'em to let me take his picture .....and now to show you that I don't even follow my own directions .........I cemented the starboard side railing in place without doing the cap rail first! looks a lot better though, than my first vision of them. I need to make a pair for the fore end of the boat. more on her soon
-
you got that right Carl.........I get the shakes whenever the site is down ! appreciate the kind comment and the due diligence Brian....cripes......yours is even coming out better 'n mine! I do feel good about 'er though, since she's privately owned, and not from a major shipping line company. it gives me a bigger window....come to think of it, I don't even recall if there really is a "king of the Mississippi". anyway.......I have to show the admiral what you've done on yours............she'll probably run out and get me another kit I do have the remains of the Robert E Lee in the closet, given to me by a patron of the site. I was going to make a ferry out of it, but I may change my mind. I have the paddle wheel frames, but I saw how Cathead made his, so if I need to alter them, I can try. but that's another story OK..........it's update time
-
I didn't even know it had a name.......we're set to get a taste of it too into Friday happy to report that me 'n the snow blower are ready
- 140 replies
-
- 5
-

-
- the sullivans
- trumpeter
- (and 2 more)
-
German WW2 Armor Models by nickbud - PLASTIC
popeye the sailor replied to nikbud's topic in Completed non-ship models
sweet looking models! -
look'in good Channell.........your making some great progress on her the PE looks fantastic!
-
thanks for the kind comments gents I've been tinkering with her a little today.......beginning to get the feeling that the railings might be a bit too high. you might have had that feeling from time to time........start something that looks cool in the start, but reality sets in, and you begin to think better of it. I don't think it would be too hard to make an alteration should have some pictures up soon. that's good to hear Chris! yours looks much better than mine, but thanks for say'in so thanks Marc........and I have many projects to prove it! I'm glad you like the build......still more to go. hope you follow along! I'm in the same boat Kevin........if I'm look'in in here, I'm not gett'in anything done..........if I'm at the table, then all the logs I watch build up and it tough to catch up to 'em all. compound that with not look'in in the scratch builds, because I'm look'in through the kit builds. as was said in the Monty Python sketch "Dennis Moore": "my, this redistribution of wealth is trickier than I thought?!?!?" honestly....I can't think of a better predicament to be in
-
great looking model CDW! the cat walks really dress up the sides of the hull
- 467 replies
-
- 4
-
-
- mikasa
- wave models
- (and 1 more)
-
finally done with my work week I can get back to what I was doing I'll get back at the table tomorrow and see how my ideas for the first level railings have dried.......I've only done one section so far....will have pictures on this tomorrow. hi there CDW! I'm trying to do something a bit different. if you come across those pictures....I'd love to see'um thanks for the good word.....hope you follow along.......I'm probably at the half way point. yes OC.......wouldn't wish that on anyone! I hope your better Chris........really love to see more of your project. superb looking model thanks Kmart! I wasn't too keen on the materials use to make it...but it did turn out well. now to try and replace all that other metal junk. Cathead did a great job on his paddle wheels.......the frames are made of wood too! I would have liked to have done it too, but I chickened out
-
no like button on that one Chris.......I hope your recovery is progressing well. thanks for the good word....... thanks pat. I did more on her yesterday.......I didn't get any pictures though. I'm also trying out something a little bit different for the first level railings. I should have more soon
-
I diluted it when I did it.... wonderful progress OC.......the windows and deck fitting look really good really coming together!
-
yea.......I like to use 10 mm brads. I have a lot of them from all the Billing kits I've built. they make great buttons and levers too. my thing is those beads......but, if that's what it calls for what happened to your hand mate?
-
it's been fun.....a lot different than what I'm used to. thanks again Lou
- 171 replies
-
- 4
-
-
- krabbenkutter
- authentic models
- (and 1 more)
-
she looks really nice...very clean and vivid colors my first build was like that......I found that not cementing between the planks allowed the gaps to show up in a big way. I have this model in my stash.......your log will make for great reference.
-
thanks OC......that's the way they set......I didn't do or add anything thanks for look'in in! thanks Lou for the like.........almost done mate!
- 171 replies
-
- 5
-
-
- krabbenkutter
- authentic models
- (and 1 more)
-
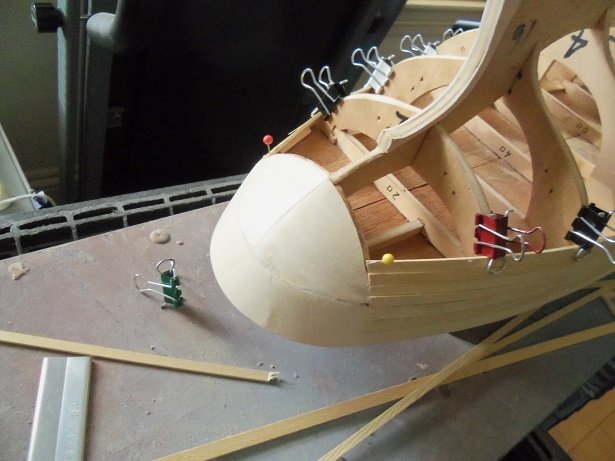
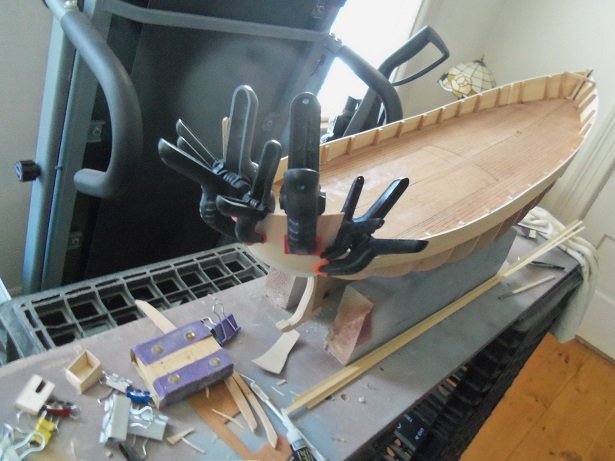
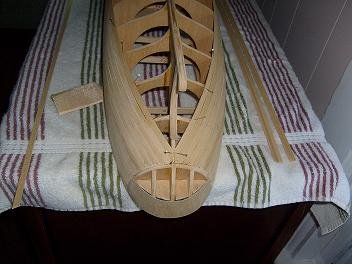
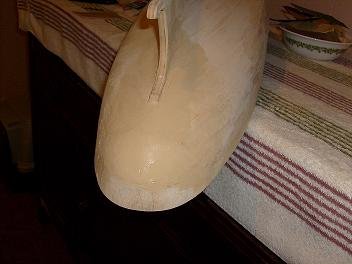
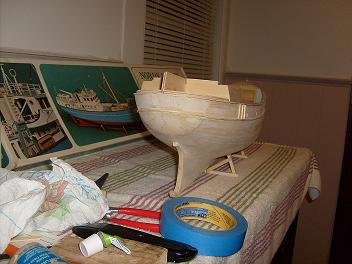
when the moment of truth came.......fitting it was terrible! one curvature was working against the other.......and it just became too crazy. so, I said the heck with it.......I split the difference. the first side was fitted and cemented in place. the other side was fitted and cemented in place soon after....and then I couldn't stand it any longer. that transom strip needed to be thickened up! I was gonna run out and get some flat stock, so I could make a whole part for it......but I grabbed any 1/32 pieces that would fit and cobbled them in, filling the span of the transom part! hee....hee.......looks like me the other day at the dentist when ll this was dry, it was trimmed and sanded to some degree. I didn't want to go too crazy on it.......damp basswood does not sand well........no..no..it don't there are a couple areas as I mentioned, but I think it will take less putty to smooth it out. I left a sill to terminate the planking. you can see some of the bow parts on the board.......the bulkhead is there, cut from mahogany sheet. in the first Nordkap kit, that part was plywood, which was a lot thicker. most of the aft cabin parts were plywood as well. I may double it up, should I use that one.......although, I cut the other bulkhead part from 1/8 basswood flat stock. it's not much different, but it's a lot stiffer. when I worked in the bow cavity, I cemented in two posts for the bulkhead to rest against. they will also serve as the locator points for the beam that will fit against the upper edge of the bulkhead. I cemented the first beam in place already.........it was out of the way. yea.......I still gotta get a light over here so I can see better........it will benefit the pictures too. the stern too is all closed in.......I think some of the CA worked it's way around the deck platform too. well........I think I bent yas ears long enough........my god........I'm such a chatterbox! I thinks I'll slinks back in me hole and see what other forms of mayhem I can get into my god!.........some cortisone please!!!!!>>>>>>>I an SOOOOOOO itching to do a fore'cle deck!


-
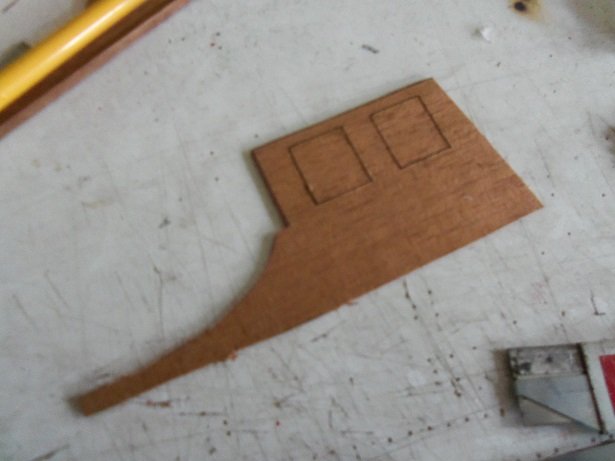
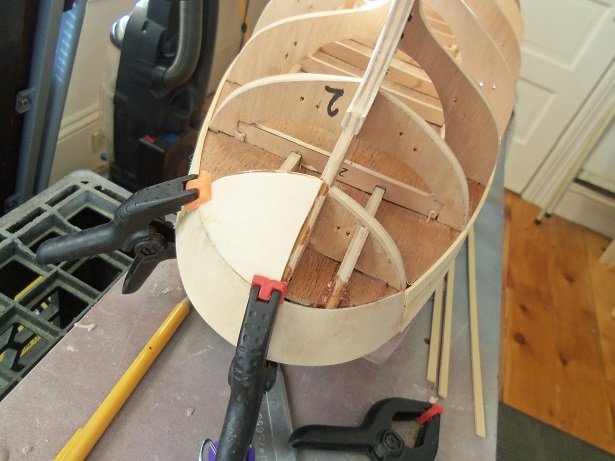
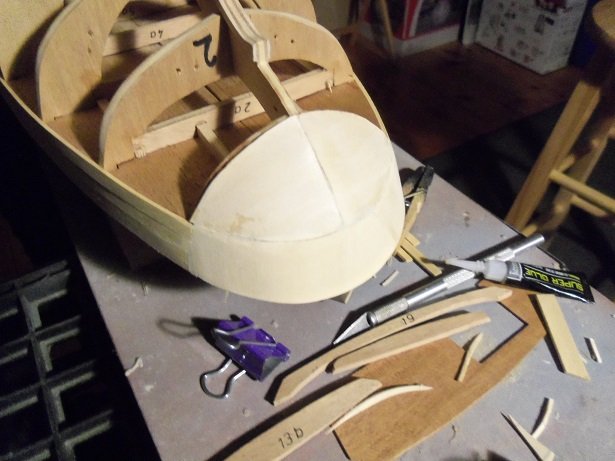
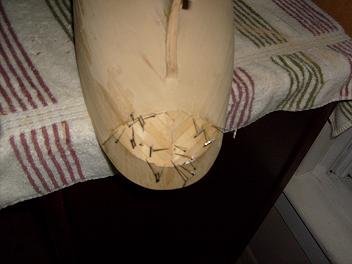
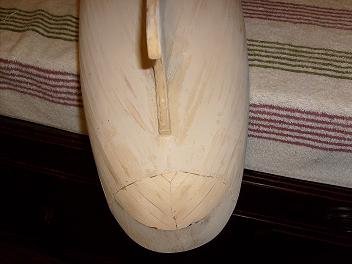
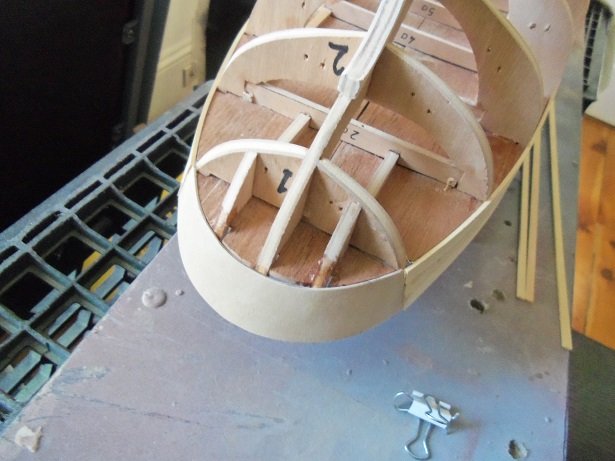
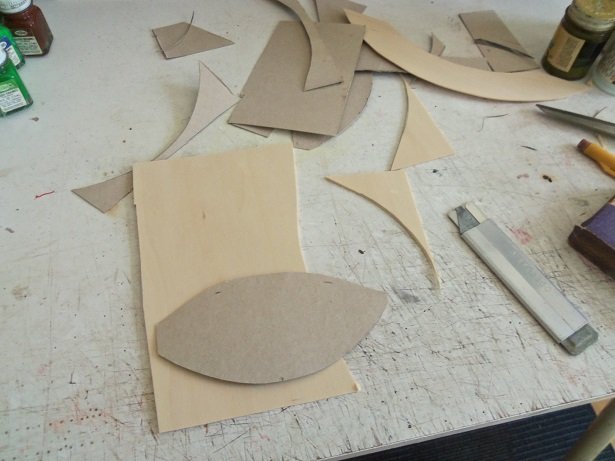
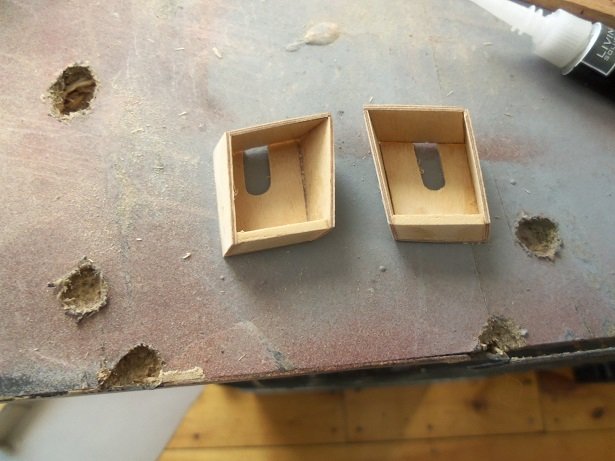
I was going to post this on the Nordkap thread in the nautical discussion forum, but seeing it here will set the tone for what I did today. when I built the Nordkap, this area of the stern was really tough, since this was my first time actually planking a wooden hull. I laid the planking until the counter {I guess this would be what this area's called} was totally isolated. I came up with the idea to use the cast off planking to fill it in then it was sanded then it got a coat of filler then it got sanded that was much later.....guess I didn't snap a picture of it sanded. what I intend to do on the Progress is a bit different......I'm going to try and cover it with 1/8 th basswood flat stock. one thing I would do beforehand, should have been to line along the underside of the deck platform with 1/8 strip stock......bent to the contour of the transom part. I would have something for the mating edge to lay on.....I did encounter a little unevenness, but nothing a little filler can't handle. taking a piece of card {a model box} I made up a template. bad enough there is the hull curvature, but there is an opposite curvature, since the stern is rounded {a compound curvature}. making and fitting a piece from the template, it was soaked in hot water and flexed enough to be able to trap it inside a glass. another glass was pushed inside to press it against the inside ID of the glass, and left in the sun to dry {with any luck}. earlier, before I did that, I had hot water in the stacked glass, to keep heat on it {setting it in the sun was the admiral's idea....she likes to help sometimes}. while playing the waiting game, I puttered around on other projects, coming back to the Progress, to make the anchor boxes. I will post something on this in the Nordkap thread........these I did a little differently......I added the bottom part rather than use the deck platform as the bottoms. cemented in the bow, they will be totally closed in. they were sanded and fitted into their places inside the bow cavity. I did go a bit further with the bow. I started to make another cabin bulkhead, cutting the bin opening in the middle of the bulkhead...but I stopped in the middle of it all, and worked with the bulkhead that was supplied with the kit. the bin opening is off to the starboard side, making allowance for a porthole and a door. I may keep it.......but I will finish the other bulkhead and compare them to see what I like best......I will also look at the diagrams and see what was actually there. in either case, I want to try and do a sliding door, rather than removable boards you can see that I'm impatient to get to work on the deck fixtures....huh
-
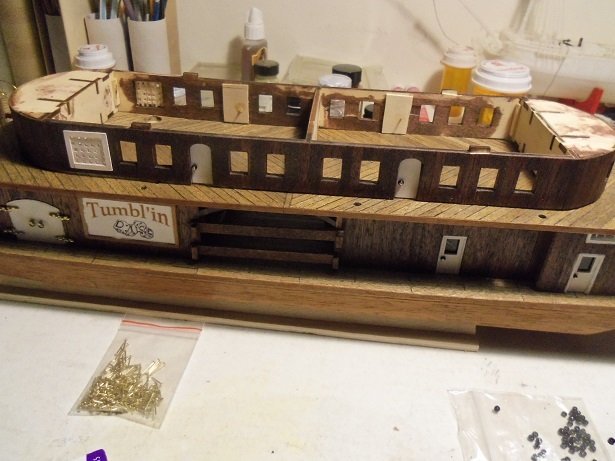
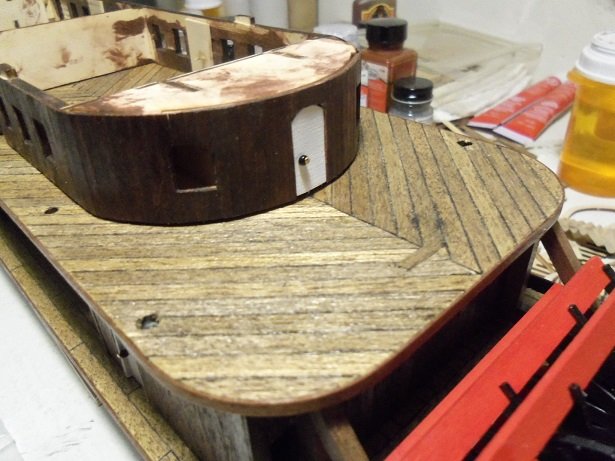
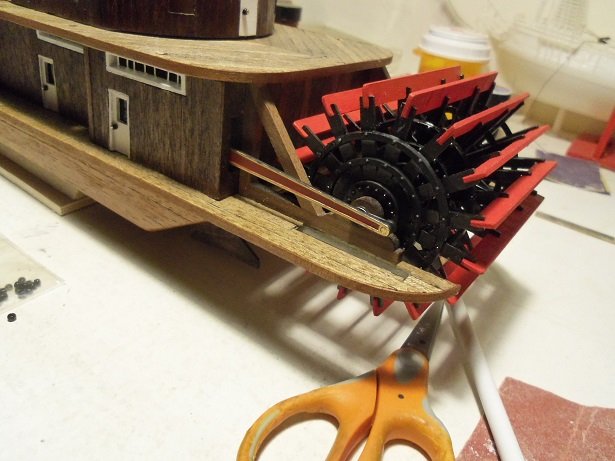
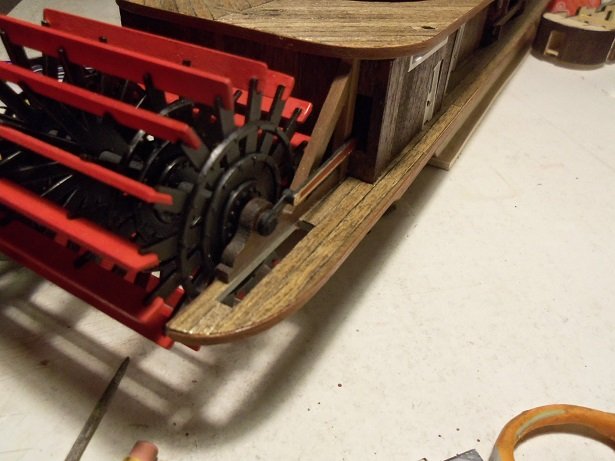
thanks for the likes...I apologize for the slow pace of the updates. I was a bit crowded at the table.........I keep say'in I need a longer table. now that I moved the obstruction to it's own temporary table {of sorts}, I can get something done on the dice. the doors and the vent covers were painted and cemented in place. much as I didn't want to {'cuz they look corny}, I added the door knobs using those black beads supplied in the kit. I gave them a backing, so they would be recessed into the door openings.......I'll paint or stain the backing inside, so they won't be seen through the windows. I'm thinking of using that tinted cello, so it may cut down on the visibility. as for the fore and aft doors, I couldn't recess them...the openings were a bit shallow. I also added the actuator rods on the paddle wheel....finishes it off. once the windows are ready and added to the structure, the third level can be added. still more to do on the first level too. I'll get to more on that soon........perhaps even the next update. thanks for look'in in......enjoy
-
I know it's been a good couple of weeks since I last worked on this project. I had some free time today, so I terminated a couple of lines. I have one more to terminate, and a few more to go, and I can call this model finished. enjoy ⚓

- 171 replies
-
- 12
-
-
- krabbenkutter
- authentic models
- (and 1 more)
-
--> August 23 <-- thanks Lou........almost done! I haven't had a chance to get back to her, but I can't wait to finish her. I'm sure you could have done as good a job. you just got to believe............imagine thanks for the good word Robert silly me.........forgot to hit the post button
- 171 replies
-
- 5
-
-
- krabbenkutter
- authentic models
- (and 1 more)