


popeye the sailor
-
Posts
16,007 -
Joined
-
Last visited
Content Type
Profiles
Forums
Gallery
Events
Everything posted by popeye the sailor
-
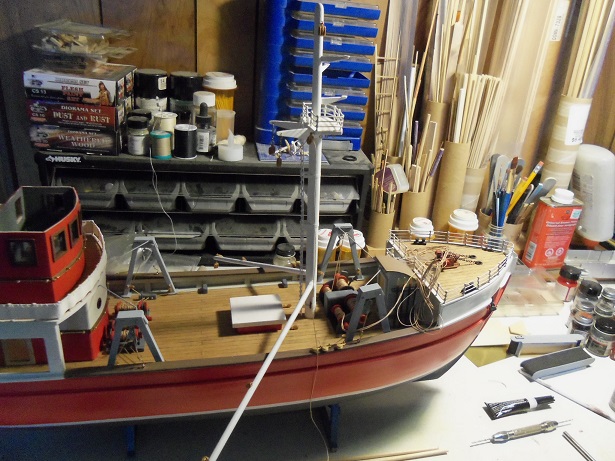
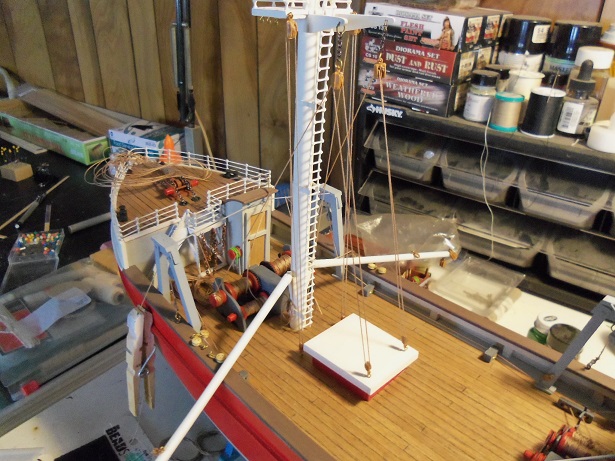
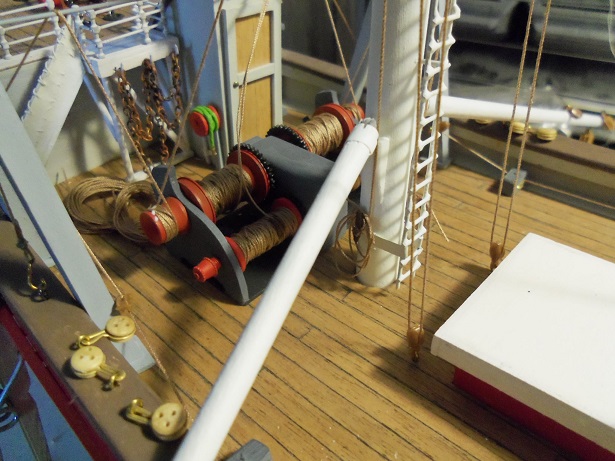
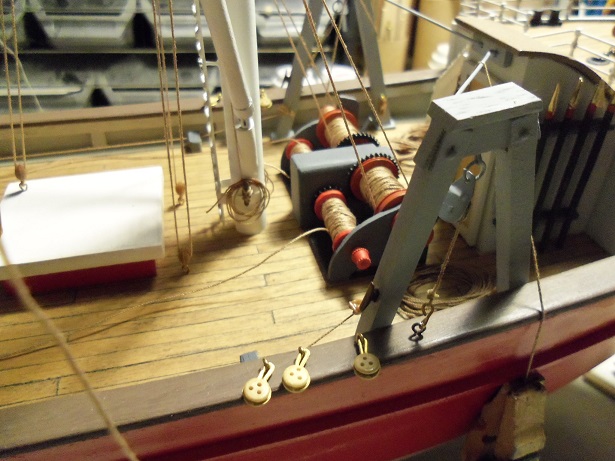
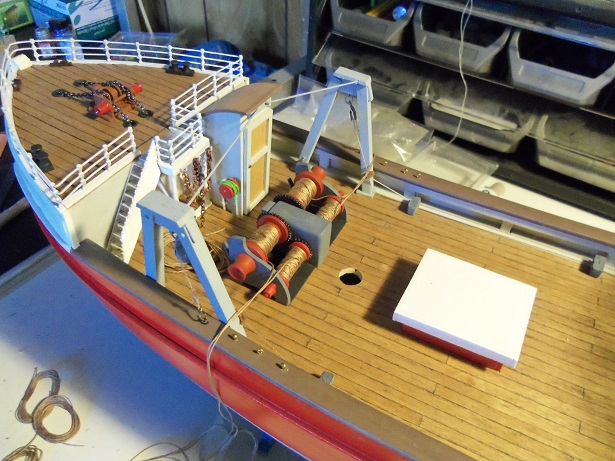
 as seen earlier, the boom winch was finally cemented in place. during the last couple of days, I did a little here, and something stupid over there.......it would have been pointless to follow what I was doing. when you hear the phrase 'rhyme or reason'.......think of me they did! wait though..........usually there's the word 'no' in front of it. oh bother! anyway........I mentioned shrouds. the fish box changed this thought a little, but I'm still doing them........just a bit differently. for the Half Moon, I got these dead eye collars {can't think of the name of them}, to make life a bit easy. I got quite a few.....I'm sure the build won't miss them. they were loaded with a dead eye, assembled, and cemented in place.......I corrected the port side, being off on the location of the dead eyes. I also cemented some single blocks to the deck. finally.......after all this time, the mast was cemented in place. no more pull'in it out for some ungodly reason I had added a couple of cleats, and a few more blocks to it. then the rigging began { I hope you can see it.....I tried to take user friendly pictures}. the center most blocks were rigged, even added a couple of single blocks to the hold, and rigged it to open and close. {not really, but you get the picture....nudge, nudge, wink, wink} where to terminate them was a puzzle........no belaying pins, so a fife rail of sorts was out {I wasn't going to use pieces of rod or anything silly}. I decided to terminate them at the winch drum. then I began with the booms......rigging the lifts. something weird about this one...I'll have to check it out. I wondered what mechanism would be used to swing the boom in and out. with the net affixed on the boom, there will not be enough weight to keep the pulley assembly taught. I will add a set of lines that will not only do that, but give the impression that they perform this task. turned around, the starboard side will be done now. I've only terminated the aft line on the port side. the fore line will be done after the shrouds are rigged. there will be some standing rigging for the bow too.......I haven't done it yet. this pulley assembly came out right.......this is the way it should look. the aft line is terminated at a cleat on the side of the gallow. the fore line will be terminated at a cleat on the fore gallow. this is done on both sides. there are some small lights that be located on those three pedestals above the top. I still have a little bit of the window maker, so I could fill in the lenses. when they dry, they will be clear.........I may try and get some yellow paint inside to color the window maker. when I do the Nav lights, they will either be done the same way, or I will used the red and green plastic inserts that come with them. the cleats for the 'swing lines' are located on the sides of the gallows..........here they are fore and aft. the layout is almost to the point, where I can cement in the fish box and the conveyors. this will pretty much finish off the mid ship, and I can move on to the helm and aft. I did have one mishap though........I broke a blade off the prop. I glued it, but it came off again........so now I've removed the prop and cemented it again. hopefully I did a better job this time, and I can put it back on. once the mid ship is done, I'm hoping for a quick finish, and I can move on to another victim.......errrrrrr, I mean project
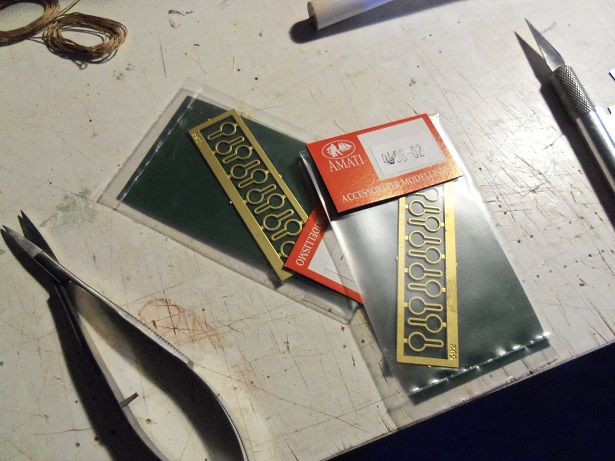

- 747 replies
-
- 15
-

-
she looks excellent Rob.........and her display area is perfect! that's a very ingenious stand too....very nice
- 1,208 replies
-
- 5
-
-
- great republic
- clipper
- (and 1 more)
-
yepper! that's me to a tee.........I'm not a gear head {I just like to look like I am}. I got the nets turned outward the proper way, and they are pressing in one of my binders........get the wrinkles out. the mast is in place......I wanted to do some of the rigging, but it was too late in the evening. hopefully I can have an update later today. thanks for the good word and look'in in
-
thanks Piet........glad to see your look'in in. The starboard side now has her bulwarks....deck is cased in. the stern is gonna look ugly........no doubt about it. but we can fix it
- 453 replies
-
- 6
-
-
- thermopylae
- sergal
- (and 1 more)
-
I guess we were ALL up early........I was up a 4:45 AM it's about time you got this off the ground..{in this case though....the keel laid} count me in on following your journey through the P.E. jungle. promise.......I won't play with the shiny stuff love that Fokker........looks real sweet
-
looks real good Jack, and the dredges lashed to the sides is a nice touch
- 250 replies
-
- 5
-
-
- willie l bennett
- model shipways
- (and 1 more)
-
sorry to hear that Walt. I hope lady luck smiles on you .........I knew you've had it rough earlier......but I think this put the icing on the cake! so sad........I wish you and the misses well
- 208 replies
-
- 2
-
-
- meridea
- repair ship
- (and 1 more)
-
thanks Pat the best part is coming. hoping the mast will be in place by bedtime thanks to those who hit the like button
-
is that what you named her........she sure is living up to her name we've all done it........I've done it with both enamels and lacquers. you can have a good day.........or.......well, it was a good day .shrug<. I'm in the same boat......but I think your in colder country than I am. I have to paint in the cellar {i'll gladly open a window for vent}. fingers crossed she looks better than before
- 165 replies
-
- 5
-
-
- cape cod catboat
- Finished
- (and 1 more)
-
thanks for the kind comments and the likes as well yea......it's kinda cool Carl......I'm lay'in two planks for every one they don't feel too thick either, which is good. I got this planking from a good friend of mine, so it's really dry. I'm going to try not to soak it in water or anything. I got another plank on the port side, and now I'm start to build the bulwarks for the starboard side. no picture worthy stuff yet. thanks John........the stern is going to be the headache......I'll end up having to shape it by the time I'm done.....I just know it.
- 453 replies
-
- 7
-
-
- thermopylae
- sergal
- (and 1 more)
-
Great Galloping Ghosts..........a two-fer! great job on the second hull Bob! now you gotta get 'er to the point, where you are with the other one. won't be tough for you, I'm sure I wuz say'en that to the admiral jus' the other day........I sez...."ya know honey, {I calls her that when she likes me}, there jus' ain't enouf dual builds kick'in 'round here.........now, who else can we pull inta the vortex?"
-
glad to see your doing well Walt! I thought you were doing great already {on the boat, that is}!
- 208 replies
-
- 2
-
-
- meridea
- repair ship
- (and 1 more)
-
very nice work on the stairways........a bit forgiving if they can't be seen. your next level is gonna look neat! gee....I had to look back in the log to see where the half round structure came from forward and upward Nils.........such awesome work!
- 2,625 replies
-
- 7
-
-
- kaiser wilhelm der grosse
- passenger steamer
- (and 1 more)
-
John.....she looks awesome! I love the 'sea gull' view.......it's a shot you usually don't get to see rigging looks great......love the pulley assemblies {sometimes hard to get them so they don't twist}. wonderful progress!
- 745 replies
-
- 2
-
-
- francis pritt
- mission ship
- (and 1 more)
-
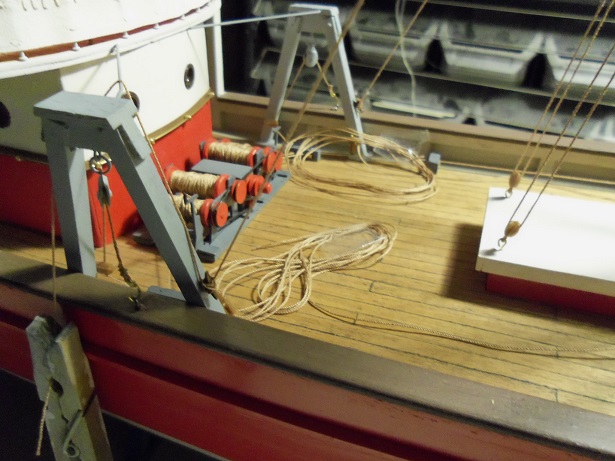
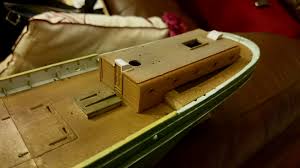
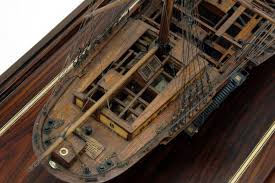
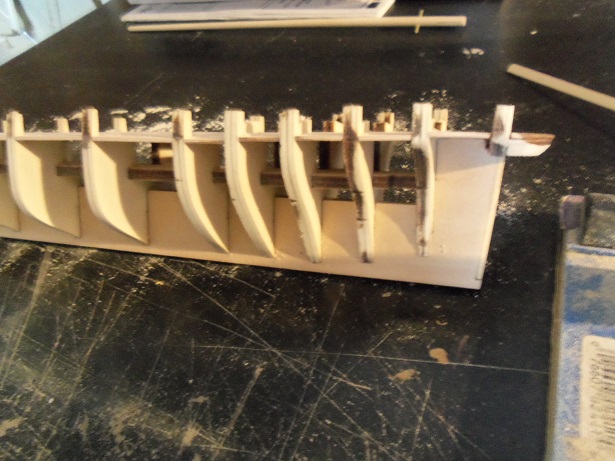
a small step forward.....but this is big. the boom winch is in place! I added the brake levers and cemented it in place.....no more parts will be added to it. the levers are actually parts that I did not use for the AmericA build........they are the light boxes. painted up and affixed to the winch, they serve the purpose well enough. you may not readily see them in the picture.......I took it this morning before the camera decided that it needed to be fed {charged up}. the holes for the shrouds are already drilled......eye bolts dry fitted at the moment. I need to adjust the port side though, since I found that the gallow for the port side is a bit forward than the starboard side. I'm sure there will be more parts added, before this is said and done more to come
- 747 replies
-
- 15
-
-
pennies from heaven! thanks gents! exactly the problem I was having John....as I zoom in on anything, the picture becomes grainy and blurry. the admiral wondered what I was hoot'in about...........she just mentioned to me that I could download a program called 'hover zoom'. I will look at that as well. thanks so much.......I bookmarked the site sitt'in here hoot'in like a kid in a candy store! thank you as well Jack ! I wasn't overly concerned about the language barrier, since I will probably use them simply as a visual reference. I down loaded it.......is that both sheets? no matter, I'll find out soon enough there are a few changes I may make as well, so going rouge will lead me away from them here and there. I hope you follow along.......shared knowledge about the kit can be a life saver, as well as a time saver. what did you do concerning the life boats? happy to say that it is happening....the hull planking has started. the 1 mm planking is working well.........but I did have an after thought. I could have measured bow to stern, and down to the deck line, and made up a pair of 1/16 panels for the bulwarks. Billing boats kits are based this way. I know they sometimes can be a pain to install, but it would really sturdy-up the bulwarks, since they want me to cut out all the posts. I did not cement the planking to these posts, so eliminating them won't leave me with a huge mess to clean......just sand the roots flush to the platform before I plank the deck. easy-peasy! I shot four pictures before the camera died........I need to charger it up. 1 plank strip equals two of the supplied planking strips for this model. I will have enough to sand, without fear of burning through......and perhaps I can get away with doing a single plank on her as well. more on her progress today.....that's what I'm shoot'in for
- 453 replies
-
- 16
-
-
- thermopylae
- sergal
- (and 1 more)
-
thanks Pat, Mark, and John for you kind comments....and thanks to all who hit the like button. the netting material supplied in Billing's kits is a tad bit thicker than this stuff. this is more like a fabric. I haven't noticed it lately, but I think they did away with the fabric dept at our local Hobby Lobby. sad if they did. more soon
-
nice progress Rob. did you got your ship's boats from somewhere, of are you using the ones that came with the Cutty kit?
- 1,208 replies
-
- 2
-
-
- great republic
- clipper
- (and 1 more)
-
nice looking winch.........lots of detail and very life-like. really nice work Jack
- 250 replies
-
- 4
-
-
- willie l bennett
- model shipways
- (and 1 more)
-
hello Steve welcome and enjoy I was doing a little browsing this morning........I thought I had more sites bookmarked, but only had one. it only showed pictures of portraits done on different clipper ships. nice, but doesn't answer too many questions. most of the pictures I did find are in black 'n white of course.......but descriptions can help with color schemes, so I'm not too worried about that. the mizzen/galley this is probably the most puzzling aspect on this vessel. in my later days as a modeler, when I began building ship mostly, I settled on the larger scale vessels. Revell was first on my list, since they had their 1:96 series. the Constitution, the Cutty Sark, and the C.S.S. Alabama were the first three that I did. then I got the U.S.S. United States, and found it to be a spin-off of the Constitution......the only real difference, was the added galley {w/badges} and poop deck {basically, the aft section is altered}. the same can be seen as true for the Cutty Sark and Thermopylae. that early in my ship building, I didn't really think of it; but later on, I began to see that ships of any specific type, do have subtle differences. I can't remember if I had ever owned a Revell Thermopylae {who could forget something like that}, but everything I had seen of these two kits, mirrored each other to the point where it was hard to dispute that these two kits were clones. Kpnuts introduced his build of the Revell Thermopylae, and turned my thoughts upside down. the galley on his model was an elongated rectangular looking structure... ......the Galley on the Cutty Sark model is an elongated rectangular structure, but the sides flare out towards the fore end of the ship....has a bit of a curvature too. the second structure was omitted on the Thermopylae as well, and in it's place is a canvased hold. these were the only two features that differ between the Cutty Sark and the Thermopylae. there is one glaring feature that indicates that the same molds were used on both vessels....the deck sections still have the same location holes for the second structure and the Cutty galley structure. the 'pad' for the galley can be seen in the Thermopylae kit........Kpnuts build shows this. I found a site for wooden decks.......even the wooden decks reflect the difference to the galley structure. even the over view of the deck shows it http://www.radekshipmodels.cz/en/seznam-modelu-plachetnic-en/modely-v-meritku-do-1_100/cutty-sark_-en if anyone is looking for wooden decking for the Cutty Sark.......and a select others......have a look here. the instruction sheets can also be found here, for revell, Airfix, And A.L. versions of these two kits. I also looked at images od the Thermopylae.......the closest and best ones I found, were of an admiralty style model. I'll be looking for more pictures.........in the meantime, planking the hull is the next thing to do.

- 453 replies
-
- 9
-
-
- thermopylae
- sergal
- (and 1 more)
-
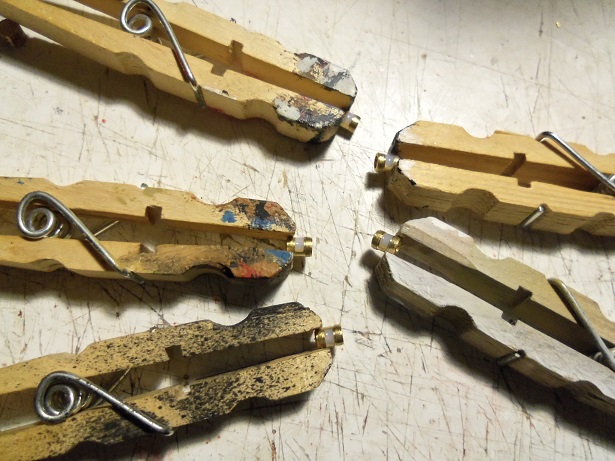
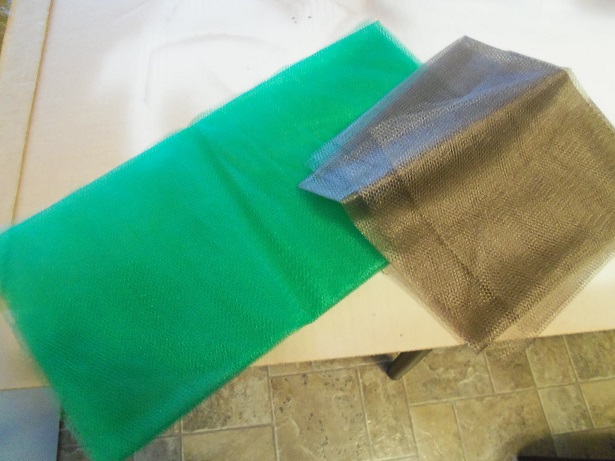
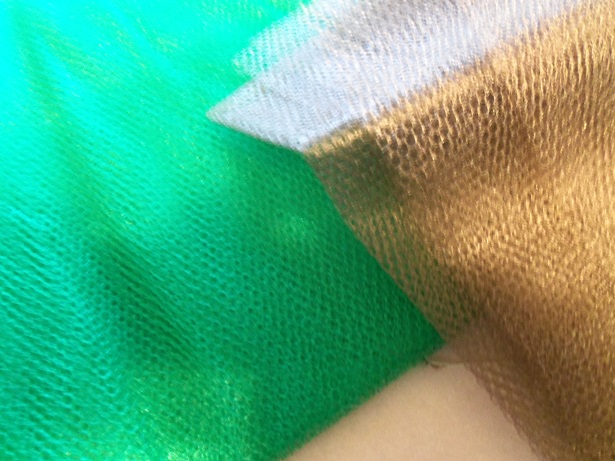
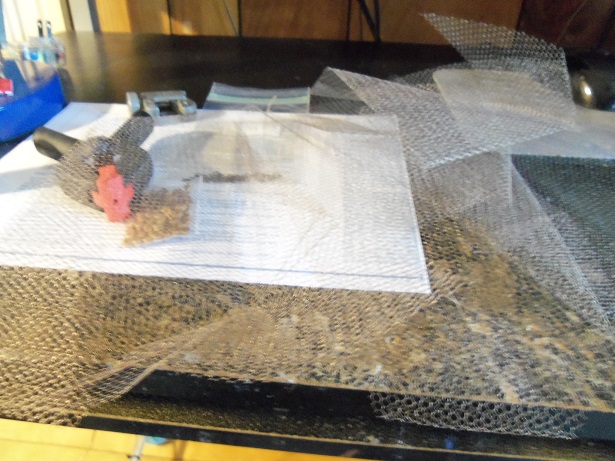
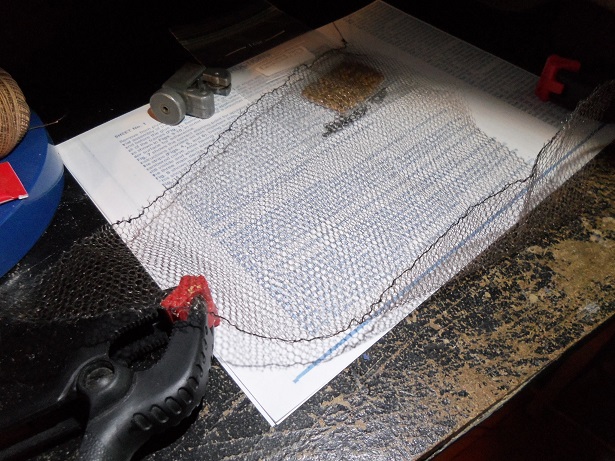
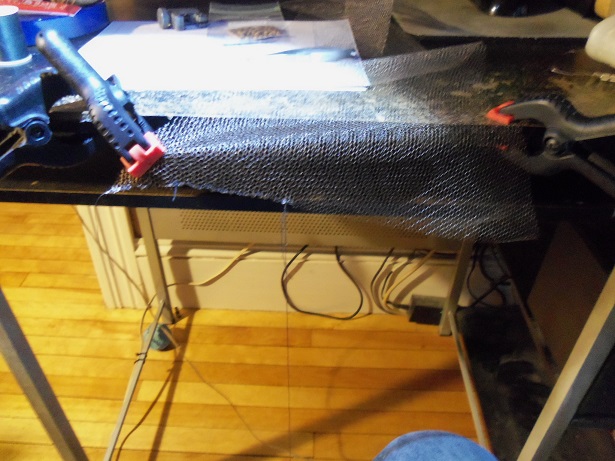
the holidays are over...........steadily trying to pick up where we left off here. there are two more parts I want to add to the boom/net winch....these got a coat of paint. while they were drying, I figured I'd do a little toggling between two larger steps, faring the frame of the Thermopylae, and starting on the nets for this build. the templates were drawn out for them......I thought I'd try to do it, so I'd only have to sew one side of the net. I did both sides when I did the nets for the Cux....can't tell ya how many times I picked myself with the needle. I thought this would do the trick......... ....till I came back to the table a bit later and realized that it wouldn't work. not feeling like redoing it, I just cut them out. I have two different colors of netting.......I bought this a while back {can't remember which ship I got it for}. I got it from the local Hobby Lobby. this is pretty close to the netting you get in most Billing's kits........the weave is small enough. 290 mm across x 290 mm deep....I chose the brown. laying a big piece of thick cardboard on the table, the template was laid out and the netting was paid over it. I used a couple short lengths of 2 x 4 to weight it down. the triangular cutouts were brought to my desk. the first one I did freehand.......with nothing to hold it in place or anchor.......what a pain! brought back some fond memories, I can tell ya that! using those clamps you see.........I devised an anchor system. it made life a little easier now........I thought I had folded it out to make two sets of net halves. seems I underestimated how thin this material really is. I ended up with four nets........and I made them all. I was rather bug eyed by the time I was done. I still need to trim off the excess thread and turn them inside out. there is still a little more prep work.......and then the net rig needs to be made. I will also add the round buoys from the Cux instructions as well.

-
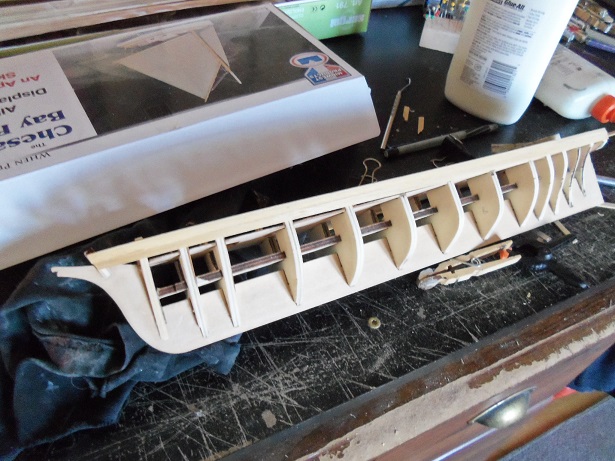
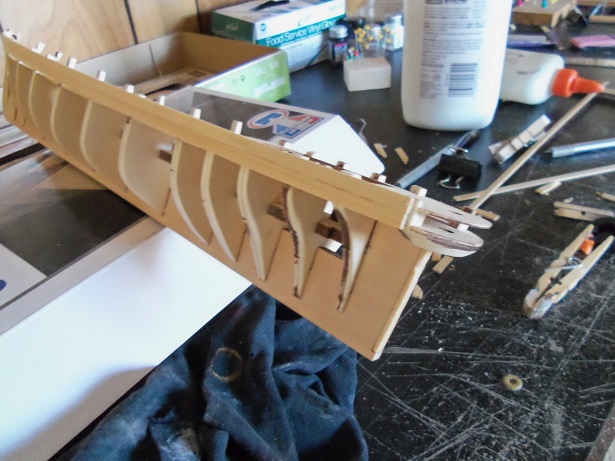
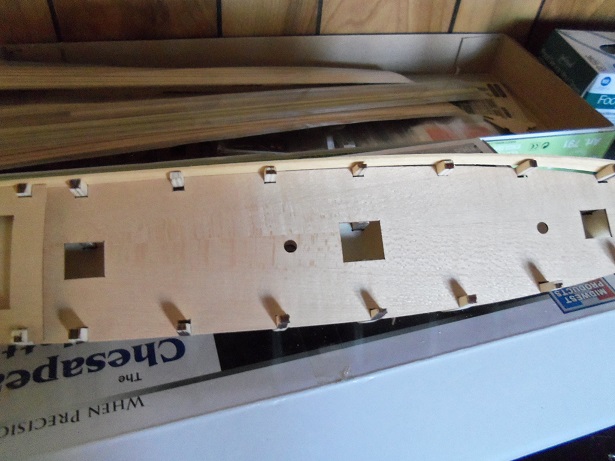
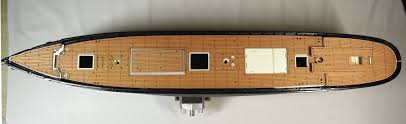
well I think I have the faring just about done. I was sharing it with another project. might need a little more fine tuning here and there........especially around the stern {part #21}. I then realized that the poop deck wasn't cemented in place. after cementing it in place, I saw where the mizzen hole is. this looks a bit odd to me....... I'll have to check this out. there is no direction to cap off the pop deck/main deck either. I'm beginning to think some deviation is in order >the inner bashman is starting to emerge<

- 453 replies
-
- 14
-
-
- thermopylae
- sergal
- (and 1 more)
-
for what I'm doing at the moment Sam..........I can agree with you!