


popeye the sailor
-
Posts
16,007 -
Joined
-
Last visited
Content Type
Profiles
Forums
Gallery
Events
Everything posted by popeye the sailor
-
 looks awesome Jerry.....congratz again on the finish of the Bluenose! you and the misses have a very merry Christmas!
 -
new steps look awesome! enjoy the time off........you picked a great time to do so I usually do it as well, but someone beat me to it this time around.
- 1,354 replies
-
- 1
-

-
- constitution
- model shipways
- (and 1 more)
-
thank you very much! I appreciate the compliment I sometimes let my imagination run away with me......it's OK though, sometimes cool thing happen .......and a wonderfully merry Christmas to you and yours as well!
-
thanks Nils..........1:124 is a tough scale to find. I did find that Edwards makes the photo etch for the academy Titanic, but so far, 1:20 is the closest I've gotten. .....can someone get these DARN sugarplums out of my head!
- 2,625 replies
-
- 5
-
-
- kaiser wilhelm der grosse
- passenger steamer
- (and 1 more)
-
thanks for the kind comments gentlemen........and for the likes as well being a newbie when I made them.......I found that this medium had so much to offer. made me feel like a fool for thinking how daunting it might be. I have and enjoy the freedom .........much more than when I dabbled in plastic.....and I don't cut myself as much either! my only hope is that someone sees it and uses it........I felt this was too good an idea, to be lost in the vortex of zeros and ones. I'm glad you enjoyed it.........now........I gotta get back to the trawler {wish me luck} merry Christmas to every one..........!
-
Cutty Sark by NenadM
popeye the sailor replied to NenadM's topic in - Build logs for subjects built 1851 - 1900
one hates it when it happens..........the only recourse, is to try again I too agree that a plug might yield better results for you. keep at it my friend......and have a swell holiday!- 4,152 replies
-
- 3
-
-
- cutty sark
- tehnodidakta
- (and 1 more)
-
super progress Rob.........nice concept for the pump. the deck is filling out nicely as well have a super Holiday....hope Santa is good to you
- 1,208 replies
-
- 2
-
-
- great republic
- clipper
- (and 1 more)
-
Nils..........she's looking great! the decks are really filling out nicely I looked back to see where you said you got your railings and ladders from......must have been some time ago, cuz I couldn't find it. have a great Christmas..........enjoy the holiday!
- 2,625 replies
-
- 5
-
-
- kaiser wilhelm der grosse
- passenger steamer
- (and 1 more)
-
a new use for legos........cool! does the peg show through the other side? sanded down, it would make for a tiny bit of extra detail. have a wonderful Christmas Jesse and Santa is good to you
- 1,306 replies
-
- 7
-
-
- syren
- model shipways
- (and 1 more)
-
hello Tom........nice bit of progress, and I'll look forward to the steps redo. did they leave a gap to allow for the gammoning? have a very nice Christmas !
-
you've really raised the bar on the home made steering wheel fluting looks cool!
- 339 replies
-
- 3
-
-
- dumas
- Chris-Craft
- (and 3 more)
-
while Daniel's is much more fun and Jan's makes me think of my trip to work.......they both lead back to where one started when progress is made in between, makes the trip all the better!
-
O.M.Freak'in G.! I'm not clmb'in up there! definitely the nose bleed level! can't even imagine how you did it.......but you did a super job. very nice with all the ladders and stuff added! really nice work
-
no excuses now..........I'm sure that silencer is removable we expect A+ pictures from you for now on very happy for you!
-
hey there J! good to see you've started another ship build your off to a very nice start! nice progress except for that boo boo at the bow {which you handled very well}........once planked over, it will never be seen look forward in following your progress of this fine build.
- 258 replies
-
- 2
-
-
- harriet lane
- model shipways
- (and 1 more)
-
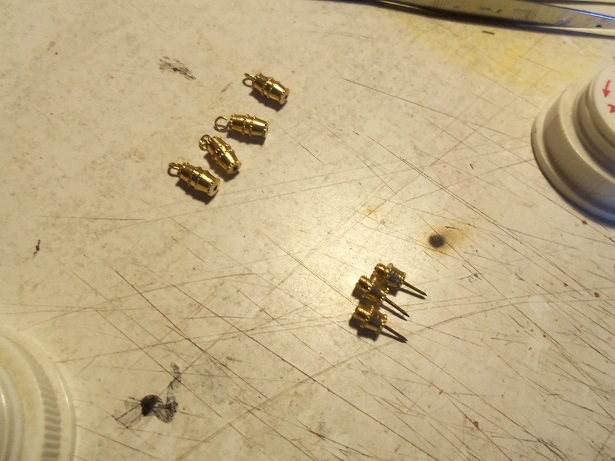
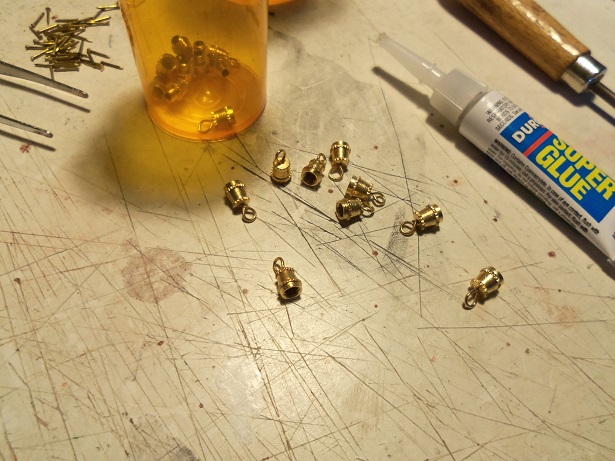
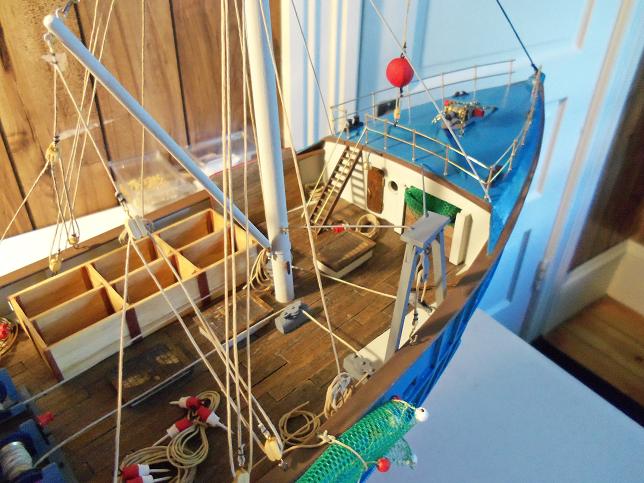
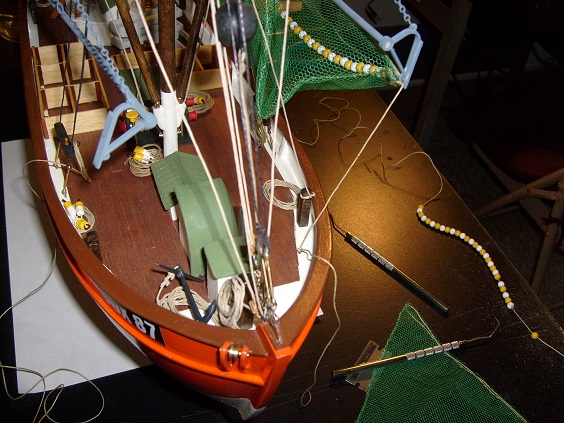
I'm still in the process of continuing here.......but if I may digress for a moment. I mentioned this earlier, that I would show you fine folks how I made buoys.......for the Nordkap, Cux 87....and I think I did it for the Mary Ann {I did so many thing on that build}. I went looking through the picture files for these builds.......boy! did I take crappy pictures back then! I guess the Sony camera I had wasn't so cutting edge after all it all starts at the craft store........in the bead dept. you want to pick the smallest ones you can find. I chose these barrel shaped beads......one, they are made of metal, two, they come apart, so they are easier to paint, and three, because they were decorative...added detail can be a good thing. round ones can be used as well.....an eyelet on one end and a tiny shaft on the other, painted up, would make a dandy buoy. I removed the eyelet from one end of the bead and took them apart to cement in a 7 mm brad in the empty hole. the existing eyelet can be adjusted to look better and fit tighter. from here, the halves can be painted to taste. I chose red and white for the Nordkap, and yellow and white for the Cux 87. I just took a look at the Mary Ann........I used some left over red and white ones..I made too many for 'ole Nordie. you can place them among some rope coils...... ......or they can be strung along any place that needs a little extra pizzazz I also used some longer slender beads for the buoy markers in the Andrea Gail build. craft stores have a lot to offer, so when you go......put your imagination in high gear I also saw this picture of the Nordkap.......I was so green when I built this model, but I learned to 'bash' and 'scratch' from the very beginning. it wasn't till I found MSW, that I found out how to expand it. while some were hanging maps and charts.......... the logs on these two vessels have long since been lost to the big crash. at one time, I had a thought to redo the Nordkap build. for the folks just starting this wonderful medium, this build would be interesting to them. I was new to the medium myself.......I made plenty of mistakes, but I think the solutions I came up with would be helpful to them. I was on such a roll........gotta get back to this build. I hope to have an update soon.......thanks to all those who are looking in. I appreciate it Merry Christmas!


- 747 replies
-
- 14
-
-
hello Marc, J, and Wayne........welcome to the build not much is done right now......so your in time for the show. probably won't get further along with the holidays just around the corner. faring and planking is the next step........still deciding which way to proceed. glad to have you folks aboard! have yourselves a very merry Christmas!
- 453 replies
-
- 6
-
-
- thermopylae
- sergal
- (and 1 more)
-
they look great Hof.........now that my work week is done, I can play some more I wish I had a lathe........might made it easier to make them.
-
look'in really good Sjors....the hammock netting and overall pictures really show the progress you've done
- 1,616 replies
-
- 6
-
-
- caldercraft
- agamemnon
- (and 1 more)
-
can't wait to see'em in my sleep John
-
glad to have you following along Rob........the admiral love the wooden ships. she has a fit whenever she sees me with a plastic kit now don't tell her I told you, but I think I caught a hint that another kit may be under the tree this Christmas something about a ship she liked and she forwarded me a site to look at. I quizzed her about it and she got all flustered. I dunno........I won't cross my fingers......if I do, it won't come true you must be referring to the thickness of the keel and bulkheads..........I know..........seems a bit too thick for this scale of kit. I have the Billing's America parts panel........haven't had a chance to measure them, but it's a smaller kit too.......I think the parts were 1/8th thick.. I need to look up small scale railings.....what they show for this kit is terrible
- 453 replies
-
- 6
-
-
- thermopylae
- sergal
- (and 1 more)
-
welcome to the log Al. we're having minus degree temps today......been like this for a couple of days now. last night was some brutal wind and snow squalls. snow and rain in the forecast for the weekend........great...I gotta work in it saving the parts panels started out as an experiment for me. buy a kit, save the panels for just the hull parts, and for the rest of the build, I do as I want. the Syborn was half of my first experiment...the M&M Fun Ship was the other half. a second experiment, the Holiday Harbor Fleet is going well....but I keep losing them to become fishing boats. so far, the first finished boat from that experiment, turned out to be the Andrea Gail. another one is in que to become {so far} an unnamed fishing boat. it was the wrong hull to be basing holiday themed ships from. I do have one other trio, that was created from the initial flawed build, sent to me from a friend. three schooners........replicated frames, stuck in the closet for the time being. I wrote this a while ago......got called away on an errand with the admiral. good idea to save the panels lucky that your friend did.
- 453 replies
-
- 6
-
-
- thermopylae
- sergal
- (and 1 more)
-
I remember that build Dee Dee........2014......time flies! there are many tutorials filtered throughout the forum......I lose track where some of them are. funny you should mention birch bark......that is a material I can easily get. I had gotten some a couple years back, and did a rough assembly of a canoe made of bark.....nothing fancy. I still have it in my template box. to me, it's too bad this kit isn't a larger scale, or I might have added the center board box, and opened the cabin. it's a great kit to play with I was planning on keeping it simple and build it quick......I knew that the rigging fittings would be my biggest focus. I'm doing a method similar....haven't tried it using CA yet. everything is worth a shot thanks for the suggestion and the good word