


popeye the sailor
-
Posts
16,007 -
Joined
-
Last visited
Content Type
Profiles
Forums
Gallery
Events
Everything posted by popeye the sailor
-
 thanks for the good word John! with the way I assembled the wall panel parts, white glue oozed out under them.......I had to pry them off the table. one of the good things about a formica table top. sanding them removed the smears.......staining shows hardly any at all. I still have more to add to it. thanks again for the vote of confidence
 -
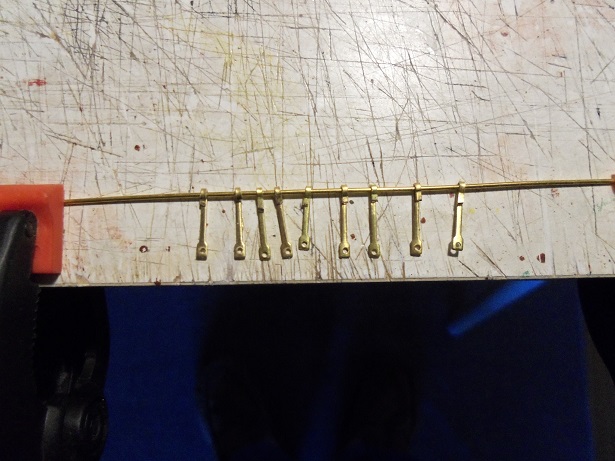
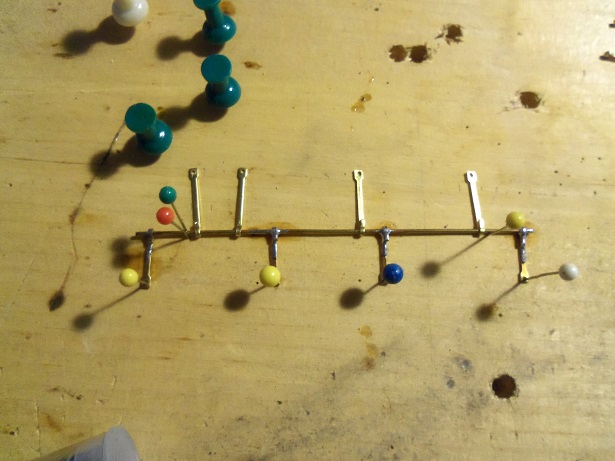
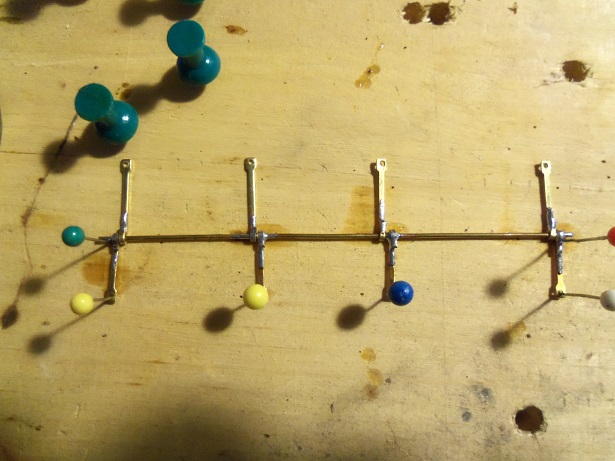
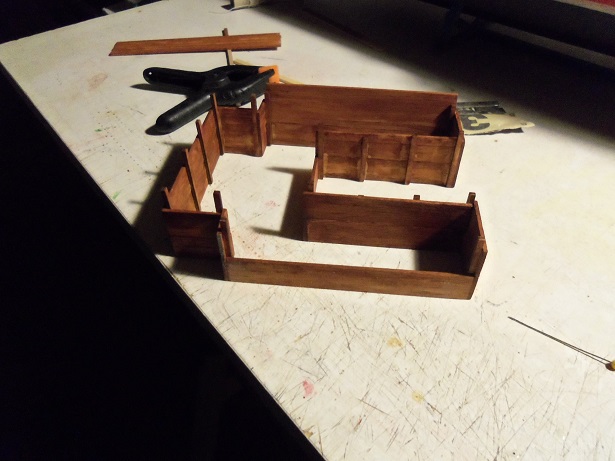
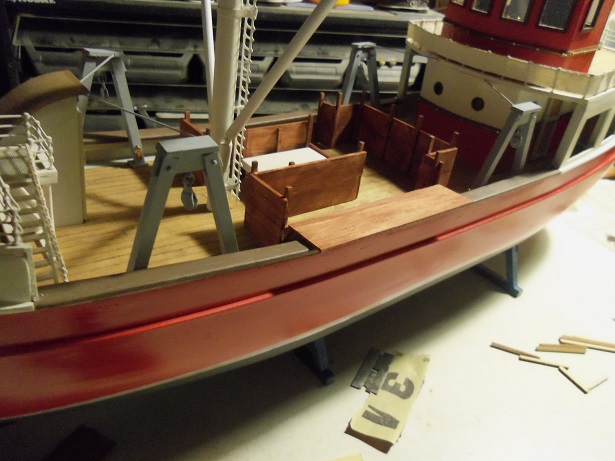
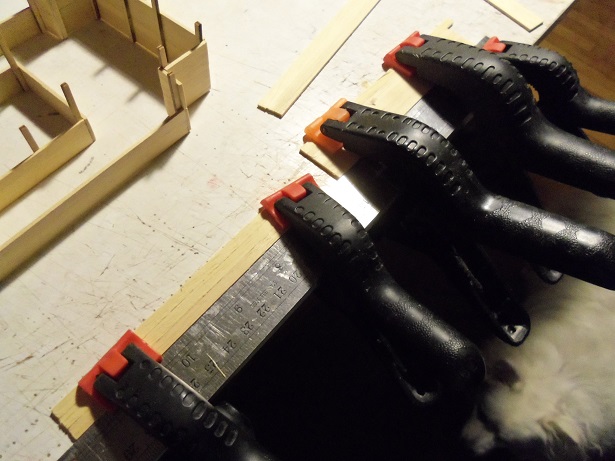
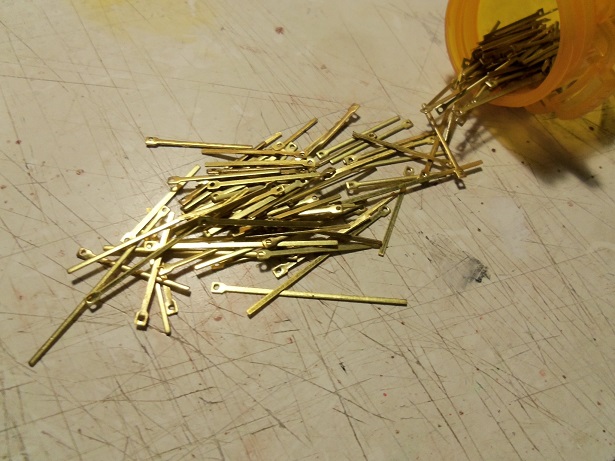
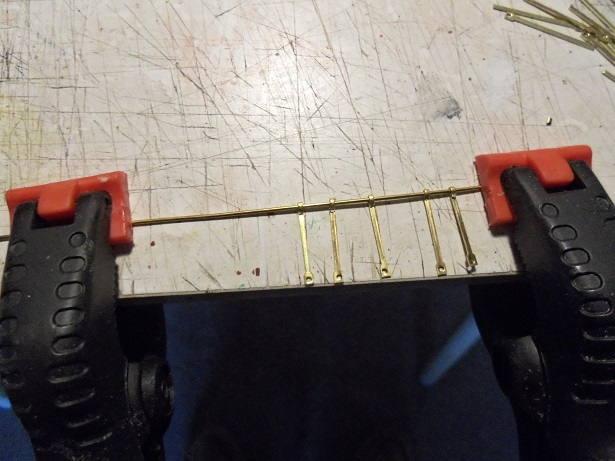
I got back to the hinges........figured out a neat way to measure them. I lined the length up to the table edge. I clamped the brass rod to the table, and slid the part under the wire. once lined up to the edge of the table, I held it in place and bent it with a free finger. it's not fool proof because the wire does tend to flex a little.........good enough for what I need to do I made a couple more of the longer ones.......enough that I had two sets of four, the same length. then I did the shorter ones. I made a few more and picked out the ones I wanted. I cut a length of rod and fed them on......one short...one long... etc the last pair, I had to switch, because the bottoms are to be soldered to the rod....there will be one on both ends. the bottom ones were soldered in the fixed position. the top ones will be movable.......I soldered them to hold the bend closed. had to be careful not to use too mush solder. I did have to reheat a couple of them to free them up......from there I just kept them moving till the solder went solid. as mentioned.....I needed to get stain. all I have is a single bottle of billing mahogany stain 1/2 oz.......I didn't want to use it, but I wanted to keep going........so I did. we did go out......I did get stain.........but when we came home, I finished staining it with the billings stain {the fear of two different colors}. I have some lifecolor weathering kits.....one for wood, one for armor, and one for figures. they are acrylics though, and I didn't want to mix them with enamels or lacquers. I got carried away..........I did the port side dump ramp........but here is how the box looks with stain. ...and here's the port side with the ramp and hinge assembly. one of the hinges is a little off.........this was taken when I first did it. I went to open the ramp, and it fell off. putting it back together, it got a few CA smears..........scraped it best I could and went back over it with the stain. when I give it a coat of lacquer {or poly urethane}, it should hide it well enough..........just don't look at it lengthwise here it is with the door open.......some CA did get into the hinge as well. I'll work it a few times.......should free up enough. it'll keep the hinge from being floppy .......trust me in place on the deck....the ramp adds quite a bit to the box. you can see the height........ adding the extra plank gives it enough reach.....it extends just over the cap rail. now to get the starboard side done........hopefully without any funny stuff

- 747 replies
-
- 12
-

-
thanks for the kind comments and to all who hit the like button. even though I went to Home Depot and bought some stain......I ended up using my last bottle of Billing mahogany stain. I didn't want to.......it's for any work I need to do on the Half Moon......yea, I know......long overdue. I do have an update that I can't wait to show you.......it's really neat you know it Carl! this will be the most elaborate one I've done so far..........thanks Patrick! you betcha Pat........I have another project to do on the admiral's hutch. I need to make a cap for the top, so she can put some of her M&M cookie jars up there. so I picked up another 2' x 4' sheet of 3/16 plywood..........I won't use it all. I should have enough to make a set of bulkheads icky mae! NCIS........you betcha I miss Tony and Zeva. I'm a big fan of David Mc Callun too........used to watch Man from U.N.C.L.E......never missed a show!
-
What is your preferred work height?
popeye the sailor replied to Nirvana's topic in Modeling tools and Workshop Equipment
my main table is 35 inches..........my other table {which is an old desk}is around 30 inches. I stand at both, but I can sit at the other table if I need to.....which is seldom, since I use my computer desk as well. -
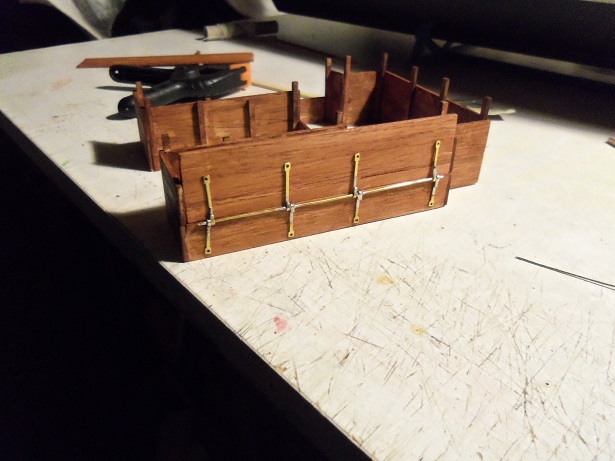
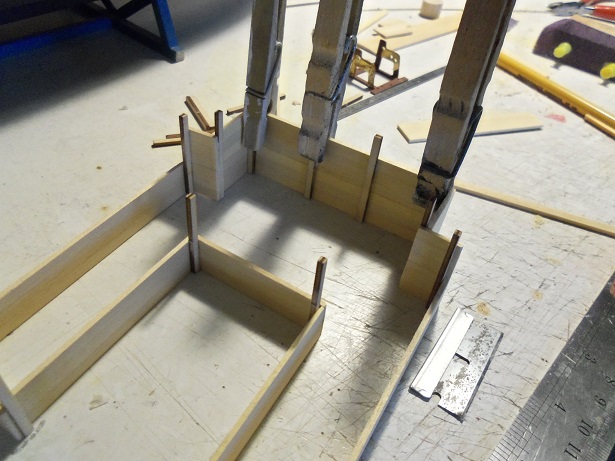
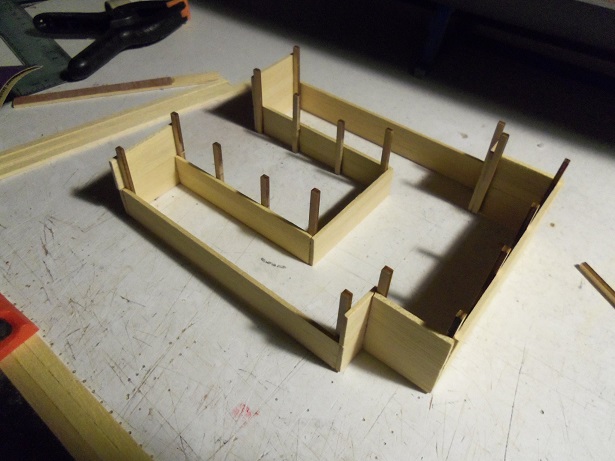
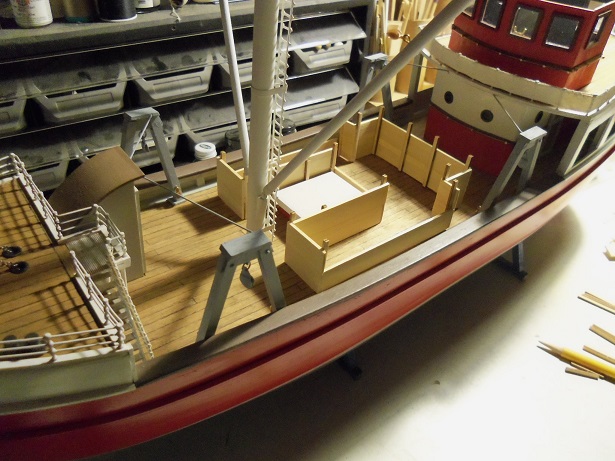
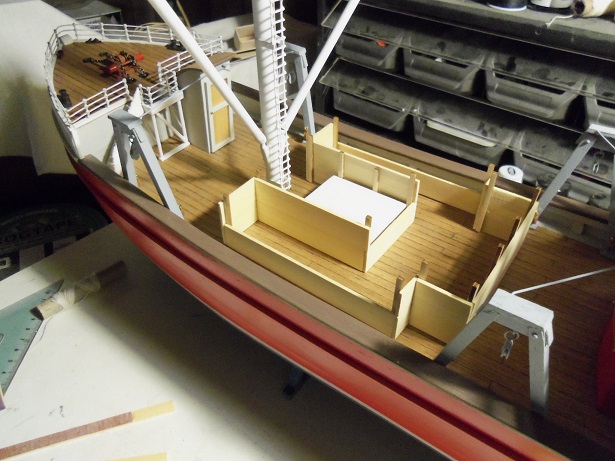
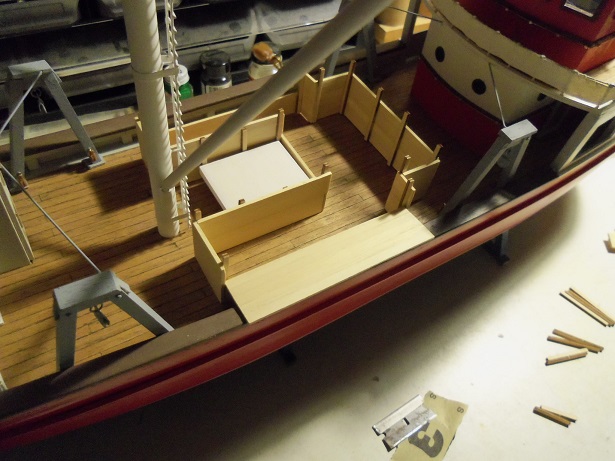
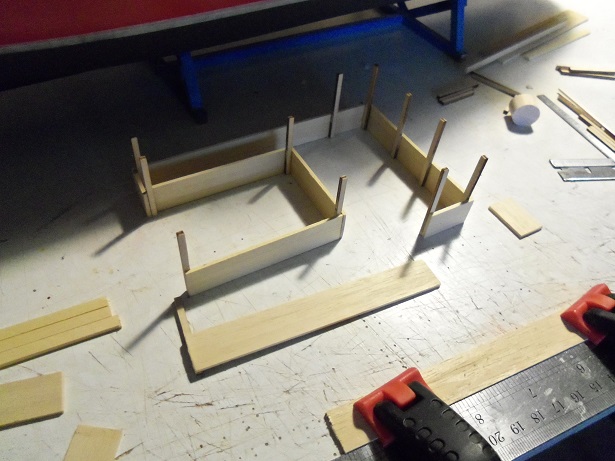
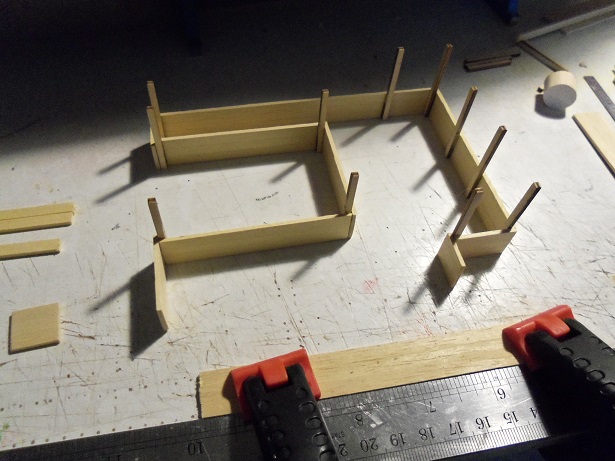
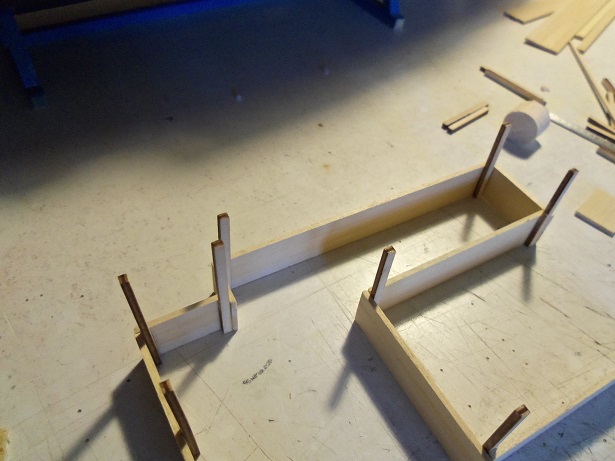
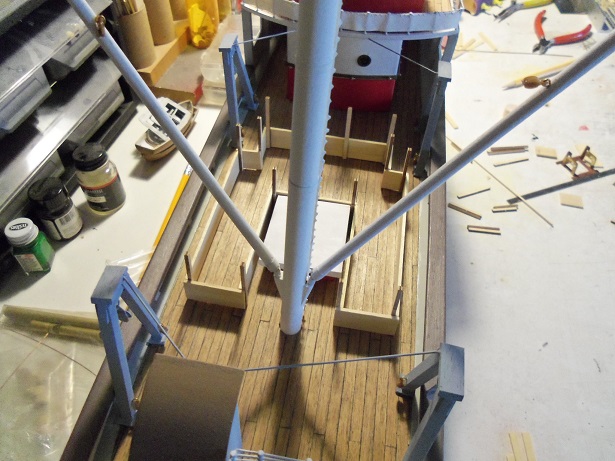
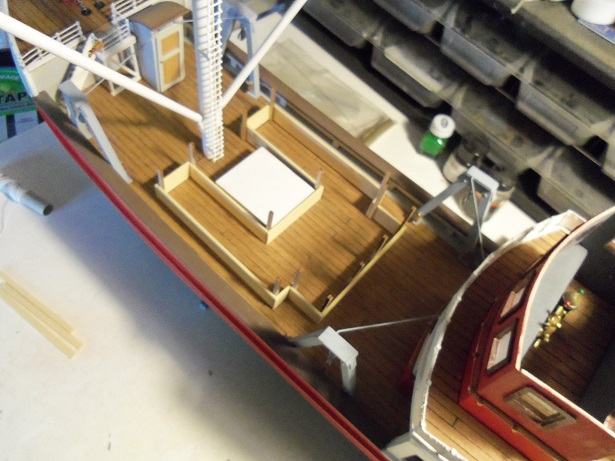
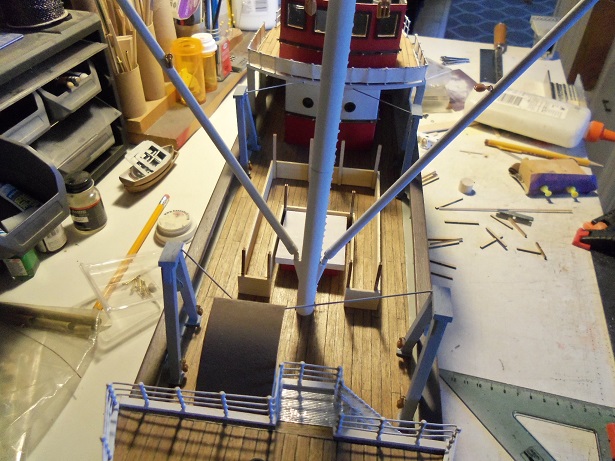
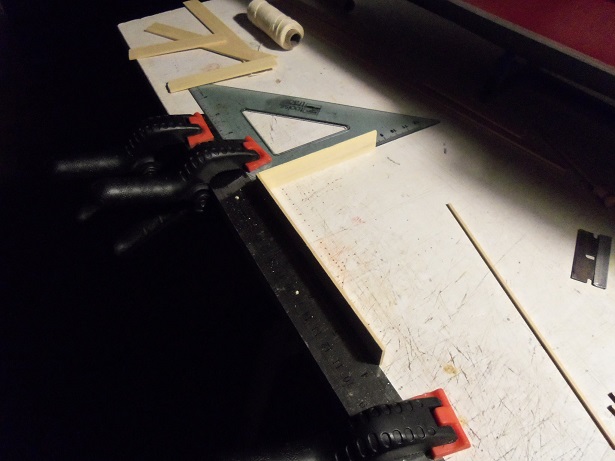
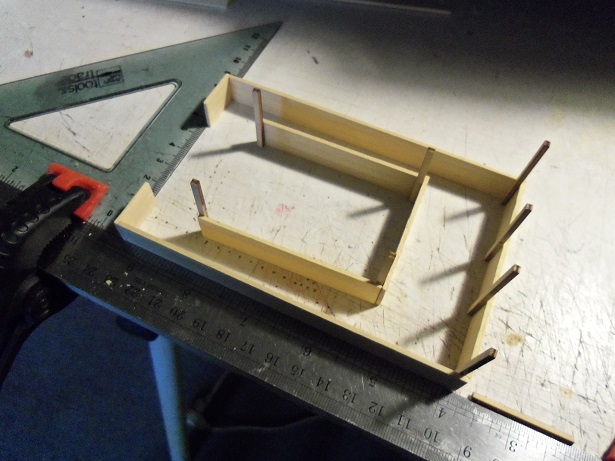
each corner has a post........the post are different heights, depending where they are located. I had made up enough wall parts to create the 'fender walls', keeping the catch from spilling out onto the working areas of the ship. the aft wall was created first.......the two cut away, the side walls and the back. the fore walls of the receiving area was next. at both ends of these walls {this wall and the cut away wall}, they extend to the wall edge, creating a lip that the dump ramp can fit into when raised. this will create a flush fit........a seamless box. I probably should have been more rough with this..........but I sanded each wall part as I made them. I know they look smooth.......too smooth I think, for a fish box {but that's me, I guess. all butted ends will be sanded flush.....I've done a little, but not completely. posts were added for the fender walls of the hold. I did a dry fit of the dump ramps........even though the box is closer to the bulwarks now, they still seem a bit short. I will add another plank to the one I made........that will bring the width of the ramp to 20 mm. the overall height of the box is 24 mm. since the height of the bulwark {including cap rails} is 12 mm.......added to the height of the ramps when raised, will make them the highest part of the box, making that part of the box 32 mm. the fender walls were added along the sides of the hold walls........the wall in front of the hold will be left at that height, for access to the hold when it is in the open position. the dump ramp was cut to length and fitted. here is an example of how it will look when lowered into position. I had a can of stain.........but it had long since dried up. I found another can down in the cellar......but I'll be darned if I can find it........I've looked everywhere. I fear that I might have used it on the plate holders I made for the admiral. I don't want to use paint.............perhaps a trip to the hardware store is in order thanks for look'in in

- 747 replies
-
- 10
-
-
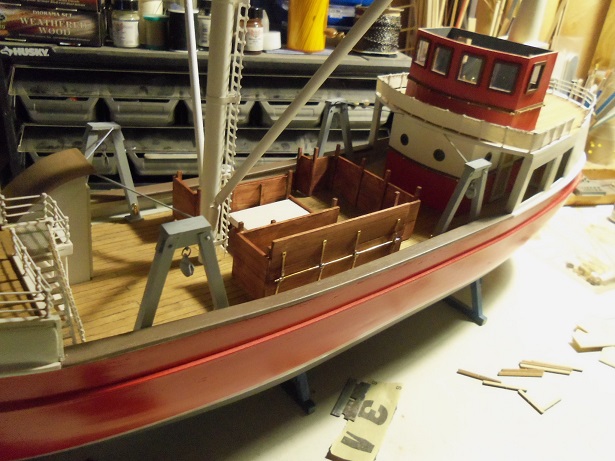
yea.......I was rushed with the fish box.......I'm a bit shy along the bulwarks. the gap between is too much......especially if I want to try the ideas I came up with. the alteration starts on the port side......I cut out the section situated between the gallows. I have these parts........they can be found in just about every Billing's kit. they are supplied as dead eye straps. I don't use them........probably no one else does either. I will use these as the hinges. the cut out section was extended by adding a wall aft, and extending the wall fore of the box. more wall parts were being assembled as I was doing this. once these additional walls were dry enough, the cut out section was trimmed to fit and cemented back in place. this creates a larger 'receiving area'........and the larger opening leads to the 'sort area'. time to begin the starboard side alteration. quickly copied and quickly done............ the time spent between drying times, was devoted towards making hinges. taking a length of brass rod, the straps were folded, trimmed and bent around the rod. I wasn't measuring........just trying to see how consistent I could be. I'll need to make some shorter though.......at least eight of them should be 16 mm........or less. when finished with the alterations, I was a lot happier to see this. the sides are in closer proximity to the bulwarks. the 'dump ramps' may fit better. the ramps consist of four planks cemented together, in the same fashion as the box wall parts. here is the box fitted again on the deck.....still more to add to it, which will define the function of the box itself. there is more.........the installation of the 'fender walls'.........but Gibbs needs to go out. he told me so in so many barks...........I'll be back.
-
I know Michael.........just wanted to make you laugh you gotta have a good attitude.....I can imagine the feeling, as you were tearing 'er down. you chose a good place to start the process. are you 'washing' the parts as you work on them? wiping them down with a damp cloth, will enable you to get an idea of the exact color. it's quite possible that you'll need to mix paint to achieve some of the hues. filler and sand on the repairs?
- 749 replies
-
- 2
-
-
- albertic
- ocean liner
- (and 2 more)
-
it's a good question.....the main point though: why are the pins removable? I think this would be the way to separate the different type lines, as to cut out any confusion. in plastic kits, the belaying pins are in segments........the rigging diagram shows where each line ties to the corresponding segment. if any segment requires an additional pin, it's quite possible that it's pulled from a group that has an unused pin, thus creating a gap, or widens an existing gap. or course it needs more research......I'm no expert by any stretch, but I would think that not all holes are used, if they are not required. it shows this in your reference photos
- 649 replies
-
- 5
-
-
- dunbrody
- famine ship
- (and 2 more)
-
now that's high class........he's fix'in 'em on a pool table that-a-way Michael! the fix is on!!!!
- 749 replies
-
- 7
-
-
- albertic
- ocean liner
- (and 2 more)
-
my my John..........what a story! she looks great in spite of all the problems you had. I only have one dog........he's more than enough! yep.......after hearing all the cat trilogies..........I'm glad I have a dog you must not have too much more to go..........keep up the good work.......she looks sweet!
-
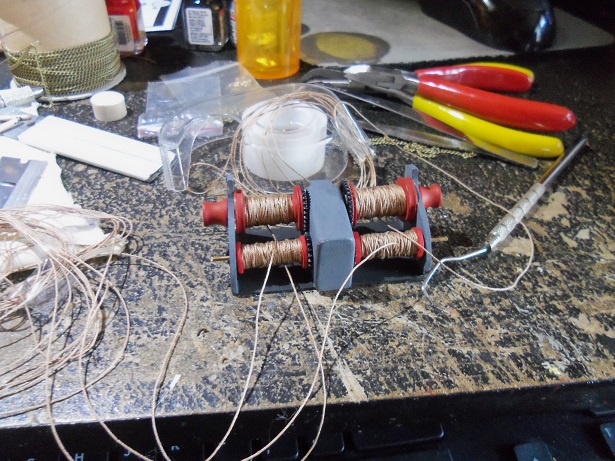
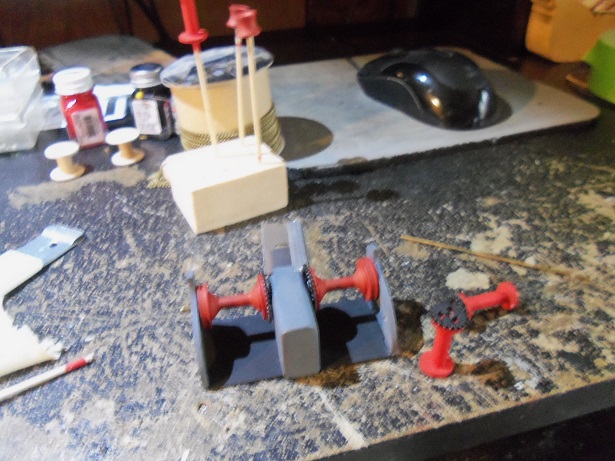
gee.......thanks for all the kind comments and to all who hit the like button the winch still need a couple more parts, and it will be ready to cement in place. I also got slapped with another realization..........I'm going to need another winch. I had an early though to do individual winches for the gallows, but I think another four reel would be better. the best part........I have the room at the moment, I'm making adjustments to the fish box. there is too much room along the bulwarks. I need to widen these two areas up, if I want to put the.......still need to come up with a name for them. along side the gallows, there usually is a folding platform that can be positioned over the cap rails. I want to add a hinged platform on the fish box........can be raised and stowed when not in use....and dropped into place when bringing in the catch. I'll get this done.........and then we'll see about the other idea I have. thanks again for looking in........hope to have another update soon.
-
it looks like your coming up with some good ideas Michael. I like some of the test work you've done with the stays and guys so far...the whippings are going to look so much better........the original ones are dreadful. I had a nice pair of the small flush cutters.......Mac tools. I broke them trying to cut that steel wire I bought a while ago.
- 749 replies
-
- 3
-
-
- albertic
- ocean liner
- (and 2 more)
-
wow Kevin.........you've been busy! looking really good........ shows the true size of the model.
- 56 replies
-
- 1
-
-
- sd-14 cargo ship
- card
- (and 1 more)
-
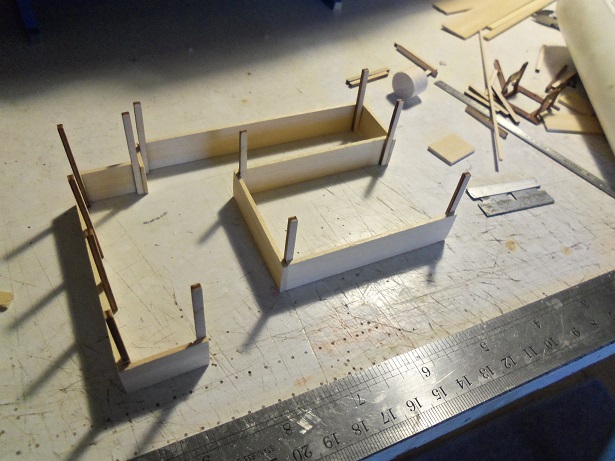
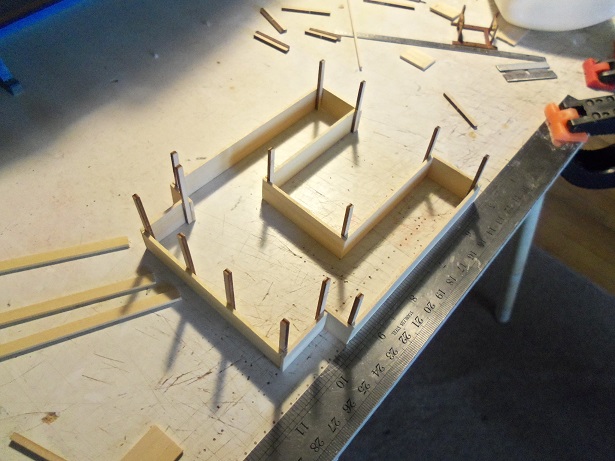
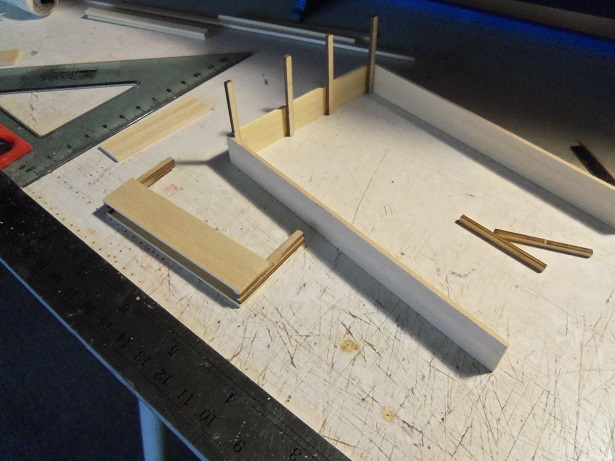
wow.....what a tough time I had with that update.........mistakes all over the place! if it wasn't about text......it was about the pictures and what order they were in! geeze Louise! these are the most recent......a split between last night and this morn. the fish box is assembled........some parts of the walls will be made higher.......and the posts need to be added. dry fitted in place........the ideas I've been thinking of look even more doable. it lays out the 'work' zone fairly well too. I have my own critiques........but what's done is done. no going back. tried some more to add the chain......still haven't found a solution to it the drums were added to the winch thanks for look'in in


- 747 replies
-
- 14
-
-
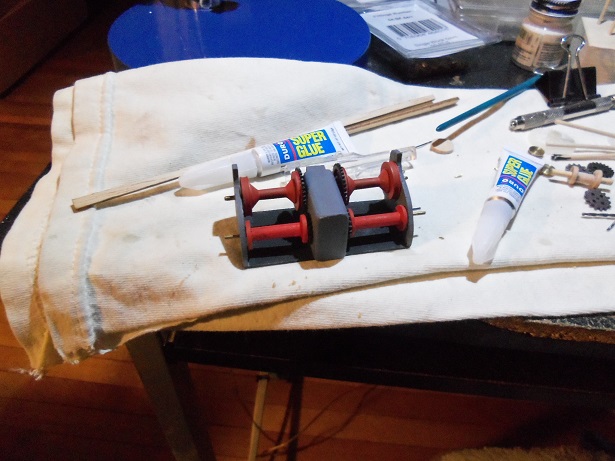
it's a blustery day out there today....was even worse yesterday. definite reminder that fall is here, and winter is around the corner. as mentioned, life has been rather busy for me, but I still found table time it starts with a forgotten picture, that got put in the wrong log file.......I have since written all the logs, so the threat of it happening again has been decreased once again. I began to assemble the winch, cementing the gears in place on the ends of the reels. I still haven't decided what thread I will use for the rigging aspect. I was going to say the heck with it and use the white stuff, but that would be a cop out, for what little detail color cordage could offer. cementing the planking together has yielded me enough 'walls' to play with, so I began to assemble the fish box. allowing this to dry, the rest of the winch was assembled. I played around with the chain idea for a bit, with no success. I then realized that the reels need to be filled first....doing so later would be much harder to do. using the cast off posts that were shown earlier, the inner walls for around the hold were cut to length and partially assembled. the outer walls are assembled, with the back wall staked out. the inner walls were assembled...........end caps cut and installed on the outer walls. once this sets for a short while, these two parts will be joined together, and the rest of the posts can be added to it. a couple of ideas came to mind..........further automating the assembly. it has a kinda futuristic spin to it.....not sure how it would appeal to the 'old salts'. I fear they might find it to be a bit over the top. I'll give it more thought. I did decide what I would do about the cordage......I was going to use a beige/brown cord...I think the admiral picked it out on one of our scavenger hunts. if I were to dry brush it with a rust color and black, it might look better and again.........the winch was assembled. I tried again to get the chain belt to work.......but the teeth of the gears won't support it. it's very hard to get the chain to sit on top of the gears.......I fear it may be a bust.
-
thanks John and Pat.....I hope that is so I wish 'dad' was more into modeling......it would make my influence a lot easier I'll keep the older ones interested with the snap kits for now, and see what happens what are the odds in finding another, as crazy as I am? while I write this......I'm playing with hooks that I'm making. I get one in my needle nose pliers.......start to adjust the shape....and then......zing! off it goes! I look for it..........amongst the carpet and wood grain flooring.......and I find it! the brass color is a dead give-a-way. set myself up again.......and zing.....off it goes again! this time around though, I'm accompanied by Gibbs, who marvels whenever I'm at floor level. I enjoy his company, but his going through my legs and around the arches in my arms, is very distracting. he has a shark like attitude though.........at any moment in this little swar-ray, I fear his 'alpha' coming out, and ruining the 'sweetness', that is his other side. he can get down-right nasty........but he's old enough now, where he can be reasoned with. when he was a puppy.........forget it!........time to get up and be assertive. I know I said I have an update to post.........yesterday turned into a run-fest to my younger son's house......he had surgery done to his knee. he re-injured it at work, due to a 'slip 'n fall'. when he was younger, he had a mishap with one of those silly metal scooters, and ended up putting his knee cap up into his thigh....literally! I never seen anything like it! the doctor put it back in place and attached it with screws..........the fall broke one, and ripped another out by the roots.......so he had to go back and have them removed. the good thing is that he doesn't need to have them reinstalled, and the rest of the early repair looked good. he will be out of work for another couple of weeks.......then, light duty w/physical therapy. he's a very lucky guy. so the call of the wild is calling again........Gibbs want to go to the field. I know it sounds like the last time..........but this time I promise........I will post as soon as I get back........more has compiled since yesterday be right back..........
-
awesome looking ship Bob.........nicely detailed and cleanly done very well done....right down to the life boats and the rigging!
- 348 replies
-
- 4
-
-
- pequot
- cable ship
- (and 1 more)
-
thanks all for the kind word! yes, the young lad {name requires more conformation} is doing very well, and will most likely be going home today. at the moment, I'm siding with the admiral........to go over today would be too hectic. best to let the chaos subside. I'll get back to ya on that Frank.......on the other hand, a dingy would make a cool crib I did get some work done, in spite of all the runn'in around. I'll post it soon. he who is so impatient, wants to go out
-
very glad to see your finding time for modeling Mark.........good indication that Janet must be feeling better the deck beam layout looks great.....I would never have known there was a problem wonderful!
-
thank you Nenad and Tom. we can be sure that this will be the last one.......my son had the procedure. very nasty driving last night Tom........I hope you didn't have to go out. major flooding at many intersections....we had to pick and choose our way to get around
-
types of wire like that looks like the same stuff I've seen used in picture hanging. you might find it in craft stores.
- 749 replies
-
- 3
-
-
- albertic
- ocean liner
- (and 2 more)
-
I am Patrick...........we had some major rain last night. it made for an interesting day/evening....my youngest son had surgery on his knee. he came through well, but it really stunk with torrential rain and flooded streets.........and VERY vivid lightning! today........our oldest son informed us that baby #6 came into the world this morning. so......yea.......the joint is jump'in thanks Michael.......coming from you, that's quite a compliment I'm hoping to be able to expand it a bit further. still at odds about what to use for rigging/cable........once I do that, things should start moving along better thanks to all who hit the like button:)
-
look'in pretty sweet there Patrick you've got some nice lines going.........very nice indeed!
-
the worst part may be the life boats.......I notice that a couple of them have some significant damage. they look to be of hand carved wood. even if you were to find a decent replica, would you think you'd need to replace them all, to insure that they all look alike?
- 749 replies
-
- 3
-
-
- albertic
- ocean liner
- (and 2 more)