popeye the sailor
-
Posts
16,007 -
Joined
-
Last visited
Content Type
Profiles
Forums
Gallery
Events
Everything posted by popeye the sailor
-
 wow!!!! your gonna do the work of two people..........I'm in so, how did you come to get commissioned.......right place, right time? anyway....it's a great looking model, and I'm sure you'll be up for the task. I'm sure your metal-urgy will be put to the test
- 749 replies
-
- 4
-

-
- albertic
- ocean liner
- (and 2 more)
-
thanks Patrick and all you folks who hit the like button today was catch up day for my blog {log} sites........wrote several logs and assembled more parts for the fish box {or boxes}. I even found a picture that was supposed to be in this last update.......I'll just include it in my next one gonna feel great not having to go to work tomorrow thanks again fer look'in in!
-
For Beginners -- A Cautionary Tale
popeye the sailor replied to ccoyle's topic in New member Introductions
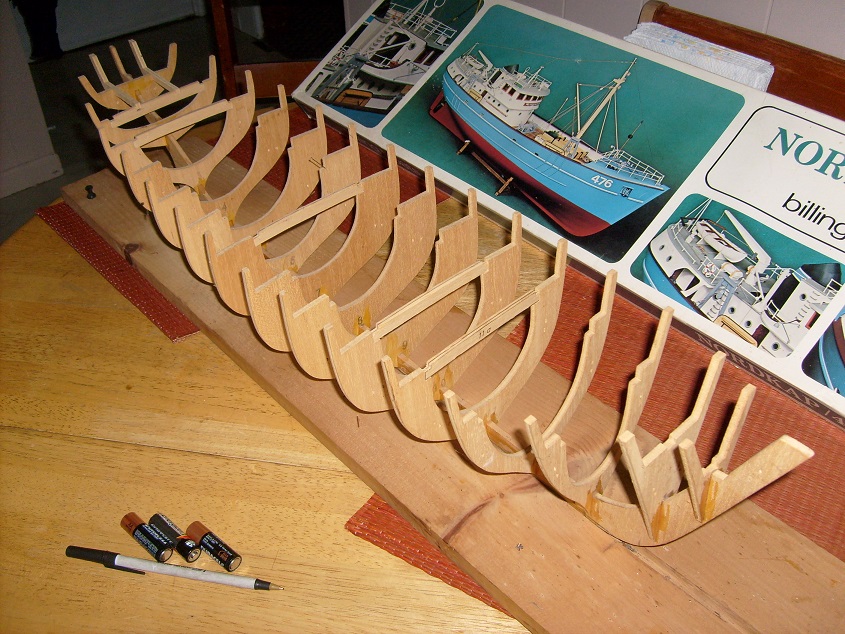
I thought the same thing Mike.......I'd see these kits on a shelf, and walk away thinking that I could never do something like that. that mentality stayed with me until I got a Nordkap kit put in front of me. the kit wasn't even laser cut.....it had been in an attic for around 30 years. I knew the gent, an older co worker.......and he gave it to me.......everything! for fun, I looked up the kit and the cost of it.......I was astounded! I had zero experience......I was working on a Revell Cutty 1:96 {what got me into this predicament in the first place}. here is what I started with: I found the link for Billing USA......that's when I met Tom Richardson. this gentleman felt bad and kinda tried to talk me out of it, for fear that I would get discouraged and shy away from the hobby. but I assured him that it wasn't going to happen.....I was build'in this bad boy! it all boils down to....the desire. I wasn't worried about mistakes......I made a lot of 'em! I did a build log on blogger........if anyone wants the link...just ask in the log, I wrote about everything.....even the mistakes. in the end, I knew it would be worth it........any newbie reading it can {and could} relate any of my mistakes to any kit there is out there. Tom helped me out a lot......I wrote the log for him. when I found this site....well, that's when all hell broke loose......I'm a certified wood nut now! this site.......YOU PEOPLE.......are awesome....I learned so much, and I continue to do so today. I'm no expert.....but I know how to glue two sticks together today........I have build logs on Blogger and word press {wenzels wharf, popeyesquadron, and popeyesgarage} I continue to write these logs......any model that crosses my table is fair game. to me......I don't care what kit it is....it will seem impossible to a person just getting into the hobby. build it.......don't hesitate. no matter what happens.....no matter how it looks.....build it. the experience you glean from it, will enhance your second build ten fold! we all have our learning curve.......the desire.....and a good 'can do' attitude.....you'll rise above it....you'll git 'er done! I even did some bash and scratch stuff to her

- 241 replies
-
- 19
-
-
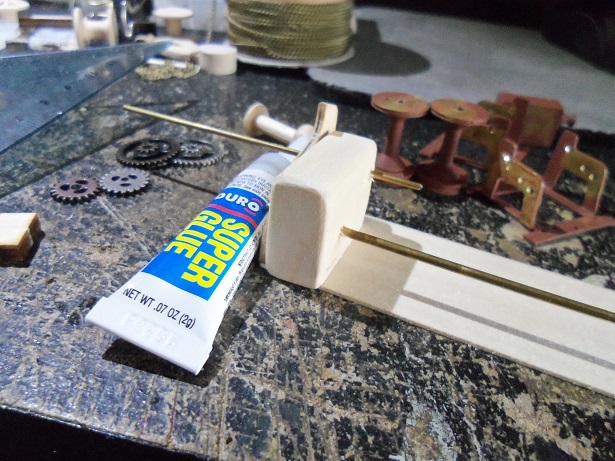
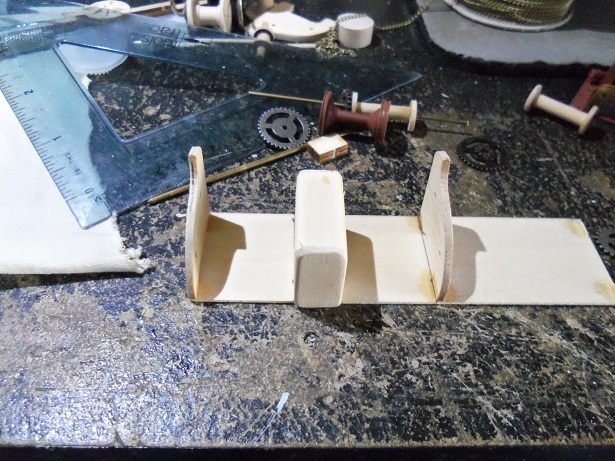
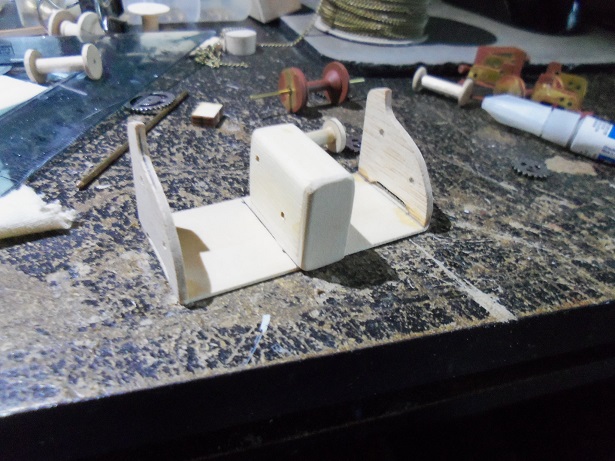
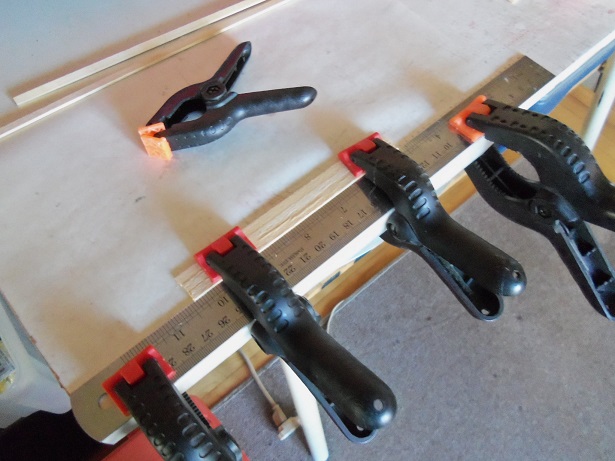
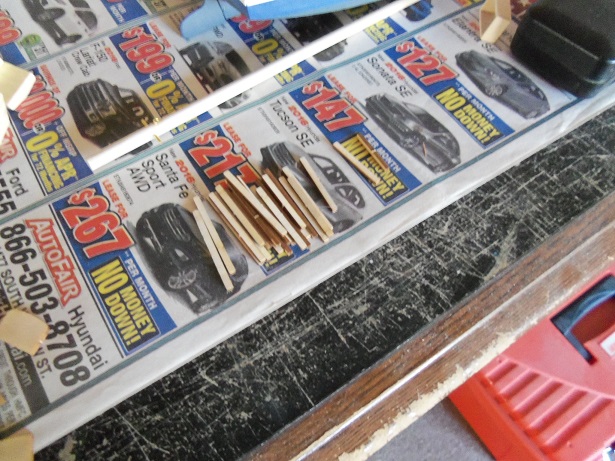
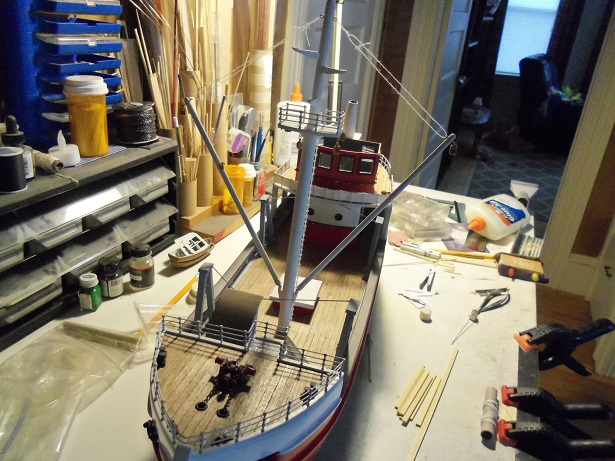
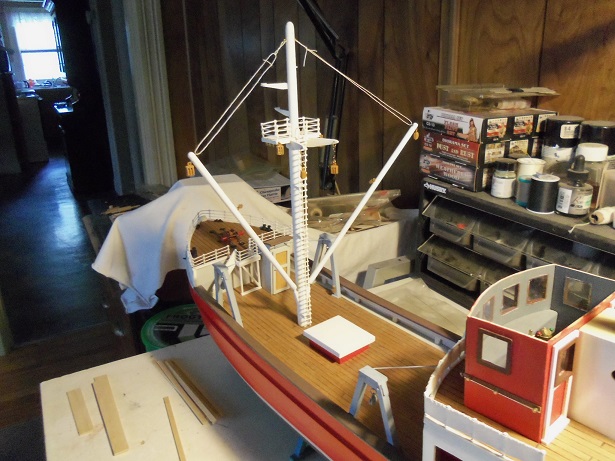
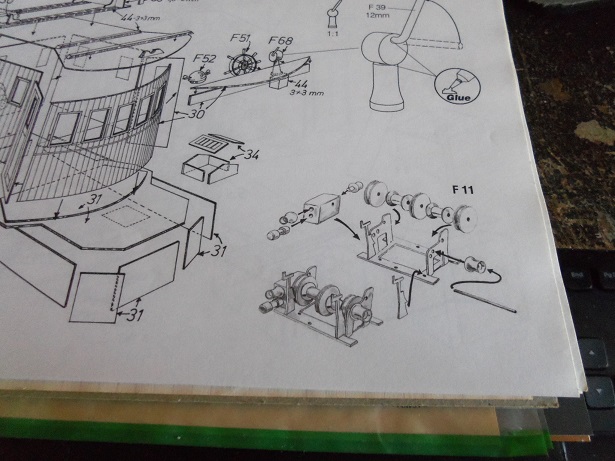
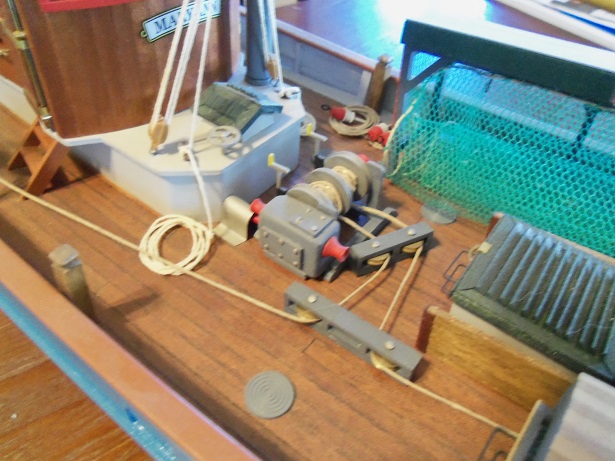
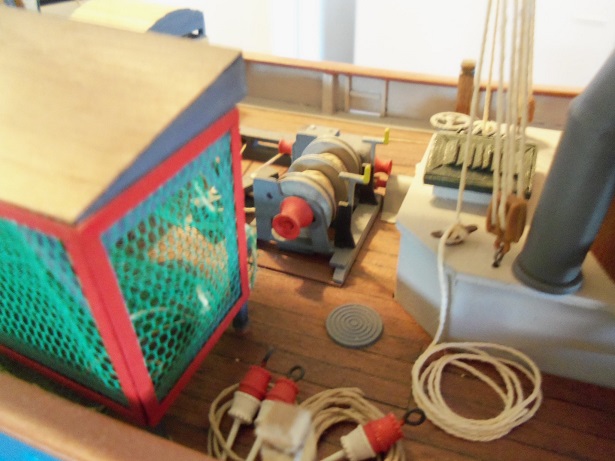
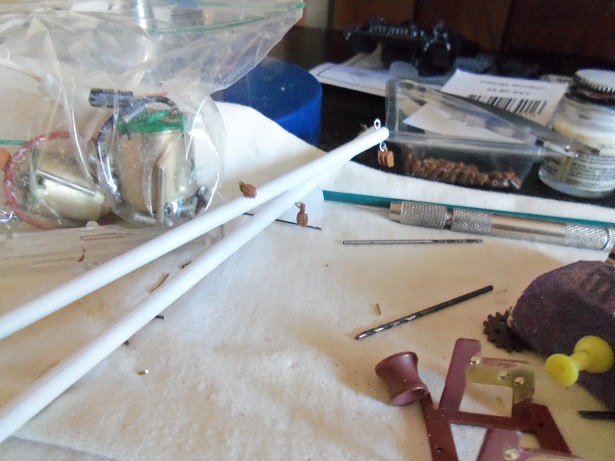
yesterday, I was able to do some of the winch assembly. at the moment I'm leaving it to the point I can take it apart, so I can rig up the spools with rope/cable. I really want to use the hemp thread.......but it's not uniform in thickness and may not run very well through the blocks. I have quite a few rolls of the Billing's rigging thread....many sizes in fact......but I'm not happy with the fuzz factor. I'm not a huge fan of bee's wax either. perhaps I can treat some of the thread.......I'll have to experiment a little anyway........I ended up making a gearbox........starting with an oblong piece of wood. I squared it up and cemented a plate over both ends......one end will lap over the base of the frame. the edges were rounded off, and the flats sanded smooth. the next thing to do, was to drill the holes for the shaft......but before I did that, the side I had cemented was removed from the base, and I made the legs shorter. I thought it looked a bit too tall.....after both sides were made the same height, the side was cemented back onto the base. the process starts again measuring the assembly, I got the overall length of the reel. this was transposed to the base....marked.....and copied for the other side. the gearbox and the other side was cemented to the base. ....and the excess base was cut off....... making sure that the holes lined up OK......the shafts were run through. then I began to cut up some planking....thinking I ought to get the fish box {or fish boxes} in the works. to begin, I will cement them three high.......the height of the bulwarks for the moment. one of them will only be two high......for facing the hold. I showed these a while back........the keel cut outs from the AmericA build {strange how I know where I got these from}. I have been wondering when I would find a use for them. I chose them because they will make ideal posts....some of them are different lengths, should I have to lower the wall. I'm sure I will along the bulwarks and hold face. I need to sort them out. while I was doing this........the paint was drying........getting the winch closer to a final assembly. I heard something hit the floor...........one of the booms, that I had to my left on the folded cloth tarp. I still need to touch them up. to keep them out of the way, I put them in their place on the mast, tying them up so they wouldn't lay on the bulwarks. I like the way I did this.....looking like a pulley assembly. I want to mimic the diagram......but this is kinda cool too more assembly is in the works for today
- 747 replies
-
- 13
-
-
thank you very much Bob! I'm no where near the level your at........your Granado build is flawless!
-
head gear looks even sweeter Rob........very nicely done! get better my friend.......hope to see you back soon!
- 1,208 replies
-
- 3
-
-
- great republic
- clipper
- (and 1 more)
-
too cool Nils! did you manage to use the one you painted, or did you make an extra one? way too awesome!
- 2,625 replies
-
- 8
-
-
- kaiser wilhelm der grosse
- passenger steamer
- (and 1 more)
-
I have the pin pusher for the 7 mm brads. I have the 10 mm brads as well......but so far, I've used them for levers and dash buttons, since they have a visible head on them. the 7 mm do well for small bolts and rivets on particular pieces of deck furniture.
-
make up a couple of fife rails.......I'm sure there were variants of the Junk.
-
such a pristine layout.......everything has it's place look'in mighty fine since I last looked in Bob........very well done indeed!
-
here is a fellow that I know........he's tried many different types. perhaps there is some useful info in there for you. https://sites.google.com/site/donsairbrushtips/home really great progress BTW........the hanger looks super!
-
thinking the same Frank the deck is getting even more busier.....really neat!
-
thanks for the update........good to hear that your getting better I look forward in seeing your shipyard in full swing again!
-
I remove the nails as well.........they are merely to hold the planks in place til they dry they live to plank another day.
-
Cutty Sark by NenadM
popeye the sailor replied to NenadM's topic in - Build logs for subjects built 1851 - 1900
shouldn't be hard for you........you've had lots of practice looking very good- 4,152 replies
-
- 5
-
-
- cutty sark
- tehnodidakta
- (and 1 more)
-
thanks for the kind word and the likes the assembly has begun.......the frame is assembled.as well as some painting. work in progress the gears have been filed.........and I've put another aspect into the works. update soon sad to hear to be sure John......although I'm glad to hear you and the Mrs. are fine. give Pam my best and I hope her mom is doing better. I have fond memories of my mother in law.....they are so precious. thanks Patrick and Carl........the most interesting thing about trawlers is the machinery that drives them. it's fun trying to shed some light on them......I hope I can balance it out with the rigging.
-
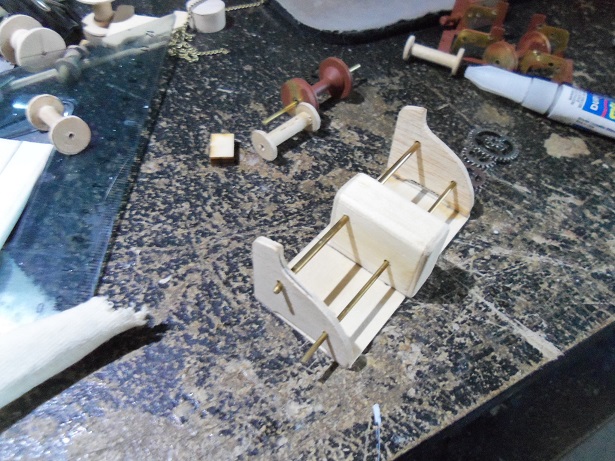
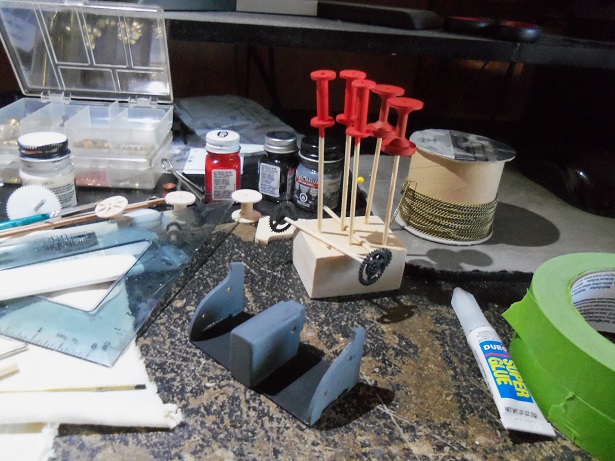
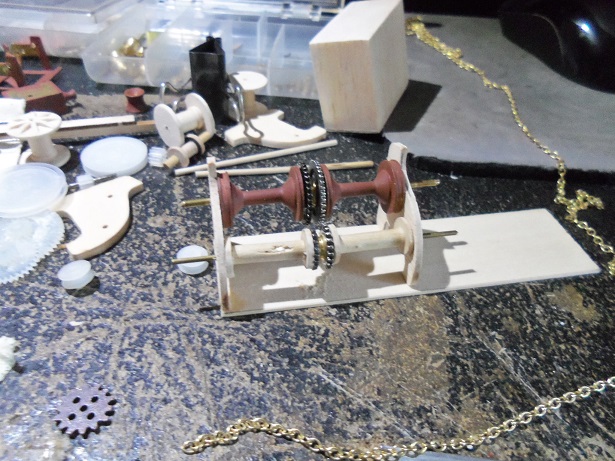
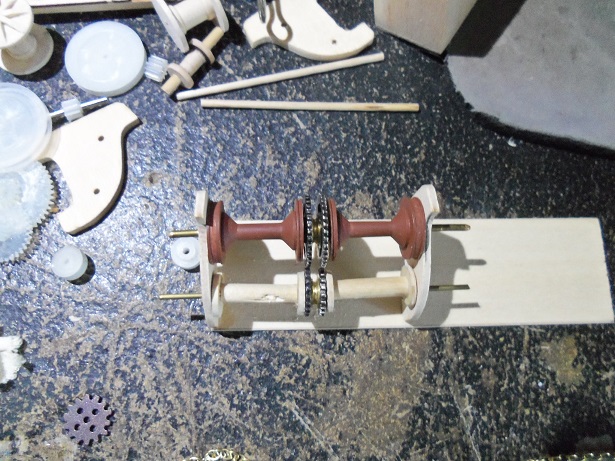
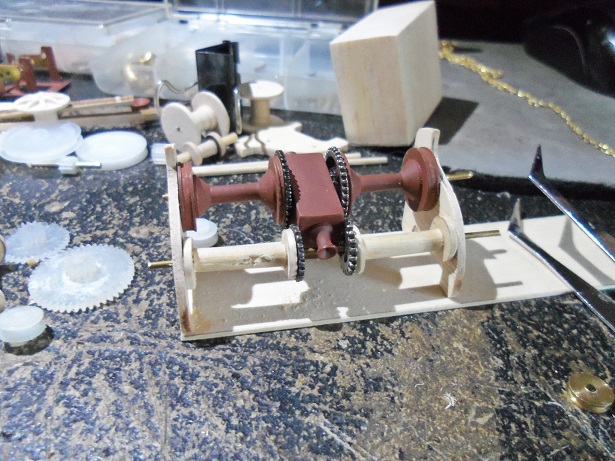
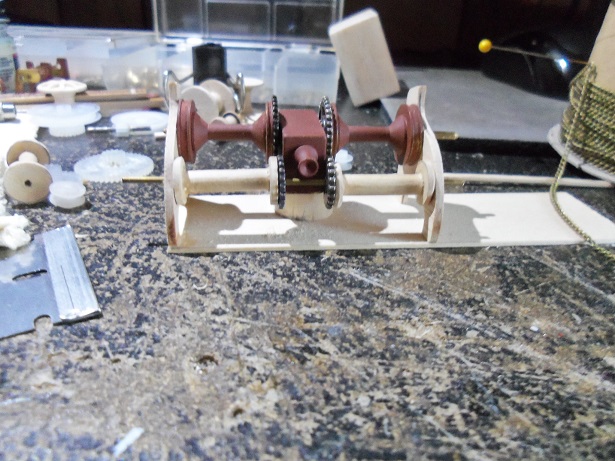
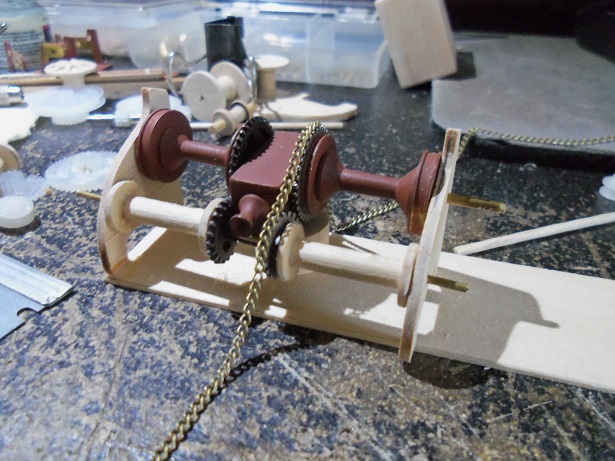
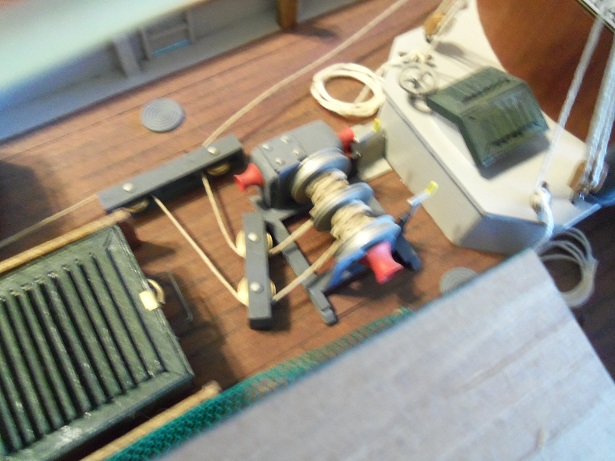
I got some cool time in yesterday..........oooo-la-la let's play dress up mix 'n match to see what the latest fashion trawlers are wearing this year! I finished setting up the frame to house all four reels. I had to drill through the smaller ones, and with out a drill press........or anything that would help me drill square, it was a tall order. I did manage to do it, with a couple of goof ups along the way, to make it interesting. I changed my mind about the plastic.........I only have one size thickness anyway. I'm using the thinner frame sides and a wood base. the holes in two 8 mm pulley reels were made larger to separate them. I have a supply of larger brass rod for the lower reels. the big problem for it though, is that it doesn't have a gear box. I added one in. it droops down in the front.......mainly because it doesn't touch the base. I cut a piece of dowel to make up the difference. it's not exact......it still droops a tiny bit. I would have to make a gear box for it.......wood or plastic. I mentioned that I was thinking about making it chain belt driven. I tried a few different types of chain that I have and came up with this. possible color combination........gray or primer red sides and gearbox, flat black base, flat red reels, and flat black gears and chain belts. any other parts ....suit to taste. now I did look at the Mary Ann winch to get an idea of it as well. keen to note that it only worked the gallows. of course, I did some extra detail on it.......reworking the gearbox with access panels.......and then making a goof with the frame {it's backwards}. it didn't hurt it, so I left it as it was. paint was the bulk of the detail. the teeth on the gears are very blunt........perhaps if I were to file them, the chain belt would fit on them better. the picture you see is the only one I could get....darn chain wouldn't behave. I like the looks though.


- 747 replies
-
- 15
-
-
thank you for the kind word and the likes I got to have a bit of fun yesterday........not to mention that this week end is a vacation for me once all this is sorted out.......the rest should be a walk in the park {Gibbs will like that } update in a moment Hi John.......back again? I hope it was for fun, and nothing medical.........your my favorite moderator, don'tcha know! hey Nenad it's documented that animals are easily affected by sound......the tone. Gibbs sometimes will sit under my desk, when I'm play'in my bass, but will howl when I'm tuning my guitar. case in point........I never play guitar see what happens when you play the song 'cat scratch fever' for bobtail......I might suggest country...........songs like 'I'm in the dog house now' ba-num-bum! thanks for the good word.......you'll like this next bit, I think
-
YES!!!! I have the Sergal Thermopylae.......and that's exactly what I intend to do! cripes.......with some modification, you could do any clipper ship, as long as the hull conforms to that type of hull construction. the White cloud........the Danmark.......here http://userpages.umbc.edu/~dbasha1/clipper.html as mentioned, you may need to modify the hull here and there........but this is a design, second only to the schooner, which has many more the Sergal kit is 1:124 scale, but if there isn't a kit put out there in a larger scale, the instruction sheets have diagrams that are 1:1 to the model. you can take these diagrams and have them blown up at any copy shop. some folks even use computer programs to do it.......but if you want everything on one sheet, the copy shop might be best. I've never heard of one in 1:78 scale........just the Revell kit at 1:96. I'd love to do one at such a large scale {I've done two Revell Cuttys already}......but larger, I think the admiral would have something to say about it . there is a log on the Great republic......and other Cutty Sark builds. you might have to do some digging......but they are here. enjoy.........and I hope to see a log soon oh........if you so get the Sergal kit, there is a photo etch upgrade you can get, and I've also been ordering double blocks and stuff.........they've missed a few things with the rigging
- 4 replies
-
- 2
-
-
- Tea Clippers
- British
- (and 4 more)
-
nice planking job Bob
-
looking really sweet Mark........although you do seem to have a cracked frame there. an little glue and a clamp, and it'll be good as new I guess it's good she's still in her cradle. that laser cutter is getting pretty handy......very nice!
-
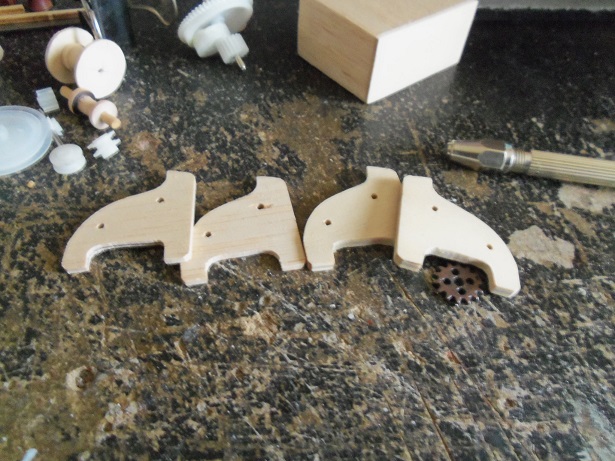
some progress has been made....although I still need to figure how it will all fit together. there will be shrouds on the mast, but I had to say the heck with it and relocate the eye bolts. I made no cut outs near the mast......and the supports there were too narrow to fit them......so I located them along the outer edge. other eye bolts and blocks were fitted as well for the boom rigging since that picture was taken. the booms themselves got fitted with eye bolts and blocks too. the winch is coming along....as mentioned. I found that using the metal frames would be impossible, so I made up a couple pairs from these four pieces of wood cut outs, that came from two different kits. one pair is 1/16 thick, and the other pair is 1/8 thick. the shape is duplicated from the metal frames, and I cut them with the scroll saw. once sanded and matched up identical to one another, the first hole was drilled into each one.......this will be for the larger reels. then........after a bit of figuring........the second set of holes were drilled for the smaller reels. now, I don't plan on using all of them........they give me enough to arrive at the finished winch. I had made some other reels earlier........some were small {you saw those}........but I made three larger ones. the trouble with these, is that they are not wide enough, so they may not get used. if not, I can use them for that other fishing boat........they won't go to waste getting the measurement from the larger reels, I made three more reels........smaller but to the same width as the larger ones. I did set up the larger reels in the winch frames.....I used three of them here. I'm not picturing the finished winch looking like this.......I want to incorporate some gear work in the winch.....interlocking, or with chain belts. throughout the pictures.........you can see plastic gears. I had gotten them from a motorize stuffed holiday toy....a snowman and dog that sings Jingle bells {Gibbs loved it so much, after it broke, we got another one from e-bay}. the interaction between Gibbs and the toy is so cool...........as jingle bells is sung, the little dog howls.........and so does Gibbs. he's almost to the point that he can do it howl for howl.....right up to the big finish! So darn funny! anyway......I might be able to use some of the gears.........it will depend how they look in combination with the gears I got from Hobby Lobby. so this is where I'm at at the moment........last week was a bust. I got a little done, but there were too many interruptions and work has been a total bugger to get through...........have I told you that I'm REALLY starting to hate my job!


- 747 replies
-
- 13
-
-
look'in good Nils..........the production line looks to be in full swing
- 2,625 replies
-
- 6
-
-
- kaiser wilhelm der grosse
- passenger steamer
- (and 1 more)
-
you must have kept her covered while you were gone the hull is look'in sweet Rob.........nice look'in head gear too! it's good to see your back. I put 'tarps' on all my projects when not in play
- 1,208 replies
-
- 2
-
-
- great republic
- clipper
- (and 1 more)