HOLIDAY DONATION DRIVE - SUPPORT MSW - DO YOUR PART TO KEEP THIS GREAT FORUM GOING!
×


druxey
-
Posts
13,274 -
Joined
-
Last visited
Content Type
Profiles
Forums
Gallery
Events
Everything posted by druxey
-
 Much detail, Phil? Nah, I don't think so. Thanks for the compliments, Jim and E&T.
- 641 replies
-
- 5
-

-
- greenwich hospital
- barge
- (and 1 more)
-
A 4 pounder would have been usually 5' 6" long. Simply scale down the pattern of the 18 pounder and you'll be close enough.
-
In earlier ships, when planking was sawn by hand, average planks were 24' 0" to 28' 0" in length.
-
Joel has this right. There was a brilliant analysis of the slack/tight line tension and methods of overcoming this by John Harland some years ago in Mariners Mirror. The sweep was the first of these methods.
-
With this sort of hull form the wing transom is usually located at about the lower edge of the main wale aft. Based on the original draught, this coincides with the uppermost transom shown in the sectional view.
- 525 replies
-
- 5
-
-
- anchor hoy
- hoy
- (and 1 more)
-
Cutter Cheerful 1806 by rafine - FINISHED
druxey replied to rafine's topic in - Build logs for subjects built 1801 - 1850
Looking terrific! Not much more to do before she's complete.- 525 replies
-
- 4
-
-
- cheerful
- Syren Ship Model Company
- (and 1 more)
-
I'm always hesitant to take anything in the AOTS series as gospel truth. Perhaps building a mock-up of the presumed arrangement might shed some light on things.
-
Nice to see your return, E&T. I was beginning to wonder what had become of you and your model. Super result with the steering apparatus - particularly as you did this without a lathe!
- 346 replies
-
- 4
-
-
- terror
- polar exploration
- (and 2 more)
-
This is normal. Your woods for the keel and false keel are of different species and absorb/give off moisture at different rates. You need to secure the assembly to your building board. As the build progresses, things will stabilize.
-
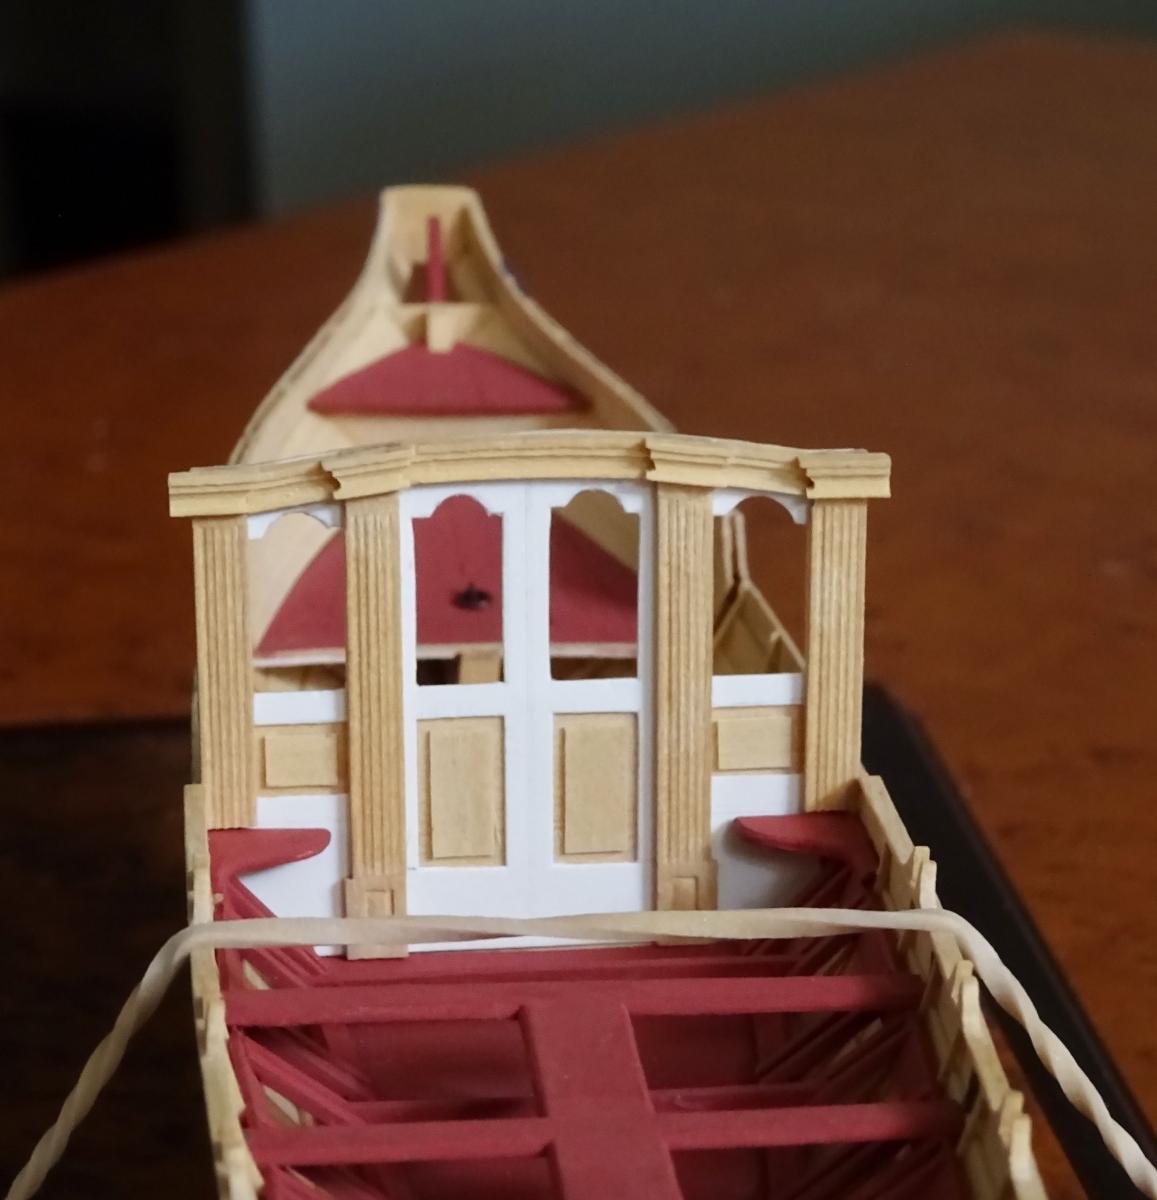
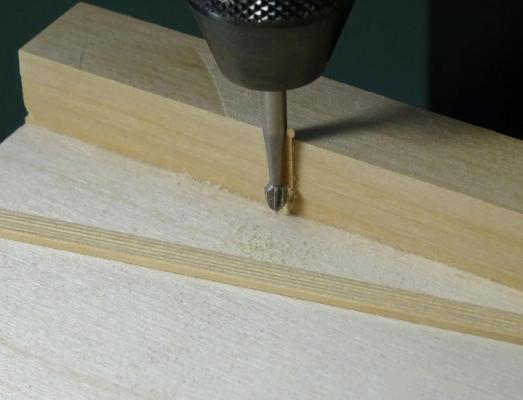
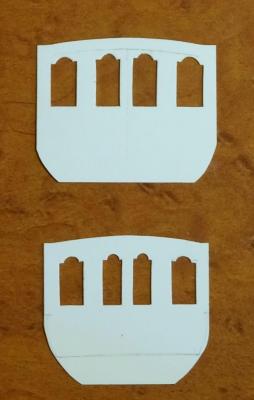
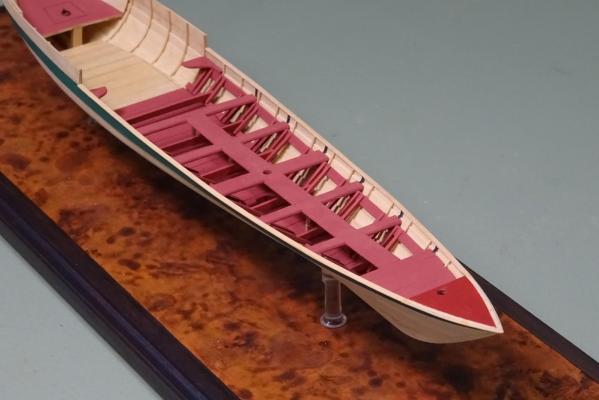
For the coachwork there are numerous repetitive ornamental mouldings. The first of these to produce is a five-reeded column. This is ⅛" wide, so it was tricky to work. I used a micro-milling cutter (Proxxon) on my mill using an x-y table to incrementally cut reeds into the stock. Also required were columnar capitals. Again, two different micro-milling cutters were used. One was a flat-bottomed cutter, the other a very small ball cutter. These produced a fair imitation of the design. The millwork is gradually being built up on the pattern piece. The pattern will be integrated into the coach, as the assembly will be painted when completed. The outer corners still need to be bevelled. Each column consists of three pieces. The reeds are stopped; that is to say, they do not extend the whole length of the column. Plain pieces of stock are grafted on the top and bottom to produce the effect of stopped reeding. In addition, there are small fielded panels in the column bases. These were cut in using a scalpel and a micro chisel. The panels in the doors and on either side were added using stock a scale ⅜" thick.

- 641 replies
-
- 47
-
-
- greenwich hospital
- barge
- (and 1 more)
-
That gooseneck fitting looks terrific, Michael. It shows no sign of the torture you put it through!
-
Rob: thank you. If you have more info on glass size availability in the 1830's, I'd appreciate this. I hadn't considered the possibility of ground, polished glass. Thanks for your comments and the links.
- 641 replies
-
- 4
-
-
- greenwich hospital
- barge
- (and 1 more)
-
Exceptional! Beautiful work.
-
Thanks again, everyone. Mark: cylinder glass was introduced in the early 20th century. It was not available in the 1830's. I have photographic details of the rowing benches of Prince Frederick's barge already, thank you. The balusters are of a rather extreme shape! However, I believe the NMM hold other ceremonial barges somewhere; perhaps at Chatham?
- 641 replies
-
- 5
-
-
- greenwich hospital
- barge
- (and 1 more)
-
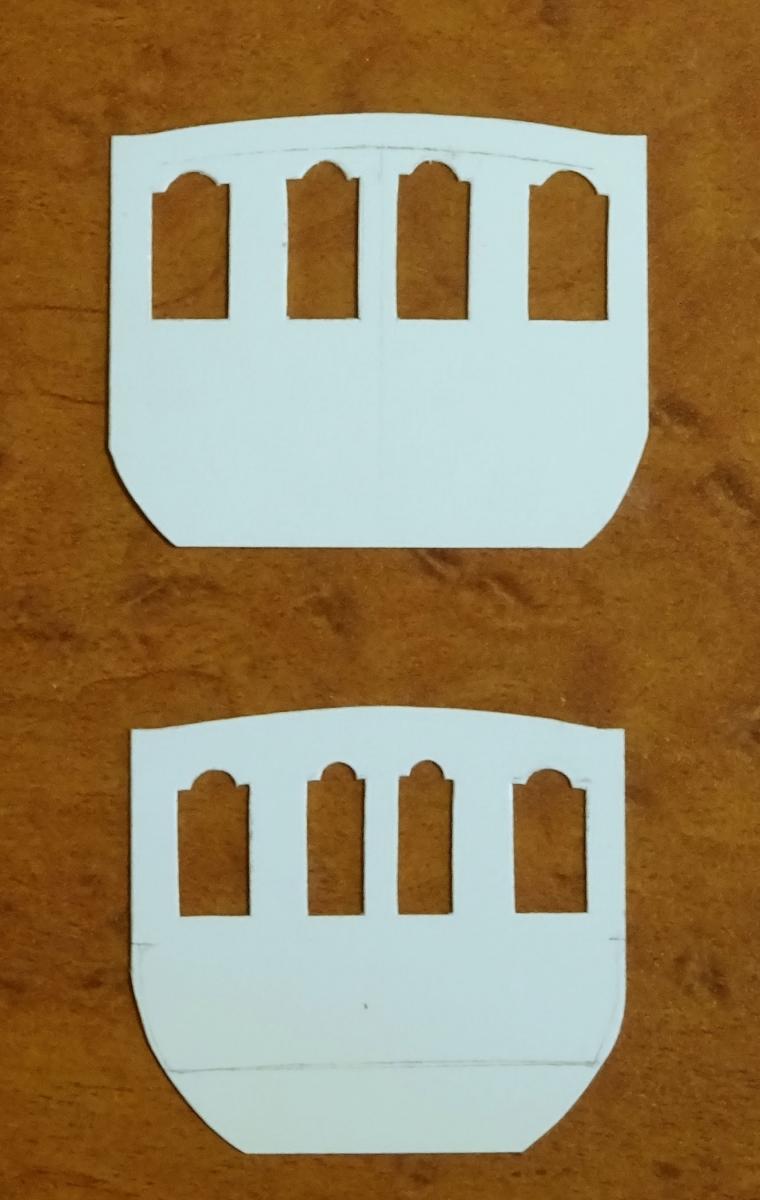
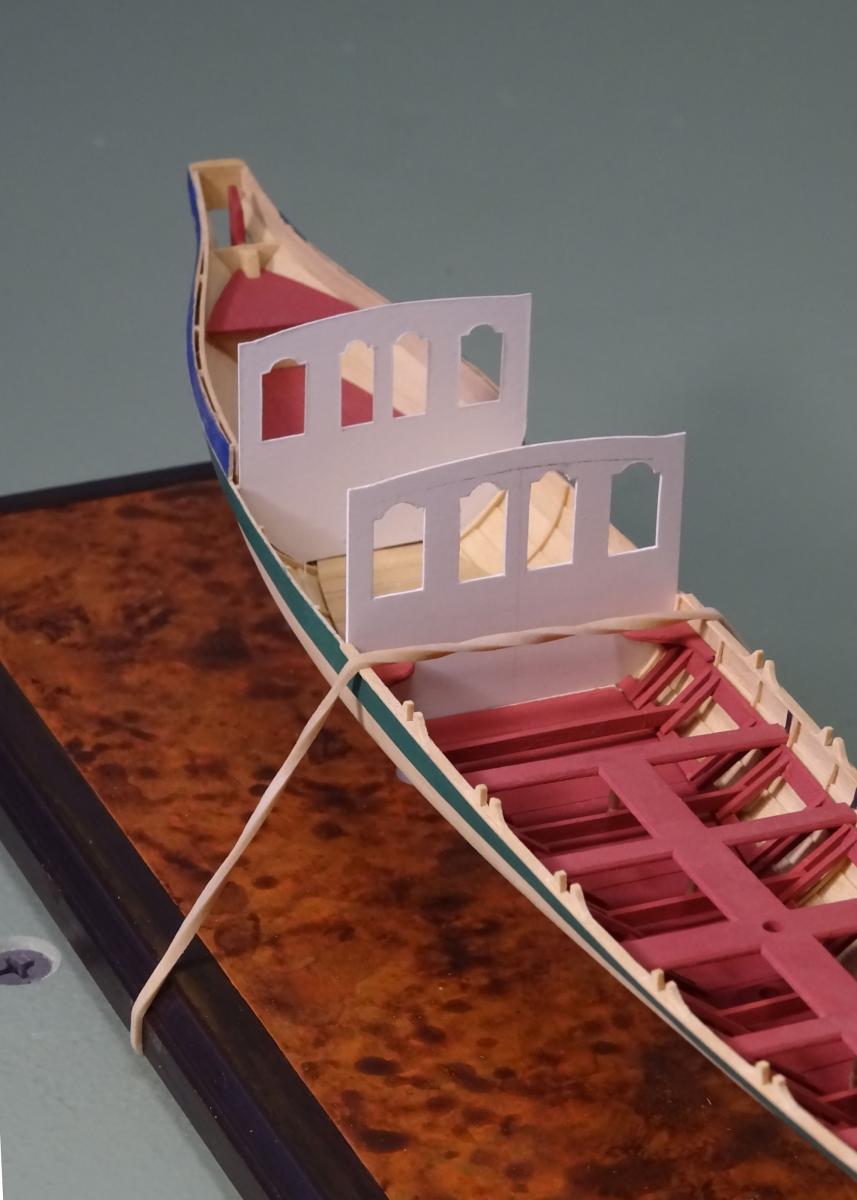
Thank you, Hakån. I now intend to use a toned rather than pure black. The latter would look too intense at this scale. This morning I performed surgery successfully on the planking and frames in the coach section. The end patterns for the coach have also been cut and fitted. Elastic bands hold the model to the pedestals temporarily. There was some hesitation on my part as to the completeness of the draught. The side windows showed no indication of panes. Were they open spaces? In the 1830's modern sheet glass techniques had not yet been invented. Only spun glass was available for glazing, limiting pane size. The height of these openings was 19". Most panes during this time period were only about 15" high at most. I finally found a reference to spun glass panes that said the maximum dimension of these was about 23". Therefore I have the confidence to install single, large panes along the sides of the coach. Of course, these would have been expensive, showing off the Commissioners' importance and rank.

- 641 replies
-
- 39
-
-
- greenwich hospital
- barge
- (and 1 more)
-
So, if I understand things correctly, the sweep or brace was raised above deck to the height of the underside of the tiller. I presume this would have been supported on pedestals or stanchions of some sort. (It appears to be about 2' 0" above deck at the midline in the sheer and profile.) As the rudder is hung at the angle of the stern post, the tiller arc will not be horizontal, so this sweep must be arc-shaped as seen from forward or aft, as well as transversally. The gooseneck at the fore end of the tiller must be there for a reason. Is it simply to raise the end to a convenient height for the steersman? And lastly, what kind of tackle or relieving tackle was fitted to the eye at the end of the gooseneck?
-
Once again, thank you for checking in and for your positive comments. Progress today was slow. The tholes took more time than expected due to chipping as I parted them off the stock. I suppose about 40 were made, to finally end up with 24 useable ones. So it goes sometimes! It is finally time to consider the coach. I realized that the panelled sides need to be inset, or they would overlap the sheer strake and gunwale considerably. This means cutting down the uppermost strake aft. The is a job for tomorrow when I'm fresh! I gave the aftermost part of this strake a preparatory coat of blue paint, but I'm having second thoughts and may change this to black. The draught indicates a dark color here, but no more.
- 641 replies
-
- 30
-
-
- greenwich hospital
- barge
- (and 1 more)
-
Dashicat: Dashed lines used as you suggest (for hidden or underlying items) is a modern drafting convention. Back then dashed lines indicated retrofitted items. Usually internal fixtures were drawn in red ink. So, the quadrant is above the quarter deck (unusual) and on the sheer and profile there is a cranked gooseneck on the end the tiller. This suggests some form of block and tackle arrangement above deck.
-
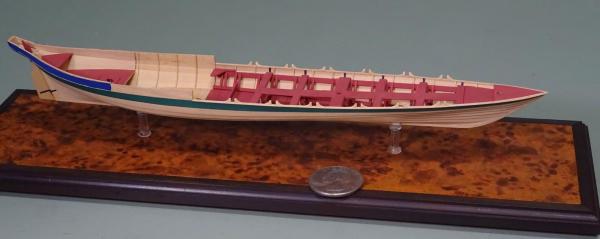
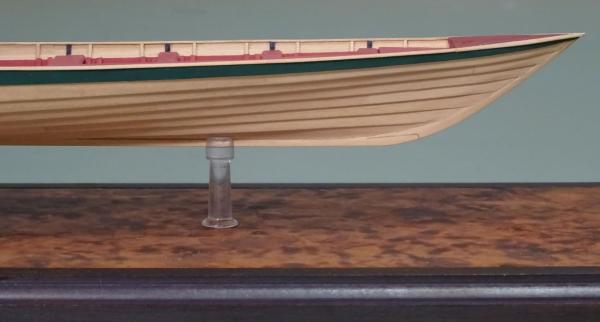
Thanks again, folks. No further finish on the surface of the base is necessary, Tom. The latest progress has been slow. Making and installing the gunwale was tricky. It is a scale 2½" wide by ¾" deep. That translates to about 3/64" by 1/64" full size. I cut this to shape from sheet Castello and carefully rounded the outer edge with fine sandpaper. The gunwale was carefully glued to the upper edge of the sheer strake and frame tops. At the bow, where the fore deck is flush to the upper side of the gunwale, revision was needed. I sanded off the paint and applied a very narrow strip of Castello over the sheer strake to match the rest of the gunwale. As masking off the top accurately would be almost impossible, I scribed the line dividing the painted area and re-painted the deck.
- 641 replies
-
- 45
-
-
- greenwich hospital
- barge
- (and 1 more)
-
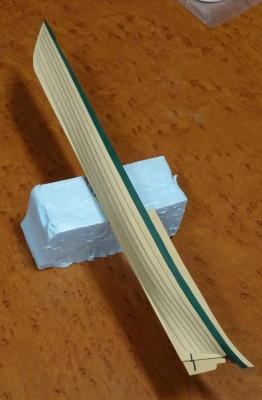
Thank you, everyone! The next thing to tackle was the 'go faster' stripe along the sheer strake. Old paintings and extant ceremonial barges show either a green or scarlet strake. I opted for green, to contrast with the red paint. Securing the model on its side gently was a problem. Clamping was not an option! I decided to use a piece of dense styrofoam, which worked very well. I simply cut a slightly wedge-shaped piece out of the block and lowered the model into the gap. The masking used is Tamiya flexible tape.

- 641 replies
-
- 43
-
-
- greenwich hospital
- barge
- (and 1 more)
-
Excellent machining as usual, Michael! It's always a pleasure seeing your updates.
-
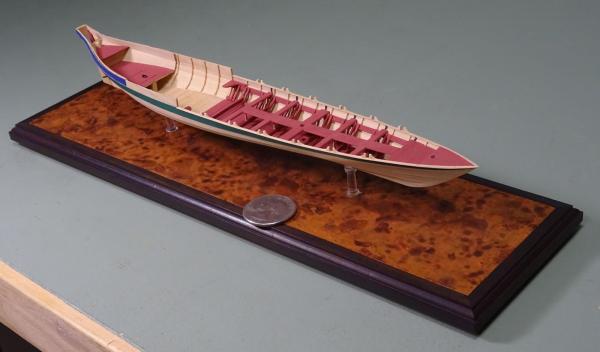
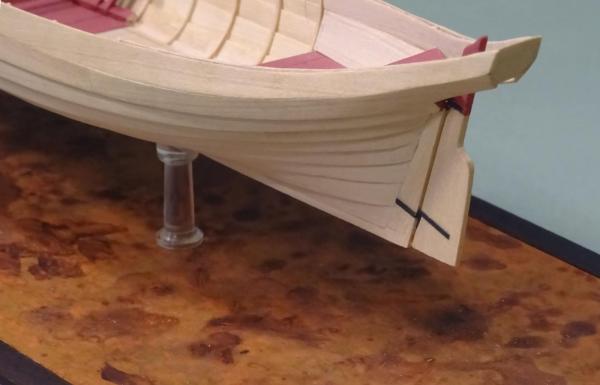
The baseboard has now been completed and the pedestals installed. The model has been temporarily mounted and the rudder hung.
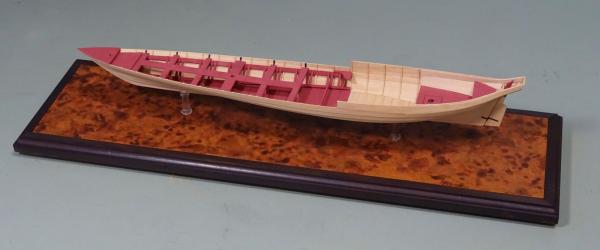
- 641 replies
-
- 47
-
-
- greenwich hospital
- barge
- (and 1 more)
-
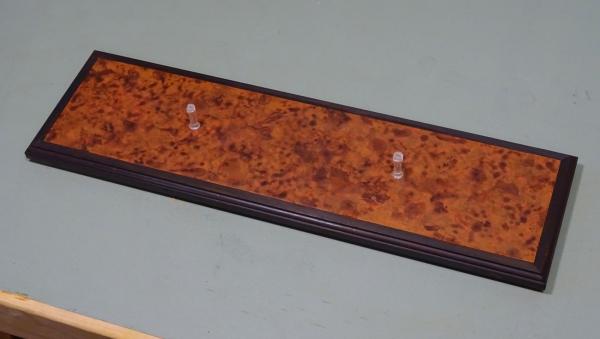
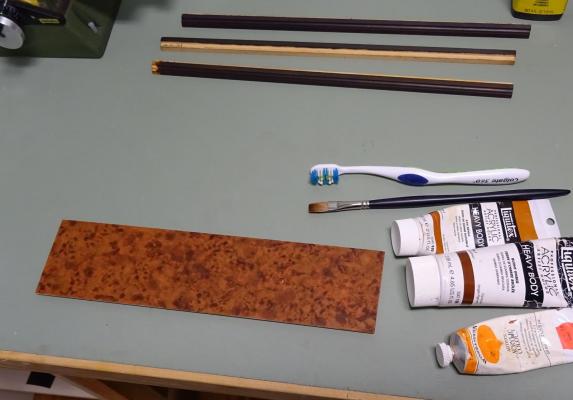
Thanks again, folks. Now for a change of pace. To complete the outside of the hull, the rudder needs to be made and hung. To avoid damage, the base had to be made now. I decided on a nice burl veneer for this purpose - except that I had none on hand. Drawing on my experience of faux finishing, I painted the burl on ply using the three colors shown. The outer edges will be trimmed using brown stained and polished wood (at top). All these elements can be seen in the photo. Assembly will be done tomorrow.
- 641 replies
-
- 37
-
-
- greenwich hospital
- barge
- (and 1 more)