DONATION DRIVE - SUPPORT MSW - DO YOUR PART TO KEEP THIS GREAT FORUM GOING!
×

.jpg.f26acc9a74319261612561bfa7da1303.jpg)
vaddoc
-
Posts
1,605 -
Joined
-
Last visited
Content Type
Profiles
Forums
Gallery
Events
Everything posted by vaddoc
-
.thumb.jpg.6fd4c1b78768bb3efd745ab810936005.jpg)
Have a extra $100.00 to spend......
vaddoc replied to CPDDET's topic in Modeling tools and Workshop Equipment
Oh dear, I saw this too late! My personal very biased opinion, these money would be better spent on the small Proxon drill press. It might be bit more expensive but it is so useful it justifies the added cost. But for now enjoy the books! -
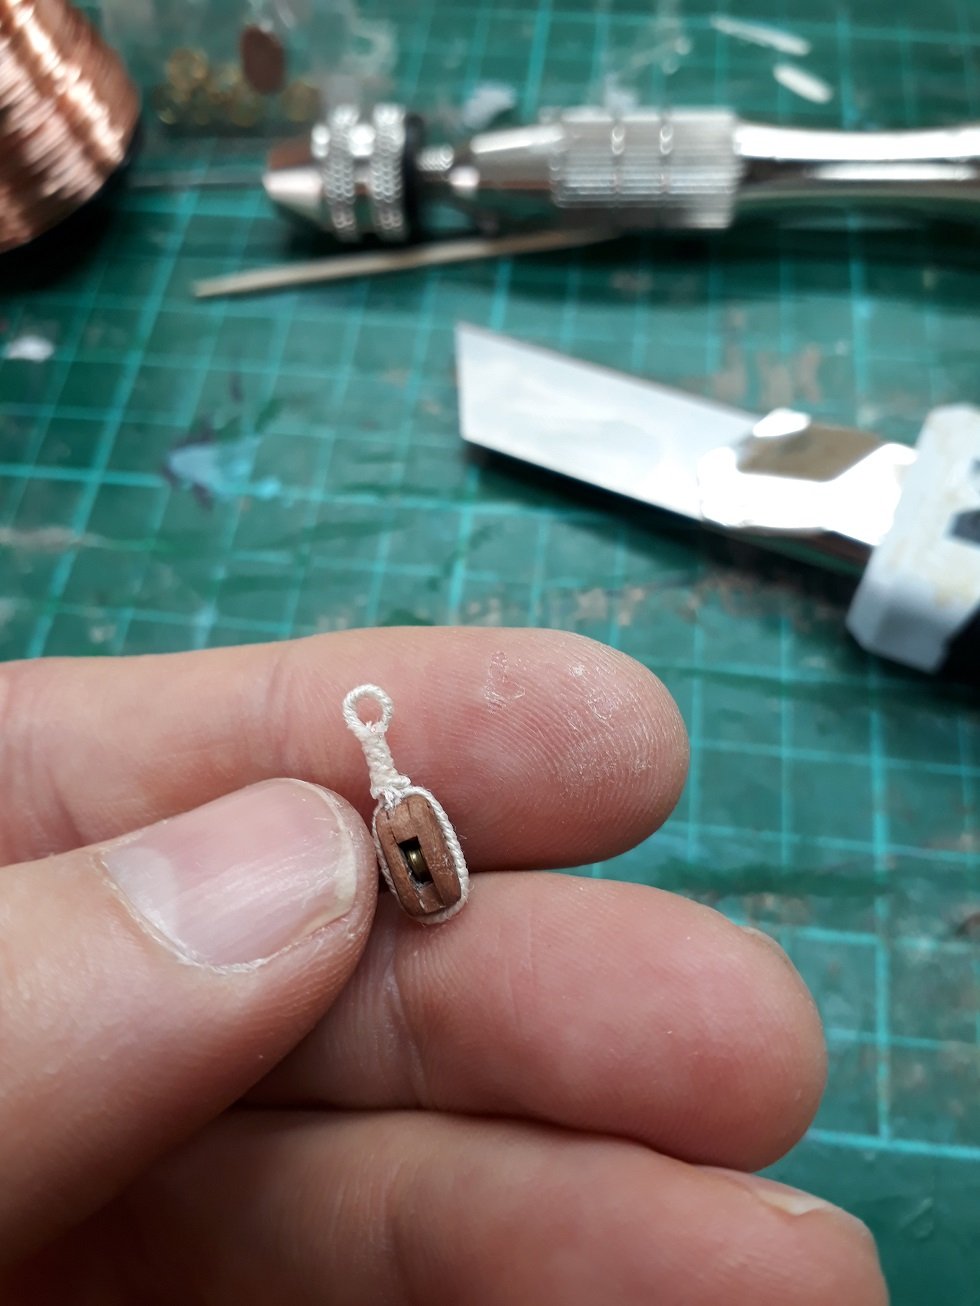
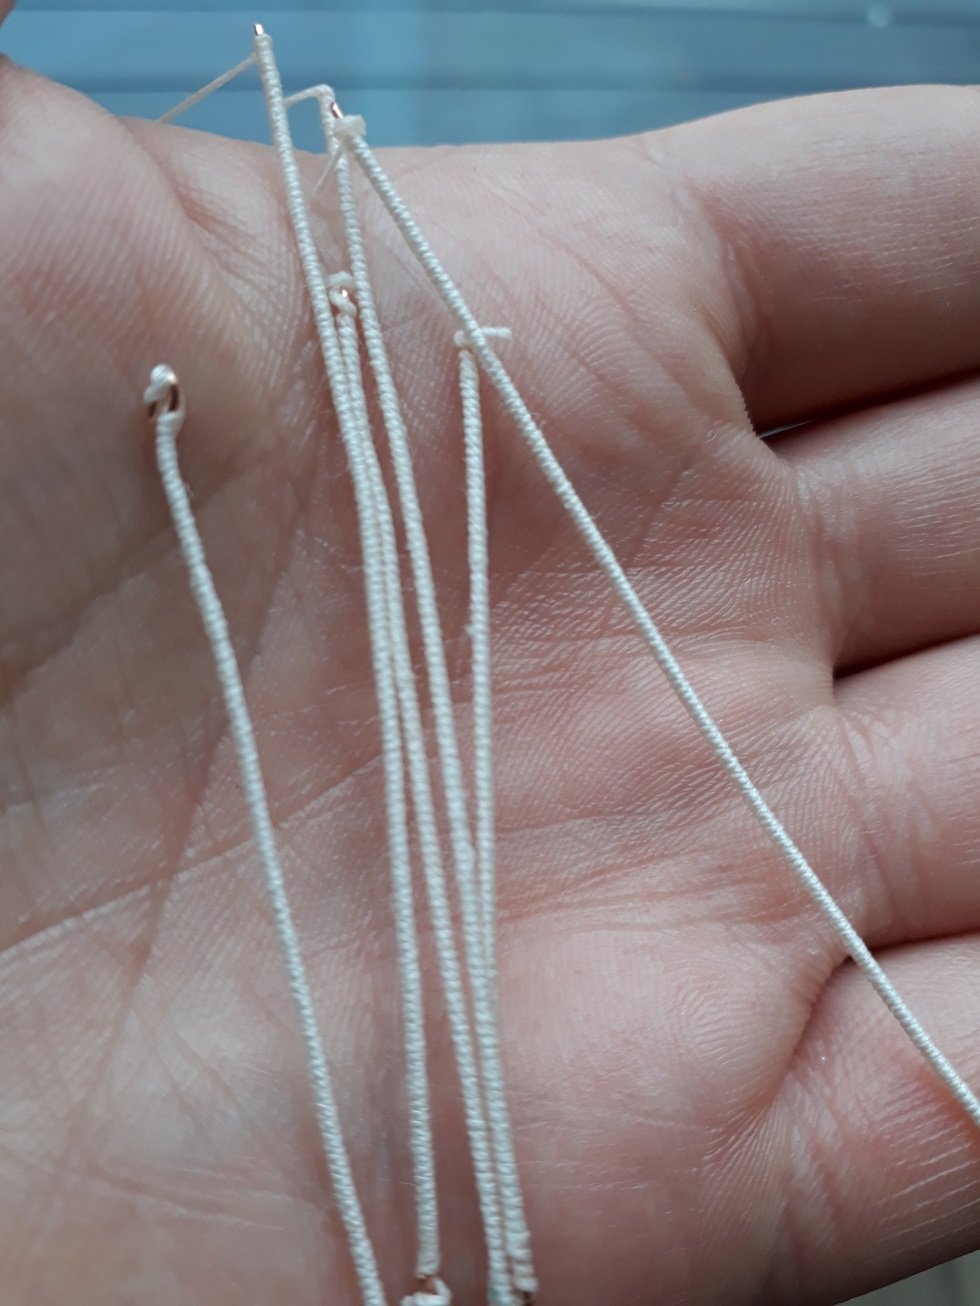
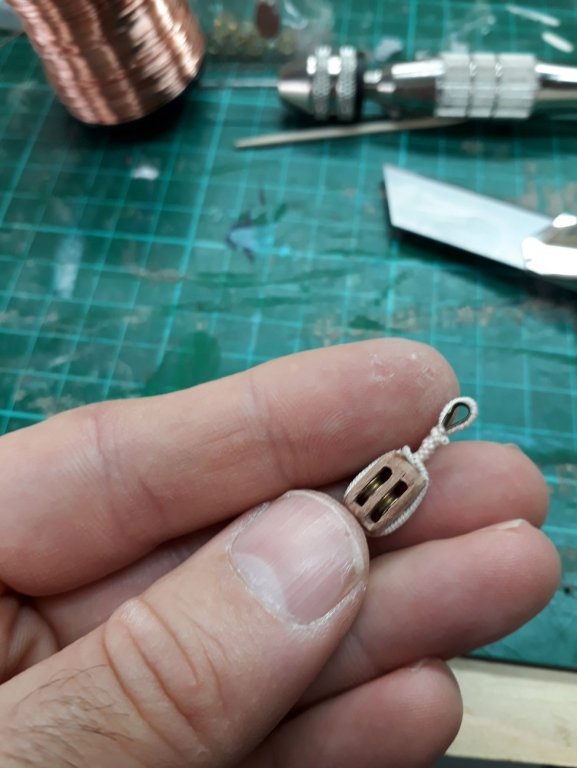
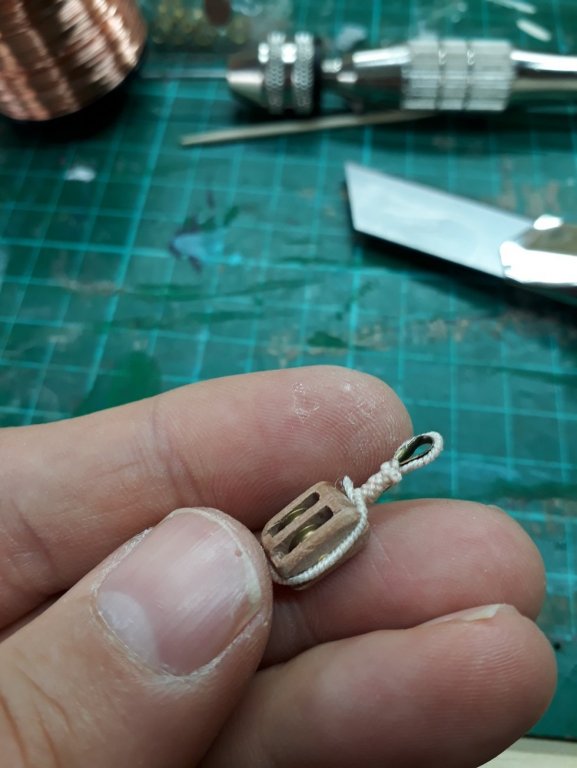
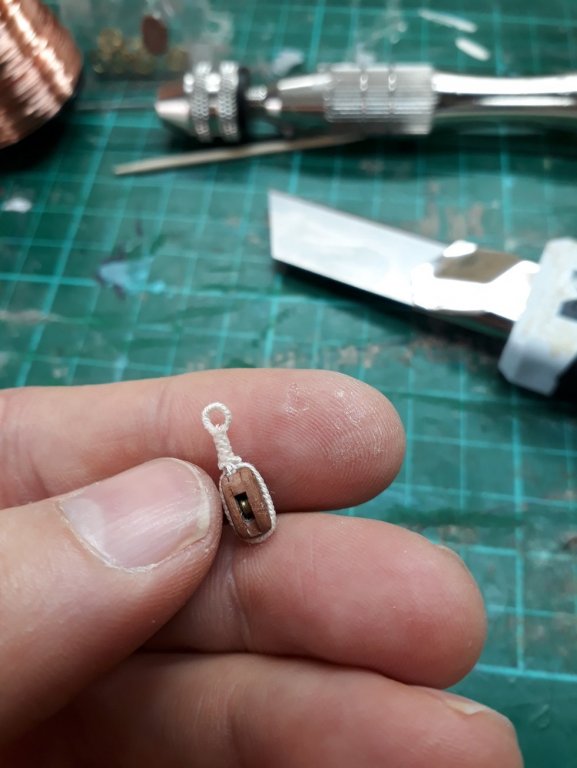
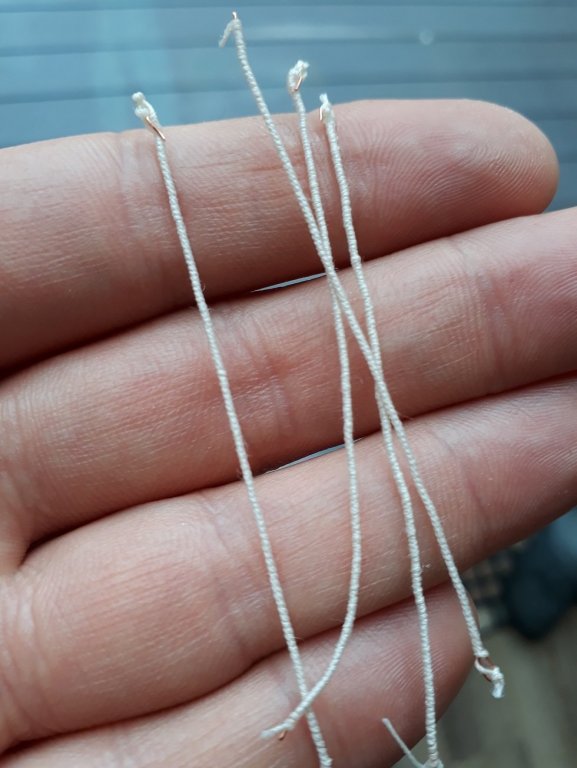
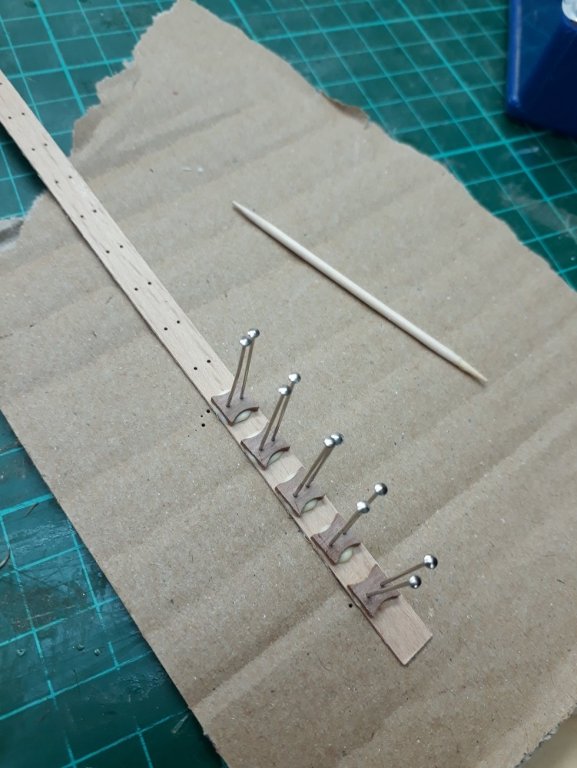
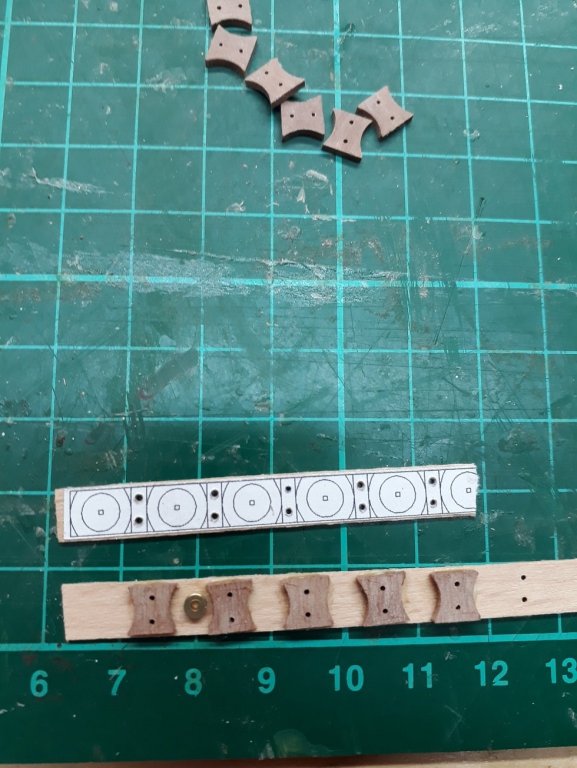
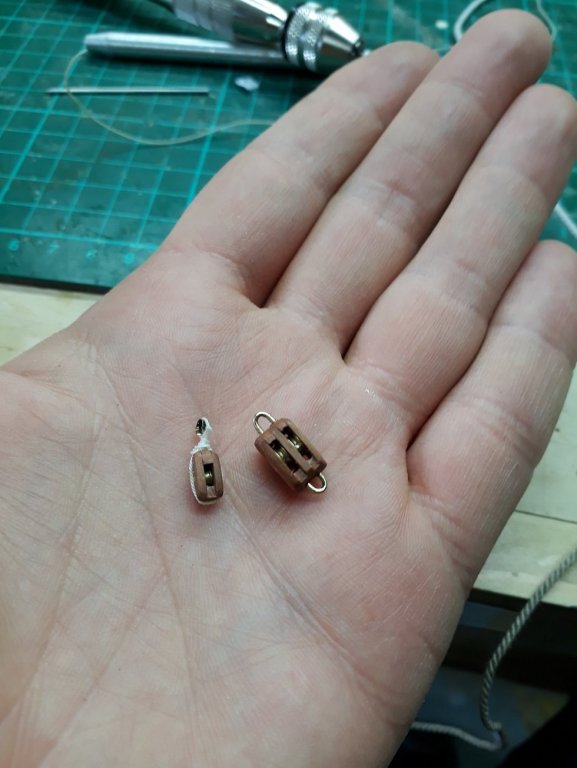
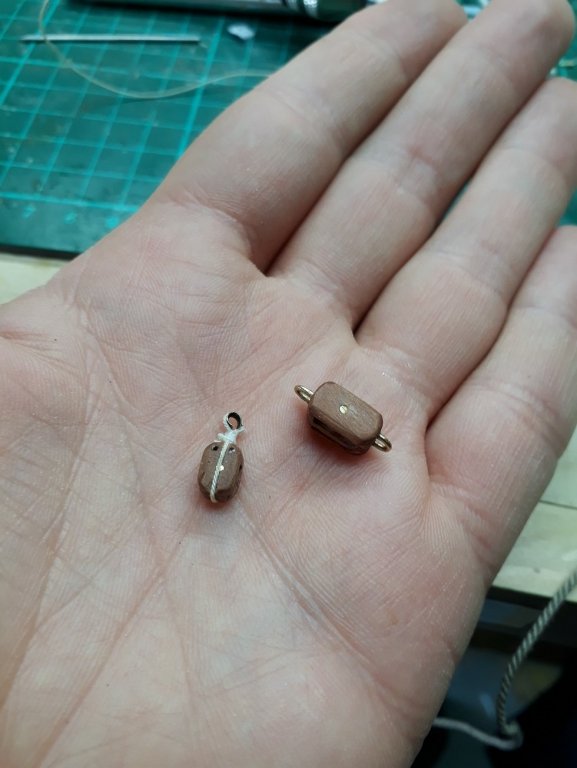
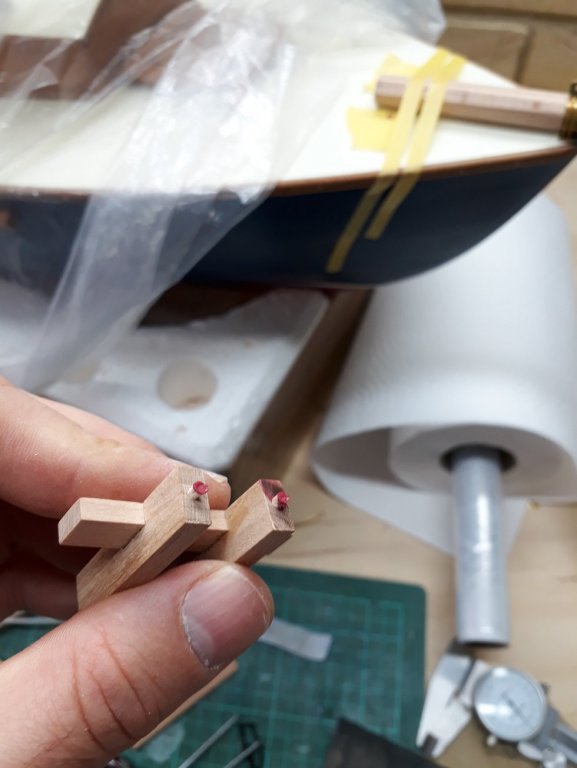
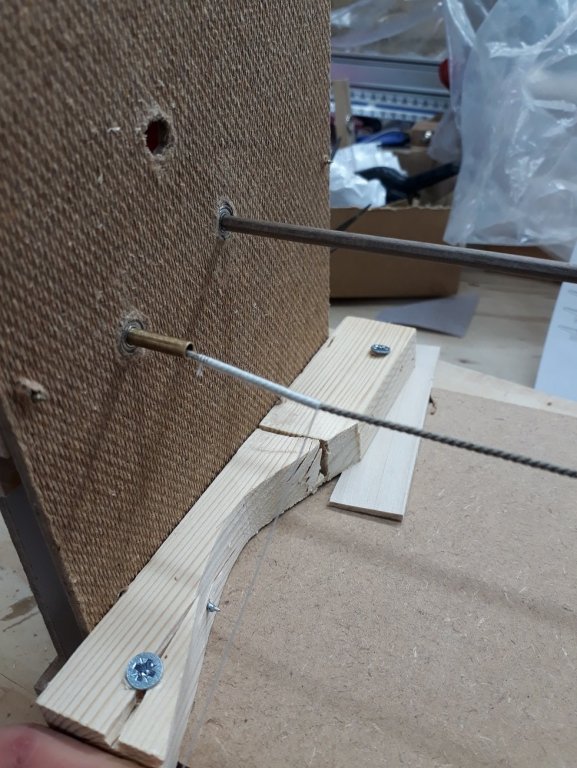
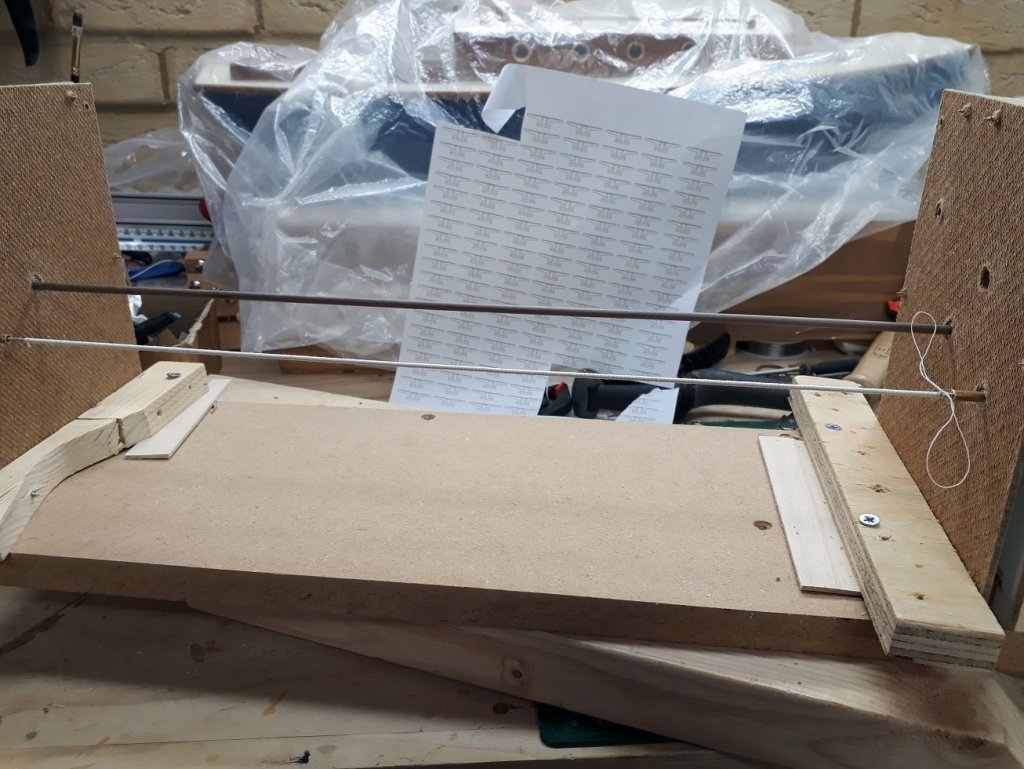
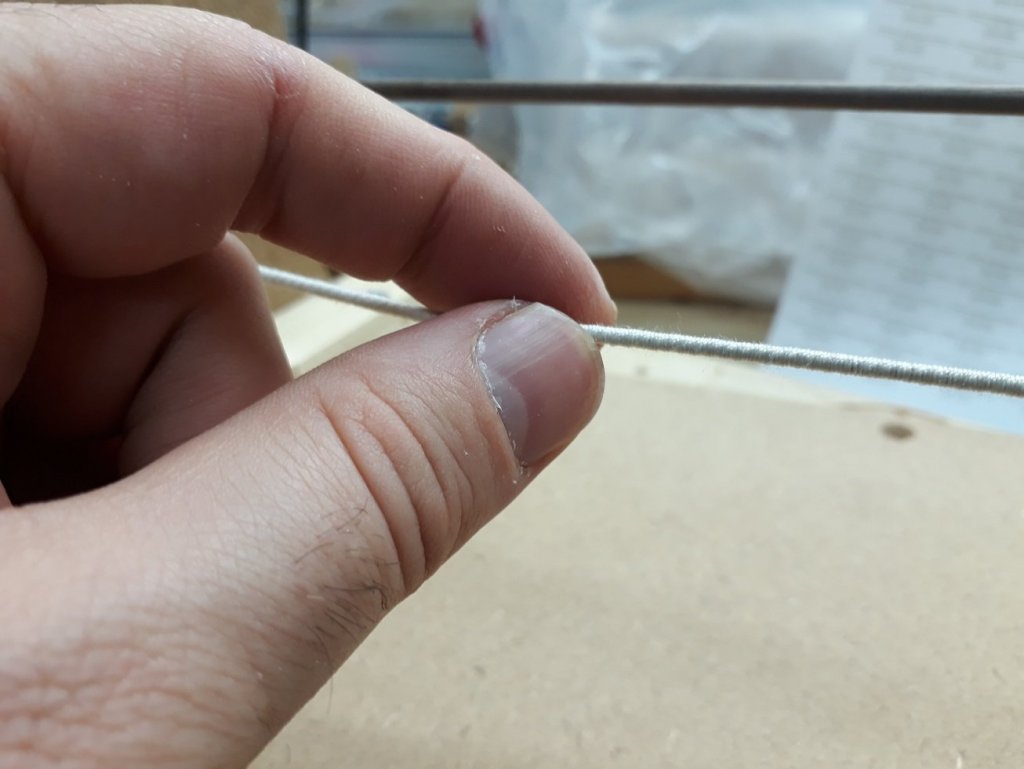
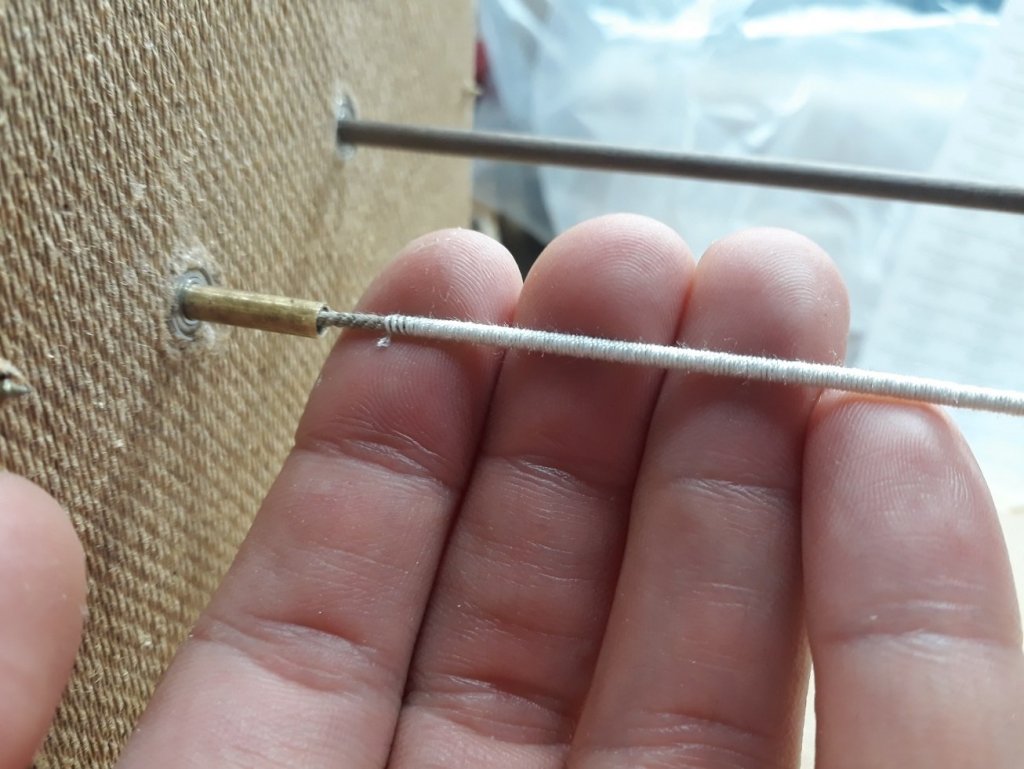
Thank you all! I continued to experiment with the blocks. Indeed, there is so little area for the CA glue to hold on to that I am concerned I ll have a lot of failures or that the sheaves will be glued by overspill. Also, I d like to avoid all this drilling and gluing. I ve spent many days considering this problem and tried a few things that did not work. In the end, I tried serving some copper wire and using this instead of rope. I think this is actually the solution. Twisting the served wire and then coating with CA is very secure and looks ok. In the next photos, the larger double block does not have Tung oil on (I forgot) but has a thimble that actually sat very nicely. For the smaller one, I should have made the twisted part shorter I think. They do run very smoothly. The thimble is slightly modified wire guardians, these come in two sizes (https://www.ebay.co.uk/itm/100-WIRE-GUARDIAN-5-COLOURS-CRIMPS-PROTECTORS-4-TIGER-TAIL-WIRE-JEWELLERY-UK/311961028467?hash=item48a2538773:m:mTVglS4r9SHT-NAqDLrcrAg&frcectupt=true) I used copper wire simply because that is what I had. I think being softer it might work better than brass though. I have made a few pieces using two diameter wires and I will strop the blocks as I go as some may need to have eyes in both ends. It is very quick and easy, much easier than using rope.


-
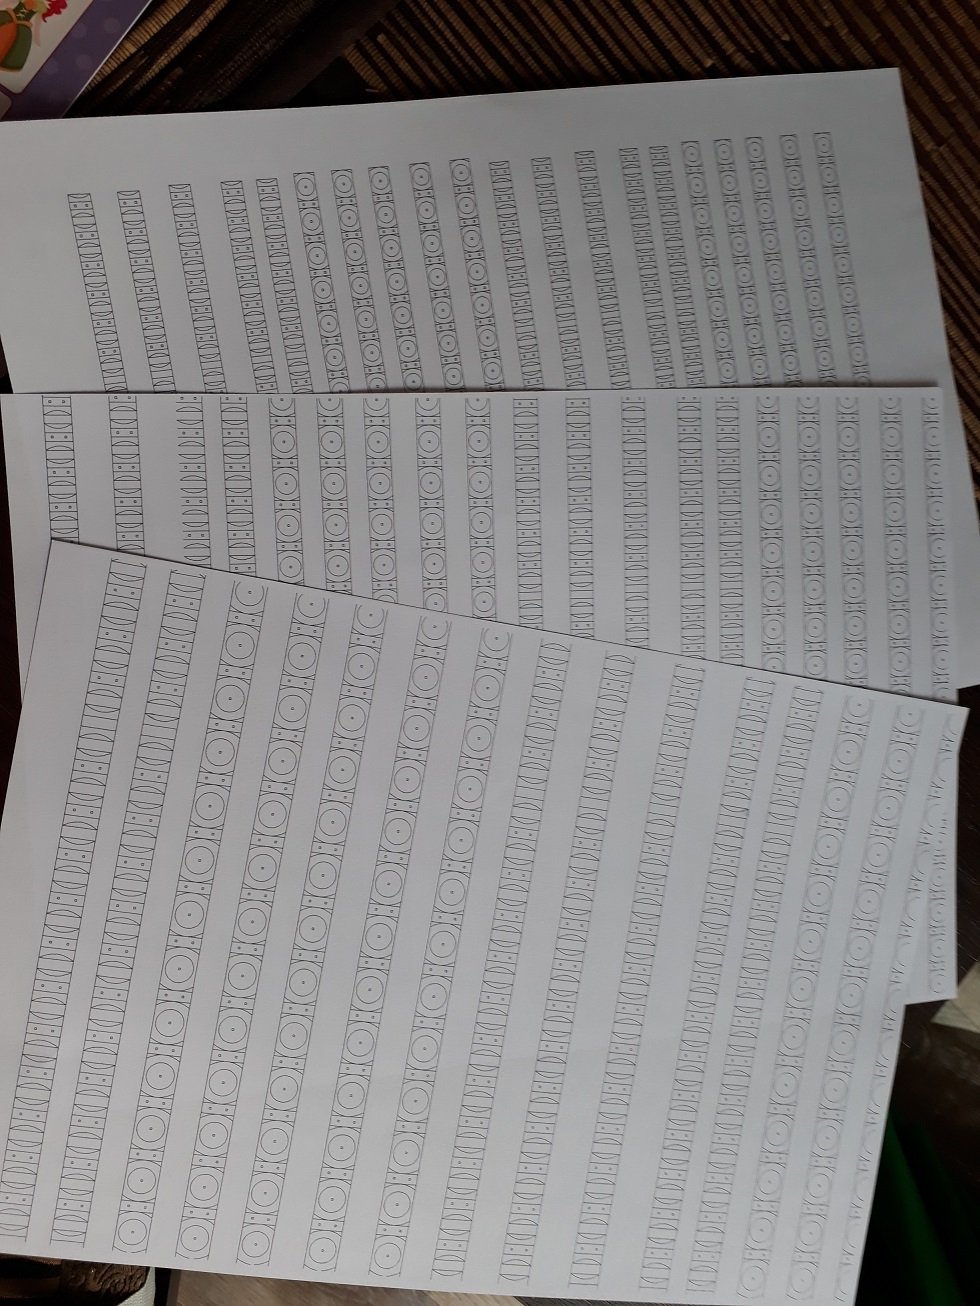
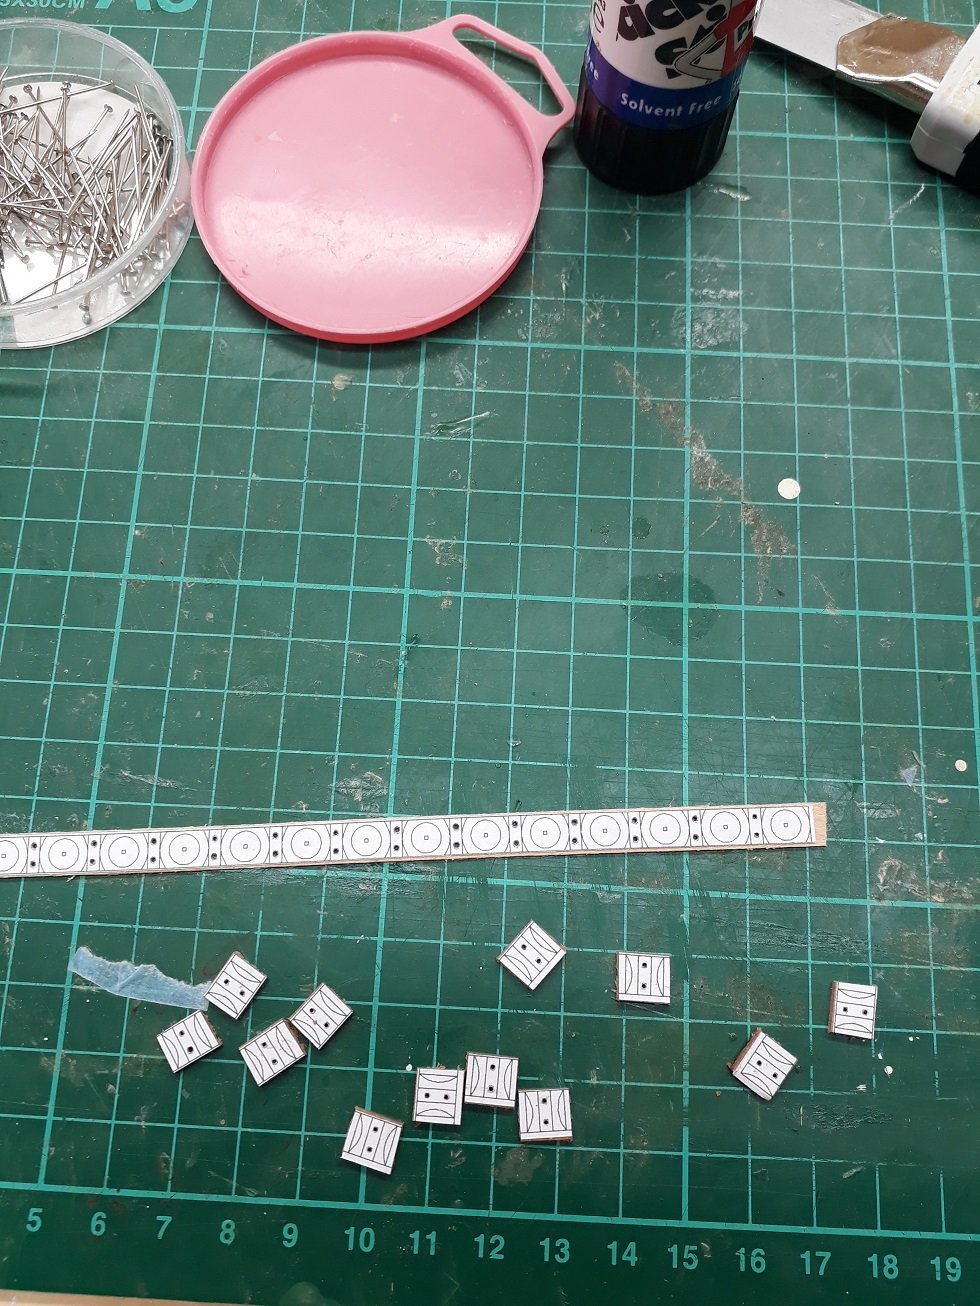
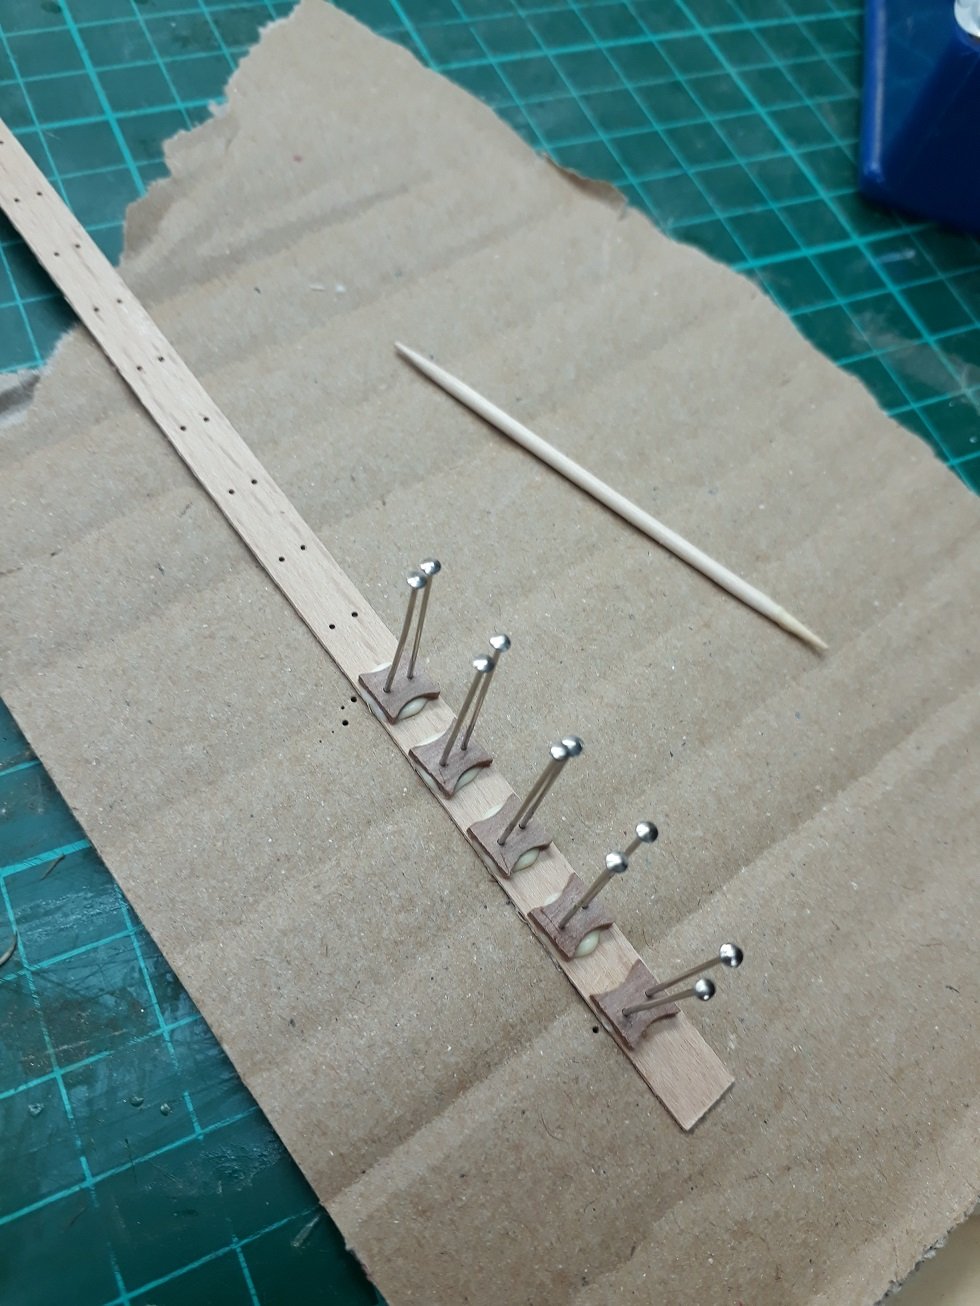
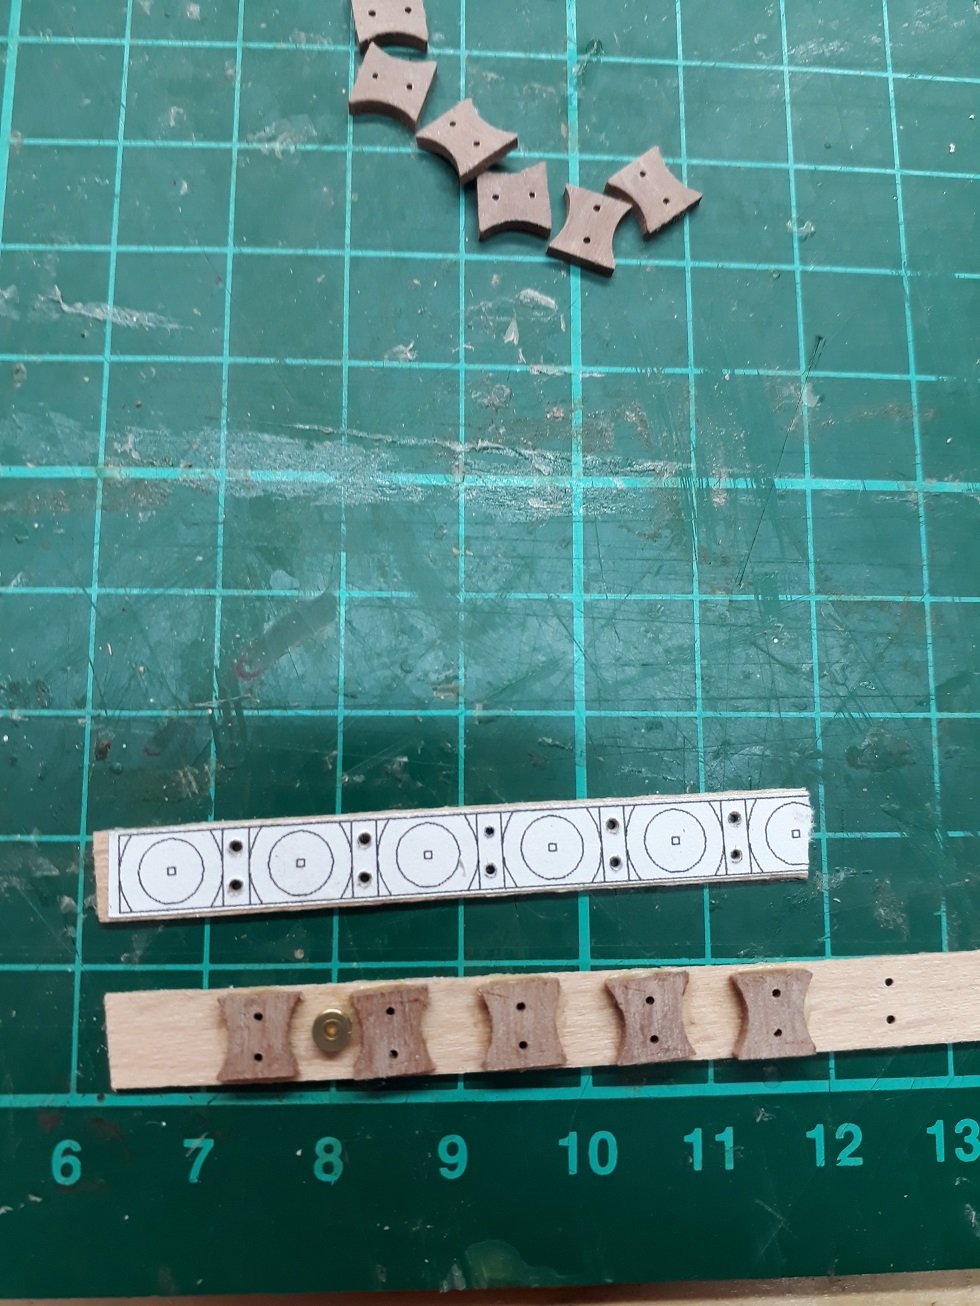
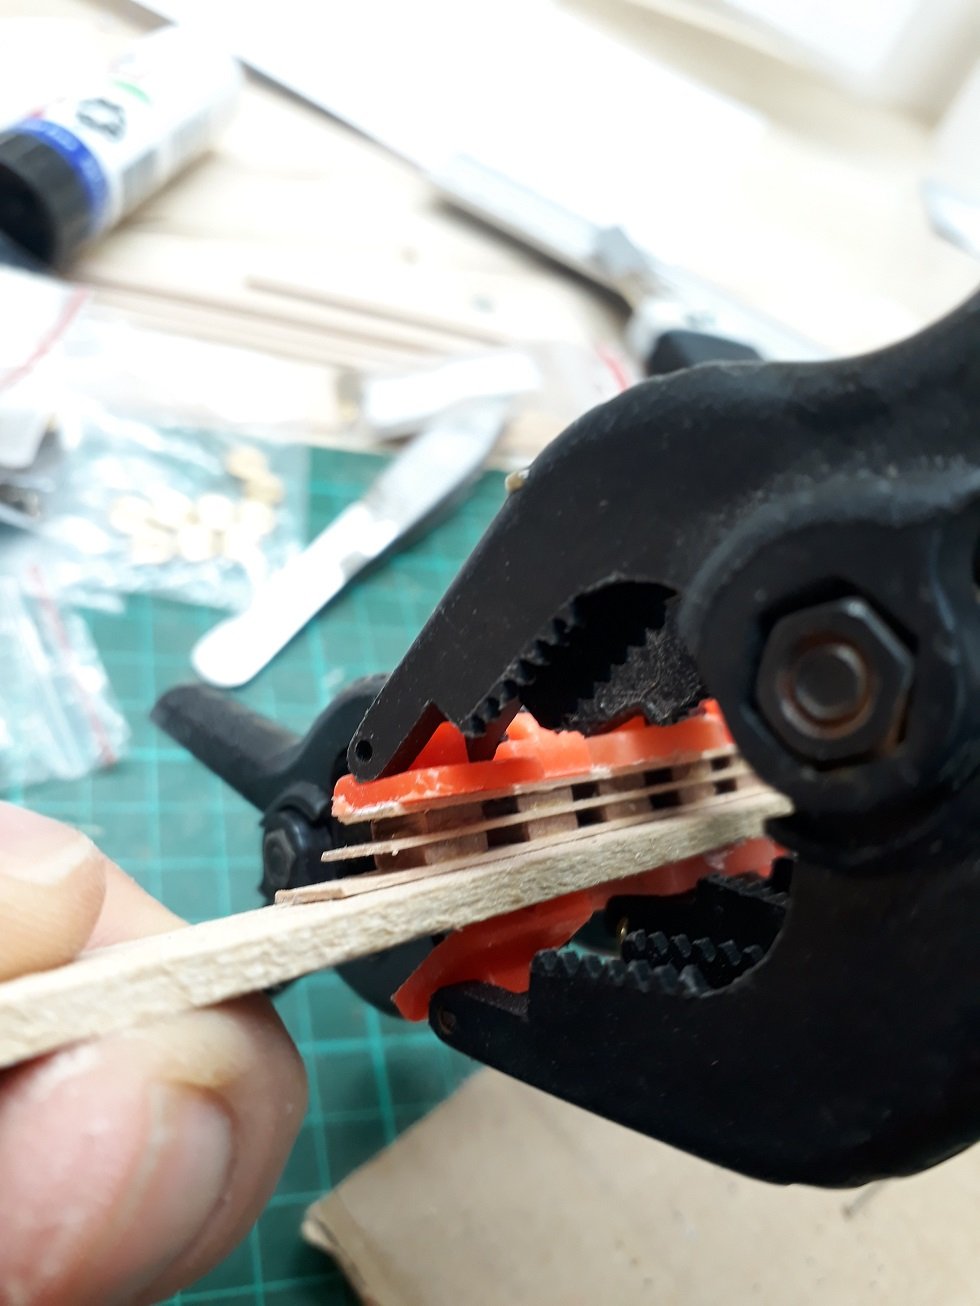
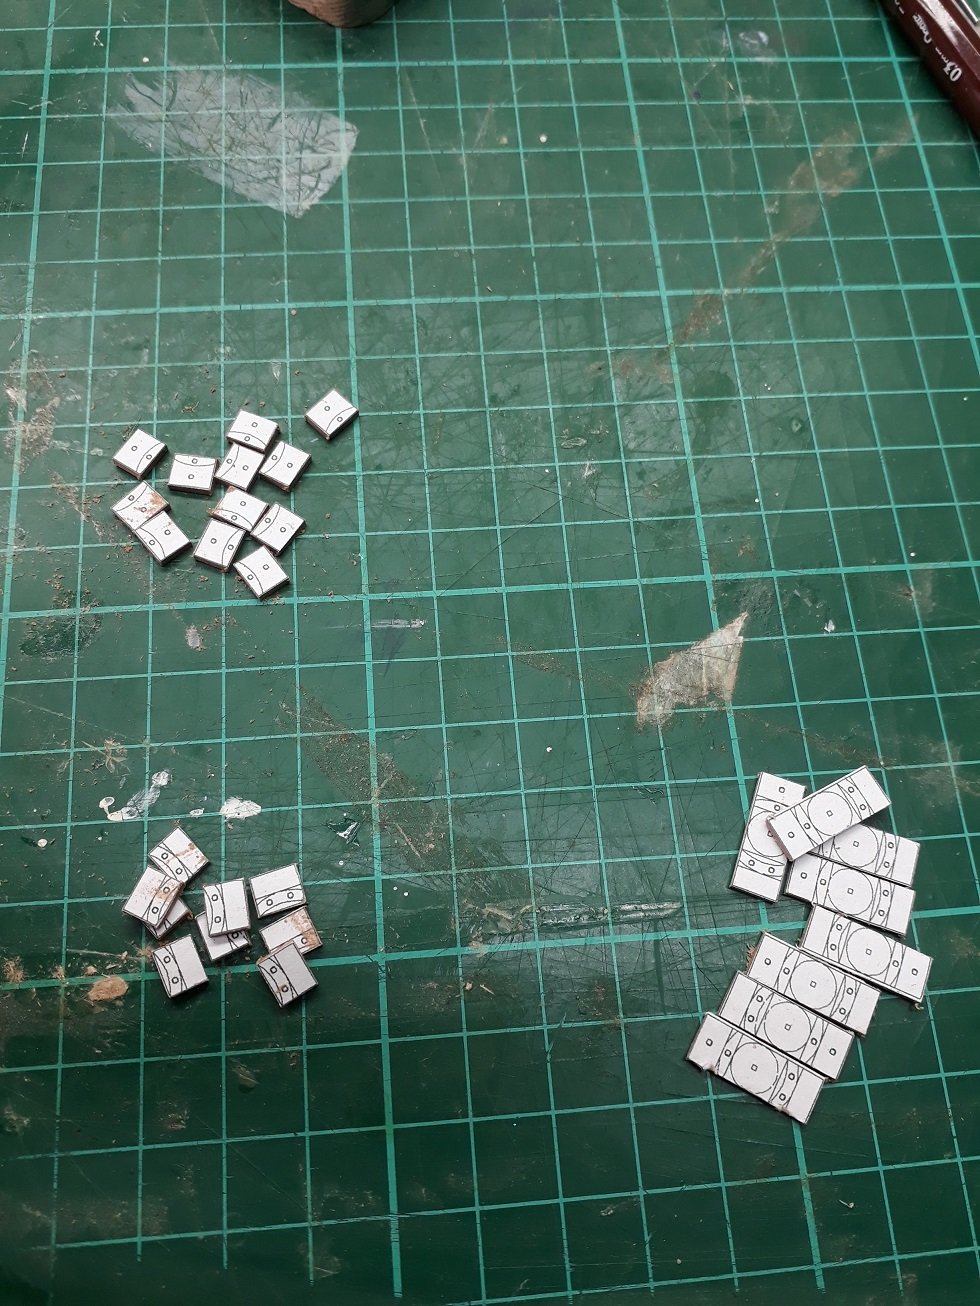
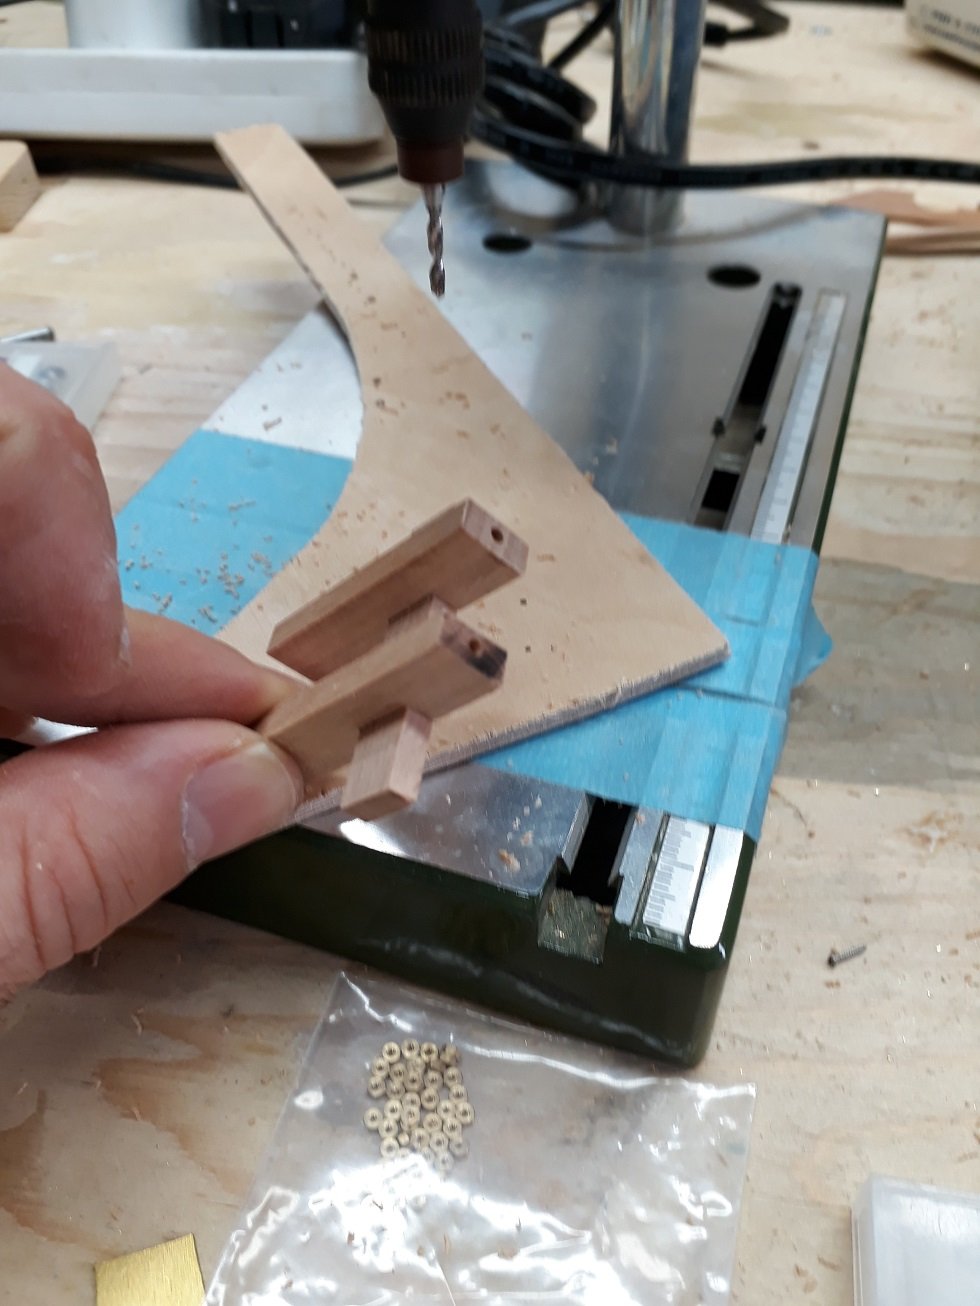
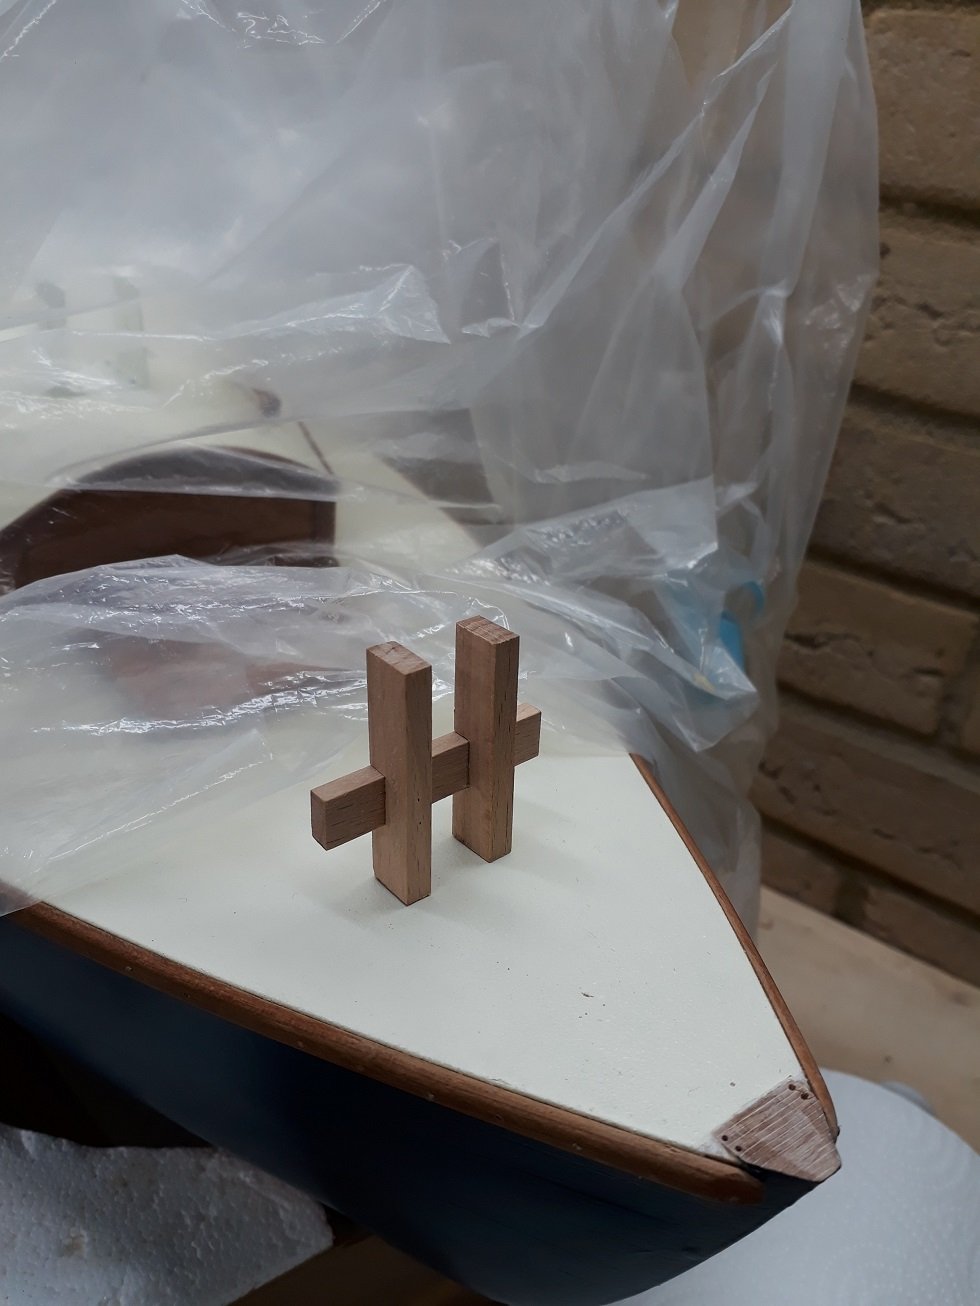
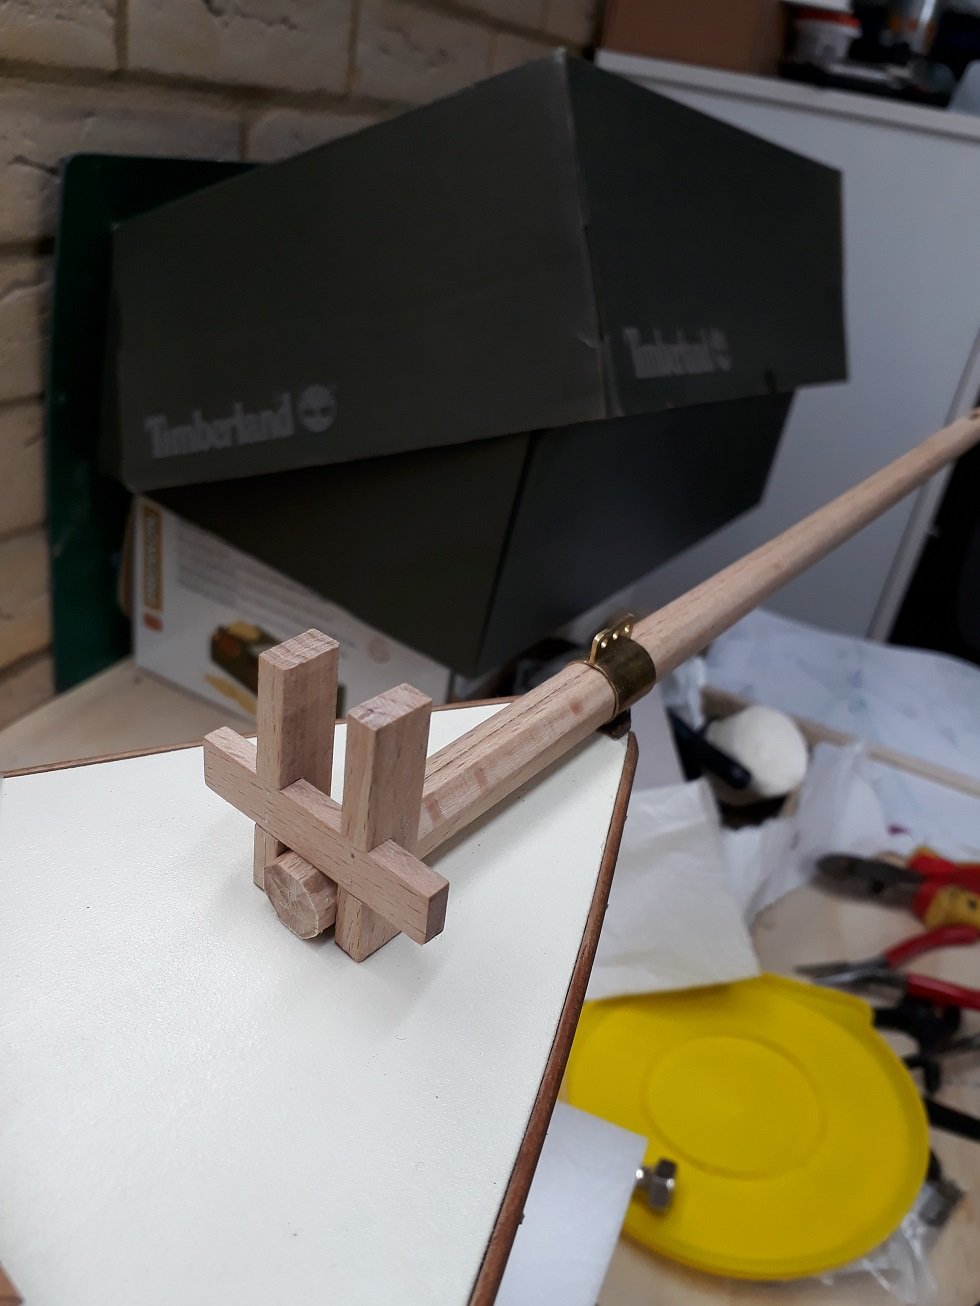
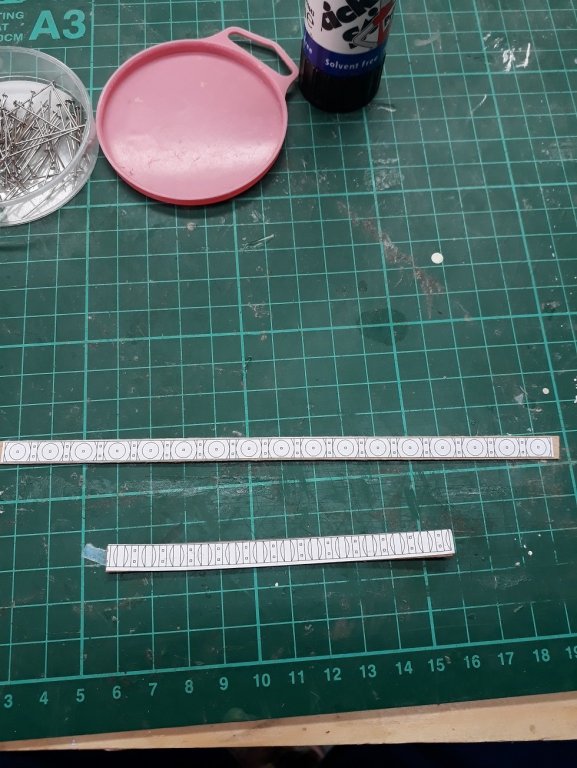
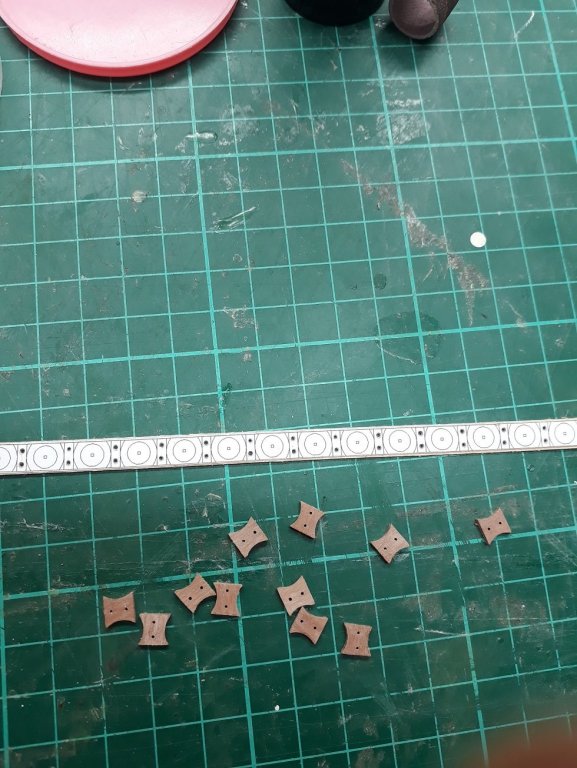
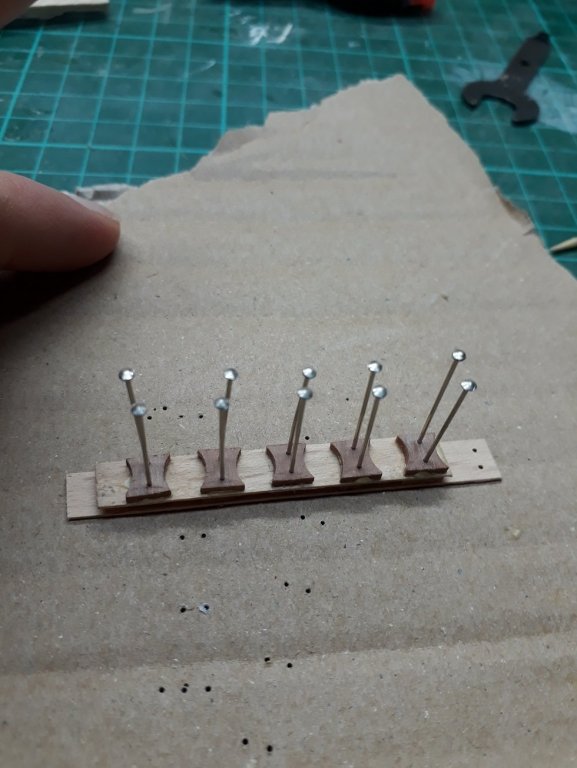
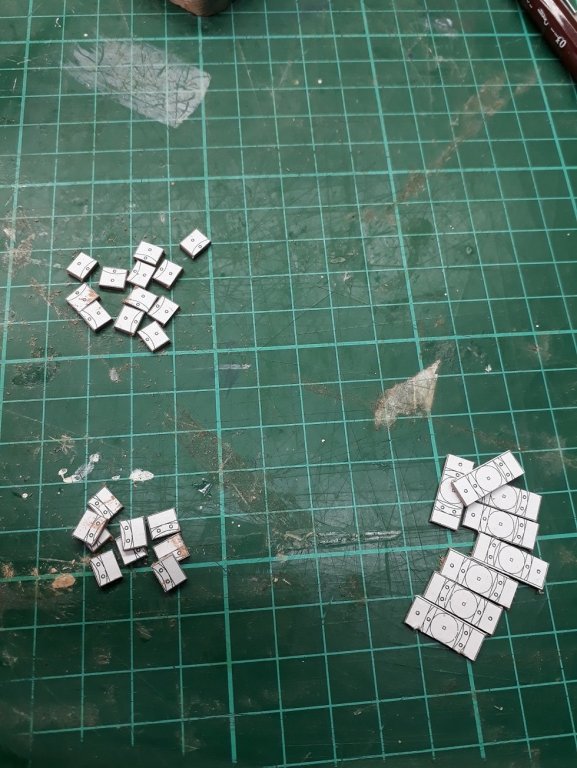
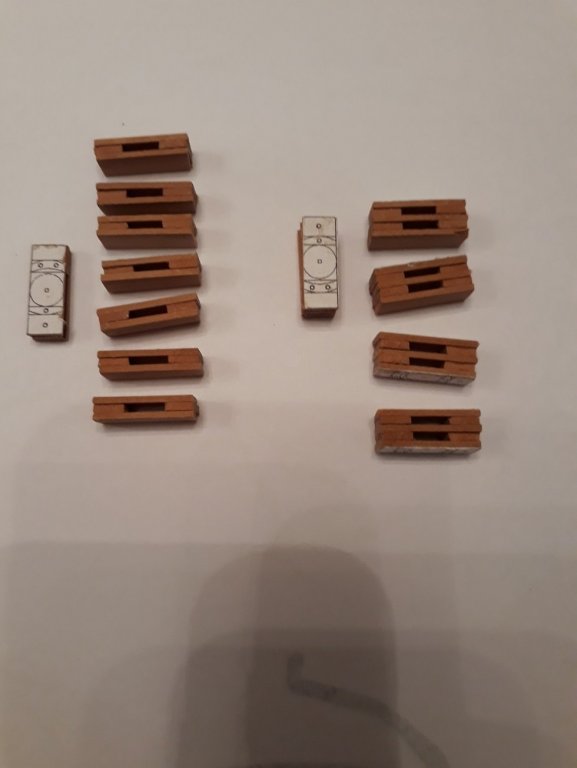
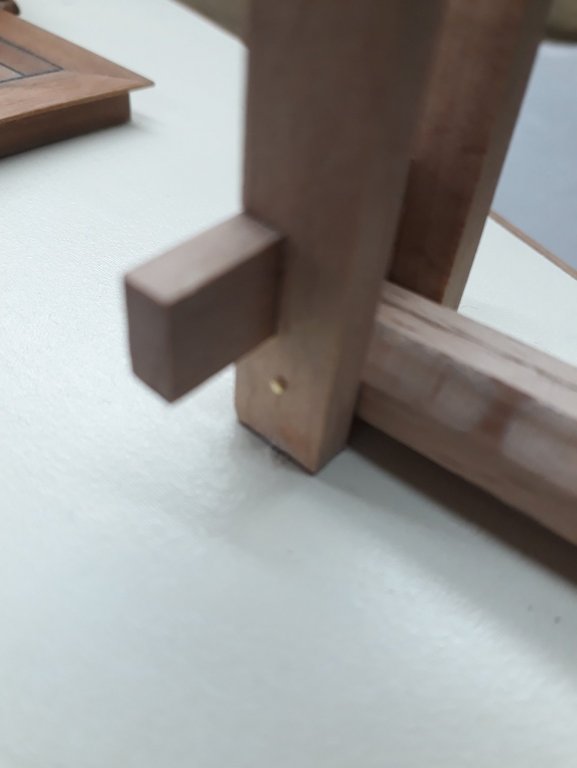
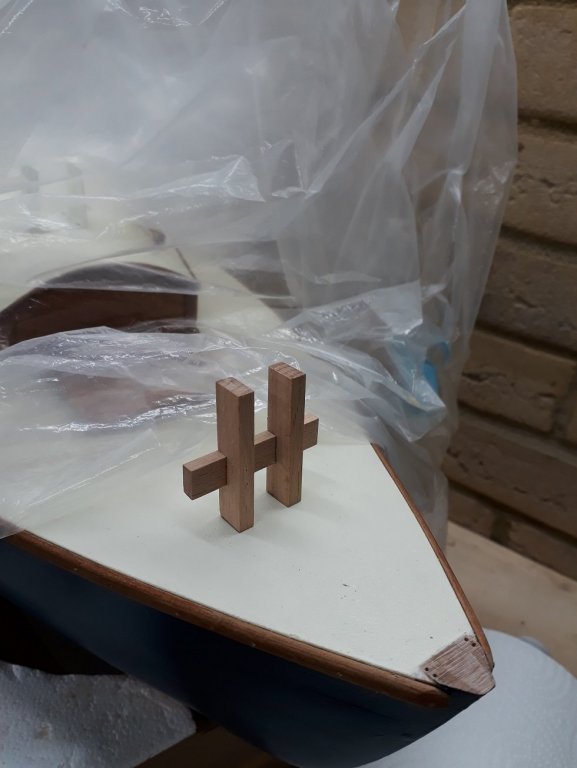
Thanks to all for your likes and comments I ve been too busy lately but I did manage to do some work on the boat. This time it was all about blocks! I will need many blocks, single and double, of various sizes. I have to find a way of mass producing them. Ordinarily, this would not be a big problem, but I want the blocks to be fully functional with brass sheaves. I spent quite a long time on the computer making CAD templates and came up with a very complex way. The next pics are from the first attempts. I realised that I could simplify things and that alignment could be maintained without any drilling. It still takes a long time to cut the little pieces, glue together, sand to shape, dill for the sheave and rings and finish with Tung oil. Still, it is now feasible and almost mass produced. These blocks need quite a lot of work but were done within 1 hour or so. I have templates for smaller and larger ones. One main issue is attaching rings to them but I think CA glue should be enough for a reasonably strong bond. I am also attaching the templates, maybe they ll be useful to some. Vaddoc block 7 x 5 with 3 mm sheave.pdf block 10 x 6 for 5 or 6 mm sheave.pdf blocks 12 x 8 for 8 mm sheave.pdf


-
Mini (micro) drill bits in bulk, not sets.
vaddoc replied to moreplovac's topic in Modeling tools and Workshop Equipment
Ebay really. Sometimes Aliexpress. I go through a lot of drills, almost all from ebay. -
I used trade wood filler once, the equivalent of ronseal. It was a disaster, it was rock hard, impossible to sand, risked destroying the hull. I now use only Elmers which is ideal for modelling https://www.amazon.co.uk/Elmers-X-Acto-16oz-White-Multicoloured-9-65x9-65x10-79/dp/B00JKB2GP2?SubscriptionId=AKIAILSHYYTFIVPWUY6Q&tag=duc08-21&linkCode=xm2&camp=2025&creative=165953&creativeASIN=B00JKB2GP2 Many ways to skin a cat. Test on scrap wood, learn how the various products behave and see what works for you.
-
Paints, varnishes etc dry quickly but take a long time, many weeks, to fully cure and actually they can emit gases etc. This is were the fat over lean rule comes from. Test on scrap wood. I actually did not about 2 months ago and went on and applied a dodgy varnish that I had concerns about directly over my rudder. Well, the whole think came out lumpy and horrible and then started peeling off. I had to carefully sand, re paint and re varnish the finished piece, taking care not to damage the water line and bottom half of the rudder. Painful experience! Vaddoc
-
Sand the wood till smooth (400 grit for me). Remember, any imperfections will be much more visible after the paint goes on. Sealing the wood will make painting easier. You can use a sanding sealer or use a primer. Modelling primers better but more expensive than automotive ones, Polyurethane I 'd think would be the finish to use over the paint or on wood. I would have concerns using water based acrylics over oil based polyurethane. There is a rule, "fat over lean". But maybe others have had success. Never used polyuerethane myself. Test first on scrap wood, not the model!
-
I think he mentions somewhere in his blog using Danish oil which is a mixture of Tung oil with Varnish. This would bring out the natural beauty if wood and water proof at the same time. I would be a bit cautious using trade products for modelling, my experience is they do not work well and that the dedicated modelling products are better. Never tried this Dulux varnish though, it may work well. A sanding sealer will water proof the wood without changing the colour at all. I think you ll struggle to get the exact colour which may actually be altered by his camera and then your screen. Best to go for a colour that satisfies you. I d get some Tung oil and see if you like it. Test on some scrap wood NOT the model!
-
Igor, this is just amazing! The good feel factor is off the scale, lovely work.
- 52 replies
-
- 2
-

-
- jack sparrow
- pirate
- (and 2 more)
-
Now, this museum seems to be a hot spot. Down under is unfortunately a bit far from Cambridgeshire, otherwise I d love to drop by John!
-
Indeed a spectacular hull. Looking forward to seeing the boat right side up greed from the jig. Very nice!
-
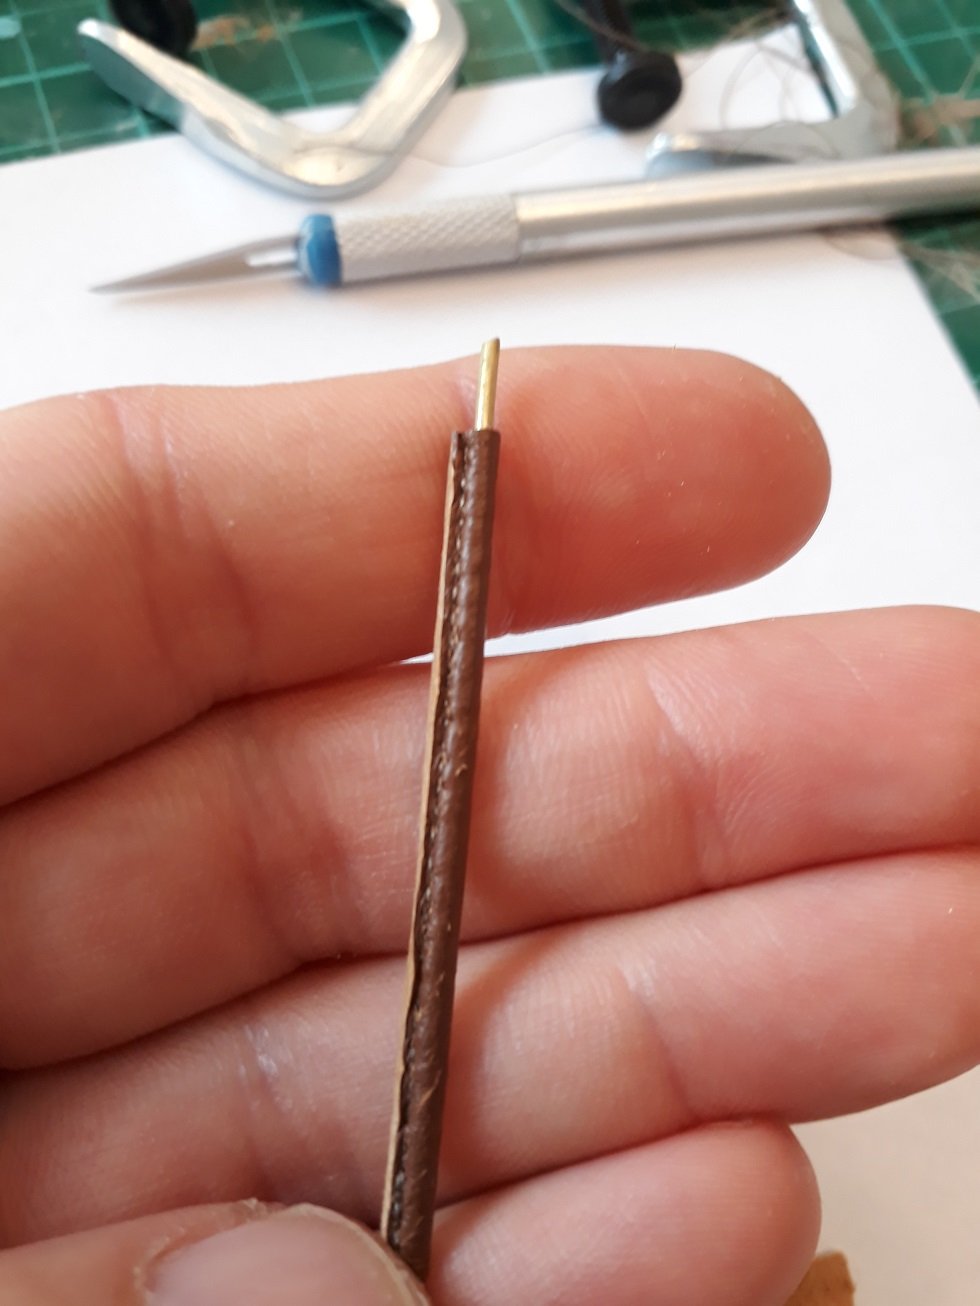
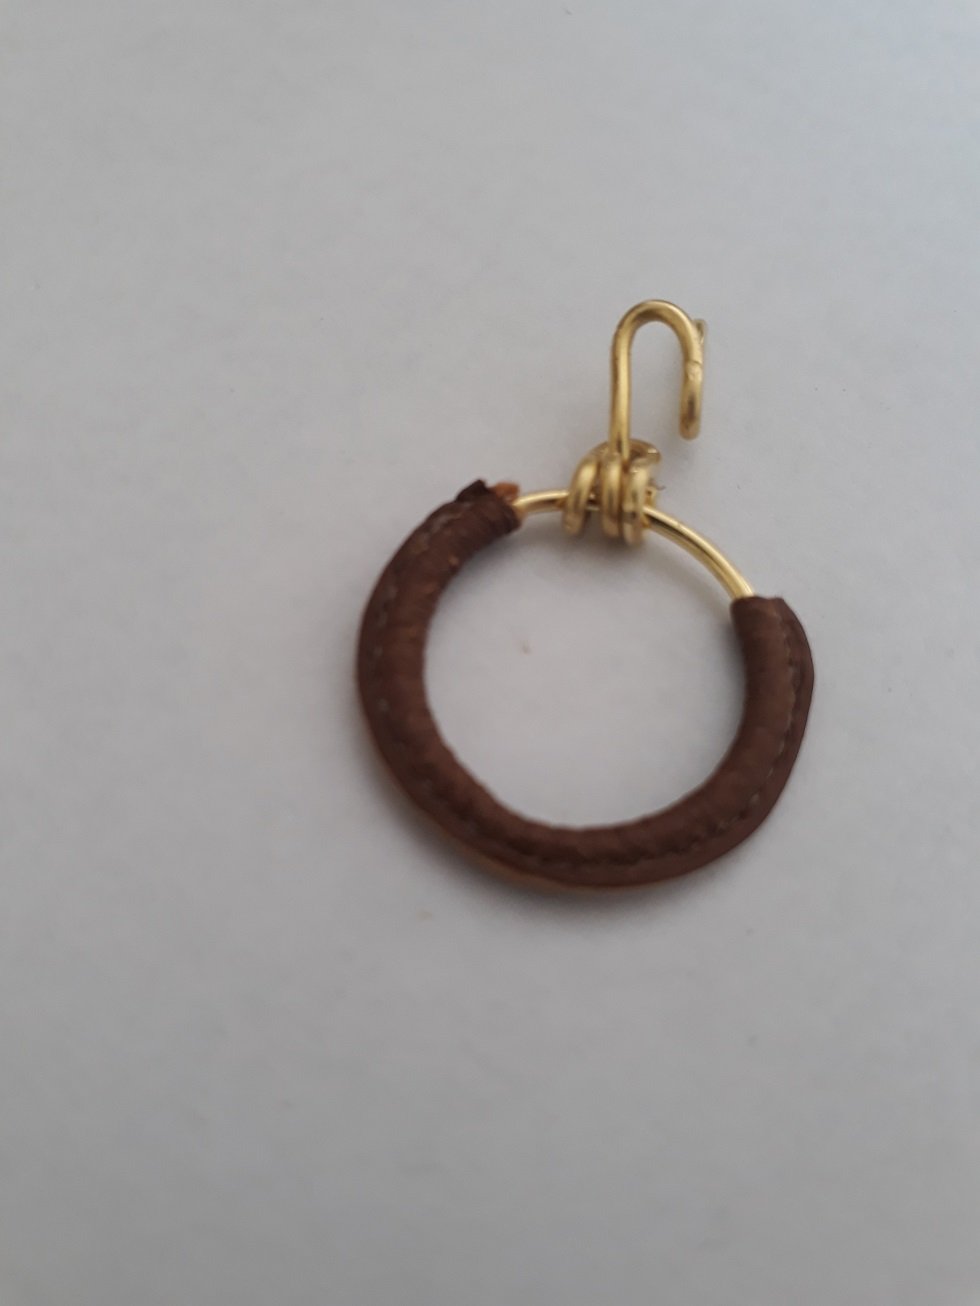
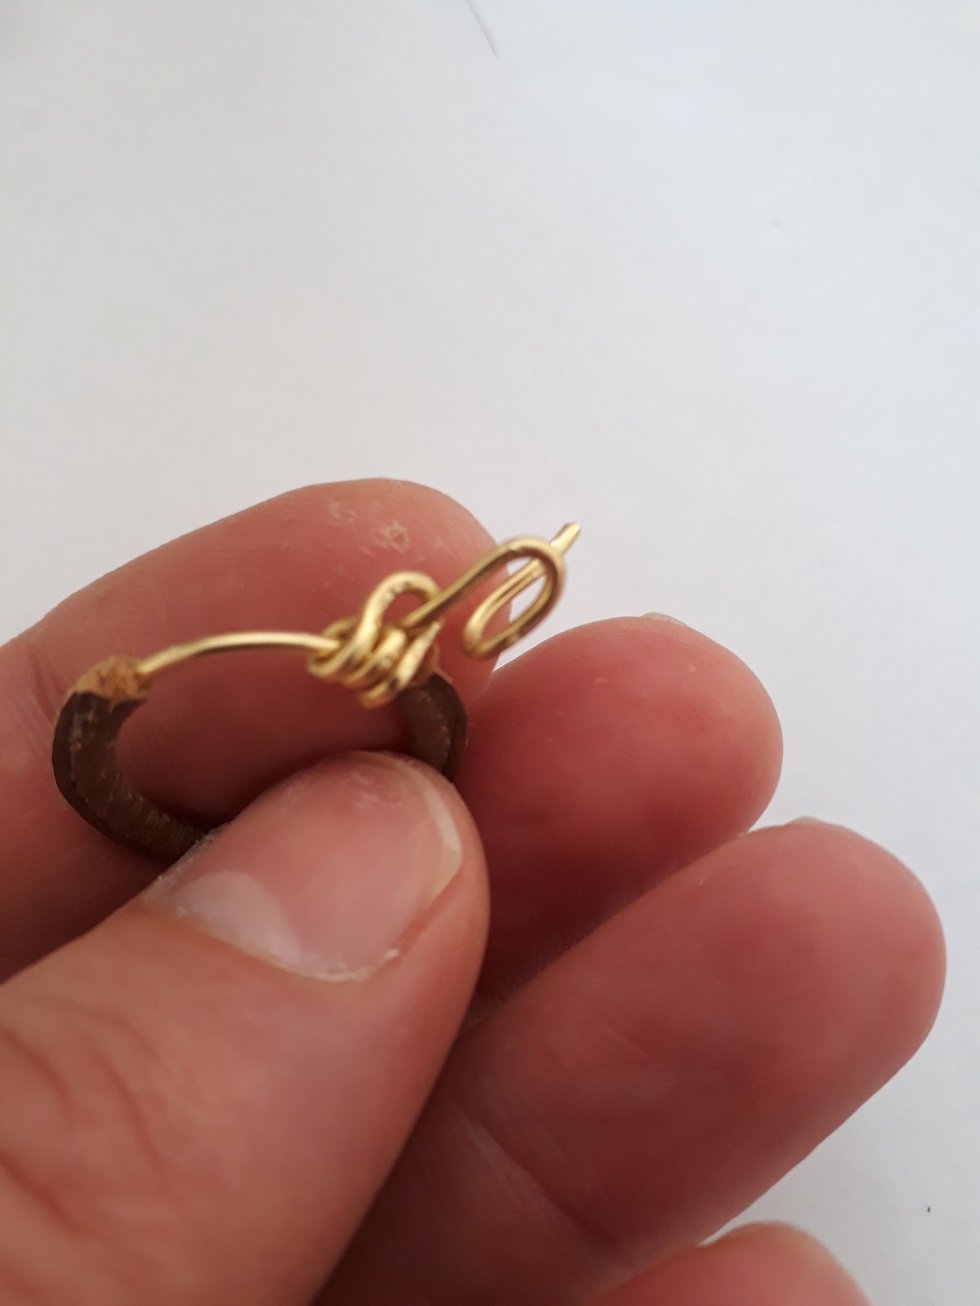
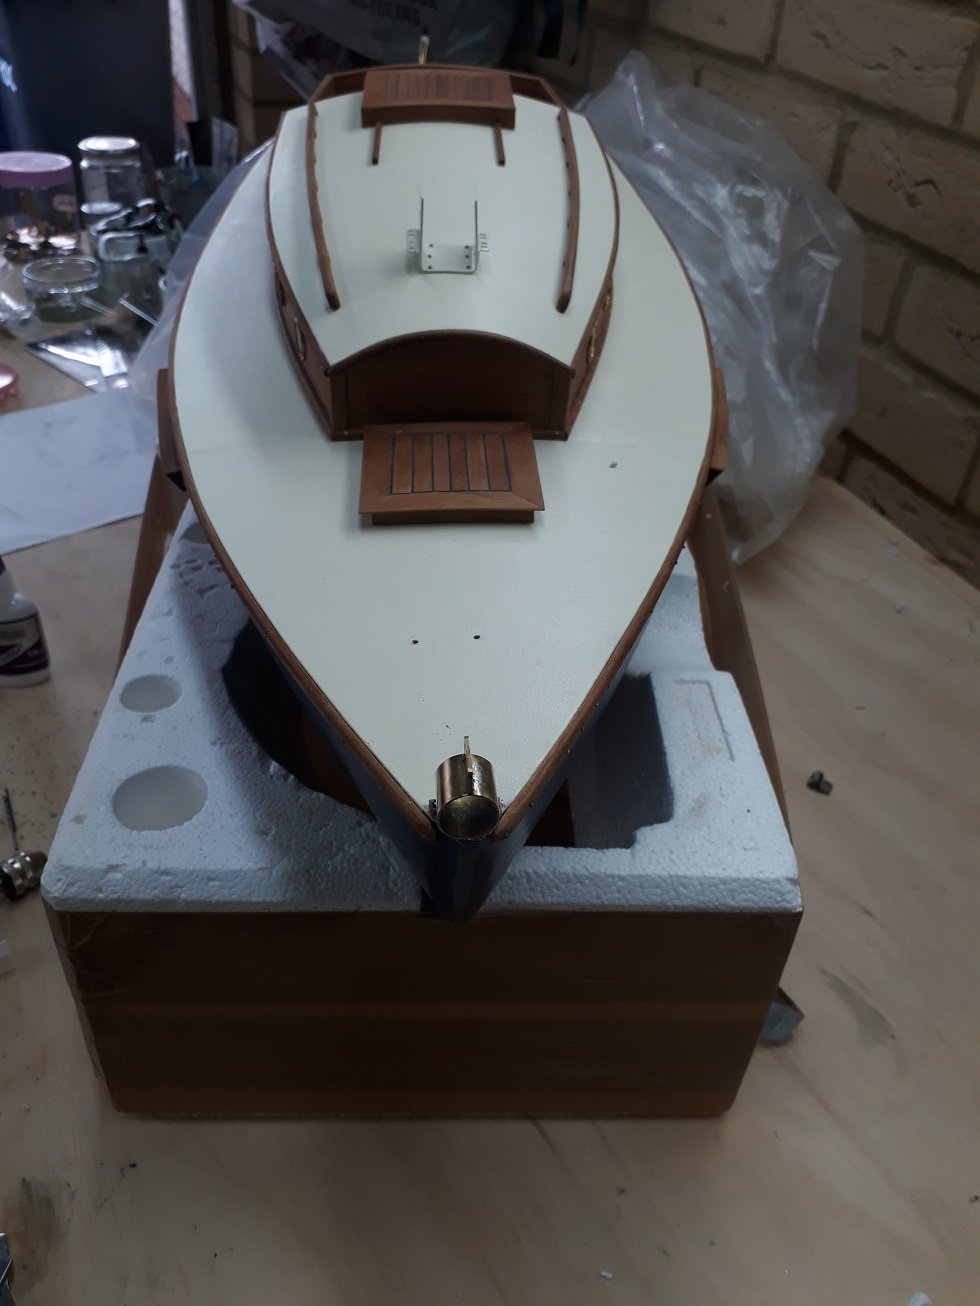
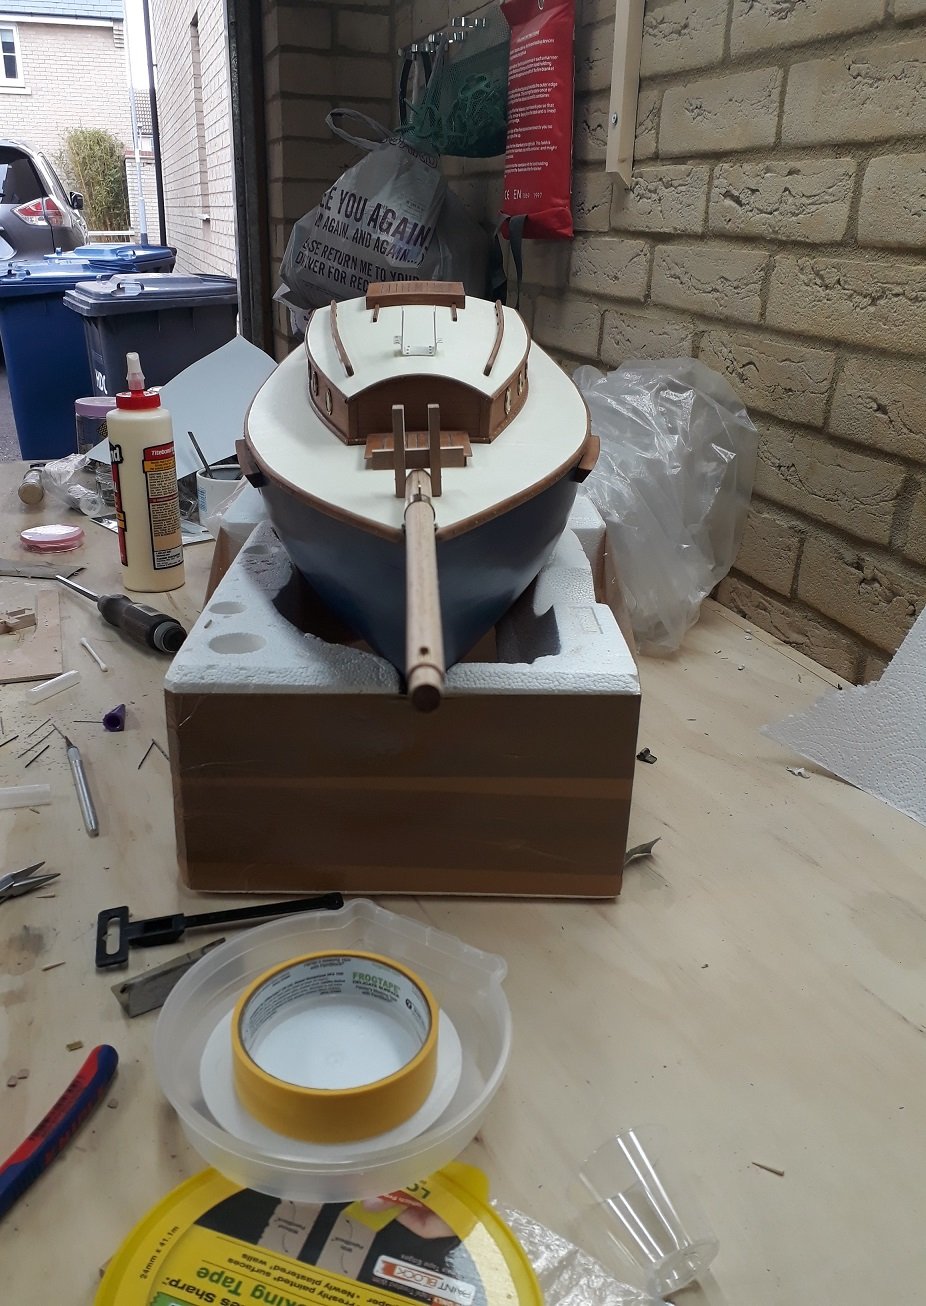
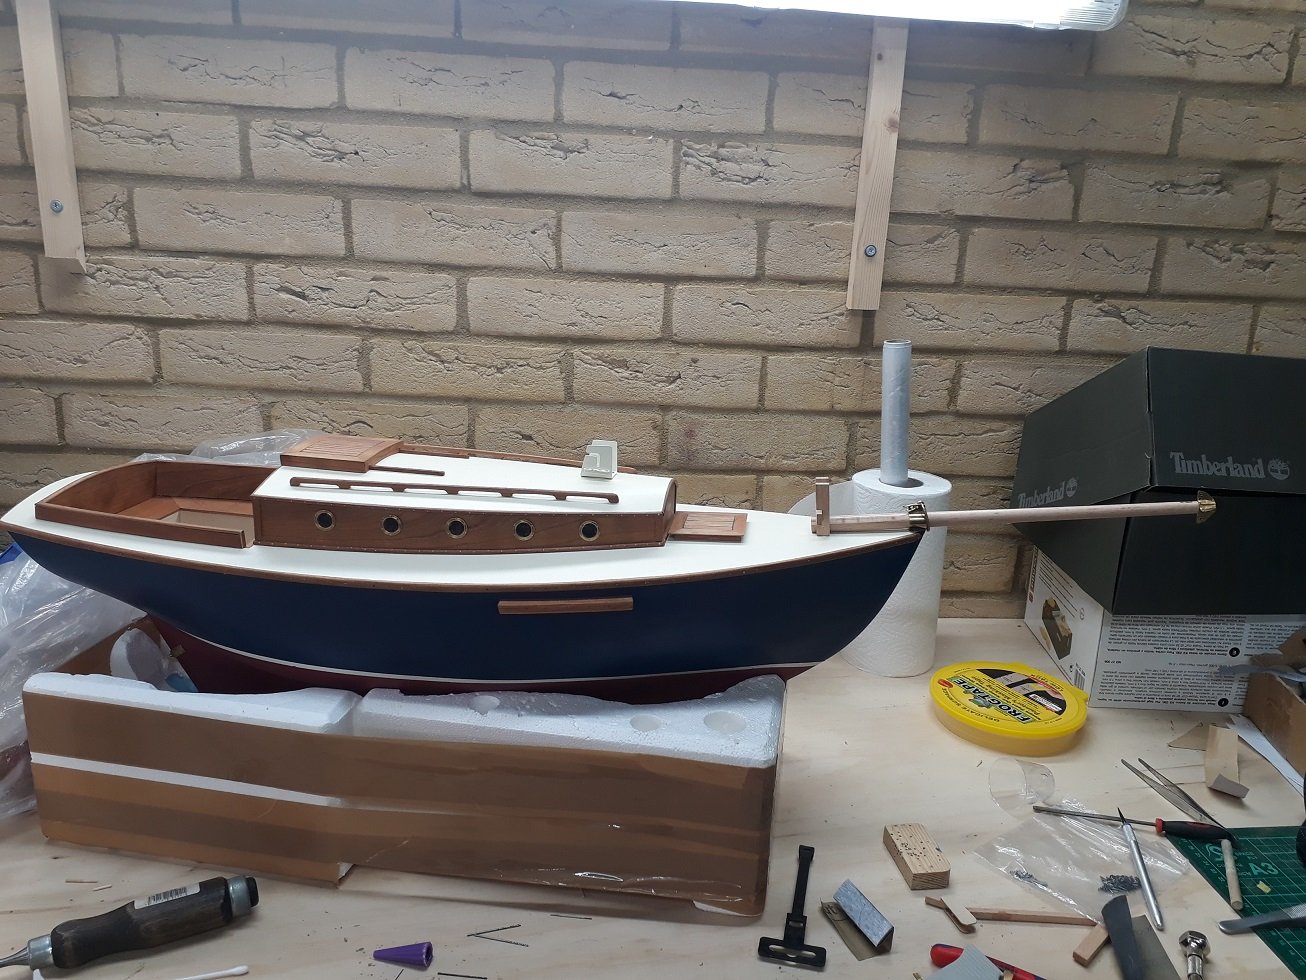
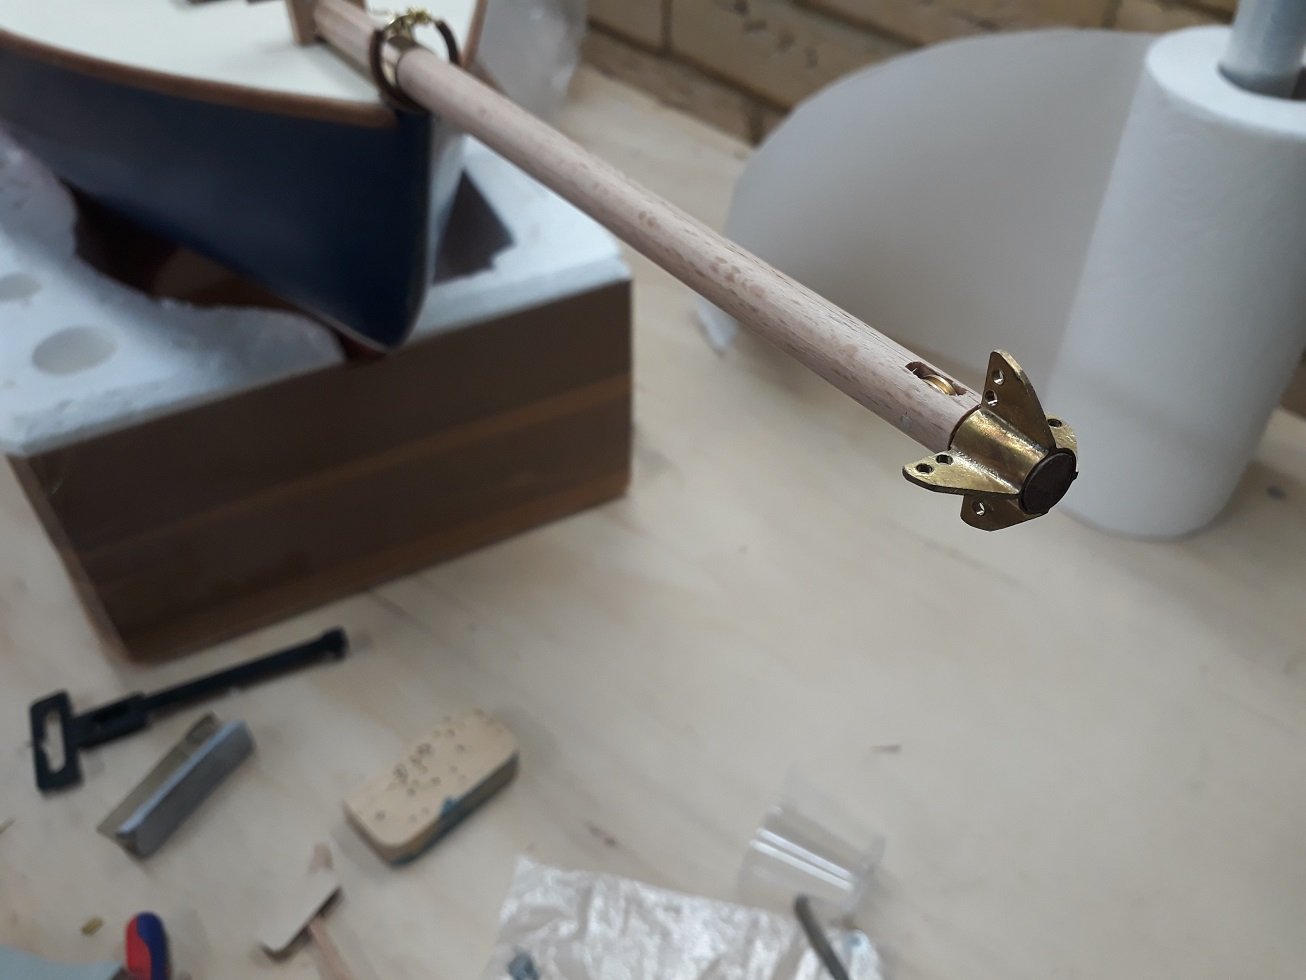
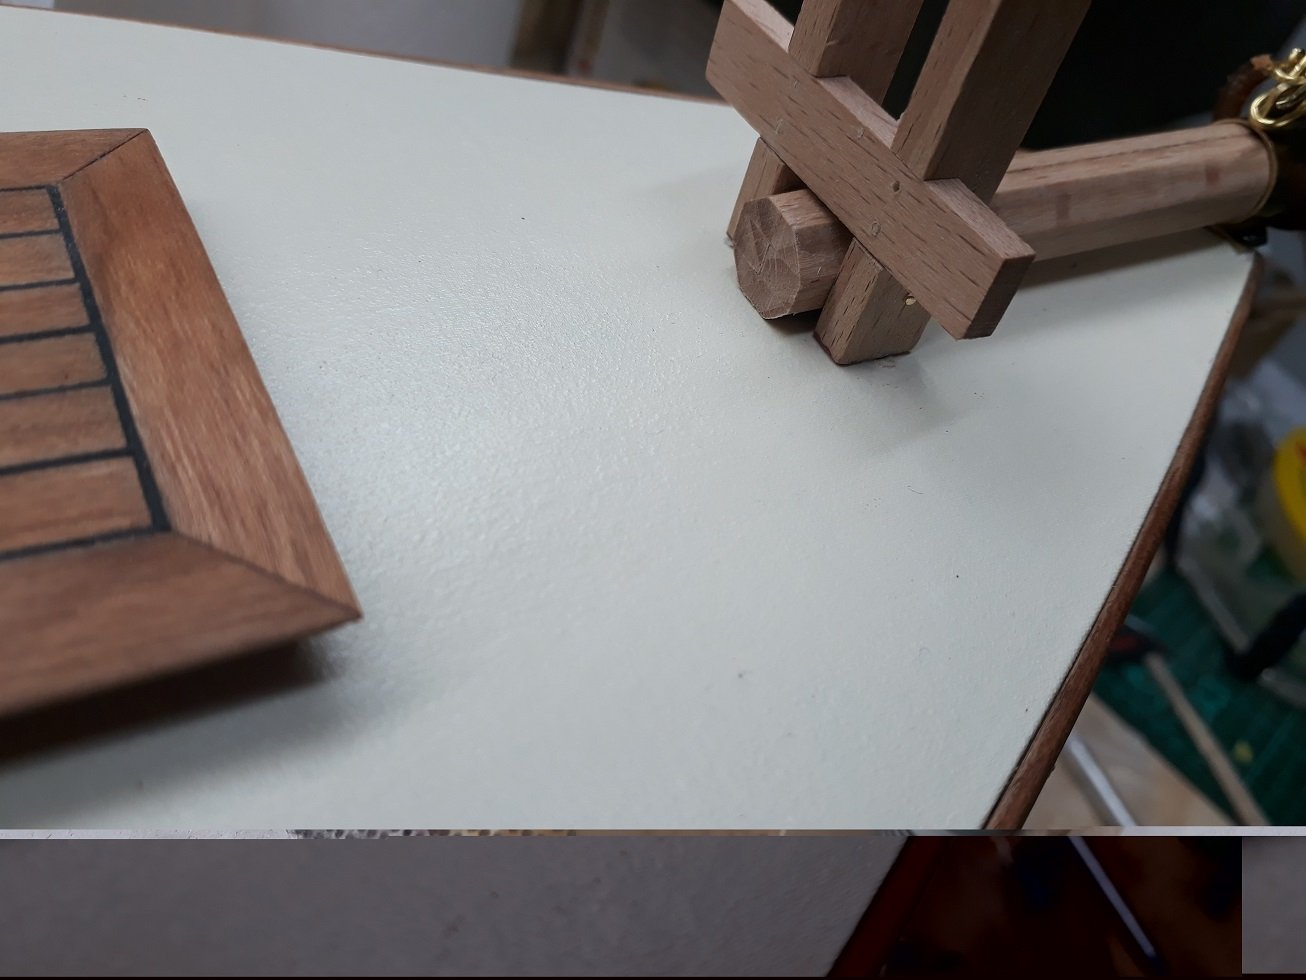
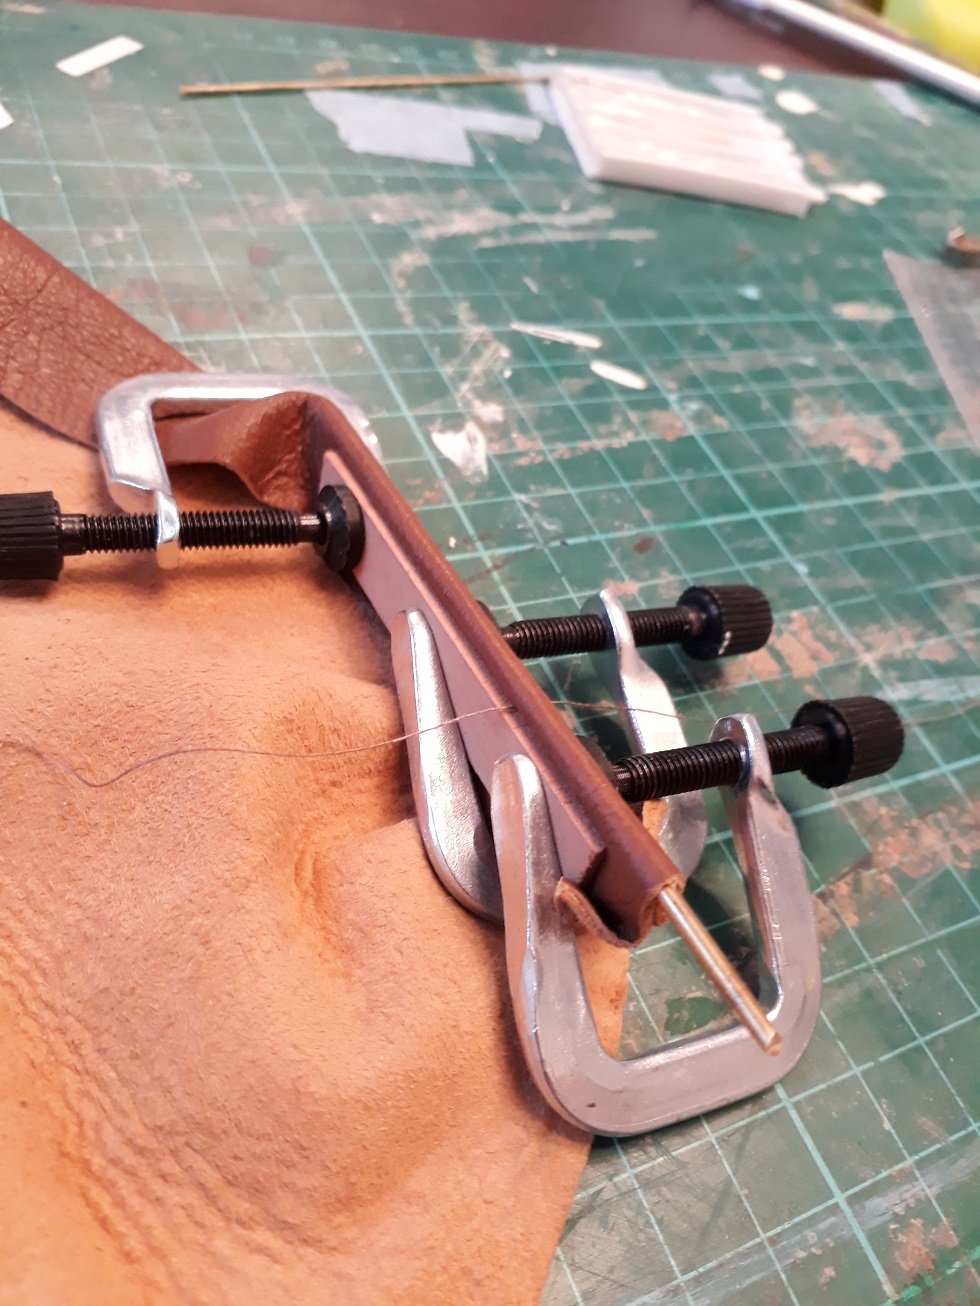
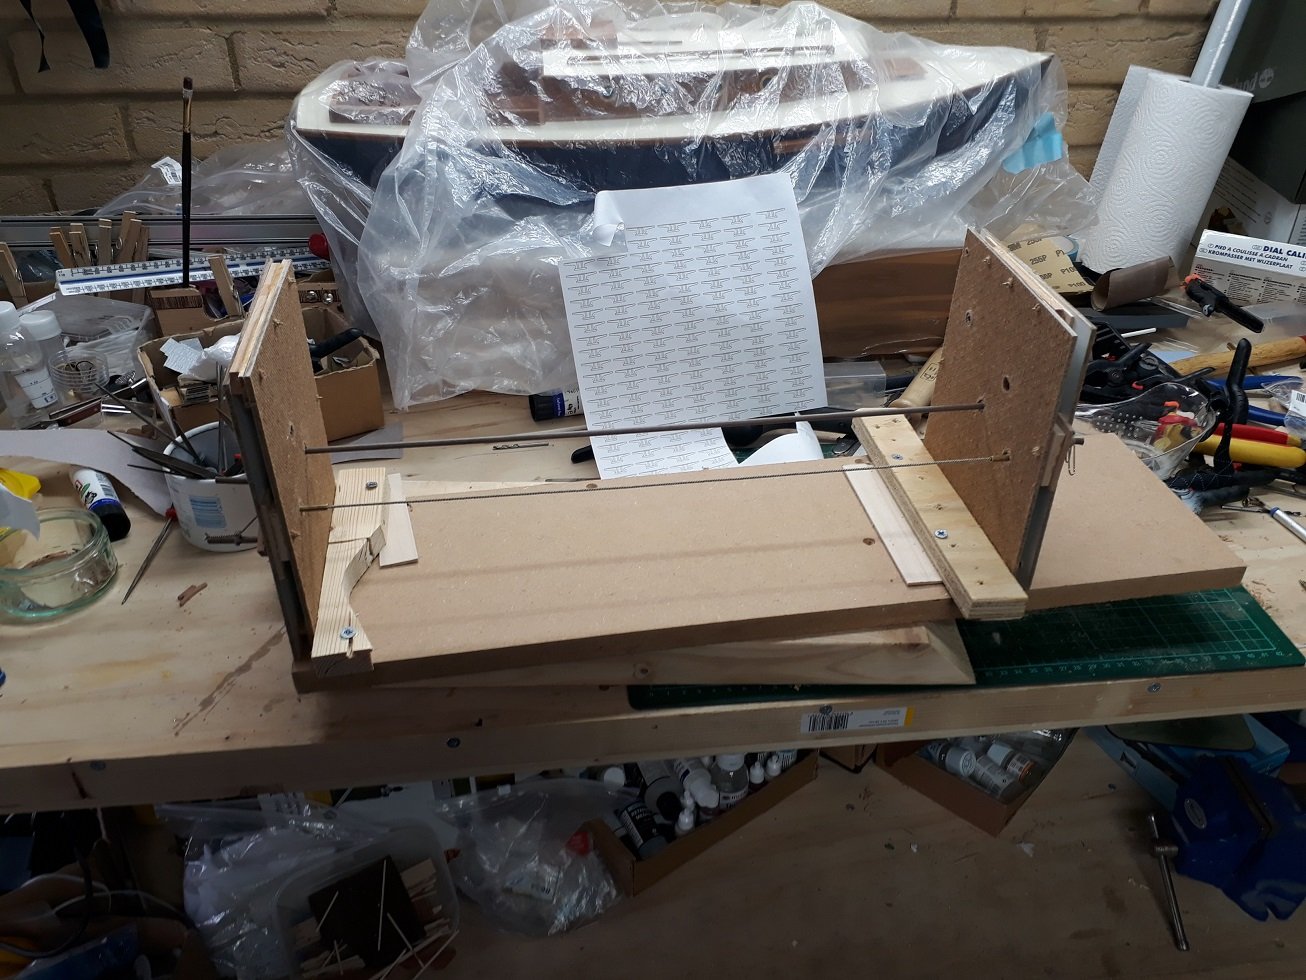
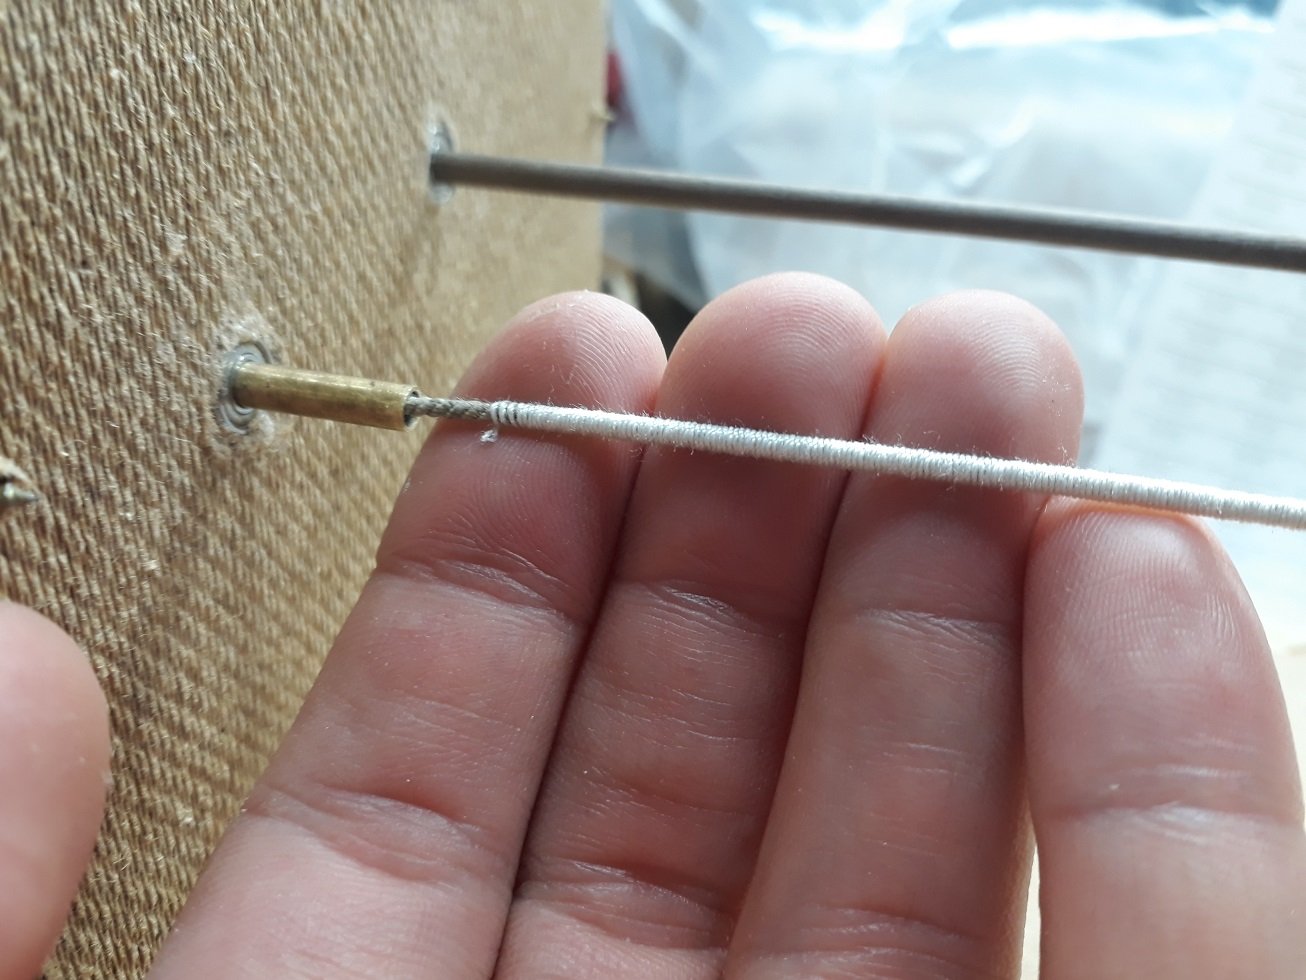
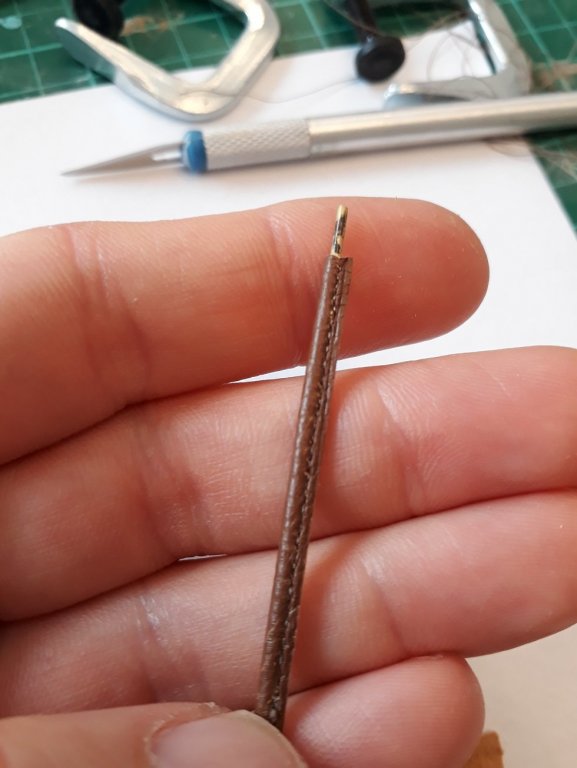
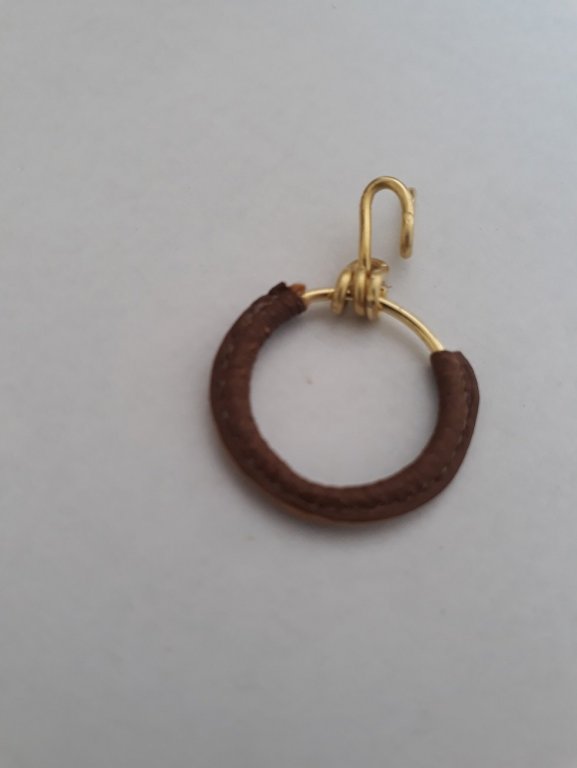
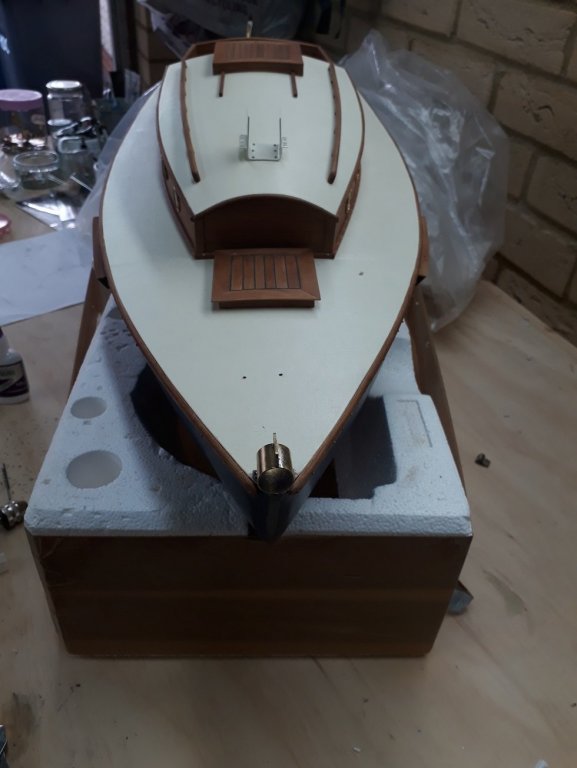
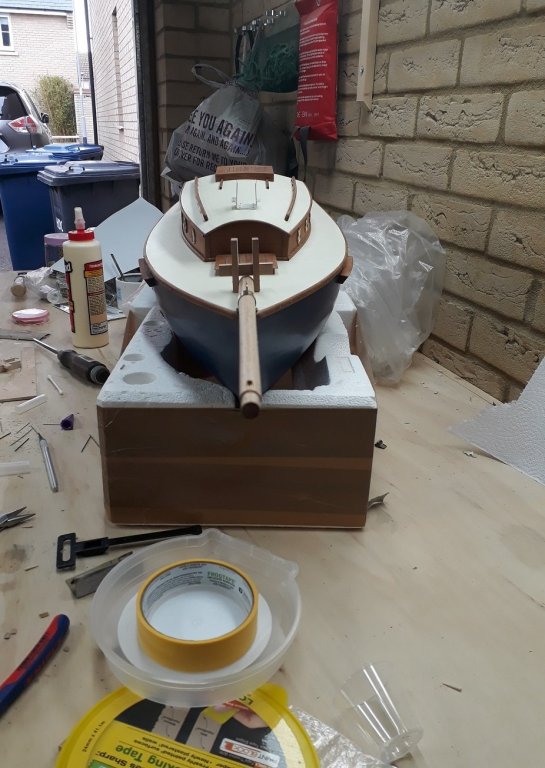
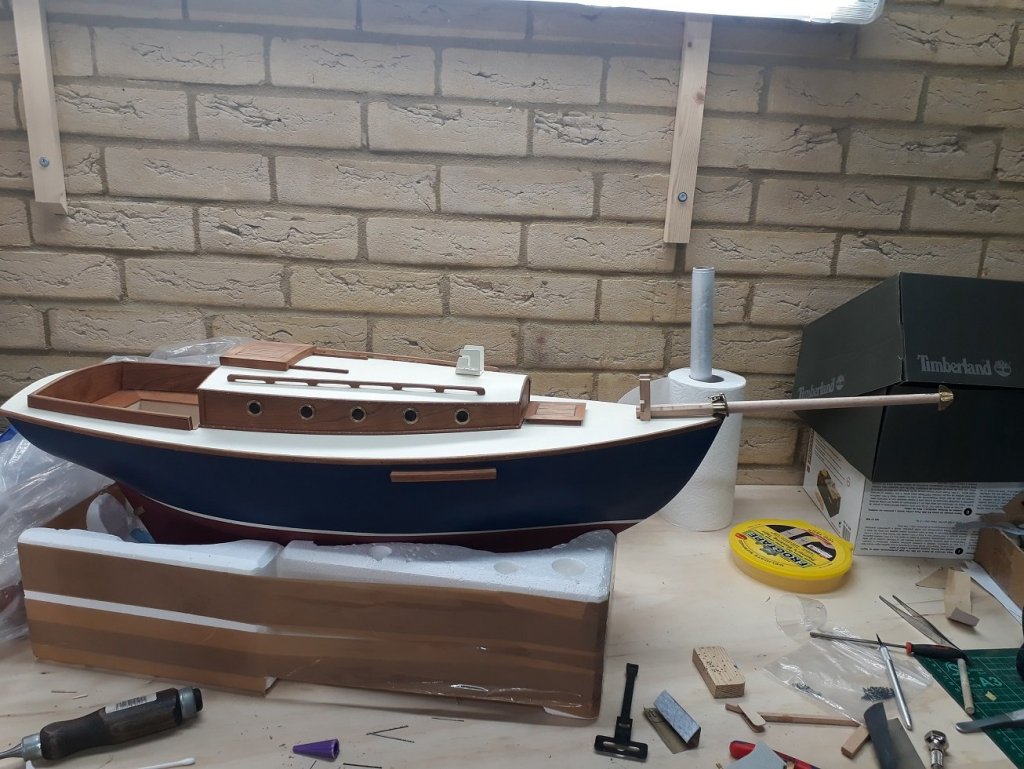
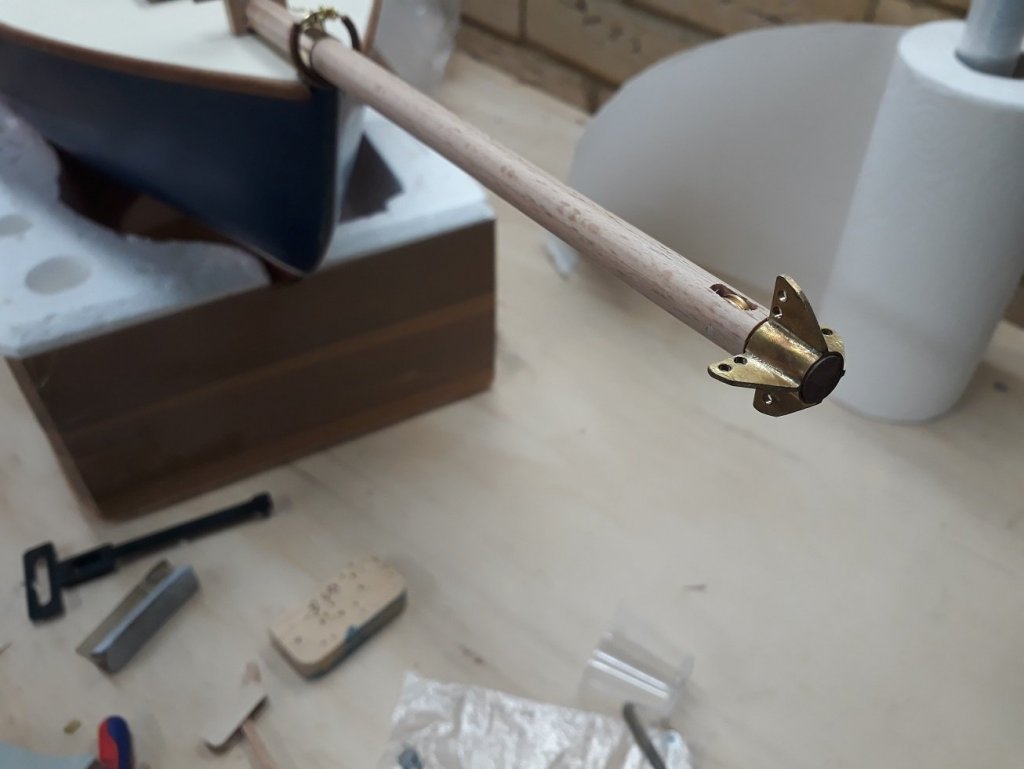
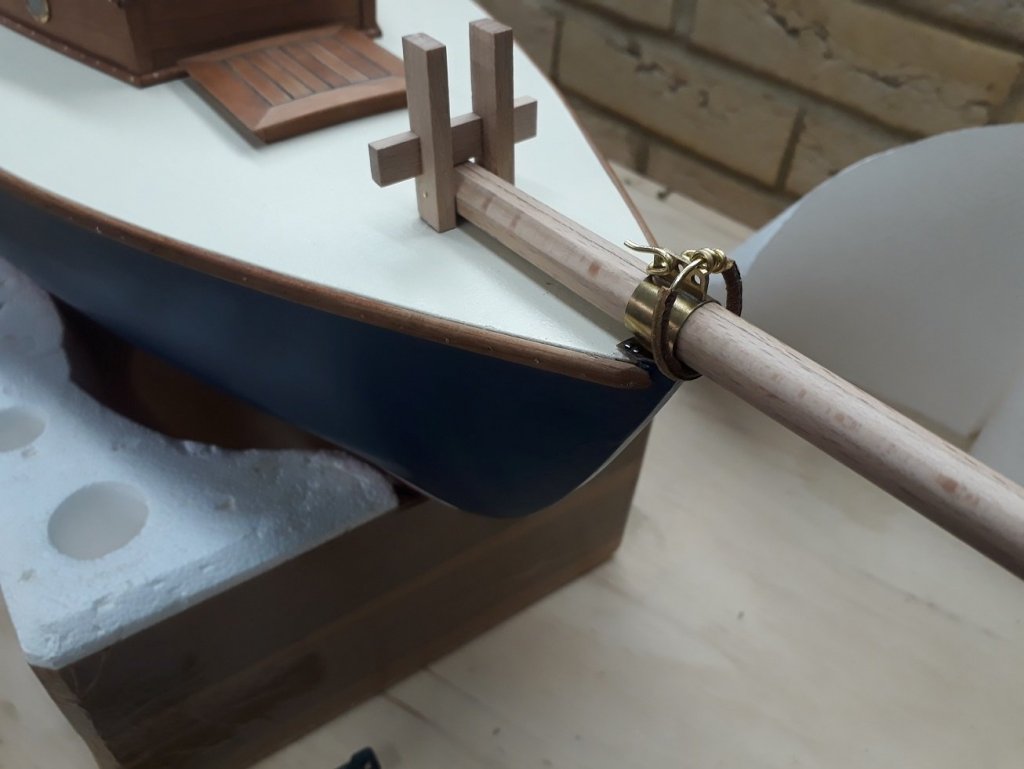
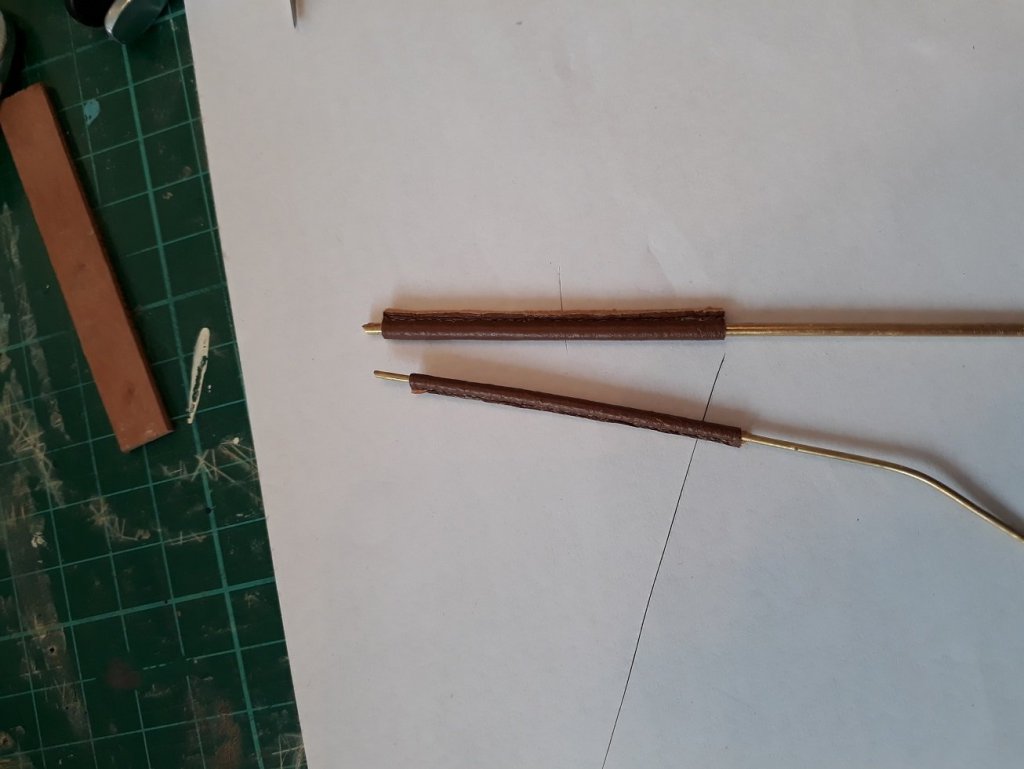
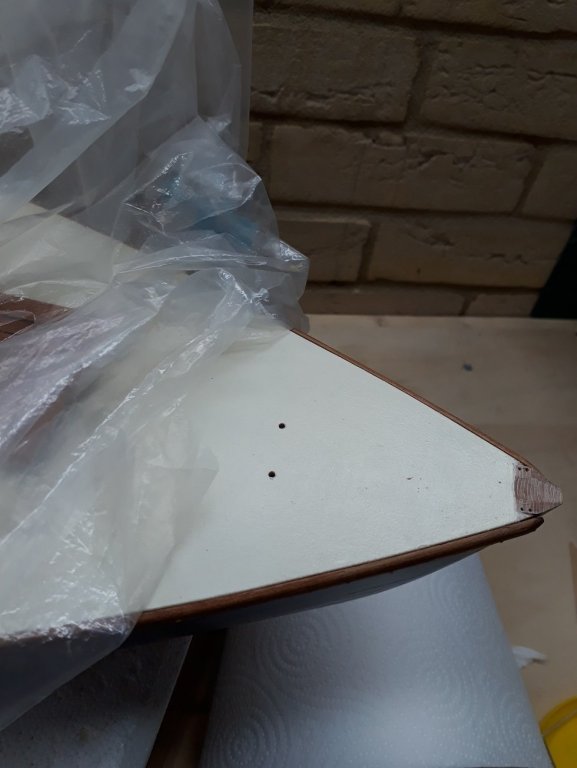
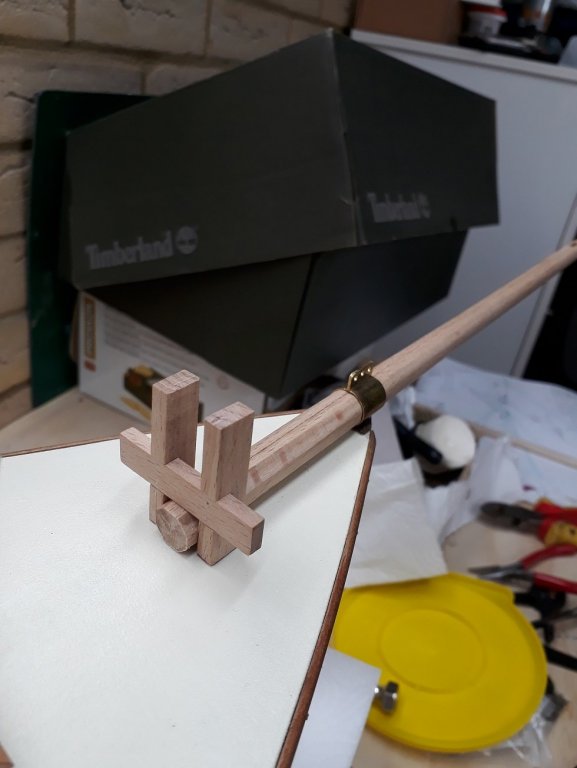
A day with many disasters today, thankfully I was able to fix things. I first did a second attempt with the traveller, this time using 1.2 mm wire instead of 2 mm rod. Clearly it was more to scale but also my stitching was better. Then I bent some wire to shape and passed it into the leather sheath. Then I turned it around so the ends of the wire would be at 6 oclock, first passing through the hook and the loop. The wire is not soldered, just the edges brought into contact. It came out fine I think. I ve decided not to blacken any metal parts, I ll just leave everything brass coloured. I actually quite like it. Then the disasters start striking. I glued the sampson post in place and before that I had nailed the bowsprit to the post. Then, I started gluing the gammon iron with CA glue but while I was half way, having installed two nails already, it suddenly fell apart. The soldering had failed. I managed to take the nails out and then, thankfully I was able to remove the sampson post simply because I had forgotten to glue the toothpicks to the deck! I made the gammon iron again and then I tried to install again everything on the boat. Oh dear! The bowsprit was way off to port, really very much out of alignment. I had messed up drilling the holes on the deck. The next photos show how wrong the holes were and since the bowsprit is really long, the error was multiplied. I drilled new holes, this time correctly and then glued everything in place. One of the wrong holes was covered and out of sight but the other one was very much visible. The solution was easy enough, I just put a toothpick in, cut the excess and put a drop of paint on. The repair has pretty much disappeared, it is much less visible than in the close up photos Then I put on the traveller and the cranse iron. The bow slowly starts coming alive. And the bowsprit pointss dead ahead! Really the repair has almost vanished I hope the standing rigging will actually hold, although it is a static model due to the scale there will be some forces applied to the parts. The bob and whisker stays will really need to do some work to keep the end of the bowsprit from wandering.


- 536 replies
-
- 10
-
-
You really did a ton of work on Genesis Patrick, this boat is on a different level. Amazing details and a very unusual model. A very enjoyable journey approaching final port of call. So...twin hulls next?
-
Very interesting. I faintly remember, as a little boy, my older cousin making a large paper kite using a mixture of flour and water as glue.
-
Table saw with a reasonable price
vaddoc replied to Clark's topic in Modeling tools and Workshop Equipment
Just to add my experience, I bought the little proxxon table saw KS230. The only thing I ask is straight cuts in thin wood material and I think this is the only service it can provide. I have our old decommissioned vacuum permanently attached to it. For any other task a much better, bigger and ultimately very different saw would be needed. This saw should provide the same service and really it is pretty cheap. Hopefully it will prove reliable, accurate and user friendly. Please Clark keep us posted One more thing to consider is safety. The little Proxxon is very underpowered which is good, as I found that table saws can be very dangerous. I have had a few kick backs and other incidents and the real safety feature I think is the lack of power. I now treat it with great respect, wear always eye protection etc. Maybe a better saw would be safer just by being better built. Really everything must be very well aligned and rigid otherwise things fly off at supersonic speeds. I also run into this, Proxxon rebranded very cheap saw. Maybe worth a look https://www.amazon.co.uk/ABEST-Electrical-Bench-Benchtop-Hobby/dp/B07CGBX394/ref=pd_sbs_60_1/257-0385828-8066955?_encoding=UTF8&pd_rd_i=B07CGBX394&pd_rd_r=0493ab71-8056-11e9-91a9-331929dfa632&pd_rd_w=SObJT&pd_rd_wg=zN97t&pf_rd_p=18edf98b-139a-41ee-bb40-d725dd59d1d3&pf_rd_r=QRZX244G0YCADQTP8ECP&psc=1&refRID=QRZX244G0YCADQTP8ECP -
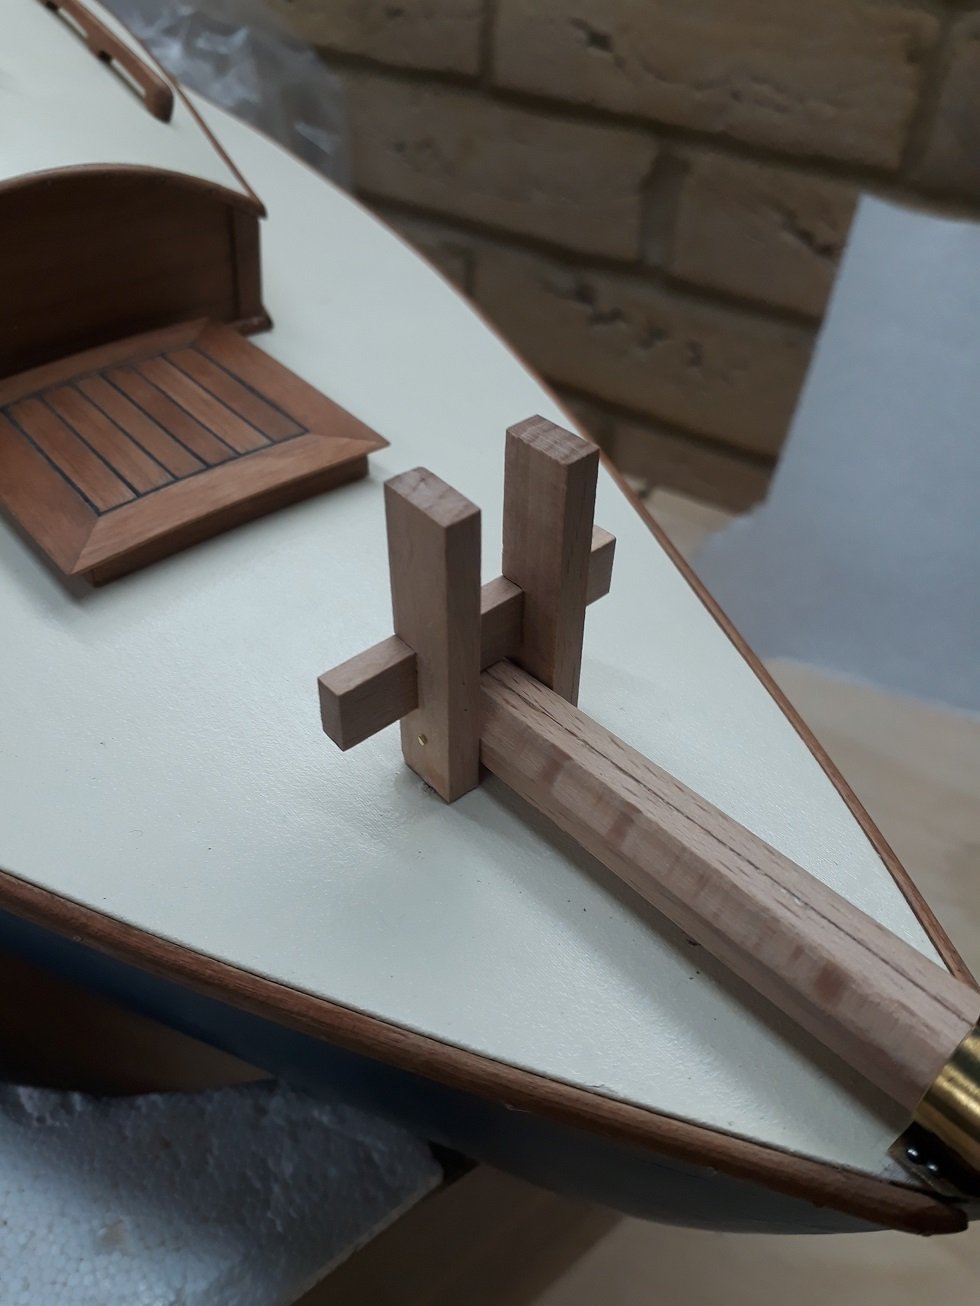
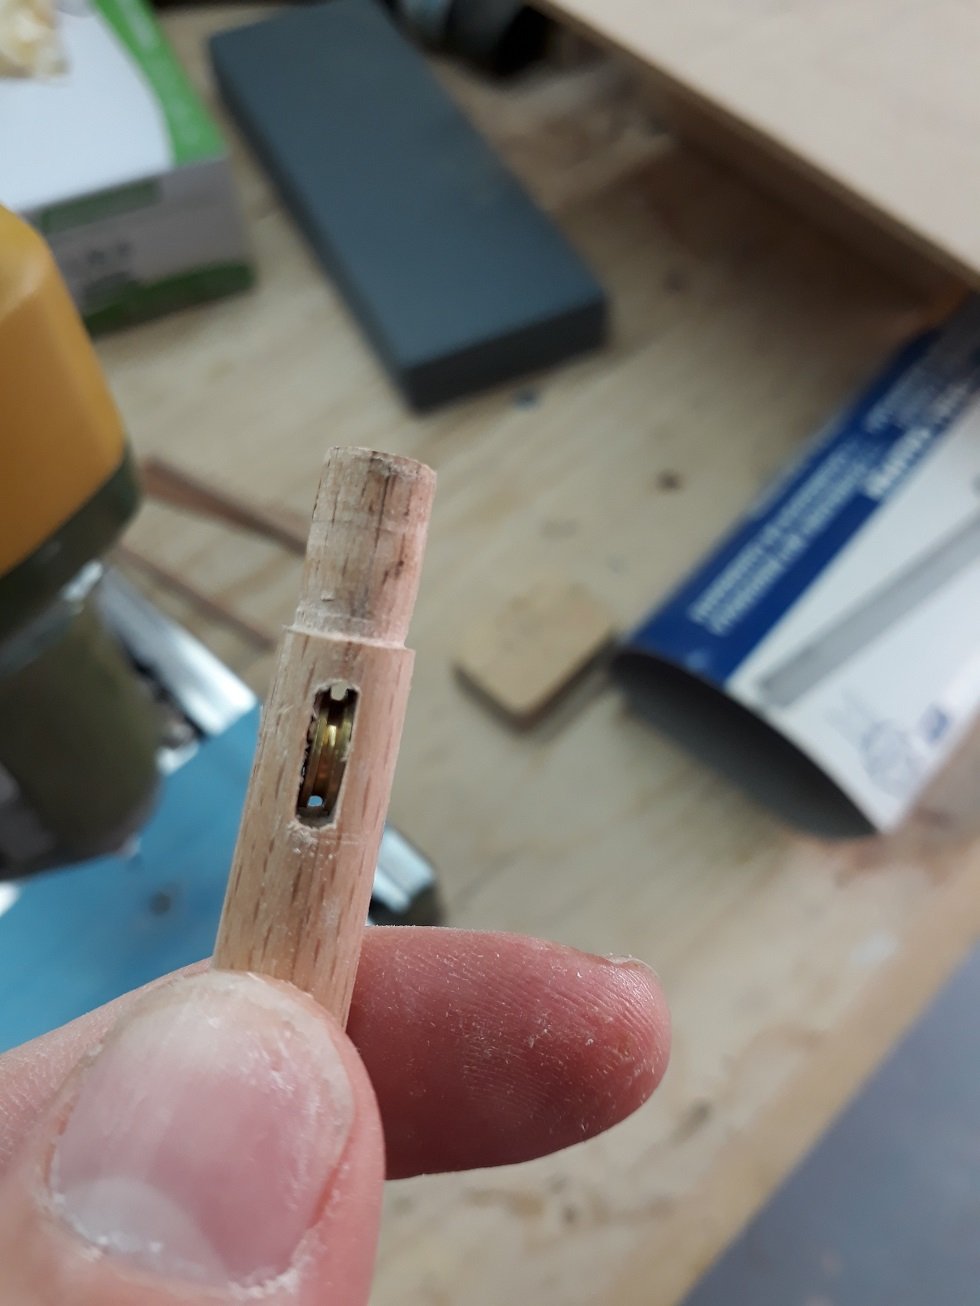
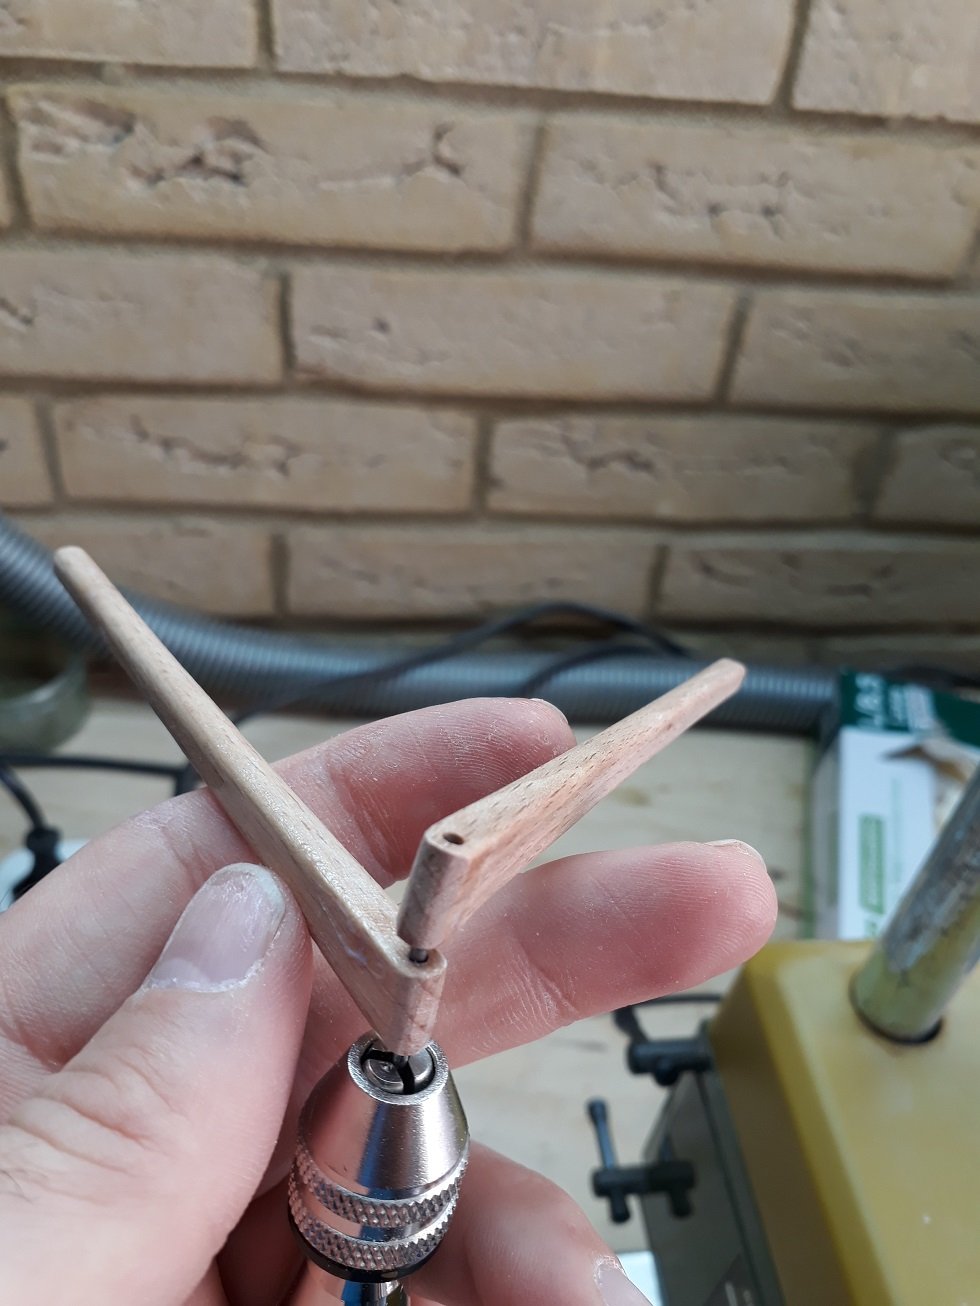
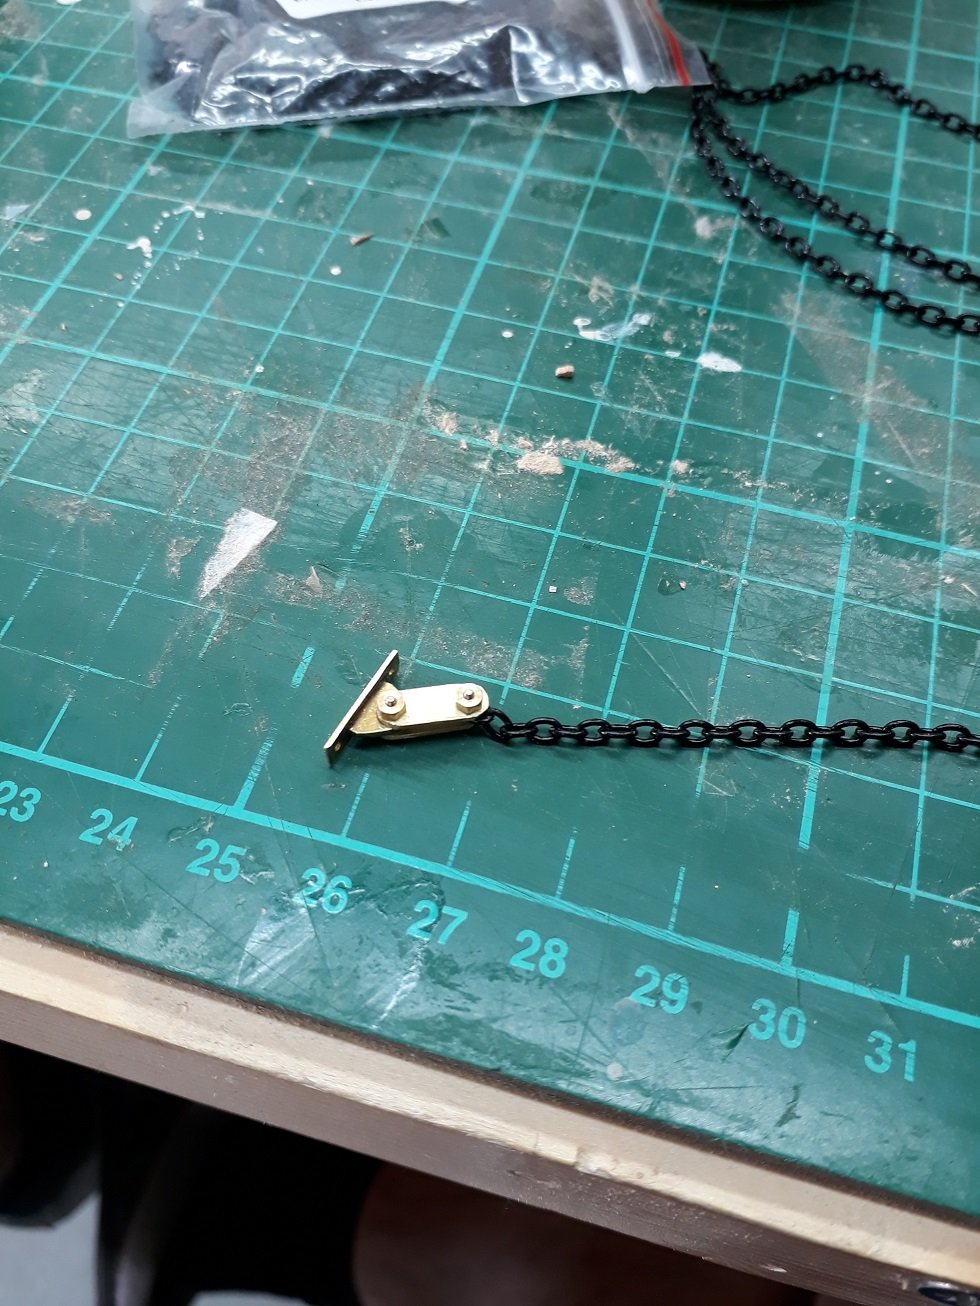
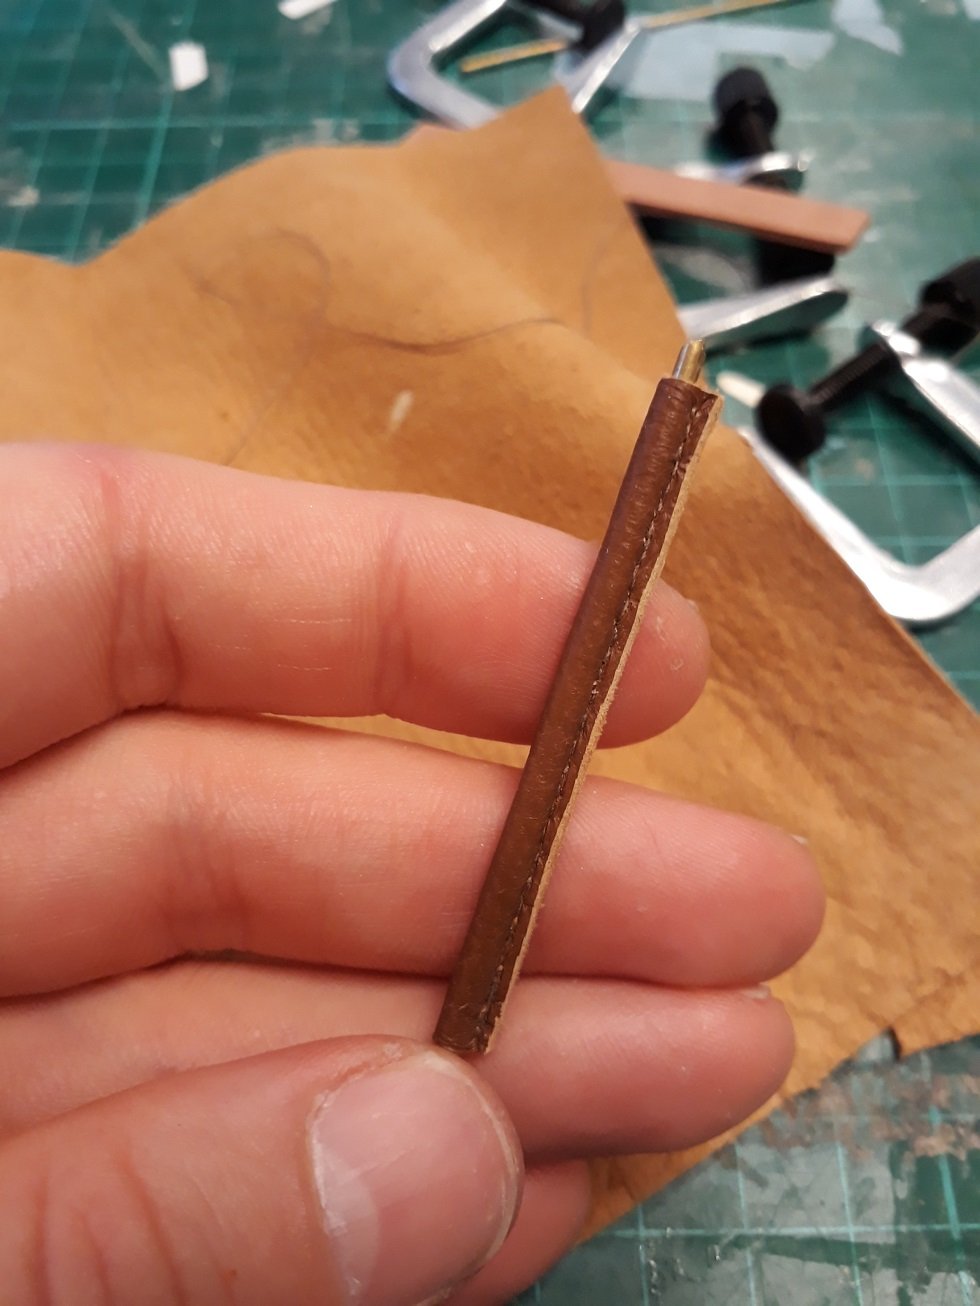
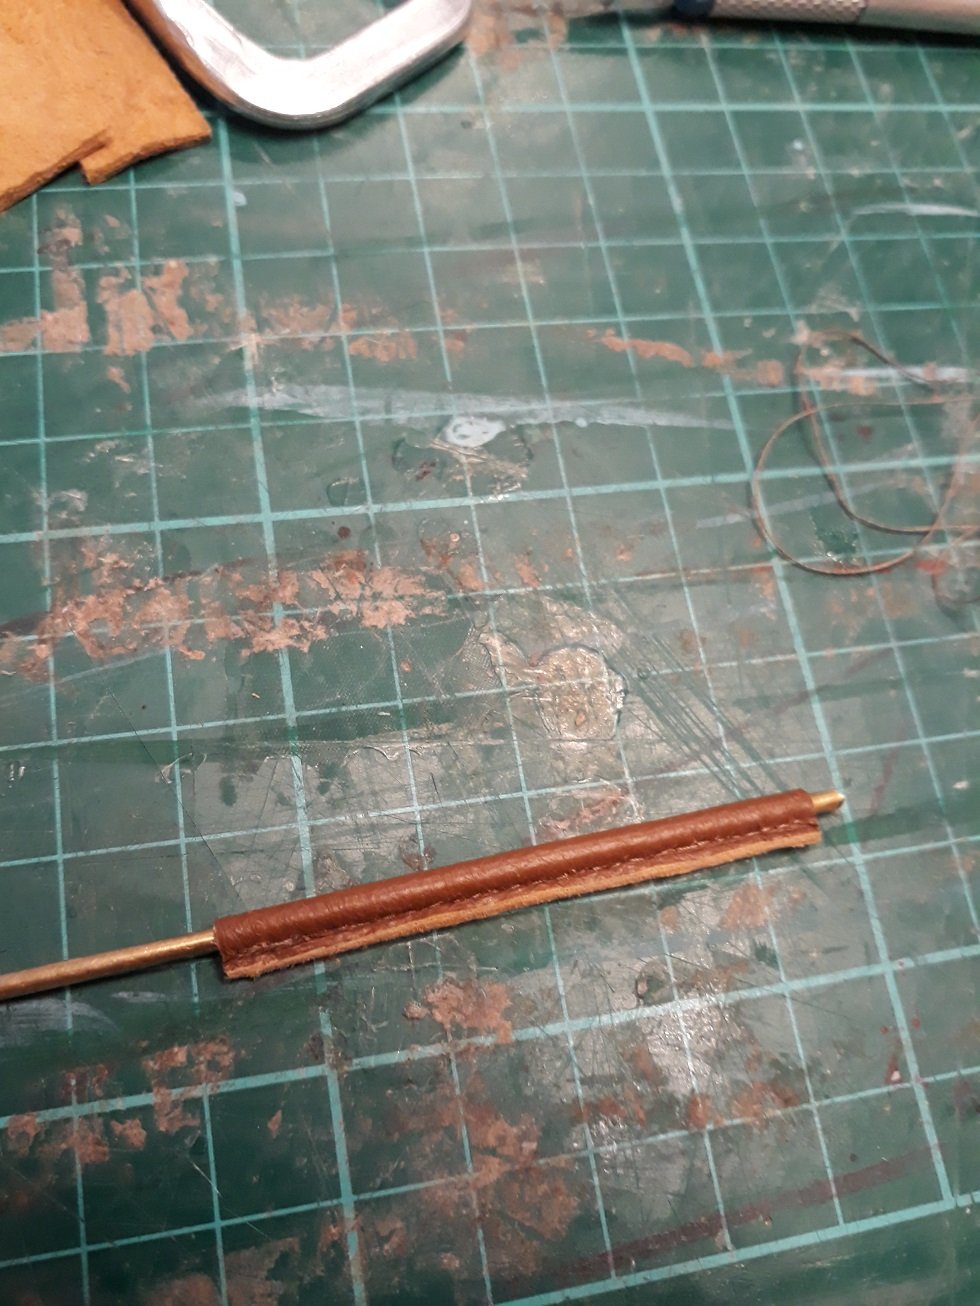
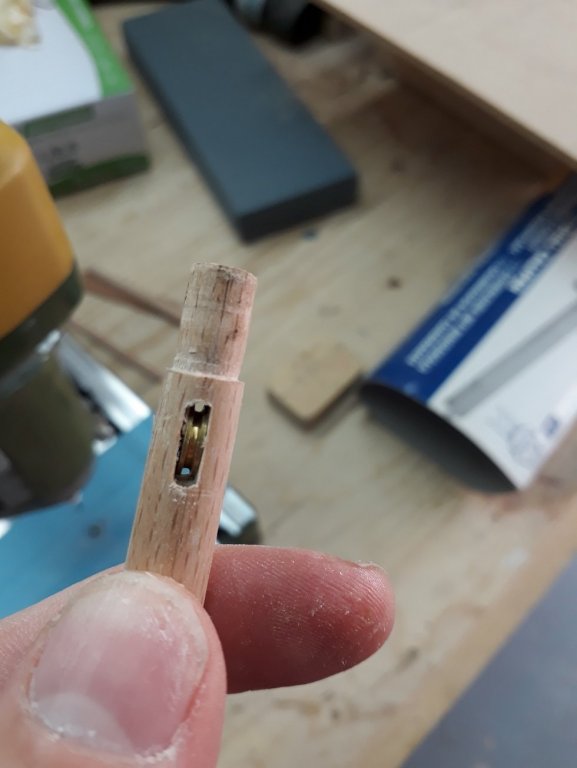
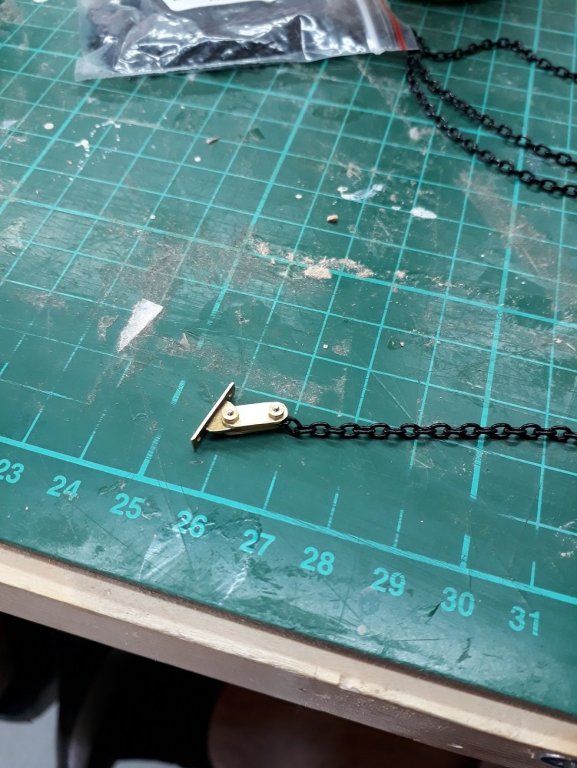
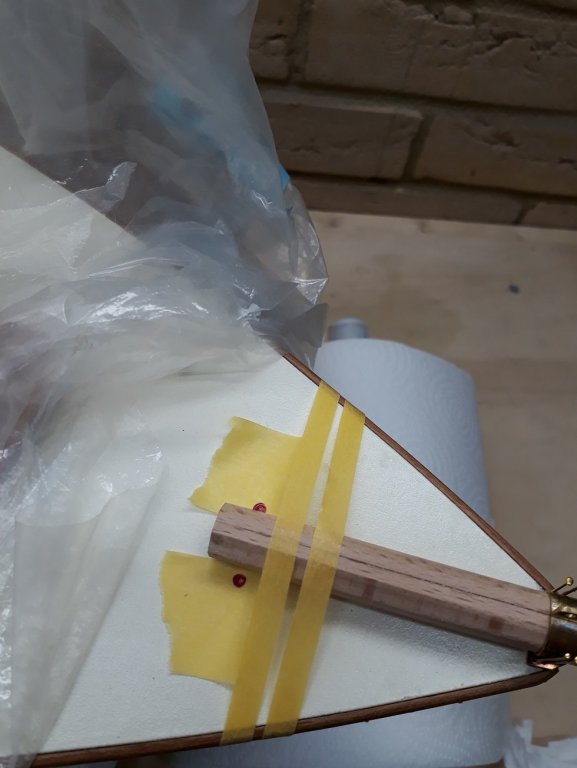
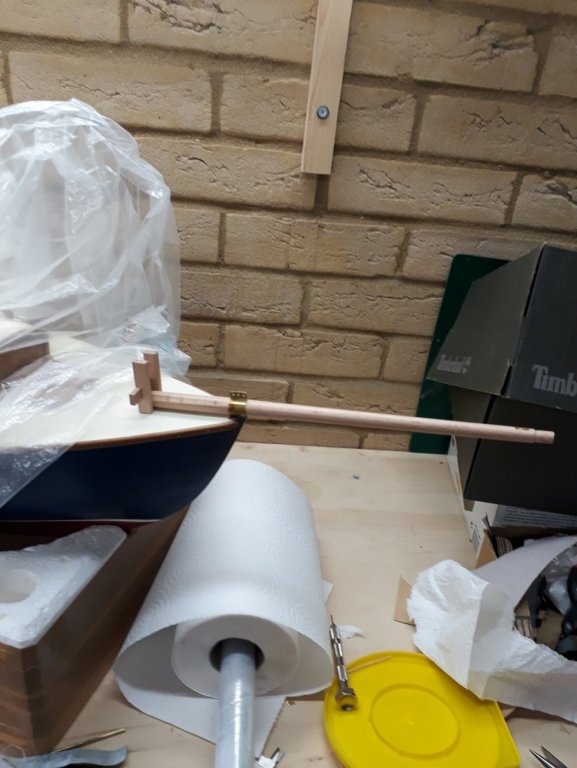
It's bank holiday weekend in UK and I did a bit more work. Actually, I think I passed another small milestone. I need to start finalising the rigging plan and this weekend I focused on the headsails. I opened my books and did quite a lot of internet search to see how this would work and I decided to go for a staysail, a flying jib and a jib topsail. Indeed this seems to be the original sail plan. The deck will be a very cramped place I suspect! I drilled a slot and installed a sheave for the traveller. I also applied sanding sealer and sanded the bowsprit to 400 grit I also sanded and sealed the spreaders, and drilled a through hole. Actually I had to make again one of the spreaders as the shape was wrong. I used the very last suitable beech offcut. I then made the connector for the bob stay chain. I managed to find my loctite and I ll use it for final assembly, so the screws will not loosen over time. Then it was time for the major task of the day, to secure the samson post to the deck. It cannot be glued and I want it to be secure. I actually made the post again as I was not too happy with the previous one. I then drilled 2 mm holes to the base of the post to insert pieces of toothpicks which would slot into corresponding holes on the deck. I used some red paint to know were to drill on the deck. I think they call this a leap of faith...no turning back now. I drilled the holes on the deck. Well, Luck was on my side! The final task for the day was to attempt the leather sheath of the traveller. It seemed easier to stitch over a straight rod and then bend to a round shape. I made something like a jig and stitched over the rod using the proper 2 needle technique. I think it looks OK. I do not intend to solder the loop, I ll just slide the sheath so that the gap is hidden. Very soon I ll need to start making the myriad of blocks that will be needed. I have many sheaves and I would like the blocks to be functional. A mill would be very useful, too bad I do not own one. Regards Vaddoc


-
Newbie paint questions...
vaddoc replied to CPDDET's topic in Painting, finishing and weathering products and techniques
Deco art sealer is a water based sanding sealer for bare wood prior to painting. -
Many thanks to all for your good words, I am very grateful. I thought it would be best to make a new thread on making cleats. Please find the link bellow. The cleat template is attached there.
-
Newbie paint questions...
vaddoc replied to CPDDET's topic in Painting, finishing and weathering products and techniques
I used to use shellac, but really this stuff works so much better, at least for me. https://www.amazon.co.uk/Deco-Art-Multi-Purpose-Sealer/dp/B000IM5EKQ/ref=sr_1_1?keywords=decoart+multi+purpose+sealer&qid=1558770896&s=kitchen&sr=1-1-catcorr Dries in 15 min and then can be sanded leaving a very smooth surface. I first sand to 400 grit, then apply two coats lightly sanding in between. Never goes bad on the shelf. Might be the same as the Delta sealer mentioned above -
Very nice Patrick. I do not think I ve ever seen plants added to a model boat! Genesis feels a very nice place to be. Lovely work. He he, Knights of Ni...😂
-
Newbie paint questions...
vaddoc replied to CPDDET's topic in Painting, finishing and weathering products and techniques
Dave, You ll need proper brushes in different sizes. Search Proarte or Daler-Rowney system 3, the ones I use, they are fantastic. Thin initially to a watery consistency. If it seems too thick, it is. Best to use the recommended thinner and consider a retarder Always good to use a sealer (I use Americana water based sealer, very good) and sand to at least 400 grit. I often also use a primer before painting. You ll need many coats. Acrylic coverage is poor. I wait 15 min between coats. Trust the self levelling properties of the paint. Spread the paint but resist going over once more to correct it. Wait for the next coat, most times it will be fine. Brush dry to wet, start from an unpainted area and finish at the area you painted previously blending the two. Use low tack special tapes like frog tape or Tamiya. Paint will bleed under all other tapes. Do not use masking or electricians tape. Valejo model colour paints, combined with their thinner for hand brushing and the retarder give fantastic results. They are optimised for hand brushing. Acrylic paint is far less tough than enamel, you ll need to vanish over. Take care of the brushes (leave in water while painting, clean with dish soap after) and the masking tape edges. Not sure about the poly treatment, may cause adhesion issues. i would sand with 400 and use a primer. Regards Vaddoc -
Dear all, I would be most happy to share my method to make cleats, \i think this weekend I might find some time. In the mean time could I present the world's ugliest serving machine, mine! I used an amazing variety of scrap material that I had lying around in the garage. It was actually much more difficult than I thought. I bought some flanged bearings and some plastic cogs. It took a couple of days and quite a lot of head scratching but surprisingly is solidly built and even more of a surprise, it works! I did a test run with some scrap rope and it worked beautifully, a length of more than 30 cm was served in no time. Some minor modifications and improvements are needed and there is a bit of a learning curve I think I must say though that if I was on the other side of the pond I would just buy Chuck's machine, slightly higher cost but much less hassle.

- 536 replies
-
- 10
-