


Dziadeczek
-
Posts
509 -
Joined
-
Last visited
Content Type
Profiles
Forums
Gallery
Events
Posts posted by Dziadeczek
-
-
Sandpaper too coarse?
- robert952, mtaylor and Keith Black
-
 3
3
-
For the modeling purposes, you do not need such a complicated machine, like this one on your pics. Unless you intend to go industrial, a simple ropewalk based on three (or four) hooked spindles, manually powered or by a small DC motor, will suffice. It doesn't matter, whether your device has two spinning ends (like, for instance, the Frolich's design) or just one, the end result will be similar. I remember someone complained, that the co called, continuous ropewalk tends to give some problems with tensioning individual threads and the results are more unpredictable.
I have this simple ropewalk I made many years ago and it still goes strong and is foolproof. (post # 20)
I think that the quality of your rope will depend more on the quality of thread you use. Cotton threads, like the French DMC (now defunct), or German Anchor, or even Lizbeth (I had good experience with the last one), will result in good looking rope. Choose appropriate thickness and color of your thread, so that you don't need to tint your rope afterwards. After you obtain your rope, you need to stretch it, because cotton will be a little "rubbery", elastic.
If you use Lizbeth thread, it already comes factory pre singed, with the "fuzz" burnt out. And it is Egyptian cotton - the best!
If you use polyester threads, be careful, because those ropes tend to spontaneously unravel after you cut the ends.
In any case, this topic was already asked here numerous times, so check out the archives for the best design of your ropewalk.
BTW, what's wrong with your Domanoff's ropewalk, anyway? Just curious...
- mtaylor, Ryland Craze, modeller_masa and 1 other
-
2
-
 2
2
-
-
Don't thread it into the chuck all the way! Just loosely place it there and tap it.
- thibaultron, rlb, Canute and 1 other
-
4
-
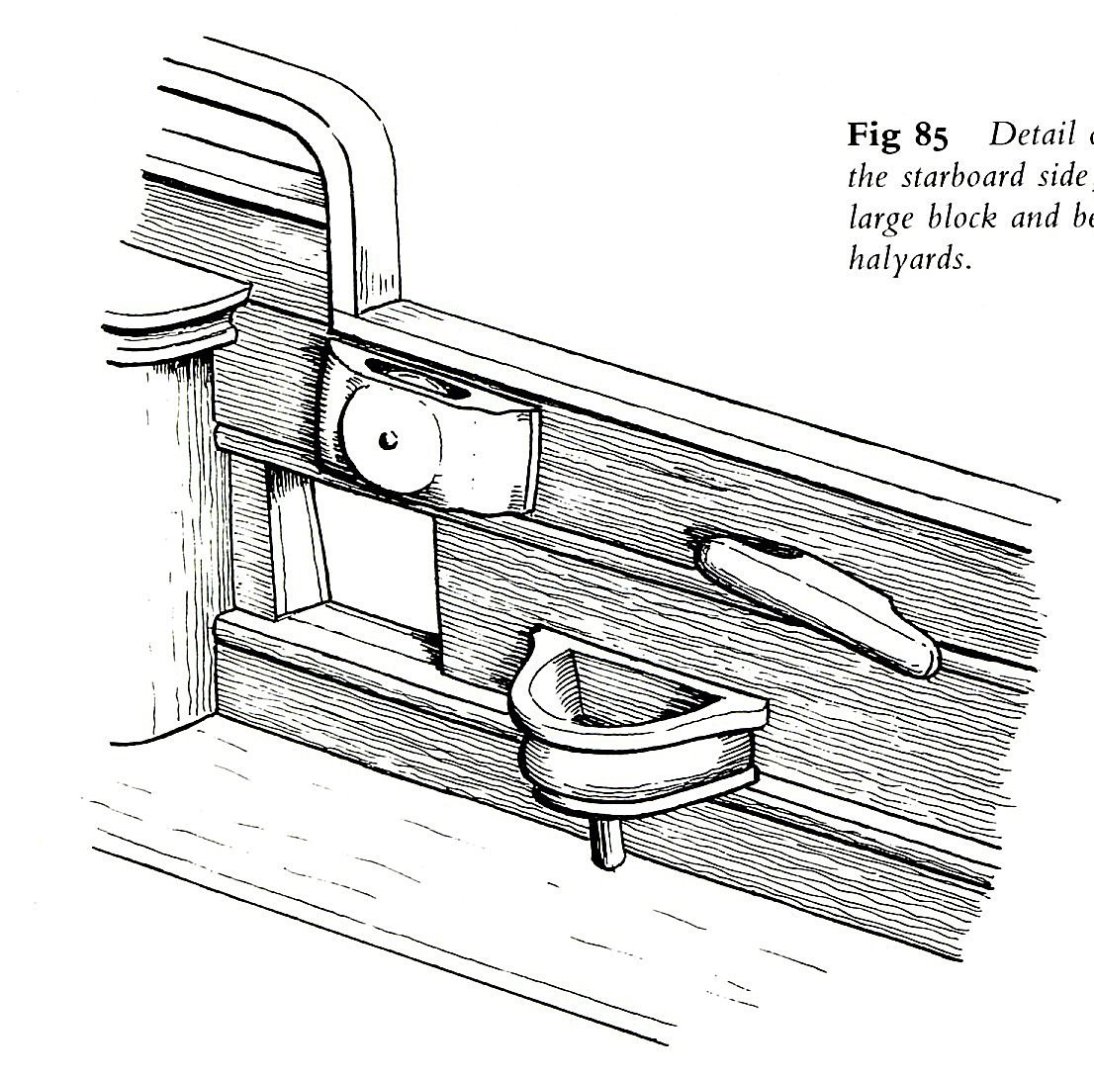
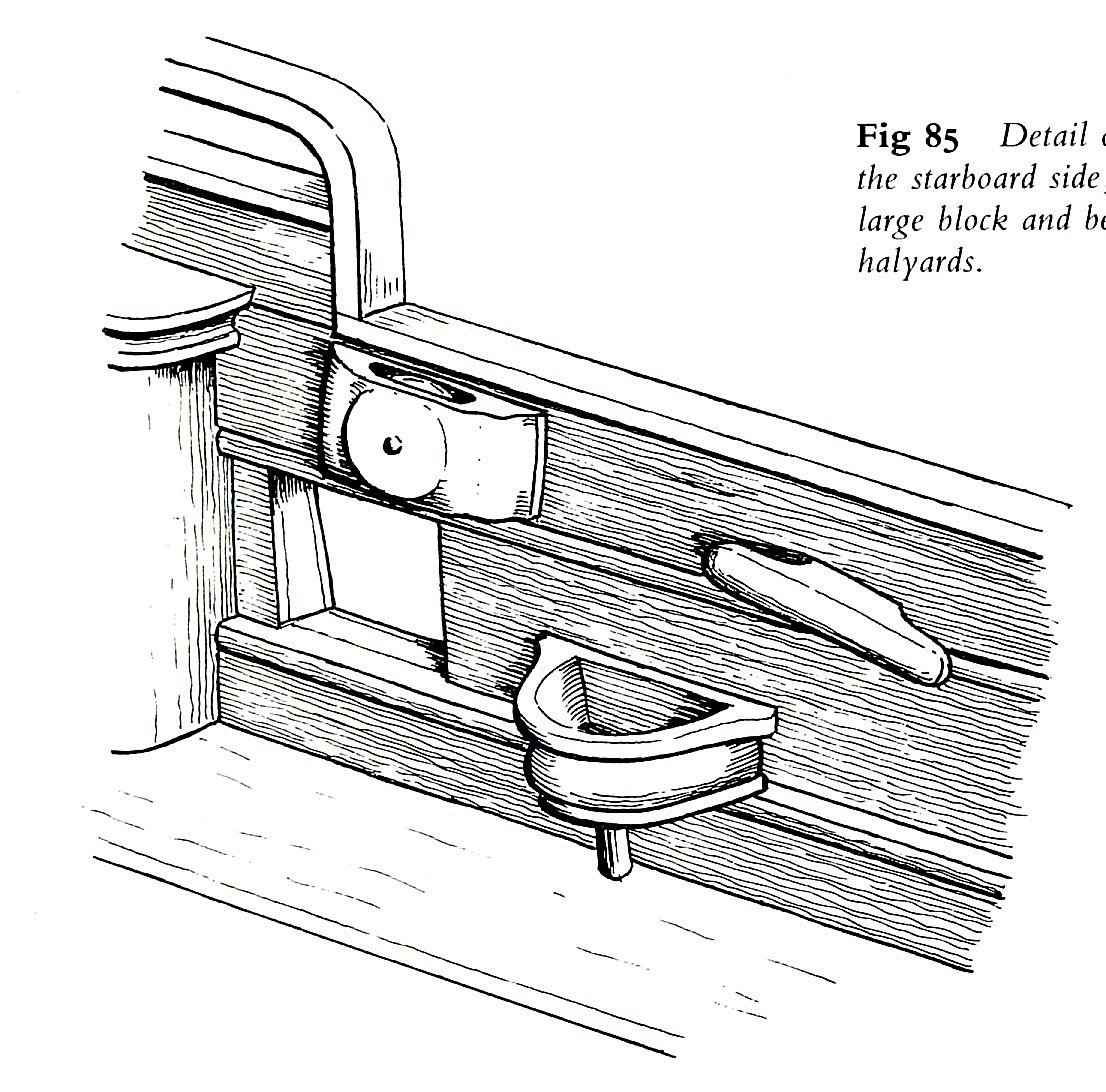
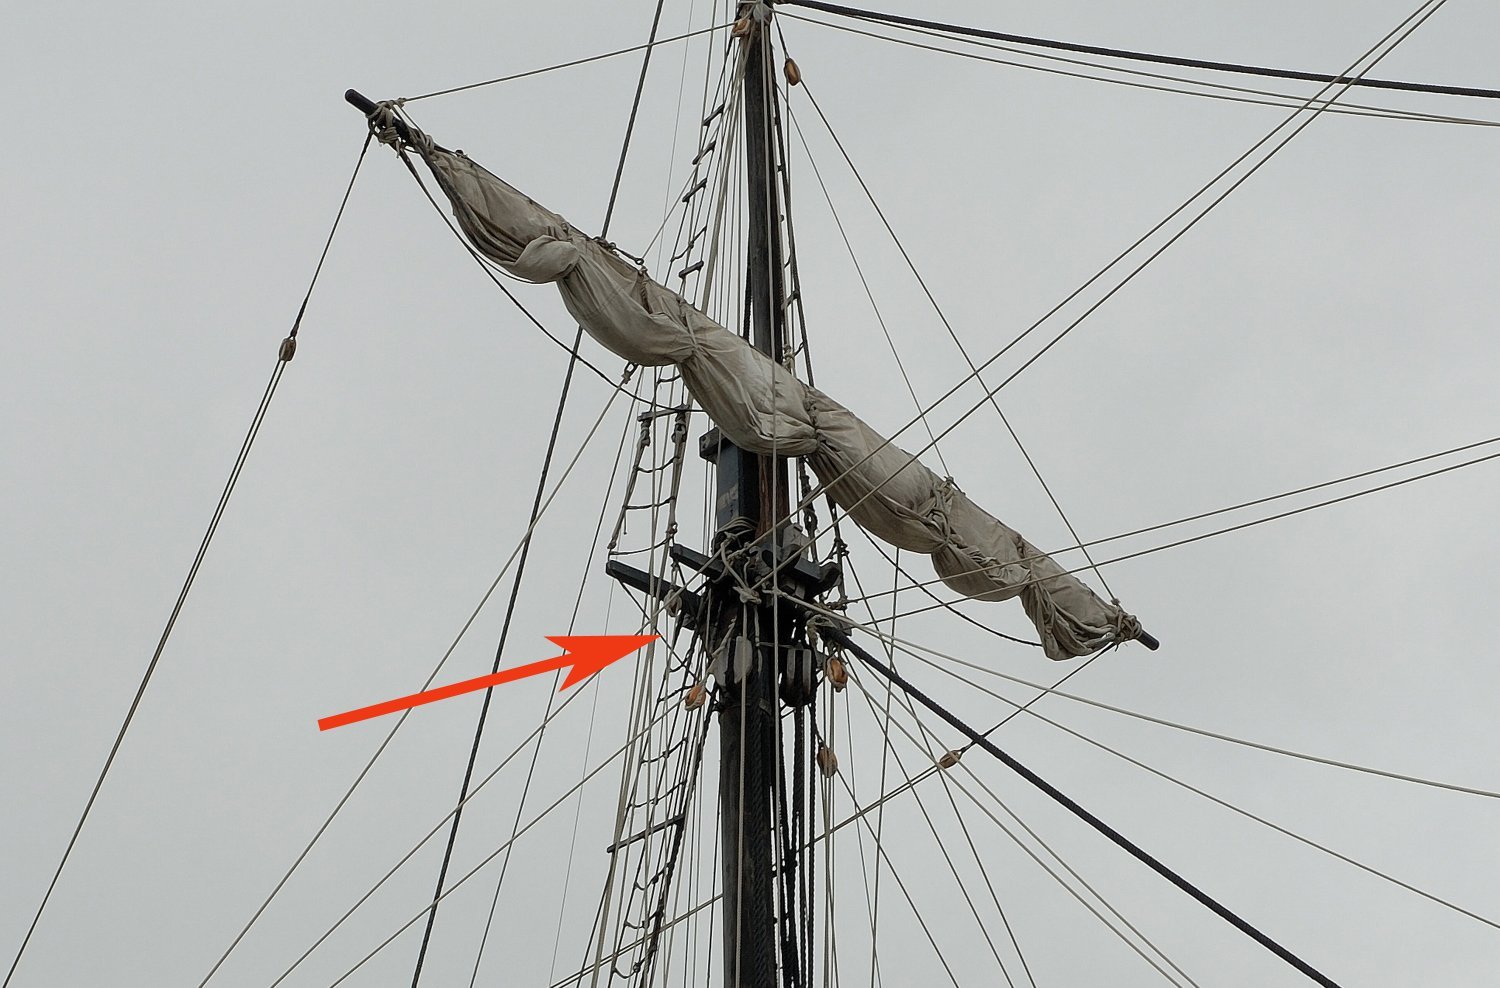
As far as pissdales, it probably won't help you, but I found this illustration in the book by J. Franklin "Navy Board Ship Models 1650-1750", showing how this device looked like on the First Rate of 96 guns c.1702. No further text on exact placement of these conveniences, though... ☹️
- rybakov, davyboy, scrubbyj427 and 5 others
-
8
-
There is this Ukrainian (I think) fellow, Domanoff, who currently lives in Poland and sells his serving machines as well as the ropewalks he designed. I don't own any of his machines, so I cannot express my own opinion on how great/bad they are, but If, for some reason you don't want to build your own, he is one of the options.
Just Google "Domanoff serving machine" and you'll find his address.
- Theodosius and mtaylor
-
2
-
22 hours ago, druxey said:
Has the wire been annealed (softened) by heating to red heat and allowed to cool? It won't 'mushroom' if still hard.
I haven't done it myself, so I don't know how it goes. From the video it appears that the wire was not annealed, he is taking it straight from the bundle. Unless the whole thing was annealed in the factory...
Perhaps someone will try it and let us know?
- Keith Black and mtaylor
-
2
-
1 hour ago, CaptJoe said:
Just started modeling. Got the three-vessel starter kit and finished the dory. Lot's of learning there, mostly, make sure the base is secure and properly positioned or EVERYTHING goes sideways. I'm just finishing the hull on the Norwegian Sailing Pram. The instructions for this boat seem to be much less comprehensive. The metal work (on the tiller assembly) is really making things difficult. Anyone have any pointers for hammering the end of a wire into a "mushroom" for a rivet? So far, I've bent one wire and split two pieces of wood. This is far more difficult than portrayed in the instructions. Thanks!!!
Perhaps this technique (shown some time ago in this Forum) could yield satisfying results?
He is making small brass nails from brass wire, but the heads appear the same as for rivets. Try it.
- Keith Black, barkeater, mtaylor and 1 other
-
4
-
-
I hope this is only the first (of two) layer of planking. Hopefully the 2nd layer will cover the hefty mistakes you've made in spiling.
-
-
I am not sure about the availability of the Byrnes's saw anymore, since Jim's passing.
I personally don't own his saw, I have a Proxxon saw (which is OK for my purposes), but I think that the quality of the machines you mentioned goes in reverse to your sequence, the best is Jim's saw, than goes the Proxxon and the Microlux (which I was told, is basicaly a Proxxon, but with a different motor, slightly weaker one).
Also, you should remember, that Jim's saw can only do a right angle cuts, while the Proxxon can do angled cuts as well as 90 degs cuts - you can tip the blade. For shipmodeling, this feature is not used frequently, but when you need it, YOU NEED IT!
I am sure, others will add their opinions to mine and perhaps contradict me a bit as well... That's the beauty of this forum! 😀
- Keith Black, mtaylor, Canute and 1 other
-
4
-
-
I found something like this online:
Main Gaff Rigging - The Suburban Ship Modeler
Would it help?
(Sorry for intruding into your conversation). 😕
-
-
David, where did you get the kit from?
Thomas
- Old Collingwood, mtaylor and Canute
-
3
-
Hull - pear (if available) or cherry, deck - holly, beech (for texture).
- davyboy, mtaylor and Retired guy
-
3
-
-
Years ago I learnt a neat trick from the now defunct Seaways' "Ships in scale" list, on how to finetune your small table saw (if the fence/blade is adjustable), like the PREAC saw or similar.
I believe this was posted by Phil Krol.
This should be done with the saw disconnected from power. First raise the blade to its maximum height. Then bring the fence close to the blade. Place a strip of paper in between the blade and the fence in the place where the blade rises (during the operation of the saw) from underneath the table - this place is further away from the operator. Place another strip of paper between the blade and the fence - closer to you, where the blade goes down under the table (where the actual cutting is done). Bring the fence tightly close to the blade, so that the strip closer to you, (where the blade goes down under the table) cannot be removed without tearing it. The other strip should be however removed quite easily, no tearing necessary.
Obviously, in this setup, the fence and the blade ARE NOT perfectly paralel! The extra tiny space between the blade and the fence further away from you prevents kickbacks and allows cutting done more easily, without burning the blade's edge next to the fence.
-
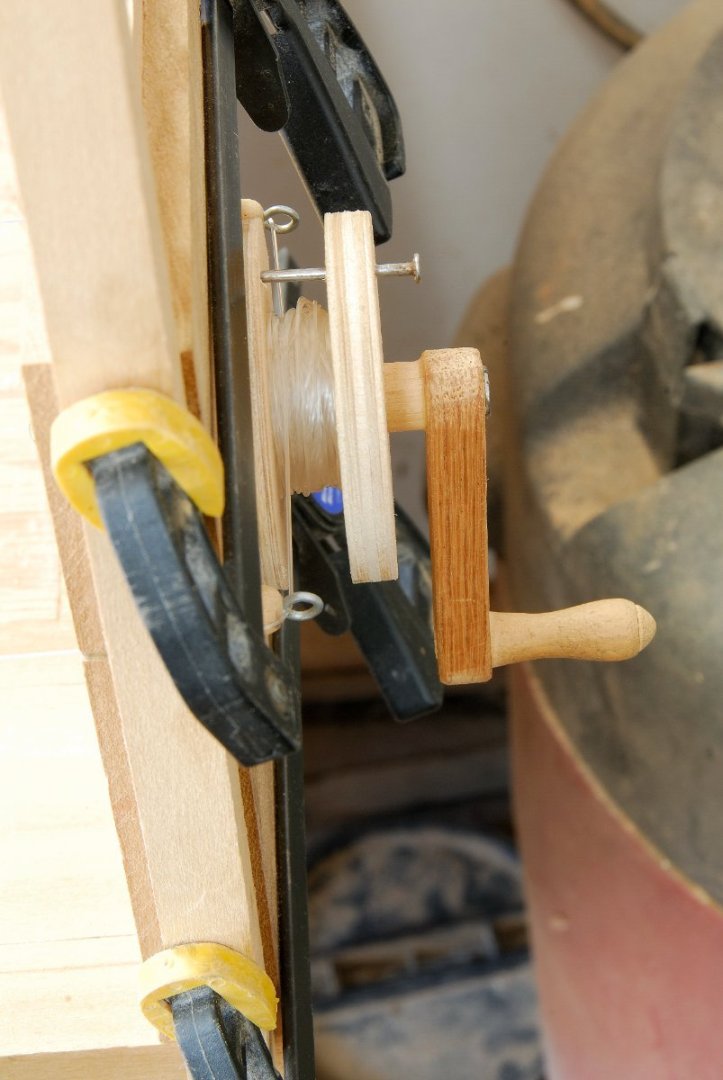
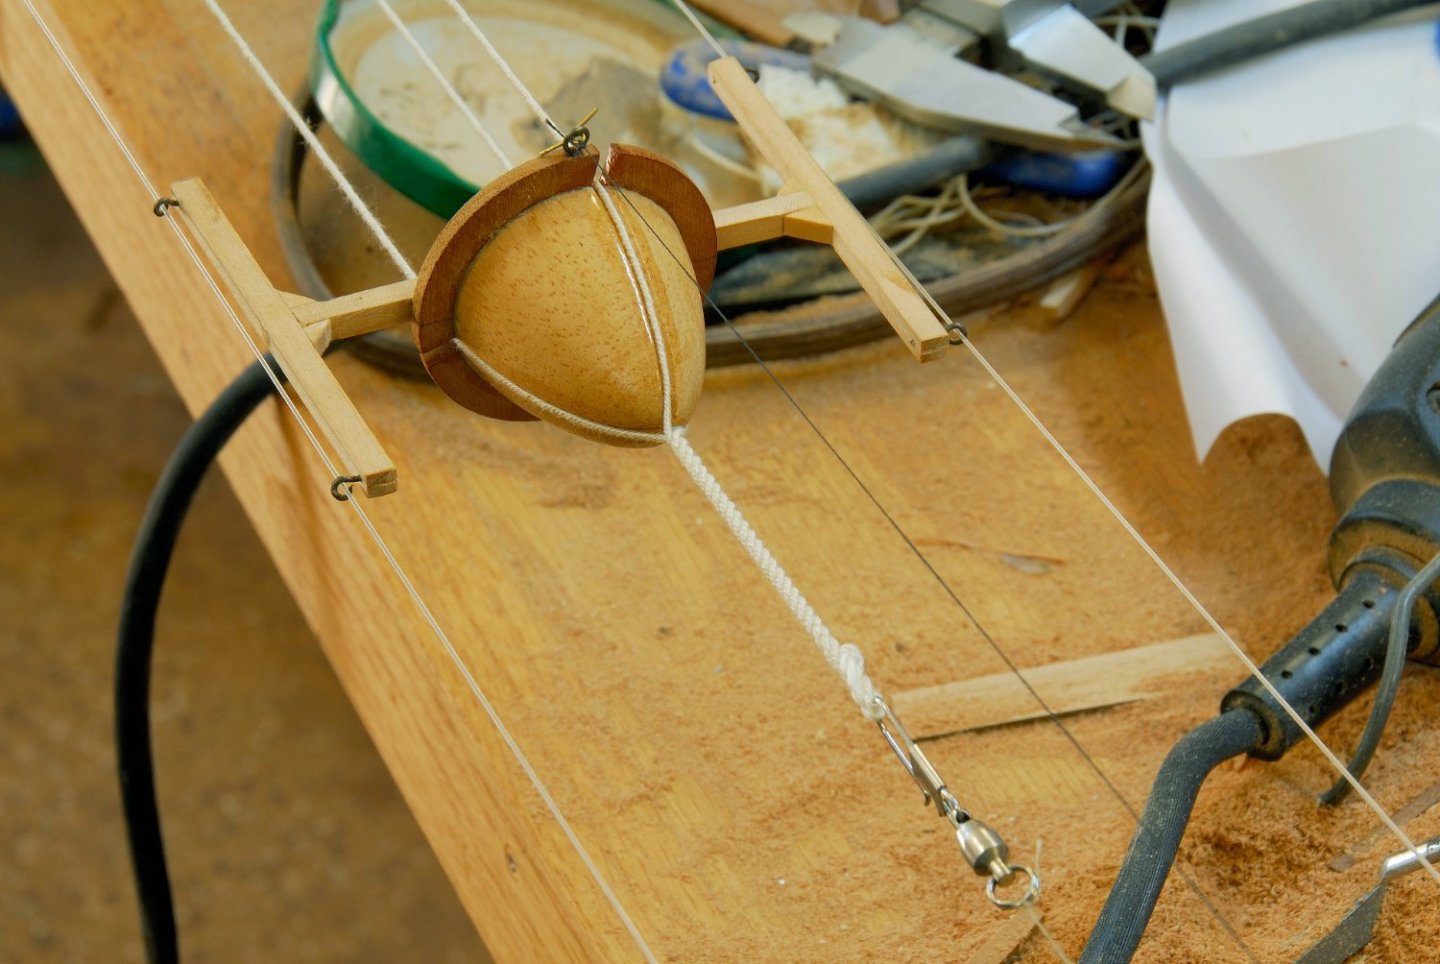
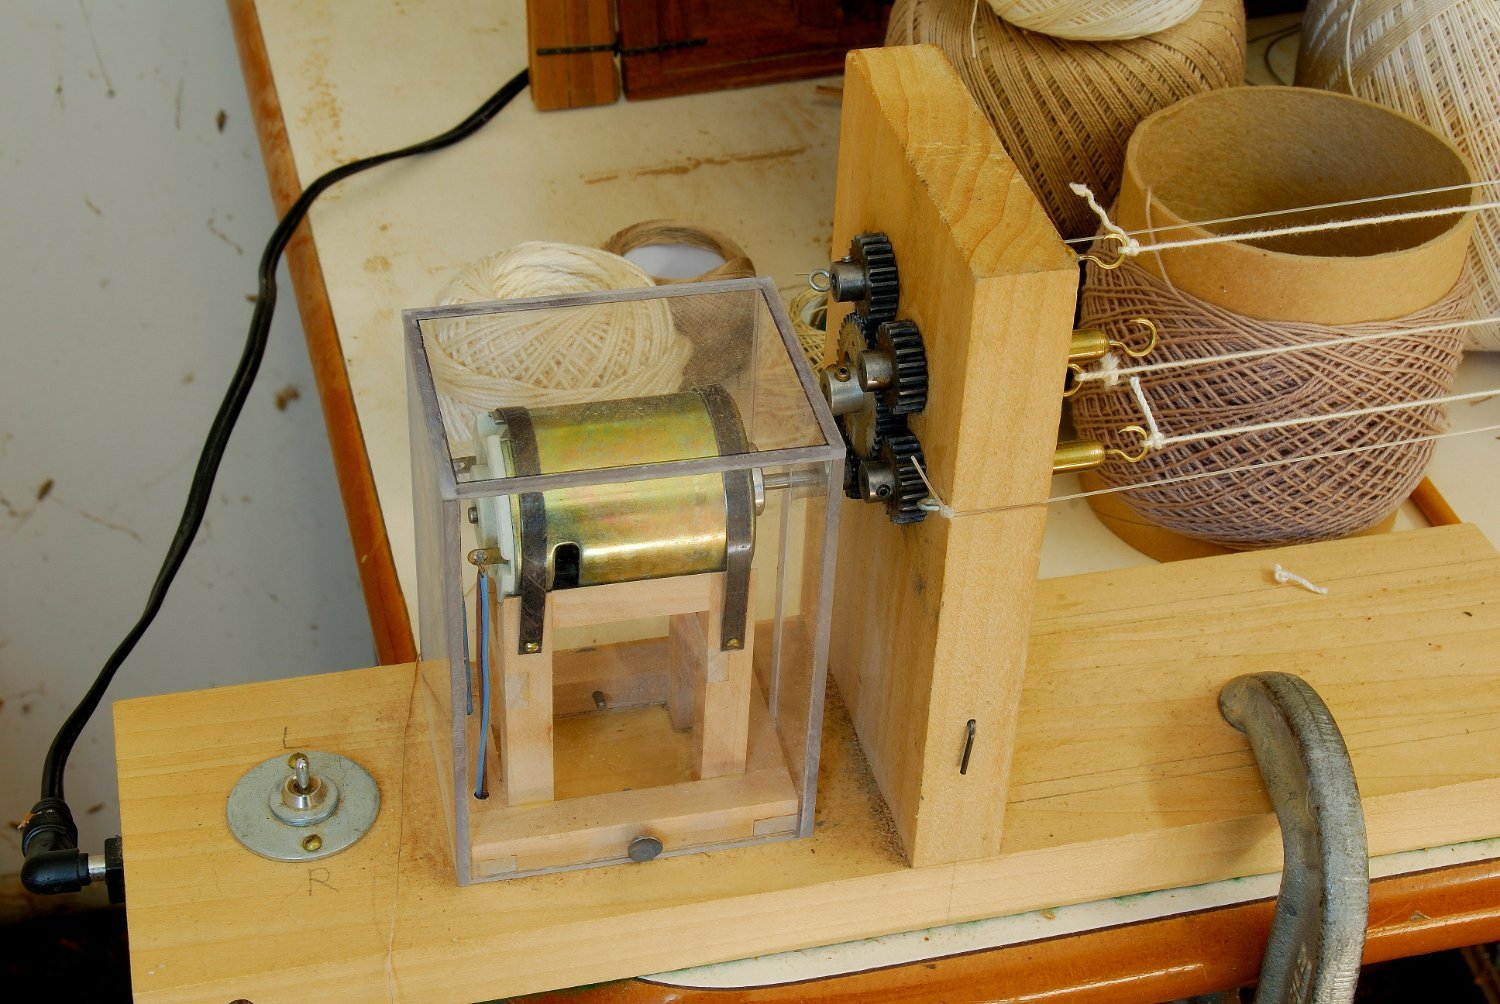
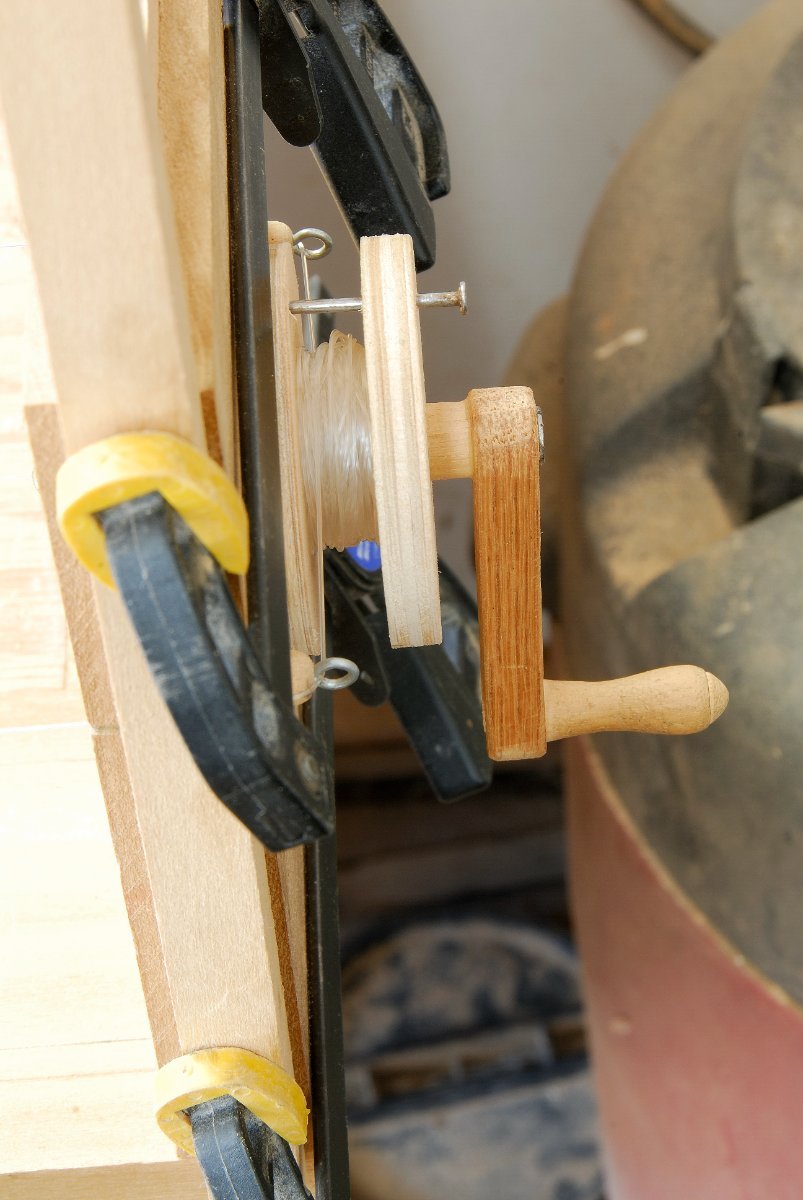
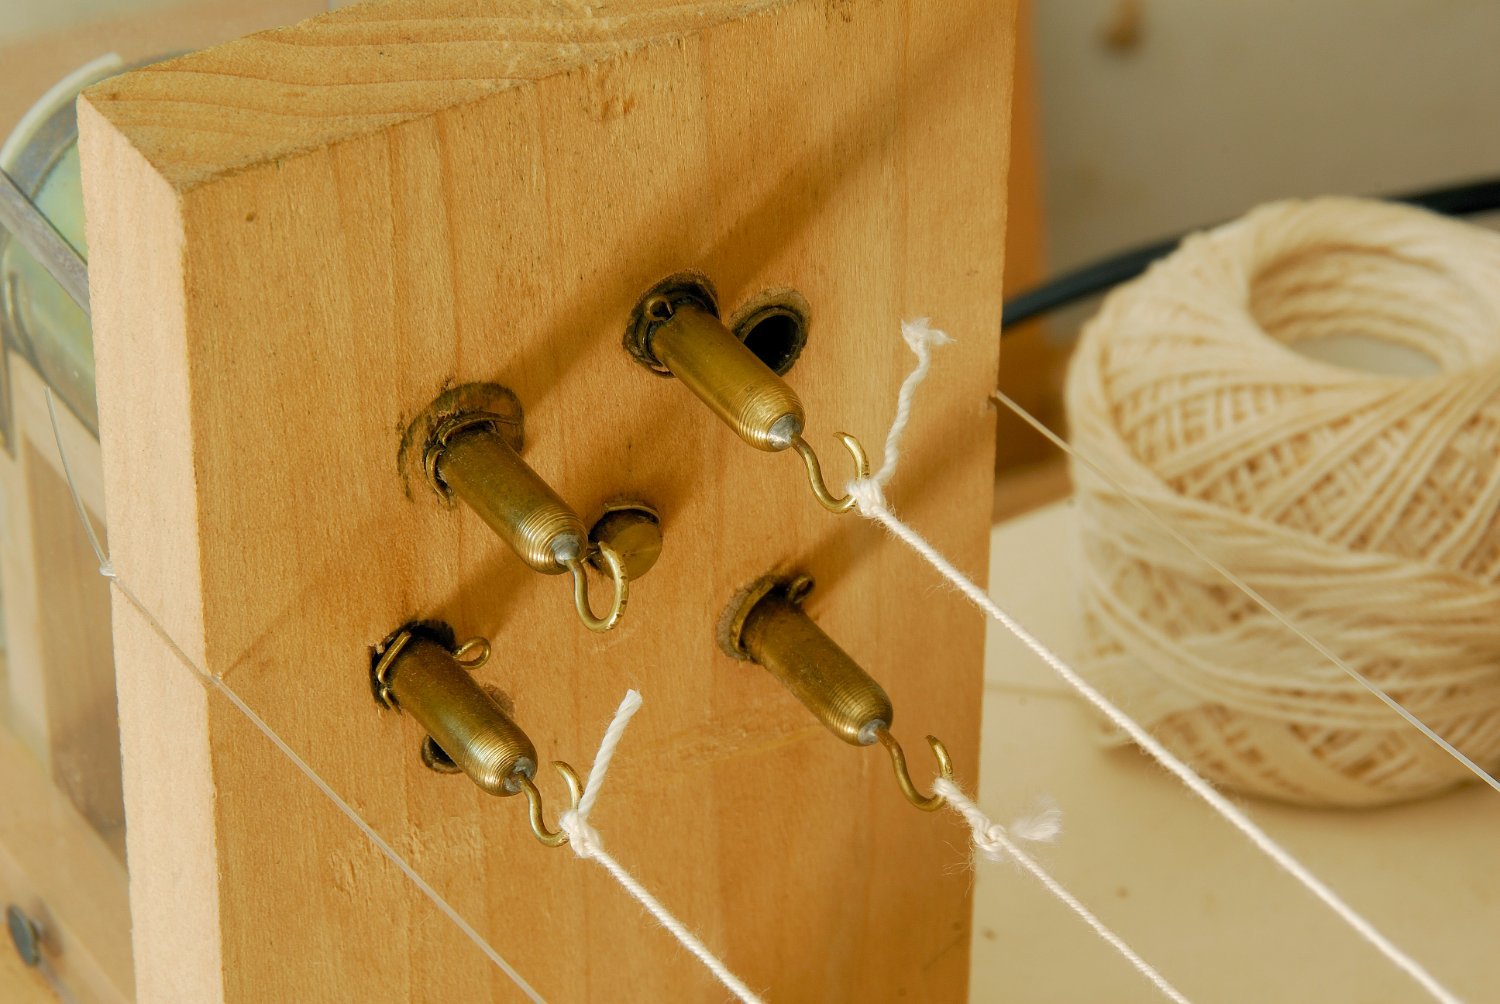
I have this type of a ropewalk I built long time ago. I use it all the time and it never fails me. It is simple to build and to operate. It is powered by a small 12 Volt DC reversible motor. To avoid constantly moving from center to center to check and correct (if necessary) the process, I have a cable (~15 ft.) connected to a remote trigger push button.
One other difference I employed, is the double fishing line stretched between centers, a cone is travelling (sliding) on. This allows me to twist quite long ropes, at least ~ 25-30 feet, If I need those. Also, the distance between centers can be adjusted gradually by winding the excess of this fishing line rails onto a spool behind the static center, unlike the version with a cart and fixed length rails on which it travels (I assume, the idea borrowed from model railroading).


-
-
Ibex planes are great. I use my 8 mm one for shaving the edges of planks (for spiling) for planking the hulls.
I got mine (used) years ago for cheap (about 5 or 8 bucks, I remember) on one of the ship models exhibits from one of the exhibitors.
You can get them used on Ebay or similar, very good, perhaps all you need is to sharpen the blade a bit, if necessary.
- mtaylor and thibaultron
-
2
-
I once learnt how to plank from Jim Roberts' brochure "Planking the Built-up Ship Model".
- mtaylor, uss frolick and Kelp
-
3
-
If you are asking about traditional rigging tools, it is easy to make your own, using a couple of large needles and fixing them into wooden dowels, or even a couple of handles from old brushes. See the attachment.
I am just in the middle of rigging of my French 74 gun ship model (1:48), [geez, what a pain! 😬], and constantly using my three DIY rigging tools - I find them indispensable!


Instructions for rigging Cutty Sark
in Masting, rigging and sails
Posted · Edited by Dziadeczek
1582675905_1485165543-bb564-cutty-sark-main-plan.pdf (modelexpo-online.com)
1582675905_1551258603564-cutty-sark-vejl-040119.pdf (modelexpo-online.com)