HOLIDAY DONATION DRIVE - SUPPORT MSW - DO YOUR PART TO KEEP THIS GREAT FORUM GOING! (Only 53 donations so far out of 49,000 members - C'mon guys!)
×


ianmajor
-
Posts
784 -
Joined
-
Last visited
Content Type
Profiles
Forums
Gallery
Events
Everything posted by ianmajor
-
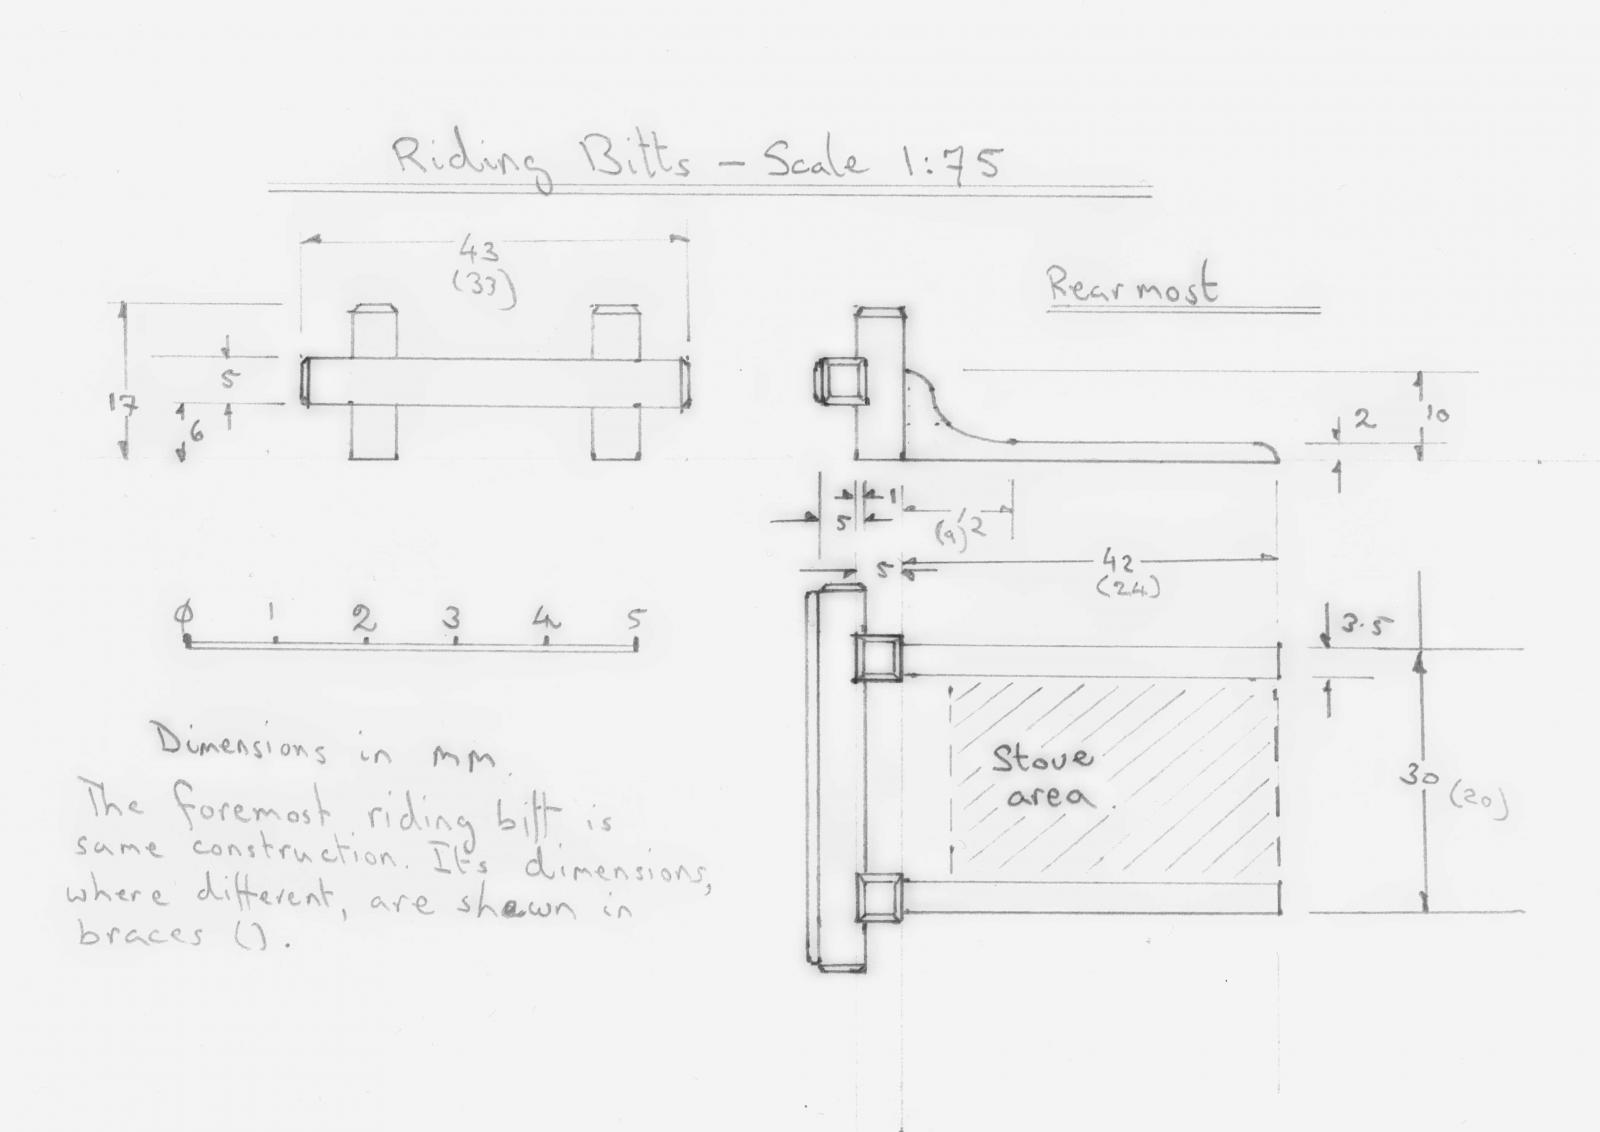
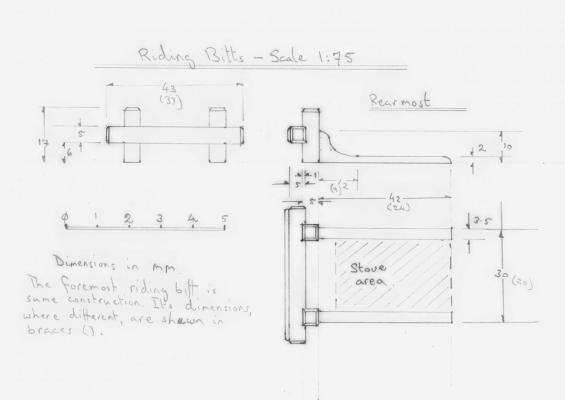
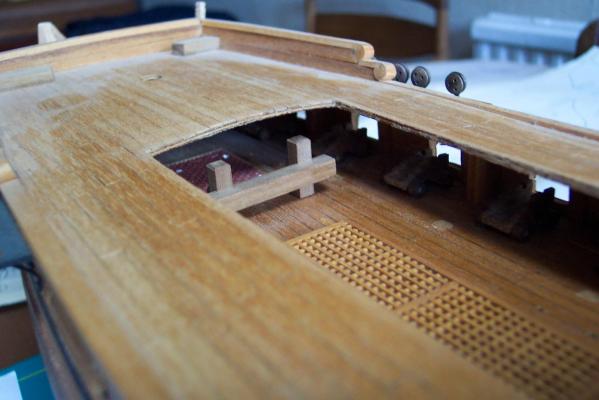
 Well - have taken another look at the Chapman plans of the Unicorn. These plans do not give the same level of internal detail as other contemporary plans held by the NMM. However it does show the riding bitts - there is one set only where I have mine in place. The plans of another beakhead ship also only had one set though these were set further forward. So I am running with just the one set. (Mike - do you agree with my analysis?)
 -
Hamilton, I think it is not so much a case of having the guts to do this, more a case of "fools rush in..."! It is definitely cramped under the fore deck of beakhead bowed ship and I am having problems squeezing two sets of riding bitts in. If I squeeze them together there is no room in front of the hearth for the poor old cook. If I set them a reasonable distance apart then they would foul the lower part of the foremast and its associated bitts. (somebody will now tell me the riding bitts actually go on the deck below on this type of ship.... ). So I am doing some research again. I may be wandering off in to a Corel like fantasy land - with flowers in what is left of my hair - very '60s like - time for some Hendrix.
-
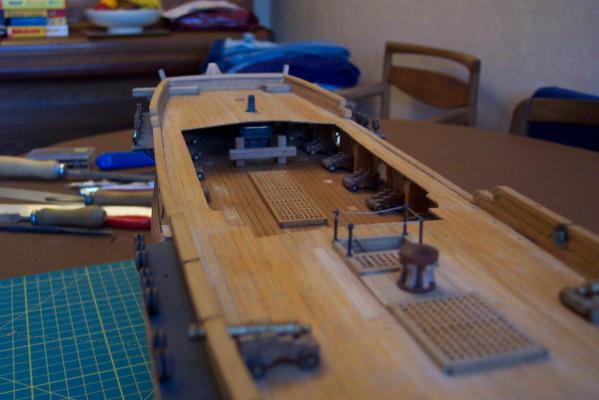
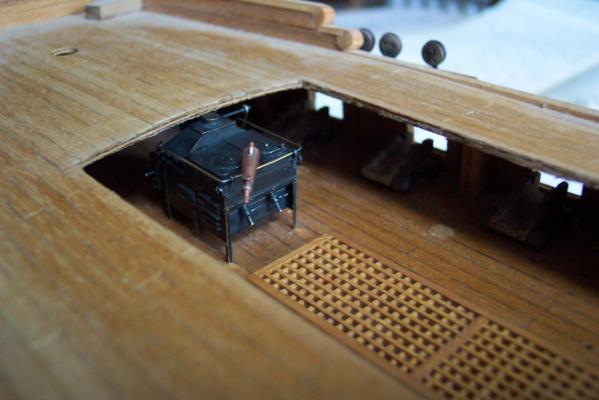
Thanks Mike, It is a pity that I could not represent the step up to the fore deck and quarter deck from the waist area but that was a modification too far. However I think it has improved the look. I have the ship in its usual place on top of a bookcase. The detail of the stove can be seen through the gun ports because there is a lot more daylight around the gun deck. It also makes the ship look wider!
-
Daniel, I thought I recognized a fellow destructer! I have built several railway locomotive kits which when completed always seem to end up with a locomotive plus the original set of kit parts.
-
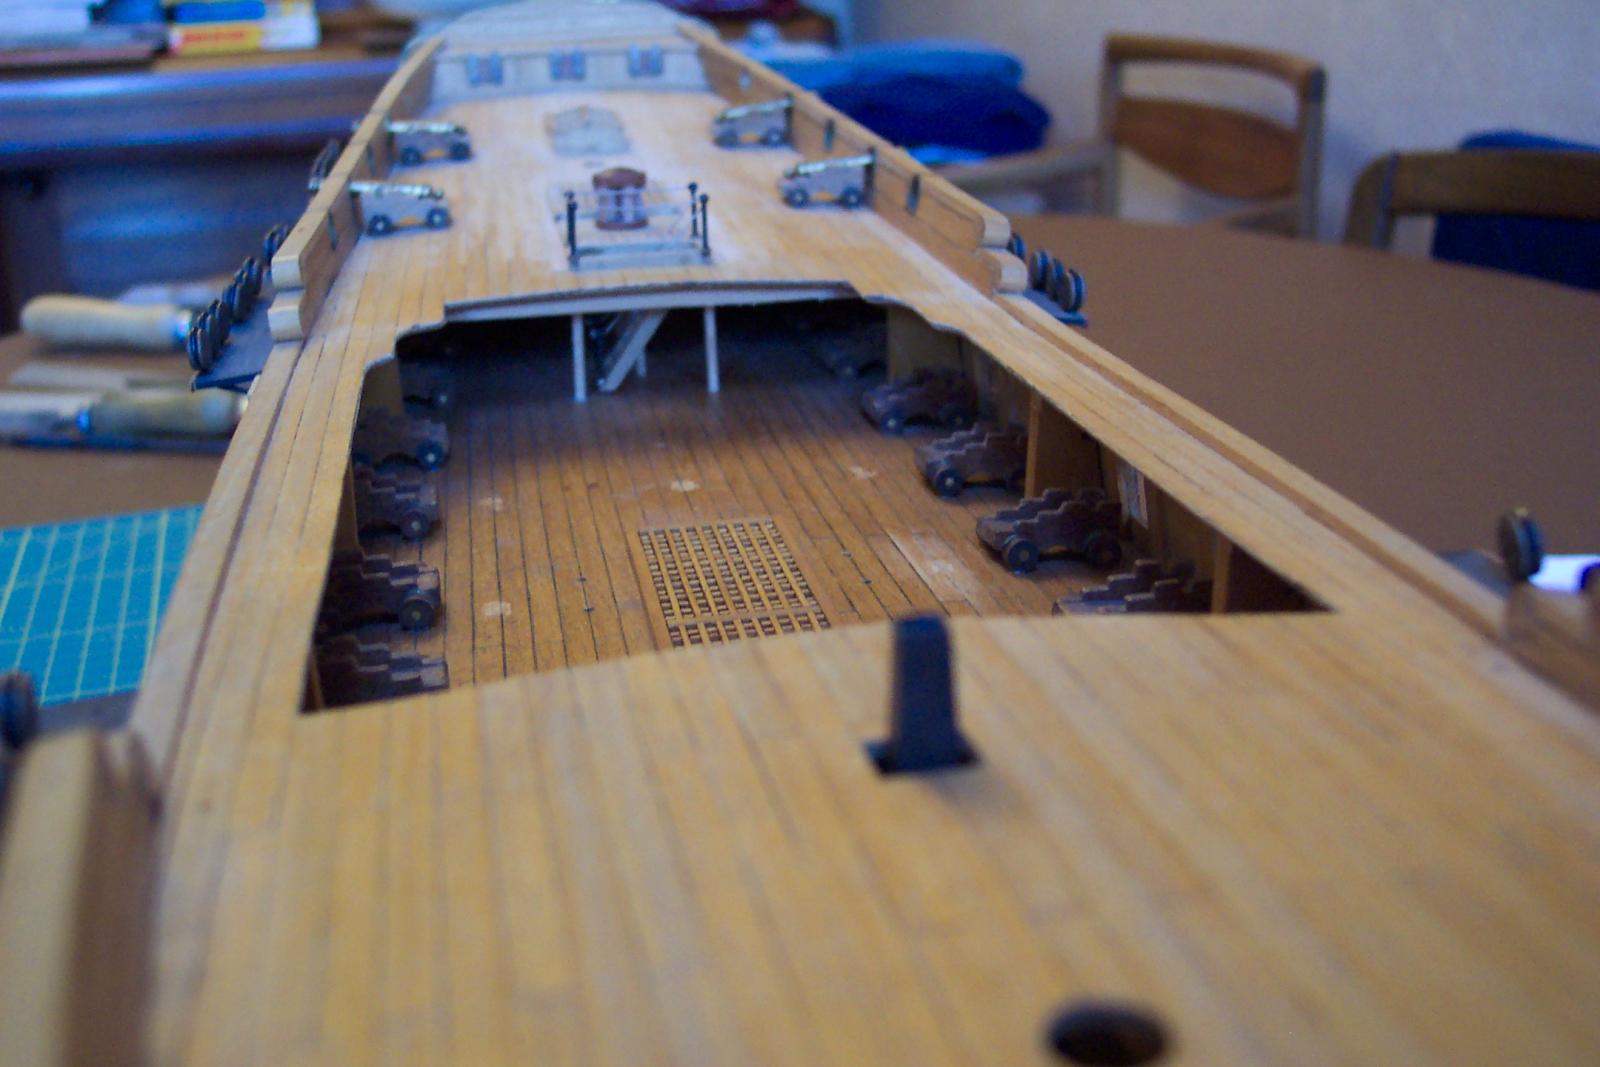
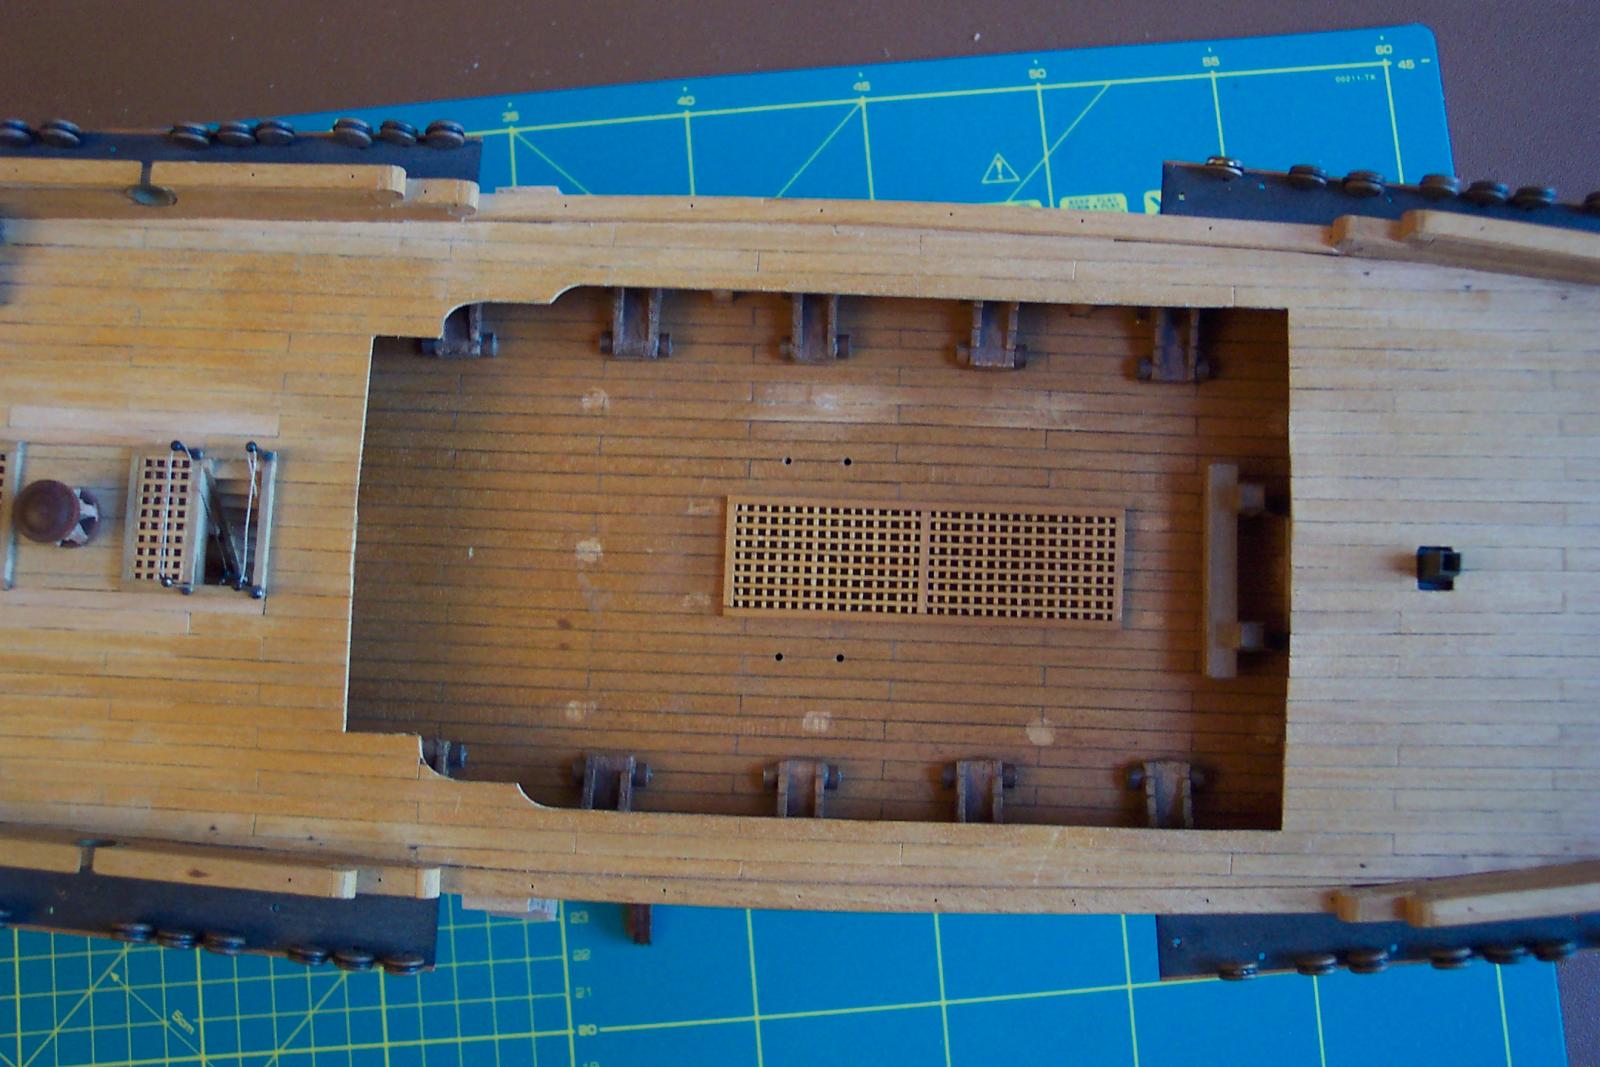
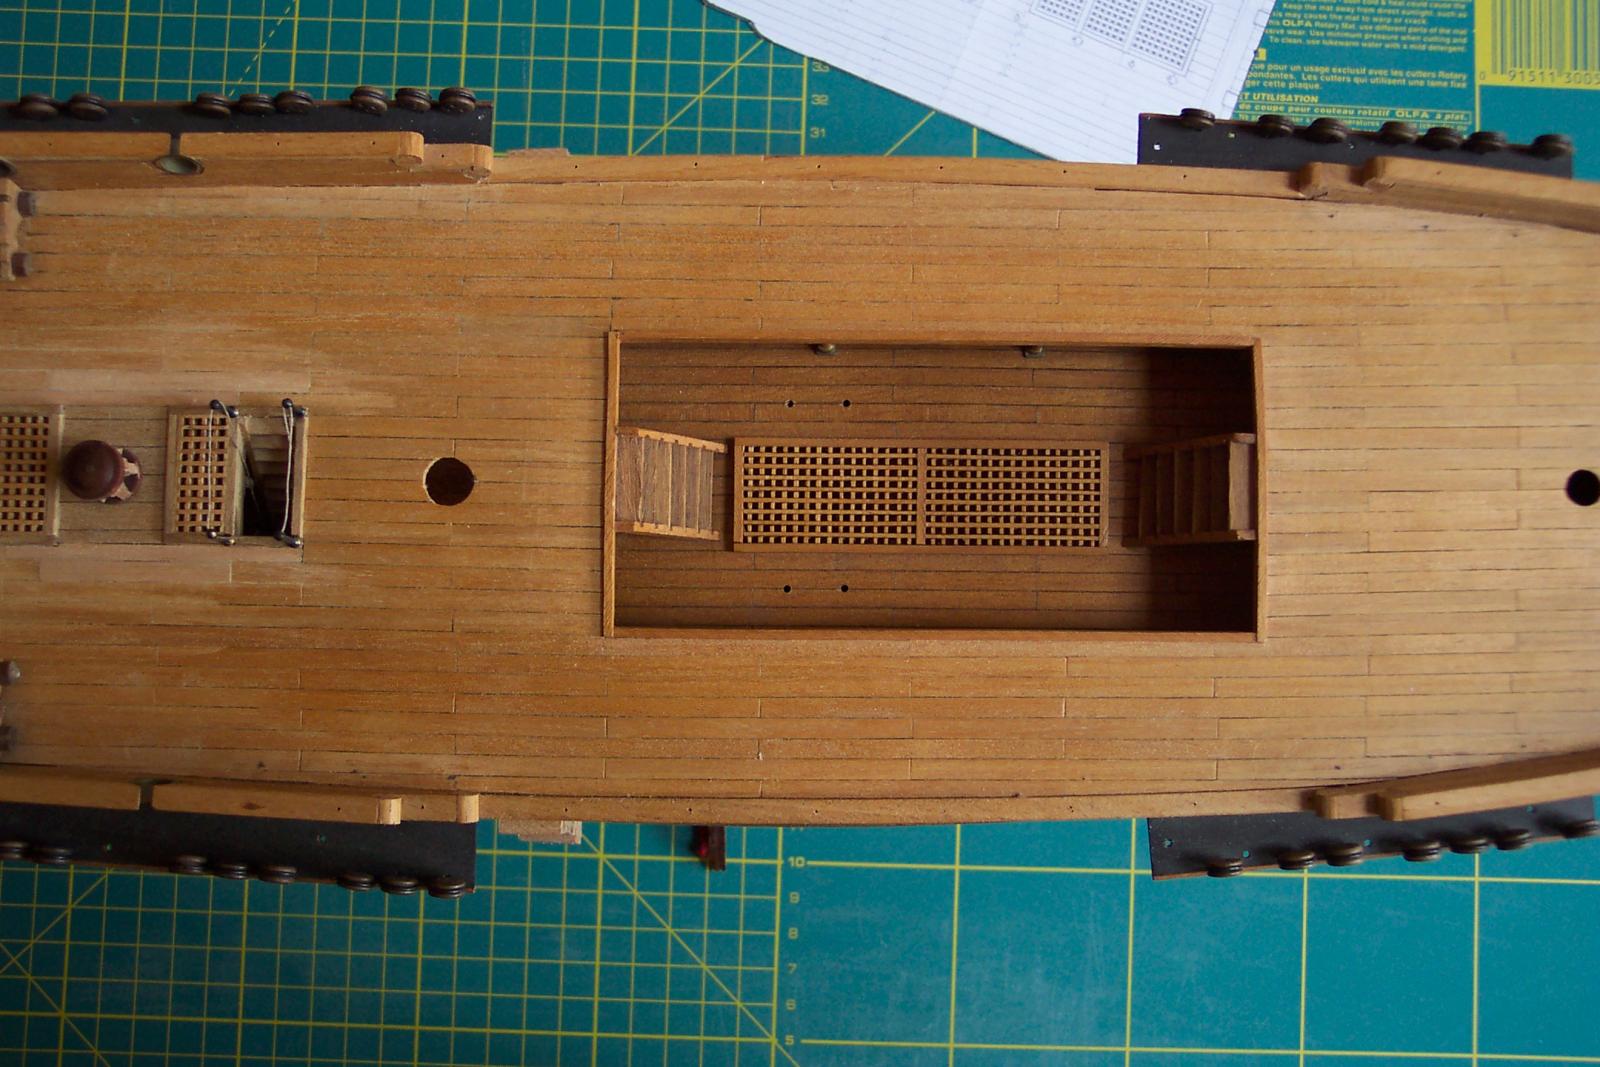
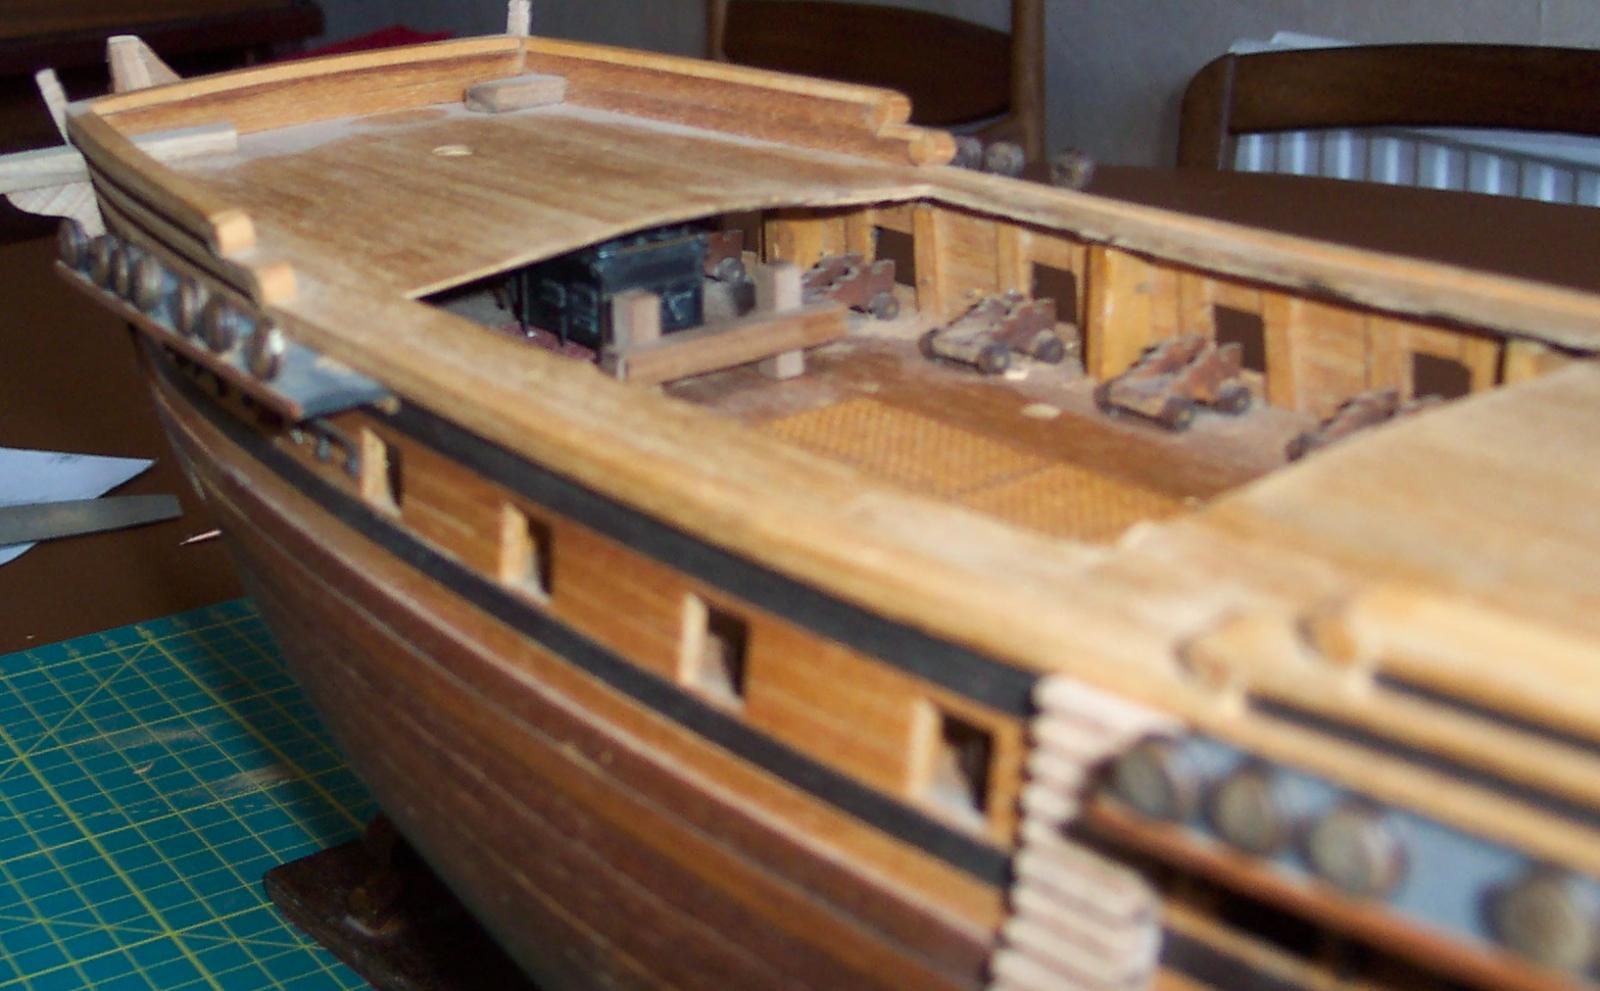
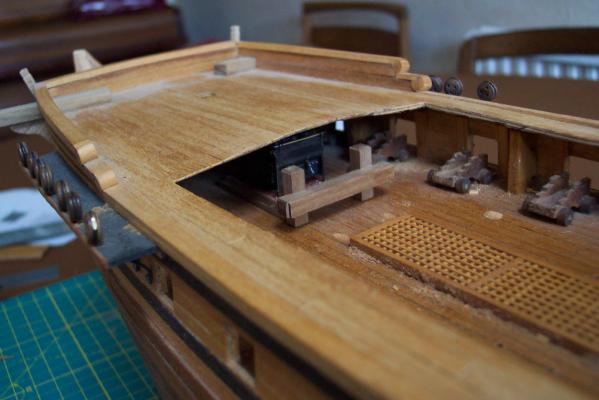
The next view is from the fore deck looking back across the opened up waist area. The area under the quarter deck is now very visible. However, once the chain pumps, main mast, gallows and steps are in place the view will be more restricted. If I had put the companion way behind the capstan (as in the Lymm) then it would have been worth modeling the lower part of the capstan which would then have been on view. One of the out of scale beams is on view, but this should be masked later by a scale beam which will go across the fore edge of the quarter deck. Finally a view from the quarter deck looking forward with the stove's flue pocking up through the fore deck. Time to settle down to some planking inside the bulwarks. Now that is going to be fiddly.

-
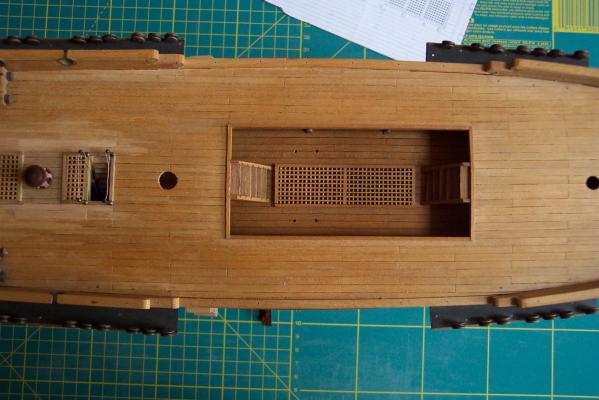
The Destruction Part 3. I have finished chopping out bits from the waist area and have beveled all the edges to make them look tidier (and looking a lot less like three ply). I have also cut out the hole in the fore deck for the flue. I will work out some suitable sizes for the steam outlet hole and the hole for the grating above the hearth end of the stove. I need to be careful on this because the Unicorn has a beakhead bow so there is restricted room on the foredeck. Some photos. The first two are before and after the destruction phase as comparison. Waist as was........ Waist is it now is............. The four holes in the deck were ones that I made a long time ago for the Coral version of the rigging and are now redundant. I will have to fill them up.

-
Hamilton, That is cracking stuff. It is looking great. The use of a rule in photos really brings home the scale.
-
Guys, Thanks for the nice words. From great modelers like yourselves it is praise indeed. Daniel, The rear for the fore deck is flimsy at the moment. The stove and bitts are not yet permanently fixed. I want to plank the inside of the bulwarks and rig the visible cannon first. (I don't think I will be able to replicate your "octopus" though! ). Once the stove is fixed in place I will fit a preformed beam across the underside of the rear edge of the deck. I will have to give some consideration about supporting the ends of this beam. Ferit, I have been considering modeling the gratings above the stove in the "open" position. There will be one grating above the boiler/condenser end of the stove which let steam out in to the open, there was another grating over the hearth end. If the one at the hearth end is open then the hearth and spit mechanism would be visible. If I do this I would need to model the fore most riding bitts as well. One problem - the main, non scale, support beam for the fore deck passes right under the position of this grating. I will have to think about that one. ZyXuz, Below is a scan of my tidied up diagram. Hope you can read it OK. If not let me know. If you click on the image it expands to make it easier to read. If you (or Mike or whoever) wish to copy this or any other thing from this log into your log, please feel free to do so. If nothing else you will be able to make your own models look even better in comparison! If you want me to publish anything else let me know. (Thinks - must finish off the soldering document that Mark suggested ). Right - now where did I put my hammer and chisel - time to get stuck in to the "destruction process" again.
-
John, This is going to make a lovely model. I am impressed with the progress that you are making. By the way, if you want your photos to appear within the text rather than as thumbnails at the end - after uploading the photo file, place the cursor in the text box where you want the photo to be, then just below the tiny thumbnail of your newly uploaded file you will find "Add to Post | Delete". Hit the add to post and something like "attachment=12345:test 01.JPG" will appear in your text with square braces around it. Then if you preview or post your update the photo will appear in that part of the text. Hope this was useful.
-
Hello ZyXuz and Ferit, It is a bit scary carving in to the deck like this. When my nerve starts to waver it is nice to know that I have your support (and the support of the others) to help me on. I am not sure that it is hard work - more a case of insanity! I have marked out the rear of the waist area and I am feeling more and more that I made the right decision to do this modification. ZyXuz, I will tidy up my notes on the riding bitts (with dimensions) scan them and put them in this log.
-
The Destruction Part 2. I have now started to open up the waist area. Thus far I have cut the sides away. I followed the planking line so that there is at least 2 plank widths down the side of the waist area. I am tidying this part up before I attack the rear of the waist area. The deck consists of 3 ply with planking on top. Where the edge of the deck is exposed I am beveling the edge so that there is only the edge of the planking plus one ply on show. I then tried the stove under the fore deck again. I took a small amount off the the top of the stub on which the flue will ultimately be fixed. The stove and riding bitt structure then went under the fore deck OK - well the condenser had to come off first. The first photo shews this test fitting (along with the woodworking detritus - needs a good clean). The edge of the fore deck to the left of the stove has been beveled - to the right the full 3 ply is still awaiting treatment. The fore deck is a bit warped (has been for some time). I will be fitting a cosmetic beam along the rear edge of the fore deck which will hopefully remove the warping. Thus far I am still happy to open out the waist. I like the way the guns on the main gun deck are now on show and they will look much better when they are finished. I will have to put some planking in front of the cannon, and the exposed edges of the bulkhead extension, which expose the edge of the plywood from which they are made, will get a vertical plank as cover. I will probably have to put lining around the gun ports. The next photo is a more general shot of the area. Now for the twiddly bit of destruction around the rear of the waist area.

-
It will only take me three months next time......
-
Spencer, The stove was about 4 months in the making. However, during that time we had our living room "re-engineered" including plastering and a a fair bit of woodwork. The dust produced defeated our best efforts and got all over the house. I am sure there is a lesson here.......
-
Jack, Best of luck with the operation - and take care.
-
The Destruction Begins...! Well I started on the modification of the waist area. The first phase was to check the location of the non scale beams under the fore and quarter decks. It looks OK. There is one close to where the stove flue will emerge but it is out of the way. Under the quarter deck the extra cut out will not go back as far as the first of its beams. It may become visible so will perhaps require some trimming. So it was time to start pulling previously fitted parts. Out came the two sets of steps, the deck pillars and the coving(?). Fortunately they didn't tear up the planking on the gun deck but have left some glue marks to clean up. This left me with a pile of redundant bits..... With the front steps gone I tried the stove for a fit under the fore deck. It won't quite go under. I will be sanding the underside of the fore deck so that the edge of the plywood exposed is thinned right down. If all else fails I have some leeway on the stove legs which I could reduce in length by up to 1.5mm without impacting its appearance. I also tried the riding bitts in place. They sit quite nicely so won't need much dressing. The photos shew the glue spots that need to be removed. It is also very dusty down there - it is 30 years since I last visited this location! You can also see the dust that has collected on the fore deck whilst I made the stove - I suppose it did take me a long time to make. With the rear riding bitts in place I am trying to decide whether it is worth making and fitting the foremost riding bitts. It would be quite a fiddle to get them in to place a bit like putting a ship in an opaque bottle. With the waist area widened I will review this and seek your opinion. Next up is a fair ammount of cutting and sanding which will probably take me several days. If you don't hear from me for more than a fortnight then it has probably all gone wrong and I will have decided to take up flower arranging instead.

-
Robert, That is very kind of you. I suspect the cook would not be too happy to be out in the open whilst doing his work!
-
ZyXuz, Ah - so that is what it is supposed to look like! The wood supplied for the main (2nd layer) planking is mahogany in my kit. I assume it is the same with yours. If you are going to paint the hull it is worth planking with a different wood. The mahogany tends to split when you shape it around the bow area. I was not alone in having this problem -I think Shaz for one other had the same issue (different model).
-
Piet, Nice work. When you are at the dentist you will have to think about your next moves on the model - perhaps it will take your mind off what the dentist is doing. Many years ago dentists were a good source of drills and burrs for modelers in the UK - they were worn be still good for what we did - then along came AIDS - after that they were not allowed to give them away.
-
Thanks ZyXuz. It will look even better when it lurks in the gloom under the foredeck! Seeing how the next work on my ship turns out should be of interest to you for your Unicorn.
-
Edward, Your progress is looking good. It is a long job cutting out frames.
-
I fear so - probably a ship's worth!
-
Well yes Hamilton - I decided I had been enjoying myself too much and should get on with some real work on the ship...... Another temptation is a ship's boat. I keep looking at your's and thinking "that is nice - must have a crack at that".
-
Daniel, Thanks for the compliment. When I open up the waist of the ship I will have to put more detail around the cannon. So it is kebab sticks to the fore (as per your Victory log ). Actually I meant to add some notes on the stove and its distiller/condenser gleaned from the display board on the Victory. Under "Galley and Fire Hearth" it says...... ".......Manned by 1 ship's cook and 2 or 3 assistants, the ship's cook was ranked as a junior officer; not because of his cooking abilities, but mainly for the responsibility of tending the largest fire source within the Victory - fire being dangerous in wooden ships....... .....(the stove's) components comprise: 1 Firebox and 1 open hearth fueled by coal or wood. 2 Large copper 'kettles' (total capacity 250 gallons/1137.5 litres) for boiling meat, stew and oatmeal gruel; etc 2 Baking ovens (total area 10 square feet/1.09 square metres) in which 80lbs (36kg) of bread could be baked in one batch. 2 spits for roasting and barbecuing; the spits connected by a chain drive to a smoke jack fitted in the flue, were automatically rotated. 7 hanging stoves on which the senior officers' meals could be cooked over coals removed from the firebox. 1 Copper distiller which converted seawater into fresh water; output approx. 2 gallons (9.1 litres) daily, which was often used for medical purposes. When delivered these stoves were supplied with a number of spare parts........." Obviously the Victory stove is a bigger version of the one that I made. I fancied trying to make some hanging stoves but decided that perhaps I should move on to some woodwork!
-
Mike and Ferit, Thank you for your kind words. And Ferit you are too kind about my Good Ship Orange Box! I am looking forward to tackling the chain pumps. Mind you - I keep looking at the photos of the torpedo tubes on Piet's O 19 log (link) with the lovely mechanism on the end for opening to tube doors, which has a pair of cylinders, coupling rods ......oooo....I could really get carried away. Better not though - I have put off attacking the waist for far too long. I am doing a quick survey of the affected area. I need to watch out for the non scale beams. Plus when I pull out the two sets of companion ways they may damage the gun deck surface. I may have to resort to judicially placed coils of ropes or what ever to hide the damage. Of course, if it all goes horribly wrong, I could always make the stove in to a battle station model and pretend that that was what I intended to do all along!
-
Daniel, I like the kebab stick idea for reaching right through the ship to mark and drill. I am about to do some retro fitting around my cannon so I now know how to do the drilling required!