HOLIDAY DONATION DRIVE - SUPPORT MSW - DO YOUR PART TO KEEP THIS GREAT FORUM GOING! (Only 53 donations so far out of 49,000 members - C'mon guys!)
×


ianmajor
-
Posts
784 -
Joined
-
Last visited
Content Type
Profiles
Forums
Gallery
Events
Everything posted by ianmajor
-

Landlubber Mike's technique for furled sails
ianmajor replied to Landlubber Mike's topic in Masting, rigging and sails
Mike, It is great that you created this as a separate log. You have tempted me to try furled sails. Thanks. -
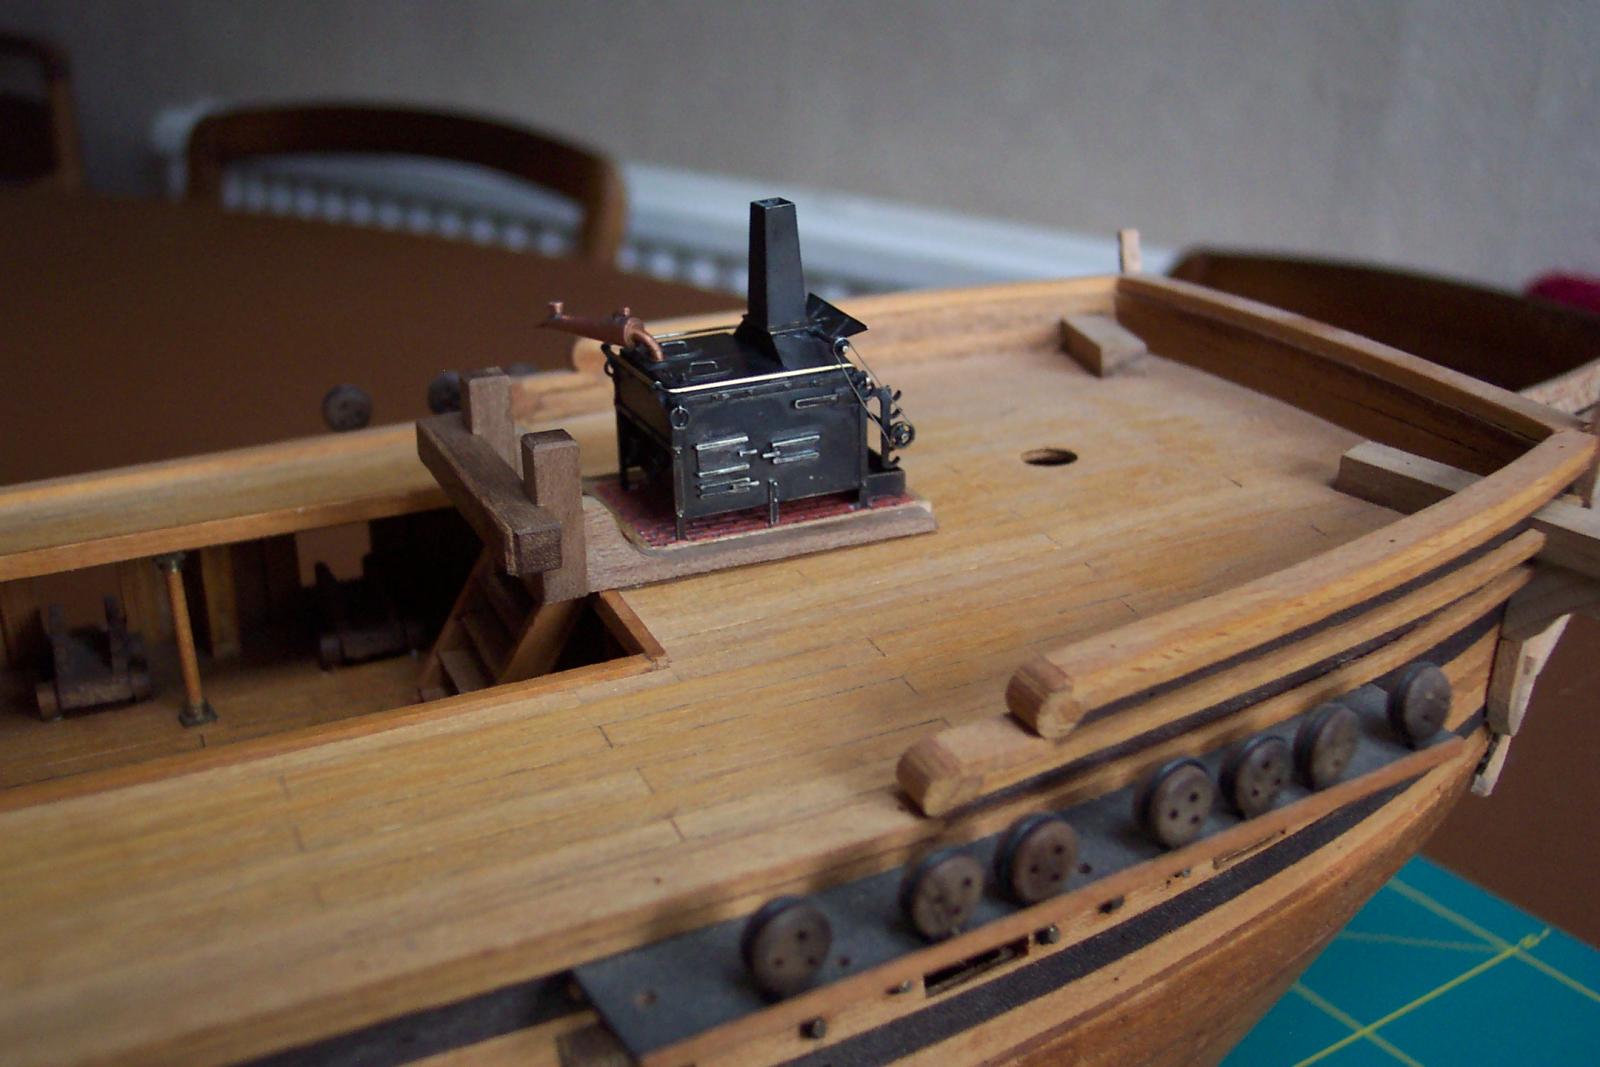
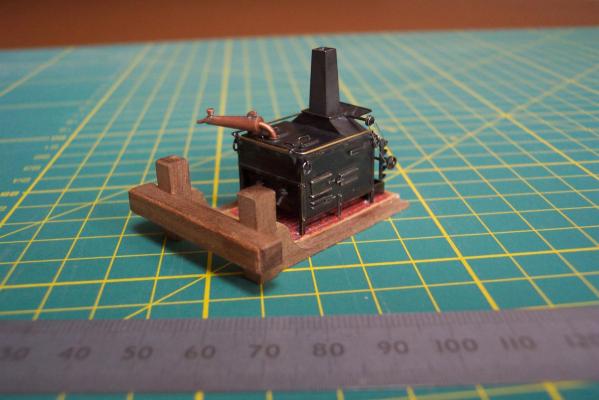
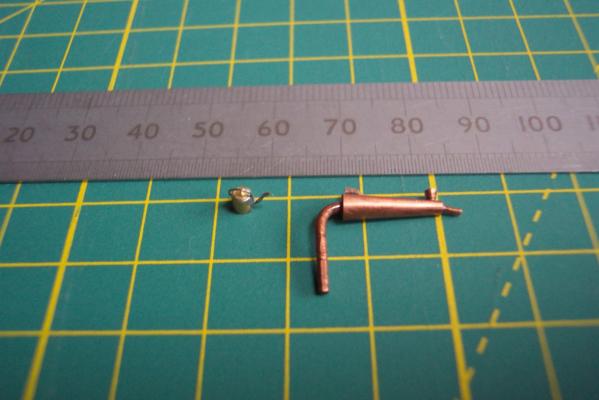
The time had come to blacken the stove. I used Birchwood Casey Brass Black. I had a tiny jam jar (the sort you get at breakfast in decent hotels) which was big enough to slip the stove in. I topped up the jar with sufficient neat Brass Black to cover the stove and let it have a bath for 60 seconds with the occasional gentle agitate. Then I washed it in running water. The following day I gave it a gentle burnish. Now those of you (like me) who follow EdT's work will know that he is not a fan of brass blackened with selenious solution because raised detail and edges if rubbed create bright spots where the blackening rubs off. See, for example, page 22 entry no 318 of tlavine's HMS Atalanta log <link>. Ed describes his preferred use of copper which "....can then be blackened with no effect on surrounding wood using liver of sulfur solution. LOS does not work on brass." Anyone who has worked on a model of locomotives know that there tend to be large areas of the undercarriage which are painted black. On models large areas of black tend to camouflage detail. The usual antidote is to dry brush the edges of the detail with a small amount of grey paint which if done carefully will represent the light glinting on the edges and points of the detail of the full sized item. Now in this case, rather than drybrush the detail, I decided to change the vice identified by EdT in to a virtue - I deliberately polished the edges of the detail. So hopefully when the stove is in the gloom of the Unicorn gun deck its detail will gently glimmer. Anywhere that I overdid the polishing I used a small brush to apply a drop of neat Brass Black to the exposed metal for 30 to 60 seconds then washed it off to reblacken that part (avoiding covering already blackened parts). Inside the hearth there were visible joints where I was not able to clean the solder off completely so this rather showed up after blackening. The solder I covered with Humbrol No33 matt black paint which blends in with the blackening well. At this point I added the spit drive made from 0.1mm wire. I got this wire by stripping the insulation off some instrument wire which produces several strands. 5 amp fuse wire is another source. I am afraid I cheated here - I used superglue to fix it. I made the riding bits that enclose the stove from 5mm square walnut and fixed these to the stove base. I debated whether these should be more elaborately carved but the ones on contemporary models seemed to be plain. The base will need a bit of fettling to make it sit properly on the camber of the deck - so the stove will be fixed after that is done. Until then I will have to put the stove somewhere safe because next I will attack the waist. The last photo is the stove sat on the Unicorn deck immediately above its final location.


-
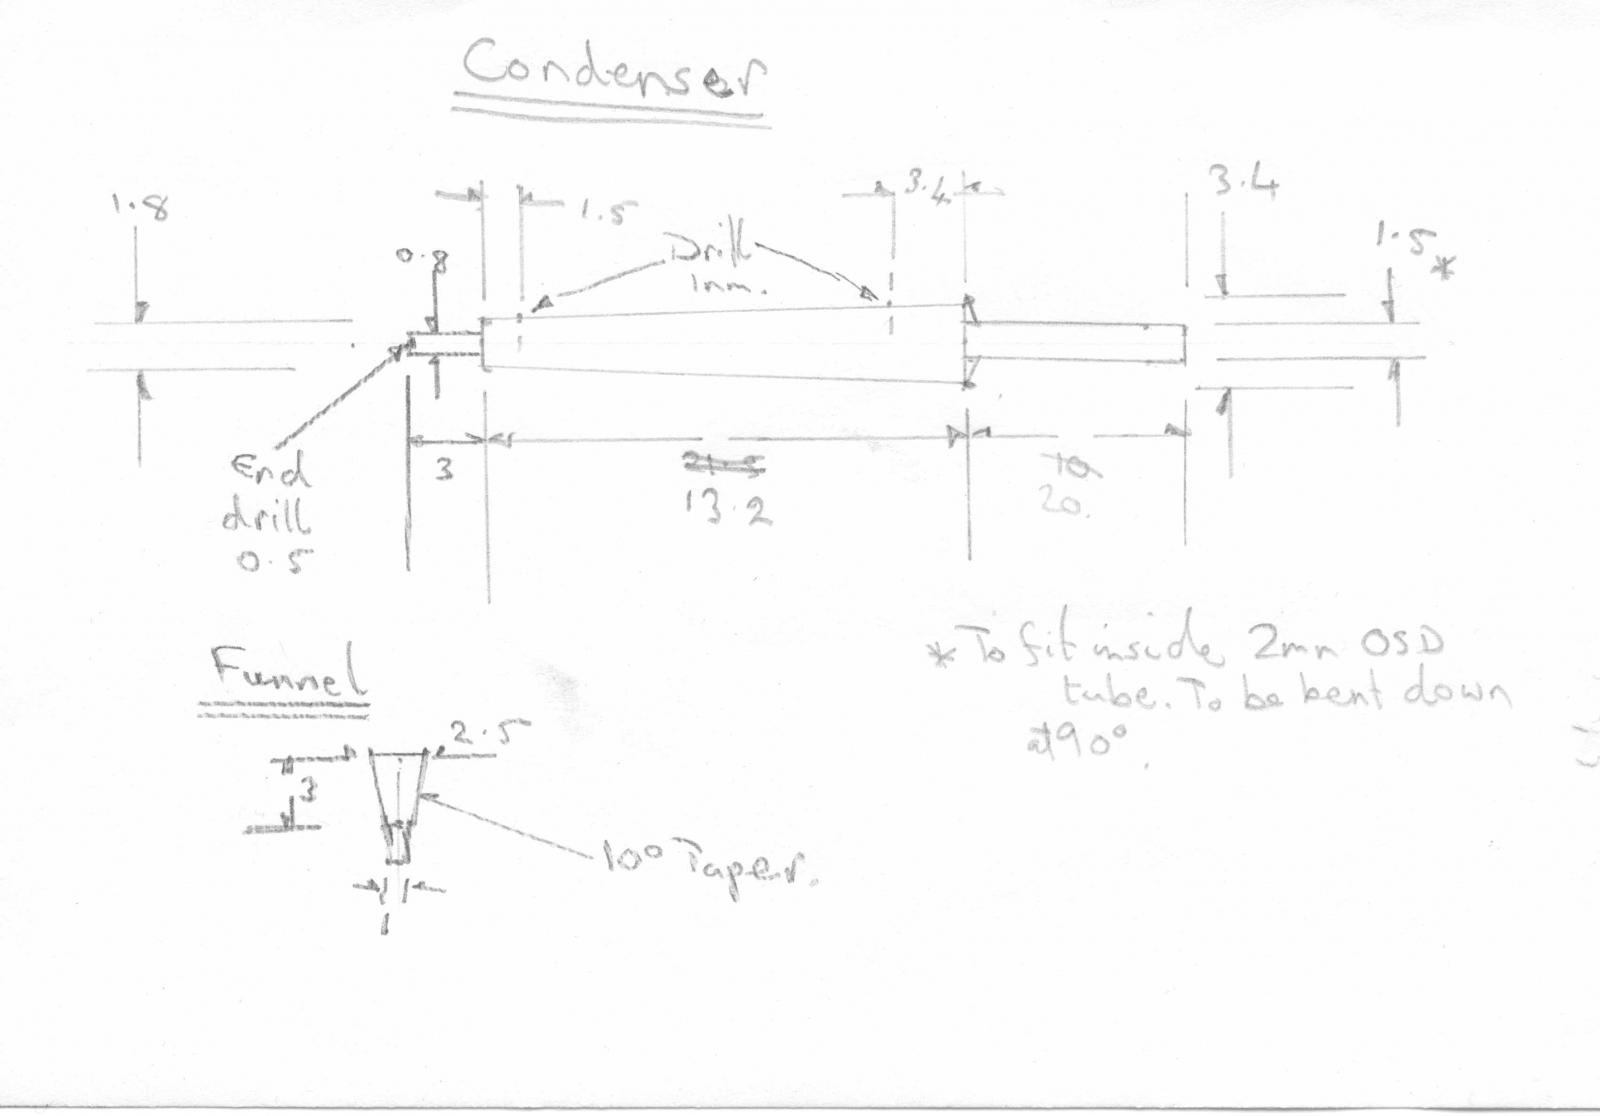
A bit more work on the lathe. I turned the condenser from a piece of 6mm diameter copper rod that I had. (I used to make replacement bits for my old soldering irons from it!) Sadly my photos of the turning process were badly out of focus so instead I have included a scan of the diagram from which I worked. I chucked a length of the rod and faced it. I end drilled it 0.5mm than turned down the end to 0.8mm for a length of 3mm. I turned a further 14mm down to 2mm diameter. The work plus chuck was transferred to the milling machine where I cross drilled 1mm diameter to a depth of 1mm where the funnel and jacket outlet pipe go. Back to the lathe where I set the top slide over to give a 1 degree taper on to the "jacket". Then using a parting tool I turned a further 20mm down to 1.5mm diameter. The whole was then parted off. The 0.8mm spout was annealed and curved in to a slight joggle downwards and the 1.5mm diameter "pipe" at the other end was bent to 90 degrees. The funnel was a simple turning job, and I turned a length of copper to 1mm diameter to make the outlet pipe.The funnel is actually too short but I was concerned about clearance under the deck. If I deem a taller one is needed it will only take about 20 minutes to turn a replacement. The three parts were then soldered together, cleaned and polished. It was then test fitted to the stove.

-
Jan, Those cannon barrels are impressive. At first glance they look as though they have been turned from brass. It takes a lot of skill to make barrels that regular out of rolled paper.
-
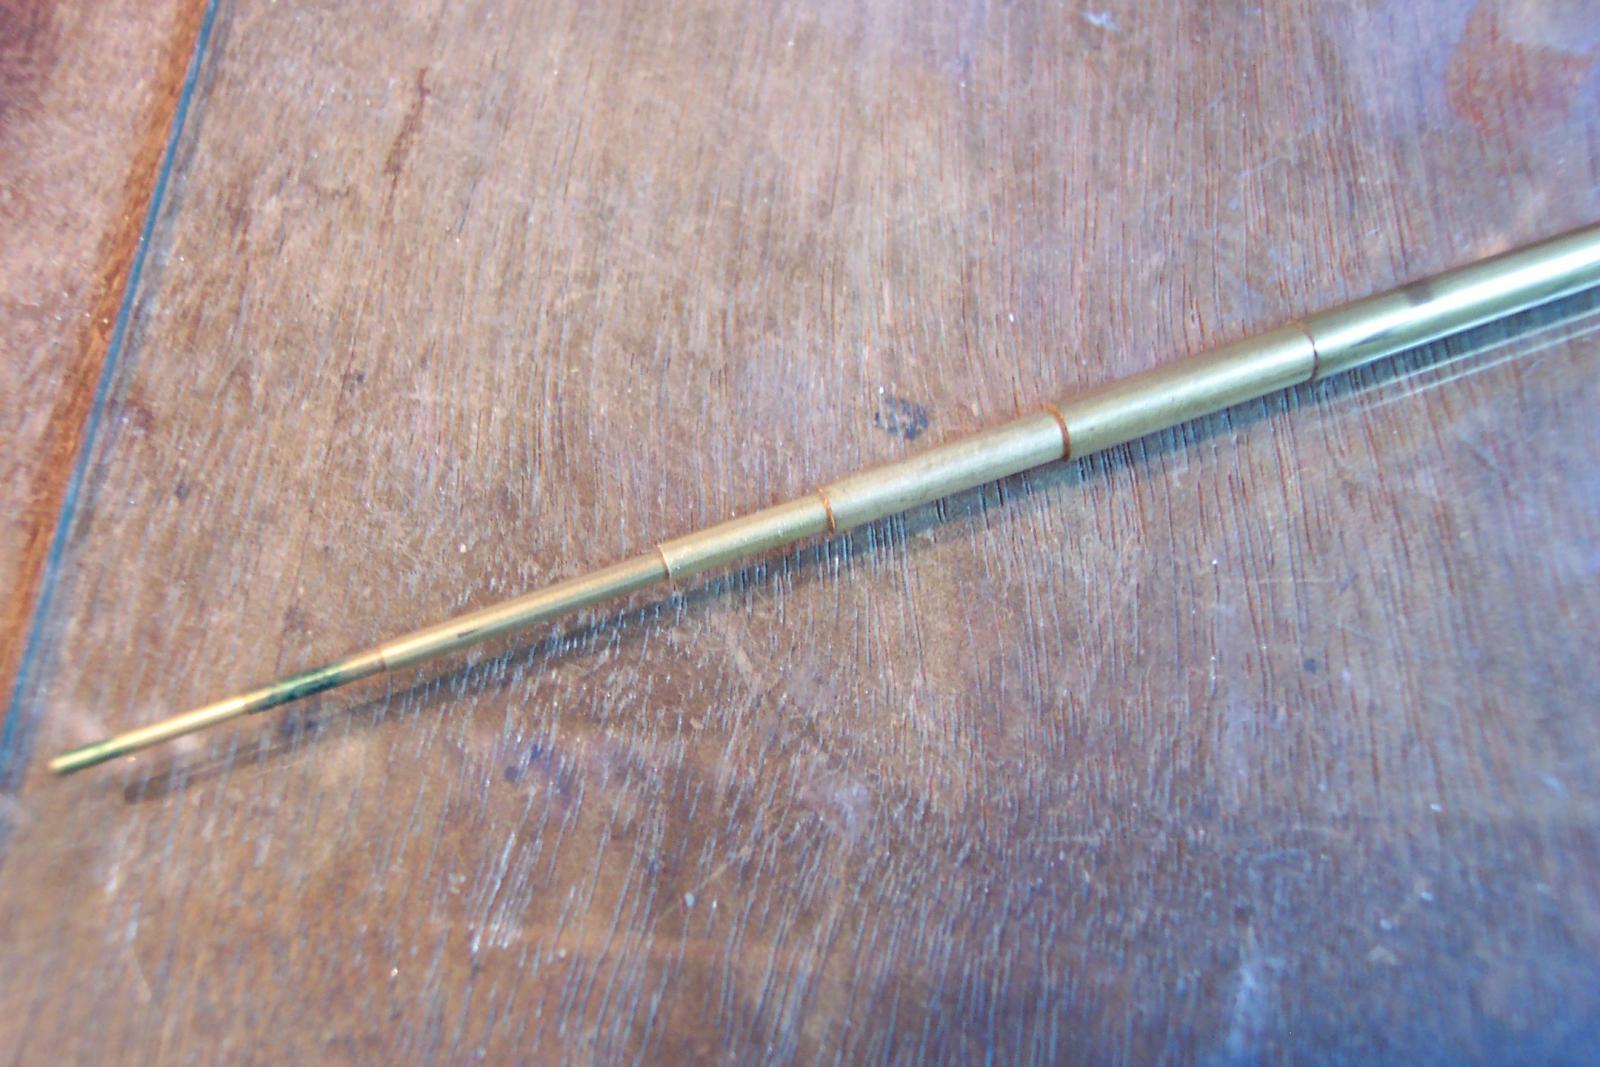
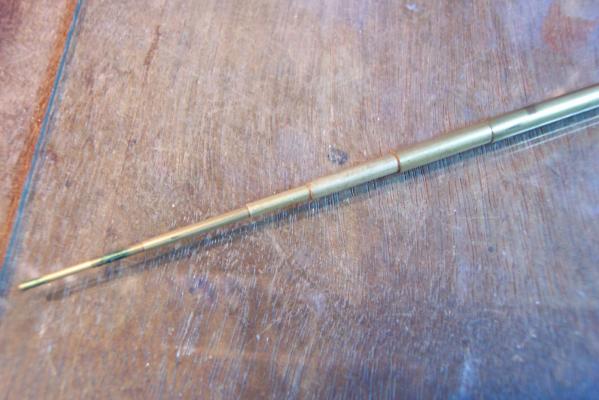
Piet, The standard thin walled brass tube sizes generally telescope together well. I thought you might be interested in this photo of a handful of my tube stock slipped together. They are from smallest (outside diameters) 1.6mm, 2mm, 2.45mm, 3mm, 4mm, 5mm, 5.5mm. In the main the telescopic sizes go up by 0.5mm in diameter, but my 4mm and 5mm came from a different source to the others and have slightly thicker walls. (something to watch for!) Hope this helps.
-
ZyXuz, It is looking good. You are really making fast progress. One problem I hit with "plug in" steps was when I added the hand rails down the side of the steps. The first time I did this the handrails were too wide to go down the hole. So I put them closer together - I don't think anyone noticed my bodge.
-
Very good description Mike - clever stuff. Did you do Origami when you were little?
- 153 replies
-
- 1
-

-
- badger
- caldercraft
- (and 1 more)
-
Mike, Very nice job. I also would be interested in how you did this. I can never get cloth type stuff to behave itself!
- 153 replies
-
- 1
-
-
- badger
- caldercraft
- (and 1 more)
-
Piet, Yes - go for the removable deck torpedo launcher panels - those launching mechanisms look great fun to make - all those pipes and twiddly bits - bliss!
-
Bismarck by NBP - 1:100
ianmajor replied to NBP's topic in - Build logs for subjects built 1901 - Present Day
Oooo - I love that crane. Positively gets my fingers twitching! -
Bismarck by NBP - 1:100
ianmajor replied to NBP's topic in - Build logs for subjects built 1901 - Present Day
Great stuff. I note the electric motor - does this mean this an active model that will float and be powered by electric motor? -
Bismarck by NBP - 1:100
ianmajor replied to NBP's topic in - Build logs for subjects built 1901 - Present Day
That is some seriously good modelling. I look forward to seeing more and perhaps a few pointers to how you achieved this. -
Glen, This is a beautifully made model. From what I can see in your photos there is little that I could offer to make it even better.
-
ZyXuz, I agree with Ferit (I usually do ) on both counts. My view is the quarter deck is too low on this kit. When you start at the waist area the deck should step up twice rather than be at one level. The kit gives a scale 5 feet headroom under the quarter deck, whereas if you look at the plans of the Lyme held by NMM at http://collections.rmg.co.uk/collections/objects/385550.html the headroom would actually be about 6 feet - I can't see the senior officers being happy to crouch in the main cabins. This extra headroom would also give your furniture a better chance of being seen. It also looks as though you are getting rid of the locker to the rear of the quarter deck. Good move - it is very much a Coral invention on this ship!
-
Hello Hamilton, Contemplating a ship in a bottle - now you are a glutton for punishment!
-
Wasa by Lin Feng - Sergal - 1:60
ianmajor replied to Lin Feng's topic in - Kit build logs for subjects built from 1501 - 1750
Lin, It is looking good. Nice progress. -
Piet, Lovely work - as normal. Evergreen supply sheeting an various cross sections in plastic. Most model shops that I have come across sell it. My friends who use it say the various sections in the Evergreen range are much more accurately produced than some other suppliers. (Usual disclaimer - I have no connection with the company). Have a look at http://www.evergreenscalemodels.com/ for more info.
-
ZyXuz, I don't think you need to worry about damaging the steps down to the lower false deck, they are quite strong units. It is an ideal time to make the steps when you can view them from the sides before the hull planking goes on - it is so much easier to get the length and angle right. You can make the steps, handrails and the surround that will go around the hole in the deck (don't know the proper name) as a single unit then fix it in at a later stage. I found this type of sub unit quite strong. I find there is something about steps on a model that intrigue me - perhaps it is the mystery of where they lead to.
-
ZyXuz, I like it. The modifications you have made will greatly improve the waist area of the ship. The parts supplied in the kit for the steps make the treads too far apart in IMHO. The miniature crew would have to be mountaineers to use them. I believe making steps as per Dafi's method (see his entry in companion-ladders-advise-needed-please ) produces much better results. Keep up the good work.
-
ZyXuz, Like Peter I am taken back a few years seeing this. The castings for the stern decoration are completely different to those that were supplied with my kit. Mine had translucent blue plastic window frames and "glass". I also had the same issue as you with the slots in the deck leaving a gap with the bulkhead. Mine was one of the first of this kit and I had two or three bulkheads which extending below the keel and which had to be filed to the correct shape. From your pictures that appears to have been corrected. A nice start. I had better speed up or else you will overtake me!
-
Mark, Certainly if you felt it was useful.