HOLIDAY DONATION DRIVE - SUPPORT MSW - DO YOUR PART TO KEEP THIS GREAT FORUM GOING! (Only 53 donations so far out of 49,000 members - C'mon guys!)
×


ianmajor
-
Posts
784 -
Joined
-
Last visited
Content Type
Profiles
Forums
Gallery
Events
Everything posted by ianmajor
-
 Hum. What is different? You were successfully adding photos at the start of the log. There is a 2Mb limit on each post - though reasonable photos only need to be up to a few hundred Kb. How many Kb are your photos after resizing?
 -
ZyXuz, Nice paint work. The ship is progressing very well. As you noted the picture of the Unicorn on the box lid has quite a few differences to the actual model. The first I noted when I got the kit was that on the illustration the ship has hammock cranes but the kit does not. Some thoughts I have had (for what they are worth ) on the bits you are going to modify. On the stern - have you considered cutting holes to represent the doorways from the main cabin in to the galleries? If these are modeled without doors fitted or with doors in an open position it would give more light/an extra viewing way for your internal cabin detail. When I did the bow of my Unicorn I used the 3mm square beech supplied in the kit for the rails. I really struggled to get them in to a reasonable shape and the resulting set of rails look heavy. I think some of the rails should have been 1.5mm square instead. It would have looked much better. Only a suggestion.
-
John, I look forward to the photos. I have no personal experience of building a bireme but my assessment is that it is a ship that looks easier to build than it actually is. Keep up the good work.
-
Announcing the Model Ship World Ship Kit Database Project
ianmajor replied to SkerryAmp's topic in Wood ship model kits
Adam, A good idea. Had look at the database it will prove very useful. I will pull some info together and drop a PM to you when it is ready. -
Gianni, Thank you for your kind words and welcome to our Unicorn "gathering". From your pictures in the gallery I guess you are renovating or upgrading at least 2 ships (Falmouth and Unicorn). It is great to see that you have started a log on your Unicorn upgrade.
-
ROYAL CAROLINE 1749 by Doris - 1:40 - CARD
ianmajor replied to DORIS's topic in - Build logs for subjects built 1501 - 1750
Anja, Please send our warm regards to her. I hope it is all good reasons for her break in ship modeling and wish her well.- 883 replies
-
- 2
-

-
- royal caroline
- ship of the line
- (and 1 more)
-
Piet, Tremendous. It makes me fell tired just trying to keep up with the rate that you are working on the sub!
-
Duff, Great idea. I only have a small cheap saw but I think I could adapt (miniaturize) your design. The cut wood binding twixt blade and fence I have always found an issue. Thanks for this. And thanks Michael for starting this thread. It is very useful and informative.
-
Ah - so that is where the rail came from that you used. I have visions of your daughter deciding to "play trains" in the future and finding her locos bouncing along on rail-less sleepers (ties)! Re the mines - go for it! It will look brilliant along with the rest of the craft.
-
Freek, Nice to see another submarine construction log. I find them particularly fascinating. You have made a lovely start. The construction thus far is reminiscent of model aircraft construction - though I have no doubt the similarities will soon end with further work. I look forward to your next entries.
-
Hello John, Just catching up on your log after my week away. She is looking very nice. Re making mistakes - we all do that - I major in them - well I ought to, I have the right name for that! The main thing is to not lose heart and to work out ways to correct the mistakes. I see you have looked at Arthur's (AEW) bireme. It might be worth dropping him a note if you are stuck on anything. I am sure he would give advice. Keep up the good work.
-
Piet, Good Heavens..I have been away for a week and missed a huge amount of progress on your boot. It is looking beautiful in its primer and the detail around the torpedo loading tubes and other deck furniture(?) is superb. I am continuing to learn a shed load about submarines - I can't wait for you to produce the conning tower to see what we find there!
-
Mike, Hum..I understand the words ... but I struggle with the sentences! There is a lot more to this rigging than meets (my) eye. I obviously need to do a lot more reading on the subject to understand better. Your set of furled sails looks tremendous. I can't wait to see them in situ.
- 153 replies
-
- 1
-
-
- badger
- caldercraft
- (and 1 more)
-
Mark, ZyXuz, Thank you both for your words of encouragement. I had a good trip to Cambridge to see my daughter and grandchildren. I also saw number 3 son, the one who did the blacksmithing, and who now lives in Chelmsford (not far from Cambridge). He is now a member of the Essex police force. So I am now back to the model making - and plan drawing.
-
ZyXuz, Just back from my travels and am catching up with your log. You are making rapid progress. At this rate you will overtake me in a couple of weeks! I am interested in the port surrounds that you have fitted - they look good. I was debating whilst I was away whether to use stained card or thin walnut on mine but I think I will do the same as you. Your Unicorn is looking great.
-
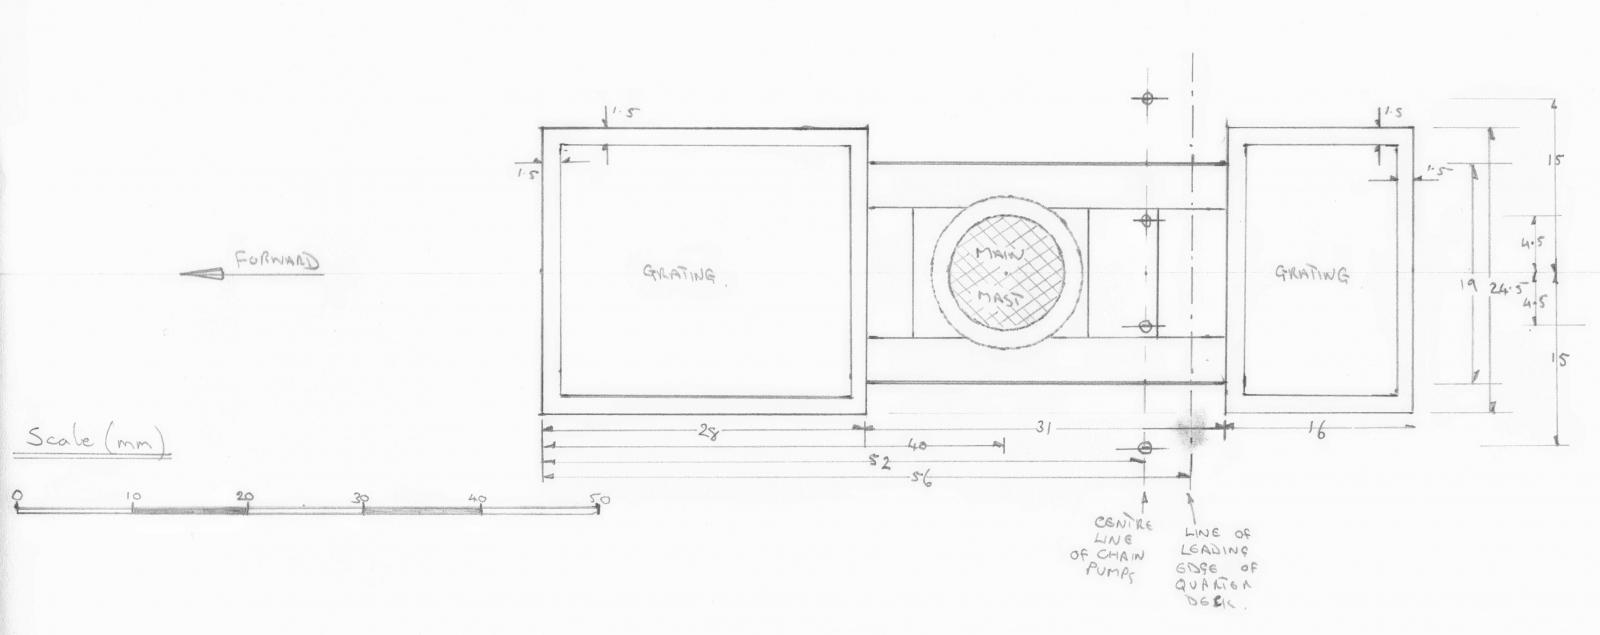
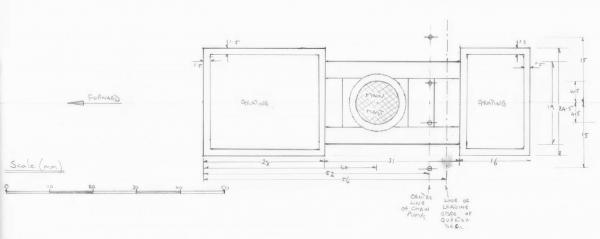
I have been planking the inside of the bulwarks that have been exposed by the waist modification using strips of mahogany left over from the original hull planking. No photos of this yet. It is fiddly work getting the planking under the overhanging parts of the deck so I am taking it steadily. I am allowing each plank's glue to harden off before fitting the adjacent planks. So - in between I have started doing the plans for the cluster of items around the main mast on the gun deck. This will include the gallows and various pumps. With the original hole for the main mast now gone (it was in the part of the quarter deck that was chopped off) I have to re-establish the position of this mast. The plans I have started on put the centre line of the main mast 6mm ahead of the centre line of the foremost deadeyes, which will give a rake of about 2 degrees (according to my calculations based on 260mm from gun deck to main mast fighting top - as per Corel main plan). I had already positioned the channels, as per the 1974 Corel plans, which gives 0 degree rake on all three masts. The various plans don't tally with each other, the main elevation plan shows some positive rake on main and mizzen masts. The new hole for the main mast is slightly forward of the position of the old hole. This does present a challenge with the mizzen mast. If I am going to put about 6 degrees of rake on it I will have to move its hole forward by about 4mm. I would have to mask/fill the old hole and this could impinge on the space for the ship's wheel and the binnacle that I wish to make. If I don't put any rake on the mizzen but have a couple of degrees rake on the main it will look very silly! So here is the first cut of the first plan for this area. If you click on the image it will magnify to make it clearer. My wife and I are off visiting our two children and two grand children who live in the south east of England - one family in Cambridge and one in Chelmsford. So I will be away from the workshop (and my Web access) for just over a week. However I will be taking pencils, paper and other implements of destruction with me to continue producing the plans. None of this computerized design stuff you notice - well I have to work towards my ambition of becoming a fully paid up Luddite!
-
Those carvings are just out of this world. Marvelous.
-
Piet, That looks great. The "teeth" show up really well.
-
ZyXuz, It is indeed a good idea to fit the hull planks in shorter lengths. Another useful model to look at is Chuck's Winchelsea which is a close descendant of the Unicorn. Look closely at page 2 and you will see the hull planks don't go the full length. We will get there in the end.
-
Kimberley, I am not familiar with Tamiya thin glue so my comments may be duplication and I may be stating the obvious..... For most of the gluing of plastic components I use liquid (solvent) glues applied with a small paint brush. The two parts being fixed need to fit together well. The technique is to hold the two parts together (no glue on them), load the brush with the solvent then touch the joint with the tip of the brush. The solvent is then drawn in to the joint by capillary action. For long joints you reload the brush and touch at various points along the joint. You hold the joint together for a few moments then set it aside to harden - the parts my need support by elastic bands clamps etc if they are large. It is so easy and quick which is why I like it ('cos I am lazy). I also use the brush with the smallest amount of solvent on it to pick up small plastic surface components which I position with (say) a scalpel blade, then add a bit more solvent to fix the part. An example is simulated rivets - I do this by cutting 0.5mm cubes of plastic then attaching them as just described. Take care not to touch the brush on the fingers holding the parts in place else the solvent will be drawn between finger and part by the same capillary action which will result in a nasty fingerprint cut in to the plastic surface. As the guys say - good ventilation is vital. In my teens I was a very happy modeler until I discovered I was getting high on the solvent. These days I am a much better ventilated but grumpier modeler. I would recommend some brands of glue but I don't know what is available in the US. For attaching etched brass components I use liquid super glues where the joints are good. If the joint is poor and needs some filling I use 2 part epoxy. Hope this helps.
- 94 replies
-
- 2
-
-
- santa maria
- revell
- (and 1 more)
-
ZyXuz, Whilst you are waiting for the extra timber give the planks that you have already fitted a good sanding. You will probably find that it will come up quite nicely. Keep the sawdust that you produce - you could then mix it with some diluted white wood glue to use as filler for any gaps between the planks. The filler produced this way will be the same colour as the surrounding wood (it should be it is the same wood after all!). For me I did small amounts of planking then moved on to other activities such as assembling the fighting tops - so it took me quite a long time to do the planking - but I didn't get fed up with it! Keep your chin up and smile at adversity.
-
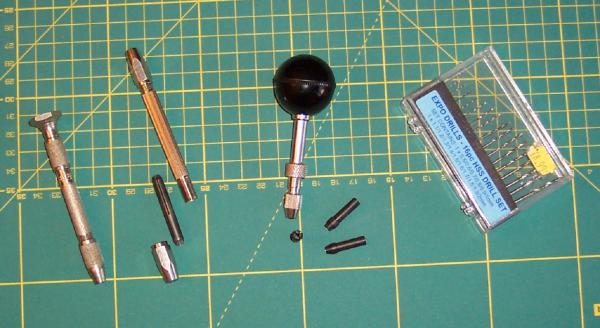
Kimberley, I thought you might be interested in a photo of various pin vises. The one on the right is a nice one to use. The black handle rotates to make it comfortable to use. It has a set of collets with it (the black things). Each collet covers a range of drill sizes. I use this to drill holes. I also use it for my 14BA and 16BA taps. On the left are a pair of cheaper pin vises. They each have two double ended collets, one enclosed in each end. One has a collet removed and on show. I use these for drilling holes. I also use them to hold very small parts when I am working on them. I either hold the vise in my hand whilst doing this or clamp it in the bench vise. On the right is a box with the range of drill bits that you can use in these tools. On the definition of the hull, I think it is safe to say it is the body of the ship less fittings, masts rigging, armament etc. It is the fat thing at the bottom - or is that me?
-
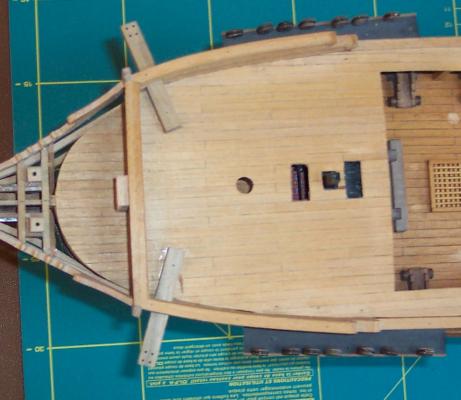
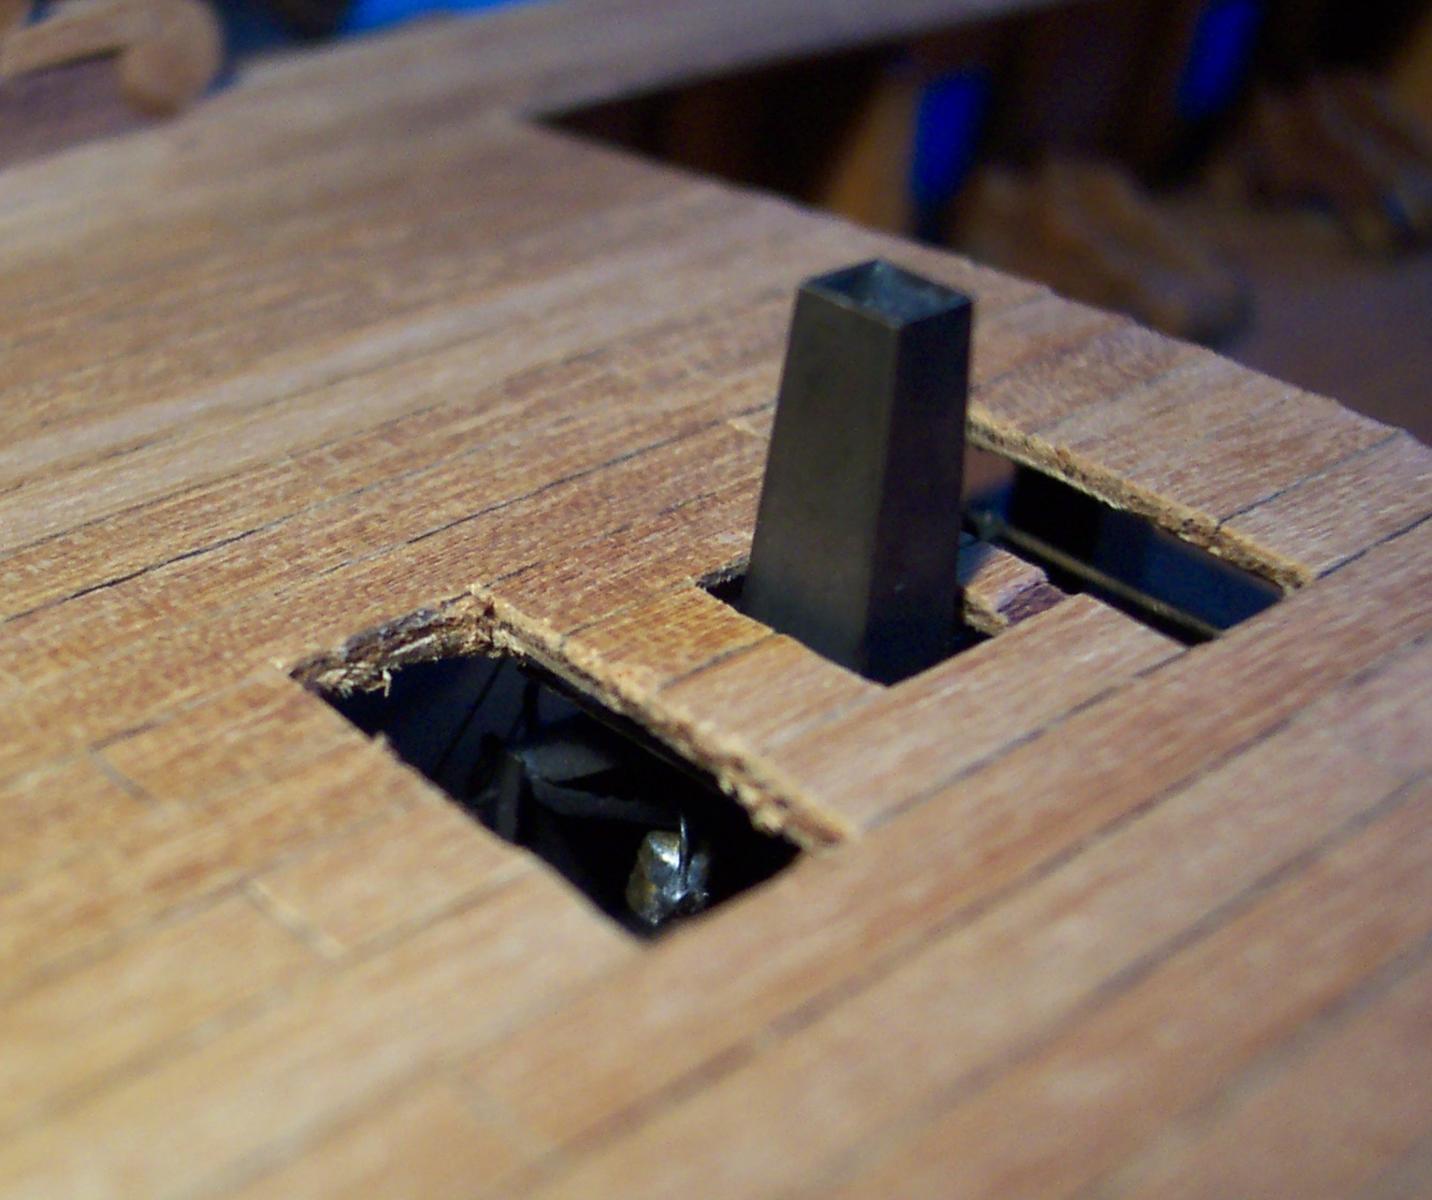
The Destruction Part 4. (Hopefully the Last). I have decided to model the two gratings over the stove area in the open position, ie with the actual gratings off, or at least removable. The grating over the boiler area of stove (or kettles as they are more correctly referred to on the Victory) was no problem. The grating over the hearth end was more problematical. The first problem was that all the plans that I have seen in this area shew a grating that is longer than it is wide. This impinges on the area around the fore mast. So I decided to rotate the grating through 90 degrees which resolved this issue. The second problem was that the out of scale beam passes right under the position of this grating. So I cut the hole which revealed that the deck was actually arching up above the beam and was not in contact with it in the middle. So - I put my small chisel through the hole on to the beam, gave a good smack, and with a heart stopping crack it came out. I will have to reinstate its two ends on to the top of the bulkhead extensions other wise the deck has no support at all. With those ends acting like brackets, and once I have a new beam across the rear edge of the deck it should be OK. The holes for the gratings are cut slightly undersize so that when the coving is made I can adjust the holes to ensure they are square and that all fits OK. There is a bit of damage to the deck planking but this will be covered by the coving. A couple of pictures. The first is a top view to shew the layout of the grating holes. The second is a close up. The dear old kettle is hanging there boiling the water ready for a nice cup of tea! Hopefully from this point I can put my hammer and chisel away - though you never know what urges may yet overcome me!