Maury S
-
Posts
1,490 -
Joined
-
Last visited
Content Type
Profiles
Forums
Gallery
Events
Everything posted by Maury S
-

Echo by Maury S - FINISHED - Cross-Section
Maury S replied to Maury S's topic in - Build logs for subjects built 1751 - 1800
While waiting for the next installment, I bought some Holly for the decks and worked a plank into shape on the Byrnes table saw for the waterway. The area between the beam and the ceiling plank was set earlier with a prototype waterway. The waterway is not yet glued in place. Maury
-
Treenails...now is the time to find an apprentice. Maury
- 3,618 replies
-
- 2
-

-
- young america
- clipper
- (and 1 more)
-
Alan, Condolences from us over here. I'm pleased to see you continuing on the build. Lots to learn as we move along. Maury
-
Danny, Another great jig idea. To get the 4-square piece to an equally-sided 8 side piece, you could mark the face of each piece using a 7 -10 - 7 fan and a tick-strip as described by David Antscherl and others. Then just chisel or sand to the line while held in the jig. Maury
-
Stick a sewing needle in the end of a piece of dowel (drill a pilot hole and CA glue it in place) and cut off the end of the needle eye. You have a glue applicator. I put some drops of glue on a piece of glass I keep nearby (it doesn't dry for some time) and pick up small amounts with the end of the applicator. When the glue dries and builds up a bit, I scrape it clean with an old Xacto blade. Maury
-
Wally, What set of plans are you using? FA is not a real ship so there are lots of variations. Maury
-
good start! Maury
-
MicroMark MicroMill - Review
Maury S replied to mtaylor's topic in Modeling tools and Workshop Equipment
You can have the belt-gears changed to speed up (2 x) the mill rpm. I did that on the big MicroMark mill with a package from the Little Machine Shop. It includes the gears and beefed-up bearings. Beware...voids the mft warranty. I had to have a machine shop do the bearing replacement. Maury -
Ed, I was about to ask how you kept the ribands wide enough between the frames forward and aft, and then you show the spreader. You make it seem simple, yet I know the accuracy you achieve is far from easy. Maury
- 3,618 replies
-
- 1
-
-
- young america
- clipper
- (and 1 more)
-
Echo by Maury S - FINISHED - Cross-Section
Maury S replied to Maury S's topic in - Build logs for subjects built 1751 - 1800
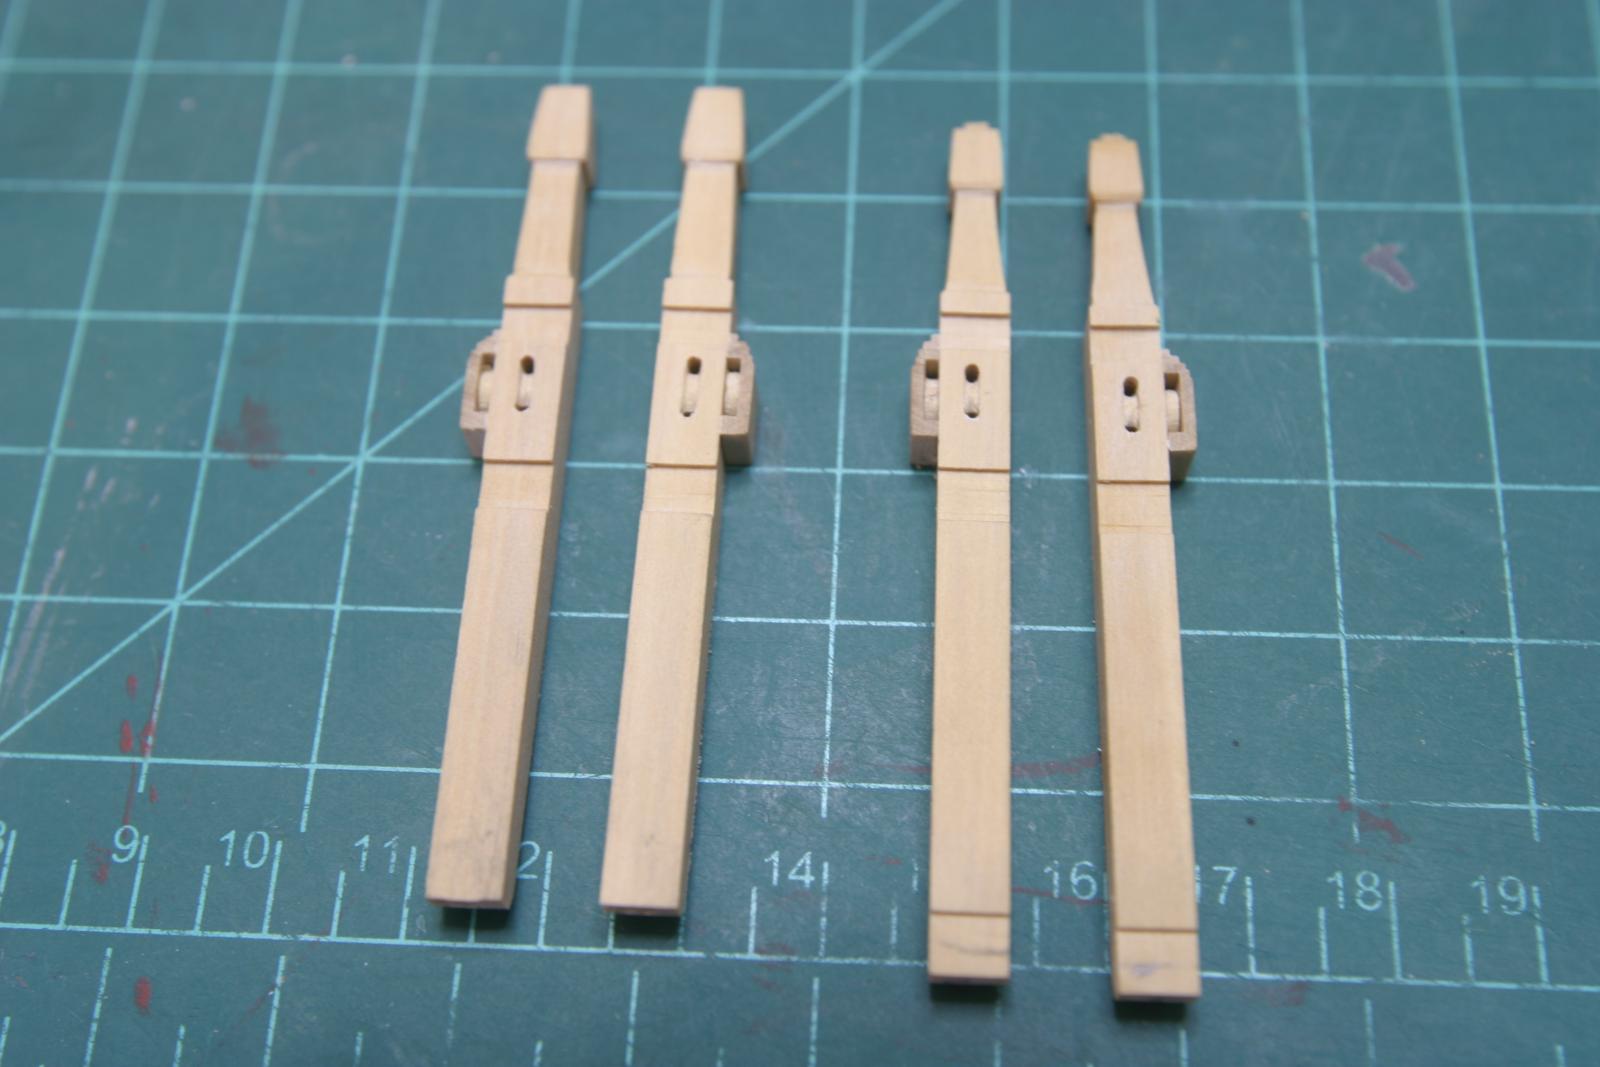
Bitts are re-done. Sheaves line up on same axis. This time I drilled and cut the sheaves in the bitt after I installed the cheeks. Cheeks are 3"+ above the top of the deck beam notch to allow for the planking. Maury
-
Ed, How do you remove and replace the jig? Seems you can't just slide it back. Maury
-
Echo by Maury S - FINISHED - Cross-Section
Maury S replied to Maury S's topic in - Build logs for subjects built 1751 - 1800
As I suspected. I took measurements off the plans and did not adjust for the inevitable variations in the model. Re-doing the brace bitts making those adjustments. Thanks for the input. Maury -
Echo by Maury S - FINISHED - Cross-Section
Maury S replied to Maury S's topic in - Build logs for subjects built 1751 - 1800
Thanks Mark and all the "Likes". If you look at the bitts on the right, the axis of the sets of sheaves does not line up. Not sure whether this is an error, but I expect the sheaves inside the bits and the ones in the cheek would be on the same axis. Comments? Maury -
Echo by Maury S - FINISHED - Cross-Section
Maury S replied to Maury S's topic in - Build logs for subjects built 1751 - 1800
The sheaves were cut from a thinned-down piece of 1/4" dowel. Glued in the mortise and then set on the bitts at a point above the allowance for the 3" deck planks. The sheaves in the cheeks do not line up with the ones in the bitts. I'm guessing that is an error in measuring along the way. Maury
-
Echo by Maury S - FINISHED - Cross-Section
Maury S replied to Maury S's topic in - Build logs for subjects built 1751 - 1800
Thanks Greg. A lot of planning, measuring, and trial cuts were involved. I messed up a few, but I got better in the process. (love that saw). I took on the cheeks this morning follow Greg's illustration. I cut a strip to size, sanded it to thickness and then took a series of small progressive cuts to make the top design, then flipped it over to mortice out the slot for the sheaves. All done with a -032 thick slitting blade. It meant many passes to cut the mortice, but probably less time than changing to a ticker blade. I now have apiece 8" long to cut four sections less than 1/4" each. Now to make the sheaves. I don't have a lathe so it will be some pieces spun on the end of a drill. Maury
-
Echo by Maury S - FINISHED - Cross-Section
Maury S replied to Maury S's topic in - Build logs for subjects built 1751 - 1800
I drilled the holes for the sheaves (.04") and the axles (.02") while the bitts were still 4-square. Then I paired the bitts in the vise and cut the tapers with a chisel, finishing off with 100 and 220 grit sand paper. More work needs to be done on the sheaves. Maury


-
Echo by Maury S - FINISHED - Cross-Section
Maury S replied to Maury S's topic in - Build logs for subjects built 1751 - 1800
Cutting the bitts... Starting with 1/4" square stock, I sanded to 10 1/4" square. I cut the tenons at the tops of the bitts by running all four sides over the saw blade set to a proper blade depth and fence setting. I think I need to cut the tenons down a bit still. The jeer bitts do not have a tenon on the bottom and the brace bitts need special attention. Because of the taper on the brace bitt, the tenon is not centered on the 10 - 1/4" stock, but centered after the taper. I ran the pieces over the blade for the sides, but the fore and aft sides were done by reducing the depth of cut on the aft-side and increasing it on the fore-side. (I love the flexibility I get with the Byrnes table saw and I'm using Thurston slitting blades for the first time!). I then cut the notch at the bottom of the jeer bit, and put them on the model so I could measurre from the lower deck beams to the uppers and mark the notches over the beams. They were cut, then I made cuts at various depths to mark the ends of the several tapers. Planning ahead really helps here. Next step is to cut the tapers. I made one mistake in cutting the ends of the tapers and had to re-do two of the brace bits...more experience. Maury
-
Echo by Maury S - FINISHED - Cross-Section
Maury S replied to Maury S's topic in - Build logs for subjects built 1751 - 1800
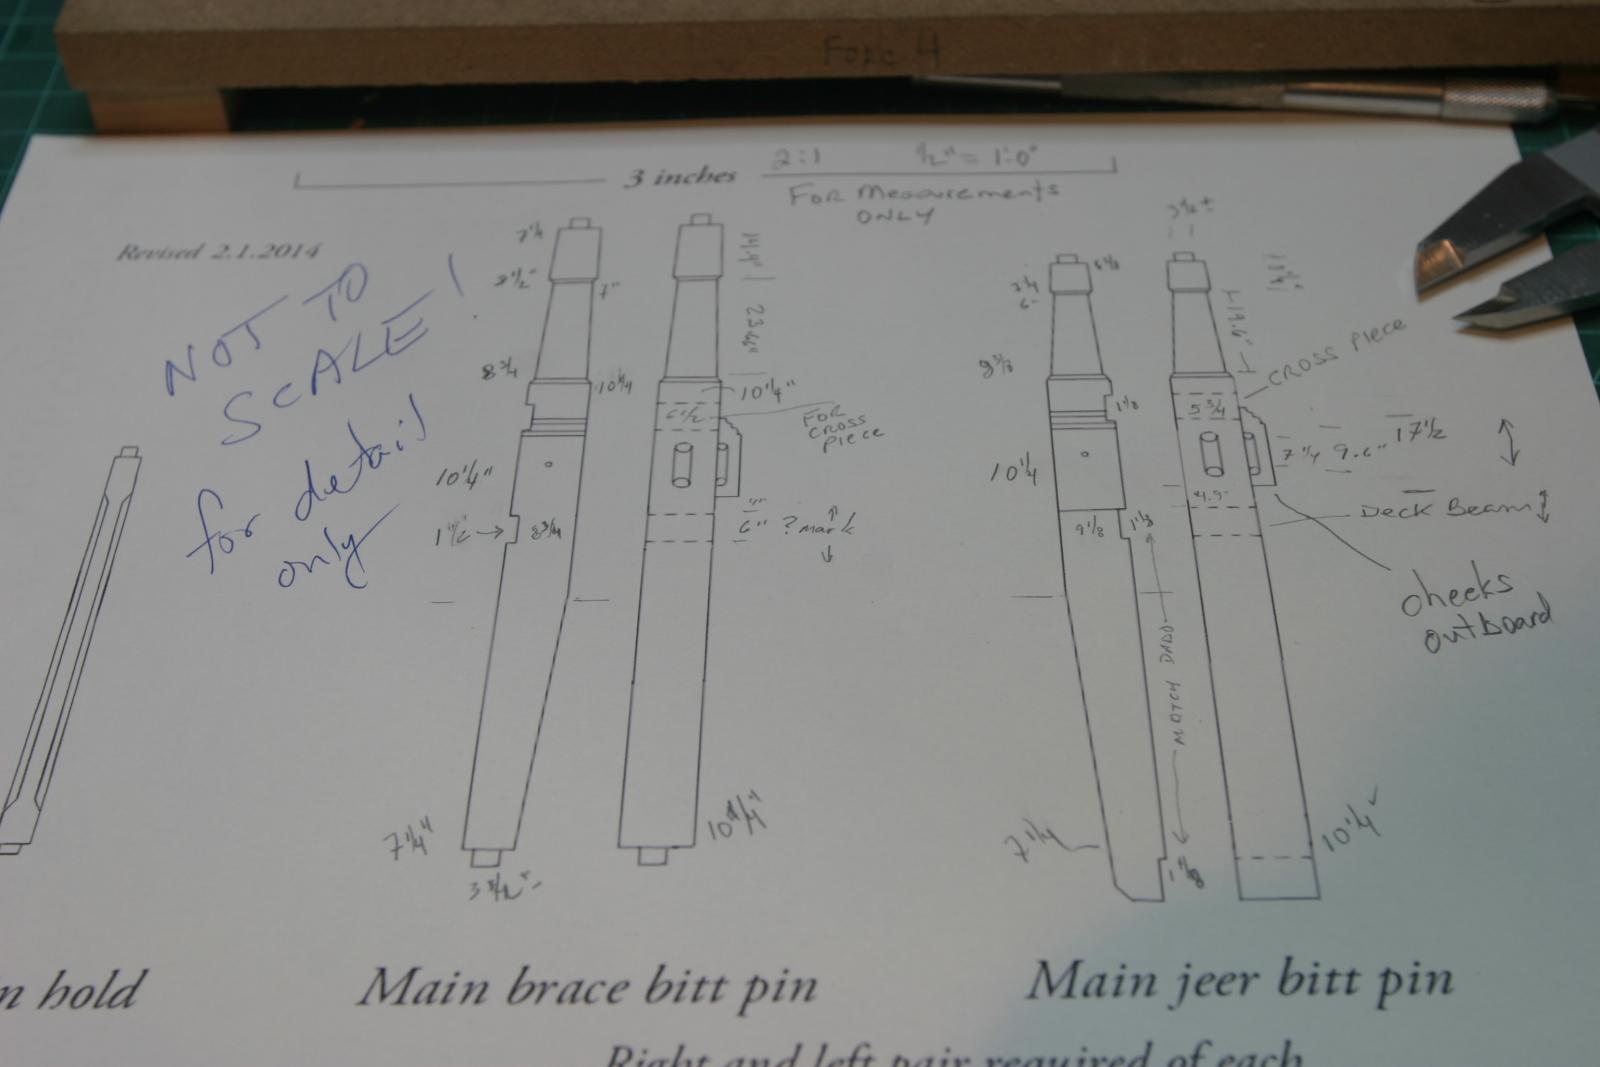
Bitts: I'm going to use the Byrnes table saw for much of the bitts construction. Planning is important! I printed out the new Bitts Illustration page from Admiralty's web site at 200% scale. This is so I can take better measurements from the plans, then convert to scaled inches. See the picture below. I measured every "critical" element (height of section, width of section, depth of cut, etc. so when I start to actually cut wood I can set up the saw fence and blade depth properly. The order of cuts might be important as well. This will be a good exercise and I'm going to cut extra pieces per Greg's suggestion. Maury
-
Echo by Maury S - FINISHED - Cross-Section
Maury S replied to Maury S's topic in - Build logs for subjects built 1751 - 1800
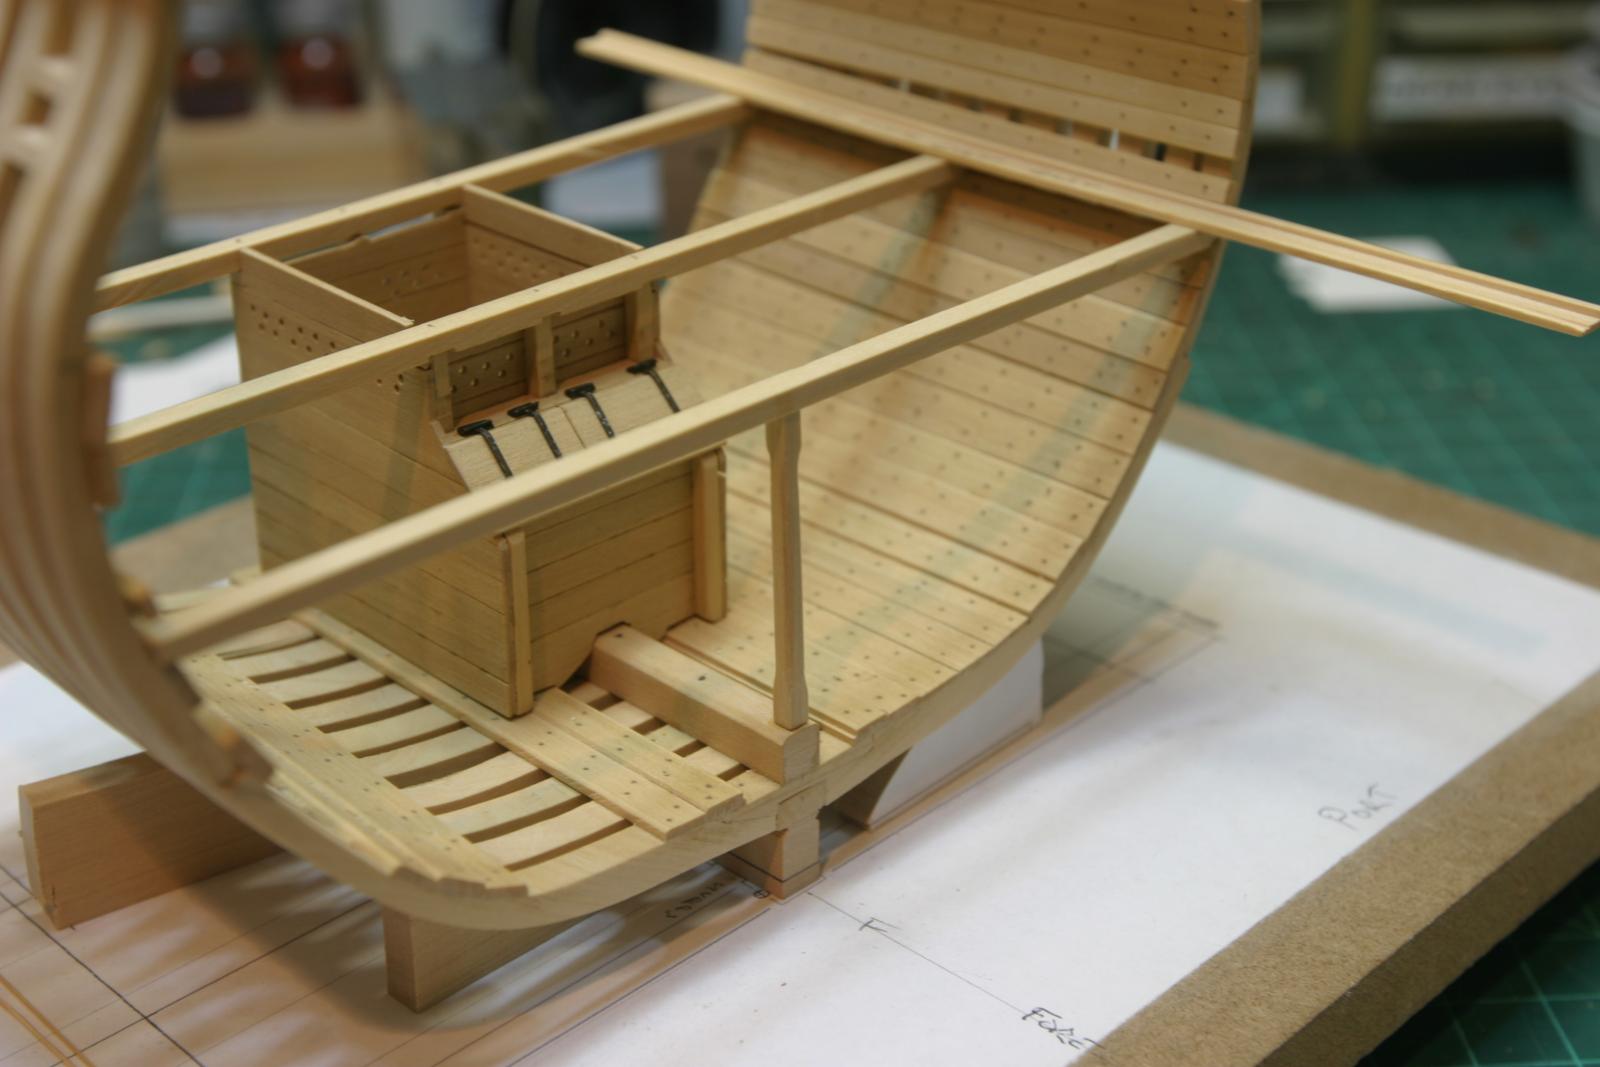
Thanks for all the "Likes". Please feel free to offer any helpful hints as I go along. I permanently installed the well, the three lower deck beams and the spirkiting (first plank above the waterway). I cut a scrap as a test and a filler for the waterway. I started with a beveled edge on one side then with the table saw ate away at one face to bring the thickness down to deck plank thickness (which is not given in the instructions but seems thinner than the 3" called for on the upper deck). I over-did this part (took too much off) but that's what the exercise was for. I sanded the angle on the waterway where it meets the spirkiting so everything fits well. I also made and installed the pillar at the dead-flat. On to the bitts! These will certainly be a challenge. Maury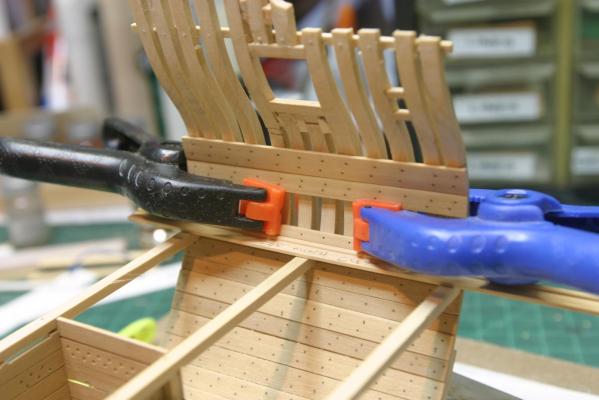

-
Echo by Maury S - FINISHED - Cross-Section
Maury S replied to Maury S's topic in - Build logs for subjects built 1751 - 1800
Time to get back to work on the Echo Section. First thing is to modify the well with ventilation holes per the new instructions. Support is necessary behind the boards, so I cut a piece of scrap lumber to the inside dimensions of the well and then drilled 2" (to scale) holes. Maury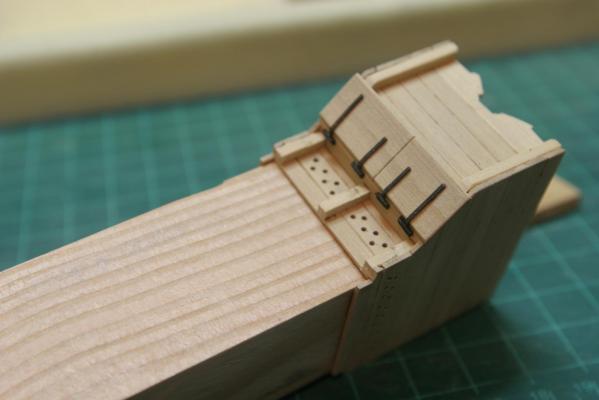
- 324 replies
-
- 11
-
-
Jeff at Hobby Mill has proposed both Holly and Aspen as various times. Maury
-
Ed, Aligning with the ribands certainly makes it look easier (and better). Love it! Maury
-
clean job of planking. Just wait 'til you fair the inside! lots of time and patience. Maury
-
Danny, Why don't you re-post your Jig tutorial in the Jig section. It is a great help to see how these things work. Maury