HOLIDAY DONATION DRIVE - SUPPORT MSW - DO YOUR PART TO KEEP THIS GREAT FORUM GOING!
×


Gahm
-
Posts
1,217 -
Joined
-
Last visited
Content Type
Profiles
Forums
Gallery
Events
Everything posted by Gahm
-
 A very clean planking job! Well done! Thomas
 -
As usual you take a good kit and use your superb craftsmanship and love for historical research to get a master piece out of it. Very impressive! Thomas
- 261 replies
-
- 1
-

-
- muirneag
- vanguard models
- (and 2 more)
-
Looks very good, Robin! I love your color choice! Thomas
-
That is a nice looking pump! And in my opinion it looks even more impressive with the handles mounted 😉. Thomas
- 950 replies
-
- 1
-
-
- syren
- model shipways
- (and 1 more)
-
Your stern arrangement with all the details in place looks very nice! And you make very good picture as well 🙂! Thomas
- 950 replies
-
- 2
-
-
- syren
- model shipways
- (and 1 more)
-
Just awesome! Are you building a model or the real thing? Thomas
-
Great progress! Your deck is getting crowded 🙂. The binnacle turned out very nice! Thomas
-
I can only agree - a beautiful, clean build! Thomas
-
Outstanding! Thomas
-
US Brig Syren by Gahm - Model Shipways
Gahm replied to Gahm's topic in - Kit build logs for subjects built from 1801 - 1850
Will, Carl and Per, thank you for your kind comments! Will, I turned the belaying pins from tooth picks on a little Proxxon lathe. To be able to repeat the pattern reliably, I just used a little drawing with the measures/dimensions of my target pin, which I had always in front of me and which I could use for comparison (see image). That actually worked pretty well 🙂 Thomas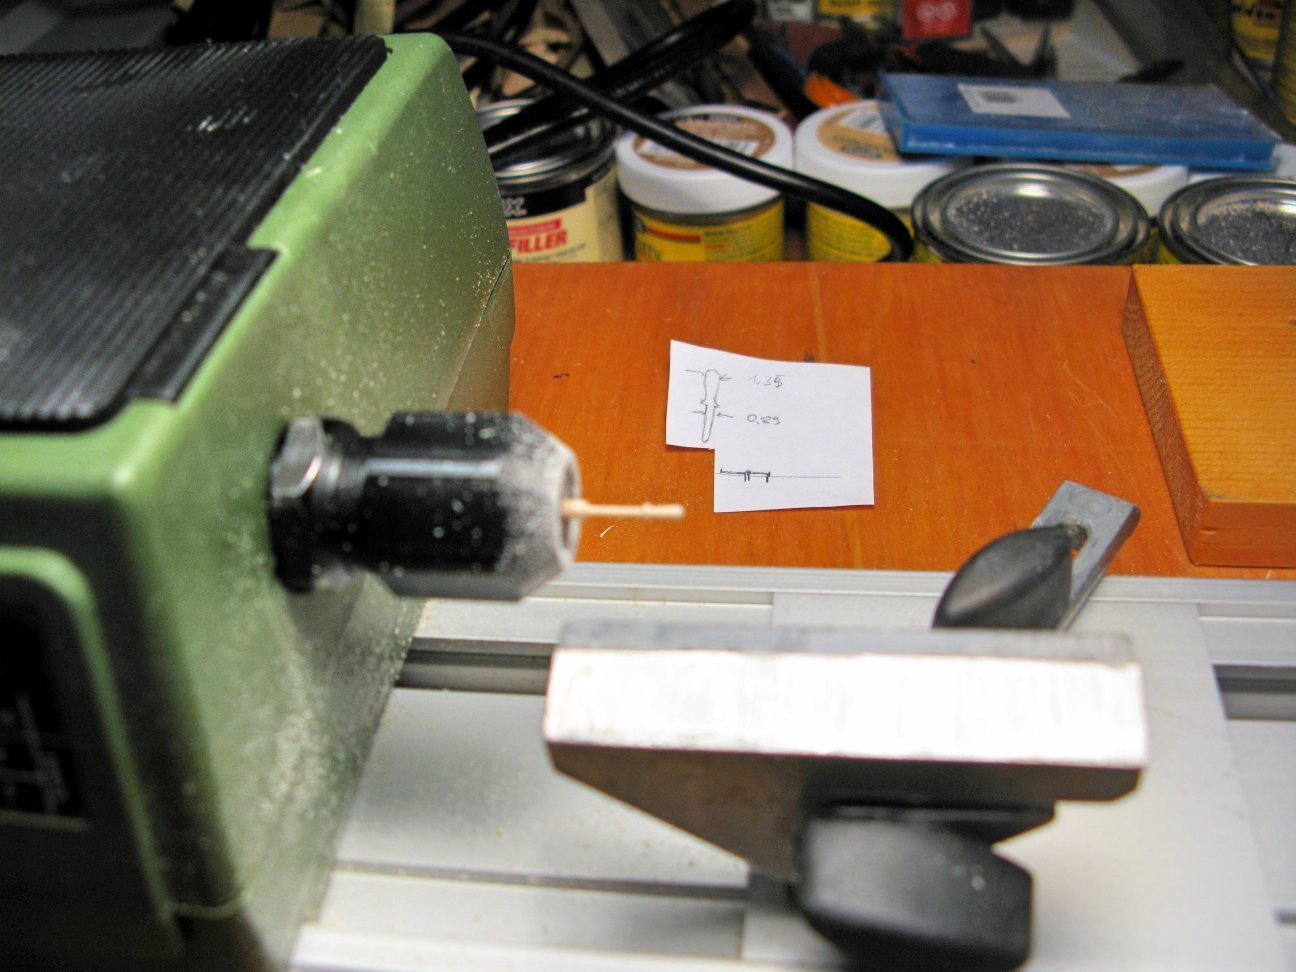
-
The steering wheel clearly is a highlight of your deck furniture. It looks great! Well done! Thomas
- 950 replies
-
- 1
-
-
- syren
- model shipways
- (and 1 more)
-
Beautiful work, B.E.! I love all the details you are adding to this model! Thomas
- 261 replies
-
- 2
-
-
- muirneag
- vanguard models
- (and 2 more)
-
US Brig Syren by Gahm - Model Shipways
Gahm replied to Gahm's topic in - Kit build logs for subjects built from 1801 - 1850
Thank you, Patrick! Thomas -
US Brig Syren by Gahm - Model Shipways
Gahm replied to Gahm's topic in - Kit build logs for subjects built from 1801 - 1850
Thank you Robin and Justin for your great comments! And thanks for all the Likes! Building these little boats is a lot of fun. And as far as I know Syren had three of them. So there is still a lot to do 🙂 Thomas -
US Brig Syren by Gahm - Model Shipways
Gahm replied to Gahm's topic in - Kit build logs for subjects built from 1801 - 1850
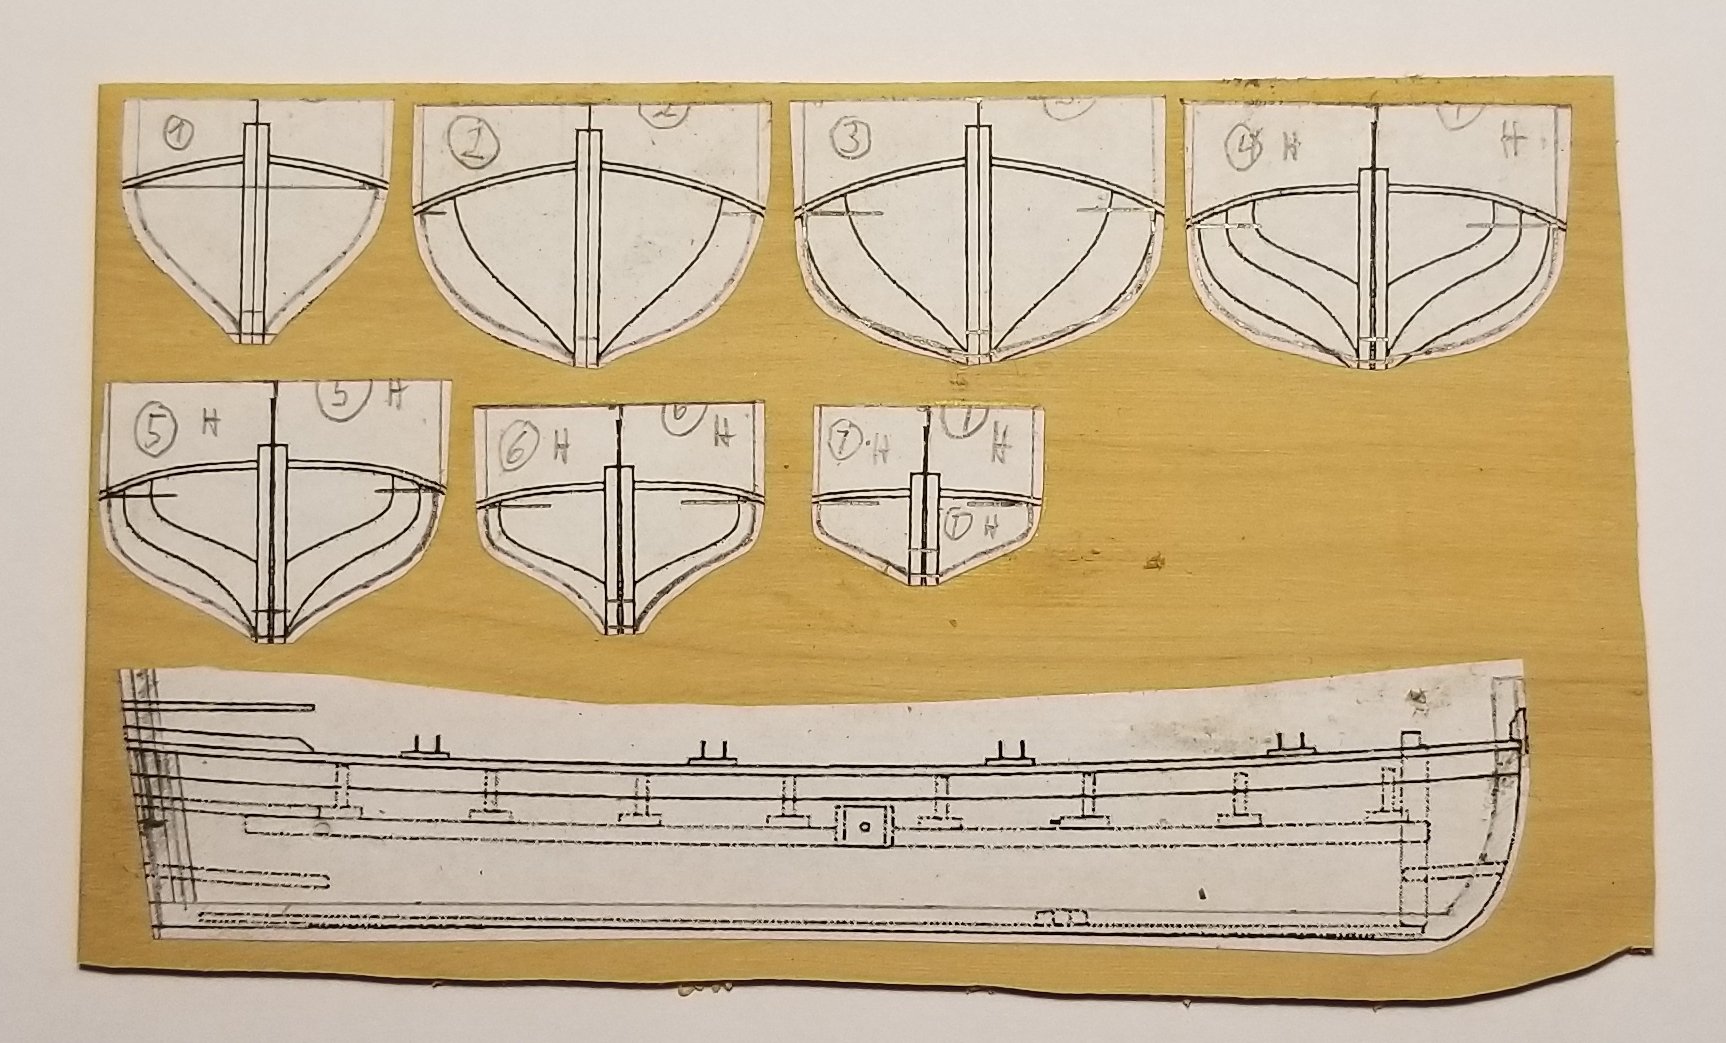
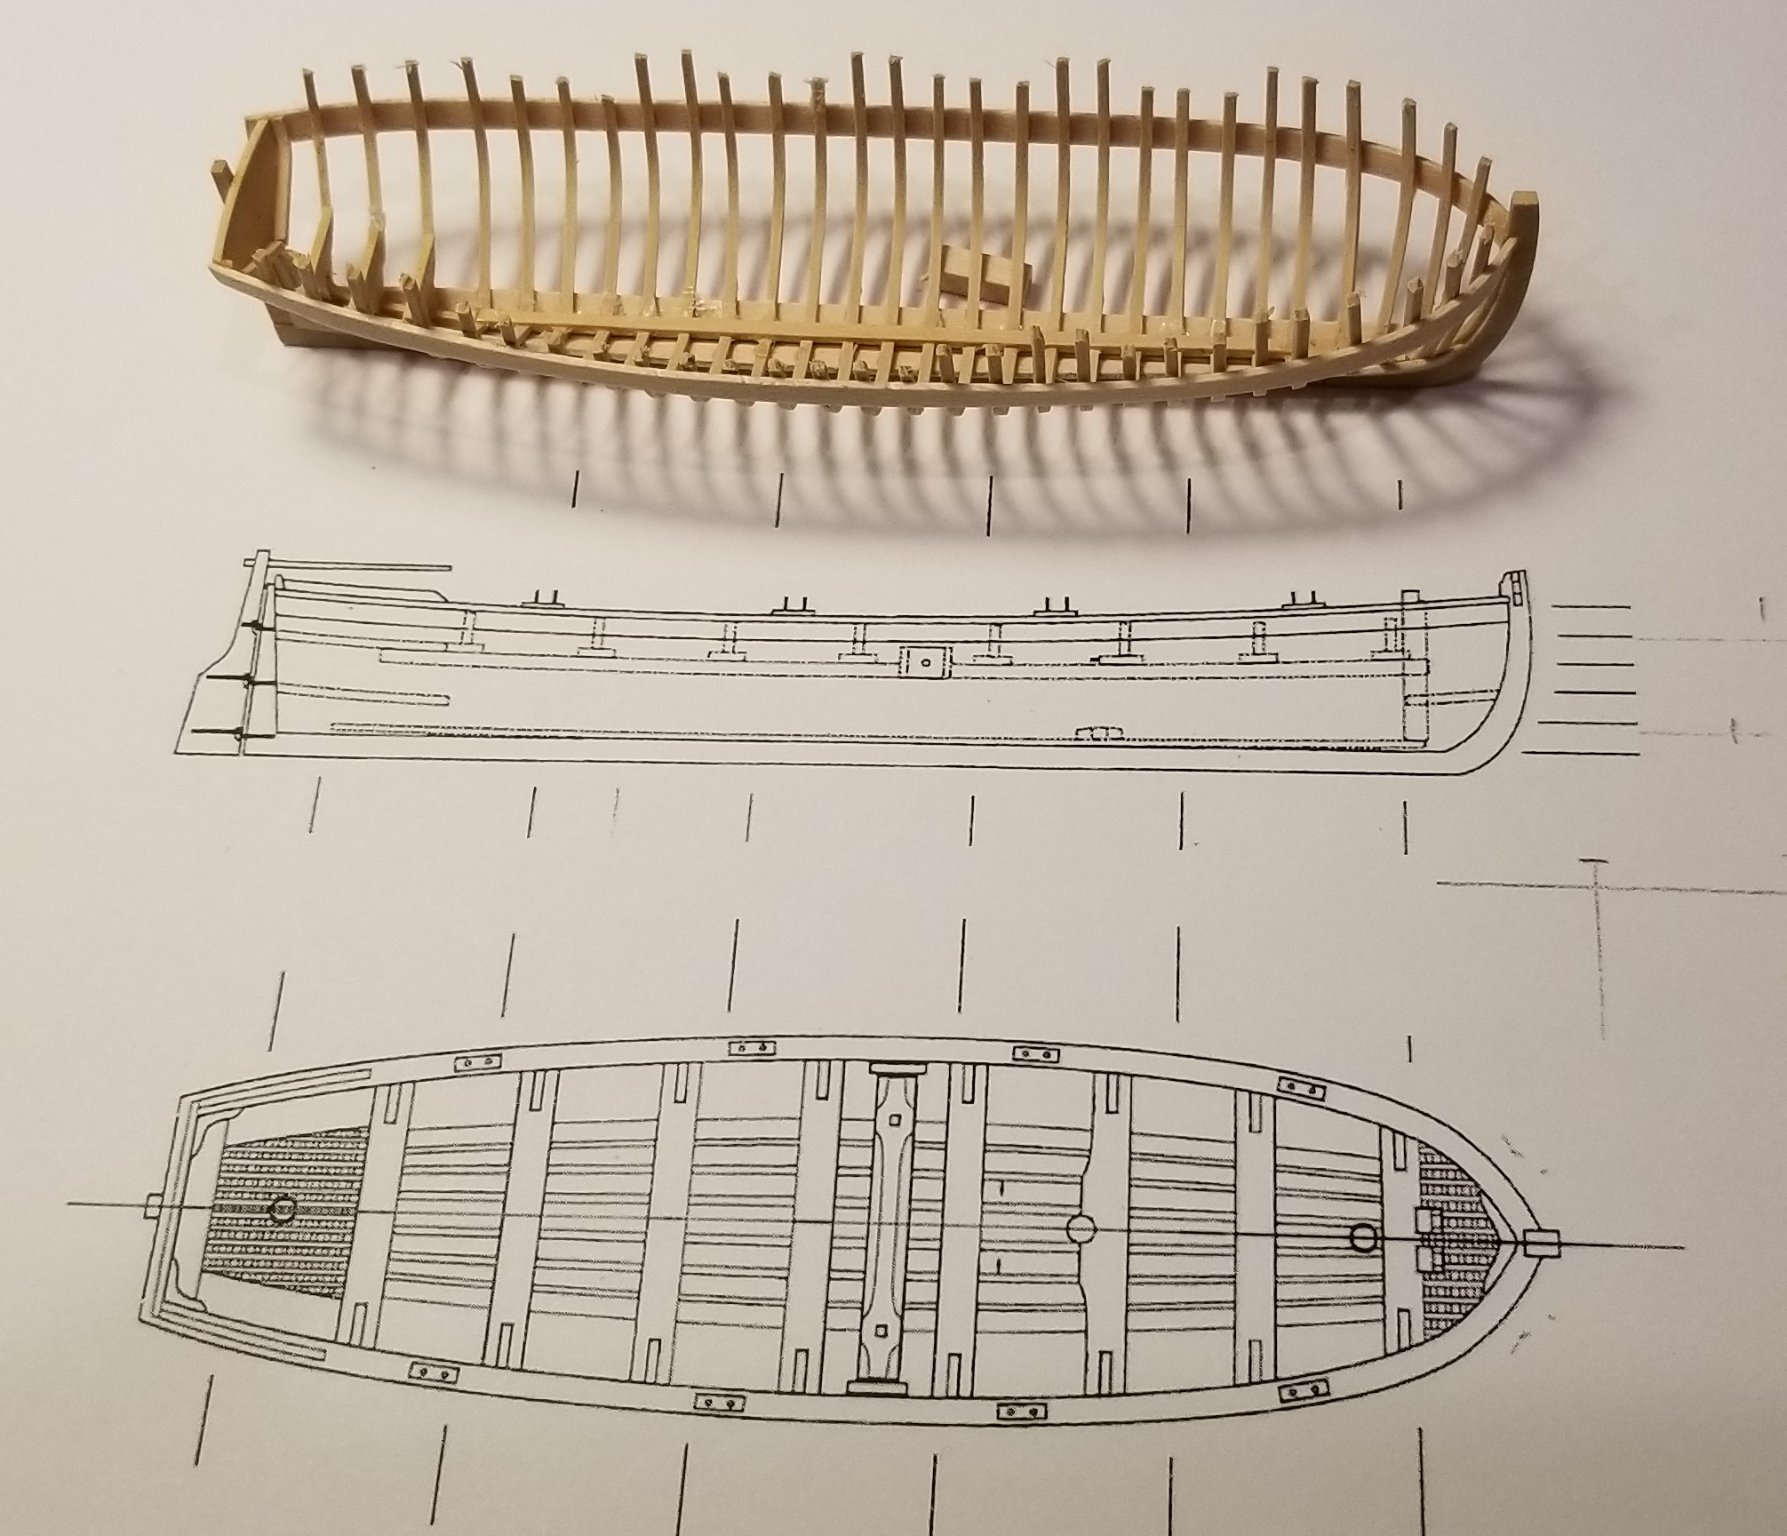
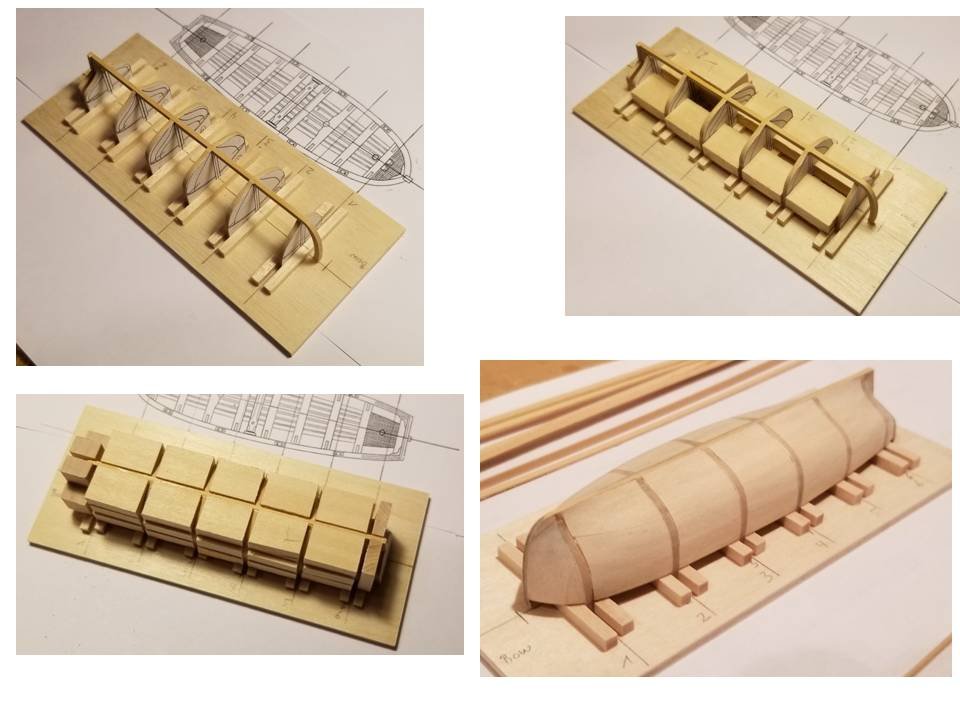
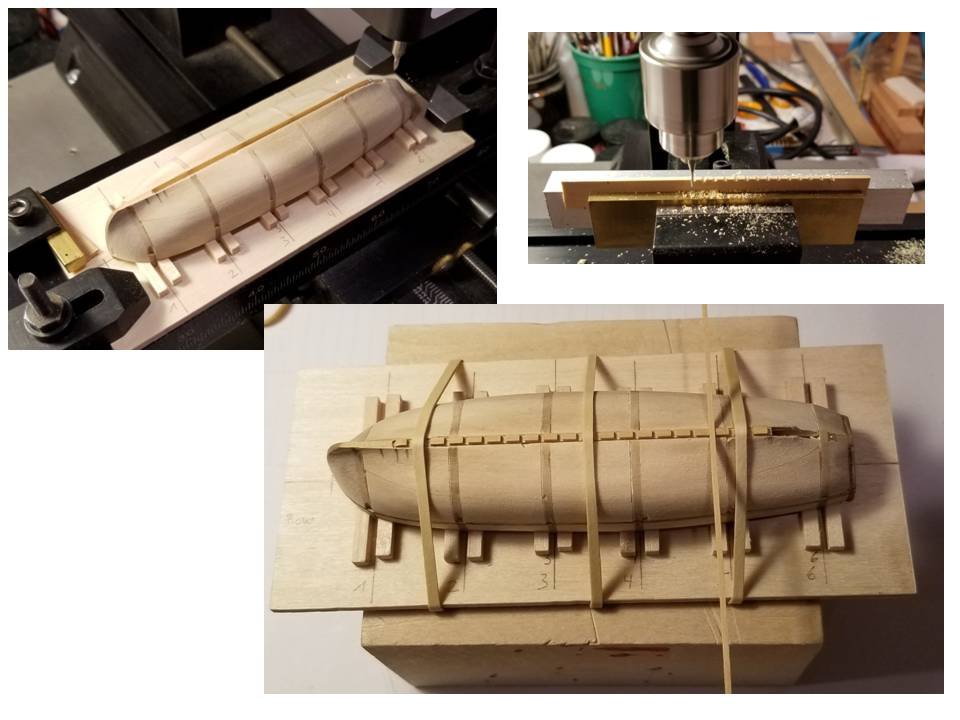
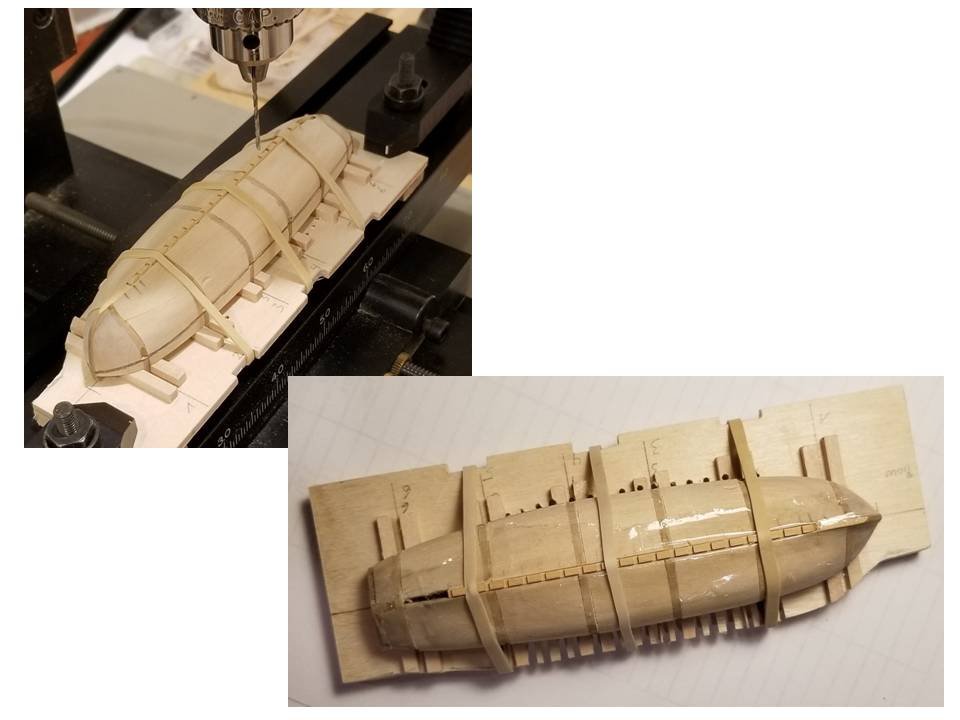
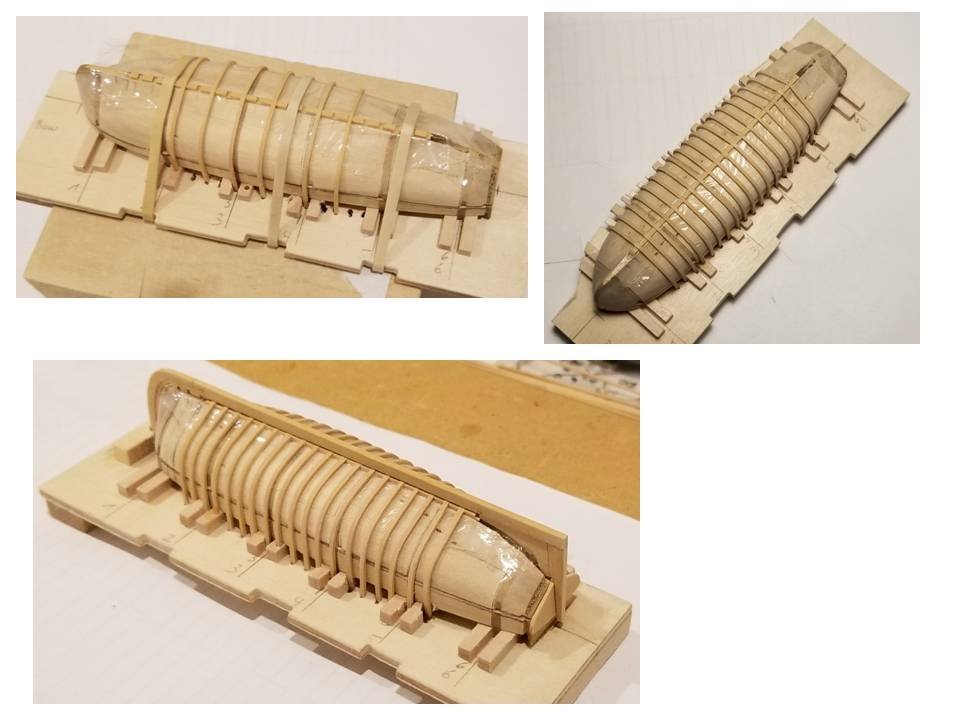
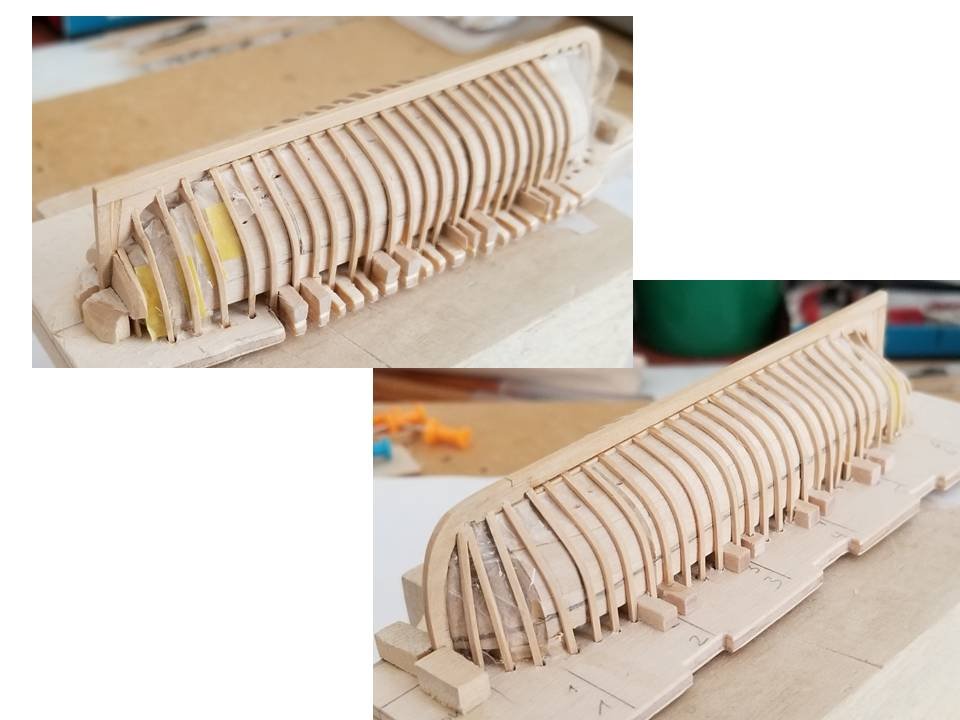
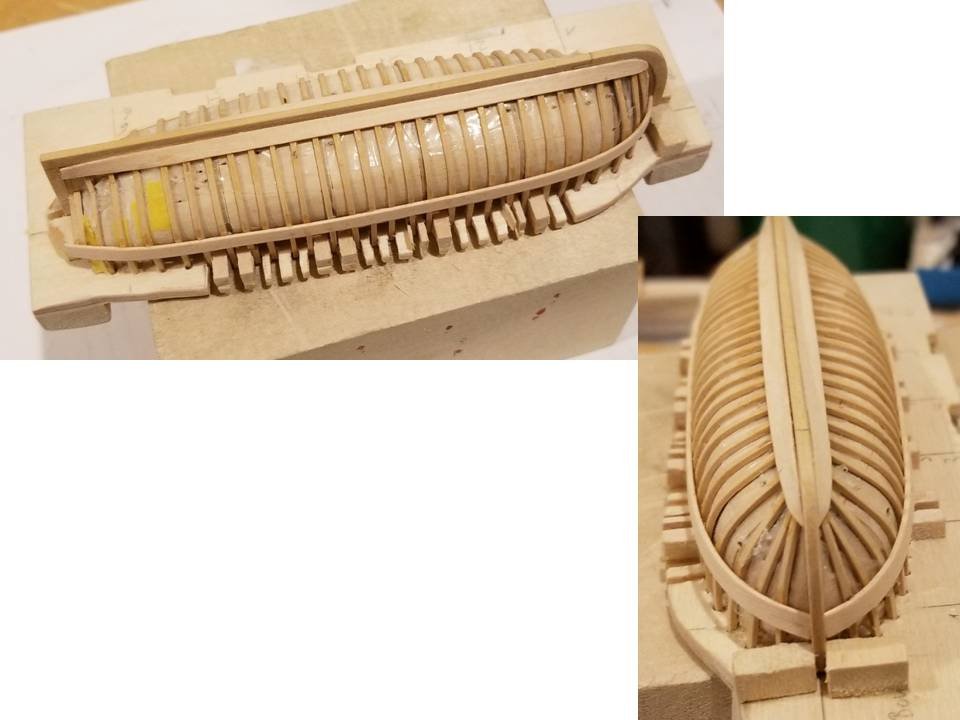
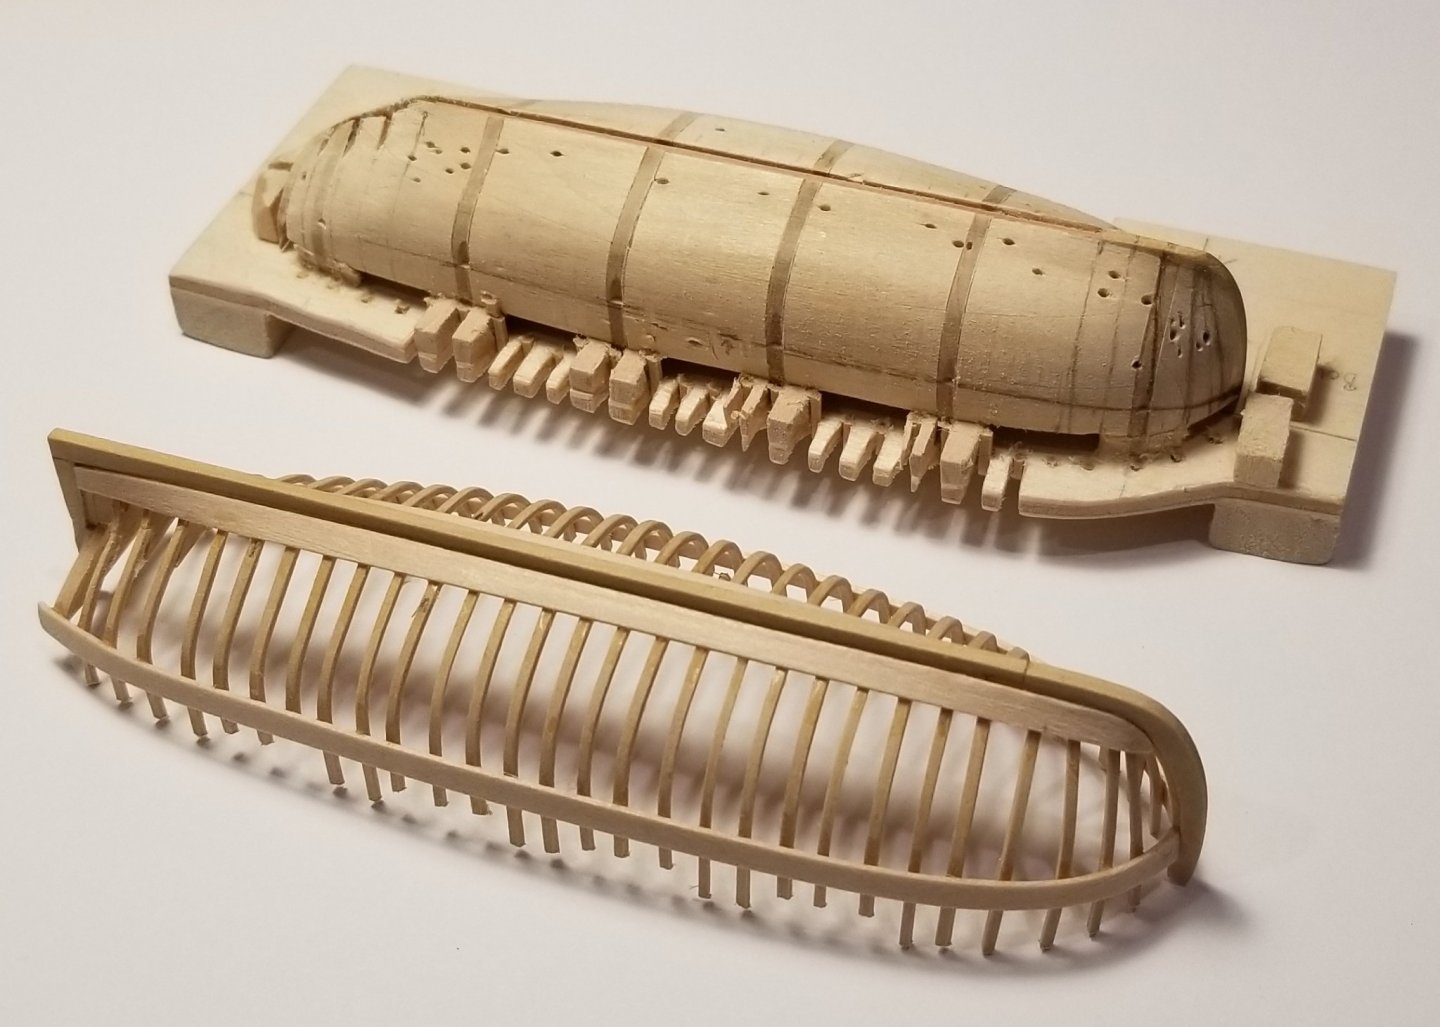
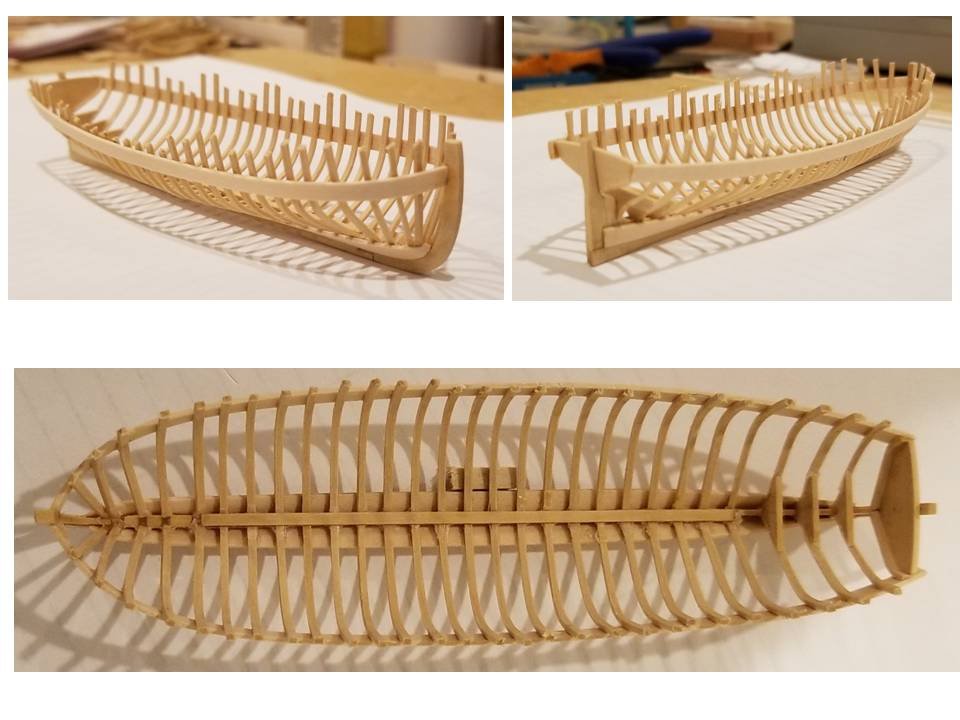
I started with the Syren longboat construction. Using Chuck’s plans provided in the Syren kit I subtracted from the frame profiles the amount caused by frame thickness (1/32’’) and planking (<1/32’’) and built a jig out of bass wood (imgs 1-2). I milled a longitudinal groove in the center of the jig for the keelson. The keelson consisted out of boxwood (width 1/16’’) with 1/32’’-wide notches cut into it at regular intervals of 5/32’’ (img 3). A thin layer of plastic foil was inserted between the keelson and the jig to insure that the longboat would not accidentally be glued to the jig during the building process. Using the mill I ‘transferred’ the keelson notches to port and starboard side of the jig to drill holes (diameter ~1/16’’) and cut slots perpendicular to the jig. Both were placed as close to the jig as possible (img 4). With these preparations finished boxwood strips of 1/32’’x1/32’’ were soaked in hot water, inserted one after the other in the holes close to the jig, bent through the corresponding keelson notches and moved through the slots on the other side to the jig. Each boxwood frame was glued into place at those three points (img 5). As a next step the keel assembly was built consisting of stem, keel, deadwood, sternpost, and transom (img 5). A rabbet was cut on both sides of the stem to facilitate planking later on. The last three rear frames were assembled out of small profile pieces and boxwood strips to accommodate the shape of the frames. Img 6 shows the front and the rear part of the finished framing. Finally to stabilize the whole construction two planks were glued to the frames on both sides (img 7). After cutting the frames above the points where they were glued to the jig the whole longboat frame assembly could be removed from the jig. This was primarily done to ensure that it would come off in one piece and that the whole construction worked 😉. The result is shown in images 8 – 10. To facilitate planking the longboat frame will be screwed to the jig again later on. Thomas Image 1 Image 2 Image 3 Image 4 Image 5 Image 6 Image 7 Image 8 Image 9 Image 10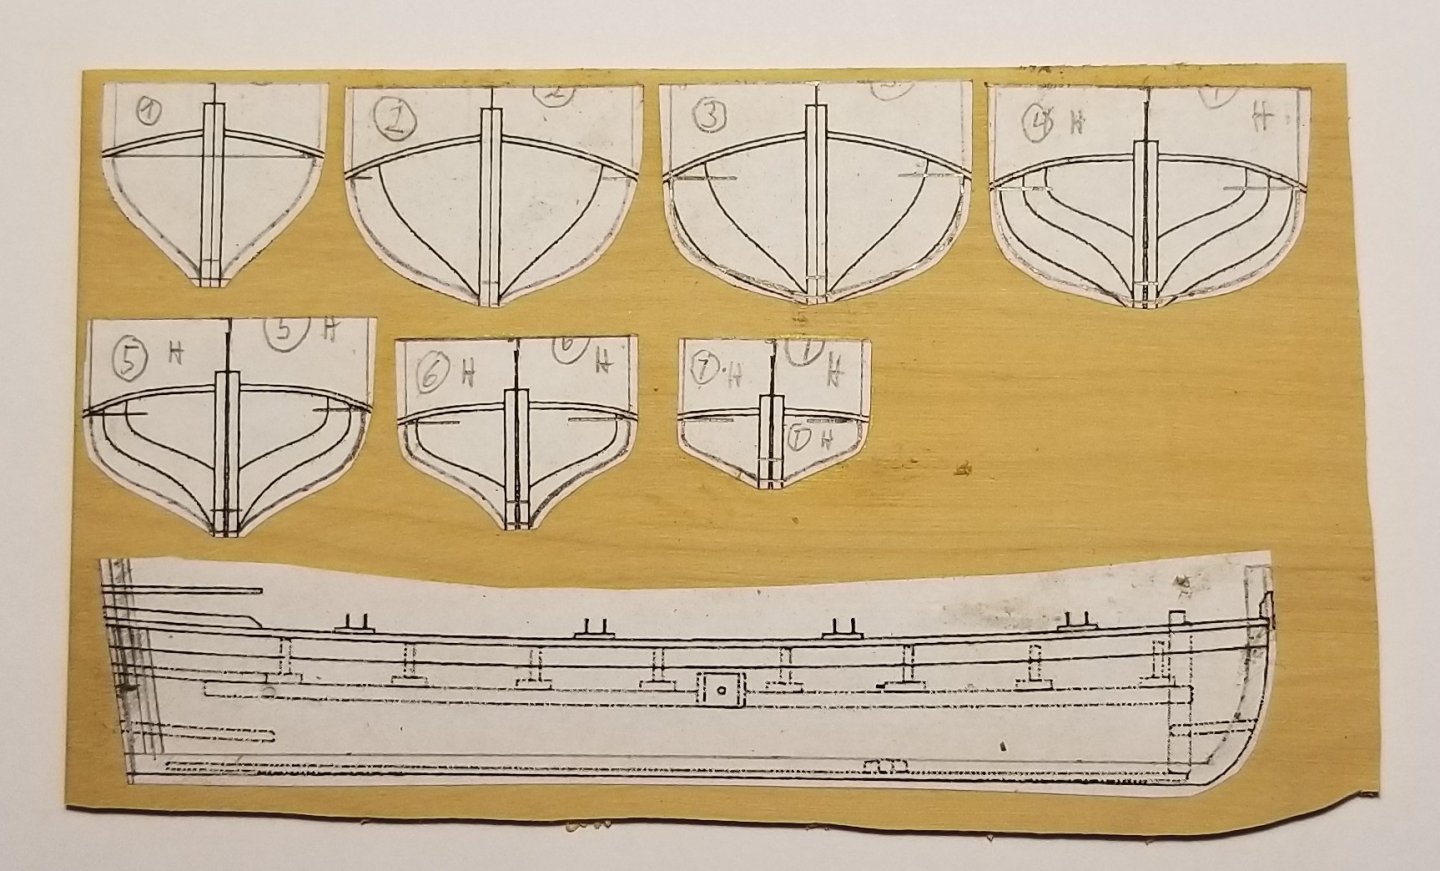

-
I can see why you ordered this kit . . . I would love to build that one myself! 👍 Thomas
-
Your combination of companionway and capstan looks fantastic! Going with pear wood was a very good decision! Thomas
-
Your binnacle turned out really nice! Another great detail added to a beautiful model. Thomas
- 950 replies
-
- 1
-
-
- syren
- model shipways
- (and 1 more)
-
Awesome! Thomas
-
The binnacle is a very nice little project, and it is one of the more prominent deck details. Yours is coming along beautifully! Thomas
- 950 replies
-
- 2
-
-
- syren
- model shipways
- (and 1 more)
-
US Brig Syren by Gahm - Model Shipways
Gahm replied to Gahm's topic in - Kit build logs for subjects built from 1801 - 1850
Thank you, Jason! -
Wonderful detail on that steam capstan! Never seen one like that before! Thomas
- 261 replies
-
- 3
-
-
- muirneag
- vanguard models
- (and 2 more)