MORE HANDBOOKS ARE ON THEIR WAY! We will let you know when they get here.
×


vossiewulf
-
Posts
1,477 -
Joined
-
Last visited
Content Type
Profiles
Forums
Gallery
Events
Everything posted by vossiewulf
-

Sandpaper Grit
vossiewulf replied to Malazan's topic in Painting, finishing and weathering products and techniques
Don't forget scrapers. Fully sharpened scrapers generate fine shavings, and are excellent for smoothing down planking because they remove material fast, they don't make sawdust that goes everywhere, and they leave a very smooth finish that can be finalized quickly with light sanding of 400 or 600 grit. The big one in the photo below is particularly good, I'd never used a heavy scraper like that but it's very good at cutting. Unfortunately StewMac (luthier supply) don't seem to make it anymore, but the light spring steel mini scrapers are still available.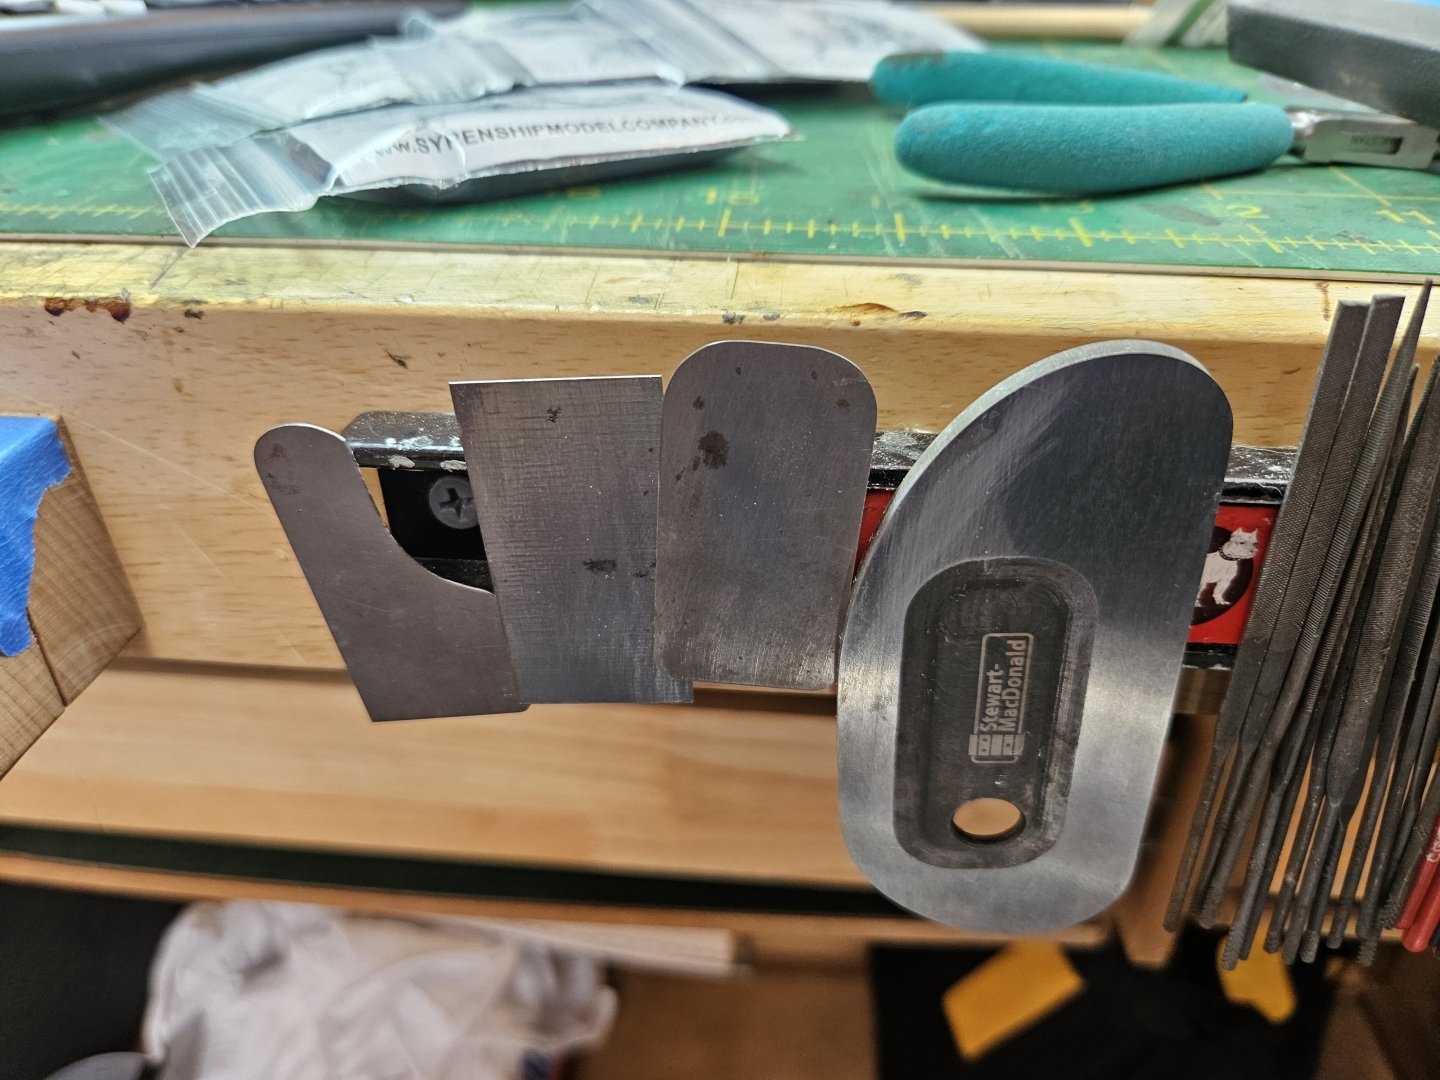
-
The first thing I see (and thanks again Gregory for posting this link) is that this cutter bears a rig almost identical to that captured by Petersson in his book. In fact I think we can use model to correct Petersson's oversights, like the lower yard with two sheaves, only one of which was shown in use. On this model we have the two sheaves present in the lower yard and both are in use. It has five stays a side like Petersson with the excess rope on the third/sixth pairs going to Burton pendants. It has a single wide spreader for the topmast shrouds, very unlike the top and spreaders and topmast shrouds on Cheerful. Then we have the odd tackle on the backstays and the forestay looped over a hard metal strap, just like Petersson showed. That still doesn't make sense to me. Hoping that we can figure this out for my and Tim's sakes and it would be good to have a topic beginner cutter builders can be pointed to that answers questions about cutter rigs.
-
I like holly, I used it for my LN deck. But if you decide to stick with holly, at a minimum I wouldn't use anything from that piece of wood, too much risk of blue showing up on the boat and that would be tragic.
-
Gregory, thanks for that link. I'd like to comment on it/ask questions, we should probably move the discussion back to the other topic.
-
Tim I was recently trying to sort out cutter rigging also, and found that Lennarth Petersson makes his own errors, for example he shows two sheaves in the lower yard but his plan only makes use of one of them. I eventually decided to use Chuck's Cheerful rigging plan since the contemporary model is in the gallery and I can confirm everything there.
-
Change out anything plywood for solid wood versions. You'll be happier.
-
I agree with you about painting a hand-planked hull, but it's pretty hard to get a really good result on a ship with just a single planking. And although it looks like you're doing pretty well, you have to remember this is your first first planking 😊 and that pretty much means oopses. I definitely had them on the first planking of Lady Nelson, but that allowed me to figure out all the things that didn't work for me so the second planking went very smoothly and neatly. You don't get that second chance here so considering this is your first hull to set a goal of just doing as neat a job as possible and making sure you as much as possible know what you are doing (as in, go watch the planking tutorial videos and go read some build logs in the planking stage to get an idea of different methods in use) and aren't just plunging ahead on instinct and basic woodworking skills. In this case it's important that you have a grasp of how it really worked so you can recreate it correctly.
- 7 replies
-
- 1
-

-
- Henriette Marie
- Billing Boats
- (and 1 more)
-
Hey Gaetan, glad to see you are still around! 😊 And eve happier to see that knife is still serving you well.
-
I actually made some sawdust today ripping square castello boxwood stock for the masts and yards, so I'm officially working on Lady Nelson again. That's the up side. The downside is that after ripping the stock and mounting the four-jaw chuck on the lathe, I found that my four jaw chuck key went missing in the move. And Little Machine Shop is out of stock. Found one that should work at another place, but it won't arrive until probably the 16th, so can't make any more progress on the masts and yards until then. Also, my basic plan to do the Cheerful rig on the LN is pretty crazy. Starting with the something I didn't anticipate, which is that Cheerful is altogether bigger than LN, about 12 feet longer at scale. Further, the mast is stepped pretty far back and has little rake, while the mast step for the LN is about four scale feet forward of that in Cheerful and this will require some mast rake. Bottom line is sometimes I wished I could just follow the directions 😊
- 714 replies
-
- 3
-
-

-
- lady nelson
- victory models
- (and 1 more)
-
Congratulations on shipping an impressive kit! That really will build up into a masterpiece in the right hands.
-
I didn't supply the reference photos, just a possible solution😊. The texture on what I pointed you too seems almost perfect, but the stones on the beach there have been bleached out on top. I would scatter and glue down the crushed slate and then give it light, very thin coats of white and gray until it fully matches the reference.
-
Another quick update, @Chuck was kind enough to send me his Cheerful rigging plans in PDF form, and I just took them down to Staples for sizing down to 75% and printing, that's the conversion factor for 1:48 to 1:64. So I'm going to do the full Cheerful rig on my Lady Nelson, making it even MORE kitbashed, which didn't seem possible 😊 I also put in an order at Syren for the standing rigging-dyed rope, something I had overlooked when I bought a bunch of rope from Chuck before. Only another week or so before I can really start moving forward again.
- 714 replies
-
- 6
-
-
- lady nelson
- victory models
- (and 1 more)
-
This looks like it would work. I googled "crushed slate" and found that it's a thing and it comes in multiple grades i.e. size of resulting pieces. So if you don't like what I linked, do the same search to see more options.
-
Thanks, and I understand 😊 If sharpening isn't for you then scalpel is your best option. I just want people to know that there is another option that is superior in most ways as long as you can learn to sharpen. I personally find sharpening to be a very zen-like exercise where you stop thinking and get totally into the process. In other words, I like sharpening things, I find it very relaxing.
-
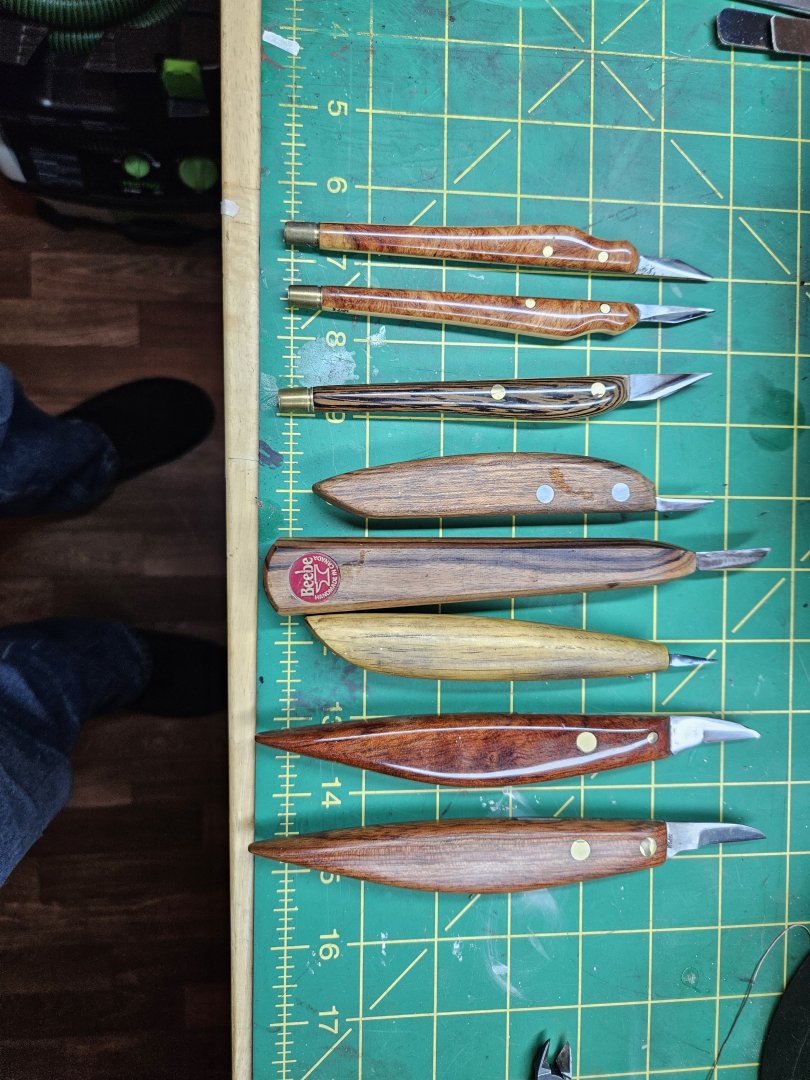
.02"/.6mm on the one with the tiny blade up to .07"/2.01mm on the Japanese knives. These are all detail knives specifically for general-purpose precision trimming and cutting and carving. Actually the single-bevel knives were made out of Japanese marking knives, not Hock blades, I forgot. You can get a matched pair of RC63 (very hard and therefore can be made very very sharp) sans handles here. For $14 each which is a steal in my opinion. The Japanese don't use them with handles, so we're the odd Westerners making wood handles for their marking knives 😊
-
Not at all there are lots of plastic modelers, look in the build logs for subjects from 1901-present day and you'll find plenty of plastic builds, not to mention card as well.
- 14 replies
-
- 1
-
-
- portland
- BlueJacket Shipcrafters
- (and 1 more)
-
I suggest getting real carving knives and relegating X-Acto and scalpel blades to tasks too abrasive for your good knives.😊 The advantages: 1. Much, much sharper. Both X-Acto and scalpels are made from relatively soft steel that is incapable of taking a real edge. 2. Edges last weeks instead of hours 3. Upkeep is about 15 minutes per knife every couple of weeks once you're comfortable with sharpening. 4. A real knife is a one-time investment. You'll spend way more over a lifetime of modeling on X-Acto and scalpel blades than you would on a carving knife, sharpening stones, and a strop. If anyone wants to take the leap, DM me and I will walk you through what and where to get. I promise it will make a difference if you do😊 My knives. The three on the left I made for myself with Ron Hock blades, the two farthest left are a matched pair of left and right hand single bevel knives that I made specifically for how I do planking. The rest are a mix of American and Japanese knives.
- 19 replies
-
- 10
-
-

-

-
Don't know anything about Indianapolis, but welcome to MSW. You thought rocket science was complicated? Wait until you try to figure out the rigging on a ship of the line 😆
-
Thanks Roger, you're doing cool things with yours too. I really like the added detail on your companionway, I wish I would have thought of that for mine.
-
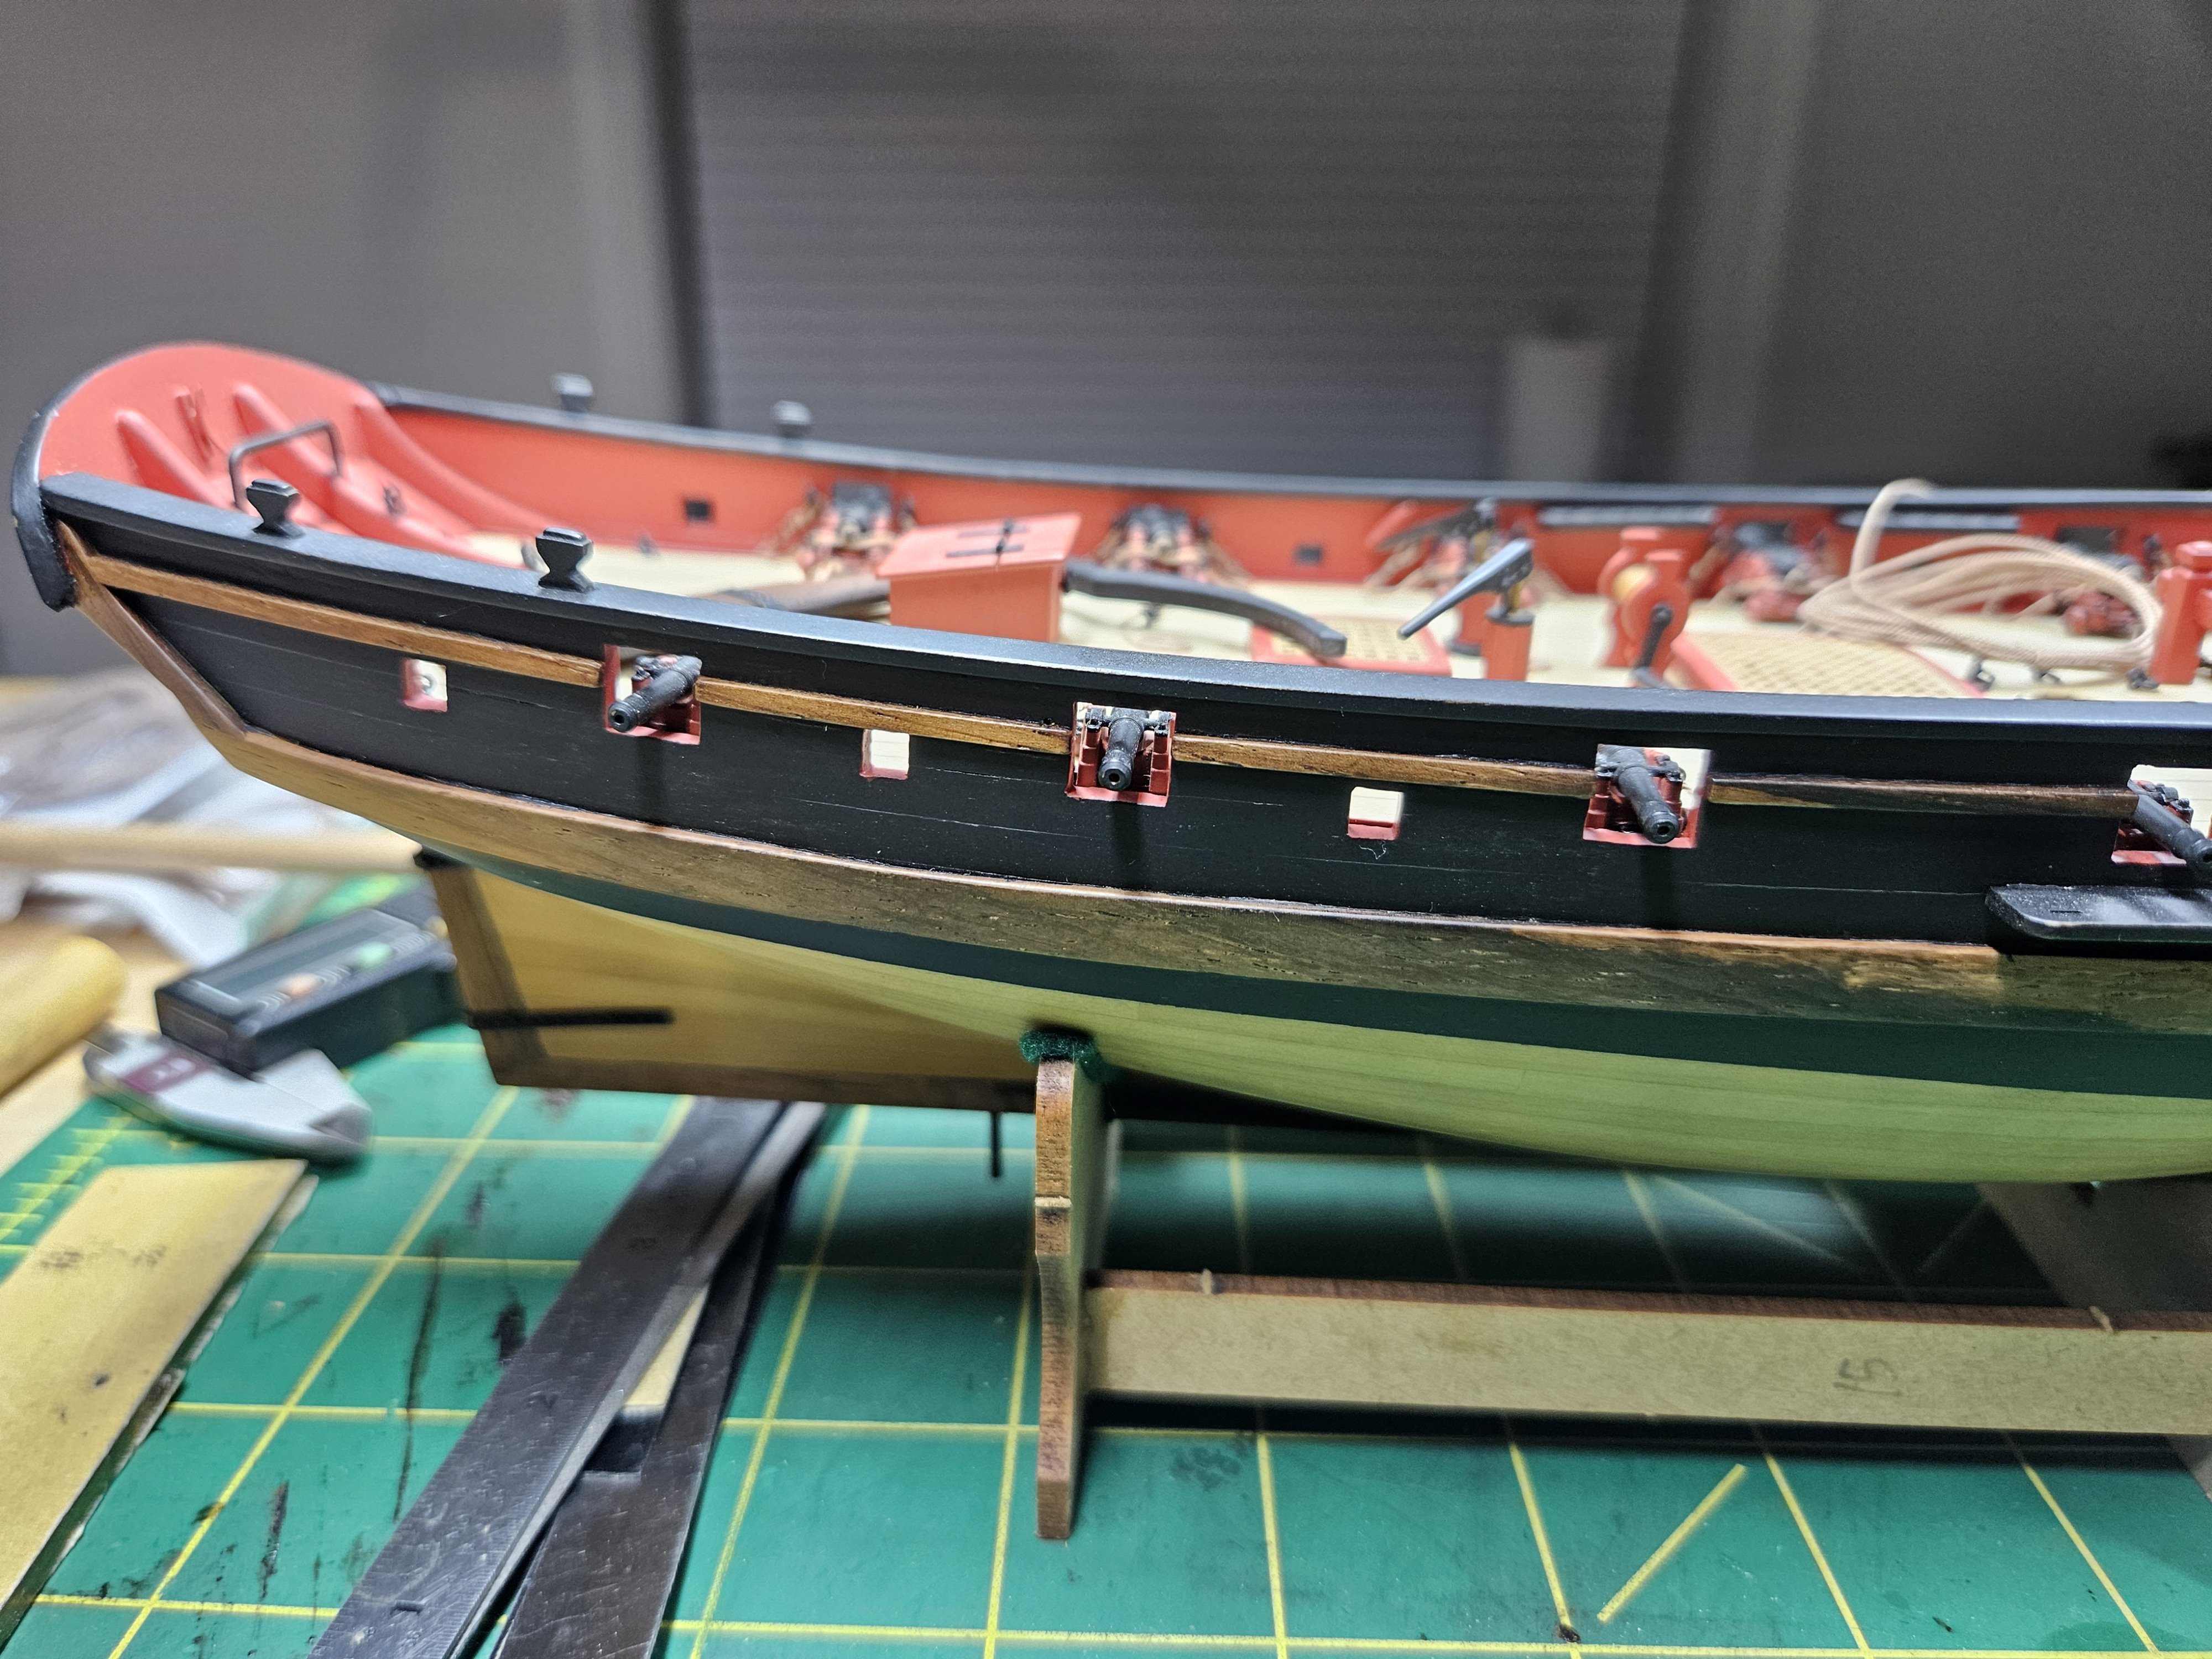
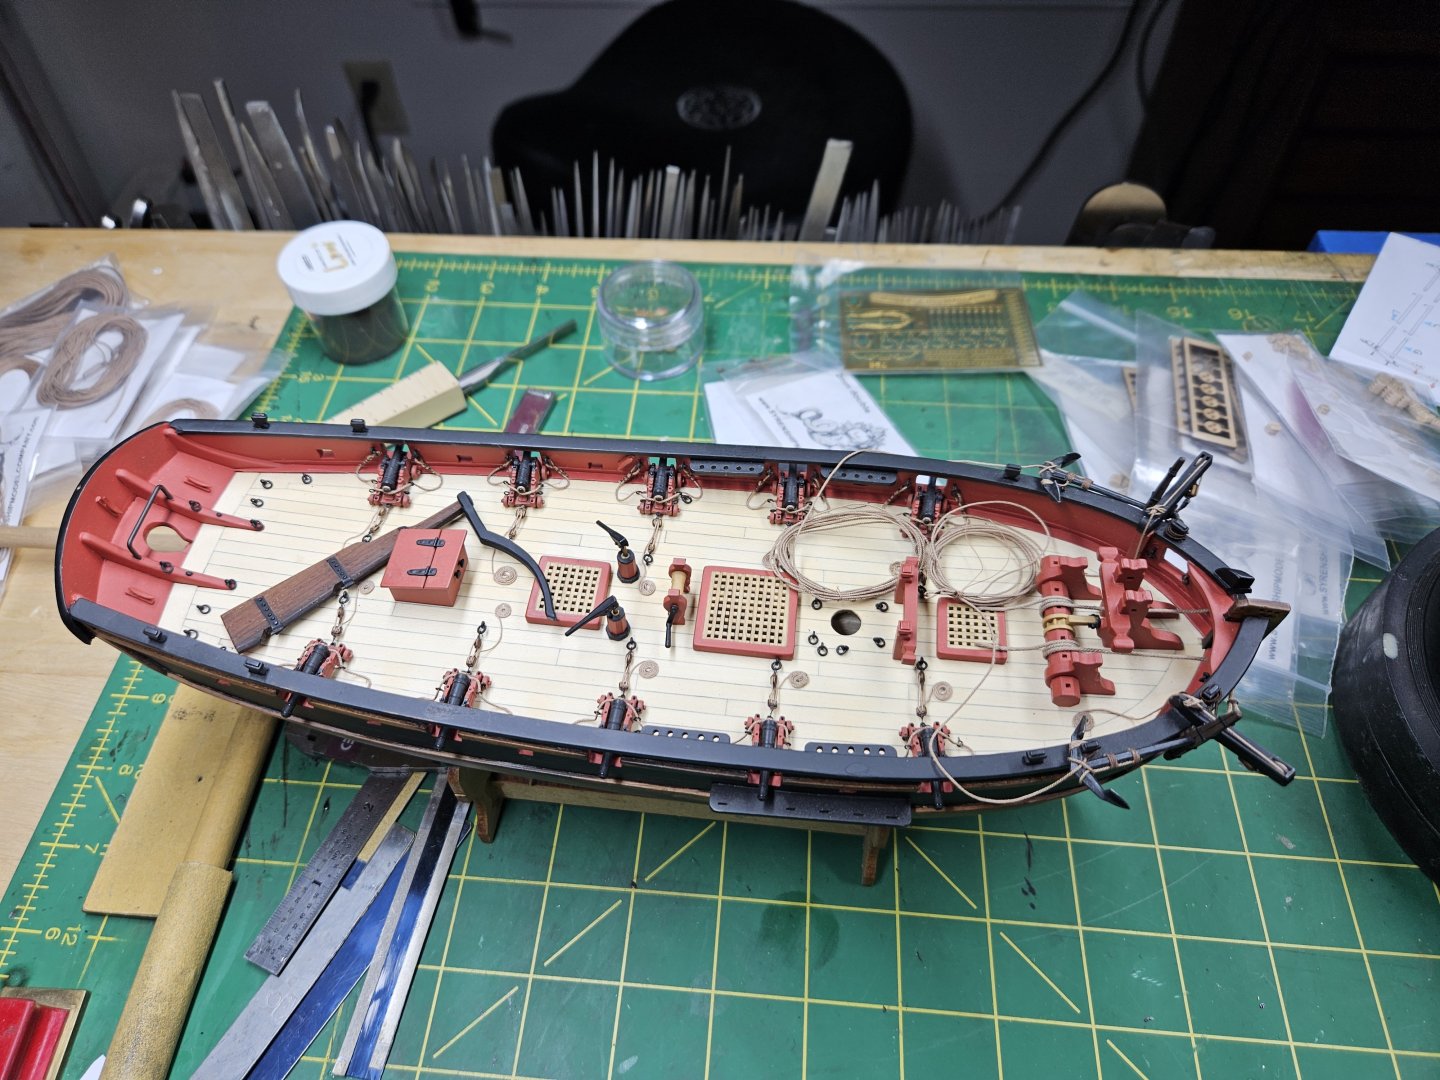
While waiting for some supplies to arrive- glues, thinners, paints, etc. as I had to dump almost all of my liquids for the move, I have been looking at the rigging and at this point I am very confused about what I will do. Chruck's Cheerful and Lennarth Petersson in his book where he covers a British cutter rig, and all the contemporary models I can find in the gallery show a mainmast and a topmast and two yards, a lower yard and a topsail yard. However, the Lady Nelson plans have a very long (for the cutter's length) mainmast set up to hang two yards and a relatively short topmast that carries yet another yard- they're called lower, middle, and upper yards in the plans which doesn't help much. Basically the good sources which show accurate rigs, the kind of thing I need to be able to recreate the rig in scale, means if I follow them I'm dumping the plan rig entirely and going with a scratch rig. That doesn't bother me except I will need to do something to convert the Cheerful plans to 1/64 to get the mast and yard lengths and widths, as the LN mast and yard diagrams will be wrong. Meanwhile, here are a couple pics that show the Lady Nelson made it through the 3500 mile move in perfect shape. In the first pic you can see the holly decking has lost its bone whiteness for a much nicer cream color, which was the plan. And with respect to the planking, we can see that after five years we've had just a little bit of movement so now you can see some of the plank edges where it was totally smooth before. This is also to plan, I didn't put any glue on the edges of the planks so that they could move relative to each other.

- 714 replies
-
- 13
-
-
- lady nelson
- victory models
- (and 1 more)
-
Echoing everyone else, beautiful work Mike.
-
Thanks for that bit of understanding. The Lady Nelson masting plan shows a pretty significant rake so I'll watch out for that. Ok. I guess I will simply have to make some decisions and take some of the rig from Cheerful and some from Petersson and some from the contemporary cutter models in the gallery. It seems even Chuck's Cheerful rig varies from the contemporary model, I saw a bobstay on the NMM version that I haven't seen on the Cheerful models being built.
-
Well, it wouldn't be any fun if we had 100% accurate knowledge of everything, that would reduce building to simple execution😊 I agree with you that the forestay on top of a sharp iron strap looks more like the modeler got lazy than anything else, I won't rig mine that way. Another question which I probably should have started with is that Cheerful and Petersson have spreaders for topmast shrouds and no topgallant, while Chris with Lady Nelson has no spreaders and a lower, middle, and upper yard (that's what they're called in the plans). Spreaders for me seem necessary to stabilize the topmast and a topgallant sail on a cutter with all that sail area seems like something you could only use in very light weather, like studding sails. I could be wrong though, as mentioned my knowledge is slim. Anyway, basically if I follow Cheerful/Petersson I'm pretty much abandoning the rig in the plans entirely, and I have to wonder if the topmast as shown in the plans needs to be shortened. I'm ok with that if it gets me greater accuracy, but I'm wondering why Chris went with three yards when I haven't seen another model of a cutter with more than two.
-
Occre VS Artesania dyes
vossiewulf replied to Johngr's topic in Painting, finishing and weathering products and techniques
For dye stains, you need to go to luthier supply companies. Example is Hammer GMBH. -
Hey Chris not sure if you remember me (it's been a five year layoff) but I helped you with your first Vanguard Models logo and showed you my very heavily kitbashed Lady Nelson, which is finally back in dock for masting and rigging. I just wanted to say I'm very happy to see how far you've come with Vanguard, back when we talked last you were sweating your first kit release and look where you are now! In fact I'm pretty sure I'm not going to be able to resist buying at least one of your kits, they appear to me to be best in class. Really awesome work, Chris.