HOLIDAY DONATION DRIVE - SUPPORT MSW - DO YOUR PART TO KEEP THIS GREAT FORUM GOING! (83 donations so far out of 49,000 members - C'mon guys!)
×


vossiewulf
-
Posts
1,477 -
Joined
-
Last visited
Content Type
Profiles
Forums
Gallery
Events
Everything posted by vossiewulf
-
 There are links to both of their stores (Ropes of Scale and Syren) on the main page, or you can google them. He's right that replacing the rope in most cases will be a mean a big upgrade in the end, and for not much money.
 -
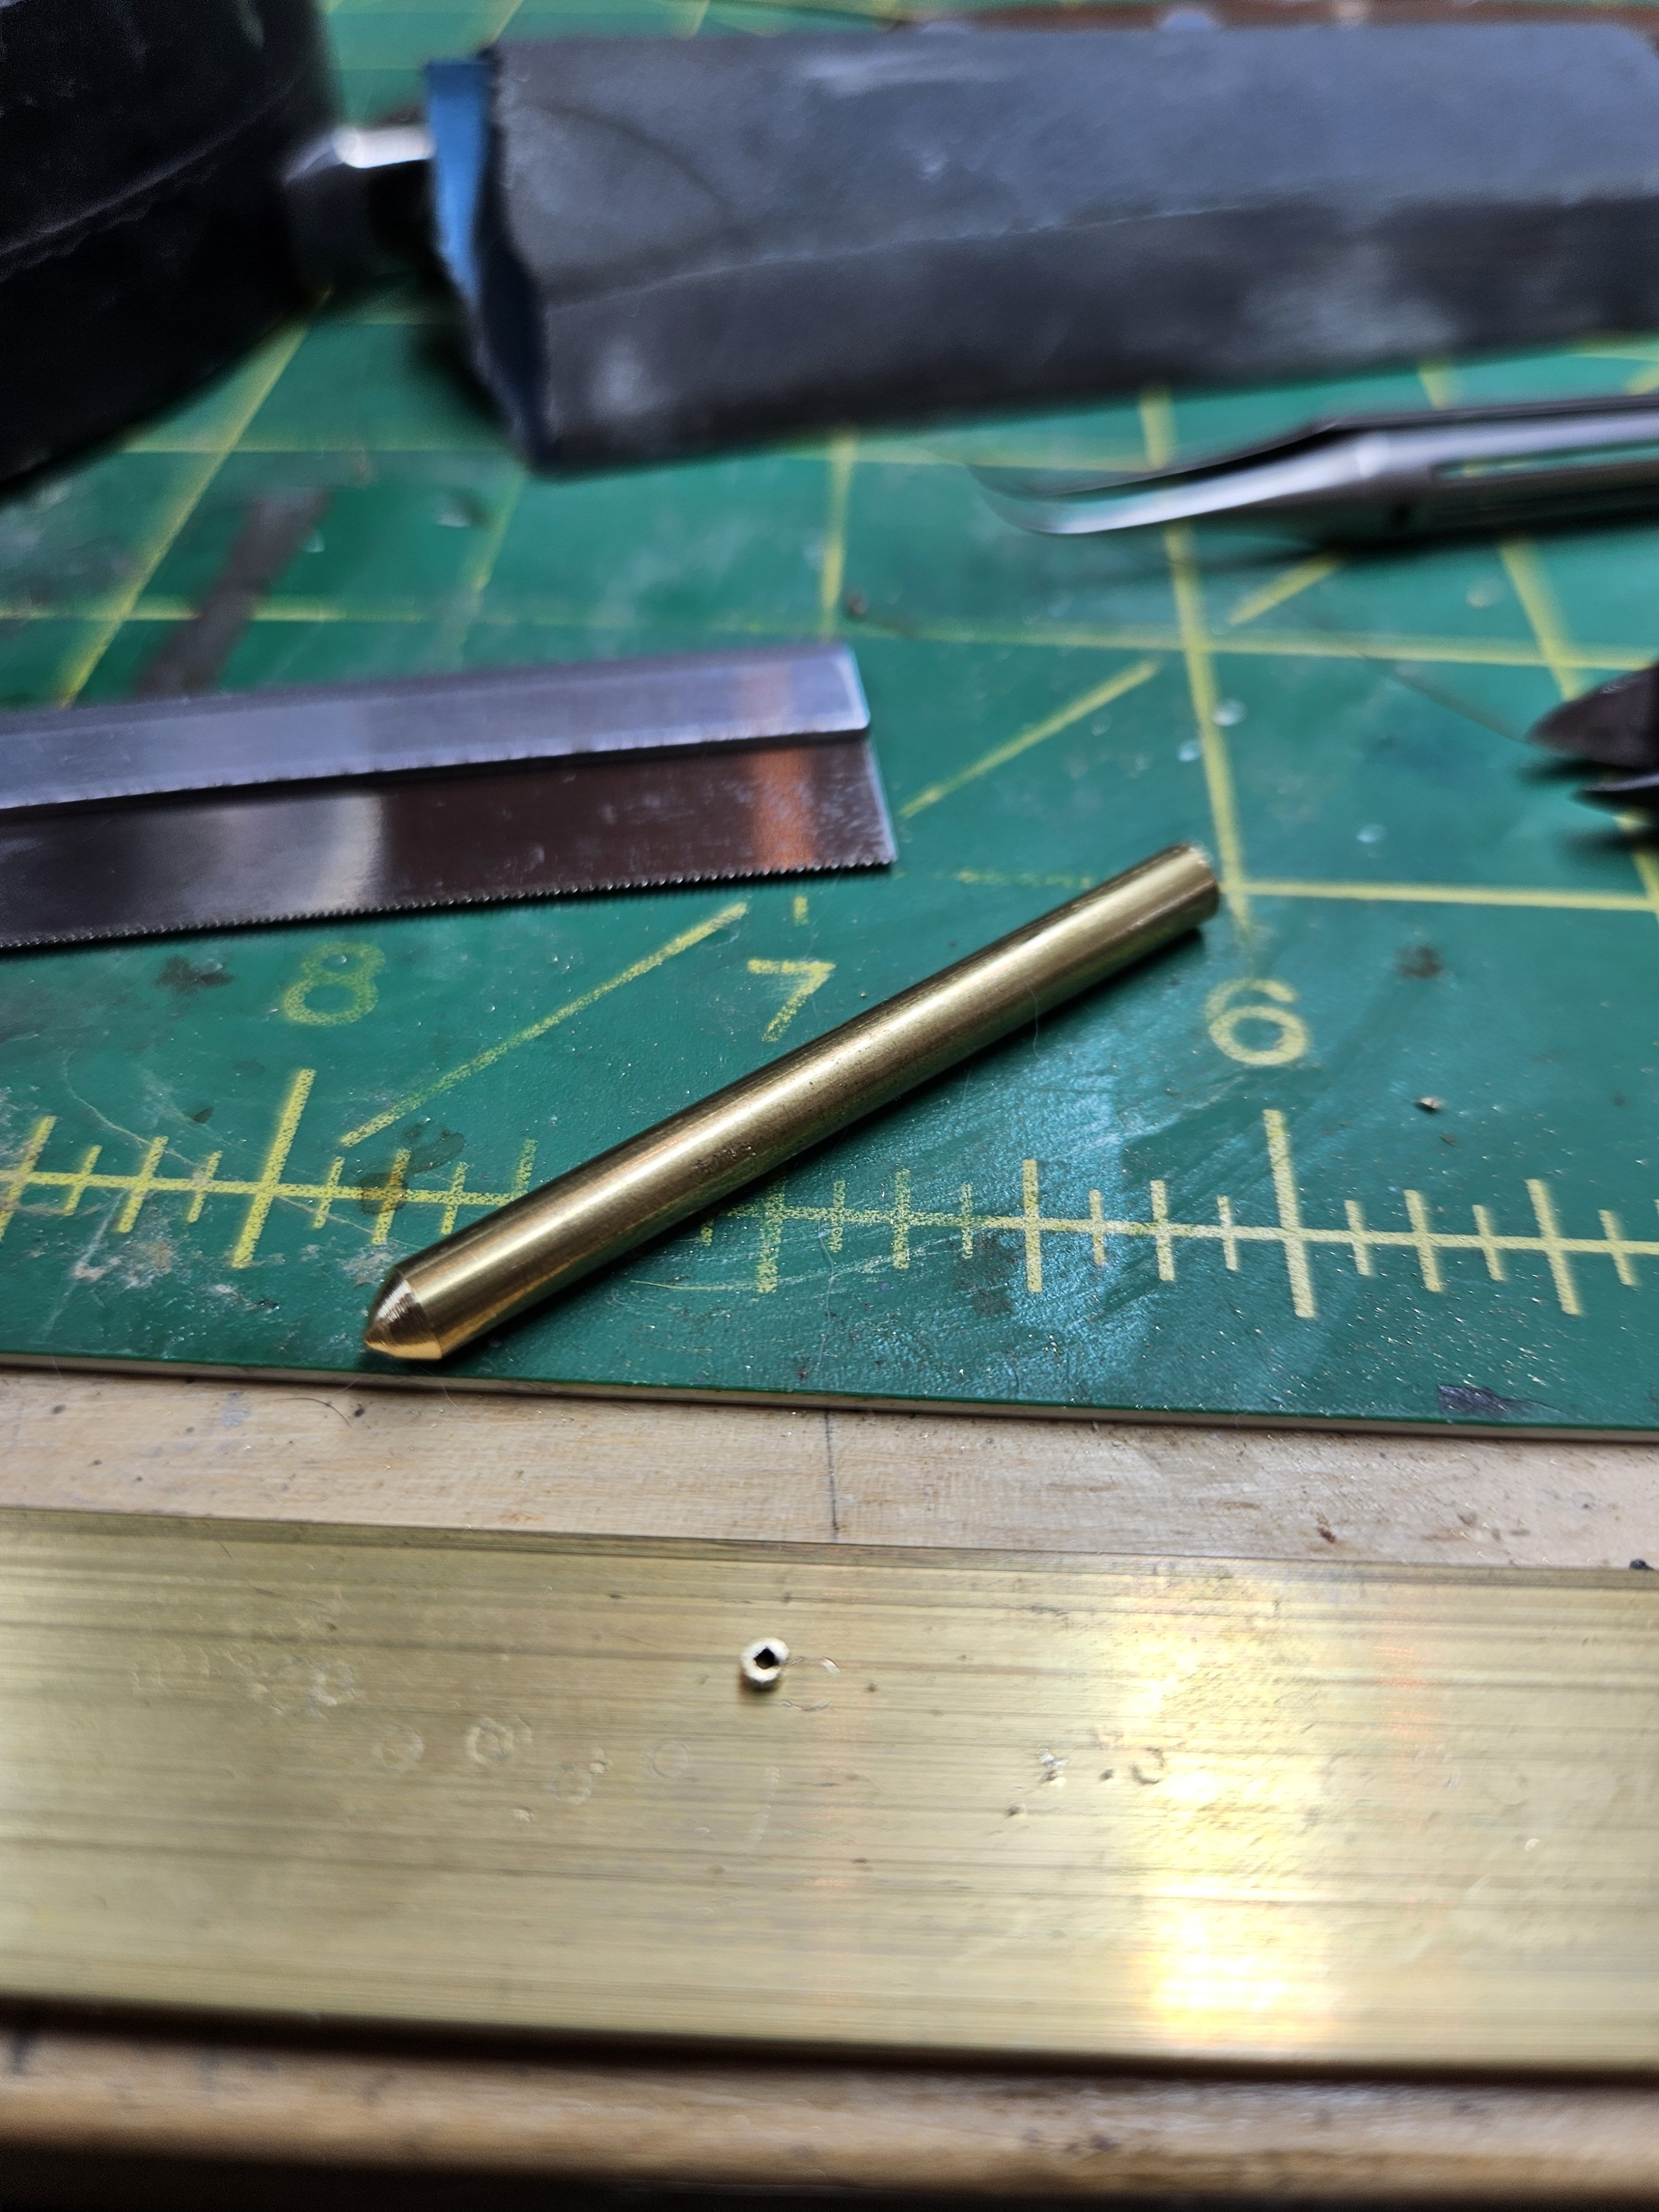
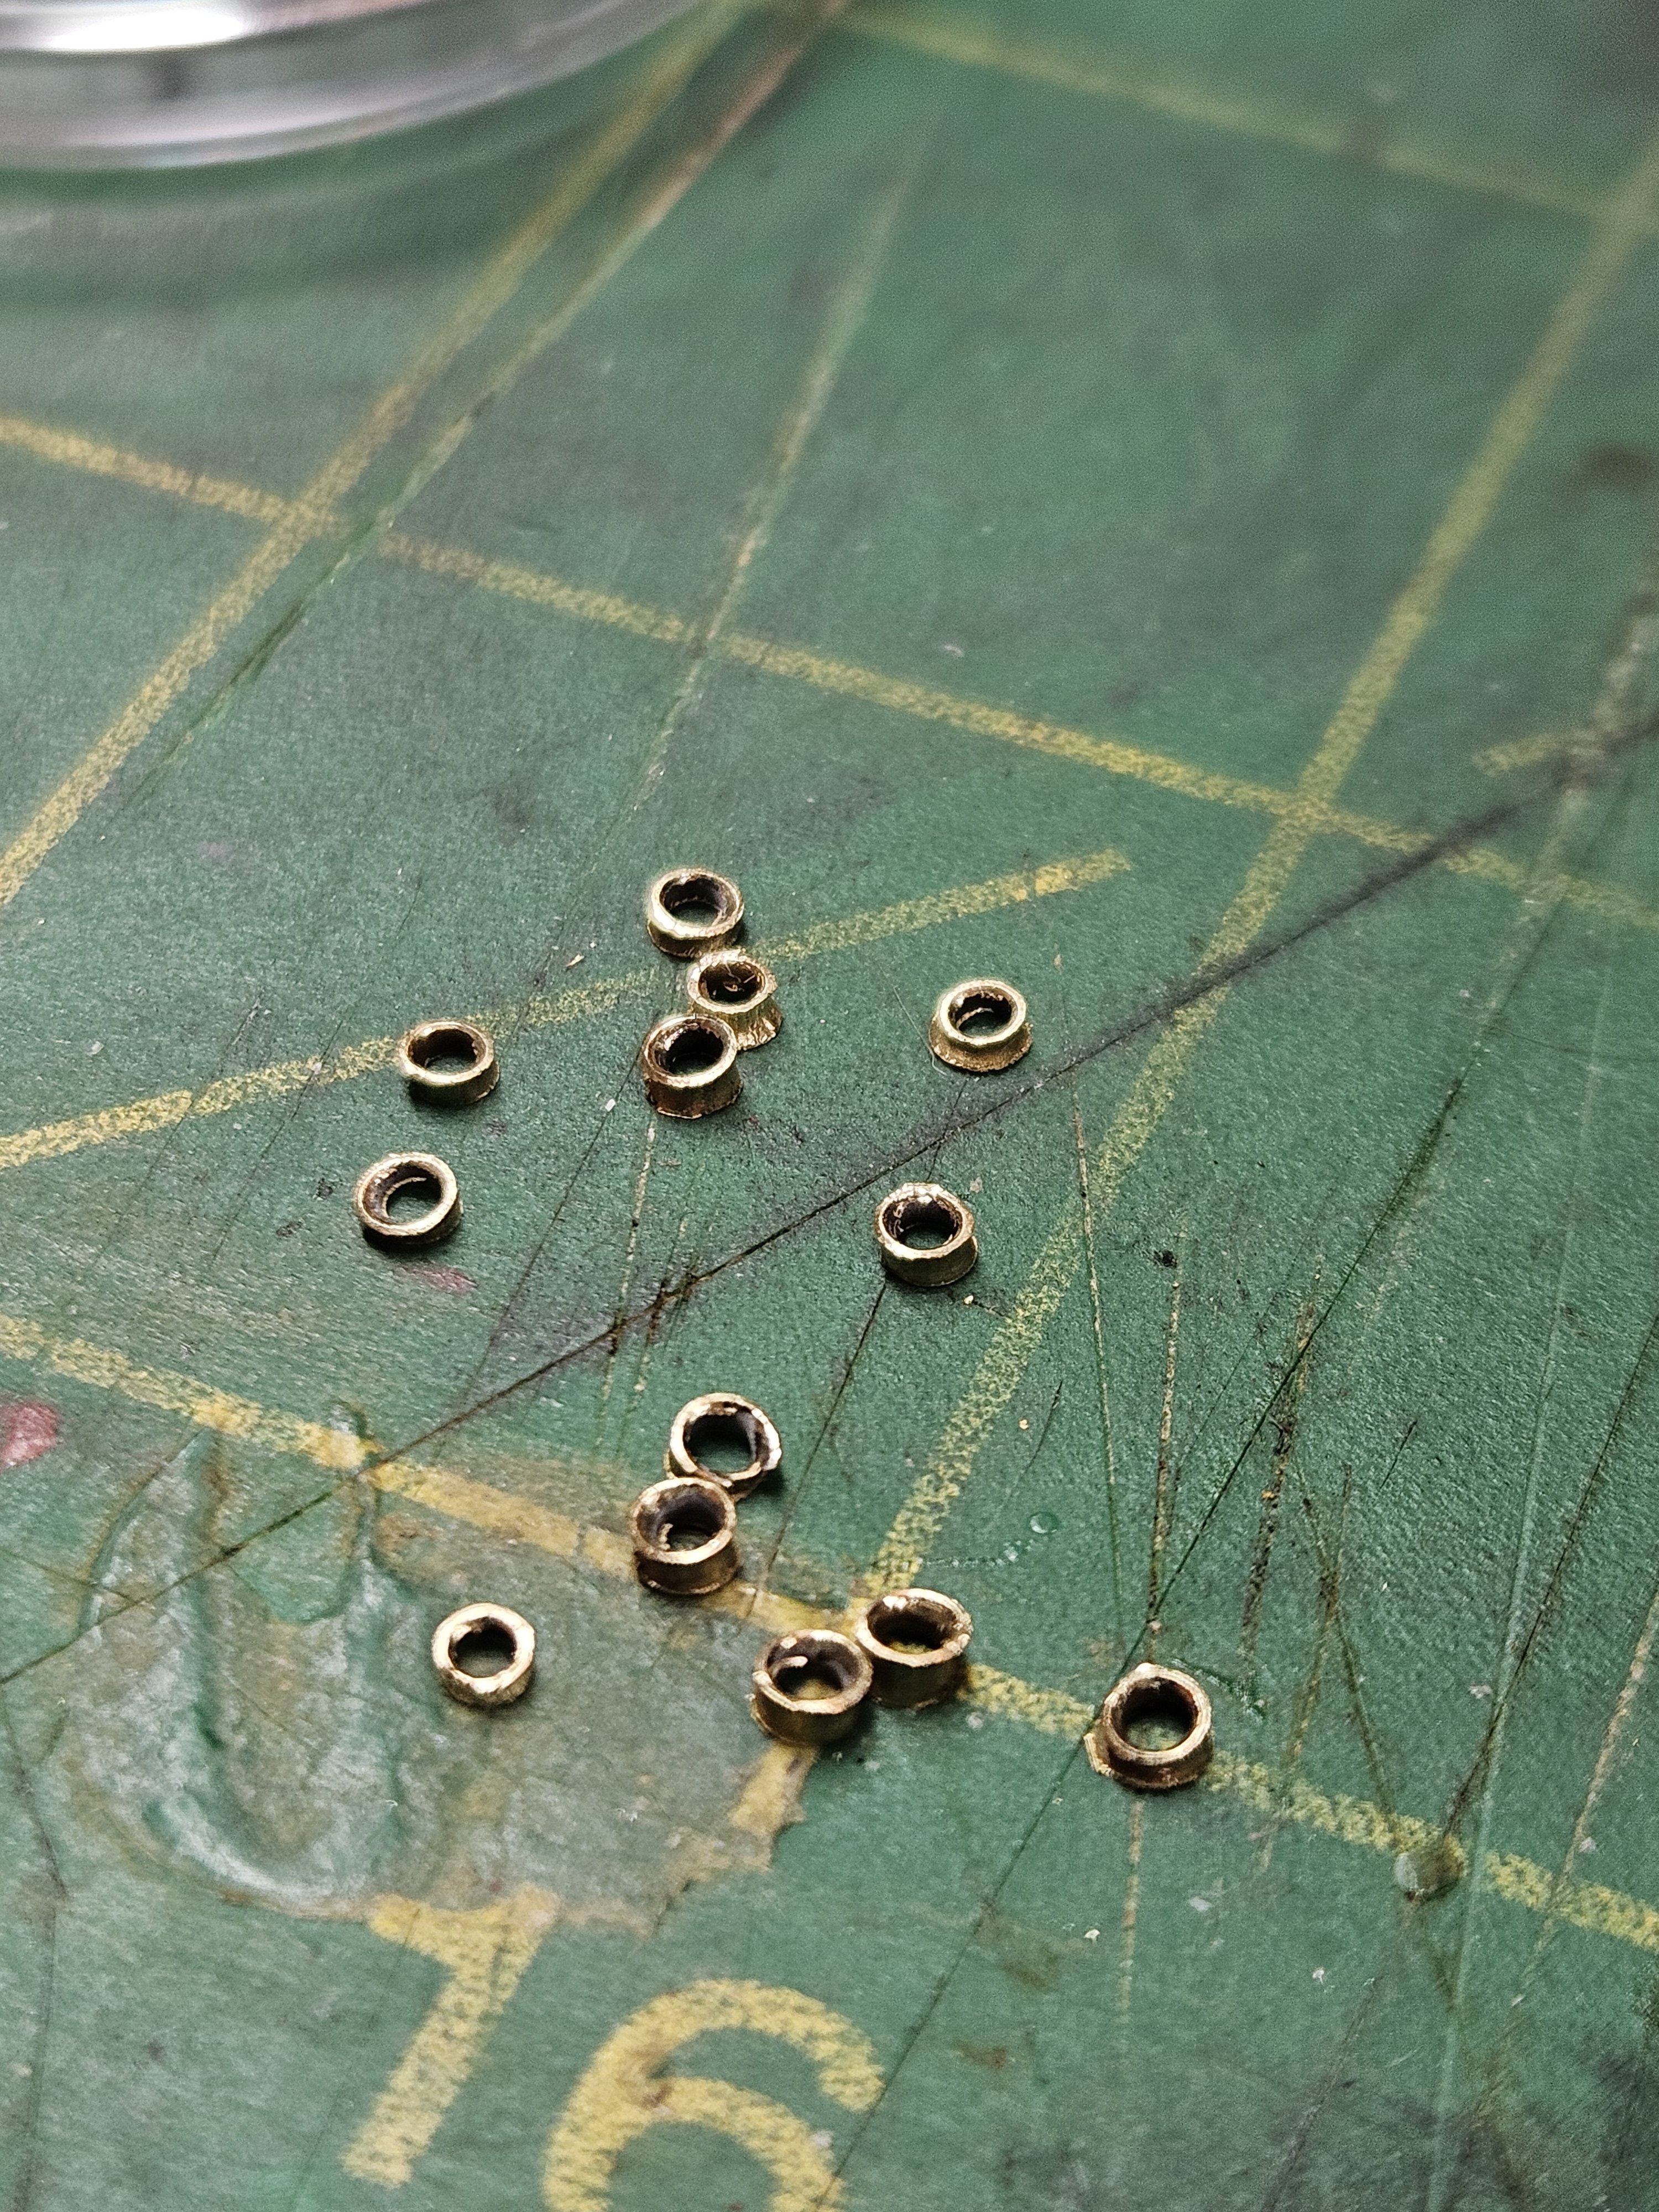
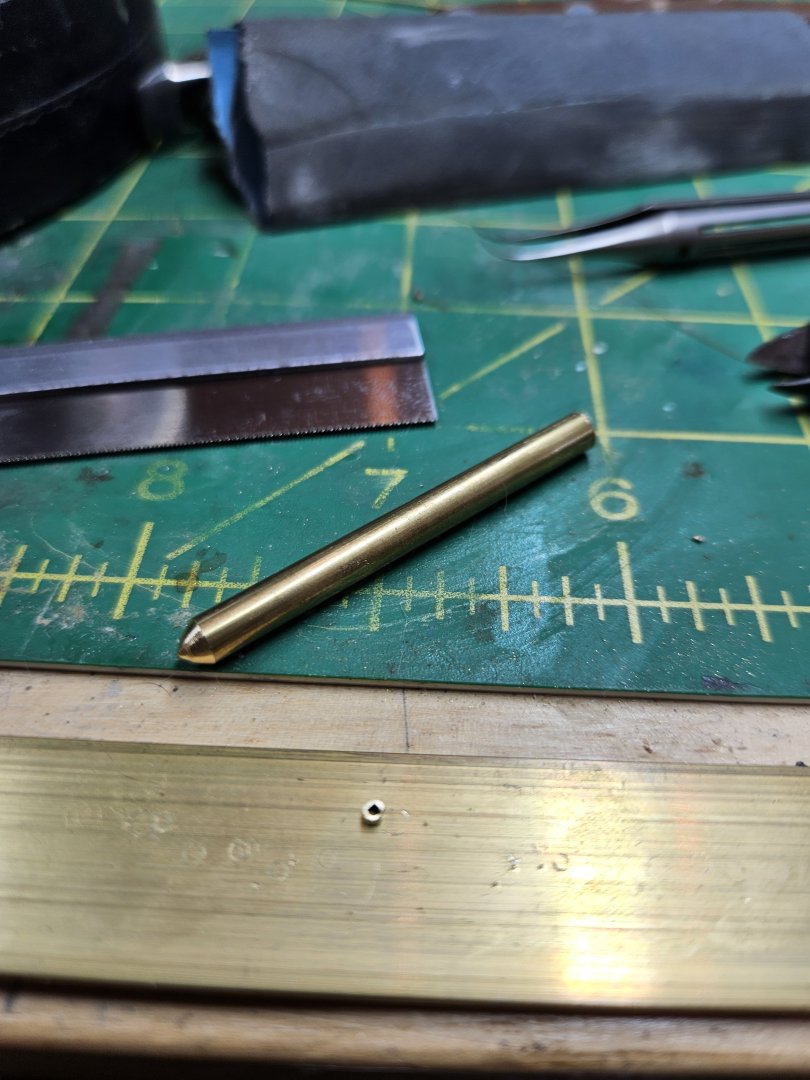
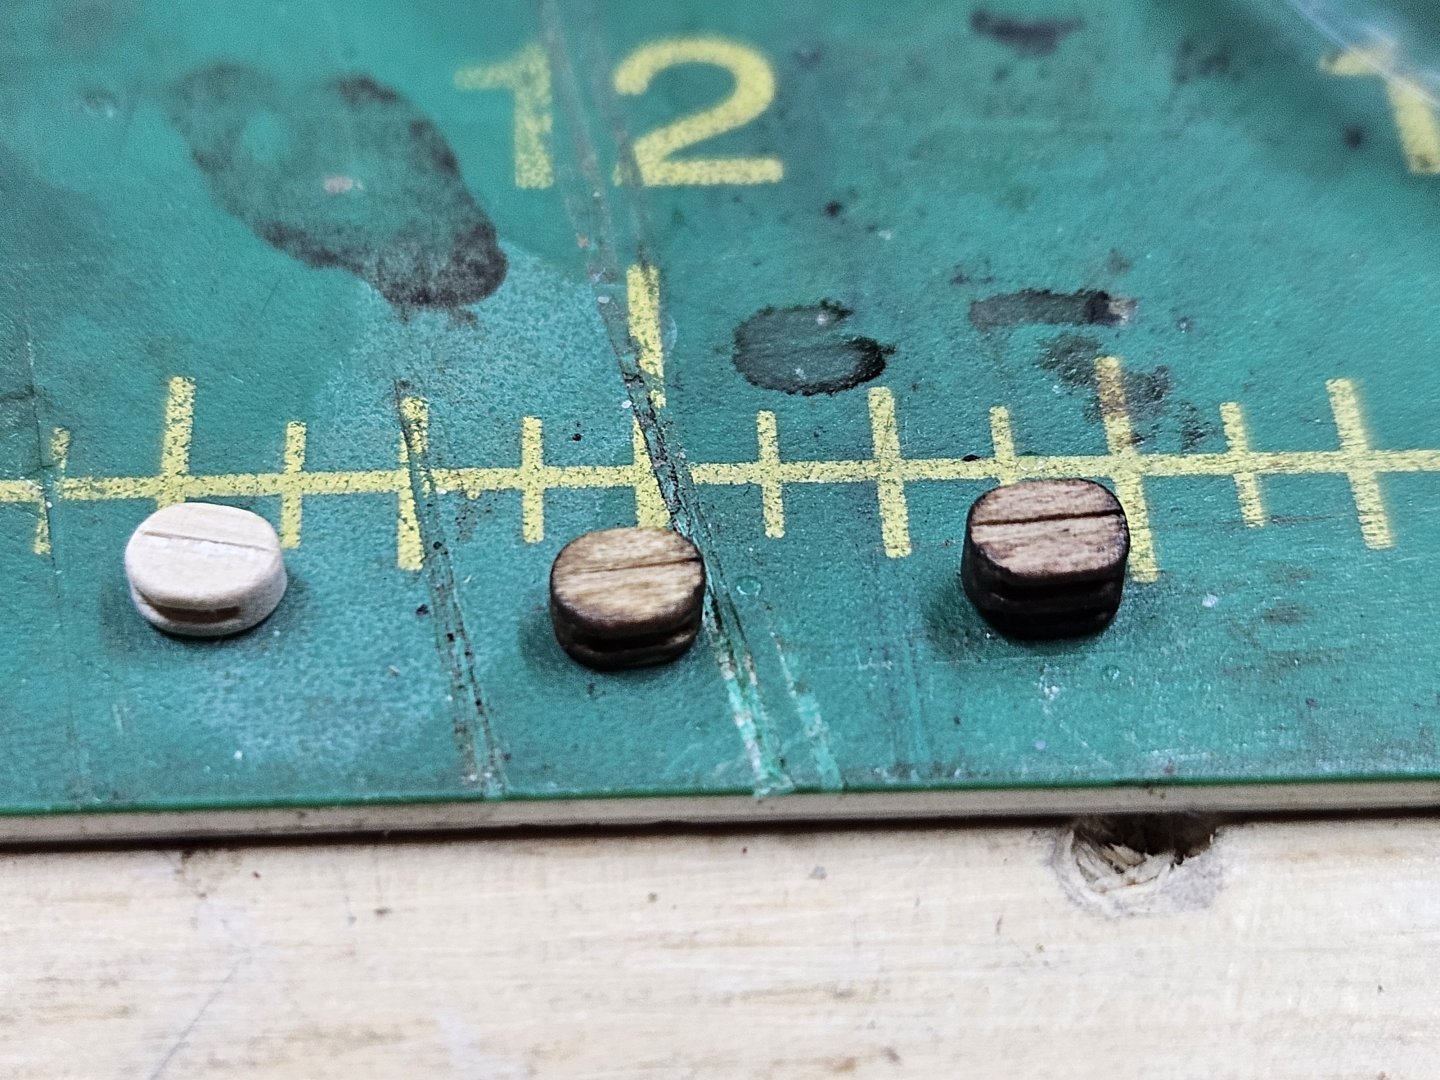
I am using ethanol-based dye stains like they use for musical instruments because they don't penetrate much, and if they don't penetrate it's hard for the result to be splotchy. But it was anyway, I'm not happy with the results I've gotten so far. So I'll take a look at the leather dye, thanks. While I'm here, I finished the blocks on the jib boom eyes. And then I took a hand at trying to create thimbles 75% of the size that Chuck creates in his Cheerful instructions, and I can report that making thimbles out of 1.2mm OD brass tube is not easy. The cuts in the tube have to be square and parallel to each other, and no matter what you cut the tube with it leaves a tang of uncut metal that needs to be removed with a small full-flush side cutter. I made a blunt-curved end brass rod per Chuck's suggestion and used that with a little chasing hammer to tap each side of the pieces of tube to form the curve of the thimble edge. Not easy to get consistent results and you really need a reasonably thick piece of brass to go under the tube sections when you're tapping. I ended up cutting the tube sections on my Byrnes saw while holding my hand right over the blade to catch the tube section as the blade hurled it in some random direction, and then clipping off the tang under magnification. As noted I wish there was more consistency in the results, I'm trying to be as consistent as possible with the number of taps and how hard they are, but I've still got some variation. I'm going to stare at these for a day or so and decide if I want to try again for improved results.


- 714 replies
-
- 2
-

-
- lady nelson
- victory models
- (and 1 more)
-
Thanks for the explanation, Phil, I'm trying to absorb the topic of rigging now and every bit helps Yes, it takes patience to serve line with fly tying thread, but I'm hoping it will get better with Chuck's serving machine, that is making its way through the mail to me. As for the block holder, make one carbon fiber rod about 1/8" longer than the other, this makes getting them both into the blocks much easier as you're only doing one at a time.
- 714 replies
-
- 2
-
-
- lady nelson
- victory models
- (and 1 more)
-
No Gregory, those are standard Syren wood blocks.
- 714 replies
-
- 1
-
-
- lady nelson
- victory models
- (and 1 more)
-
Thanks Keith and Merry Christmas to you and yours and a Happy New Year!
- 714 replies
-
- 1
-

-
- lady nelson
- victory models
- (and 1 more)
-
https://www.drillbitwarehouse.com/product/61-thru-80-tiny-high-speed-jobber-drill-set/
- 436 replies
-
- 1
-
-
- Syren
- Model Shipways
- (and 1 more)
-
Quality of instructions Quality of plans Ease of assembly/quality of kit engineering Historical accuracy Quality of rope Quality of fittings Quality of wood Those would be my variables if I was putting together a ratings system.
-
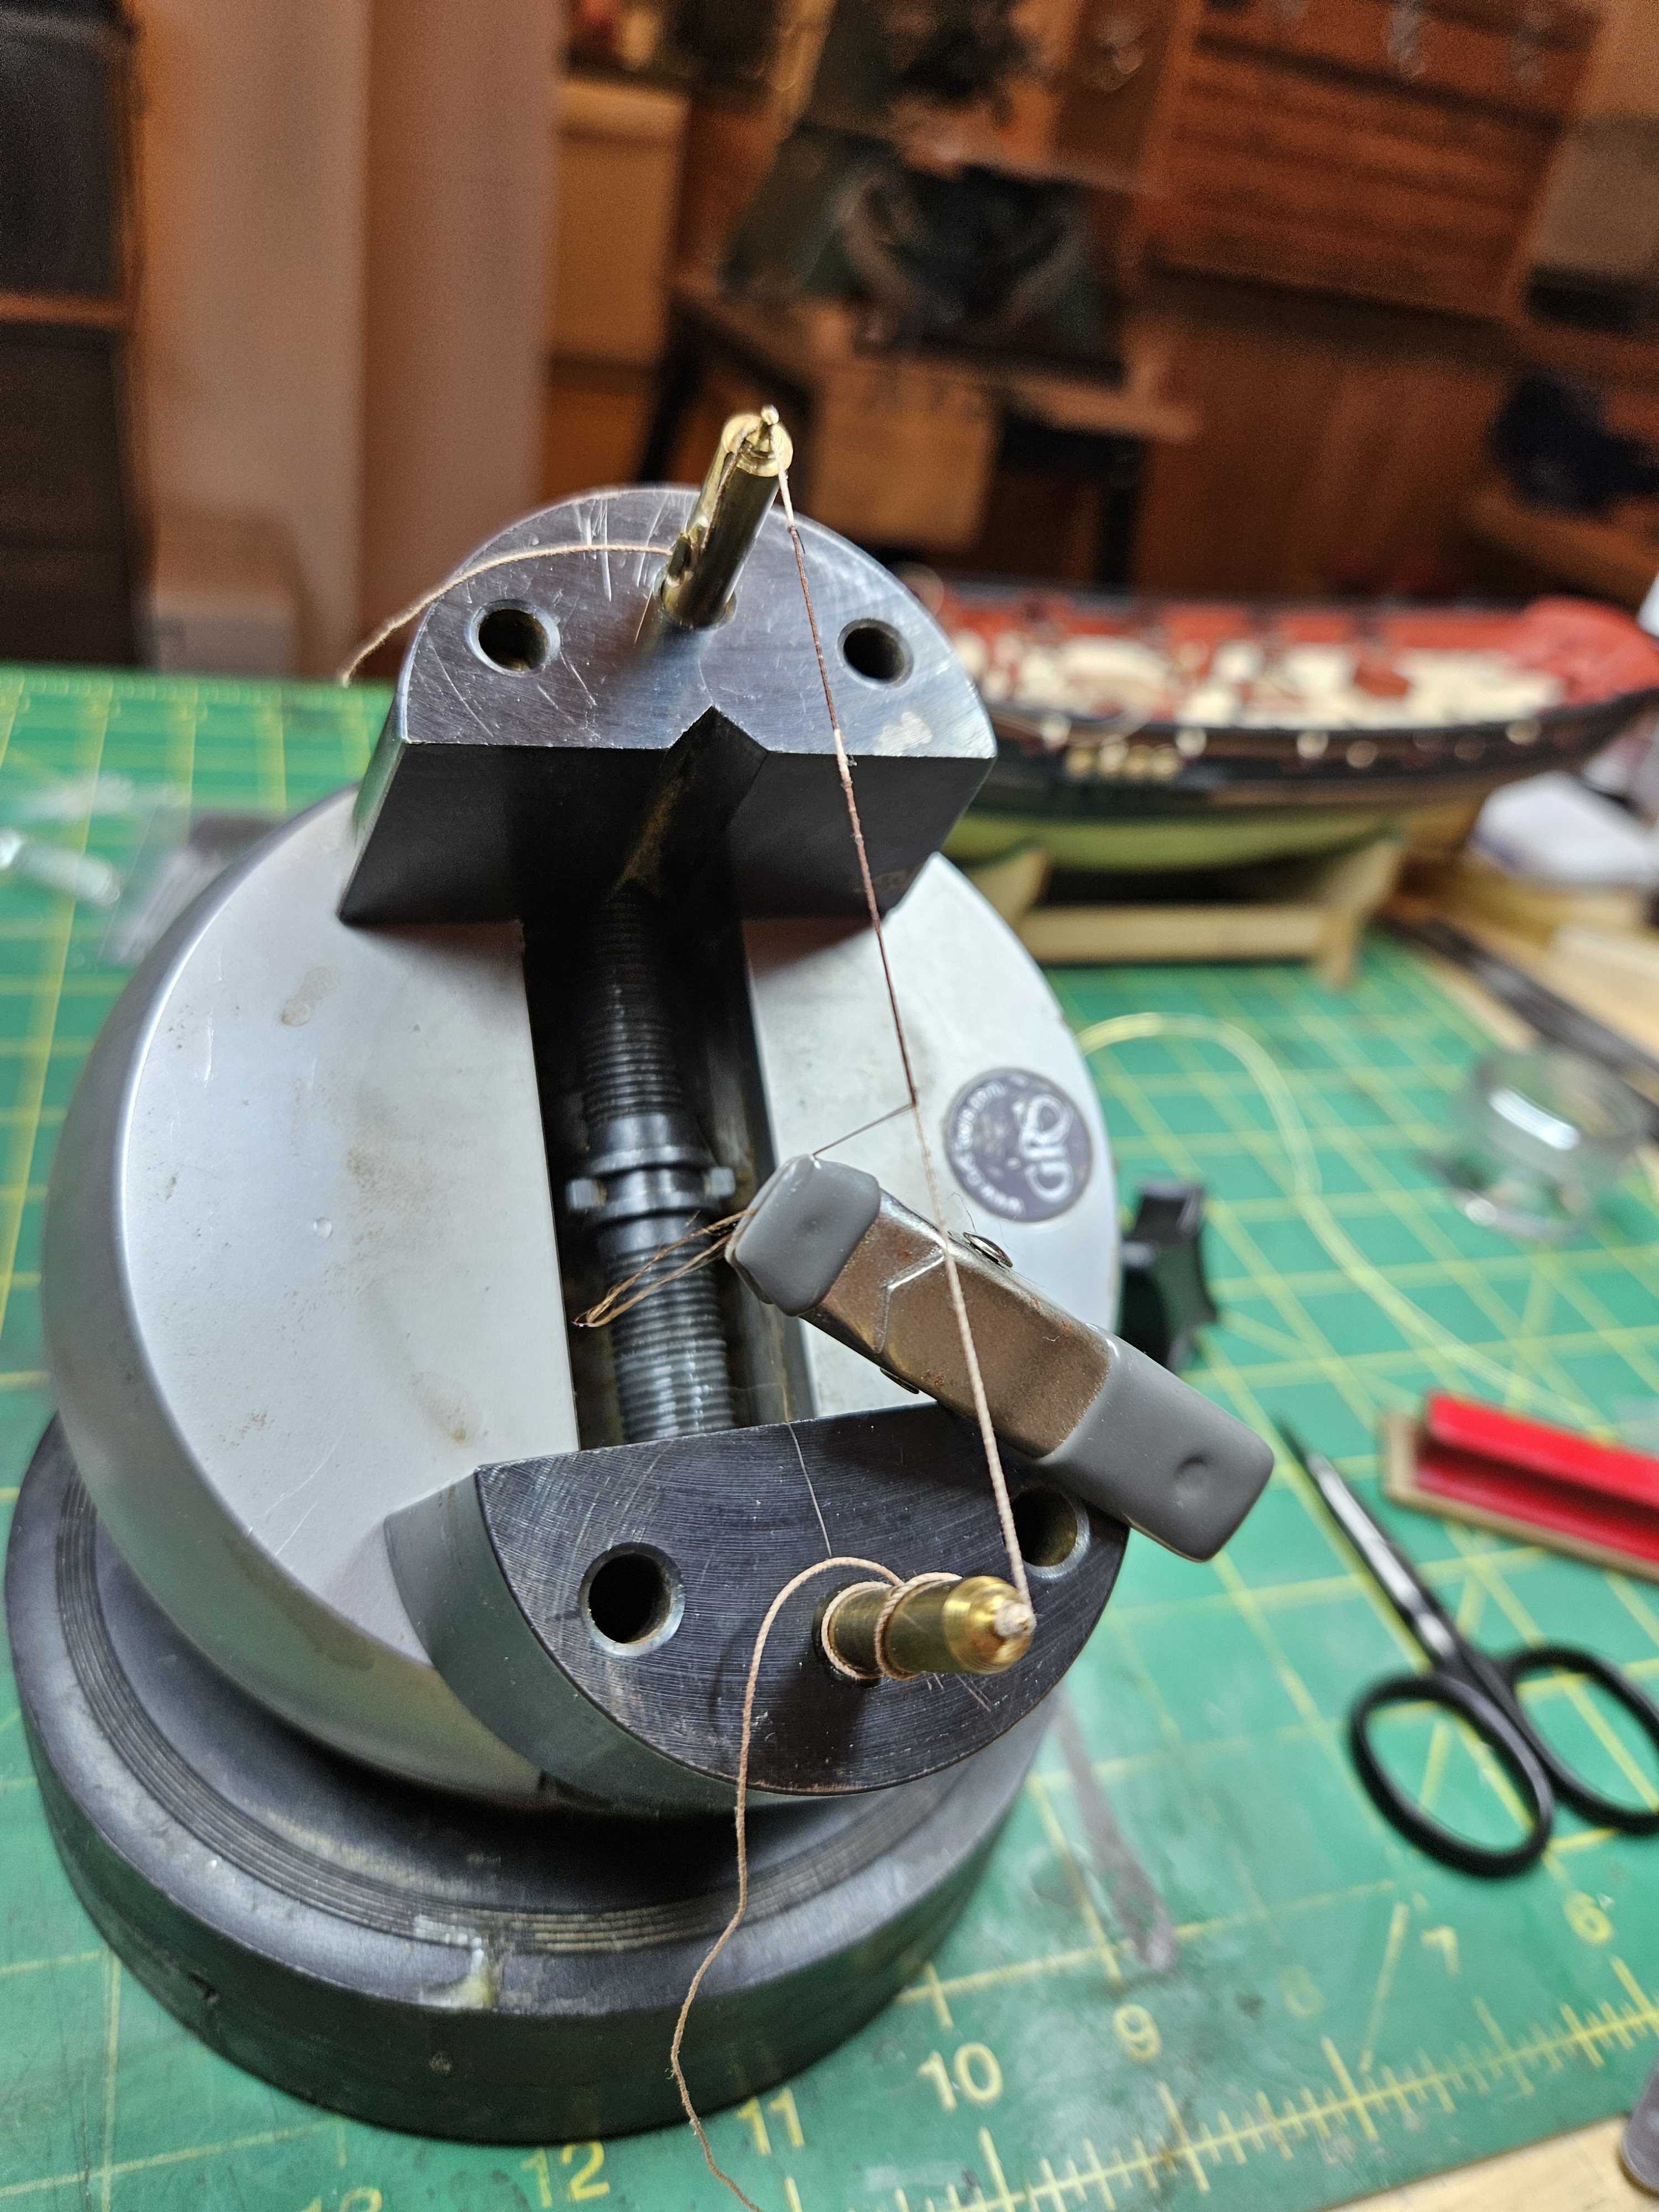
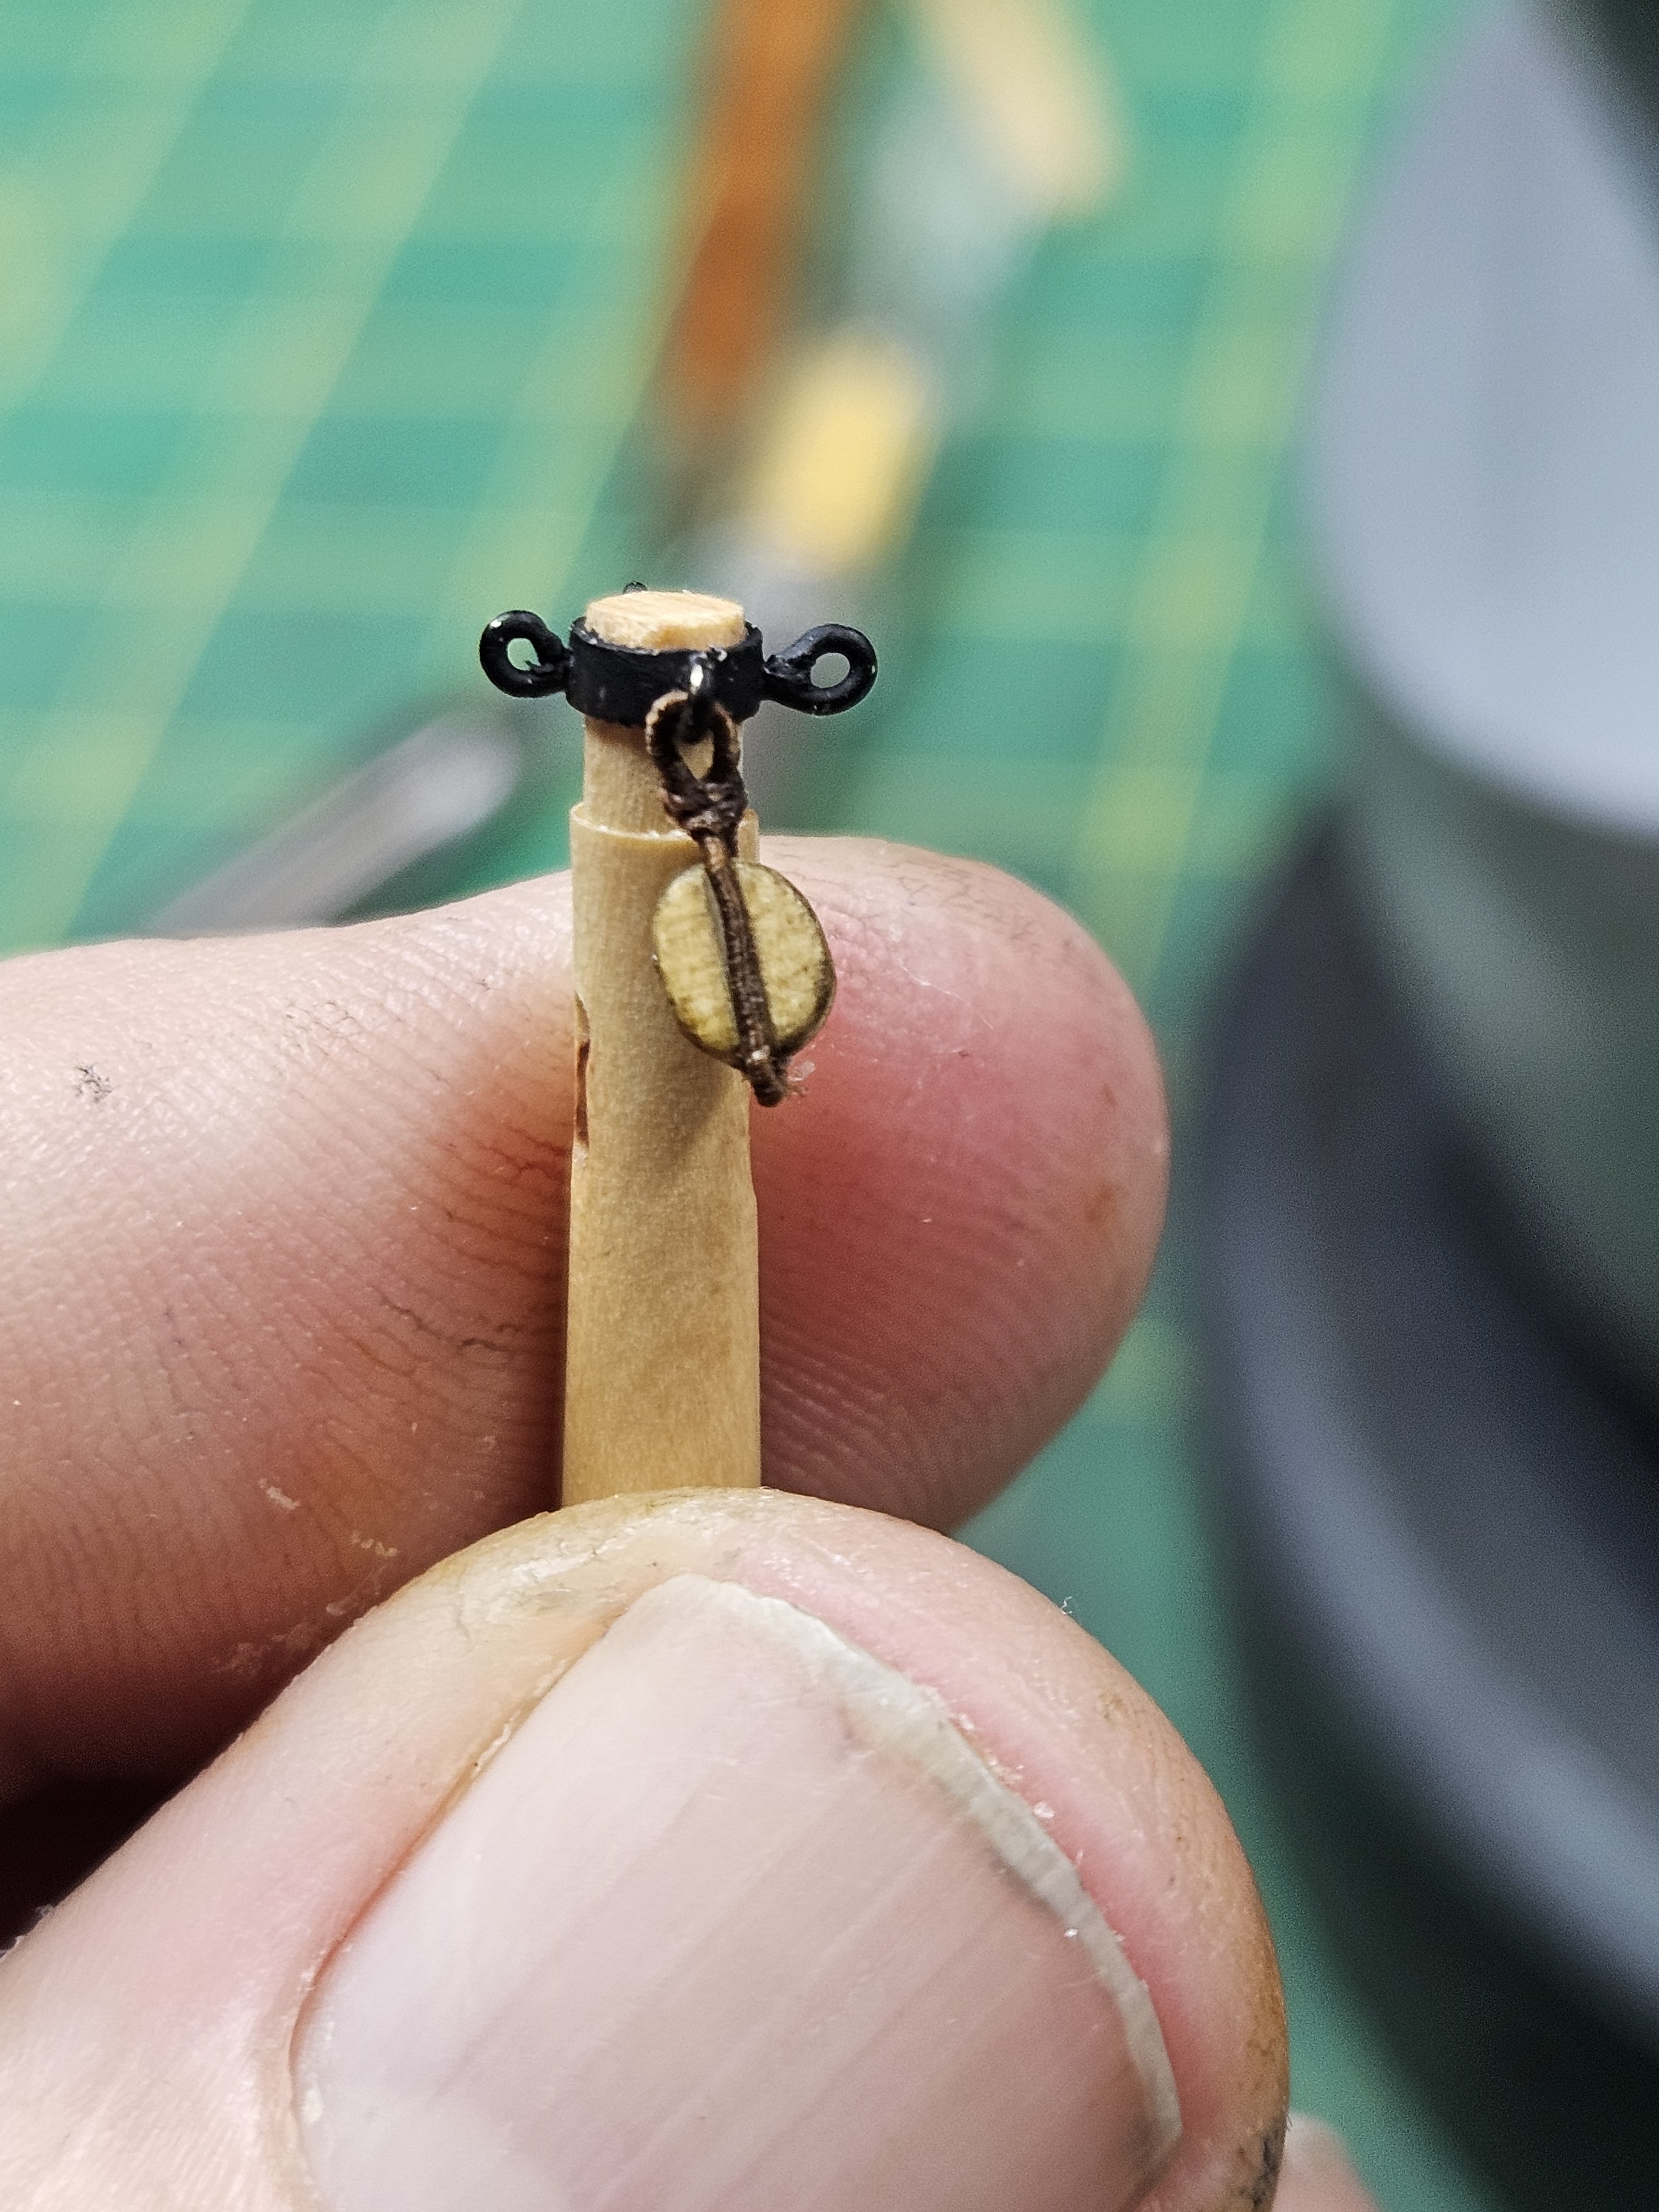
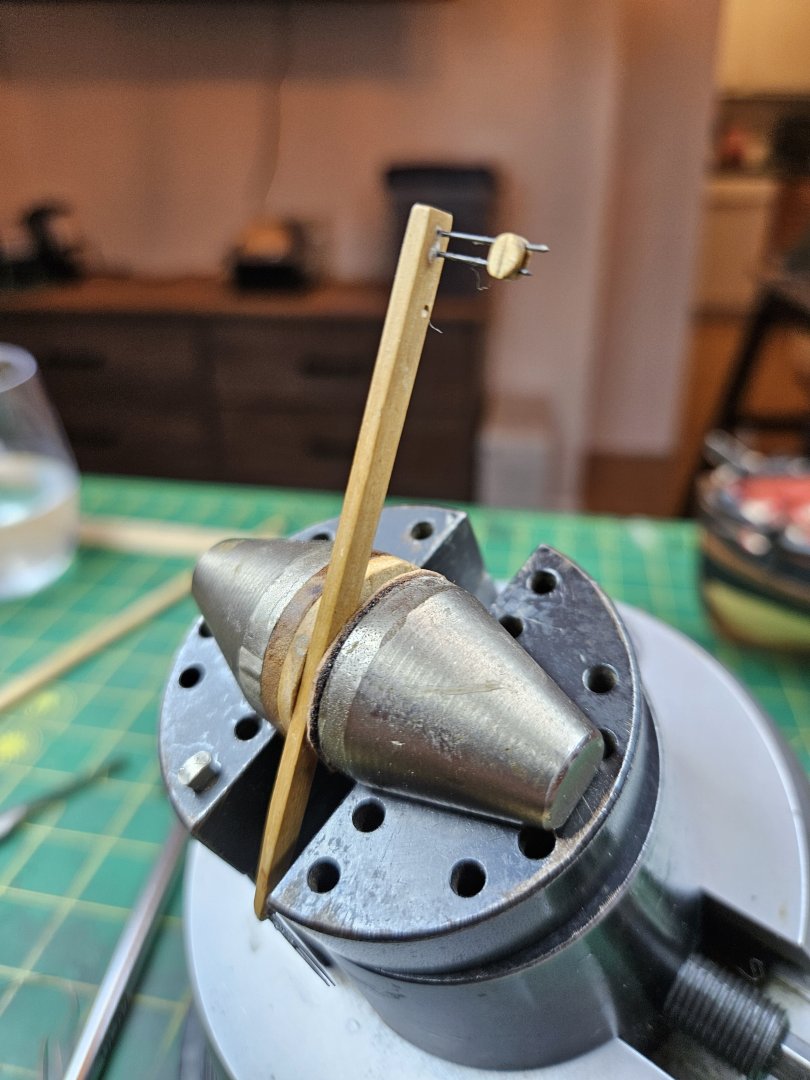
Today was a day of trying to remember things I had figured out about rigging and stropping blocks, and putting to use the jigs I'd made before. They're not exactly super sophisticated. This is my manual serving rig, it uses two brass posts with cleats, plus each post has a groove and pin at the top, it's kind of complicated how it works but basically I can set the line semi-tight and then twist the posts and the line gets tighter and stays tighter. Once it's reasonably tight it's easy to serve the line manually with the 3/0 fly-tying thread that I'm using, and the result looks nice but it's a slow process. I went ahead and ordered the serving machine from Chuck which will make it possible to fully serve the bobstay and the two side boom guys, which Chuck wants me to put on first before moving to the mainmast for some reason. This is my super-fancy block holder. It just uses two fine carbon fiber rods embedded in a piece of wood, one end has spacing for 1/8" and 5/32" blocks and the other end does 3/32" blocks. I just slide the carbon fiber rods into two of the drilled holes and friction will hold the block very well. I'm probably going to continue to use it, it works pretty well. I also experimented with various amber and brown dye stains for the blocks, since they come pretty white from Syren. All that together leads me here, with a single block seized to one of the side jib boom eyes. Tomorrow will finish up the other three now that I more or less have a process now.

- 714 replies
-
- 6
-
-
- lady nelson
- victory models
- (and 1 more)
-
Welcome Bob! You're in the right place to find lots of people interested in all kinds of ships.
-
Scrapers are very important for shaping especially concave wood surfaces, they are also much faster than sandpaper at removing material while leaving a better finish. I got my mini scrapers at stewmac.com. Also I've used the convex Veritas palm plane, when sharpened and set correctly it works really well. This little plane set also includes a scraper plane of useful size for ship modeling, I have them too and the steel in the irons is reasonably good and takes a good edge. I refuse to comment on whether I have a tool addiction.
-
Excellent work Sean!
-
What wire, I don't have any wire...

-
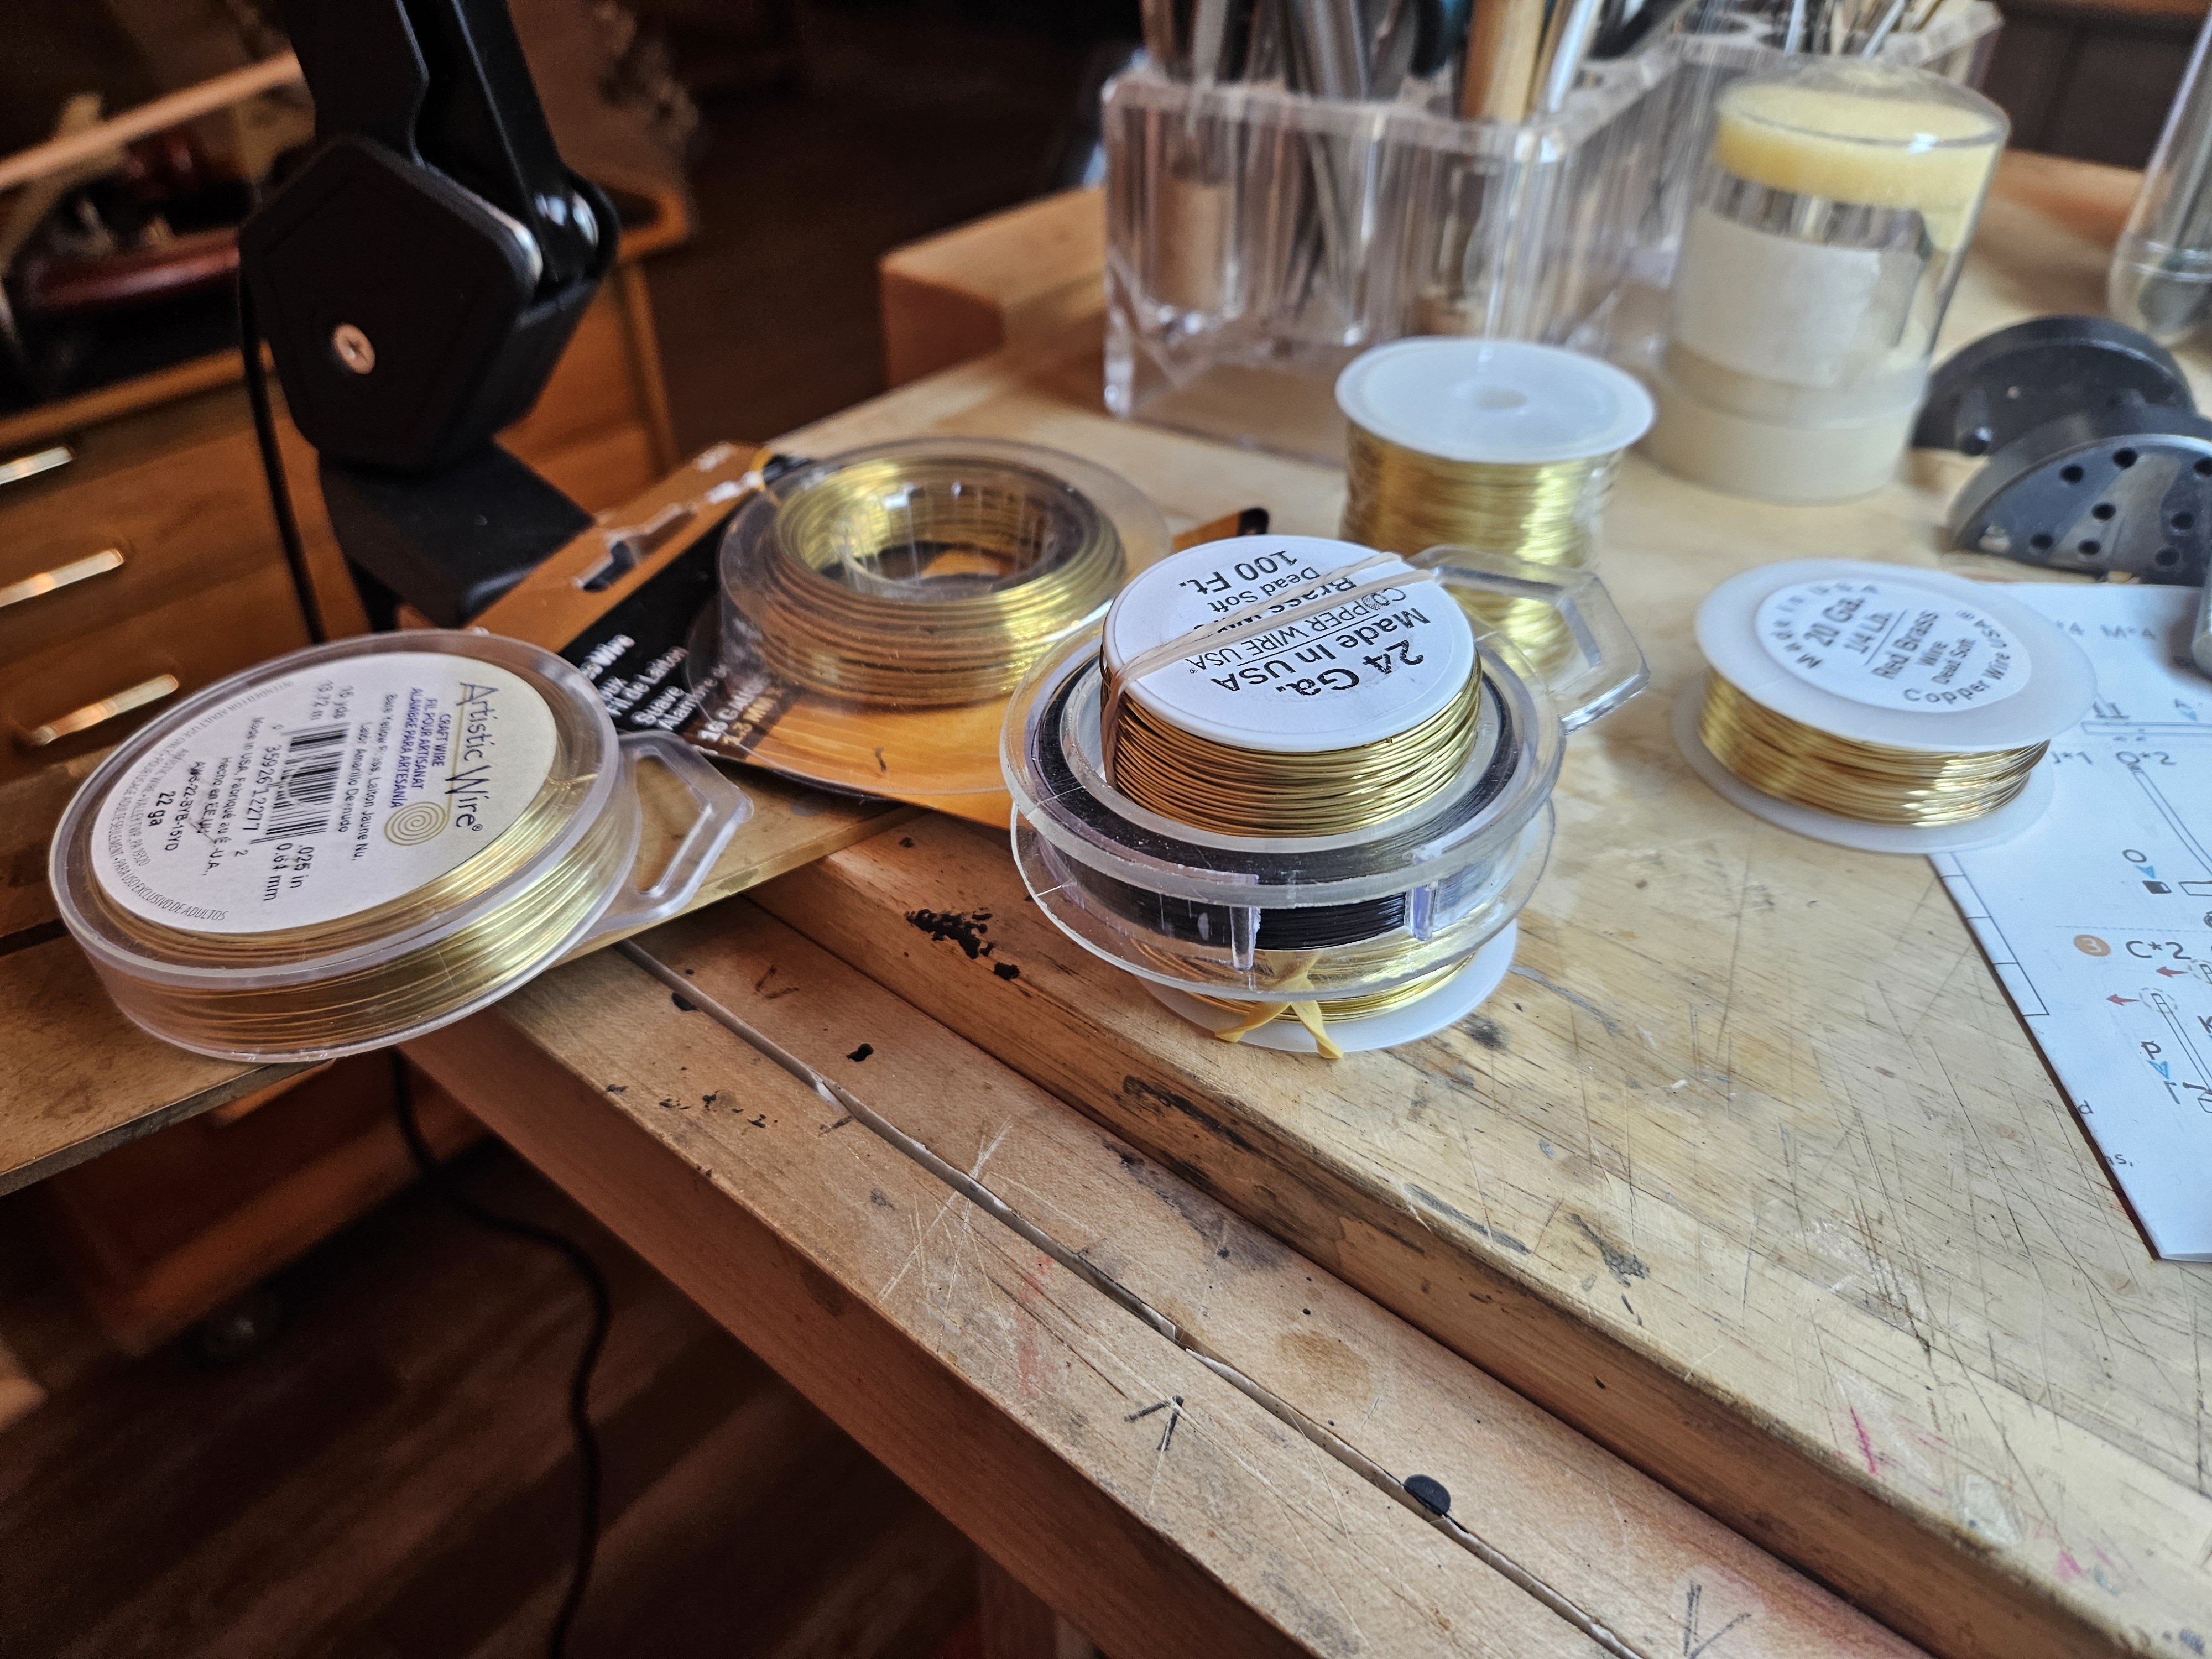
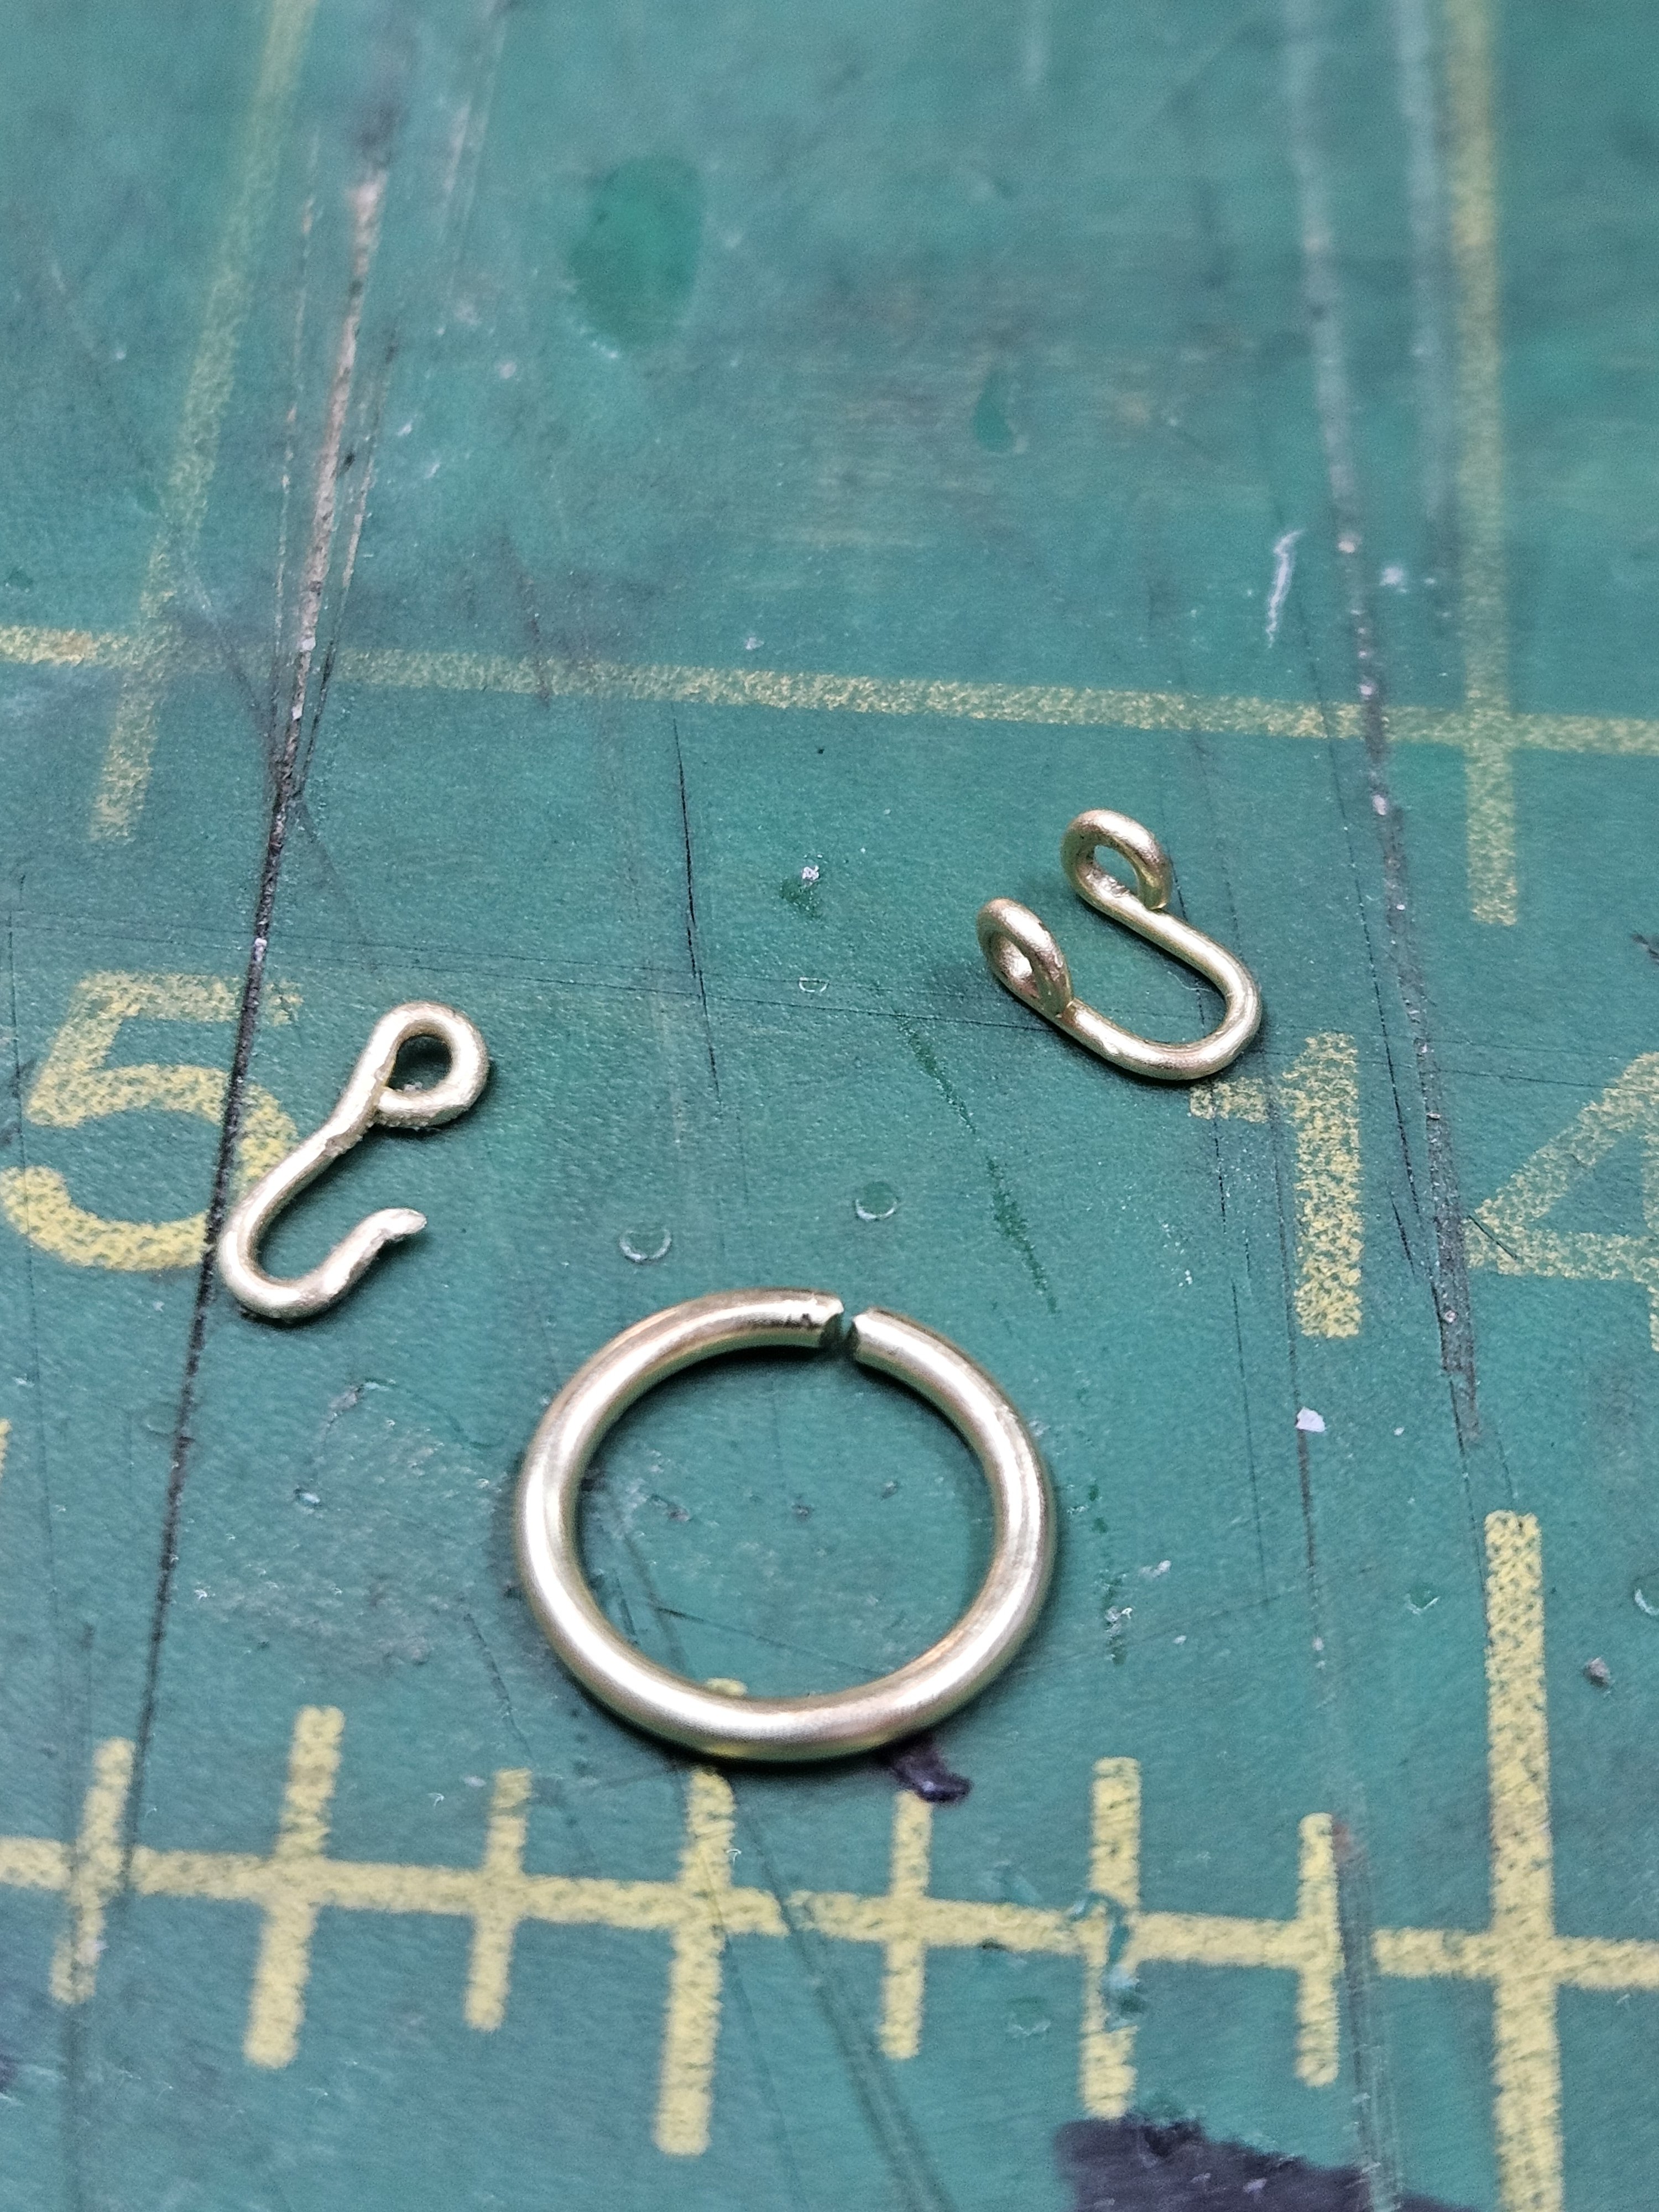
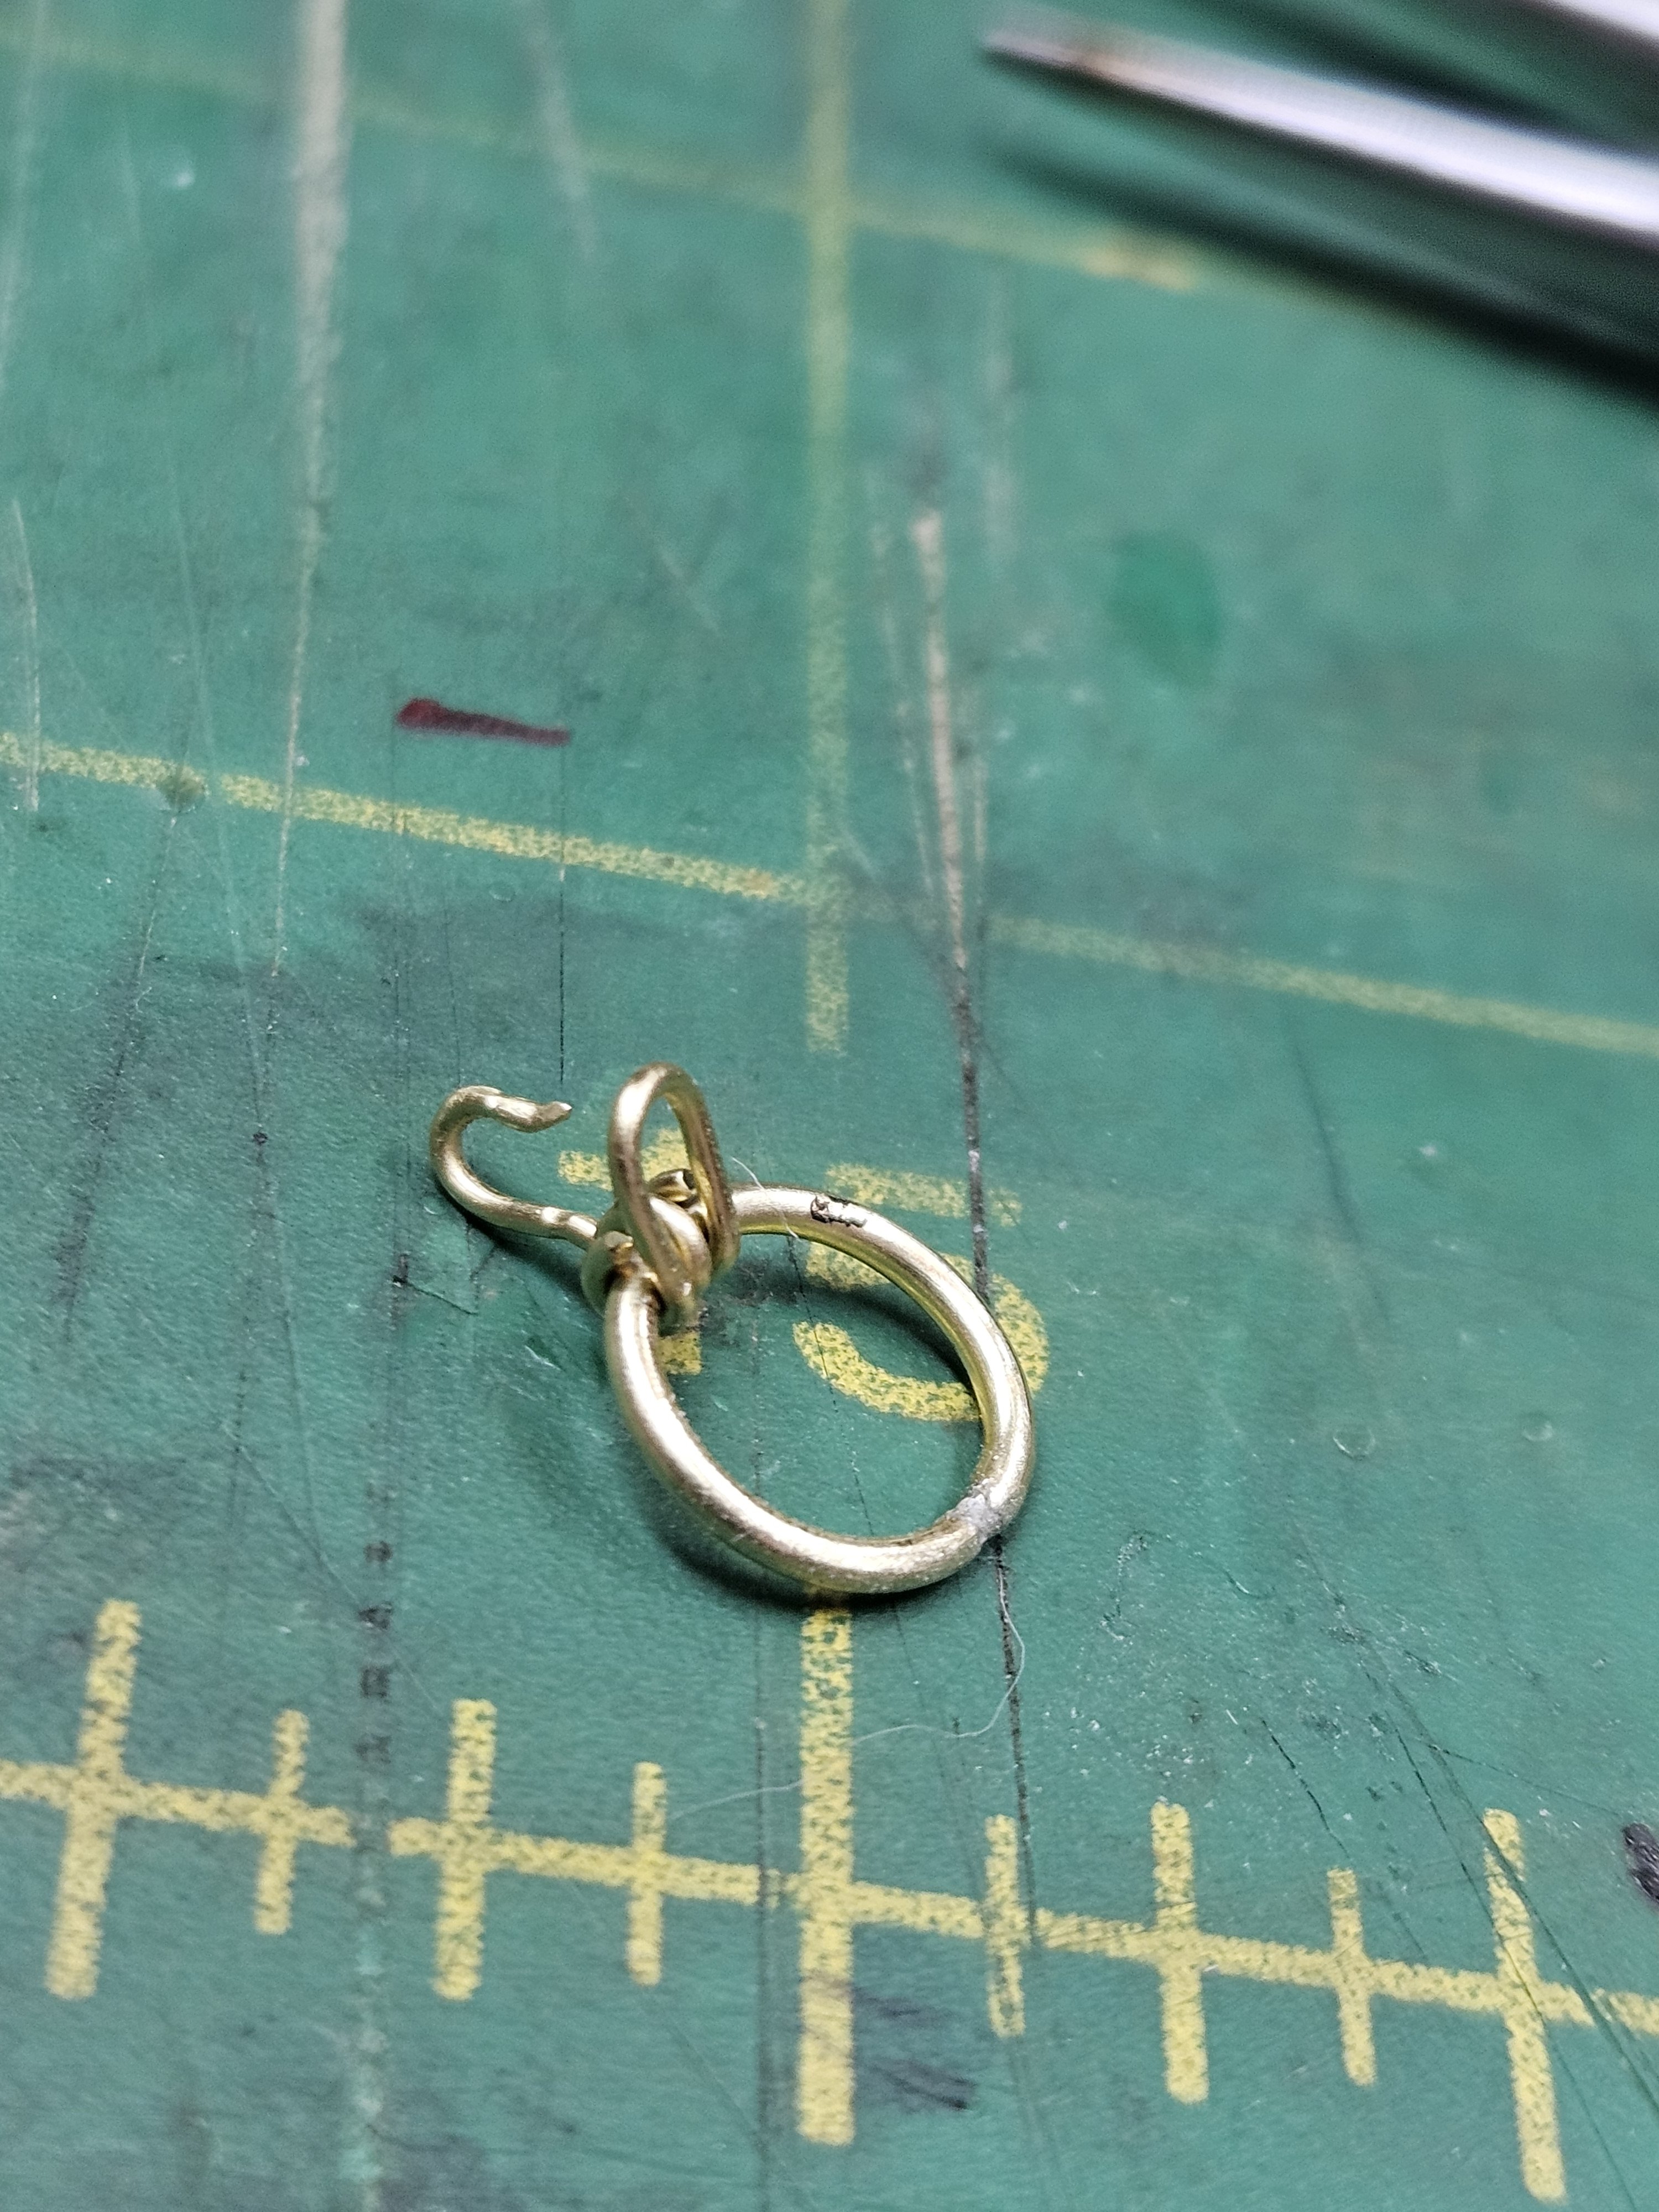
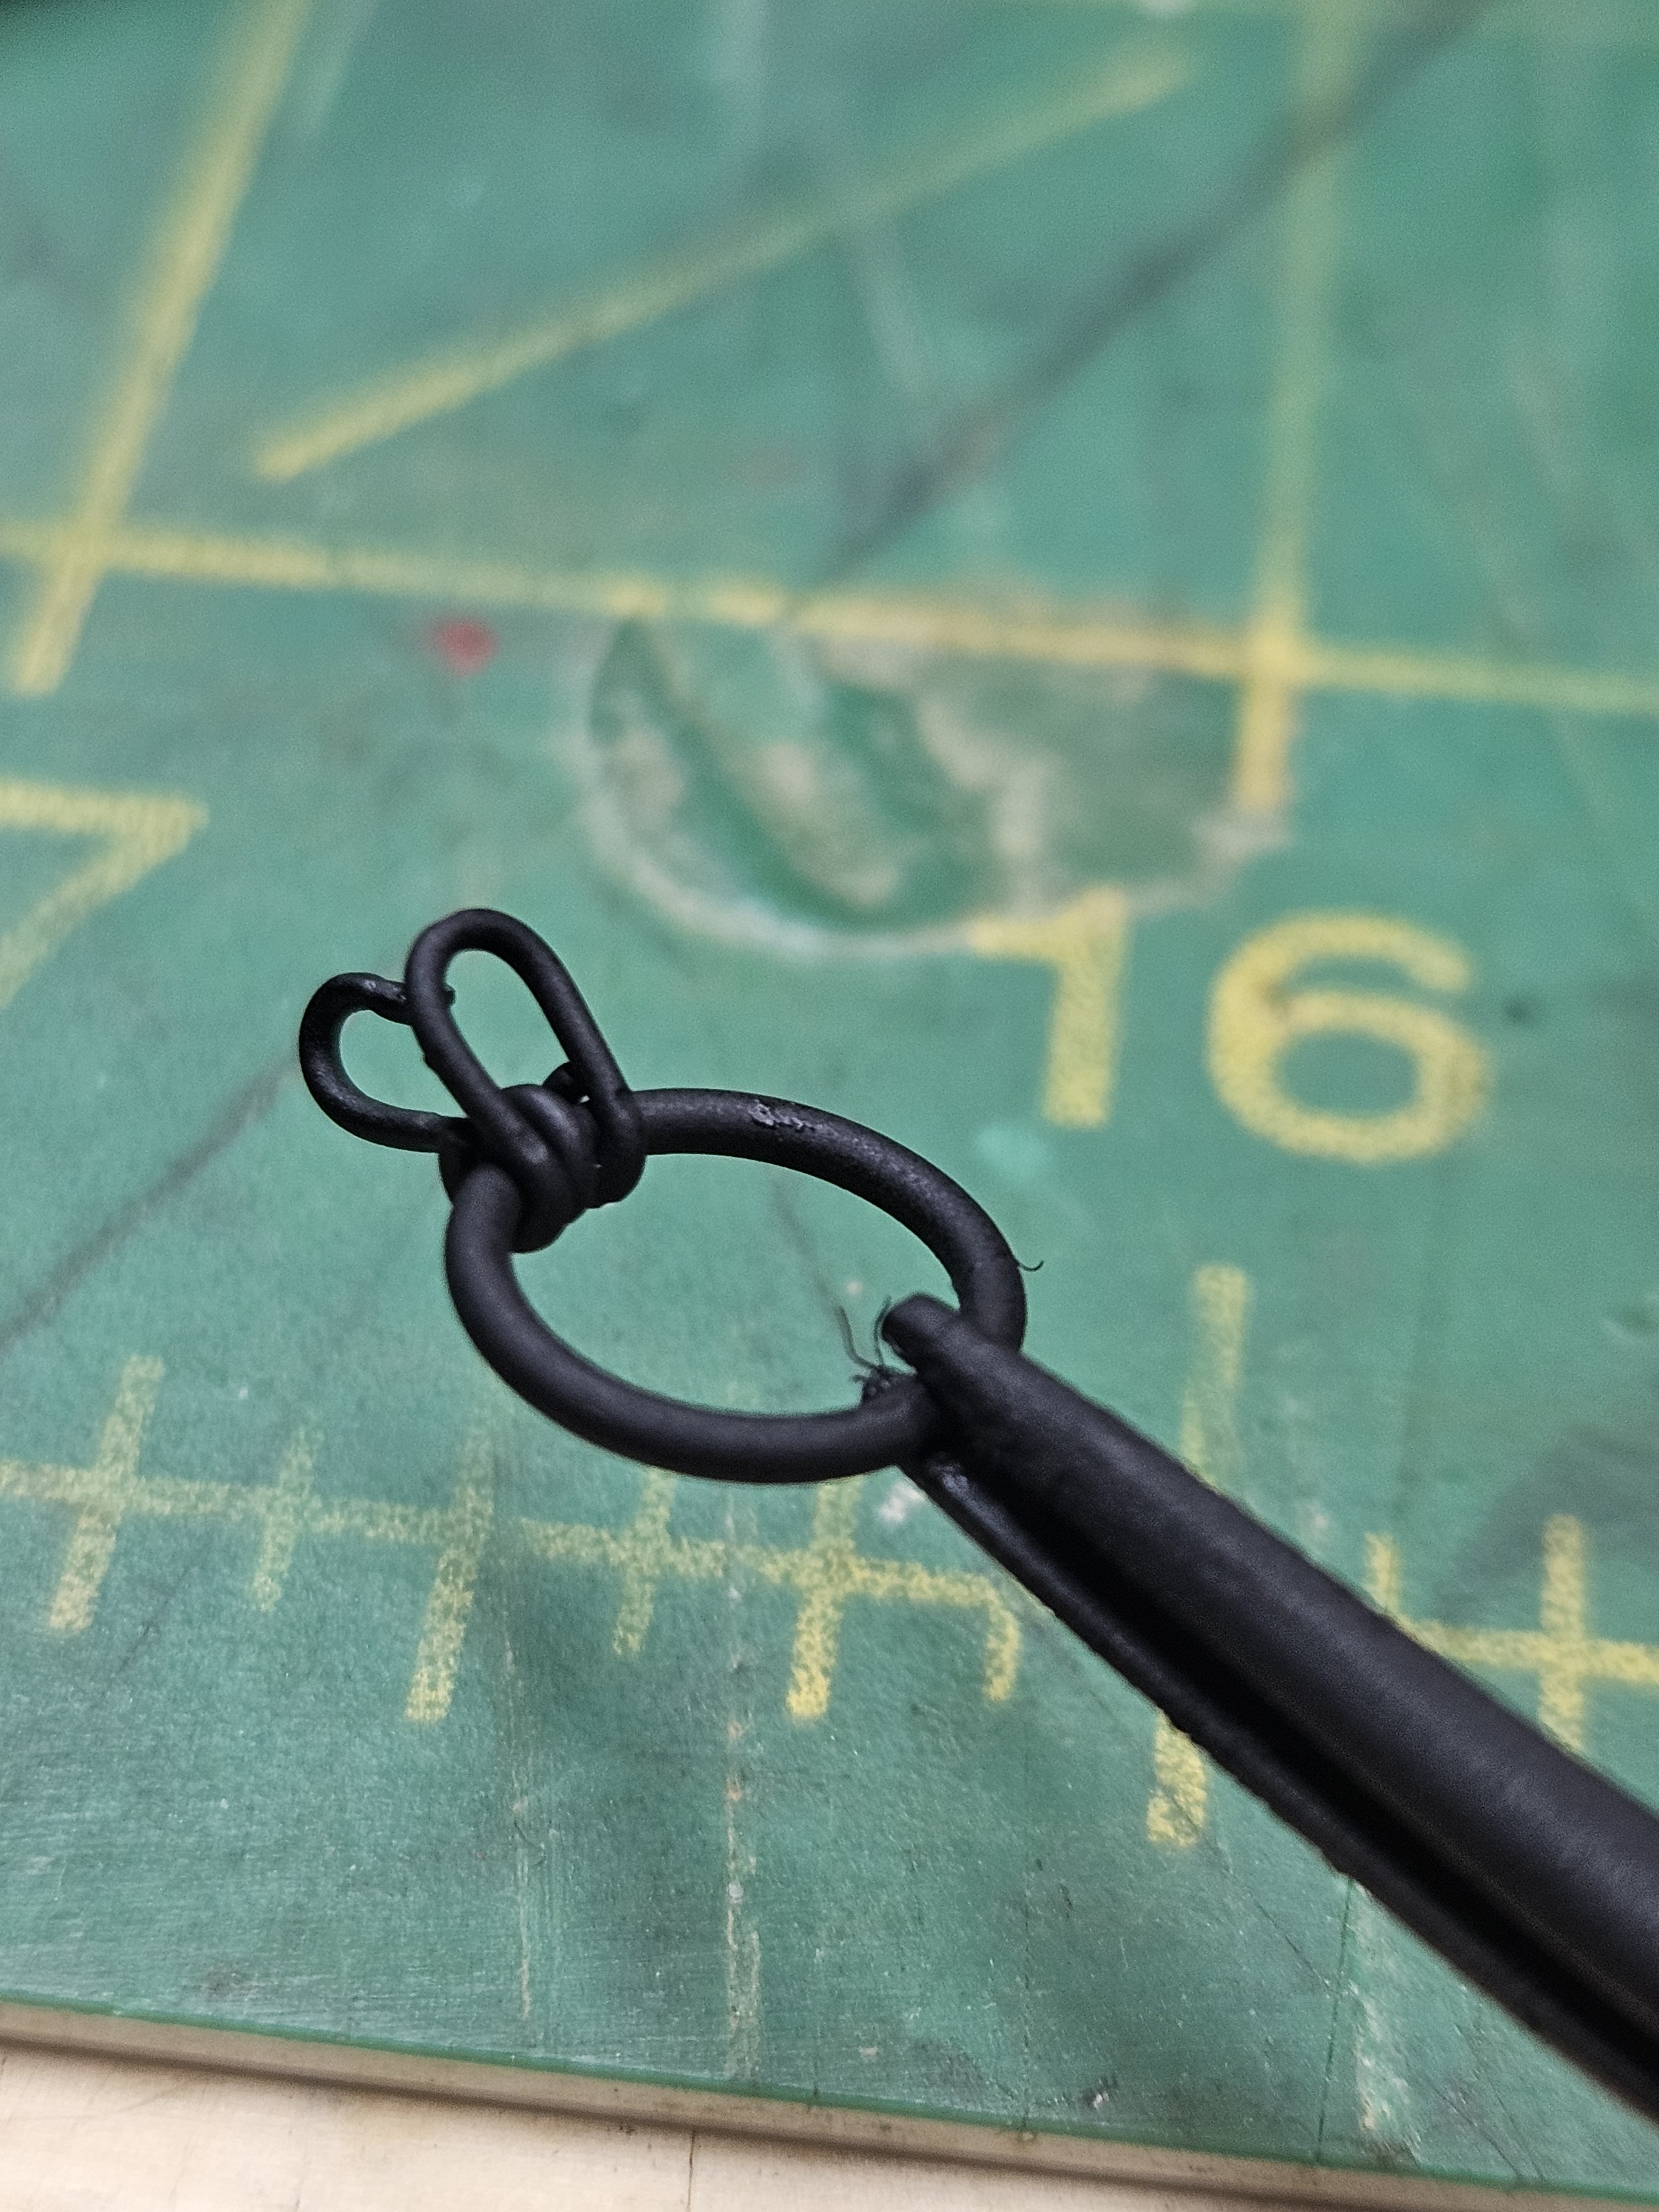
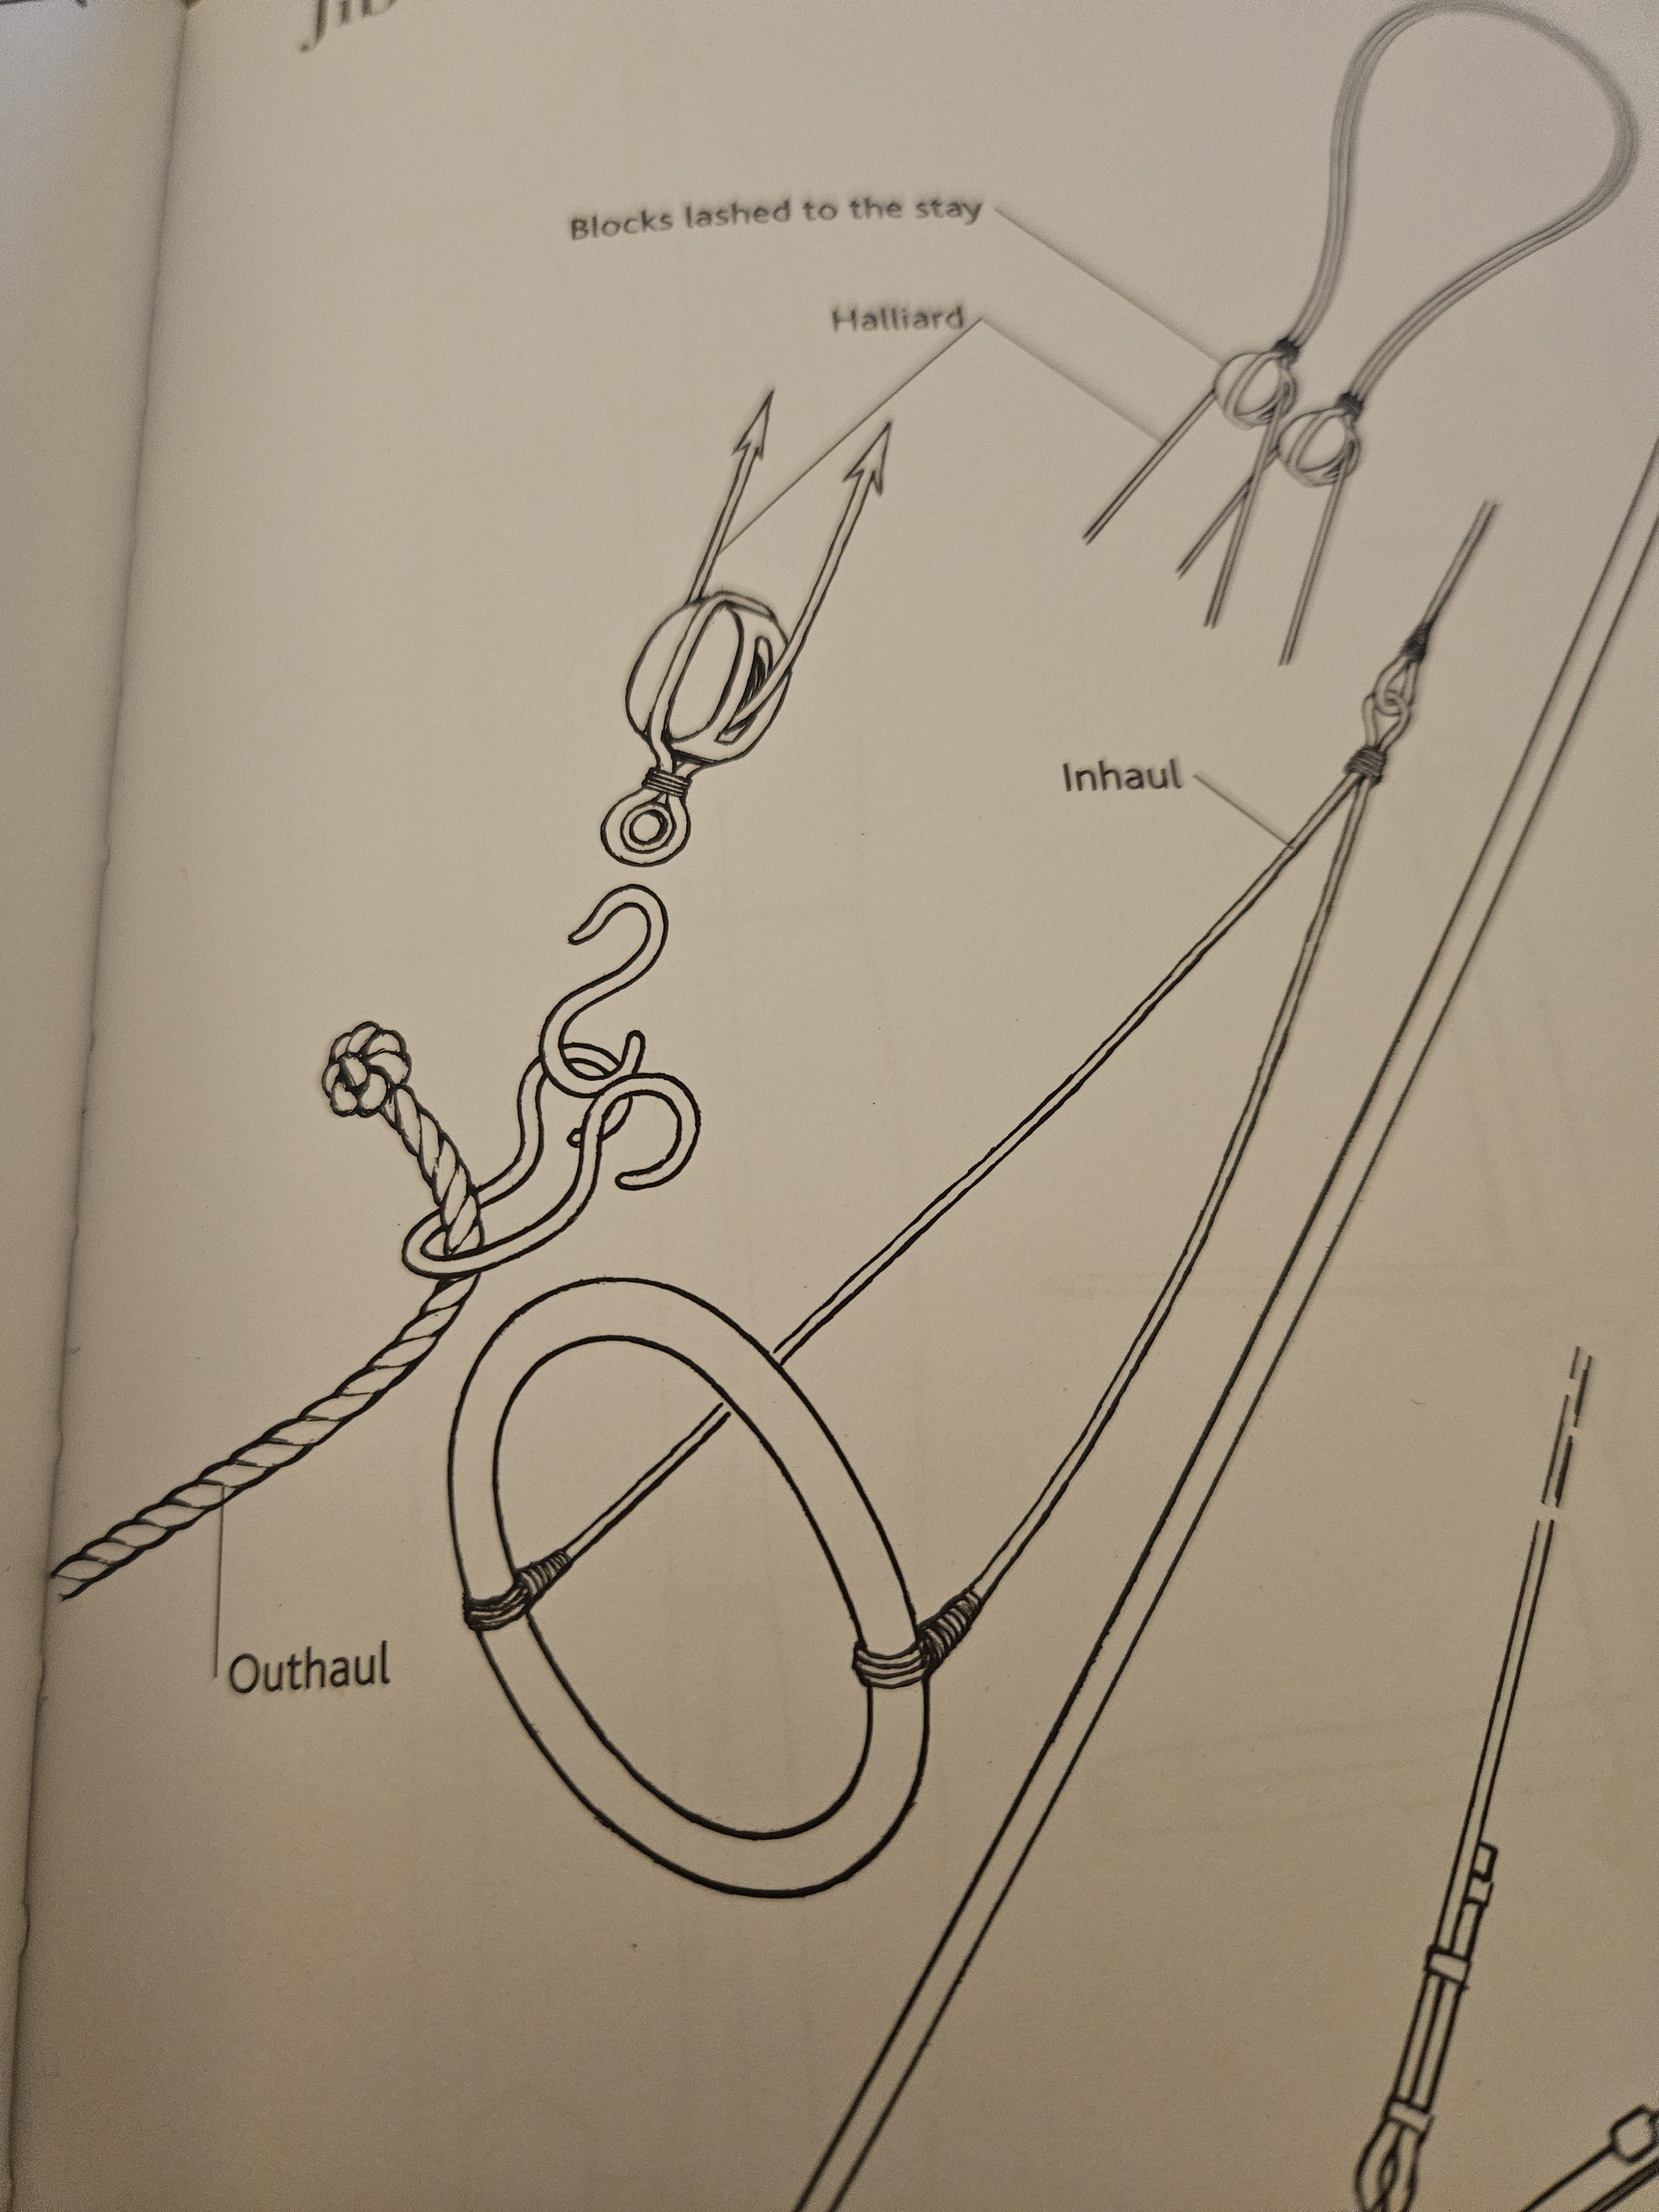
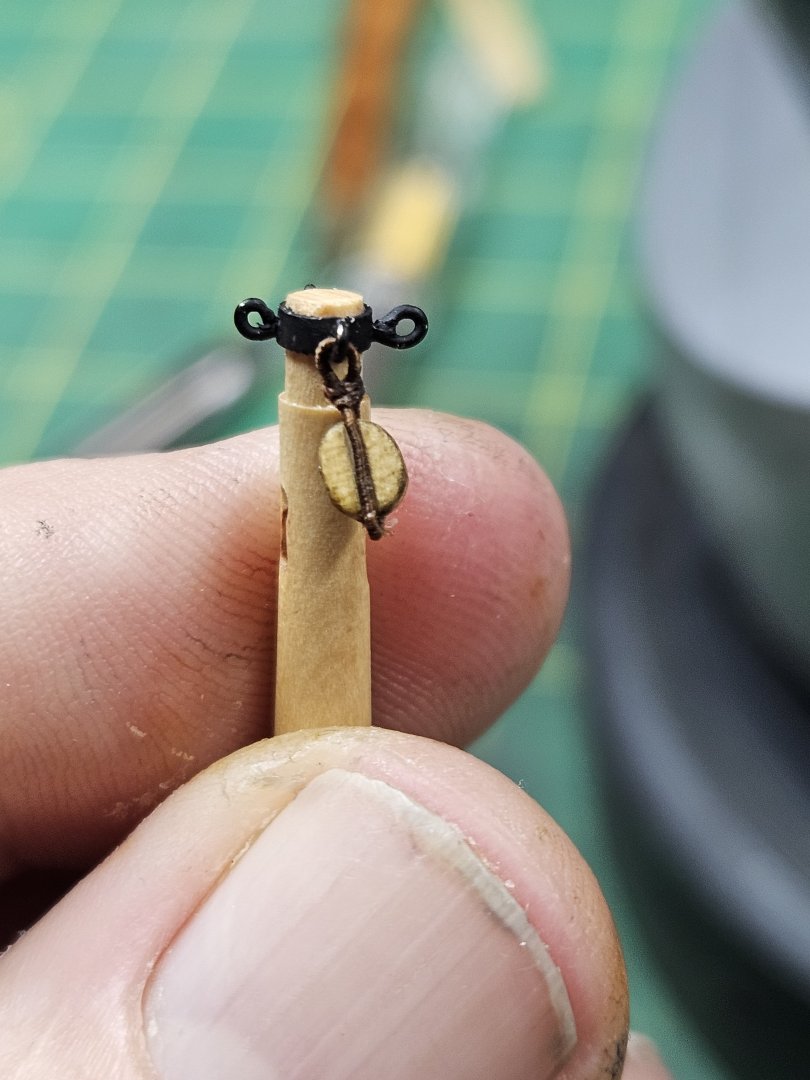
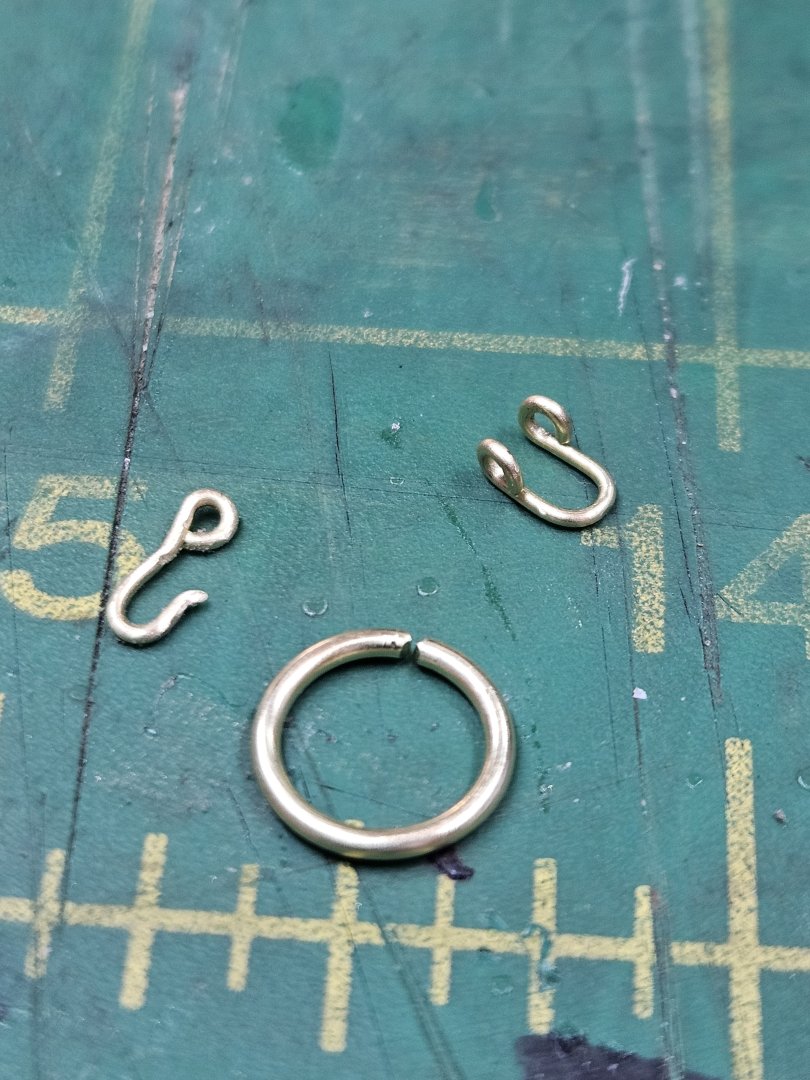
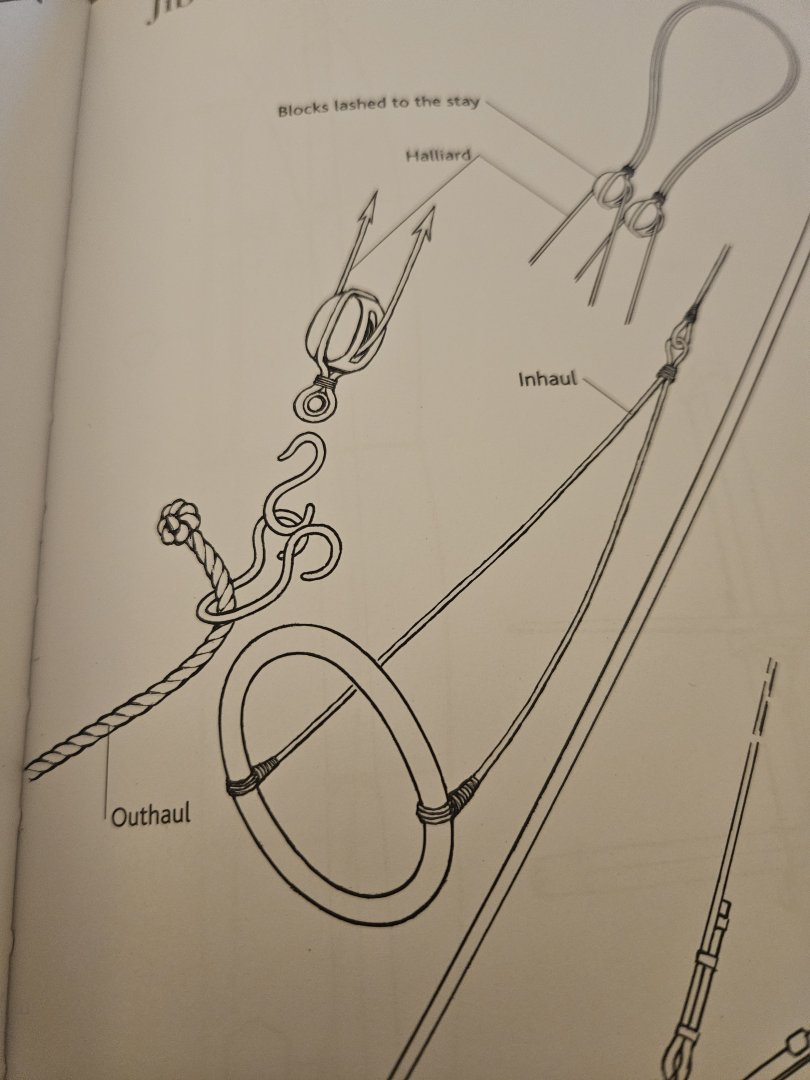
Another quick update, I made the jib inhaul/outhaul/halliard ring thingy, I don't know what it's specifically called. One of the few cases where Chuck and Lennarth Petersson agree on what something looks like. Made out of 18 gauge and 22 gauge wire. I'm also considering getting a serving machine from Syren, Chuck has the stays all fully served and since I've established the serving as fine fly-tying thread, that's lots of serving by hand. I'm also going to experiment with making thimbles from some sub-1mm brass tubing again as Chuck does it for Cheerful, but I'm not sure it will be viable at 1:64, we'll have to see if I can make it work.


- 714 replies
-
- 9
-
-
- lady nelson
- victory models
- (and 1 more)
-
Thanks Dan, and no worries my sailing terminology is barely hanging on by its fingernails 😀 Please continue to mention anything you see!
- 714 replies
-
- 1
-
-
- lady nelson
- victory models
- (and 1 more)
-
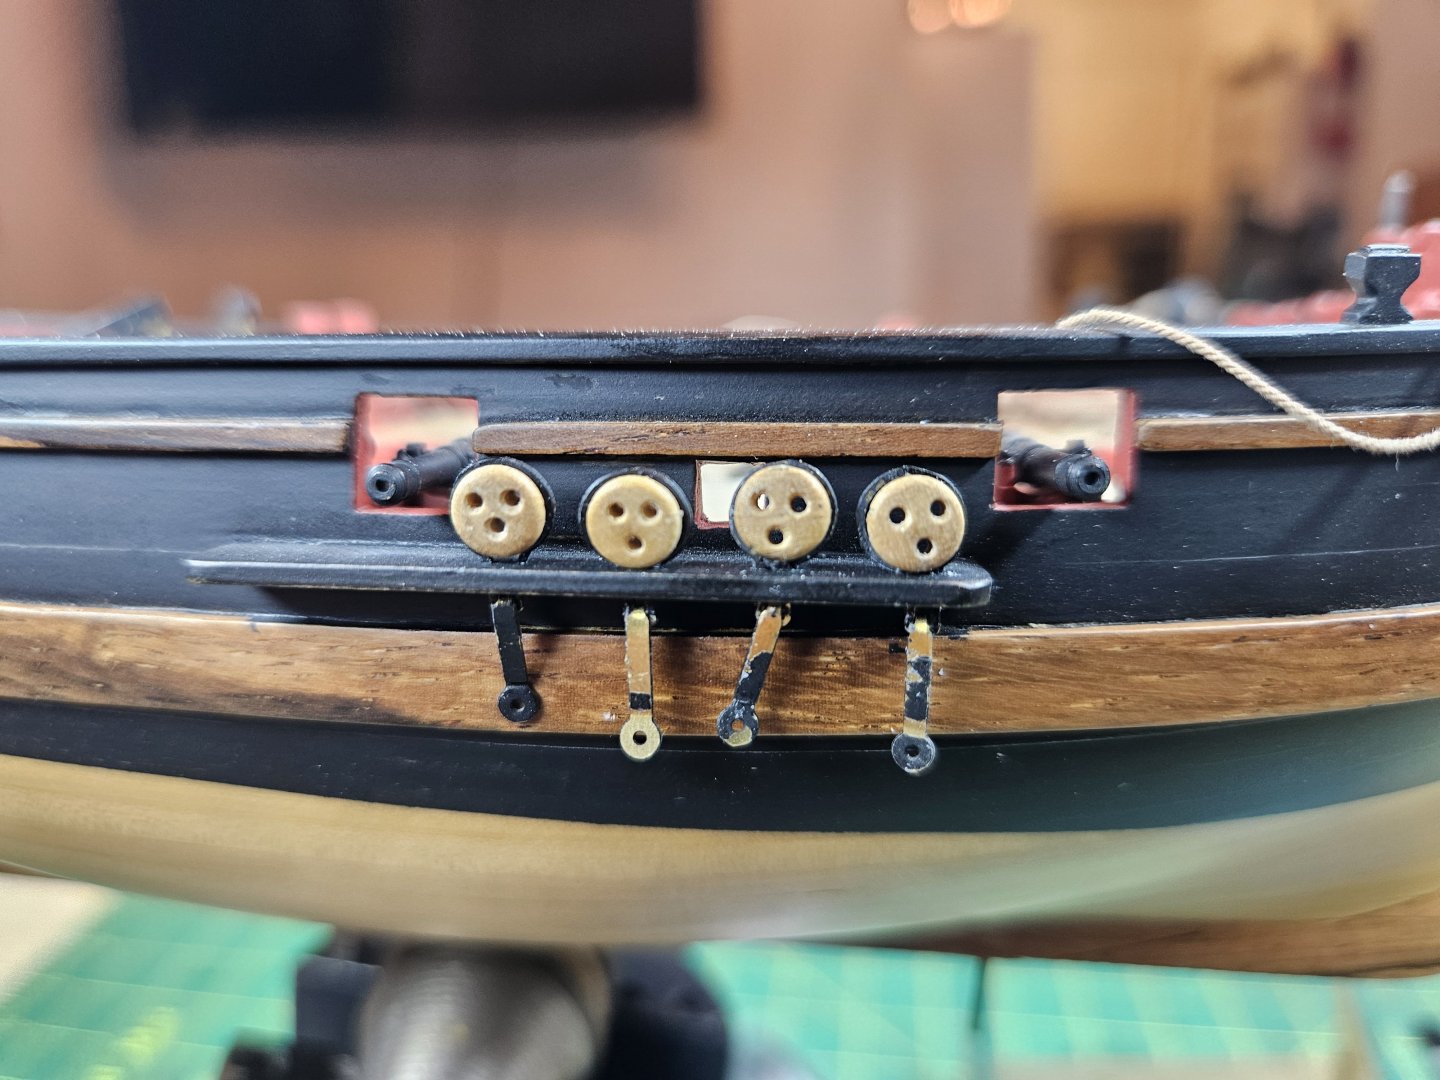
Thanks Dan, got it. But I think you mean how to attach the channels, not the chain plates? My channels are already attached to the hull and I think I used brass rod to reinforce the joint. In this case I'm talking about the end of the chain plates, seen below. I think I need to use nails here. Correct me I'm missing what you're saying.
- 714 replies
-
- 4
-
-
- lady nelson
- victory models
- (and 1 more)
-
Thanks Dan! Can you show me a pic of the pins made from tube? I have some small scale tube coming but I'm having a hard time visualizing how to use tube for the chainplate pins.
-
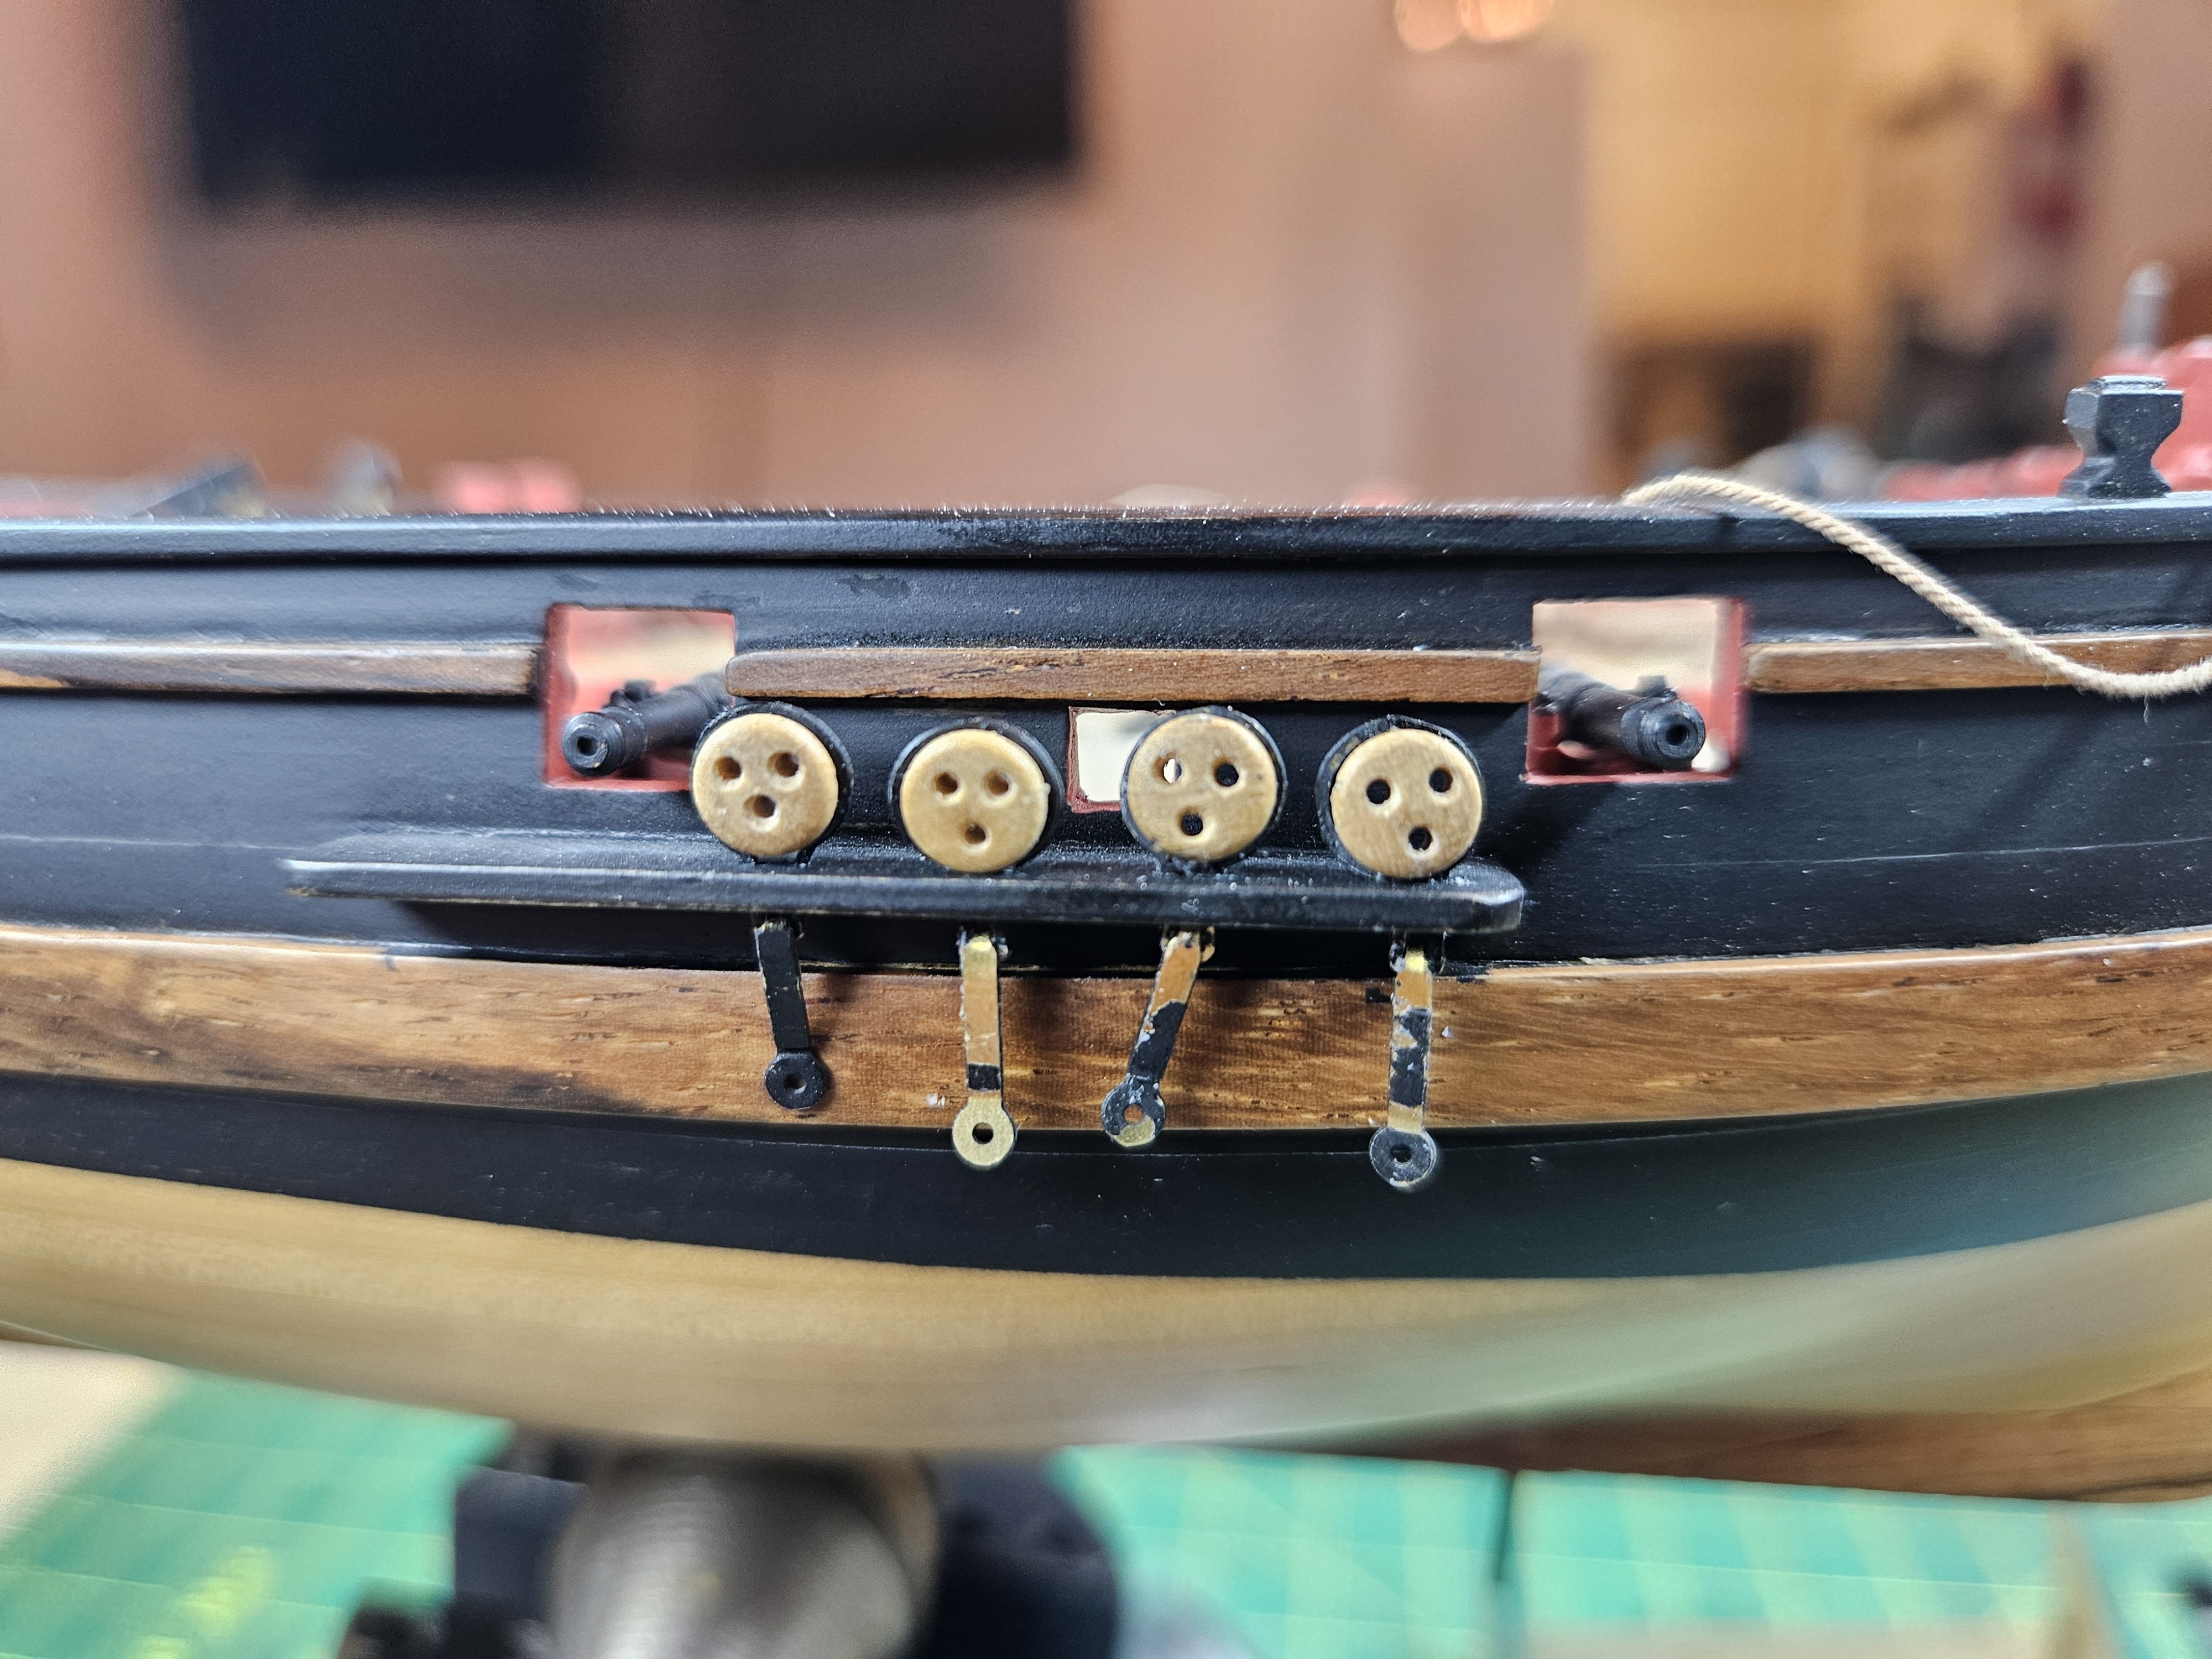
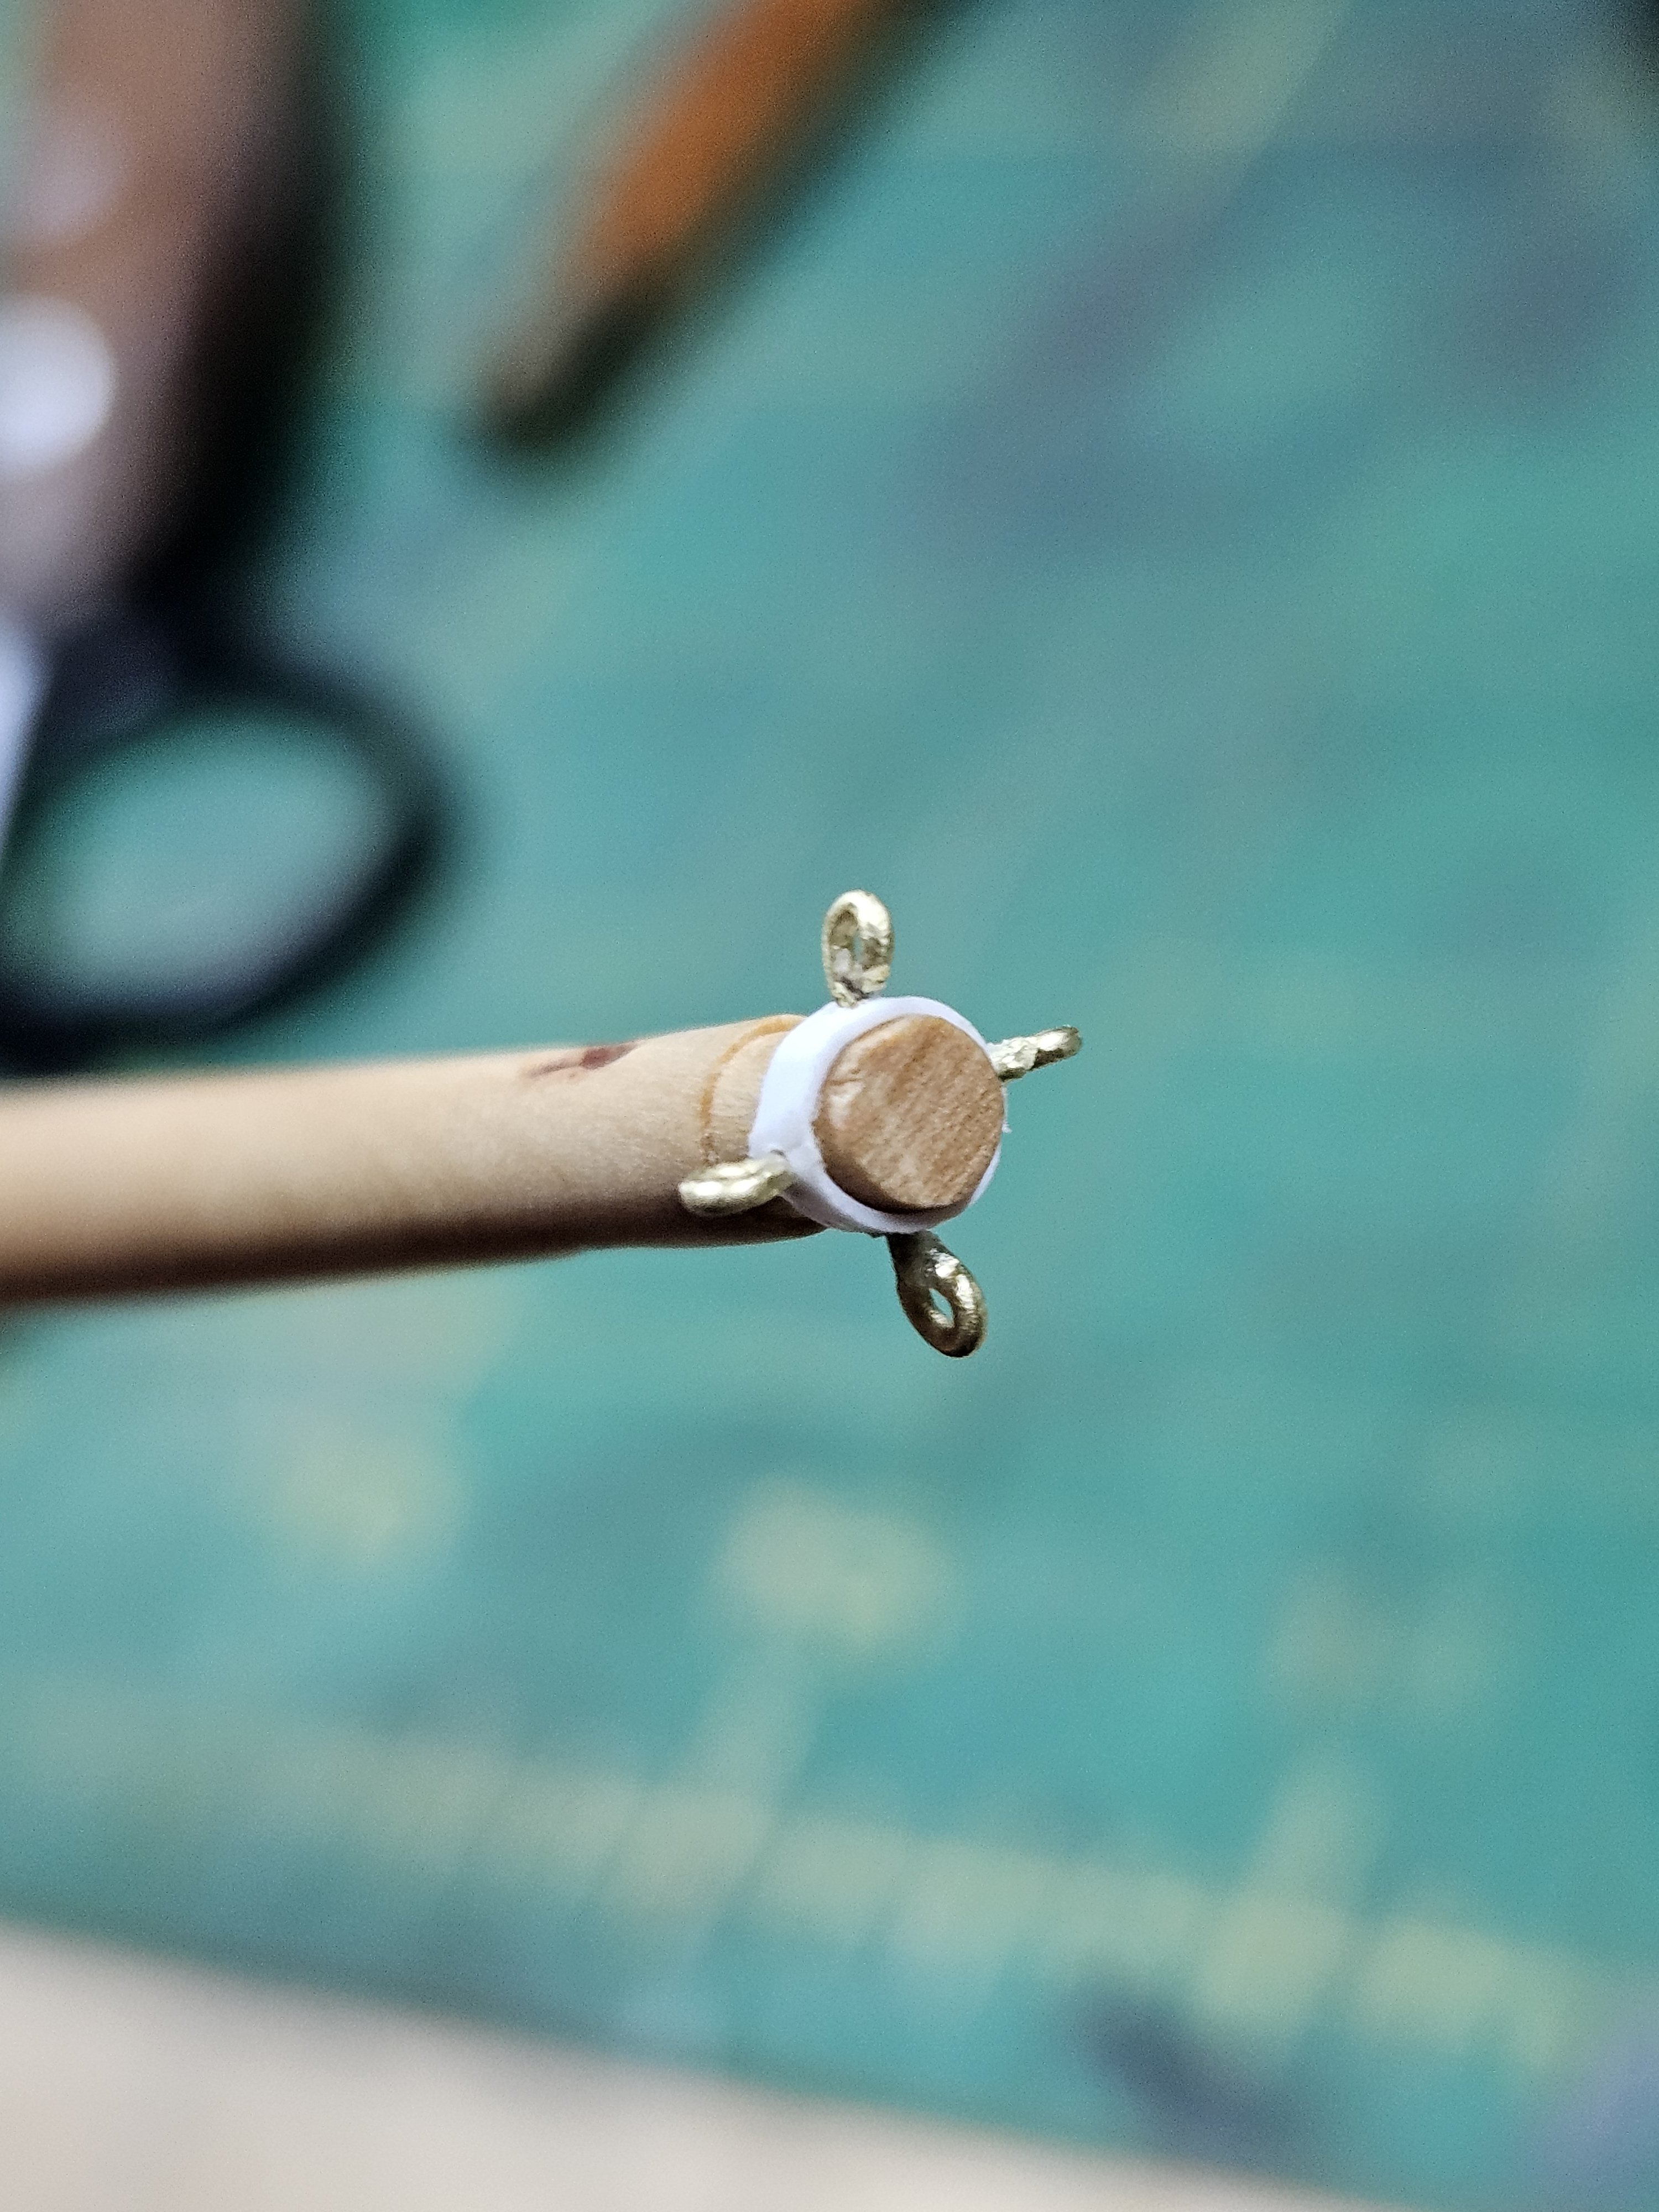
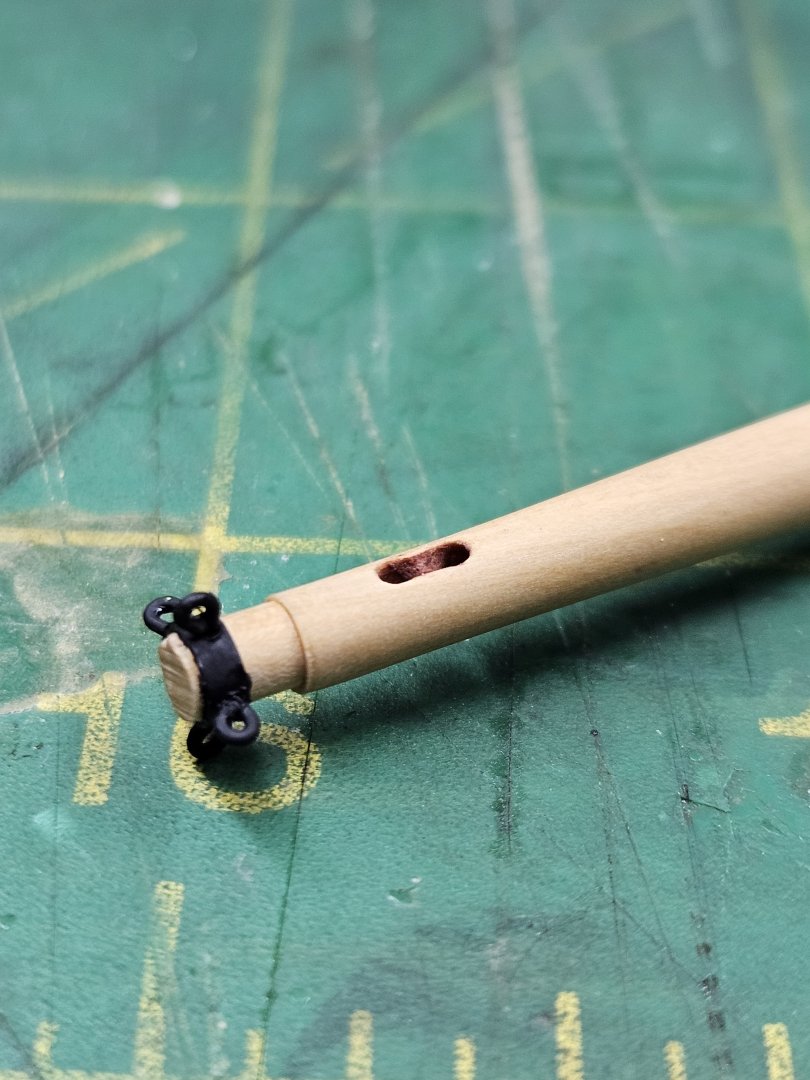
Progress is not blazing, but I finished the jib boom sans rigging. Well, a Cheerful jib boom, per plans from Chuck. Used styrene and brass wire to model the iron band at the end of the boom with eyes for the guys and stays. And I drilled and carved a sheave into the end. I think I used too big a drill making the sheave wider than it should be, but it's close enough for a first effort. And the other end is a good fit for the bits and the cutout in the bow. Still waiting for some brass nails small enough to anchor the chainplates against the hull, and I'm probably going to order a new mill this week. Next up is the mainmast, following the Cheerful instructions.

- 714 replies
-
- 8
-
-
- lady nelson
- victory models
- (and 1 more)
-
The Micro Mark one claims to be specifically for wood but it says it is simply a jeweler's drawplate. Which implies those for wire will work as well for wood. But I'm not certain on that, I have the Byrnes one.
-
Yes they do but they're about two or three time as expensive as the Micro Mark version. On the up side you can be sure they'll work very well. But yes Otto Frei, Contenti, Rio Grande all have drawplates. Actually Contenti carries some in the same range as the Micro Mark.
-
Micro Mark sells one. No idea how it compares with the Byrnes, but at $54 it better work reasonably well.
-
Try professional jeweler's bits, they are of much higher quality than anything MicroMark sells, and unfortunately the price reflects that. That said, scroll down where there are Swiss Tungsten Vanadium sets for $49 and I saw a cobalt steel set for $59, https://www.ottofrei.com/collections/burs-drills?pf_t_types=types%3AAll+Drills It's always painful to buy something like a nice set of drills but you get drills that actually work and work for a veery long time, so the investment is worth it.
-
I'm so sorry Greg, always very hard to lose such close friends.
-
I'm sorry Rusty, it's always so hard when we lose our dockyard supervisors