
MORE HANDBOOKS ARE ON THEIR WAY! We will let you know when they get here.
×


vossiewulf
-
Posts
1,477 -
Joined
-
Last visited
Content Type
Profiles
Forums
Gallery
Events
Everything posted by vossiewulf
-
 The degree to which you can bend wood is a function of how hot you get it for how long, at high temperatures the lignin that provides the strength of the wood structure gets progressively more flexible. The hotter you get it, the more you can bend it without fracture. That's why steam is much better for serious bending as it gets the wood considerably hotter without burning than other options. She looks fine as is with the bow planks covered, so no worries, just something for the next time around. Good steam cleaners that produce lots of steam on demand are pretty cheap these days, and all you need is a clear plastic tube to attach to the output end of one of those and you have a perfect plank steamer. Leave them in there for 15-30min and you'll be able to tie bows with them. Ok you won't be able to tie bows with them but you can bend them around very tight curves. Look up Kortes' boier build, it's apparently against the law in the Netherlands for a boier yacht to have a straight line anywhere, and their hulls are closing in on being circular. He had to do lots of severe wood bending for that, all done with steam.
- 90 replies
-
- 2
-

-
- english pinnace
- Finished
- (and 1 more)
-
Cleaning Small parts prior to blackening
vossiewulf replied to src's topic in Metal Work, Soldering and Metal Fittings
Sam, I finally had success blackening with a good finish after rinsing the parts well in alcohol to clean and remove any finger oils, and then leaving the parts in vinegar for 30 min or so. You have to do two things- generally clean the parts, and remove the oxide layer so the blackener works. You could just use your ultrasonic cleaner for the cleaning part, and use vinegar to remove the oxide layer. I also had better luck dabbing the blackener on with a q-tip and periodically rinsing it off in water rather than dipping the parts in, as nonsensical as that may be. -
Ok so now do I put hawsers going to both anchors, and have both of them going around the windlass? I agree that letting out an anchor by easing out line wrapped around the windlass would be more controlled, but even the anchor on a cutter was plenty heavy, would that have been a reasonable process? I'm thinking it was heavy enough that you'd have to go very slowly, and all of the anchoring procedures I've read seem to involve the anchor going down quickly.
-
Nice job Slog! F-8, was called "the last of the gunfighters" as it still carried guns during the time where they were being eliminated in favor of missiles, which turned out to be a bad mistake at the time. Today of course guns are pretty much superfluous, the chances of planes evading both modern radar and dogfight missiles is really pretty slim. As for the F-8, everything I've read says that pilots loved flying it, the maneuverability and power were very good for the time. And even though the F-4 proved popular, they should have gone with the Super Crusader, it would have flown rings around the Rhino.
-
Wow, now that's a busy deck. I thought you said you hadn't seen any contemporary models with turns around the windlass? That one has both anchor hawsers on the windlass.
-
Thanks to everyone for the information and comments. As Greg notes, having turns around the windlass helps explain to the less knowledgeable how the anchors were worked. So I think I'm going to leave the starboard one as is, the ship just raised that anchor and the hawser will be detached and stowed shortly, and just have the port one stowed- I'm not sure how they even fit the runs of hawser on this small and busy deck, they had to have the train tackles stowed at least, and I have those on deck.
-
Lots of knives here from reasonably good to extremely good. Western and Japanese knives. If you want to try western knives, try Pfeil and Two Cherries and they also carry Ron Hock's blades. And any of the Japanese marking/woodworking knives here are going to be Rc63 or so and therefore sharpenable to a very good edge. You just regrind them to whatever you want and make a handle. And if you want an insanely good edge, buy really good Japanese marking knives, they'll be pushing Rc64-65, but edge fragility is an issue.
-
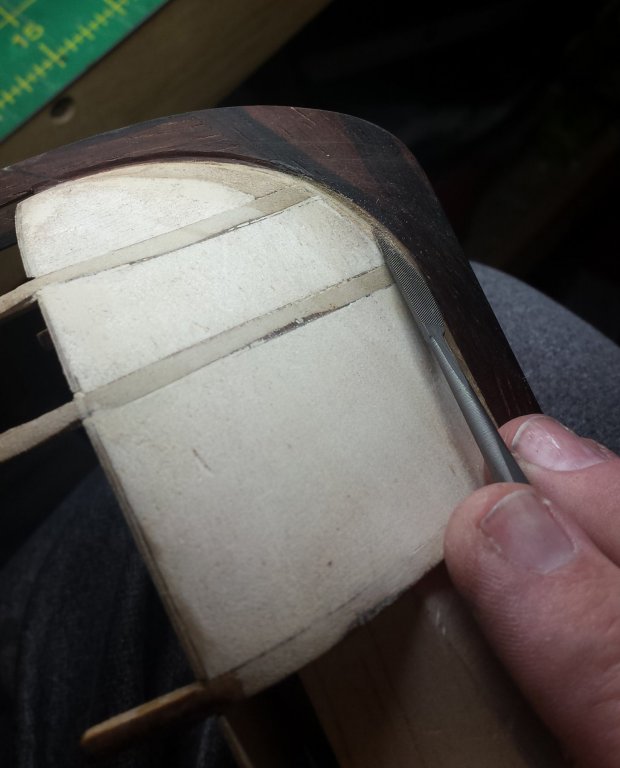
Jo, looks pretty good to me. However I would even up the bottom of the blocks/bulkheads. Either you need to add material between frames 1 and 2 or remove material between frames 2 and 3, or both. This is going to establish where your planks are coming into the stem and not too far from now, you probably have to cut a rabbet (US) or a rebate (UK) along this line so that the planks will fit correctly, and you want the substrate (fillers and frames) to flow smoothly into the rabbet. Below is me smoothing out the rabbet on the bows of my Lady Nelson, easier to understand by seeing it.
-
Thanks @el cid, @mtaylor, and @Roger Pellett. The question remains though, what do I do on the port side? Run a hawser to the port anchor and run it around the windlass barrel, assuming they could loosen one or the other as necessary? Or do I leave the hawser off entirely?
-
Don't hold your breath waiting to be impressed by the sharpness of Flexcut, their steel is just average. I bought one of their knives, it ended up being used to open boxes that arrive at my door.
-
Thanks to @el cid, @allanyed, @Roger Pellett, and @popeye2sea. Here is my problem: I am trying to rig anchors on my cutter complete with anchor buoys. But as you see, once a hawser is bent to an anchor, there is no way to either engage or disengage it from the windlass- that has to happen before the hawser becomes attached to the anchor. But at the same time, they can't raise an anchor unless it's engaged on the windlass. So I am thinking it simply wasn't possible for a cutter with this type of windlass to drop and recover two anchors, and in terms of rigging I am inclined to leave the hawser entirely off the port bowyer because I can't see any way for both hawsers and anchors to be in action at the same time.
-
Hope anchor issues go here and not in the rigging section. Anyway, I am confused as to how one operated two anchors from one windlass, was not the normal anchoring process to drop one anchor, drift, drop another and then winch yourself back to midway between the two? Or did small vessels like cutters only use one anchor? I can't see how you could have both hawsers wrapped around the windlass and still be able to operate on one at a time, but if you don't pass the hawser around the windlass before dropping an anchor, I have no idea how you're supposed to drop said anchor safely, much less how you're going to get the hawser around the windlass to be able to raise that anchor post facto.
-
It looks fine Jolene, that's what it should look like, nice job. Only thing is if you're going to add more balsa blocks, you want to do that all at once because as you see, when you sand down the balsa you're sanding down and beveling the frames also. You really want to do that process all at once to end up with a fully smooth result, as each frame needs to be sanded and beveled into something exactly halfway between the frame in front and the frame in back.
-
That's the only solution if we don't have dimensions wrong somewhere- they'd have had to shorten the breeching ropes until the carriage couldn't really move at all, and hope the bulwarks could take it. And you'd have to work the guns outboard, probably over top of the rail rather than trying to do it through the small ports.
- 574 replies
-
- 4
-
-
- cheerful
- Syren Ship Model Company
- (and 1 more)
-
Yes, I have the advantage of doing an imaginary ship that has some very odd features for a cutter (like the stern) so I can pretty much do whatever I want and get away with it. I changed the way the main boom will be rigged, replaced the windlass and boomsprit mount to something that looks like Trial, pretty much making it up as I go along. I like that in one respect but certainly will be looking to do specific ships in the future. And yes, no matter what you learn there are simply now more questions.
- 574 replies
-
- 3
-
-
- cheerful
- Syren Ship Model Company
- (and 1 more)
-
I am confused also about cutter bow ports, every model I've seen has not enough room for the guns one way or another, Lady Nelson is even worse than Chuck's Cheerful. I totally gave up on the idea of placing guns at the bow as they were much too cramped. Even looking at the contemporary models I see the same problems. Trial for example, although not really built for fighting, has absurdly cramped forward ports, I don't think you could even fit in a carriage. The others in the gallery aren't much better, and none are displayed with guns in the forward ports. So it seems like they just really liked having holes in the bow that didn't help them do anything and which probably shipped lots of water.
- 574 replies
-
- 1
-
-
- cheerful
- Syren Ship Model Company
- (and 1 more)
-
MONTAÑES by Amalio
vossiewulf replied to Amalio's topic in - Build logs for subjects built 1751 - 1800
-
They used what was called orthochromatic film at the time, and it does odd things with colors. For example, yellow will appear very dark, and there are photos of planes out there that look like they have black noses when we know they were painted bright yellow. So it's basically impossible to get colors from photos. Also, the paints they used (as well as the German printed lozenge fabric) faded quickly when exposed to weather, so planes recently vs. not recently painted could look very different. My suggestion is to research what is the current best guess for various colors, but don't stress about it too much, you'll never get it exactly right unless you had a color photo and then you could match a plane's appearance only on that day.
-
Approach carefully, generally rasps are very rough on wood, leaving deep scratches. Don't make them deeper than you intend to sand. Not sure why it is necessary, any plane, chisel, gouge, or knife should be able to trim down balsa easily if they are sharp. But a rasp will indeed remove wood quickly.
-
I use tack cloths from Liberon, no wax or silicone and tacky while leaving no residue. Not that a damp cloth won't work, I just prefer not to get any water on wood once I have started a finish. OTOH we should probably just leave Keith alone to finish his finish before digressing on another discussion of finishing techniques
-
Jolene, you'll find it easier if you get the balsa to the right thickness to fit between two bulkheads, and then mark each side by tracing the bulkhead in front and in back on each side of the balsa piece. You can then use a scroll saw or any number of other tools to shape it down very close to what is needed while off the model. Then when you glue them in, there's just a bit of sanding to do. Also, if you can, you try to orient the grain of the filler blocks lengthwise to the ship, that makes shaping the them much easier.
-
What's NOT to like about a candy cane-painted capstan that's actually correct for the period? I think you'll get a universal thumbs up for that one.
- 756 replies
-
- 3
-
-
- galleon
- golden hind
- (and 2 more)
-
Your best option is to go to Syren and get a range of sizes of replacement line, it's much better than that from the kit, whatever that kit is. Museums recommend you do not use beeswax as it is acidic and will eat away the rigging in the long run. If you want to use wax, use paraffin. For what sizes to use, you need to buy books on rigging and fitting out ships.
-
I found some good ones at Cornwall.


