DBorgens
-
Posts
327 -
Joined
-
Last visited
Content Type
Profiles
Forums
Gallery
Events
Everything posted by DBorgens
-
 Audie, I have to admit I'm with Sjors, more pictures! Reading your log is like sitting in the living room talking to many friends and I love it for just that reason. So please, keep chatting all, and let's toast the 100 page mark (sooner than later). BTW, nice purchase from Chuck, the quality shows. I'm definitely upgrading guns when the time comes. Dave B
- 2,191 replies
-
- 1
-

-
- confederacy
- Model Shipways
- (and 1 more)
-
Glen, Very nice work. I will follow your work as I enjoyed your Pegasus log. You provide many great tips in your log to help us less experienced. Please keep posting and providing photos. I appreciate your desire to "back off" a bit but I expect to learn much. Welcome back. Dave B
- 101 replies
-
- 1
-
-
- victory models
- amati
- (and 2 more)
-
Maybe in a hundred years I could aspire to such accuracy and skill! Danny you inspire us. Keep up the great work and many thanks for your log. Dave B
-
Jake, They illustrate the block in the instructions. Take a close look at the stern view on the plans along with the side and plan views. Start with a block that appears about the right size and begin carving and sanding. If you aren't sure, practice with a scrap block of balsa to work out hte size and shape. That will give you a good template to make the parts out of the basswood. You may need to laminate a couple of sheet or wide strip pieces to get the block thick enough. Pleae consider starting a build log. This is a great way to get help and MSW has the best . Dave B
-
Your sterm blocks look good. Just make sure they fair well with the planking strips. You'll have a opportunity to shape the tramsom as there is more to build up later. I'm sorry I don't have any pictures to illlustrate. Just remember, if you sand off too much you can laways build it back in. Microballoons and epoxy work well, I know because I had to use some. Dave B
-
Michael, thank you. I started with Bluenose because I liked her lines and Bob Hunt's practicum. The farther I get, the more I appreciate her. Bob, my thoughts exactly. That led me to setting the main and fore sails before stepping the masts. So far, so good. Needed to temporarily rig the gaffs to keep the sails out of the way. That exposed a couple of poorly tied blocks which needed rework. By the time I'm done, there won't be much that was not done twice. I did leave the top sails off since they appear easy enough to set in situ. BTW, I posted a simple seizing of the sails to the hoops in the rigging forum. Dave B
- 43 replies
-
- 1
-
-
- bluenose
- model shipways
- (and 2 more)
-
Harvey, thank you. Will we see you next weekend at Floyd's? Bob, thank you, credit where credit is due. I was working form feeble memory, but I am pleased how it turned out. Please do post yours. Have you started rigging? I know summer is tough to make progress but I would like to see your progress (I'll probably learn more ). Dave B
- 43 replies
-
- 1
-
-
- bluenose
- model shipways
- (and 2 more)
-
Druxey, thank you. Frankie, I did not know that. To think, I was only trying to get close to scale. Dave B
-
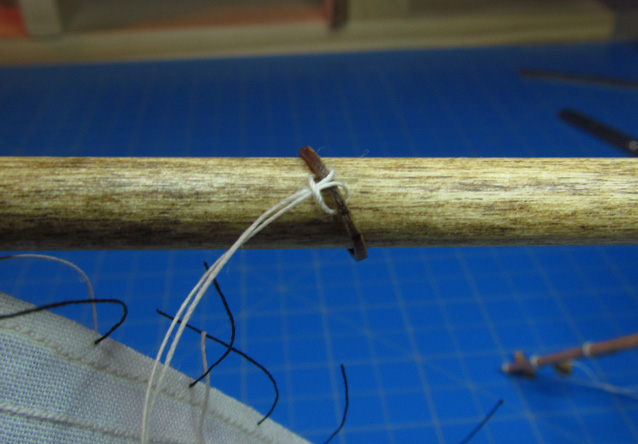
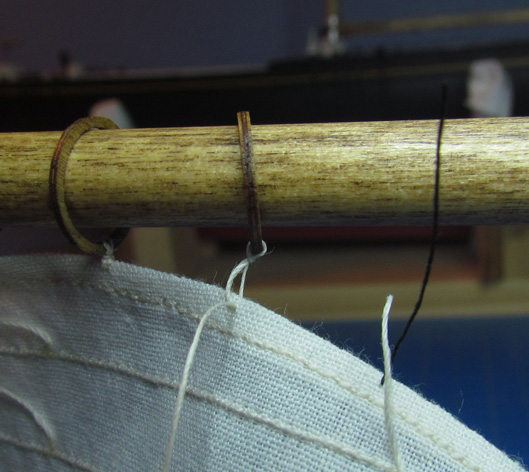
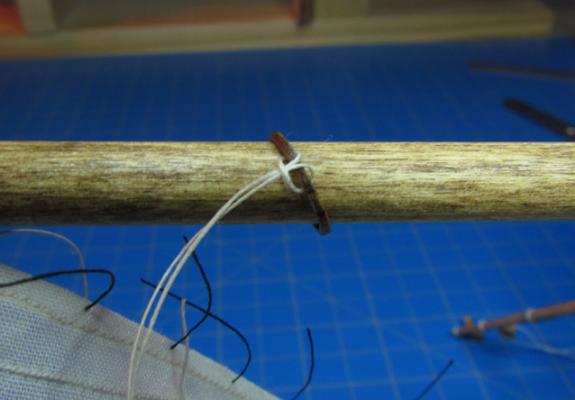
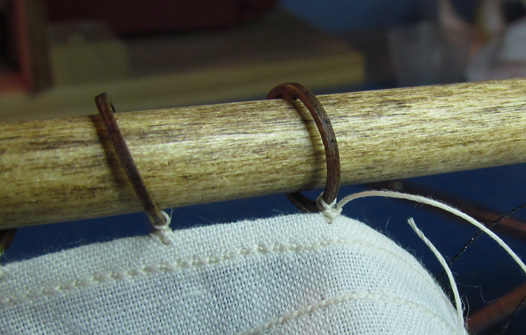
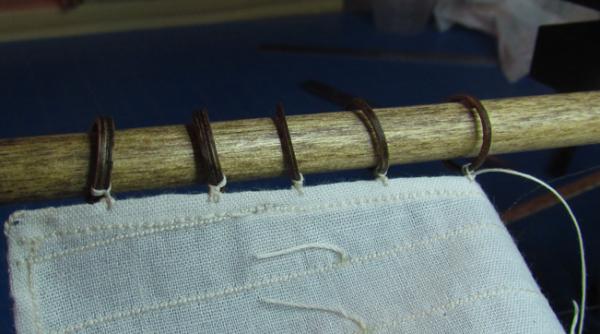
I asked the club how best to attach sails to mast hoops and Mike Graff kindly provided a full size method of seizing a mast hoop. The full size seizing is too complex and large for model scale. So, after a little thought, I tried this simplified method. Start with a cow hitch on the hoop. Thread each line through the sail at the eyelet location. Pass each thread through the same hole in the sail in opposite directions. Snug the sail up to the hoop and tie an overhand knot on one side of the seizing. I chose the lower side (left side in the photo). Finish with a square knot on the opposite side of the seizing. The photo shows the seizing at this stage. Lock the seizing with diluted PVA and trim the loose ends. Simple and quick. Dave B

-
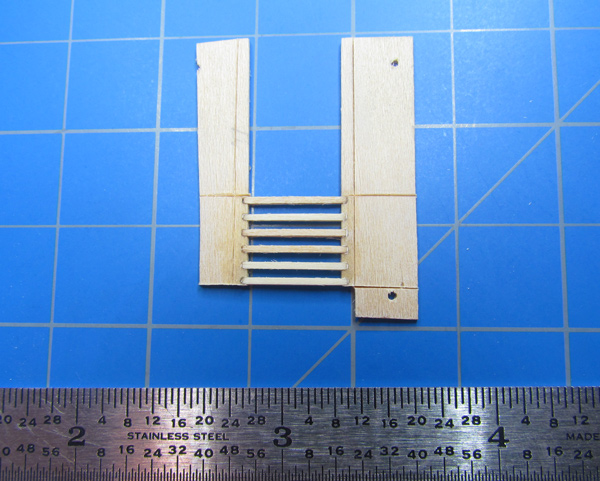
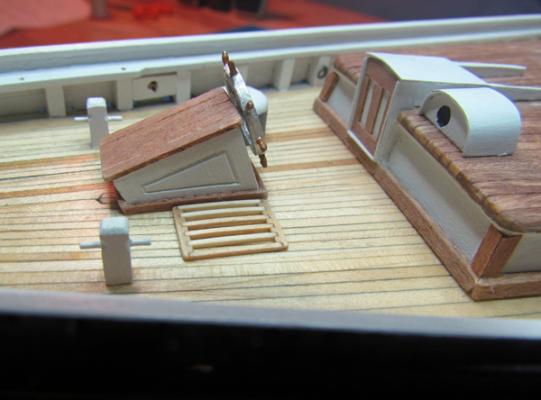
In the old forum, I read a log showing a grating for the helm. So working form memory, I fashioned a grating from1/32 strip and a couple of wider slats. The photo below was taken after I started to cut the grate to final size, approximately 26 x 40 inches. And the finished product. Since then I have started rigging or "tying knots" as my son says. Dave B

- 43 replies
-
- 2
-
-
- bluenose
- model shipways
- (and 2 more)
-
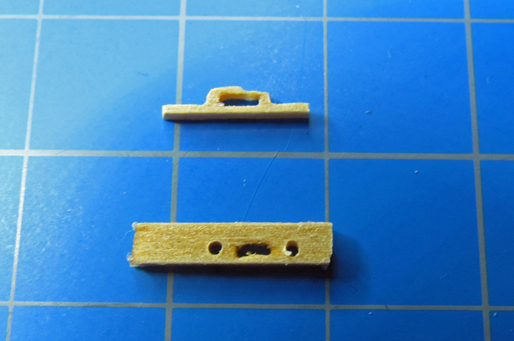
Finally back, the back yard is officially finished. A few months ago I knocked a chock off the monkey rail and could not find it. While Model Shipways will replace parts, I thought I’d give a try to making a replacement. Starting from a 1/16 x 3/16 strip of basswood I drilled holes for the slot and fillets (lower part in first photo), hardened with thin CA, carved and sanded the chock to shape. My first attempt (upper in photo) chipped as I was forming the outline. The second turned out better. Now I can see why the scratch folks build everything. Even the l fiddly bits give satisfaction. Dave B

- 43 replies
-
- 2
-
-
- bluenose
- model shipways
- (and 2 more)
-
Always willing to help! Dave B
-
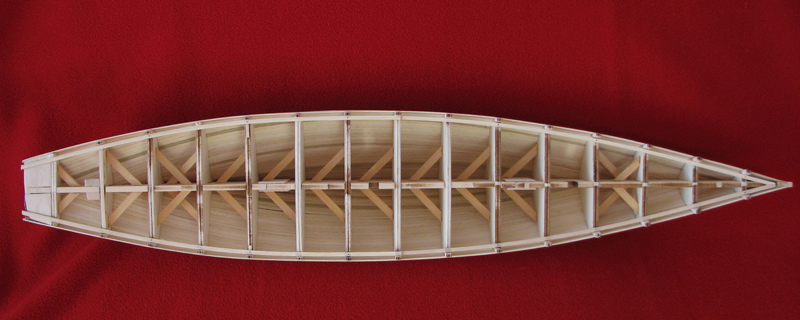
Welcome to the Bluenose community. I did not have much trouble with the laser cut bulkheads but this is my first build and I didn't know any better. The other reason may be that I stiffened each bulkhead with diagonal braces as I installed them. I read that they can come loose when fairing the hull so I was concerned about overall stiffness for sanding and planking. Also had some 1/8 x 3/8 basswood left from an earlier glider build. The hull turned out rock solid. I agree with Bob regarding Bob Hunt's practicum. They are very expensive unless you buy the whole set. Bob's practicum differs from the kit in build sequence, though I cannot answer if it is that much better. He does give good advice about thinking ahead in the build. I also set it aside once the hull was complete. I some great guidance and ideas in this forum (check out Bob's metal work, he inspired me!). When cutting the rabbet, I recommend lightly gluing a piece of scrap instead of the stern post to the keel to prevent damaging the part. Brad, tapering the quarter deck planks was a learning experience resulting in many broken sticks. However, it is well worth the effort and good practice to boot. Do enjoy and keep posting! Dave B

-
Glueing problems.
DBorgens replied to iceblue's topic in Building, Framing, Planking and plating a ships hull and deck
Perhaps try Weldbond (white), it seems a bit thicker than Elmers wood. I planked Bluenose with CA by applying the glue sequentially along the strake. That method worked well since it set so quickly. -
How to sew sails on your wifes sewing machine
DBorgens replied to Mirabell61's topic in Masting, rigging and sails
Nils, Great sail work! I do like your use of music wire for the bolt rope, it gives the sails a nice, filled appearance. -
Bob, good to hear from you again. Brad, I second Bob's use of a cradle. I too did not learn of providing a nut for the pedestals until my hull was planked. So I will use a cradle as well. Besides it gives us another opportunity to be creative with wood.
-
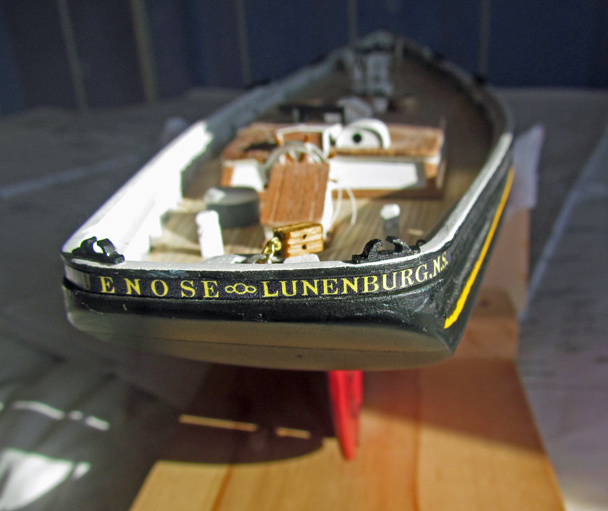
Looking very good Dave. I do like the way you laid on the anchor chain. Remember, we are our own worst critics, as it should be. You've done we'll. Dave B
-
Brian, I don't know what size needle I used, will have to check. I sewed the seam lines after cutting the sails but before hemming. You could sew the seams first if you use seam tape, which might look good. I laid out the sails so the long edge aligned with the bias to minimize stretching and pulling the sail out of shape. Sewing seams at an angle did not pull the cloth, the hems did more. Practice will improve and I may try a different technique. Handkerchief cloth is a good choice. Michael, thank you. I am happy with them. Wefalk, I agree the hems turn out large, I accept this for Bluenose since it is my first build and I am trying to learn as much as I can. Great recommendation, that is a good way to get a finished edge. Thank you. Dave B
-
Dave, Russ gives good advice, as usual. I have read of several modelers who glue T-nuts or the like in the keel before assembly or planking. These would use a small (#4?) machine screw thus reducing the chance of splitting the keel. I learned this after My hull was planked, so I decided to make a cradle. Give the pedestals a try, just go slowly and carefully. Dave B
-
John, Dave, Jim, Thank you for checking in. I recently completed rigging the bowsprit, may have some pictures soon. No modeling since. Spent most of yesterday cleaning up and gardening at a friend's house. She is recently widowed and is fixing up the house to sell. Today we built some new garden boxes so we will have fresh vegetables this summer, yum. Building at full scale for a short break. Dave
- 43 replies
-
- 1
-
-
- bluenose
- model shipways
- (and 2 more)
-
Harvey, looks superb, can't wait to see her live. The cannon add a lot and I love the rigging you've done. Thanks for keeping us up to date. Dave B
-
The struts look nice. Kudos to Bluejacket for coming through. I've always kikes the lines if th PT boats and yours is showing them nicely. Keep up the good work. Dave B
-
Say it ain't so! Just leave a good path for us to follow (into the dark . . .!).
-
Stelios, yes they do need tuning occasionally. That is a good reminder to tune ours, especially if the Admiral wants to start sewing again. Thanks for the fabric glue tip. Dave B
-
Gil, your focs'le is probably nicer than most lounges. Sign us up! Dave B