kurtvd19 Posted February 18, 2017 Share #181 Posted February 18, 2017 Those are the hold downs for the pilothouse. Made from brass strip with a hole in each end, the end bent down at a 45 degree angle - rigging line was taken down to the deck. The attached photos show how I did them. The photo with the rigging line on my Chaperon shows the rigging before I went back and tightened it up. Fig 9 - shows a different type of wind brace/tie down - this is from Alan Bates' Steamboat Cyclopedium The other drawing is from the old Model Shipways plans (for the solid hull kt that was never produced) Also detailed on Sheet 4 of the instructions for the current kit. Kurt hexnut, Tadeusz43, tarbrush and 4 others 7 Quote Kurt Van Dahm Director NAUTICAL RESEARCH GUILD www.thenrg.org SAY NO TO PIRACY. SUPPORT ORIGINAL IDEAS AND MANUFACTURERS CLUBS Nautical Research & Model Ship Society of Chicago Midwest Model Shipwrights North Shore Deadeyes The Society of Model Shipwrights Butch O'Hare - IPMS Link to comment Share on other sites More sharing options...
Blighty Posted February 18, 2017 Author Share #182 Posted February 18, 2017 Thx Kurt. not one of my brightest moments! if in doubt "read the instructions". Canute and mtaylor 2 Quote Link to comment Share on other sites More sharing options...
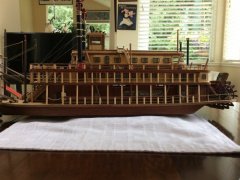
Blighty Posted February 20, 2017 Author Share #183 Posted February 20, 2017 (edited) Hi I have some updates to show, although currently only roughed in I think they are significant changes The LED lights arrived and Rossi46 and I wired up the lower decks. There is a slight change to the layout of the lights that I posted earlier in this log but the effect dictated that these minor changes were required. I wanted a very restful, dim illumination and the yellow LEDs did just the job, I am very pleased. I'll post night pics later when it gets dark. Yellow lights all round, between 1,8 and 3mm DIA. The pics below show more detail than I can describe, you know what they say, A picture paints a1000 words. Messy work bench, it got ugly, nearly pulled the chainsaw out. Edited February 20, 2017 by Blighty tarbrush, Cathead, hexnut and 5 others 8 Quote Link to comment Share on other sites More sharing options...
Blighty Posted February 21, 2017 Author Share #184 Posted February 21, 2017 A pic of the lights so far, still have the Texas deck and pilot house to light up. All this is temp as I am still painting and finishing up lower decks. tarbrush, hexnut, hof00 and 10 others 13 Quote Link to comment Share on other sites More sharing options...
Tigersteve Posted February 21, 2017 Share #185 Posted February 21, 2017 Awesome! Steve Canute, Blighty and mtaylor 3 Quote Current: Mayflower- Model Shipways Completed: Lowell Grand Banks Dory- Model Shipways English Pinnace- Model Shipways 18th Century Longboat- Model Shipways Link to comment Share on other sites More sharing options...
chborgm Posted February 21, 2017 Share #186 Posted February 21, 2017 I like the effect. I see that you are powering with battery. Have figured out how long they will last? I use my lit models for night lights in the house so I used house current. I think your choice makes a cleaner installation. Clarence Canute and Blighty 2 Quote Flying Fish -- MSW Essex --- MSW Constitution -- MSW Confederacy -- MSW Philadelphia -- MSW Chaperon -- MSW San Felipe -- Panart Portland -- Bluejacket Link to comment Share on other sites More sharing options...
Blighty Posted February 21, 2017 Author Share #187 Posted February 21, 2017 Clarence, Using your ships for night lights must look awesome, great idea, however I think that commits you too house power source. That was not a consideration for me, the only time we will be in darkness in my display room will be to look at the Chaperon lit up, a matter of minutes only. I have not calculated the battery life, nor am I likely too but when the installation is complete I will definitely run a fresh battery to failure and add info to this log. Actually running a test is the best real world method in my opinion. Battery power does make life easy for a clean self contained installation in most cases, I was originally going to mount the battery in the hull but I was on again, off again with the lights, (no pun intended)! so my options kept diminishing as the decks got built up. So now, the battery will be mounted in or around the pilot house, exact location tbd. another wing and a prayer design change. Thx for following. Canute 1 Quote Link to comment Share on other sites More sharing options...
Blighty Posted February 21, 2017 Author Share #188 Posted February 21, 2017 Thx Steve, it was well worth the effort to install LEDs. Len Canute 1 Quote Link to comment Share on other sites More sharing options...
Mike Dowling Posted February 21, 2017 Share #189 Posted February 21, 2017 If I dare make a suggestion why not have the battery outside of the boat? I think it will show a lot if you put it in the pilothouse. Also tricky when you have to change it. I would have thought a tiny hole either through the hull or between decks for the wires would hardly show. Canute and Blighty 2 Quote Current build : Gorch Fock Occre Completed non-boat build 1/16 Model expo Sopwith Camel - in shore leave. Previous boat builds: Amerigo Vespucci Occre Yacht Mary Artesania Latina Red Dragon (Modified) Non-boat build 1/24 scale Dennis bus by OcCre - in shore leave. Mare Nostrum (modified) Amati Oseberg (modified) Chaperon sternwheel steamer 1884 Constructo Lady Smith kit/scratch build OcCre Santisima Trinidad Cross Section Constructo Robert E Lee Paddle Steamer Constructo Louise, steam powered river boat OcCre Bounty with cutaway hull Corel Scotland Baltic Ketch (not on MSW) OcCre Spirit of Mississippi paddle steamer (not on MSW) In the Gallery: Mare Nostrum Oesberg Constructo Lady Smith Constructo Robert E Lee Constructo Louise OcCre Bounty OcCre Spirit of Mississippi Link to comment Share on other sites More sharing options...
Blighty Posted February 21, 2017 Author Share #190 Posted February 21, 2017 If I dare make a suggestion why not have the battery outside of the boat? I think it will show a lot if you put it in the pilothouse. Also tricky when you have to change it. I would have thought a tiny hole either through the hull or between decks for the wires would hardly show. Mike, I thought about putting the battery on top of the Texas or Skylight deck but I have it from good authority the Captain is storing some crates of wine under tarpaulin sheets on one of these decks which leaves little room for wine and battery. Now if a few of those wine cases were to 'be left off' your plan would work!!!! ummmmm. Mike Dowling and Canute 2 Quote Link to comment Share on other sites More sharing options...
Guest Tim I. Posted February 21, 2017 Share #191 Posted February 21, 2017 I am really enjoying following your log. I am not an expert at weathering by any stretch, but your step by step examples are very helpful. Thank you, TIgoe Quote Link to comment Share on other sites More sharing options...
Blighty Posted February 21, 2017 Author Share #192 Posted February 21, 2017 TIgoe, your kind comment has made my day, thanks so much. I'm certainly no expert and have learned things doing this build. Good luck with your weathering efforts. Anything you want additional detail on, let me know and I'll help where I can, just don't expect expert advise!. Len Jack12477 and Canute 2 Quote Link to comment Share on other sites More sharing options...
Blighty Posted February 23, 2017 Author Share #193 Posted February 23, 2017 (edited) I have the pilot house constructed, just have to add light and some furniture. I purchased the wheel from M/S it is very nicely finished. The interior of the pilot house deck has had the vinegar wash treatment, I am liking that finish more and more, especially when the solution has aged. I've been working on my hobby room so the Chaperon will have a better dry dock for her refit. Note, for the modified frt panel of the pilot house I used 1/32" stock, I'm pleased with the scaled appearance. Excuse the quality of the modelling, my close up shots will expose my considerable shortcomings, 'practice makes perfect!', sawdust in my case. The walls were also washed with vinegar and then a thin coat of white was applied ensuring the weathered surface still showed through. Edited February 23, 2017 by Blighty deleted blurred pics. Cathead, mtaylor, Mike Dowling and 6 others 9 Quote Link to comment Share on other sites More sharing options...
Canute Posted February 23, 2017 Share #194 Posted February 23, 2017 Len, coming along nicely. The washes work well, don't they? mtaylor and Blighty 2 Quote Ken Started: MS Bounty Longboat, On Hold: Heinkel USS Choctaw paper Down the road: Shipyard HMC Alert 1/96 paper, Mamoli Constitution Cross, MS USN Picket Boat #1 Scratchbuild: Echo Cross Section Member Nautical Research Guild Link to comment Share on other sites More sharing options...
Blighty Posted February 23, 2017 Author Share #195 Posted February 23, 2017 1 hour ago, Canute said: Len, coming along nicely. The washes work well, don't they? Thx Ken, Yep, the vinegar wash is great but a few draw backs with it too. The pros:- It looks exactly like real aged/weathered wood, no mixing colors or skilled art techniques required. The stain is permanent and the penetration is deep into the surface, this allows rubbing down after paint, for example, vinegar wash, allow to dry, thin coat of paint and then sand off areas where excessive ware is required, I did this on the deck in fairly large patches. Easy to paint over, I really like putting a thin coat over the top as on the pilot house, so the stained surface shows through. Much more pleasing than seeing virgin wood showing through the paint. Another thing I did on the deck that I forgot to mention, after final red oxide spray, a few patch ups with a mixed red/black to get close to the spray color, put a bit of variation into the finish. So when that was done I still thought it was a little bright compared to the aging on the walls so I put a brushed coat of vinegar mix on top of the paint. I think that looks stella, may be a bit over the top for most tastes but I was well pleased. Dulled it right down. The cons:- Warpage, hard to avoid on thin stock wood, this could be a downer for the pro modeller. For me, I'm just having fun with the build, a few flaws in the tolerances and joints though I try to avoid them, it doesn't detract from my enjoyment of the build. Different species of wood stain differently. I don't know the woods used but if you are considering the vinegar solution, try some on scrap pieces. Some of the wood I tried to stain barely changed, however same types seem to be consistent. (This can be seen on the wall I created rear of the boiler, I used some scrap wood from my previous build, (Emma C Berry) along with some Chaperon kit wood. Stained it afte it was built. My next build is the Picket Boat from MS, I'm thinking of painting all the wood with the vinegar before starting and keep the painting to a minimum except the outside of the hull which will definitely be black. I'm already looking forward to that. mtaylor, Jack12477 and Canute 3 Quote Link to comment Share on other sites More sharing options...
Blighty Posted February 25, 2017 Author Share #196 Posted February 25, 2017 The Admiral graciously made some lamp shades for the skylight lamps, thx babe they look great. Gluing down the Texas deck now. Mike Dowling, Canute, coxswain and 6 others 9 Quote Link to comment Share on other sites More sharing options...
Rossi46 Posted February 26, 2017 Share #197 Posted February 26, 2017 Those look great and show excellently in the sky light. Blighty, mtaylor, Mike Dowling and 3 others 6 Quote Link to comment Share on other sites More sharing options...
chborgm Posted February 26, 2017 Share #198 Posted February 26, 2017 Really looks great.. Blighty, Canute and mtaylor 3 Quote Flying Fish -- MSW Essex --- MSW Constitution -- MSW Confederacy -- MSW Philadelphia -- MSW Chaperon -- MSW San Felipe -- Panart Portland -- Bluejacket Link to comment Share on other sites More sharing options...
Blighty Posted February 26, 2017 Author Share #199 Posted February 26, 2017 Thx for the comments above, I'm looking forward to getting the final couple of decks down now, the end is in sight. I have to now paint the brass components, any advise as to best way of doing this and which type of paint to use? They are all still attached to the blank except for one piece. Thx in advance. Canute and mtaylor 2 Quote Link to comment Share on other sites More sharing options...
Cathead Posted February 26, 2017 Share #200 Posted February 26, 2017 Personally, I'd use a blackening solution. Holds better and looks nicer. mtaylor, Canute and Blighty 3 Quote Eric Current builds: scratchbuilt Missouri River steamboat Peerless (1893); 1:1 scale timber-framed outdoor kitchen Nautical builds (kits): USS Cairo; NRG capstan project; NRG half-hull; Viking longship; US revenue cutter; 18th century longboat; Bounty launch Missouri River craft (scratchbuilt): 1853 Missouri River steamboat Arabia; 1865 steamboat Bertrand; Lewis & Clark barge; keelboat; 1876 steamboat Far West Link to comment Share on other sites More sharing options...
Blighty Posted February 26, 2017 Author Share #201 Posted February 26, 2017 Hi Cathead, I was actually referring too the white trim pieces, however I will purchase the blackening solution for the unpainted brass, this will be a new process for me but I've been meaning to check it out but this is the first opportunity, which is the best make to get? mtaylor and Canute 2 Quote Link to comment Share on other sites More sharing options...
Cathead Posted February 26, 2017 Share #202 Posted February 26, 2017 I've only ever used the stuff supplied by BlueJacket, but it's worked very well for me. Also, I've found that metal parts actually take paint better after blackening; the process seems to roughen the surface slightly and the paint adheres better. But take all that as a grain of salt; I'm not that experienced with a wide variety of solutions and paint brands; I hope others chime in as well to give you broader advice. Make sure you order brass black rather than pewter black. Canute and mtaylor 2 Quote Eric Current builds: scratchbuilt Missouri River steamboat Peerless (1893); 1:1 scale timber-framed outdoor kitchen Nautical builds (kits): USS Cairo; NRG capstan project; NRG half-hull; Viking longship; US revenue cutter; 18th century longboat; Bounty launch Missouri River craft (scratchbuilt): 1853 Missouri River steamboat Arabia; 1865 steamboat Bertrand; Lewis & Clark barge; keelboat; 1876 steamboat Far West Link to comment Share on other sites More sharing options...
kurtvd19 Posted February 26, 2017 Share #203 Posted February 26, 2017 I have used Birchwood Casey Brass Black after trying a lot of other stuff. There was a lengthy discussion here on MSW about blackening brass - a search will provide a lot of other opinions and tests. Kurt Canute, mtaylor and Blighty 3 Quote Kurt Van Dahm Director NAUTICAL RESEARCH GUILD www.thenrg.org SAY NO TO PIRACY. SUPPORT ORIGINAL IDEAS AND MANUFACTURERS CLUBS Nautical Research & Model Ship Society of Chicago Midwest Model Shipwrights North Shore Deadeyes The Society of Model Shipwrights Butch O'Hare - IPMS Link to comment Share on other sites More sharing options...
Blighty Posted February 26, 2017 Author Share #204 Posted February 26, 2017 Thx for the feedback on brass blacking, I'll read up and go get some. Len mtaylor and Canute 2 Quote Link to comment Share on other sites More sharing options...
Blighty Posted March 2, 2017 Author Share #205 Posted March 2, 2017 I'm super stoked tonight, I just lit up the Ole' riverboat for the first time with all the lights in place including the Texas and pilot house, all yellow LEDs. Very pleased with the brightness and balance of luminance. I have to clean the wiring up tomorrow and glue down the pilot house. So pleased I went ahead and lit her up. I had to make a outhouse to house the 9V battery but it looks ok, still requires a splash of rust but I don't think it is out of place. Len Nirvana, Canute, coxswain and 8 others 11 Quote Link to comment Share on other sites More sharing options...
Nirvana Posted March 2, 2017 Share #206 Posted March 2, 2017 That illumination is making the Chaperon coming alive. Jack12477, Rossi46, Blighty and 3 others 6 Quote Please, visit our Facebook page! Respectfully Per aka Dr. Per@Therapy for Shipaholics Finished: T37, BB Marie Jeanne - located on a shelf in Sweden, 18th Century Longboat, Winchelsea Capstan Current: America by Constructo, Solö Ruff, USS Syren by MS, Bluenose by MS Viking funeral: Harley almost a Harvey Nautical Research Guild Member - 'Taint a hobby if you gotta hurry Link to comment Share on other sites More sharing options...
Cathead Posted March 2, 2017 Share #207 Posted March 2, 2017 That's really nice. The low-key, understated lighting effect is well-done and just the right approach, in my opinion. Excellent work. mtaylor, Nirvana, Rossi46 and 4 others 7 Quote Eric Current builds: scratchbuilt Missouri River steamboat Peerless (1893); 1:1 scale timber-framed outdoor kitchen Nautical builds (kits): USS Cairo; NRG capstan project; NRG half-hull; Viking longship; US revenue cutter; 18th century longboat; Bounty launch Missouri River craft (scratchbuilt): 1853 Missouri River steamboat Arabia; 1865 steamboat Bertrand; Lewis & Clark barge; keelboat; 1876 steamboat Far West Link to comment Share on other sites More sharing options...
mtaylor Posted March 2, 2017 Share #208 Posted March 2, 2017 Impressive build, and the lighting really makes the eyes "pop". Jack12477, Canute, Rossi46 and 2 others 5 Quote Mark "The shipwright is slow, but the wood is patient." - me Current Build: Past Builds: La Belle Poule 1765 - French Frigate from ANCRE plans - ON HOLD Triton Cross-Section NRG Hallf Hull Planking Kit HMS Sphinx 1775 - Vanguard Models - 1:64 Non-Ship Model: On hold, maybe forever: CH-53 Sikorsky - 1:48 - Revell - Completed Licorne - 1755 from Hahn Plans (Scratch) Version 2.0 (Abandoned) Link to comment Share on other sites More sharing options...
Mike Dowling Posted March 2, 2017 Share #209 Posted March 2, 2017 Len, it looks smashing, well done. Are you going to swap the little out house you made for the battery for the chicken coop? Then no one would know your secret inside ! Nirvana, mtaylor, Canute and 2 others 5 Quote Current build : Gorch Fock Occre Completed non-boat build 1/16 Model expo Sopwith Camel - in shore leave. Previous boat builds: Amerigo Vespucci Occre Yacht Mary Artesania Latina Red Dragon (Modified) Non-boat build 1/24 scale Dennis bus by OcCre - in shore leave. Mare Nostrum (modified) Amati Oseberg (modified) Chaperon sternwheel steamer 1884 Constructo Lady Smith kit/scratch build OcCre Santisima Trinidad Cross Section Constructo Robert E Lee Paddle Steamer Constructo Louise, steam powered river boat OcCre Bounty with cutaway hull Corel Scotland Baltic Ketch (not on MSW) OcCre Spirit of Mississippi paddle steamer (not on MSW) In the Gallery: Mare Nostrum Oesberg Constructo Lady Smith Constructo Robert E Lee Constructo Louise OcCre Bounty OcCre Spirit of Mississippi Link to comment Share on other sites More sharing options...
Blighty Posted March 2, 2017 Author Share #210 Posted March 2, 2017 4 hours ago, Mike Dowling said: Len, it looks smashing, well done. Are you going to swap the little out house you made for the battery for the chicken coop? Then no one would know your secret inside ! Crikey Mike, are you suggesting I fill the outhouse with BATTERY HENS? mtaylor, Rossi46, Nirvana and 2 others 5 Quote Link to comment Share on other sites More sharing options...

Recommended Posts
Join the conversation
You can post now and register later. If you have an account, sign in now to post with your account.