James H
-
Posts
6,133 -
Joined
-
Last visited
Content Type
Profiles
Forums
Gallery
Events
Everything posted by James H
-
 Ok folks, this is now up to Volume 50. That's some heavy work. Go grab yourself an article and have something to read with that beer tonight! https://thenrgstore.org/collections/articles
 -
Let's not turn a build log into a debate, like the diminishing wales thing. Feel free to open a topic on carronades that can be used for reference. That's the best way to expend this thirst for knowledge. Please use this topic to enjoy Glenn's ongoing work on Indy.
- 587 replies
-
- 5
-

-
- Indefatigable
- Vanguard Models
- (and 1 more)
-
When I painted the internal walls, I didn't use the VM paint as the sets weren't ordered. What I used was an equivalent colour from Gunze, and airbrushed it on. In hindsight, I should've prepped those areas with Tamiya aerosol white primer as that covers the engraved colours far better.
- 587 replies
-
- 2
-

-
-
- Indefatigable
- Vanguard Models
- (and 1 more)
-
I'd go with a gentle sanding of 400 or finer grit, and then use a soft brush to remove dust from the engravings.
-
Check them out directly, here: https://thenrgstore.org/collections/articles We are in the process of bringing all of the digital journal articles up to date, and this has been a long task. Articles up to year 2000 are now available individually for only $2 each, with 20% discount for NRG members. Delivery of article is immediate as soon as you purchase. I'll be bringing more Journal articles to the NRG site over the next weeks, so keep an eye out.
-
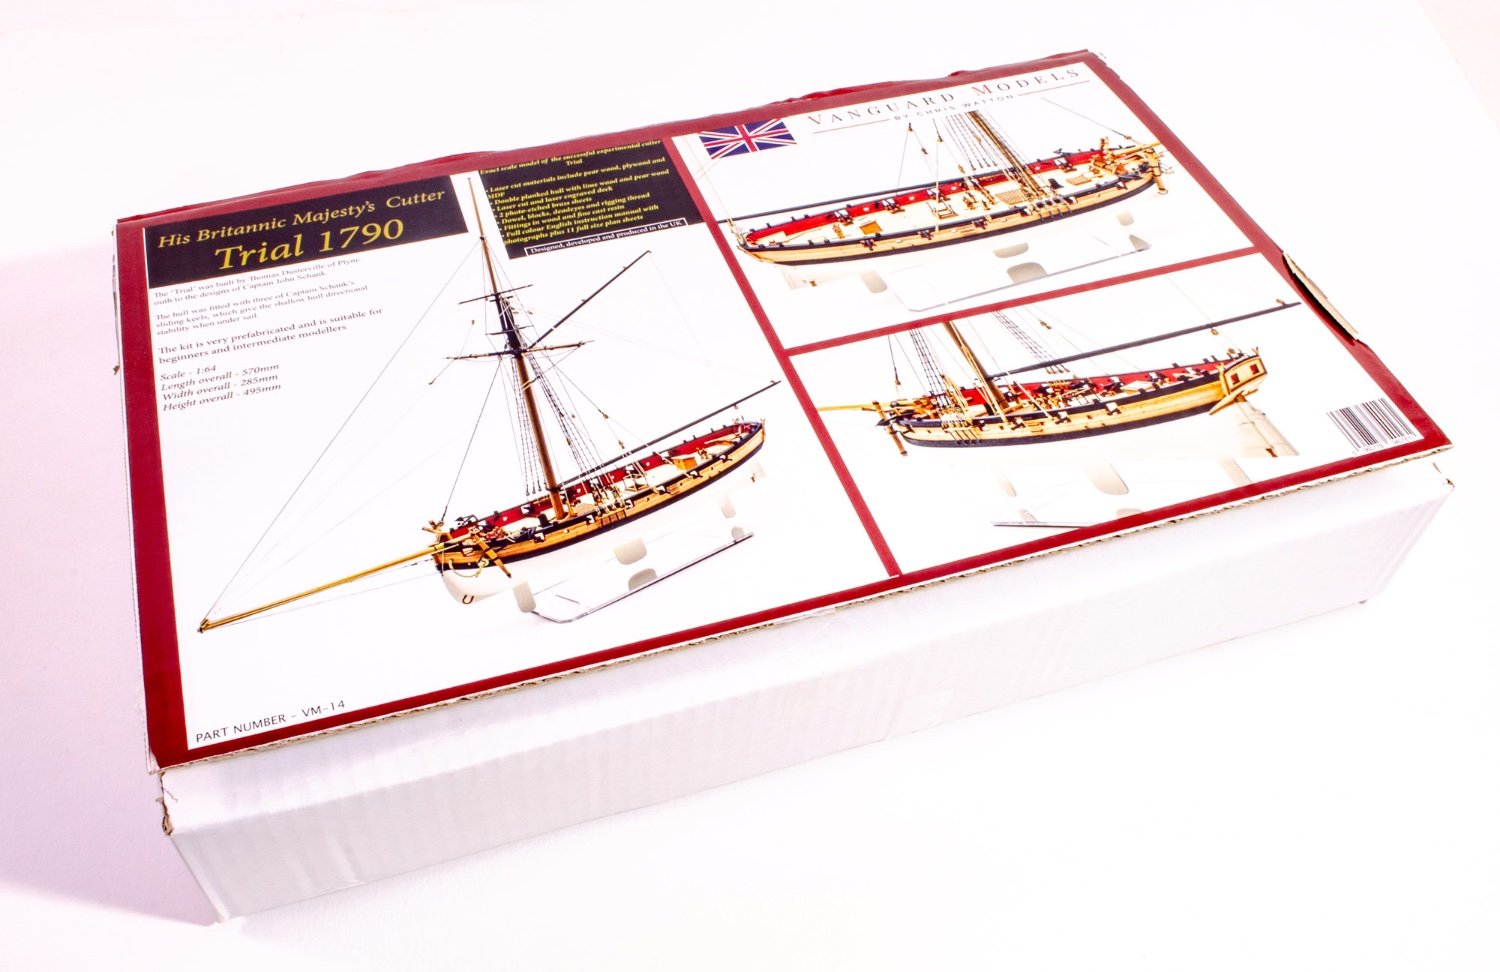
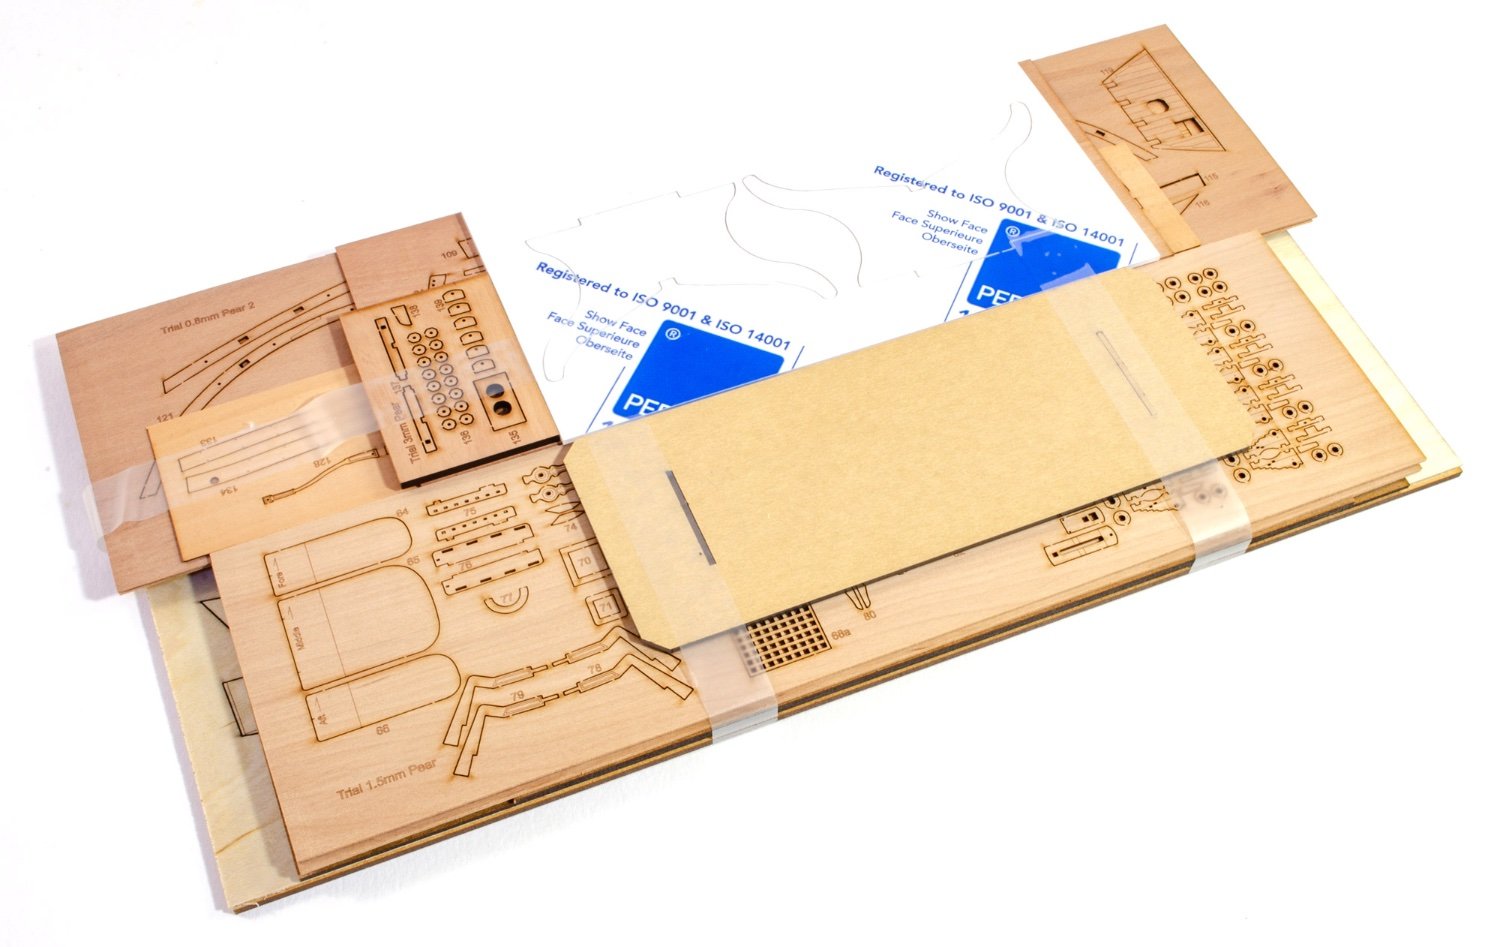
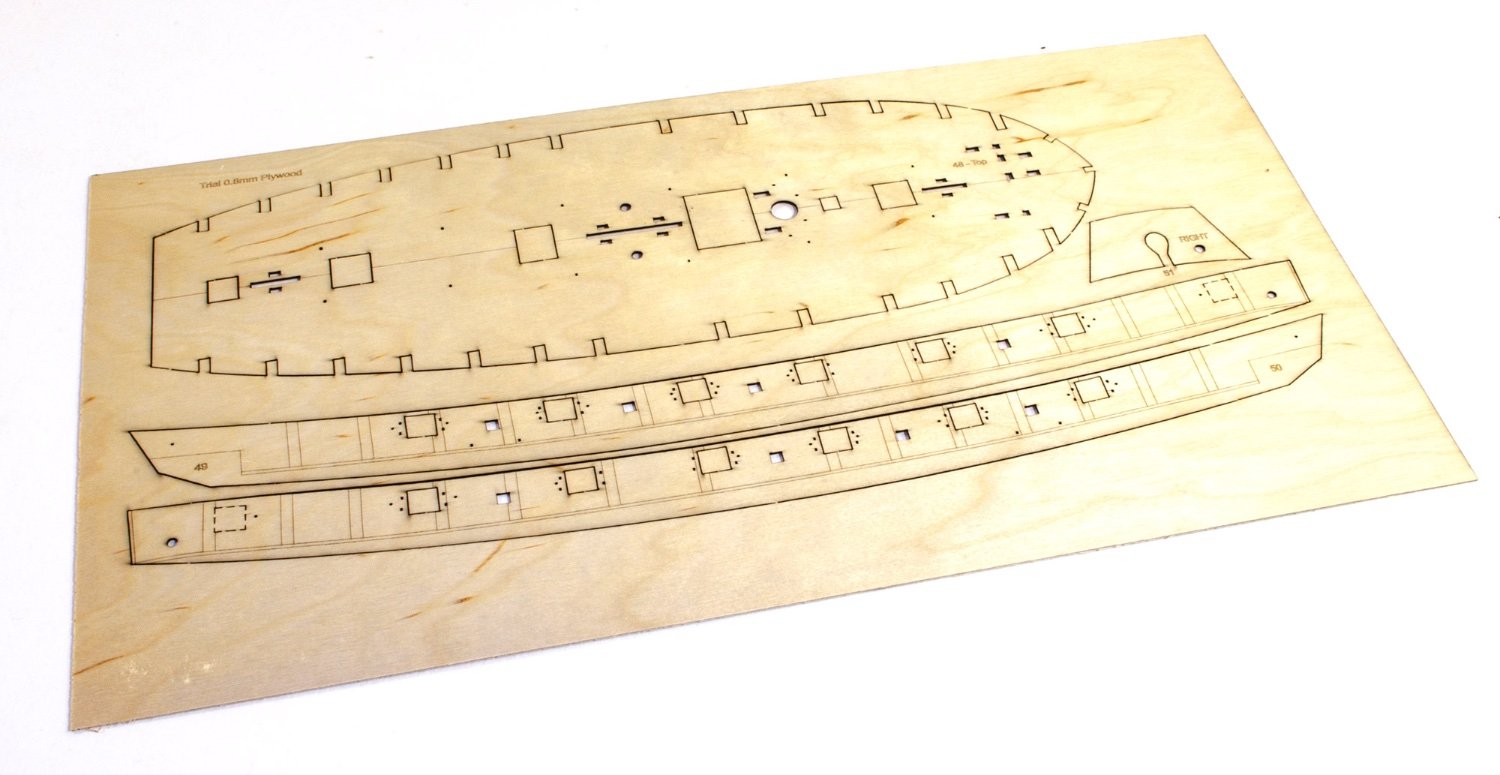
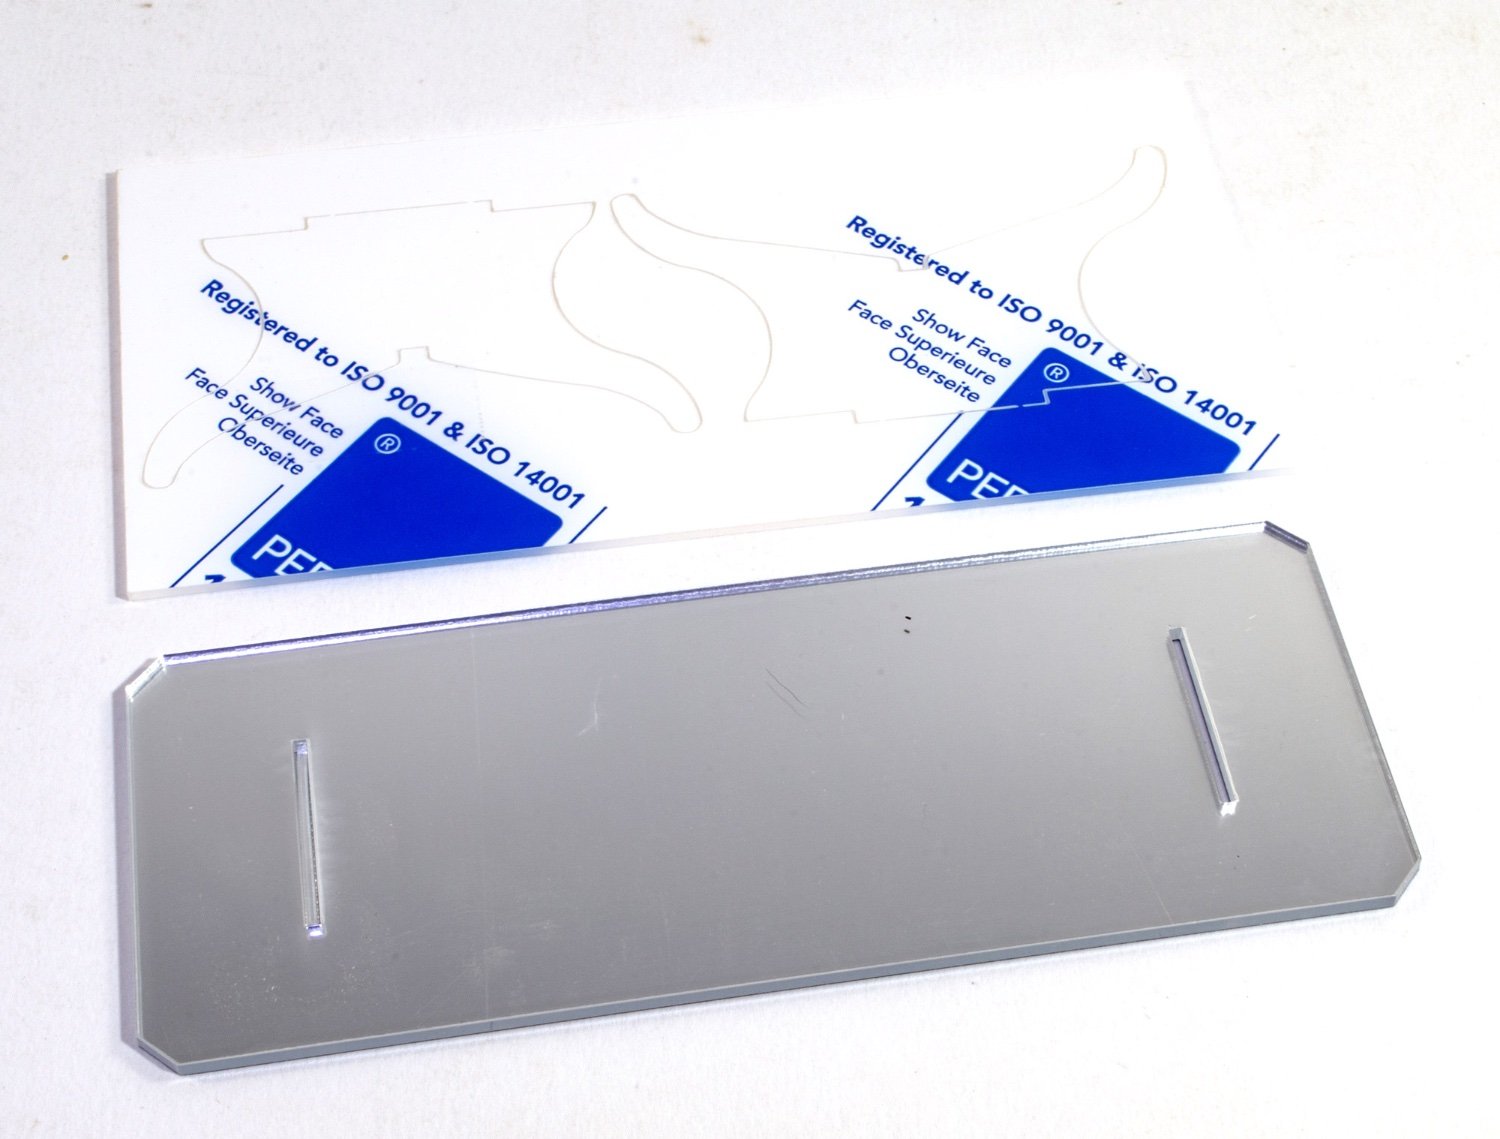
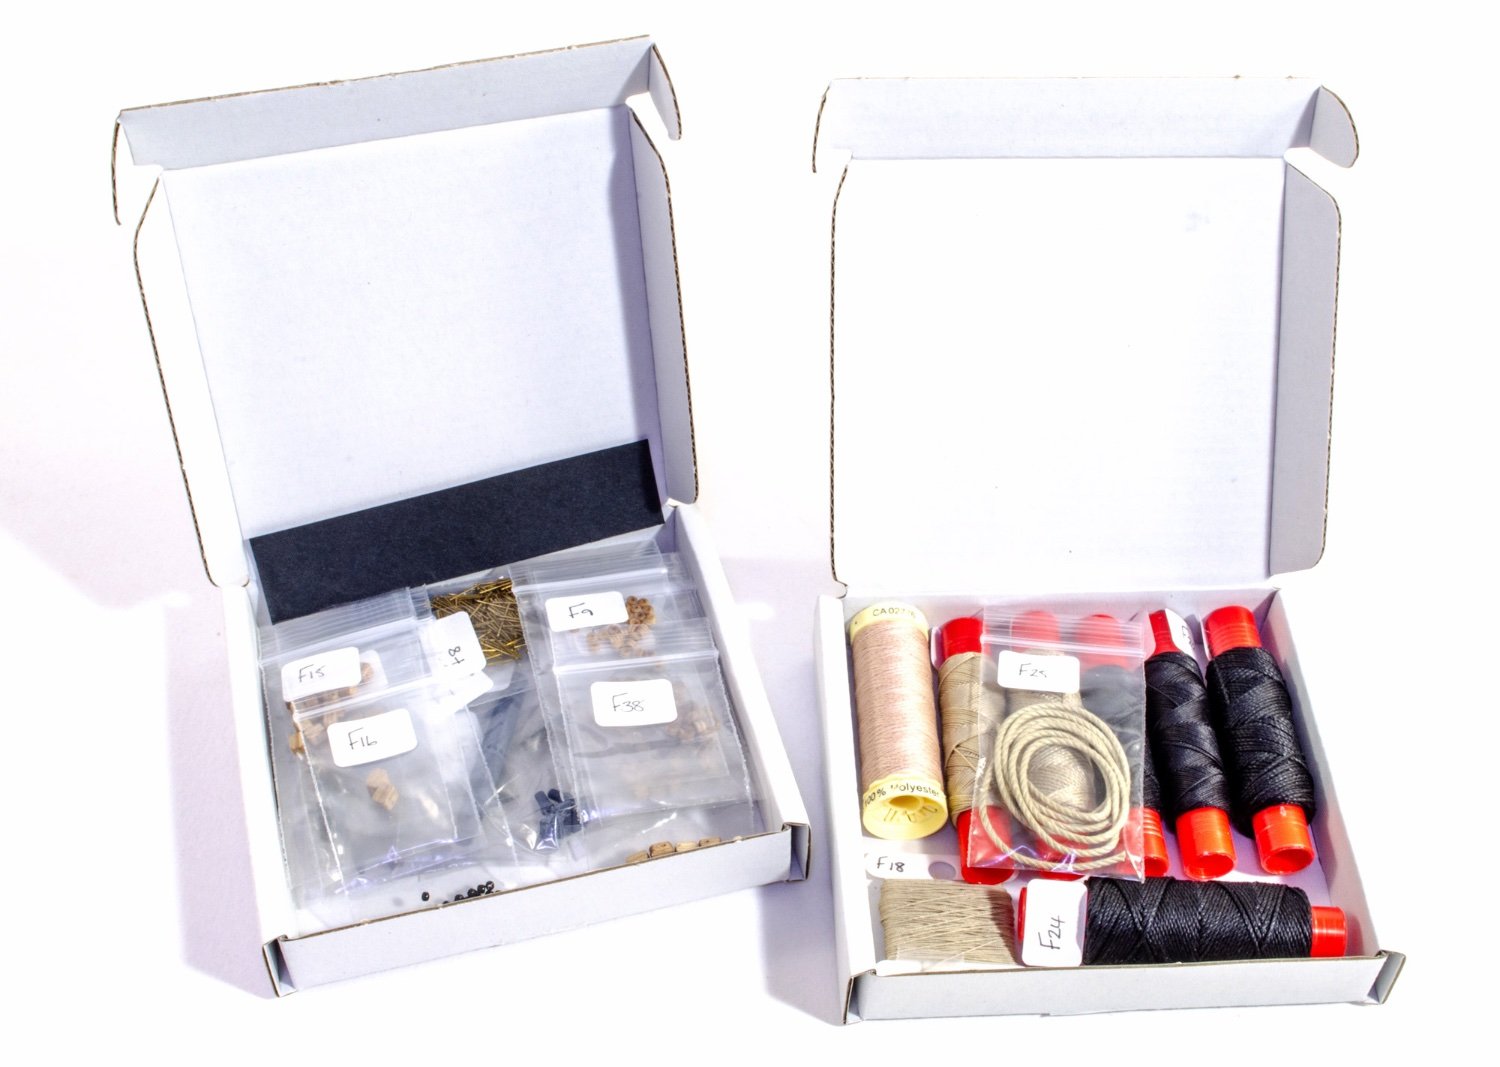
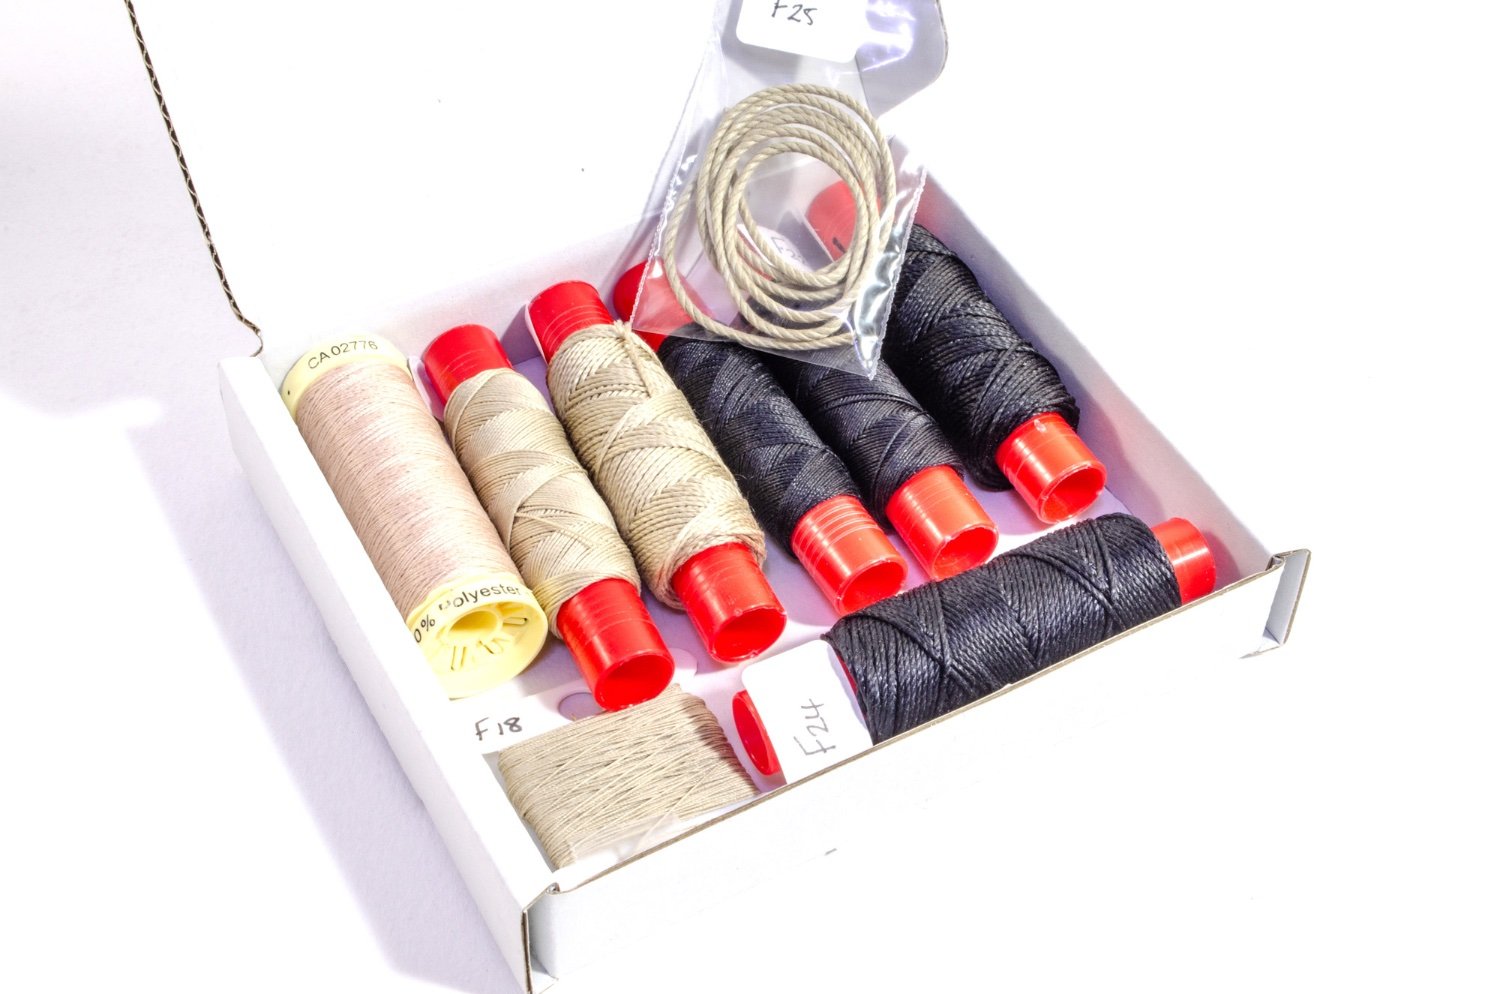
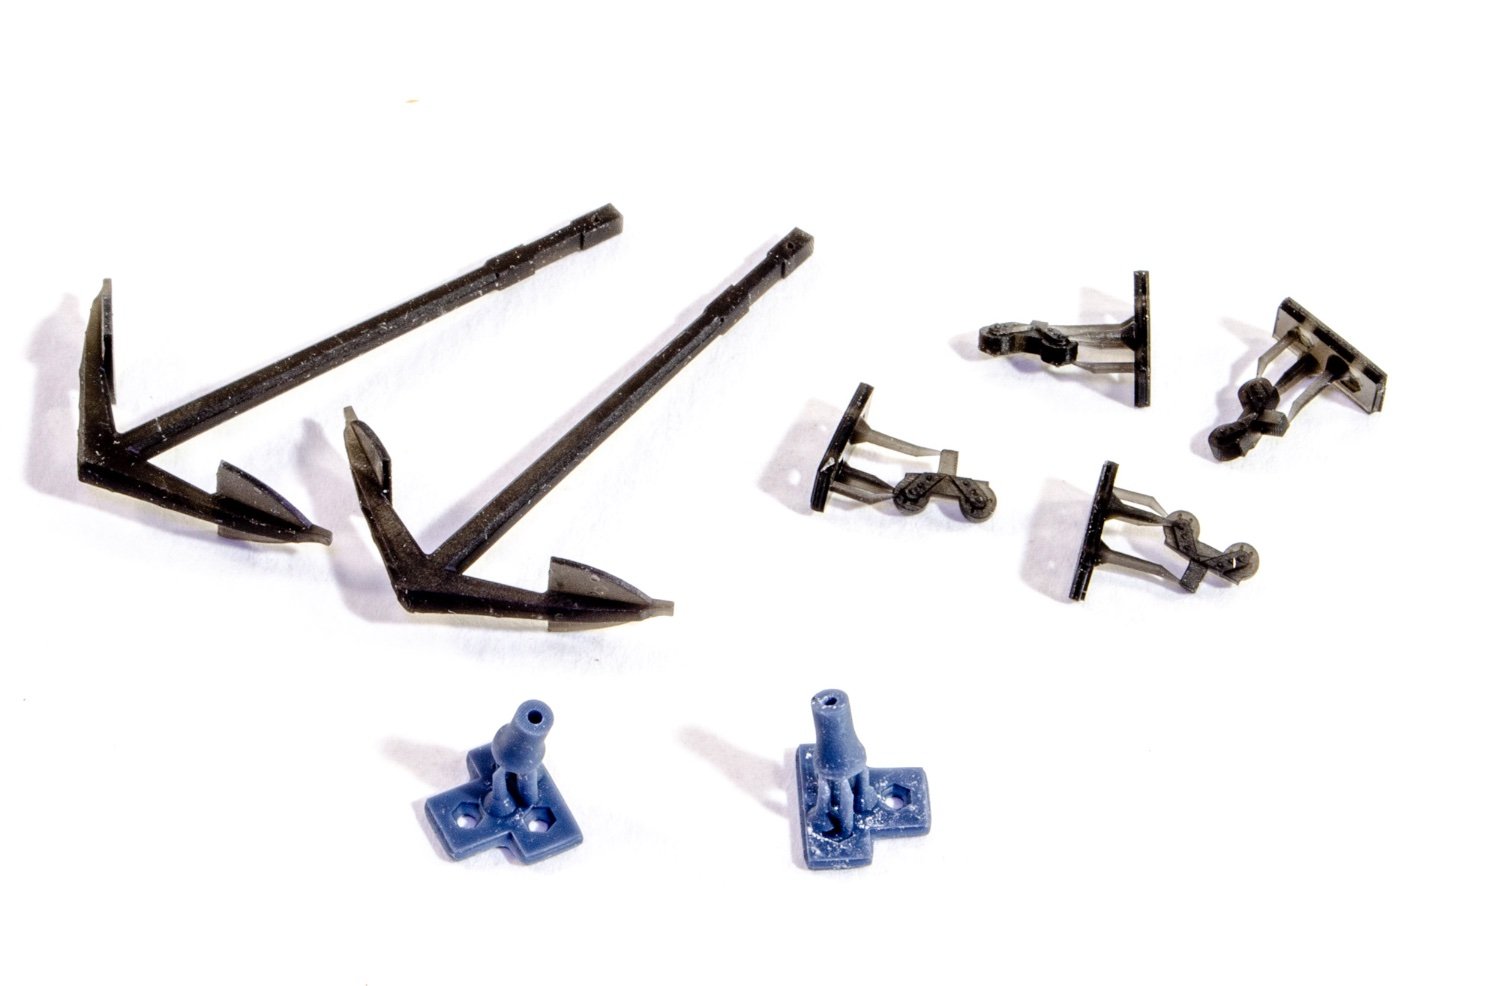
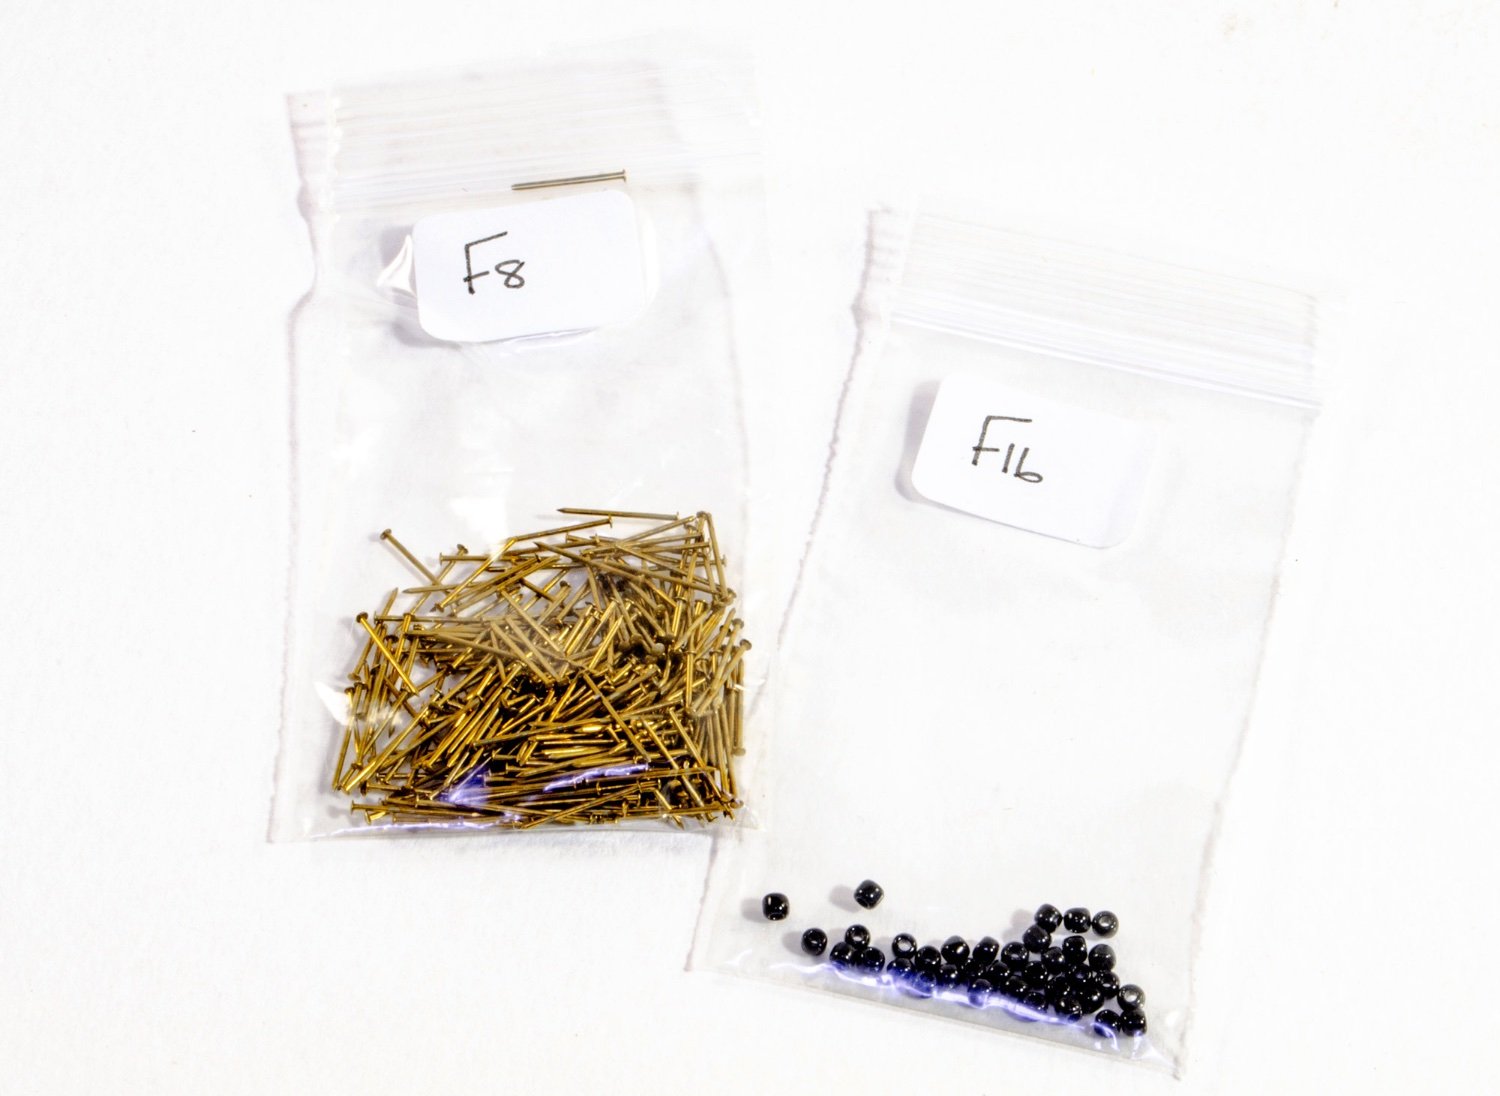
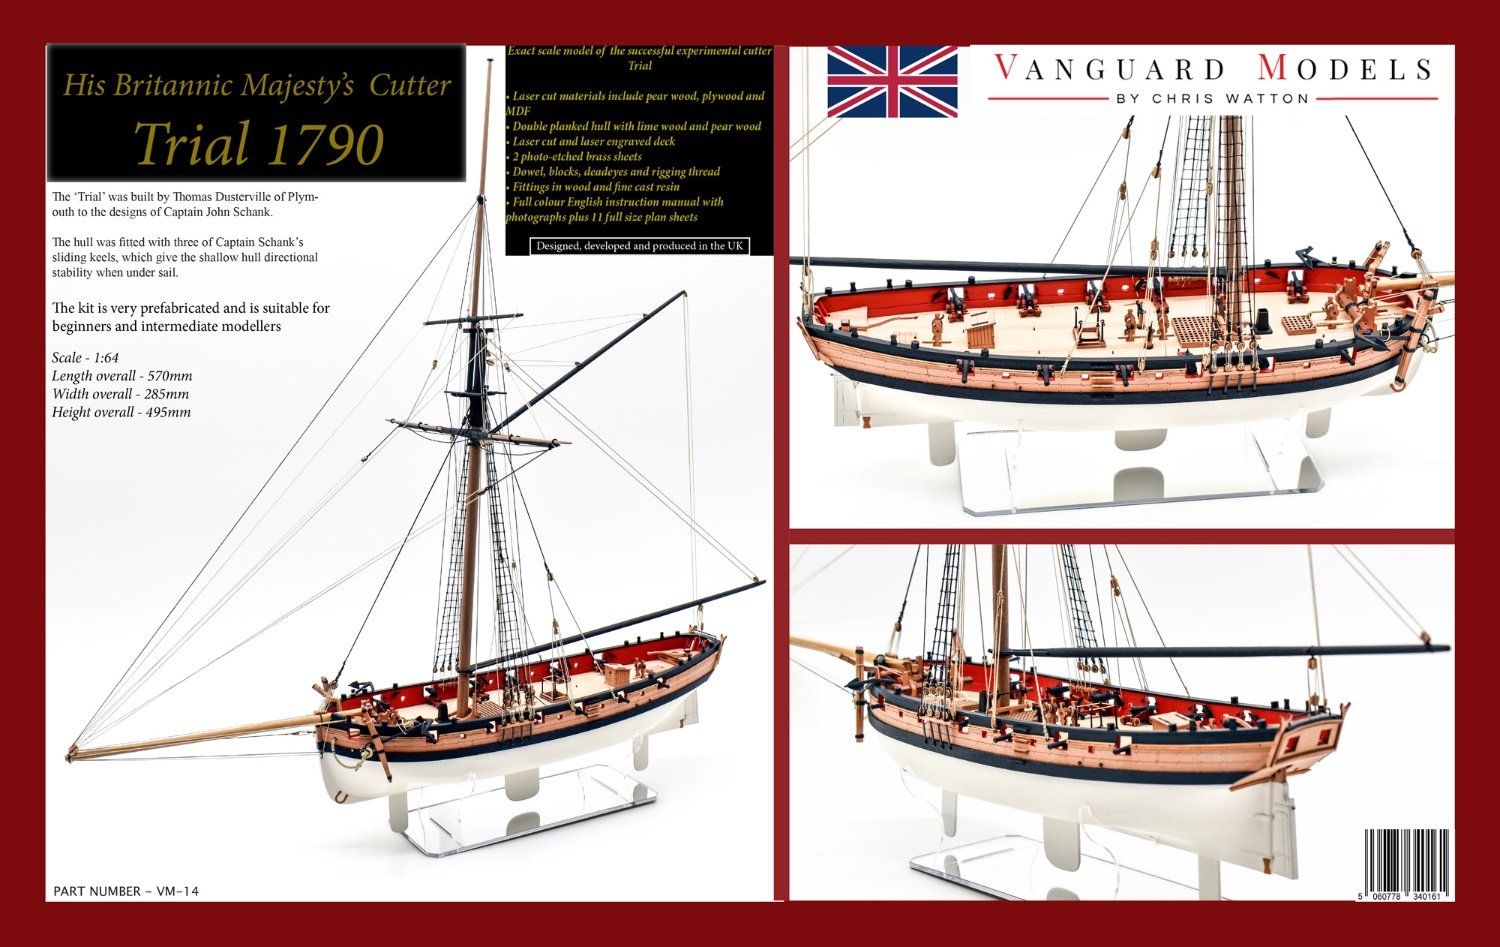
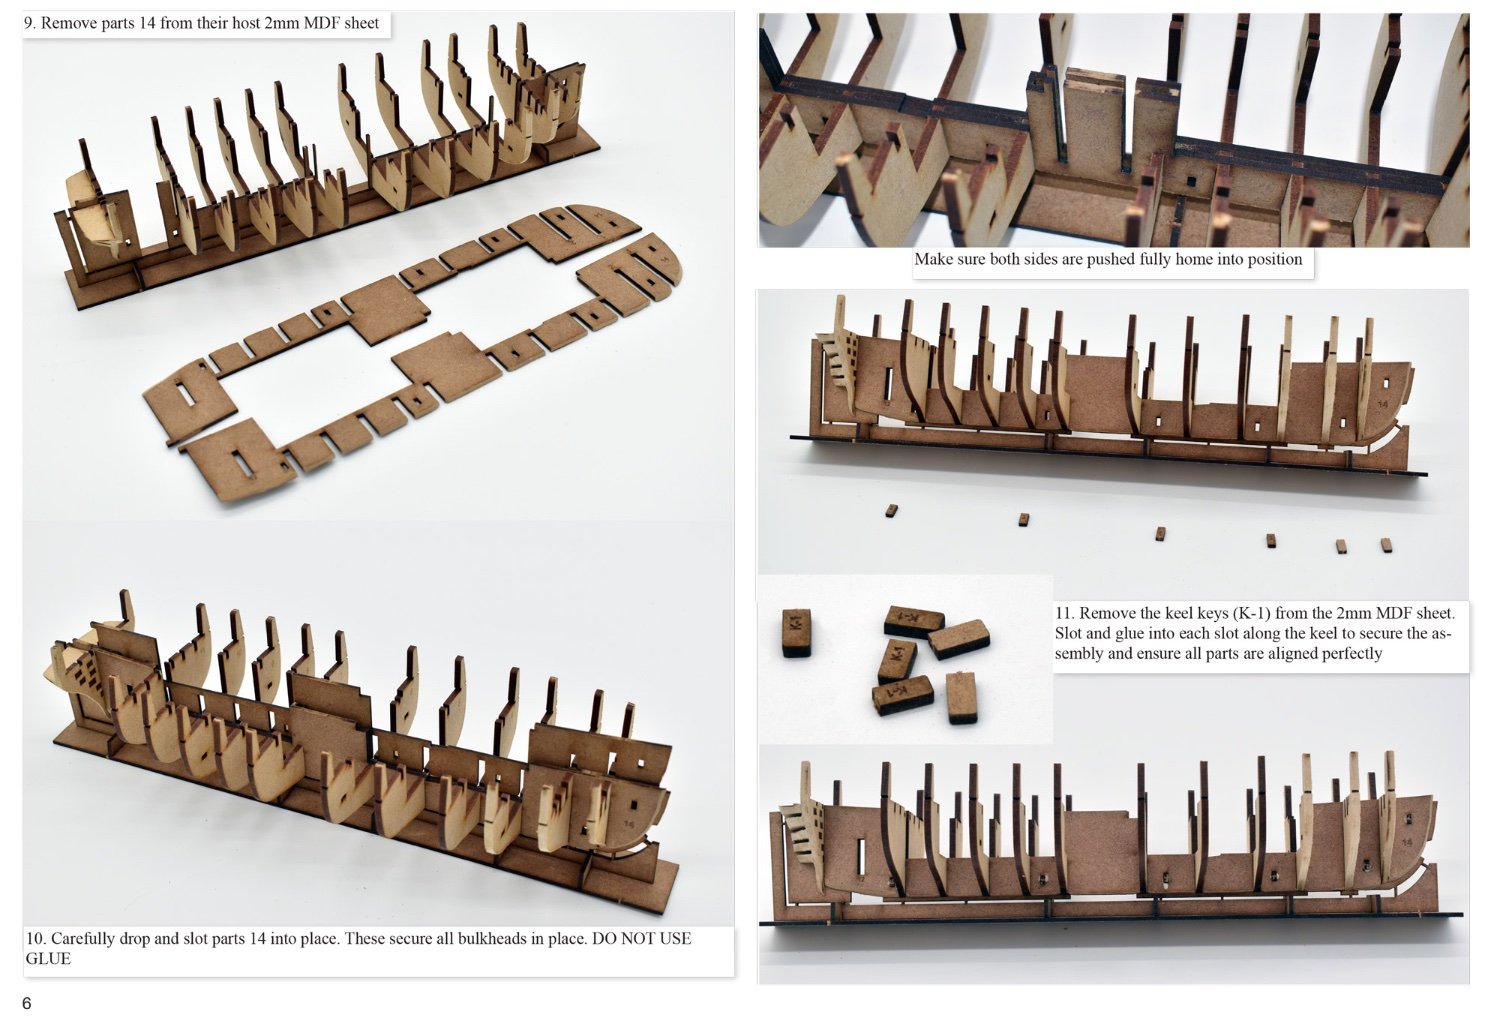
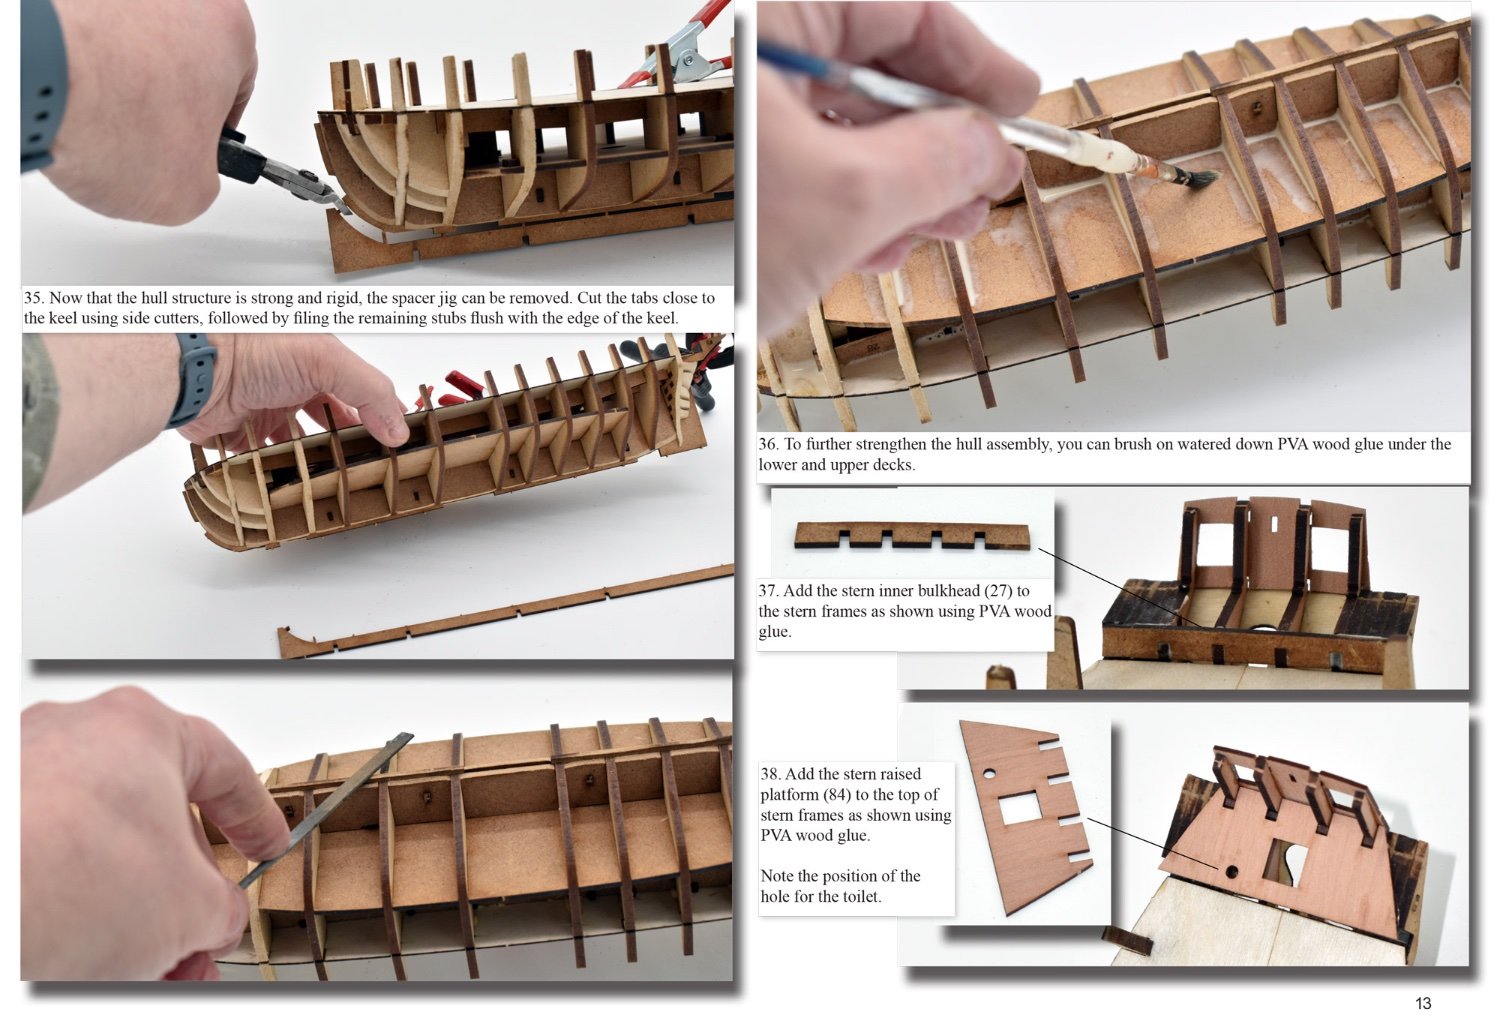
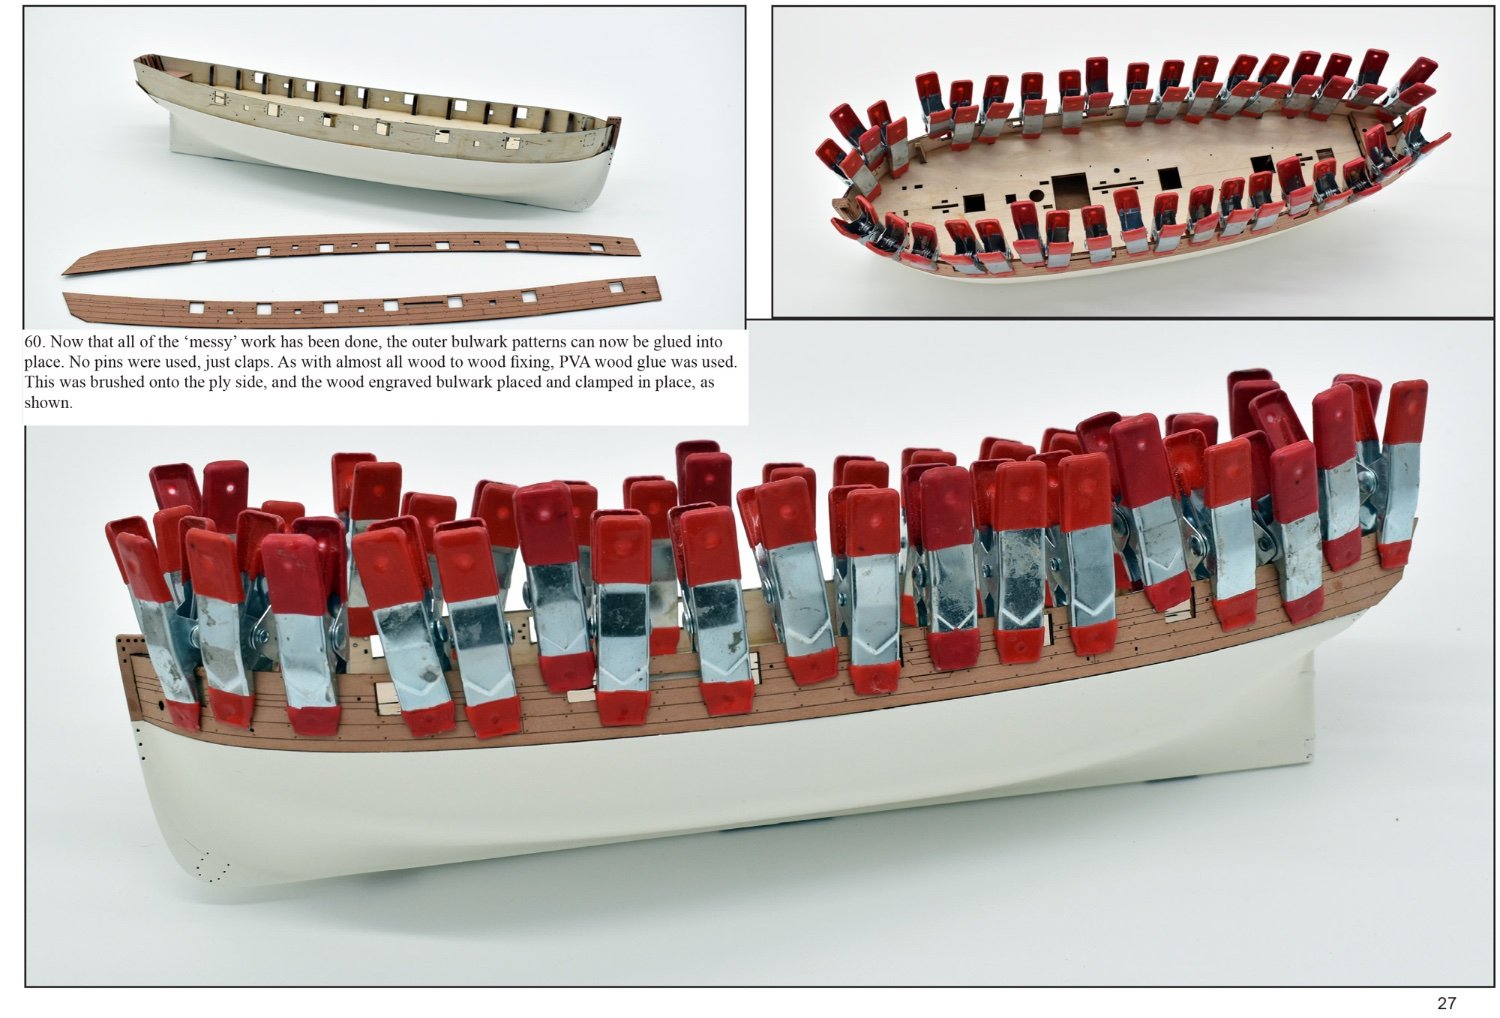
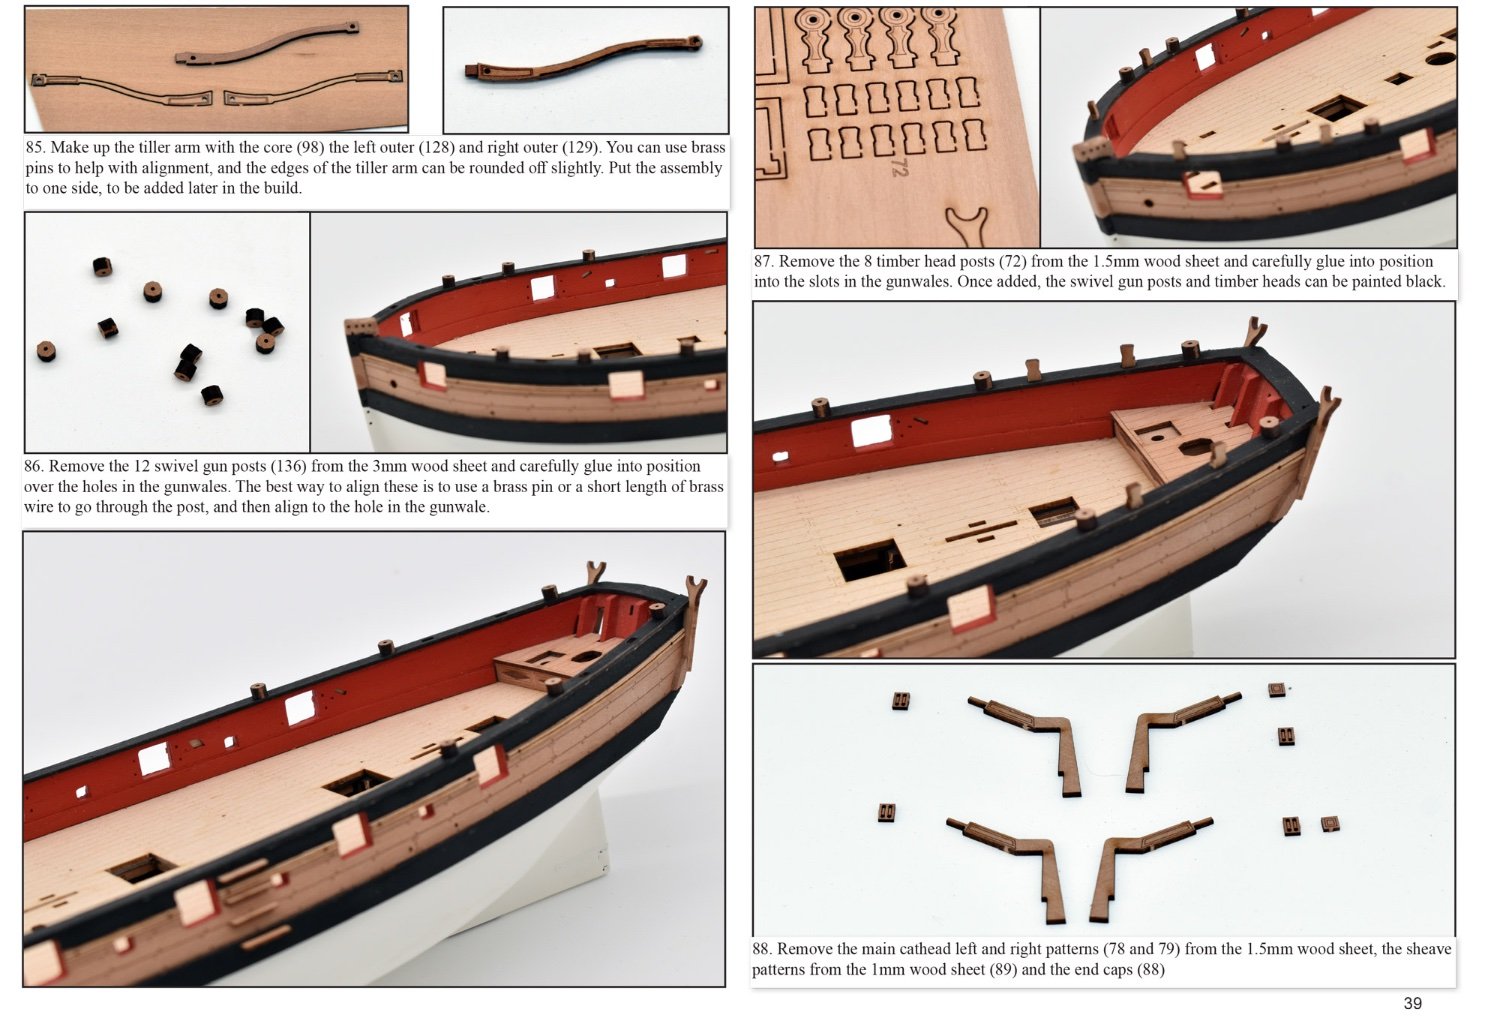
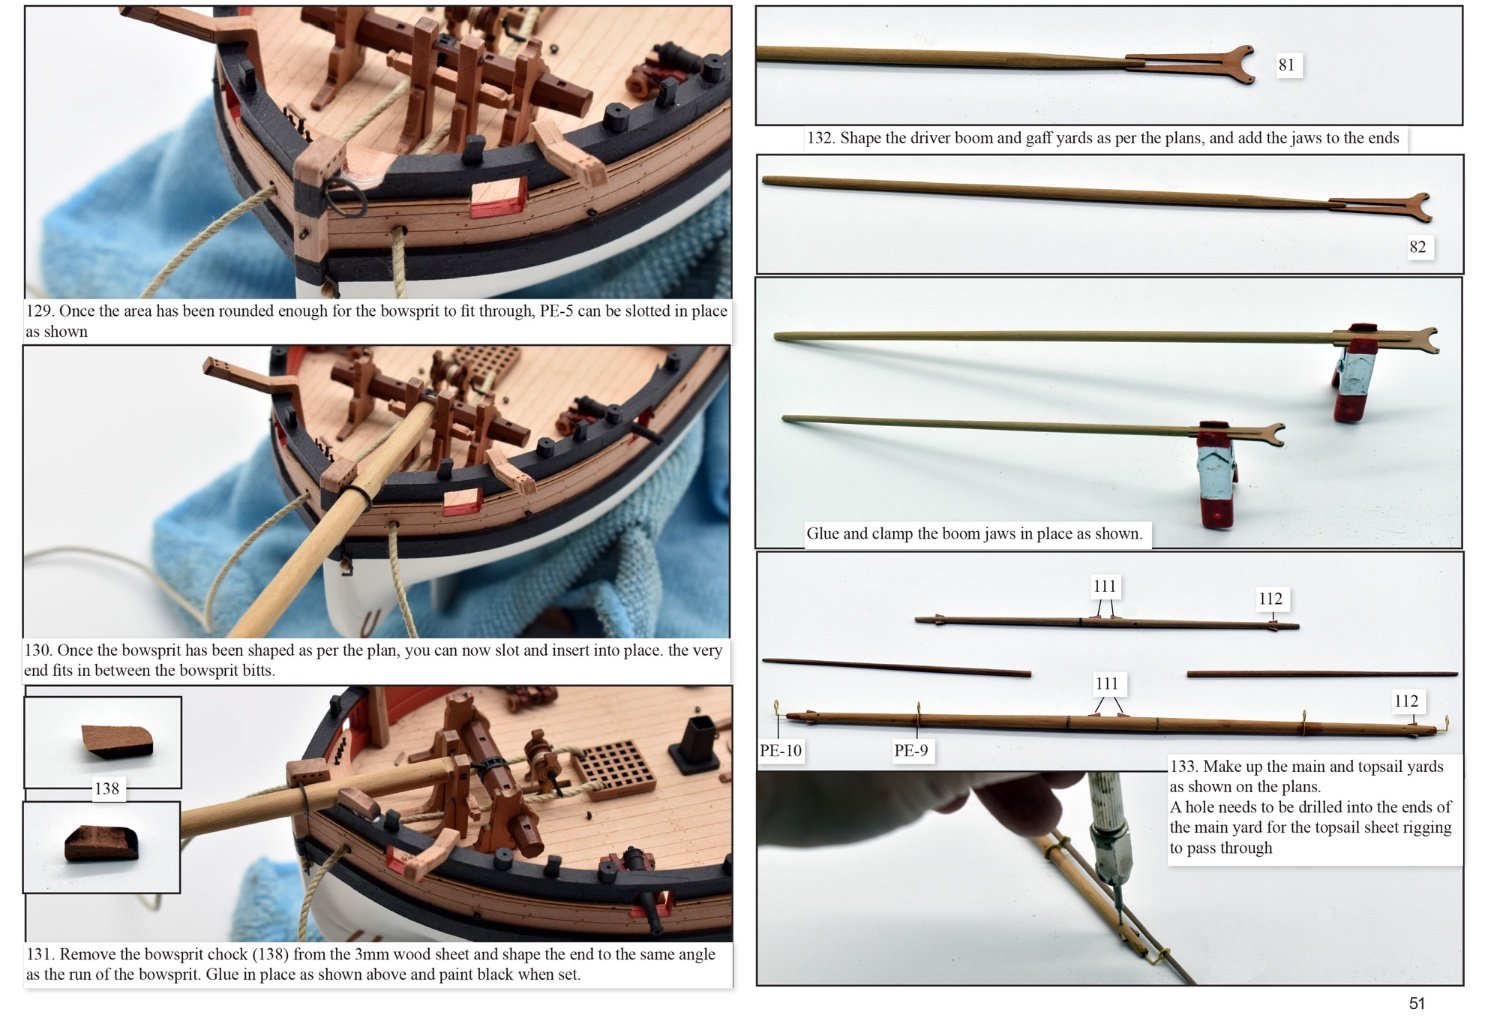
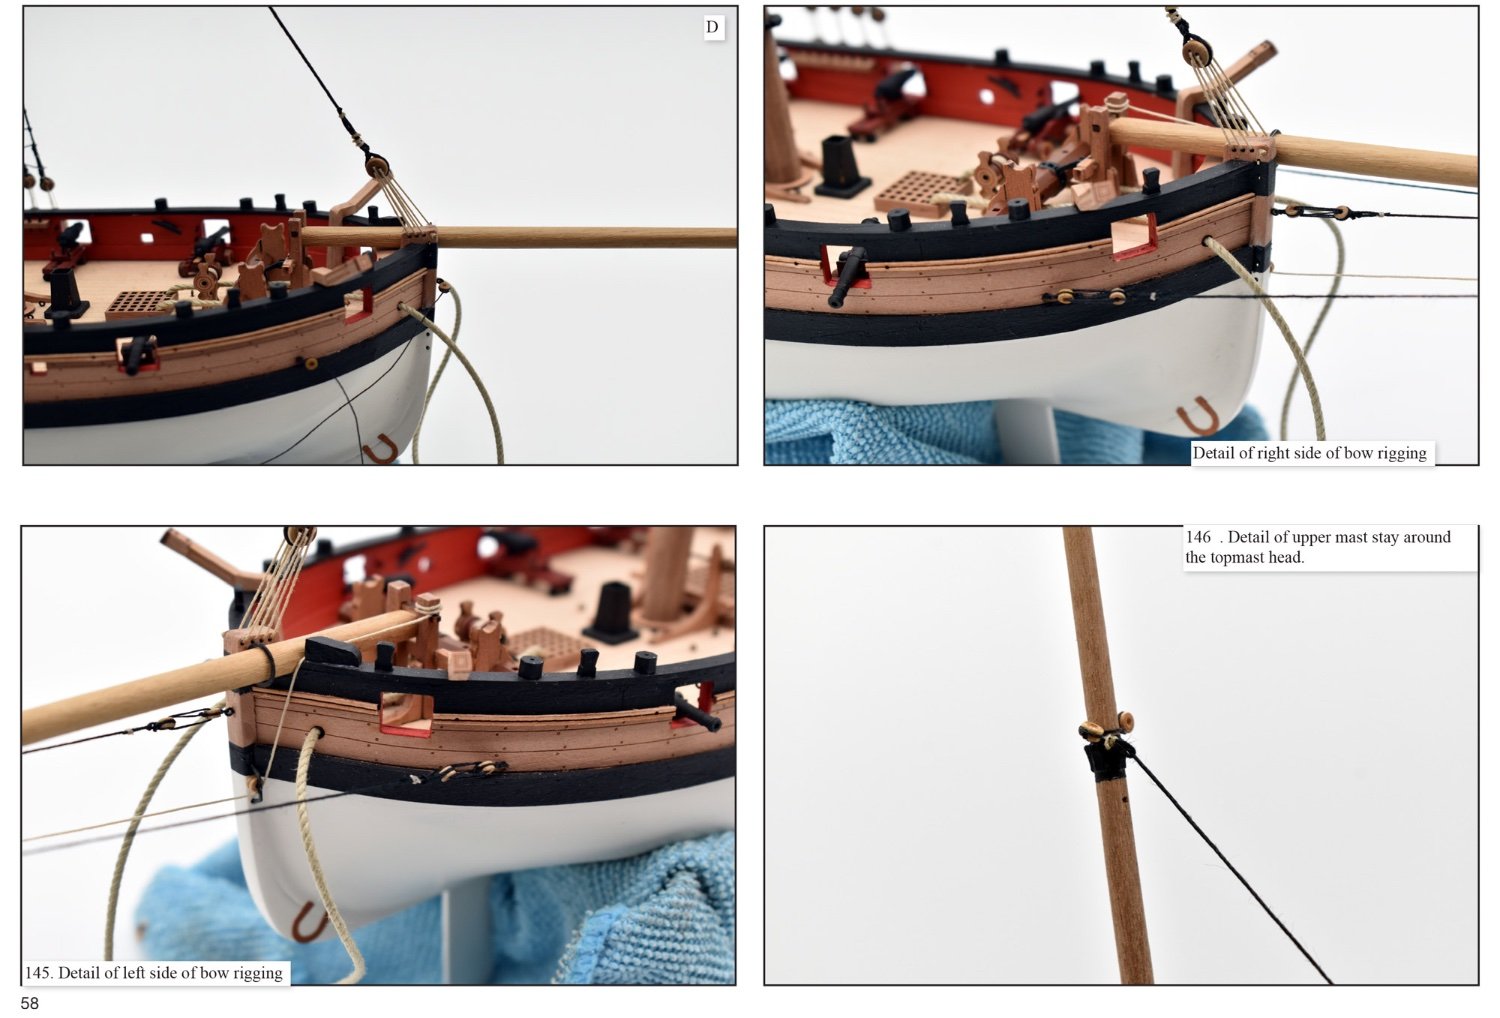
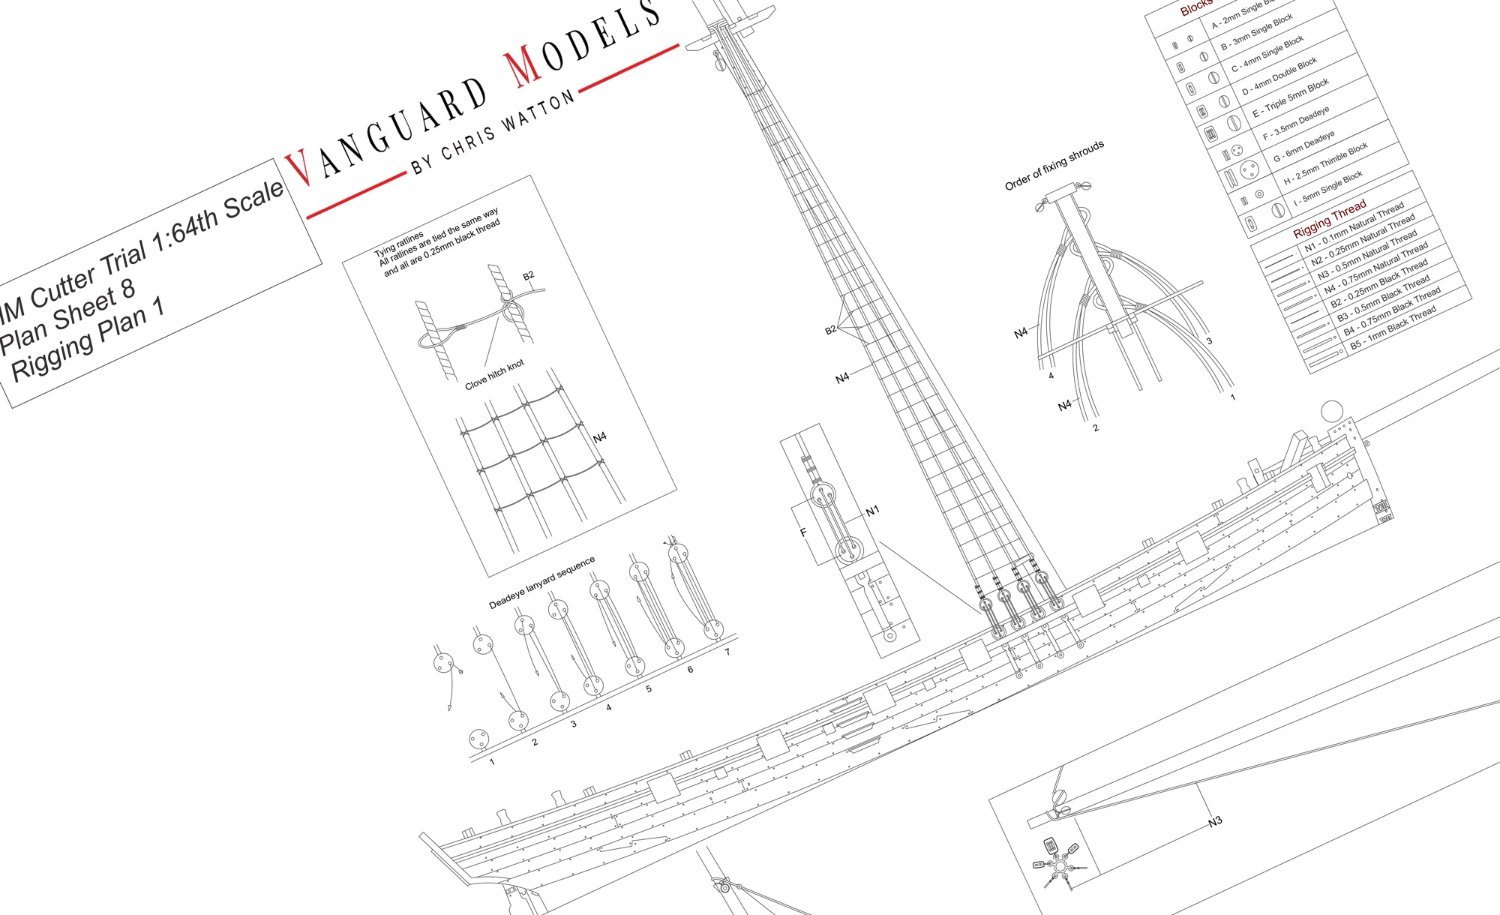
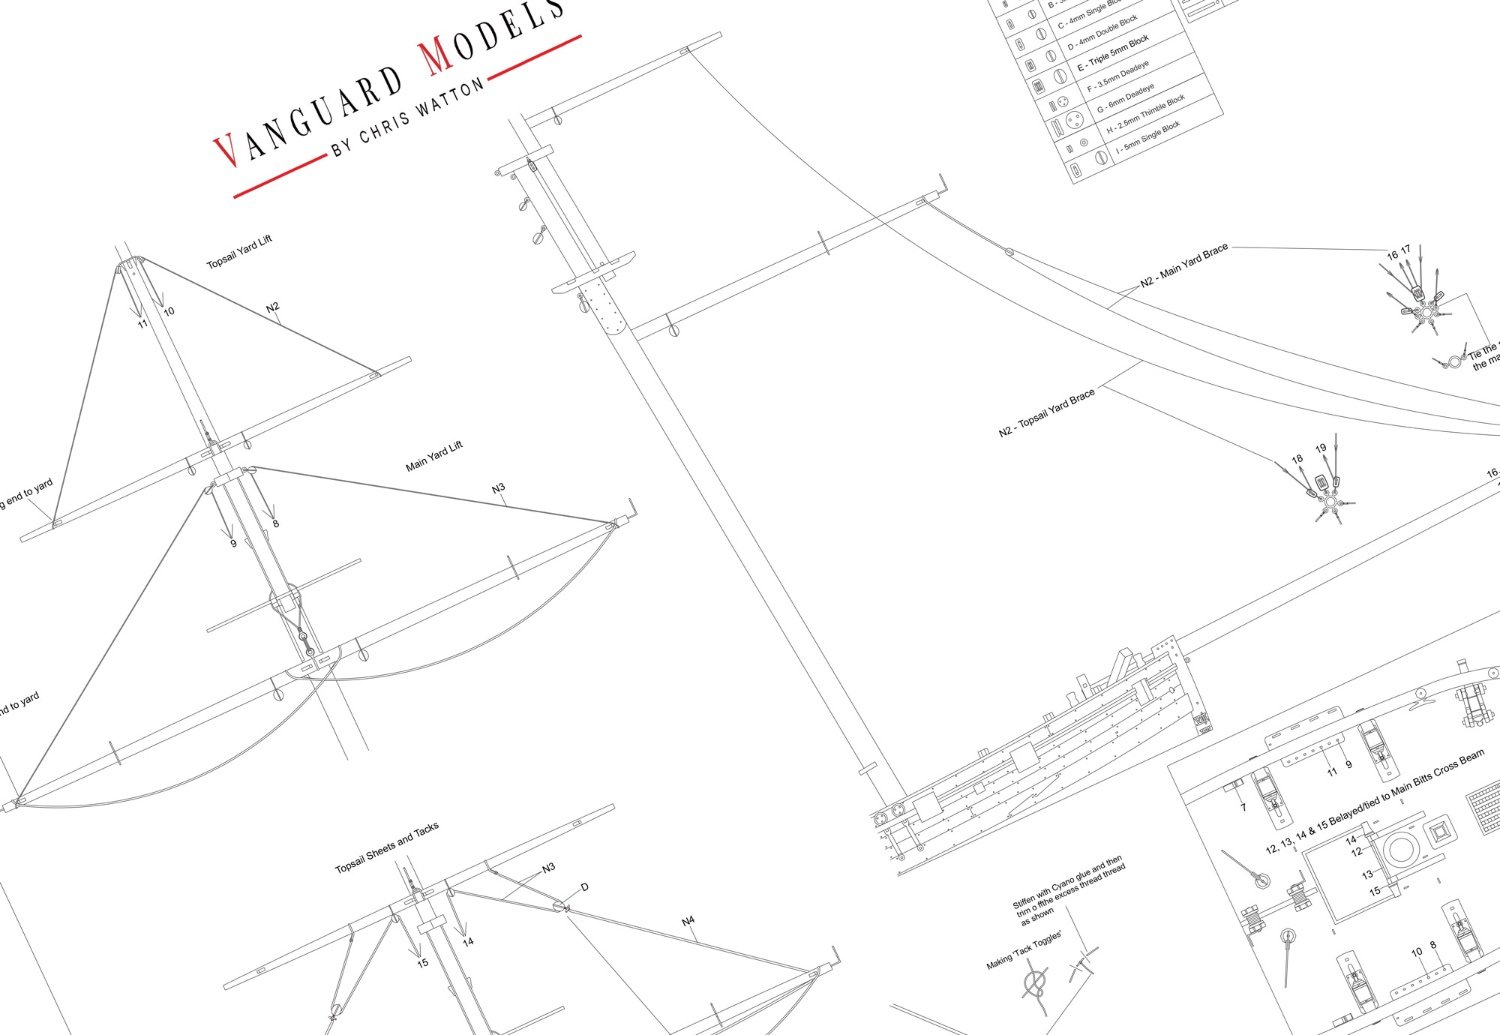
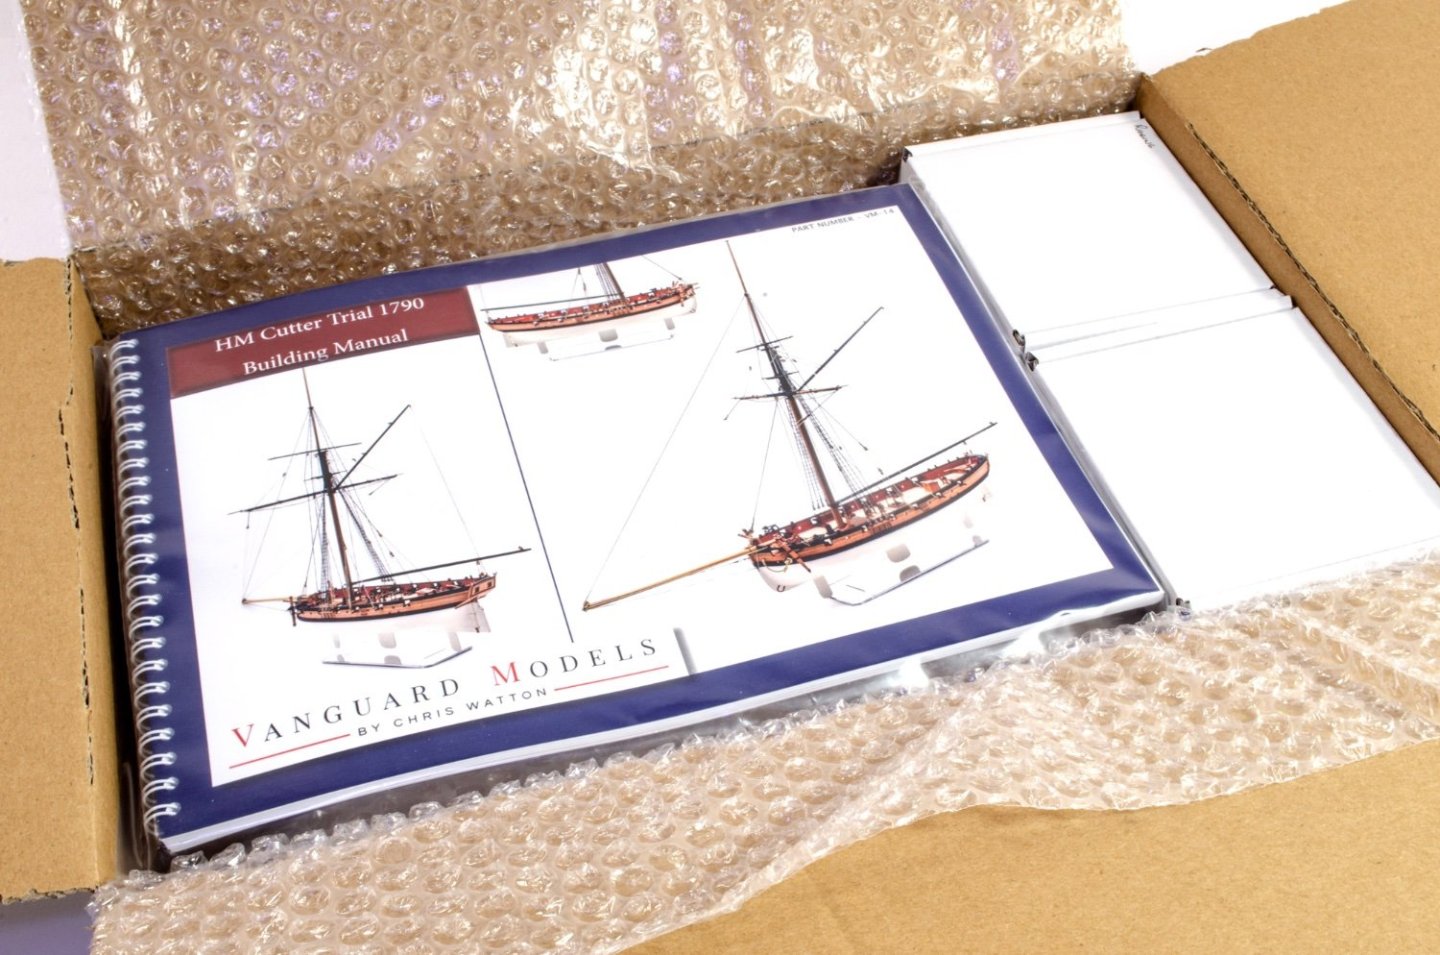
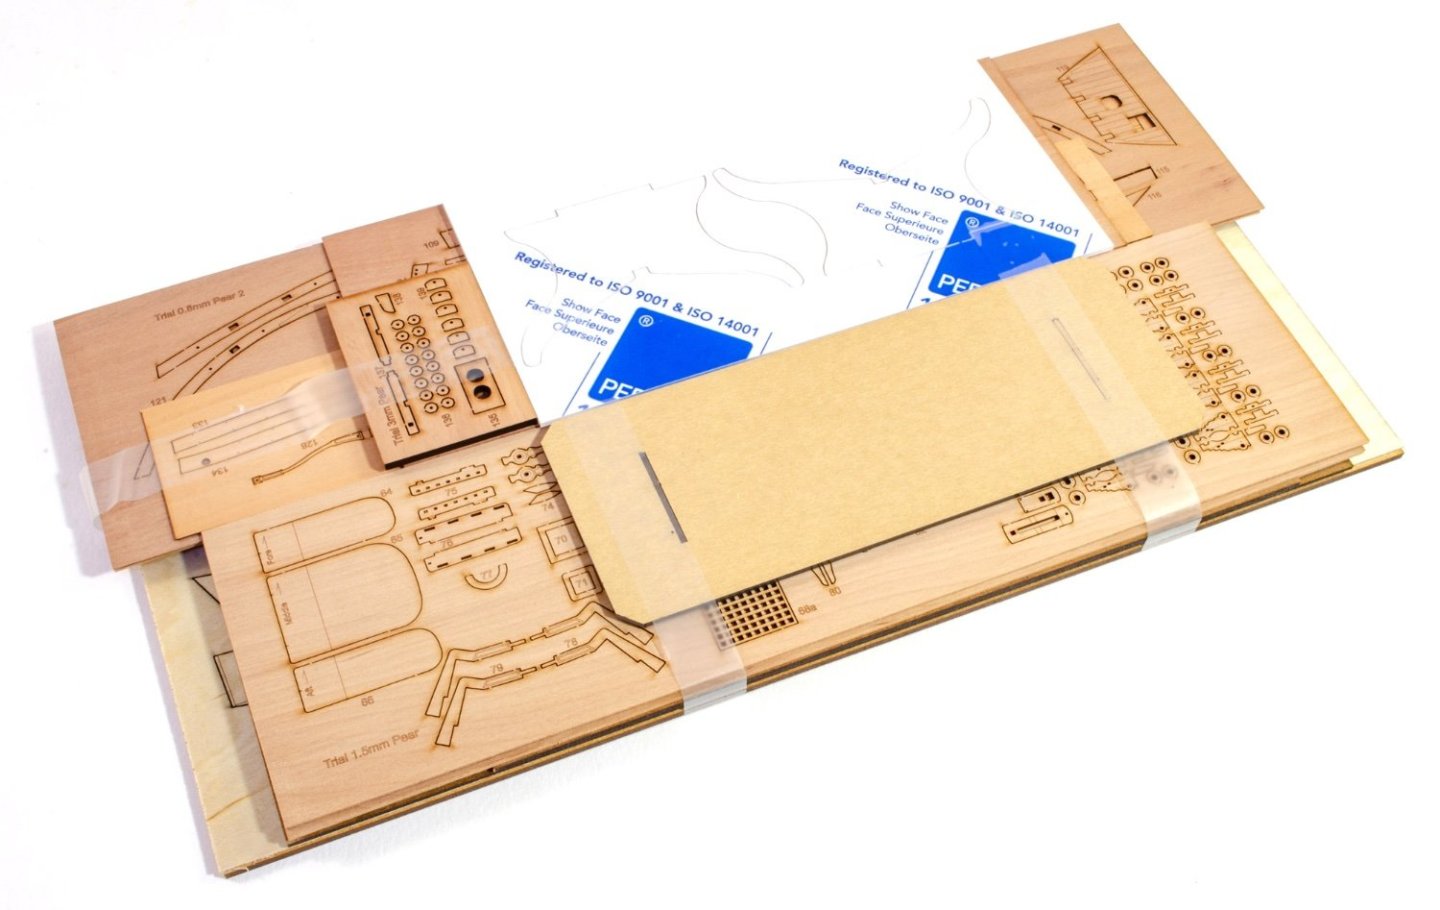
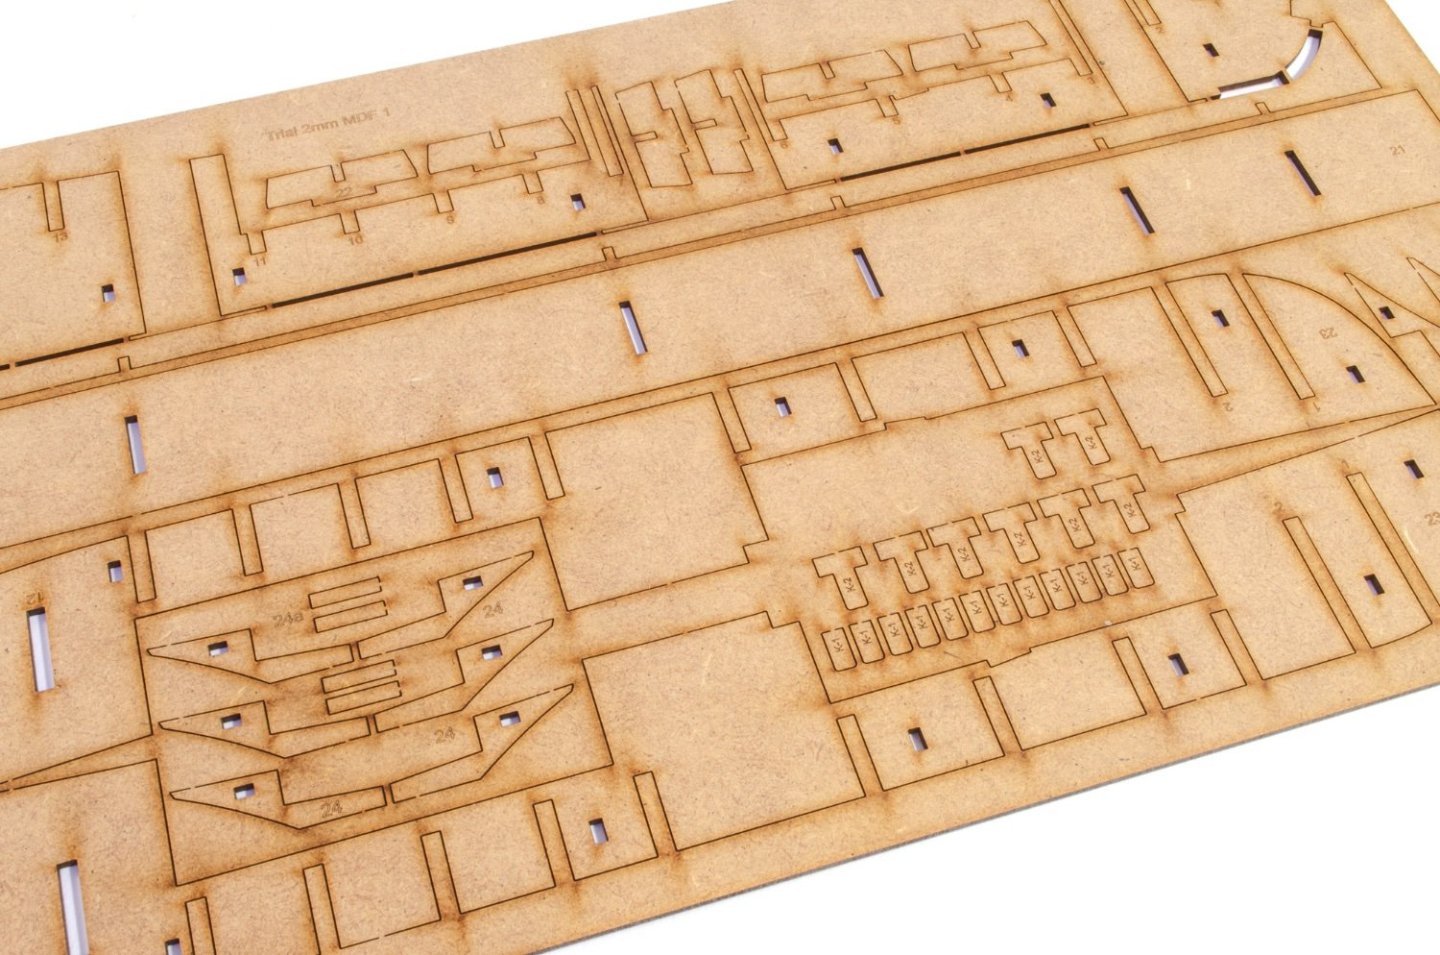
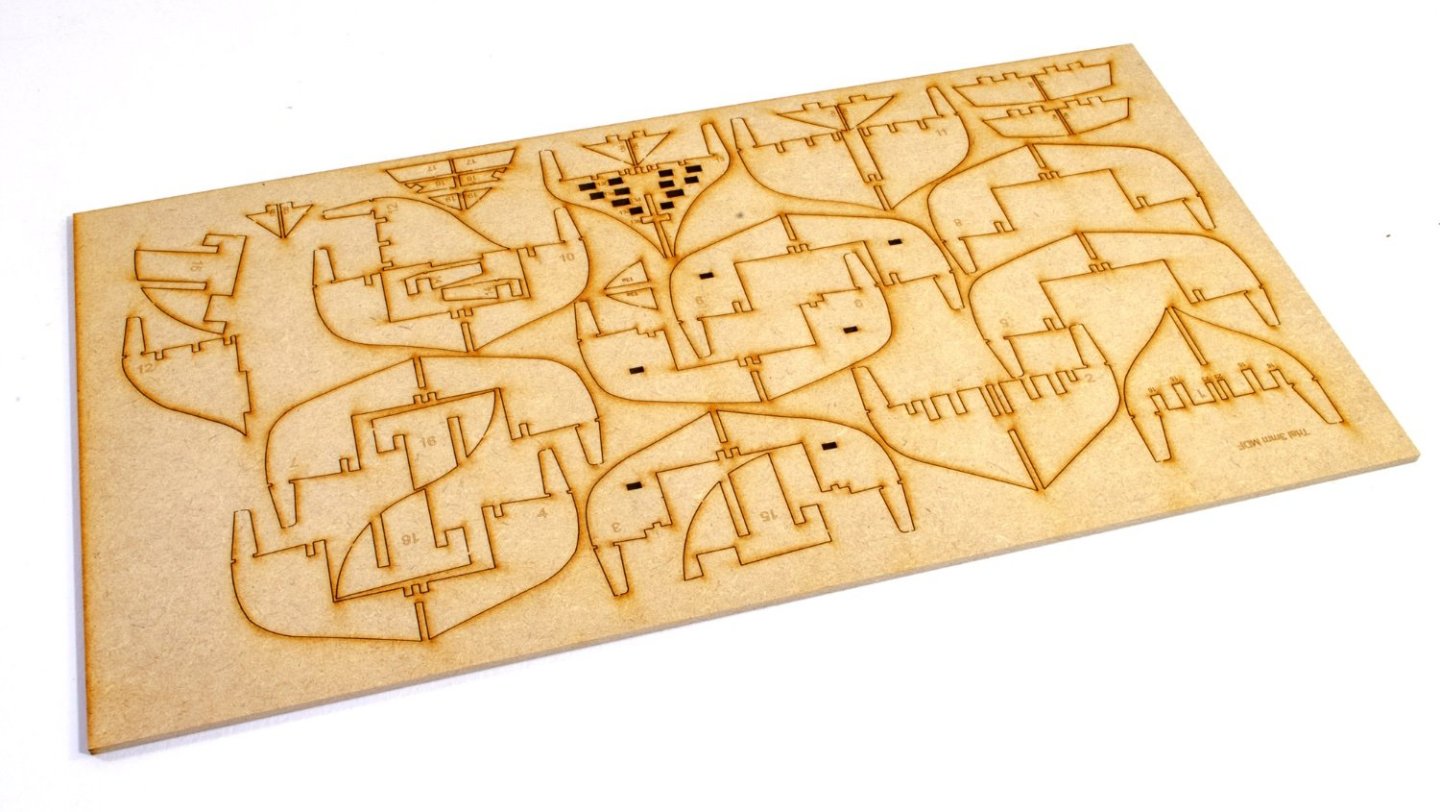
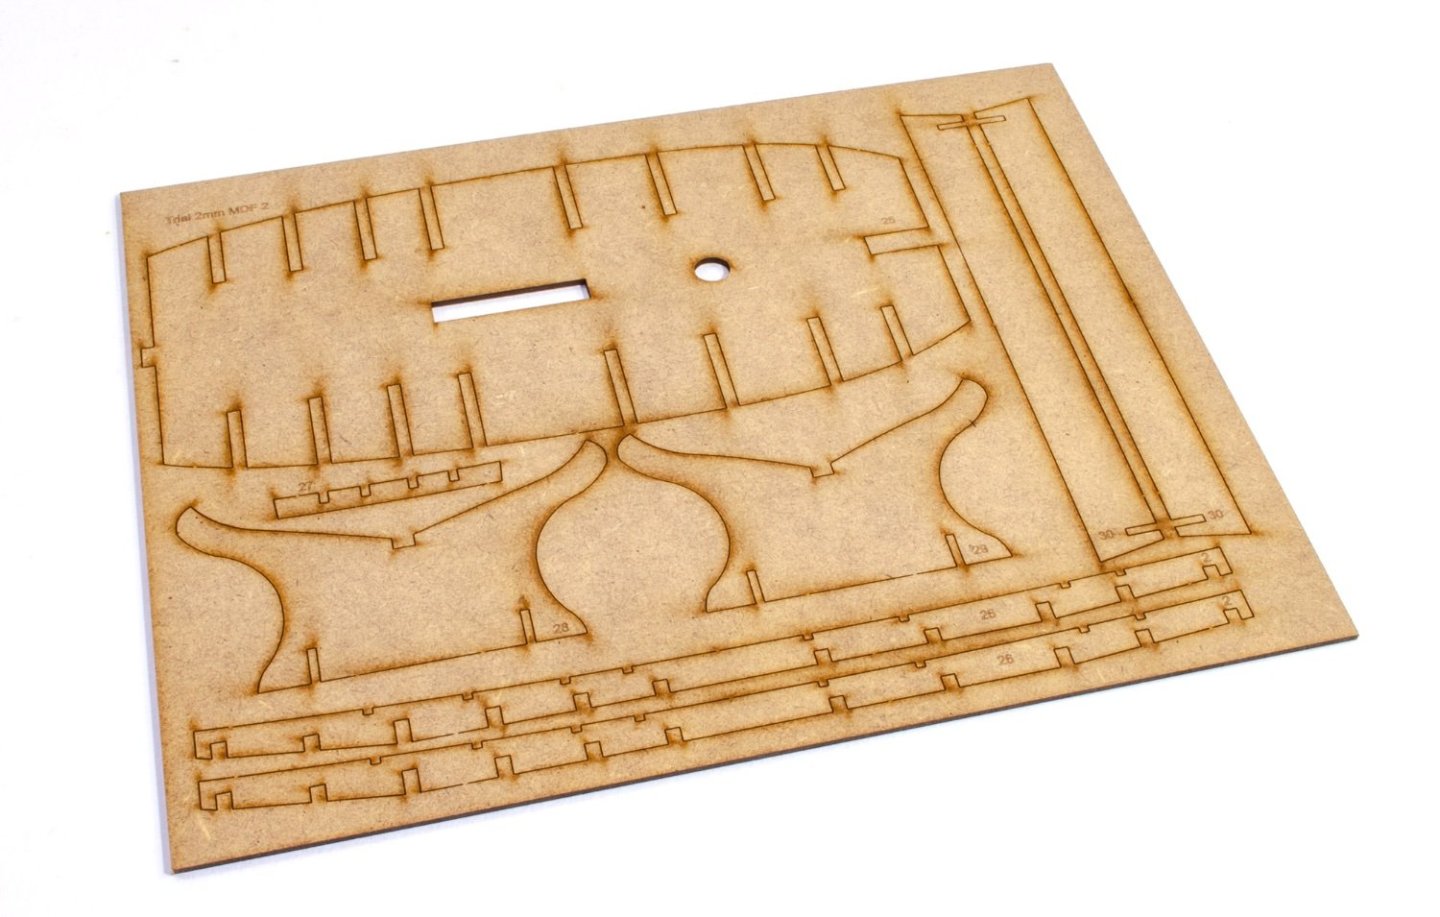
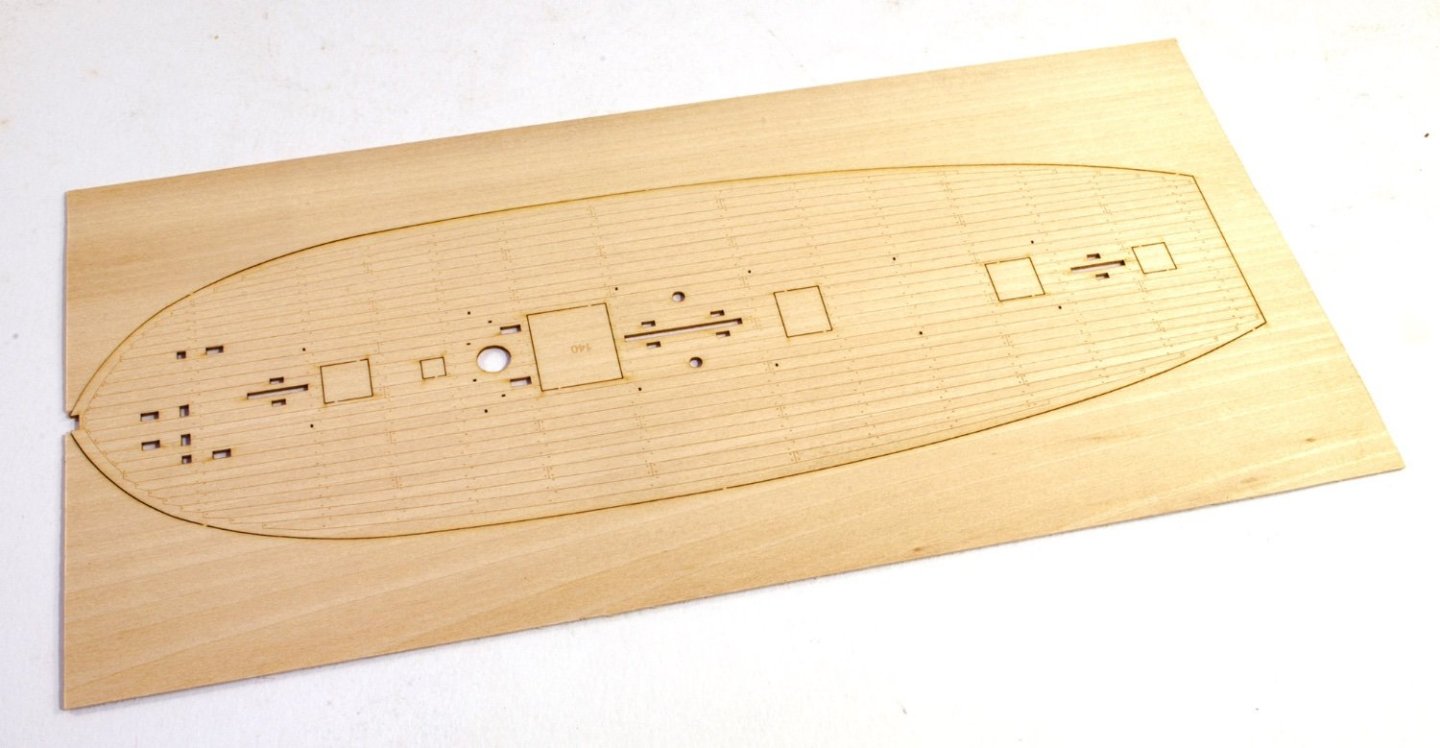
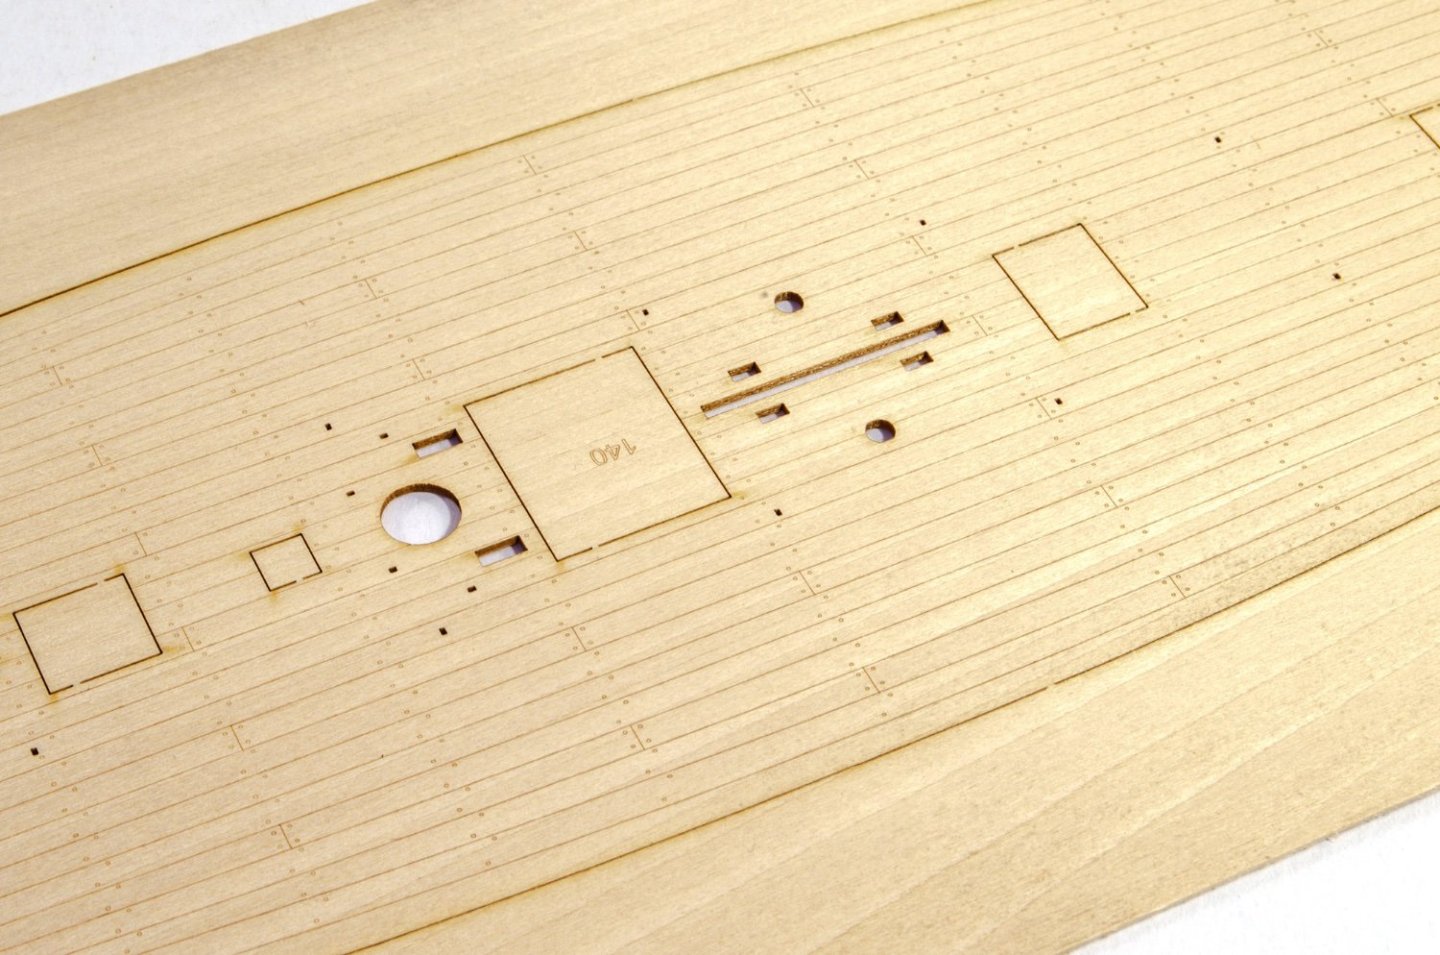
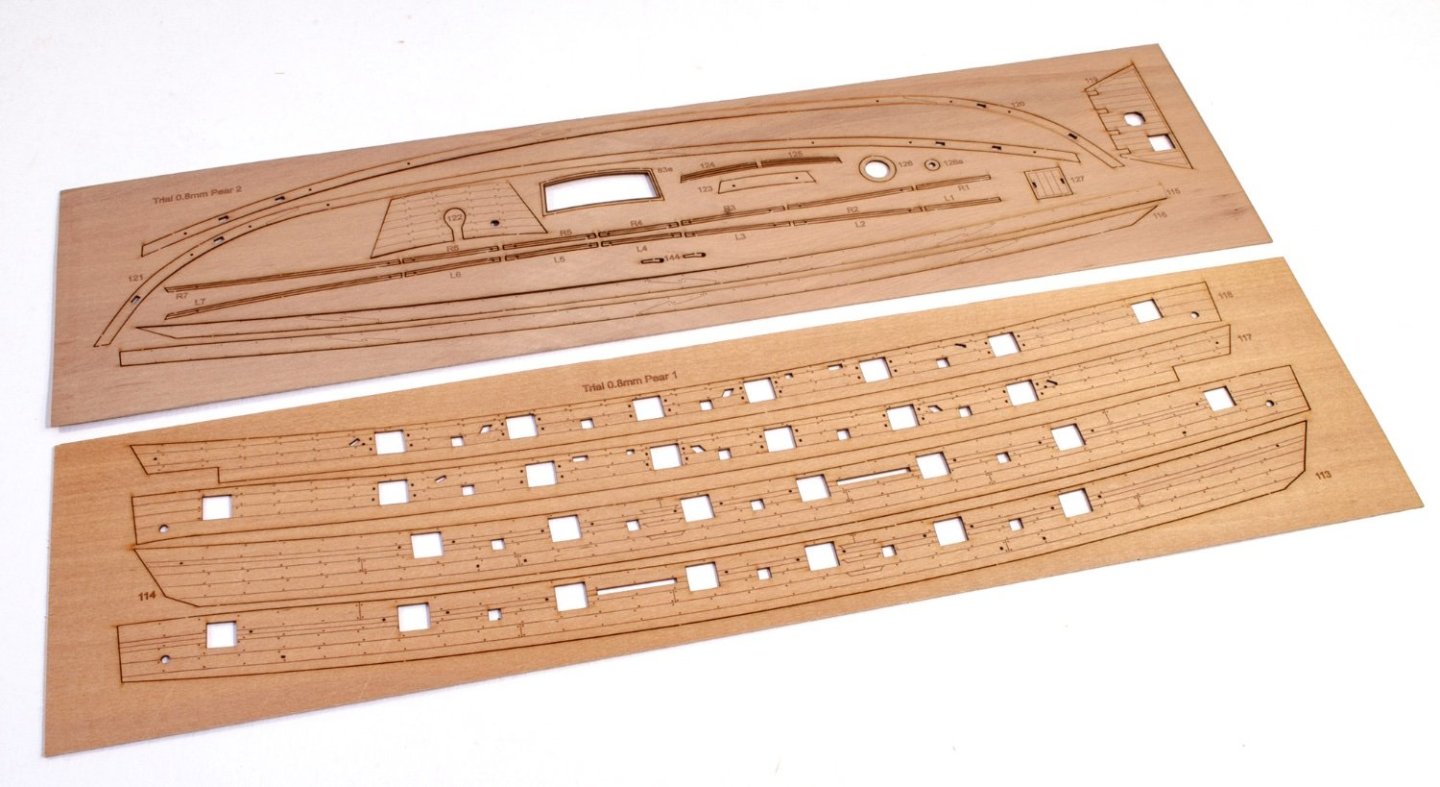
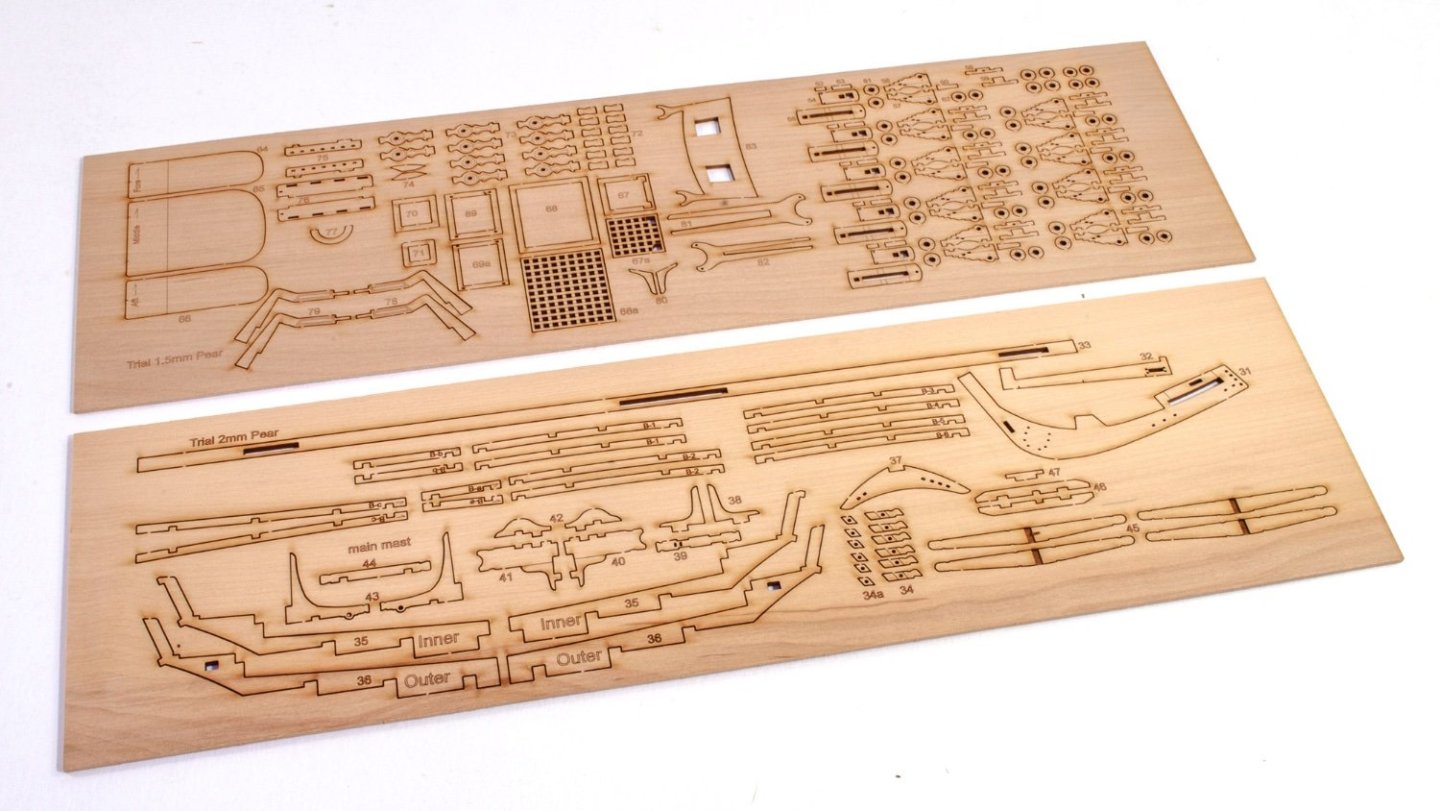
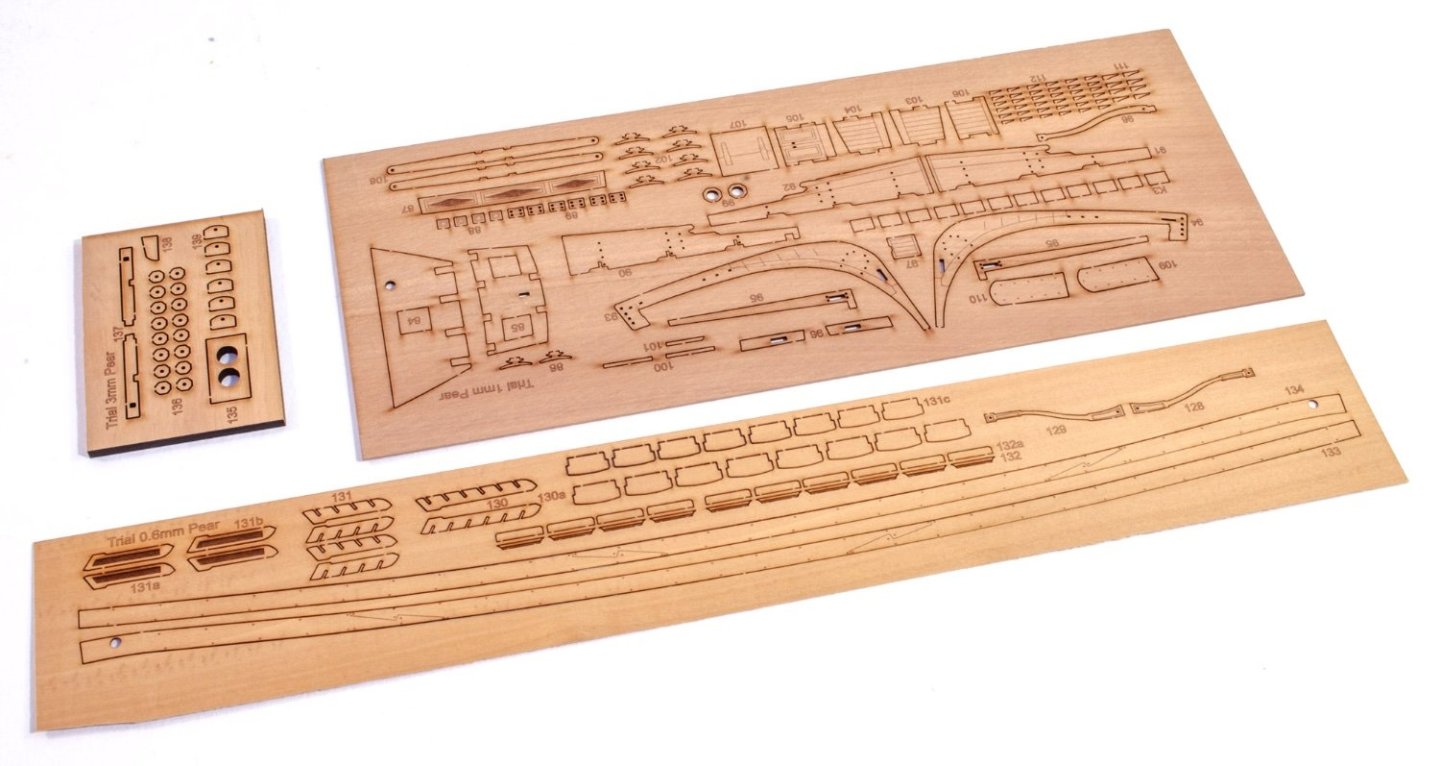
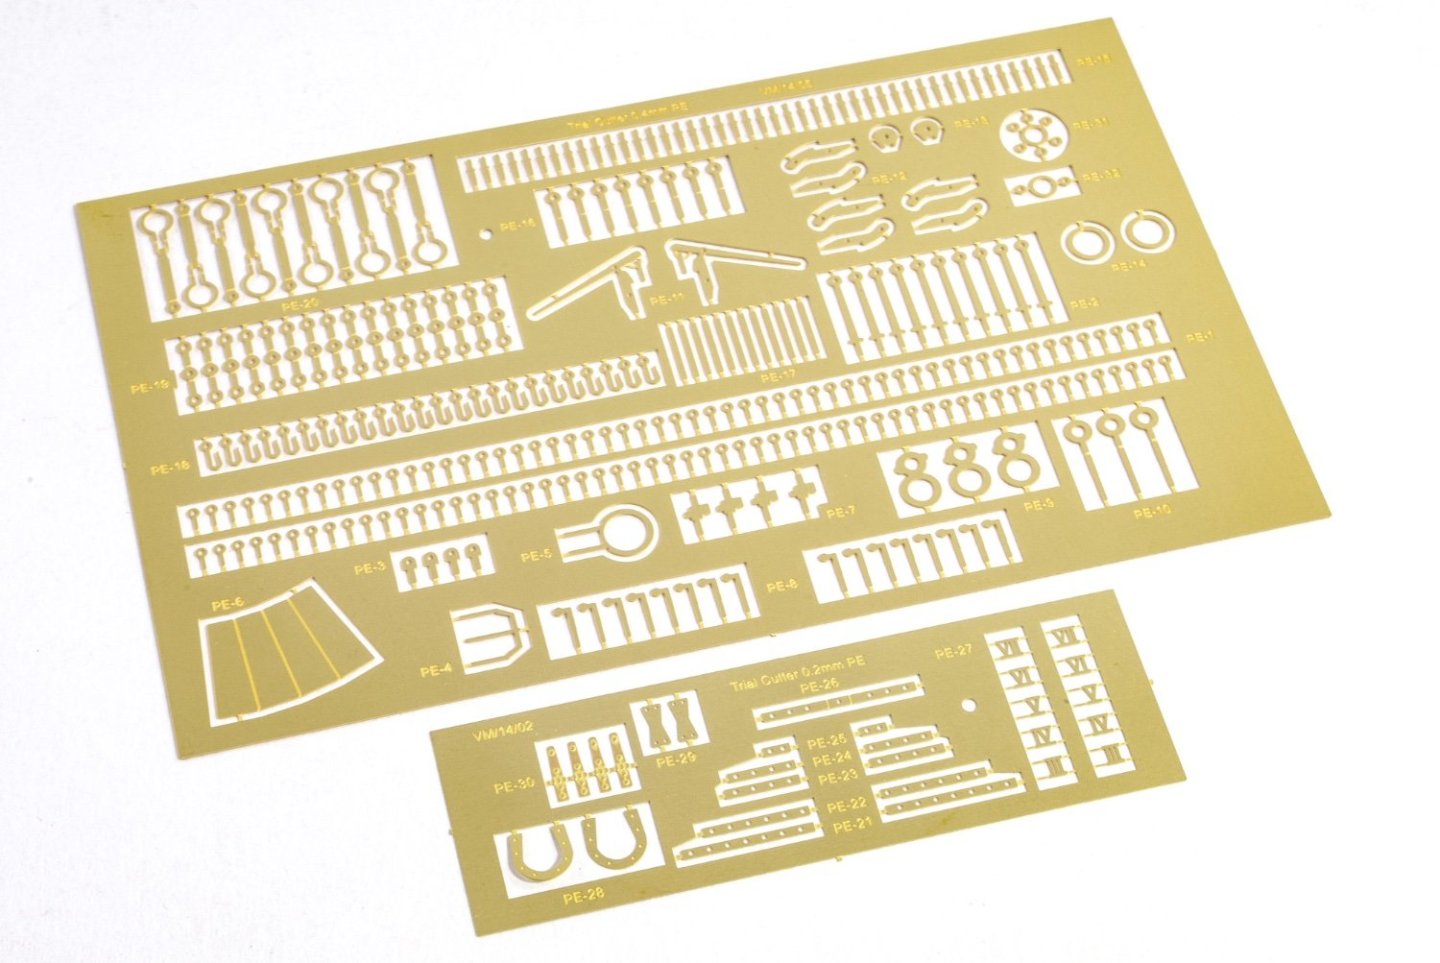
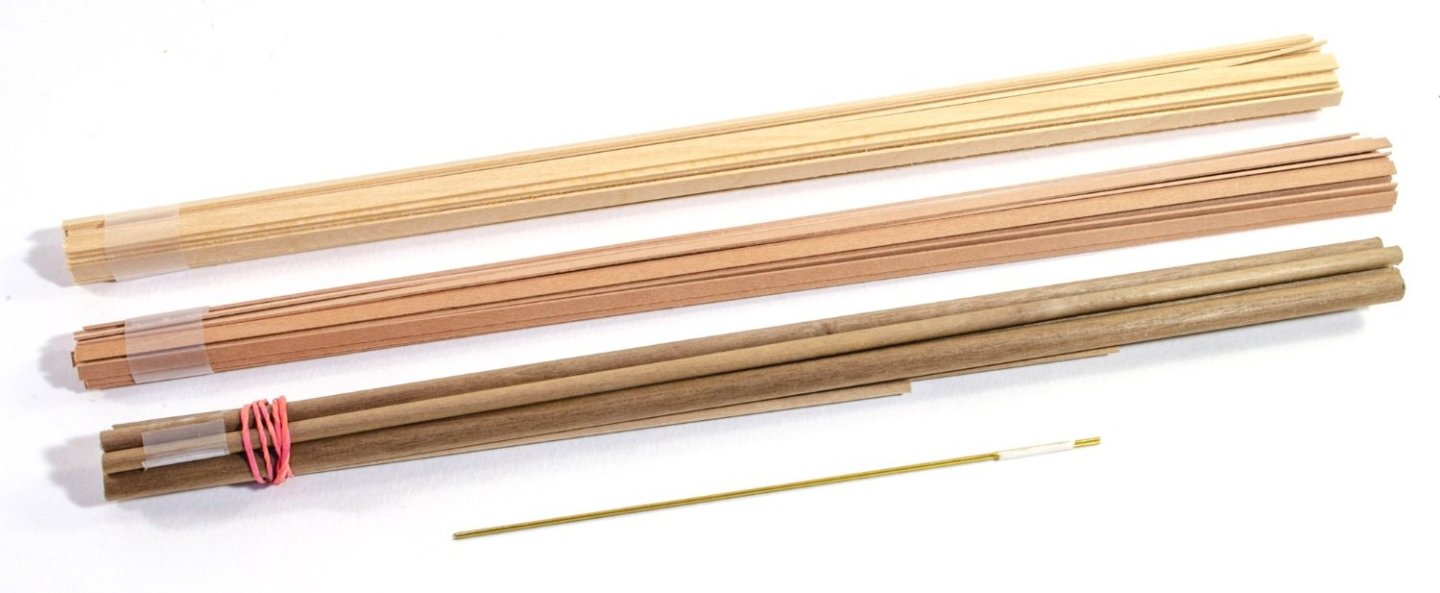
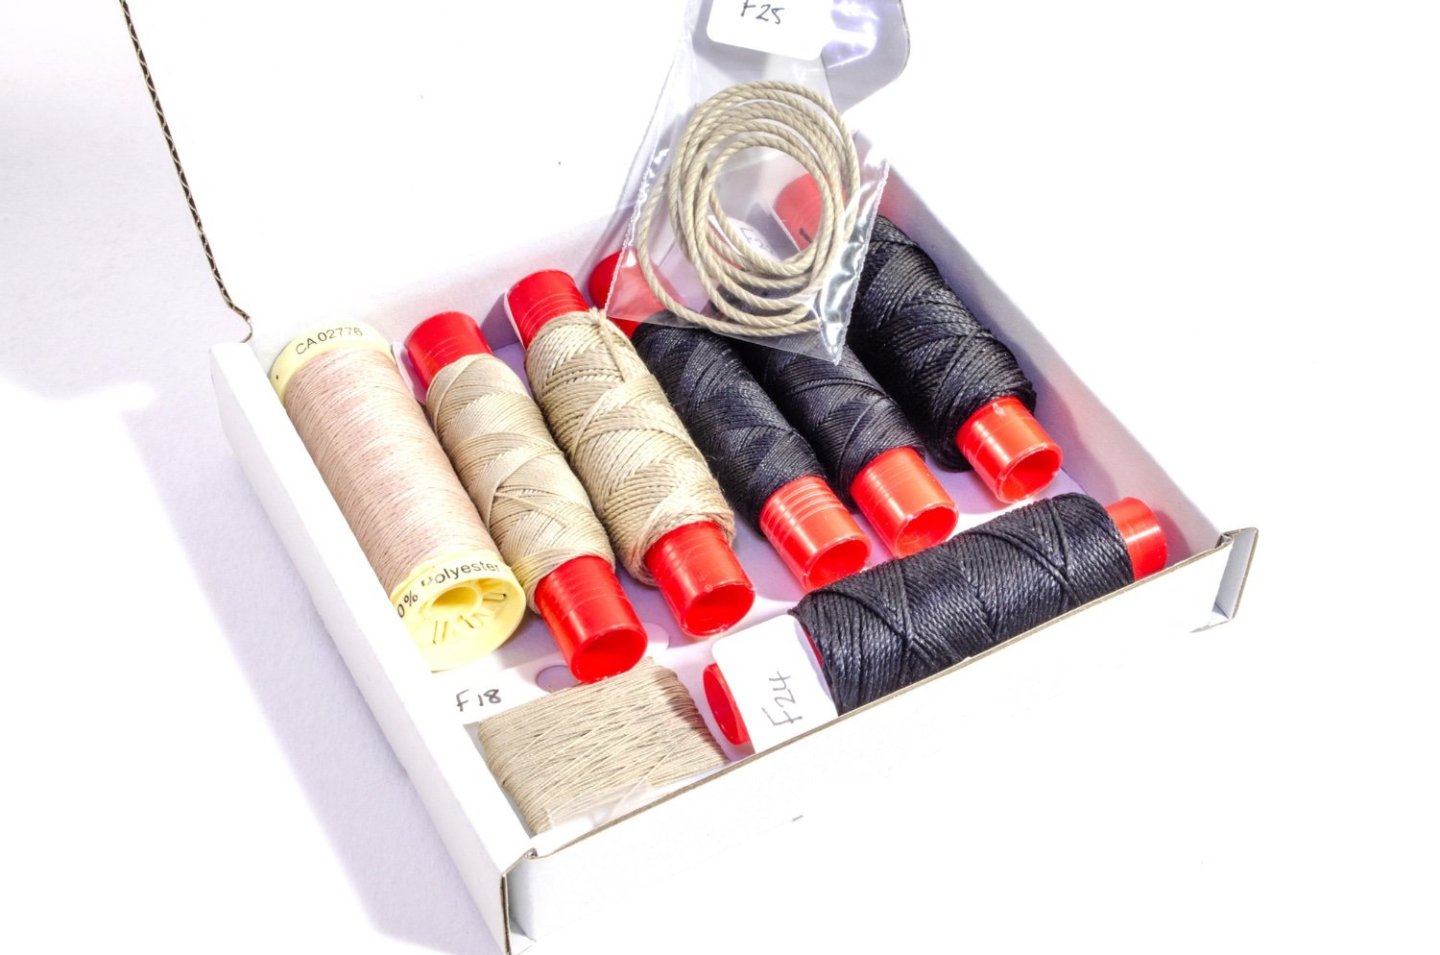
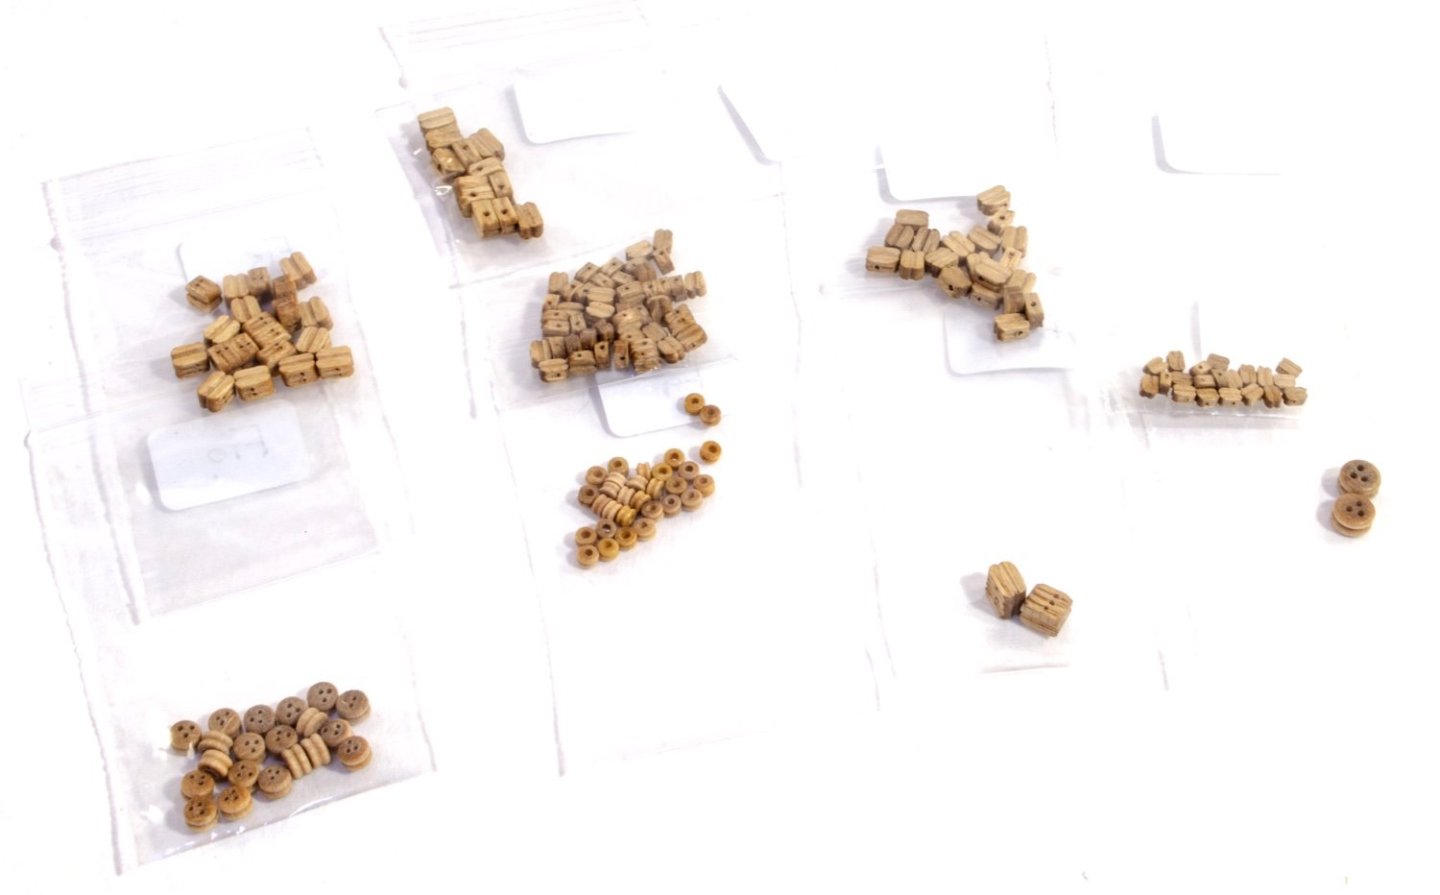
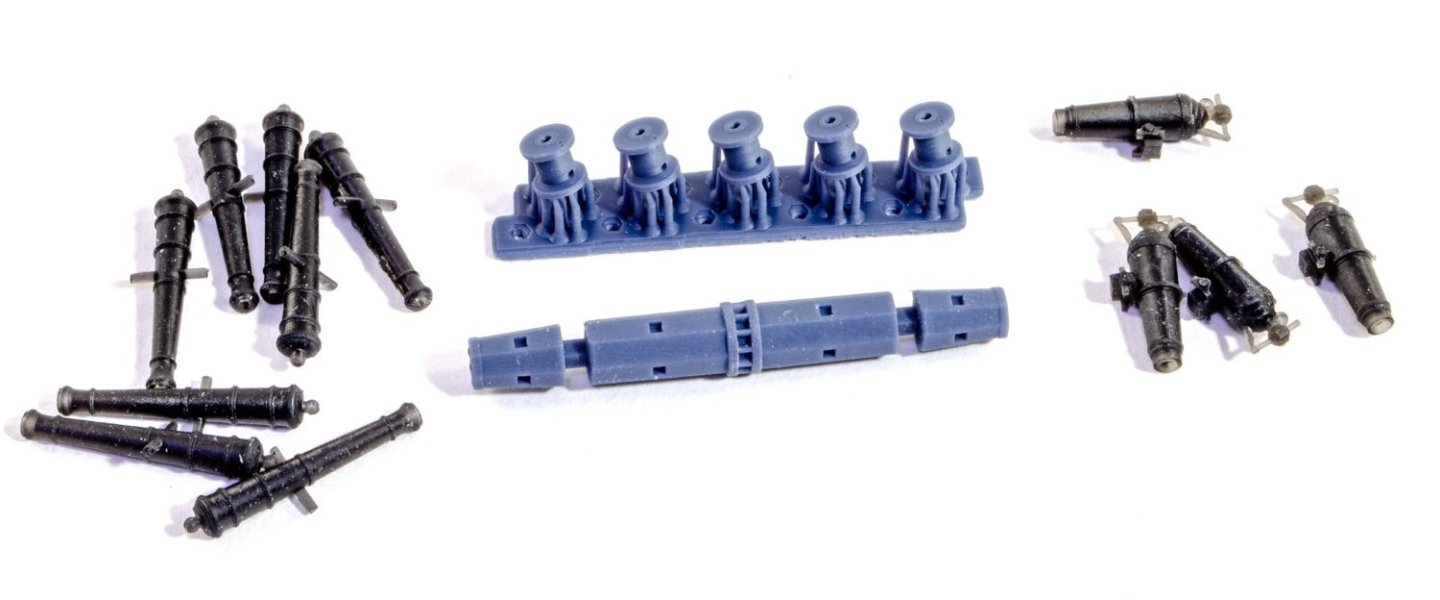
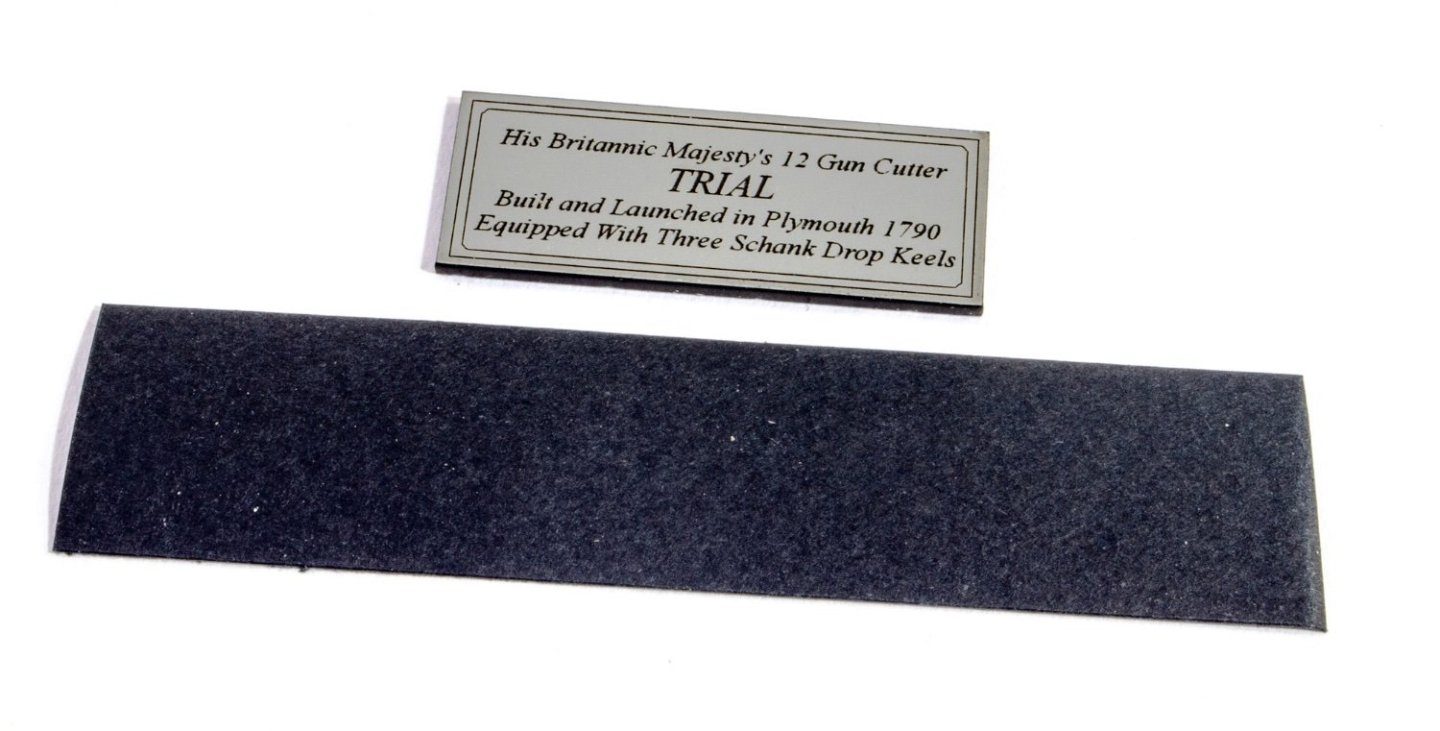
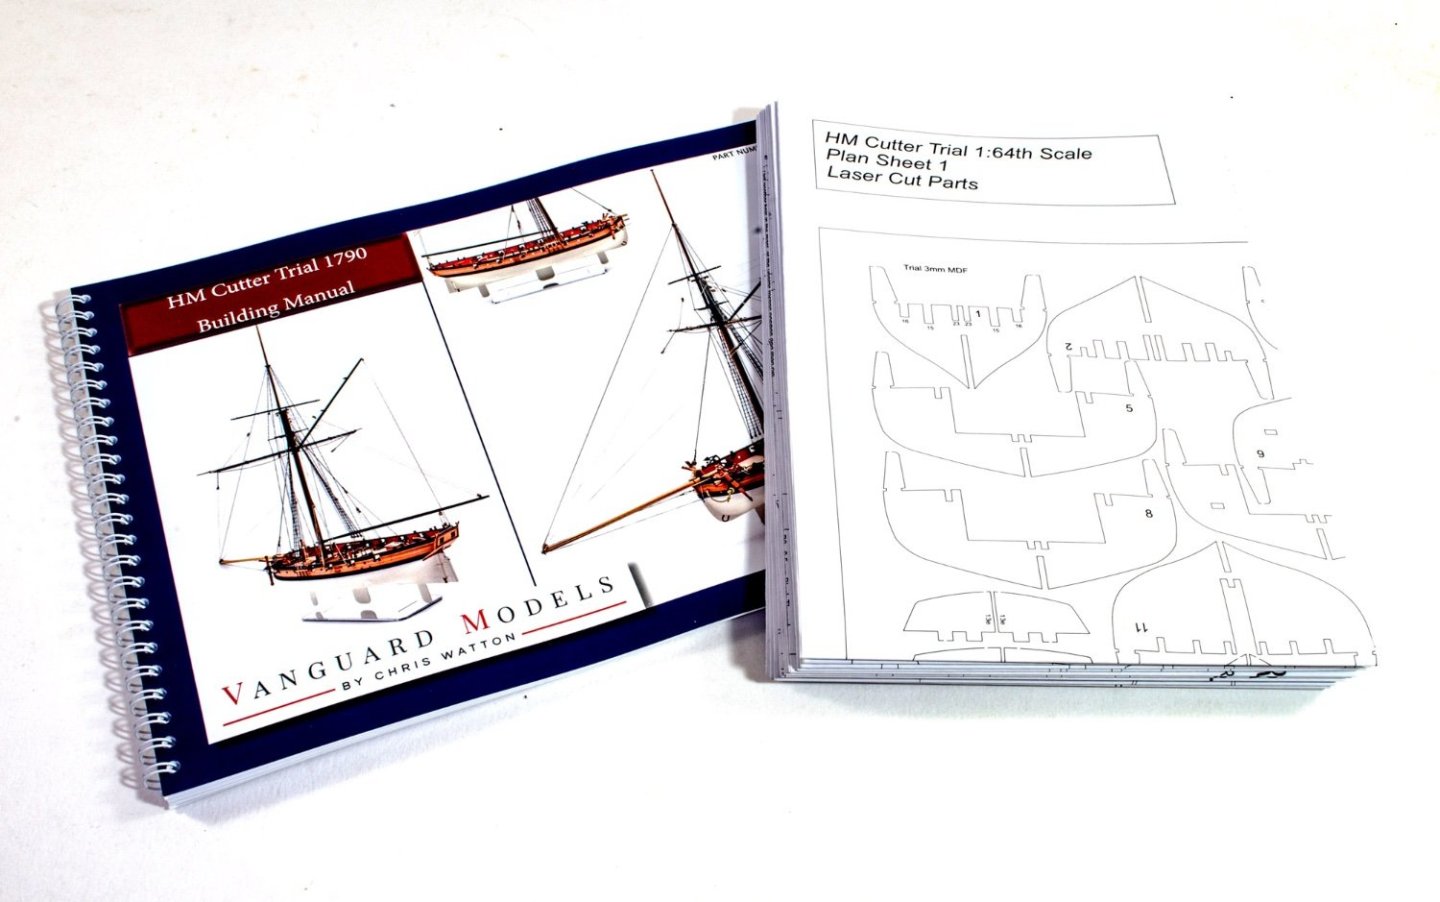
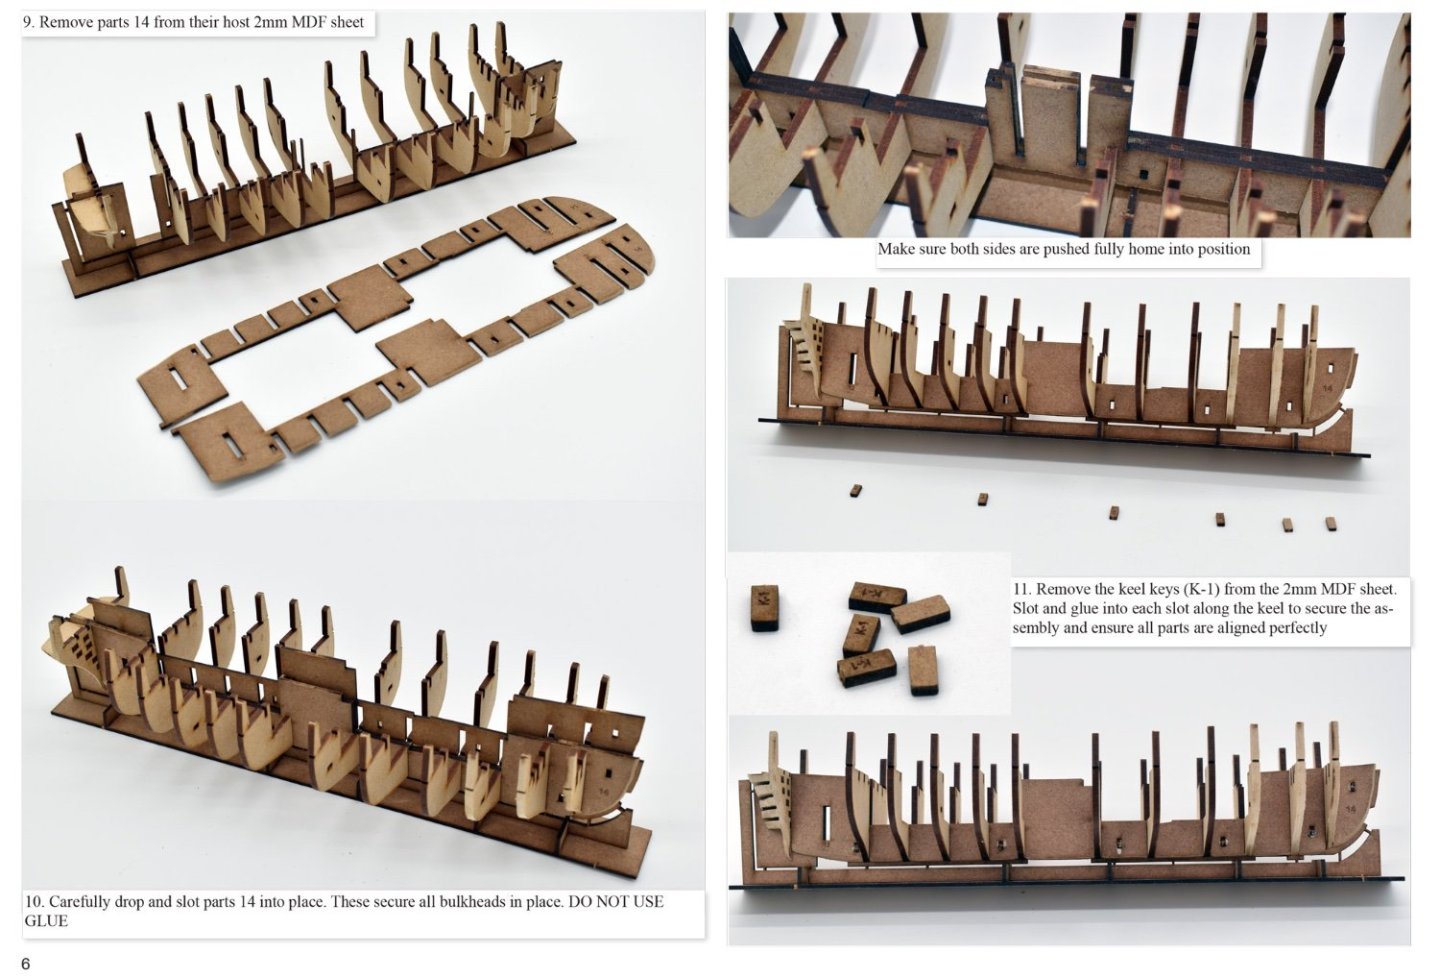
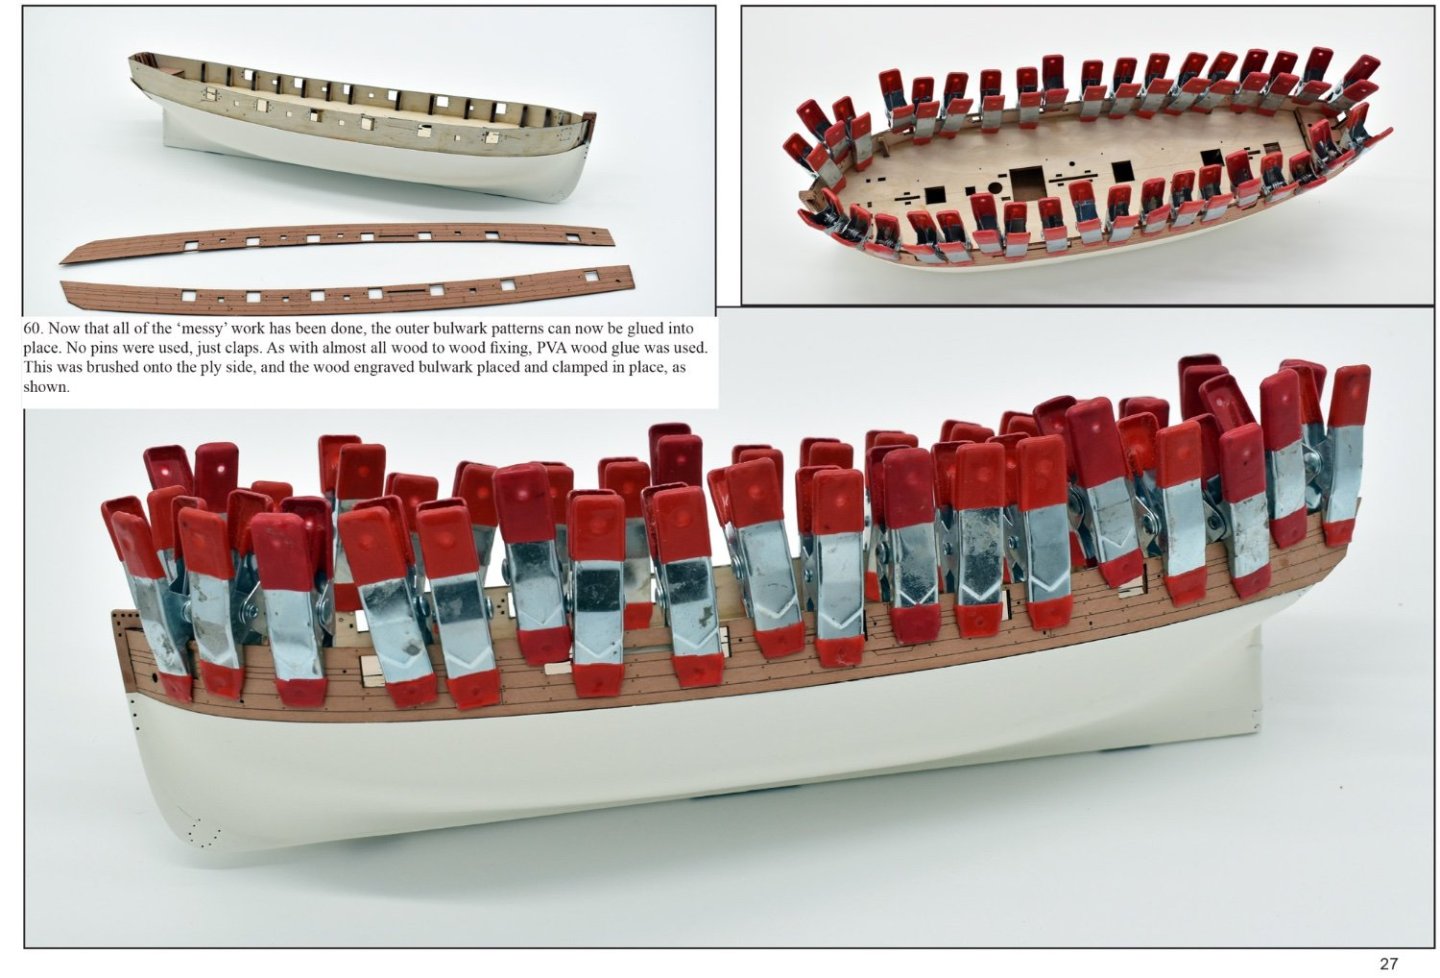
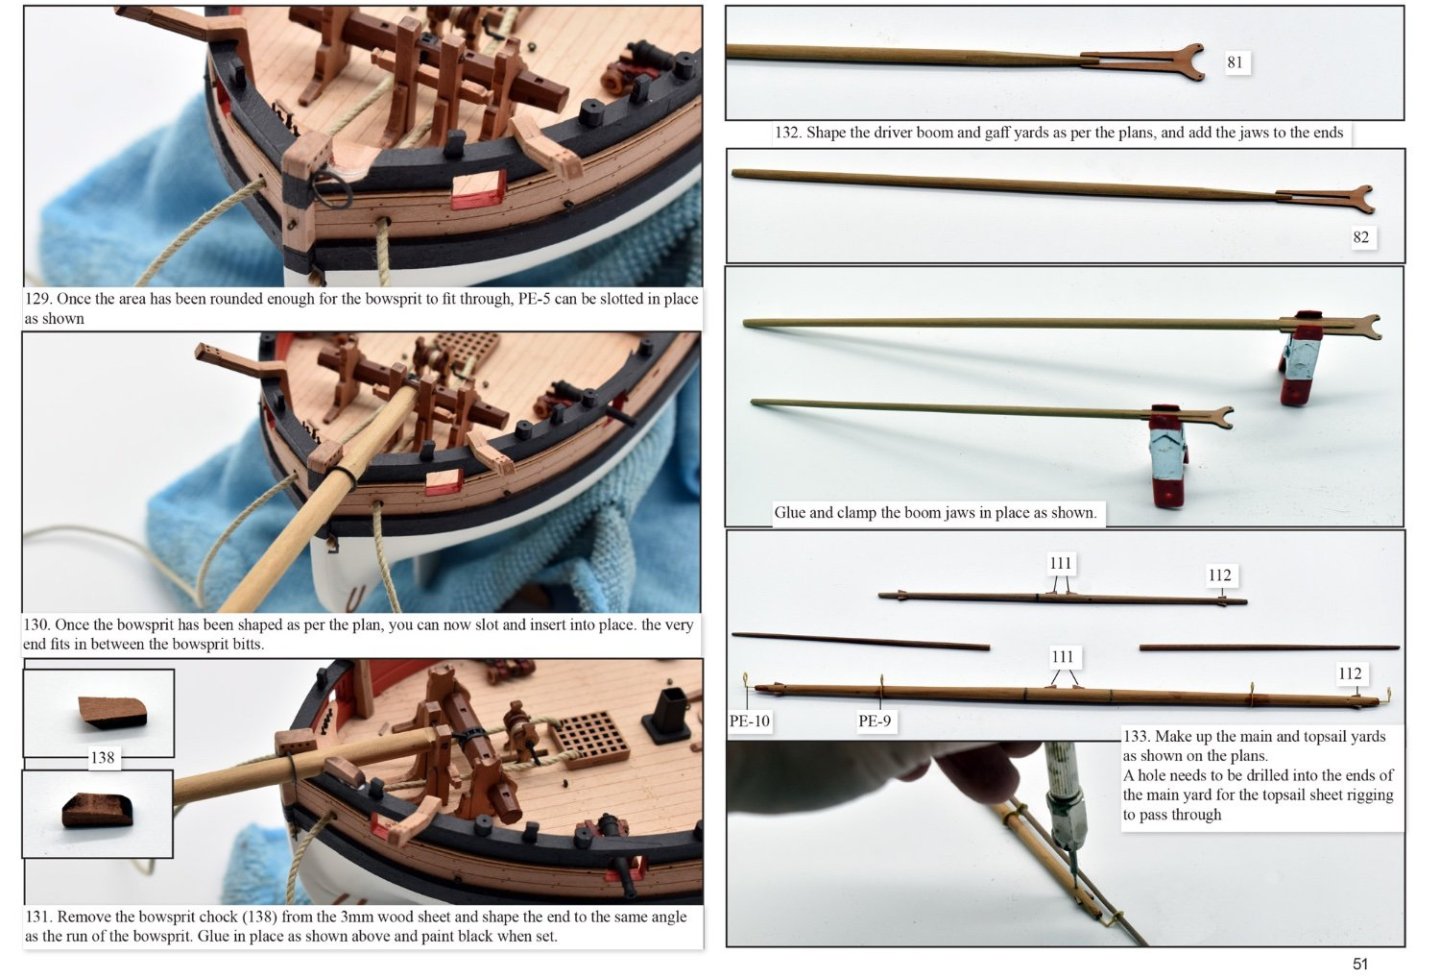
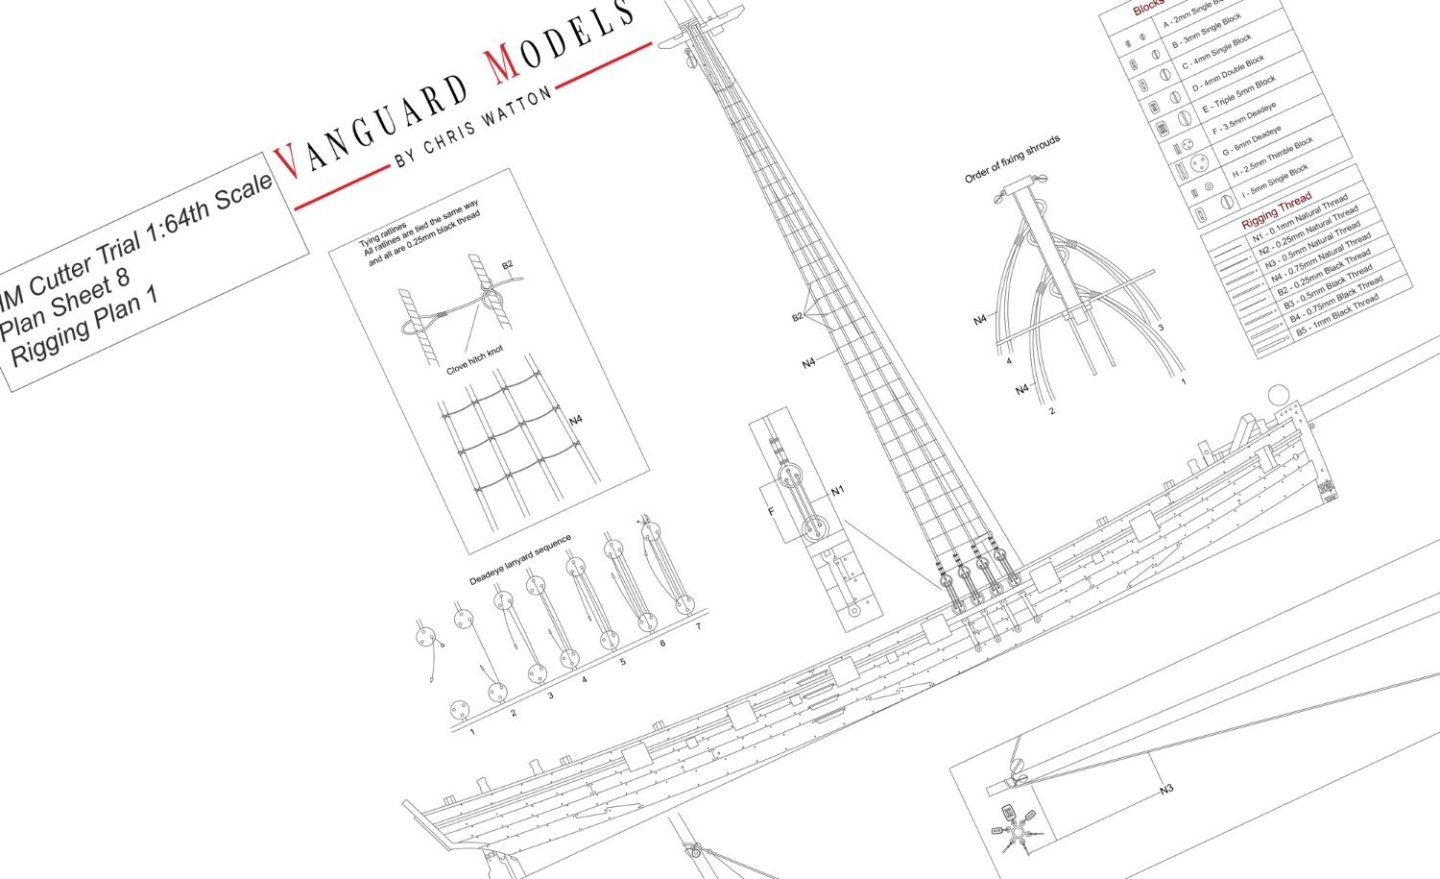
1:64 HM Britannic Majesty's Cutter Trial 1790 - Vanguard Models This is the latest kit from Vanguard Models. I don't feel I can review this as I would with any other product, per se, as I already have a well known connection to the company. I don't want to be accused of having an agenda or bias. This will be an overview/in-box look at this release which is VM's 14th kit since the company began. It's also, for me, the first release in around 3½yrs that I haven't had any involvement with. The aim of this kit is to bring a relatively low cost naval vessel to market which is at a level where novices can try their hand. It's set at a skill level 2. We do go to great pains to make sure that these levels reflect the build as much as possible, and that they are benchmarks that can be trusted when you shop at VM. For more info on these skill levels, check out this page: https://vanguardmodels.co.uk/understanding-our-skill-levels-ratings/ The box for this kit is quite compact and there's very little room left inside it, so I had to be careful in repacking this afterwards. A lining of bubblewrap lied within the box and inside that, all timber and acrylic parts are also wrapped in the same. There's no chance of stuff getting bashed about during transit. As with the rest of the range, the model is built around a laser-grade MDF skeleton and then lime planking is set for the first layer. Above water, the inner core bulwarks are from laser engraved and cut ply, which is then later doubled with an exterior pear later, complementing the second layer of plank that are also from pear. Although I have included some images from the manual, you will be able to look at the entire manual online on the kit's product page too, for more clarity. You can see from those images that the MDF frame is another slot and lock affair, which is designed so the modeller may actually do a reasonable amount of construction before any glue is applied. This will ensure that the model is properly assembled and aligned to the modeller's satisfaction, before any of the more traditional work is undertaken. There are seven sheets of pear, in varying thicknesses. Nigh on everything is pre-cut for the modeller, such as the inner and outer bulwarks (no planking needed), wales, gunwales, keel facings, rudder, etc. The keel facings fit the central keel core before second planking. This allows a rebate to be naturally created, that then lets the modeller neatly plank within and up to it for the second pear layer. You will also see the gun carriages, stairways, and various deck structures on these sheets. I am perhaps at a point where I automatically recognise everything that's visible here. The details supplied are, in my experience, higher than those in contemporary kits, with parts that aren't generic, but created specifically for the release. The quality of the pear is also high. Great pains have been made with this over the last years, believe me! Here you can see the ply sheet which contains the initial deck. Also seen are the inner bulwark cores. These are engraved so the lowest, horizontal engraved lines sit along the lines of the ply deck. This ensures that the bulwark elevation and position are correct. On the ply sheet is also the innermost lower counter part. As standard, laser-engraved lime decks are supplied, complete with treenail details. These are very easy to fit and have no tendency to curl when installing. Three bundles of timber are supplied for inner and outer planking, plus materials for the mast, yards and bowsprit etc. This kit contains two frets of photo-etch parts in two thicknesses of material. You will see easily identifiable parts in these sheets, such as the depth markings, fishtail/horseshoe keel parts, eyelets, pump handles belaying pins, and chainplates. The latter are made from single pieces so there's no awkward assembly to be had. The kit supplies an MDF cradle for construction, but the display stand itself is made from a lower section of mirror acrylic, with two clear and parts that clip into it. The reason for the mirror is to emphasise the vessel's drop keel much better and make it a feature. There are two boxes of fittings. The first one contains rigging rope of various sizes, whilst the second has a wealth of other things, such as brass pins, cannon and carronade barrels, winch, rigging blocks, anchors, carronade wheels, glass parral beads, black card, and also a nicely made name plate for the mirrored display base. For those unfamiliar with VM kits, the manuals are typically printed in an A4 format, as here, with some of the larger vessels having A3 manuals. All manuals are full colour and spiral bound. This kit also has eleven plan sheets which detail everything from parts maps, through construction and then onto rigging. So, that is a look under the hood of VM's latest kit. I'm not here to pass my own comments as I am too close to VM to do so. The quality of this release is commensurate with the whole range and nothing has had any corners cut to bring it to market. I also feel the price is fairly pitched for such a kit, especially with pear being included. If you fancy trying your hand at this unusual little kit, then head over to the VM page and grab yourself a copy! https://vanguardmodels.co.uk/product/trialcutter/


-
2023 Donations drive
James H replied to James H's topic in Using the MSW forum - **NO MODELING CONTENT IN THIS SUB-FORUM**
Topic pruned to bring back on track. I adjusted our donations received figure yesterday too. We are now at about 40% running costs. Thank you all for your continued support. -
The varnish is just to seal the timber before paint. I generally do this for any area that receives colour. You can also use sanding sealer etc. but if you're not used to doing any of that.....just do as you normally would.
-
I got sick of thin timber curling all the time!
- 587 replies
-
- 1
-
-
- Indefatigable
- Vanguard Models
- (and 1 more)
-
At this point it really feels like the ship has soul. Beautiful work!
- 587 replies
-
- 7
-
-
-
- Indefatigable
- Vanguard Models
- (and 1 more)
-
2023 Donations drive
James H replied to James H's topic in Using the MSW forum - **NO MODELING CONTENT IN THIS SUB-FORUM**
Massive thanks to everyone who has donated to our running costs. Every donation, both large and small, are all appreciated -
The housing just takes some time, careful measurement and re-measurement. Just remember to continually tie in the work on the panels, with the top shelf, so you know everything matches.
- 587 replies
-
- 2
-
-
-
- Indefatigable
- Vanguard Models
- (and 1 more)
-
You could make things a little easier by splitting that deck into three sections. It'll also help when it comes time to glue it all down. Looking real nice though.
- 587 replies
-
- 1
-
-
- Indefatigable
- Vanguard Models
- (and 1 more)
-
2023 Donations drive
James H replied to James H's topic in Using the MSW forum - **NO MODELING CONTENT IN THIS SUB-FORUM**
@NRG Office Manager Can you check this? -
2023 Donations drive
James H replied to James H's topic in Using the MSW forum - **NO MODELING CONTENT IN THIS SUB-FORUM**
I've updated the % total on sidebar. Many thanks to everyone so far -
Yup, that discount should now be working just fine.
-
2023 Donations drive
James H replied to James H's topic in Using the MSW forum - **NO MODELING CONTENT IN THIS SUB-FORUM**
Ok, done. -
2023 Donations drive
James H replied to James H's topic in Using the MSW forum - **NO MODELING CONTENT IN THIS SUB-FORUM**
Ok, for anyone that generous, I've fixed that! -
2023 Donations drive
James H replied to James H's topic in Using the MSW forum - **NO MODELING CONTENT IN THIS SUB-FORUM**
Hi Allan, It's on the front page sidebar.
-
I'm on that ship next year! Welcome to MSW.
-
With the prototype, I made sure all the plates were buffed down as much as possible to remove any wrinkle, and then I used some isopropyl alcohol to remove any grease from my fingers. From there, I used 0000 steel wool to really shine it up before then applying acrylic matt varnish to it. That makes it look nice and uniform without the shine. If you want patina, don't varnish and let the copper tarnish itself, BUT don't go touching it again or you could see fingerprints in that patina, from the acid in your skin.
- 106 replies
-
- 3
-
-
- Grecian
- baltimore clipper
- (and 4 more)
-
You'll find things a LOT more solid from this point, especially when you get the inner bulwarks added.
-
Hi all, MSW will ALWAYS be free to use for all members, but this ship still needs a few £/$/€ etc. to keep afloat. We generally try to do this via our sponsor banners, but we also still rely on the generosity of our membership to help us with costs. We operate a dedicated server for this site, which isn't an insubstantial cost, plus the various other things we need, such as our domain names, anti spam and proxy firewall. It adds up to a pretty penny. I know the old adage of 'if every member donated $1 etc' goes without saying, but we're realistic! Times are harder for many folk at the moment with the way things are with global economics etc. but if you do want to, or have considered throwing a few $ our way, then I guarantee it will be very much appreciated. It all helps keep this wonderful and info-packed community afloat and preserves our valuable resource for years to come. Should you wish to donate, then we have a tool on the forum home page sidebar. Kind regards, MSW/NRG staff
- 43 replies
-
- 12
-