


James H
-
Posts
5,964 -
Joined
-
Last visited
Content Type
Profiles
Forums
Gallery
Events
Posts posted by James H
-
-
That is looking so nice. Glad the Chaos Black fitted the bill too.
- BobG, chris watton, EKE and 1 other
-
 4
4
-
-
That sir, is looking champion! The sanding and shaping look real good. The second layer should be quite easy now.
- chris watton and Glenn-UK
-
1
-
 1
1
-
-
9 minutes ago, glennard2523 said:
Thanks Dave.
I did taper my early planks also. I just thought it would make a slightly neater job of the unseen first planking. I have completed the starboard side and I'm about 50% complete on the port side. I did find some of the cross beams had a habit of becoming dislodged also.
You have a nice looking model.
Excellent work!
I'd love to see you start your own build log and sharing with us please. Nicely planked hull.
- Rustyj, chris watton, BobG and 1 other
-
4
-
That's looking spot on.
Those ply bulwarks are easy enough too. You shouldn't have any ripple with them on the bow either. Just get the top of them as close to the tops of the bulkheads as you can.
-
27 minutes ago, Rik Thistle said:
Thanks Bob.
I think I've been guilty of trying to short cut the work needed to get planks to fit. I had set myself a target of getting the first planking done in about 1 week, even though I wasn't working on it every day. Less haste, more speed.
Thankfully my build log highlighted where I was cutting corners and the members have been great in advising me how to fix the issue and what to do in the future.
All the best,
Regards,
Richard
Pretty much anything is fixable, especially at this stage.
Just take your time. Really liking watching you build this one.
- BobG, Chuck Seiler and Rik Thistle
-
3
-
Looking nice!
Any chance you can still twist those stern planks in a little so they make more contact with the false keel?
-
9 hours ago, Old Collingwood said:
Can I also add another tool that members can use if the normal drag and drop from thier hard drive is giving problems -
OC.
Thanks for that. I'll keep this link here, but please can this topic be limited to the software that Rob has posted here.
That will keep this topic straightforward.
- mtaylor, thibaultron and Obormotov
-
3
-
Pinned!
(...and thanks for all your work, Rob)
- Old Collingwood, Canute, mtaylor and 3 others
-
6
-
Looking real good.
It's good to get that first planking on and them remove those temporary beams.
- Glenn-UK and chris watton
-
1
-
1
-
There will be a 1:64 range available from Vanguard Models in the near future.
I'm building the prototypes very shortly.
- peterbrowne, Ryland Craze, mtaylor and 1 other
-
4
-
-
-
Nice to see another Duchess coming together. You can tell it's a very solid frame!
Yes, there are so many interlocking slots that applying glue afterwards is the safest way and PVA/Titebond have good penetration...and even more so with a little dilution too. I've had to use this method on Victory too because of the sheer size of joint coverage area. By the time I'd be half way through applying, the chances are the glue would be going off, so application afterwards was key.
-
Just now, DWright said:
I do have a question. I have always removed the laser char, particularly on bulkheads where planking will occur, to assure complete bonding of the planks. Do you, or anyone else, feel this practice is necessary with this kit?
Thankfully, there's zero reason to do it except for aesthetics for visible edges.
Chris Watton did a test on this theory a long time ago and there was no weakness in a joint still carrying char.
-
-
Fresh from Vanguard Models. A 'sign' of things coming...
🤫😆
-
24 minutes ago, glennard2523 said:
The instructions are clear as day and follow a nice logical sequence. Mine was a simple error. After pre fairing the parts as instructed I simply forgot to fit the mast supports as I had put them away for safe keeping. Old age I'm afraid.
I get moments like that too and I'm 50!
Carry on! 🤣
- Glenn-UK and chris watton
-
1
-
 1
1
-
2 minutes ago, Jim Rogers said:
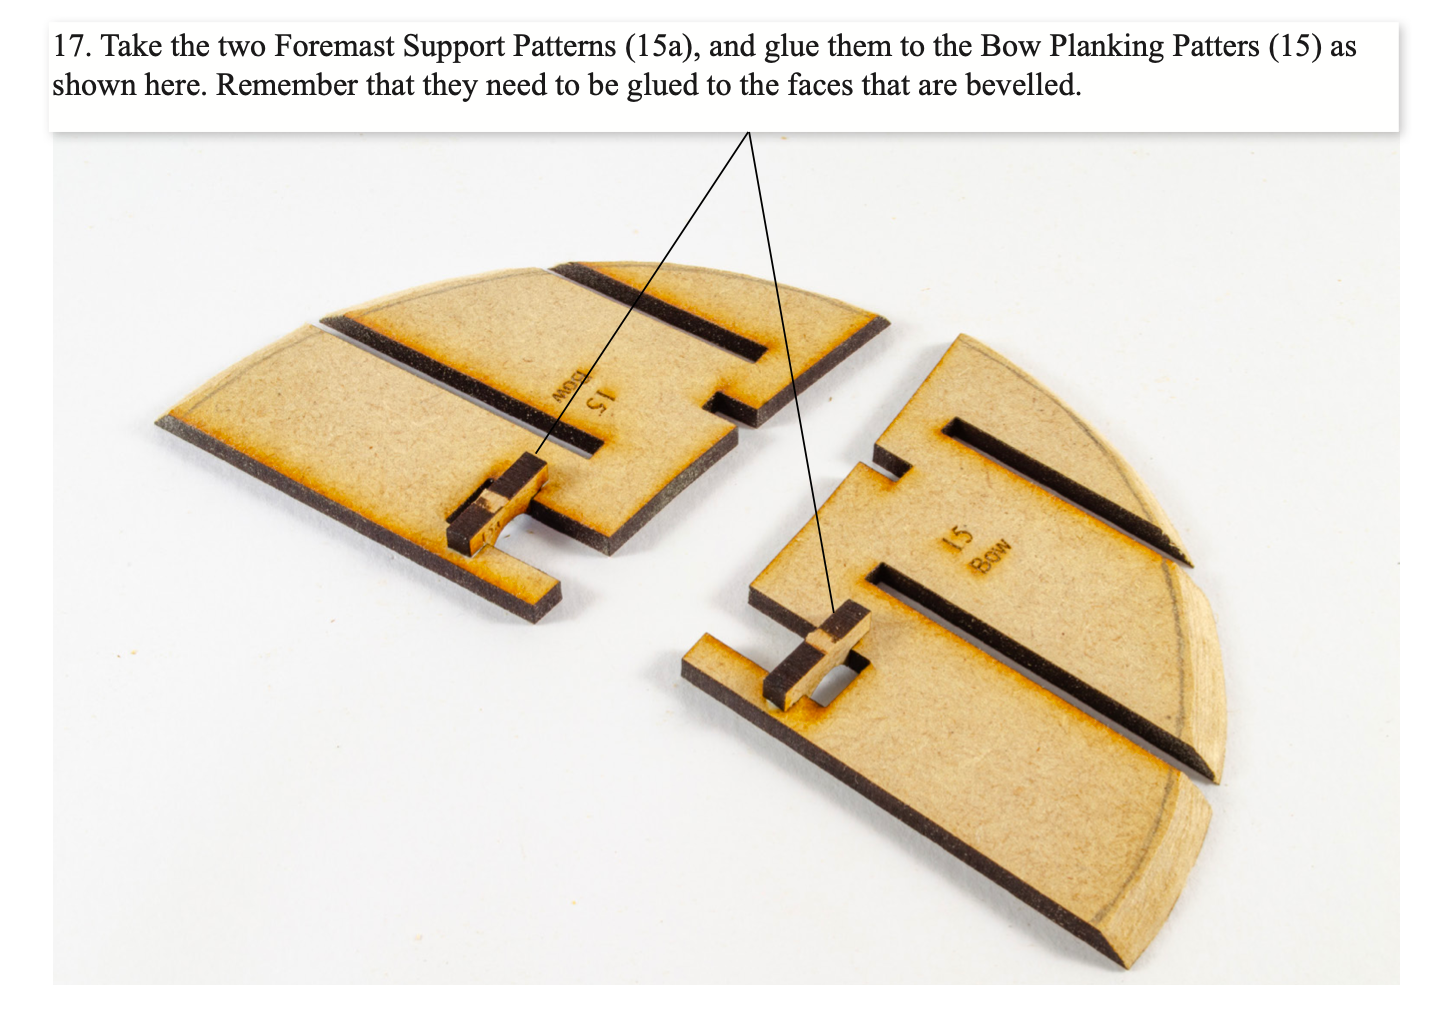
Yes, I wrote Technical Documentation for Torpedo Maintenance. The Technical Manual would have in depth procedures whilst the checklist would be abbreviated. Example the technical manual would explain that part 15a should be installed in bulkhead 15 after removing char and test fitting. It would explain any placement processes. The checklist would say: Install 15a (para 3.1) . Using a checklist means steps don’t get missed in the verbiage.
I don't want to hijack this log at all, but this is in the manual I wrote:
-
1 hour ago, druxey said:
You should patent this design and get Byrnes Machine Tools to manufacture it under license! It is far superior to the usual plastic cutters.
Definitely.
There is a metal rotary circle cutter but the blades are very fine and not suited for stuff like cutting those abrasive paper sheets.
-
Moved to correct forum area.
-
8 hours ago, Jim Rogers said:
It would be great if an abbreviated checklist came with the written instructions.
Can you explain what you mean?
-
It happens.
Look at the part numbers on these early stages. If low numbered, you can guarantee they are needed very early on.
- Glenn-UK, chris watton and BobG
-
2
-
1
Duchess of Kingston 1798 by glennard2523 - FINISHED - Vanguard Models - 1:64 - Royal Yacht by Glenn Shelton
in - Kit build logs for subjects built from 1751 - 1800
Posted
Please do! Another sure will be good 😎