thibaultron
-
Posts
2,952 -
Joined
-
Last visited
Content Type
Profiles
Forums
Gallery
Events
Everything posted by thibaultron
-
 Thanks for the review! I just ordered a copy from Amazon for ~$19 US.
 -
Received mine yesterday, have not had a chance to look through it yet.
-
Stunning!
-
Here we have plenty of TP, but all the Lysol, hand sanitizer, rubbing alcohal, masks, and cleaning wipes are long gone.
-
Get one like one of these: https://www.ebay.com/itm/Air-Tank-Tattoo-Nail-Tool-TC20T-Set-1-5-HP-Airbrush-Compressor-Air-Demand/323506475598?epid=19032708877&hash=item4b527d124e:g:lrYAAOSwnbZYHsfY https://www.ebay.com/itm/1-6-HP-Airbrush-Compressor-Kit-W-23L-Air-Tank-For-Tattoo-Nail-Painting-Tool/173917474491?hash=item287e4a0ebb:g:lrAAAOSwKmtc7qkZ They have a nice regulator, and are fairly quiet. The owner of Badger Airbrushes, says that they are the same as the ones he and others sell, built in the same factory, just without the added cost of buying a name brand label. The small block type compressors have poor pressure regulation.
-
My copy, is also on the way! Thanks for the review!
-
VAC-U-DUCK - Vac-U-Boat by Osmosis - FINISHED
thibaultron replied to Osmosis's topic in Non-ship/categorised builds
The point of sailing is to go, it is the journey, not the destination, that is important. -
VAC-U-DUCK - Vac-U-Boat by Osmosis - FINISHED
thibaultron replied to Osmosis's topic in Non-ship/categorised builds
There were several different clubs, there may have been a 1/96. Yes a 9 foot or so Iowa would be imense! Our club was the original, and others started from our example. Other than the BB(ours) or 1/4" ball bearing, the biggest difference was most of the other clubs went with scale X actual ships speed/X for model. Ours was the square root of the speed, ie. 1/12th of actual ships speed. This is the formula that the US Naval Design group uses when studying a model in their water tank. This gives the same wave dynamics as the real ship will. Water does not scale. The other clubs run into the problem, that any sort of wind will blow all the models to the downwind shore, as they can't go fast enough to counteract it. Unfortunately, with the reccession, and time my old club has shrunk to be mostly bases in the NE, and my limited budget does not allow for much travel. I also found that after my sons grew up, and dropped out of the hobby, my interest also diminised. Now all my batteries are dead and the RC equipment out dated, so a large amount of funds would be needed to restart. I still have all my, and my sons' ships though, I did sell my first one to fund the USS Arizona I scratch built for the 1991 season. -
VAC-U-DUCK - Vac-U-Boat by Osmosis - FINISHED
thibaultron replied to Osmosis's topic in Non-ship/categorised builds
One of my former hobbies, was indeed RC Warship Combat, hence the origin of the offered gun. Our ships were 1/144th scale. Built several over the years, both kits(2), one from a stripped hull, one scratch from plans, and one I did the drafting for myself from Naval Archive plans. The guns were either 50 or 75 shot semi-auto, the number allowed varied by ship size and class. I can supply plans for a bilge pump also. -
VAC-U-DUCK - Vac-U-Boat by Osmosis - FINISHED
thibaultron replied to Osmosis's topic in Non-ship/categorised builds
If you want, I can give you a design for a RC BB gun, to protect your duck from attack. 🙂 -
I have not forgotten this build. I was hoping to find my stash of silkspan, while I was moving stuff around, after finishing the back section of the shop, but failed to find it. today I ordered some new silkspan, and will continue the build in the next couple of weeks, when it arrives. I just could not force myself to use the vacuum formed ones supplied with the kit.
-
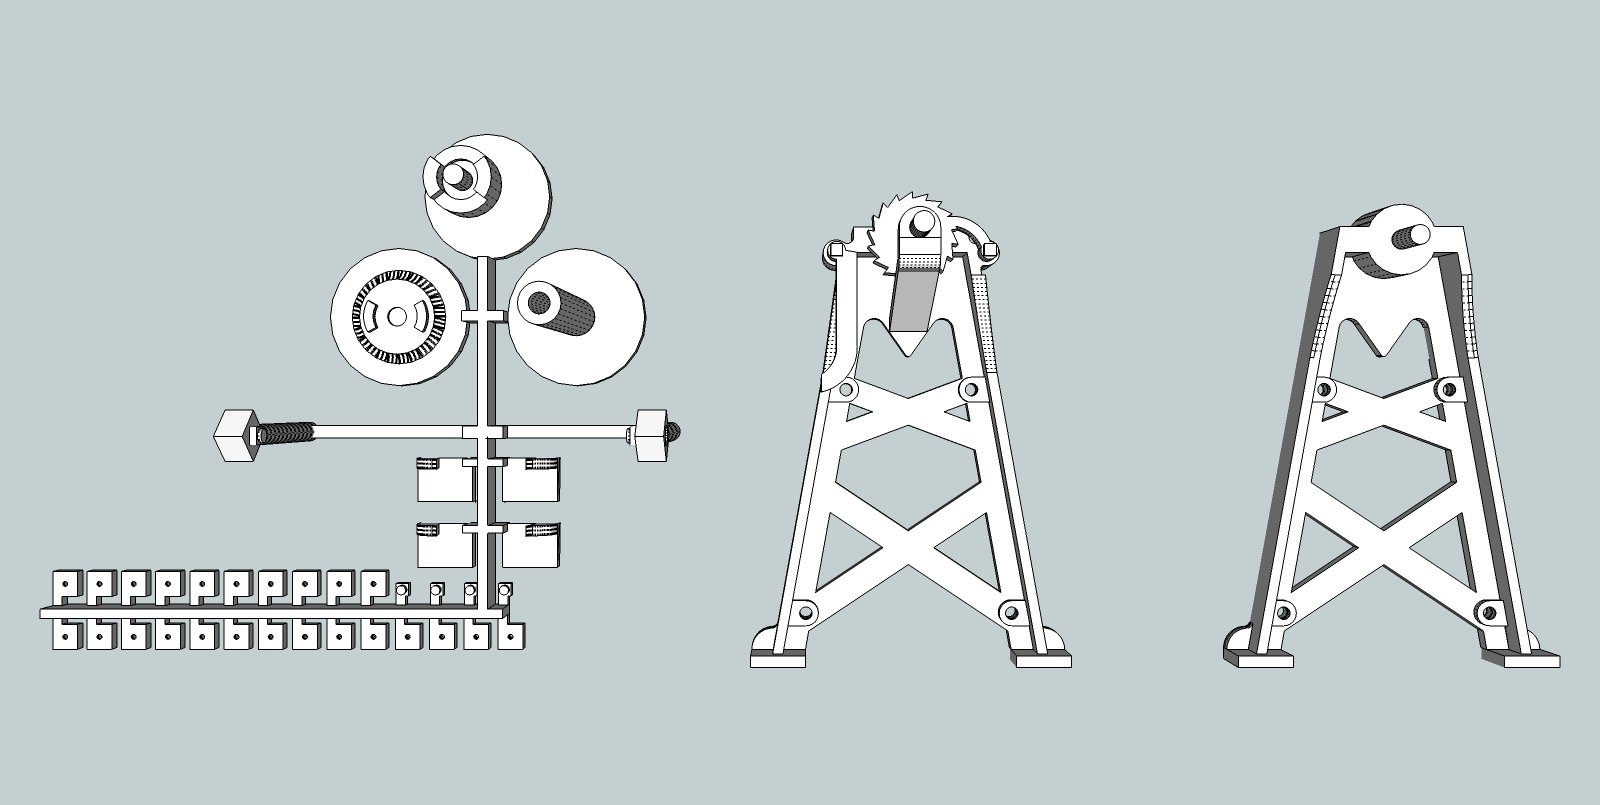
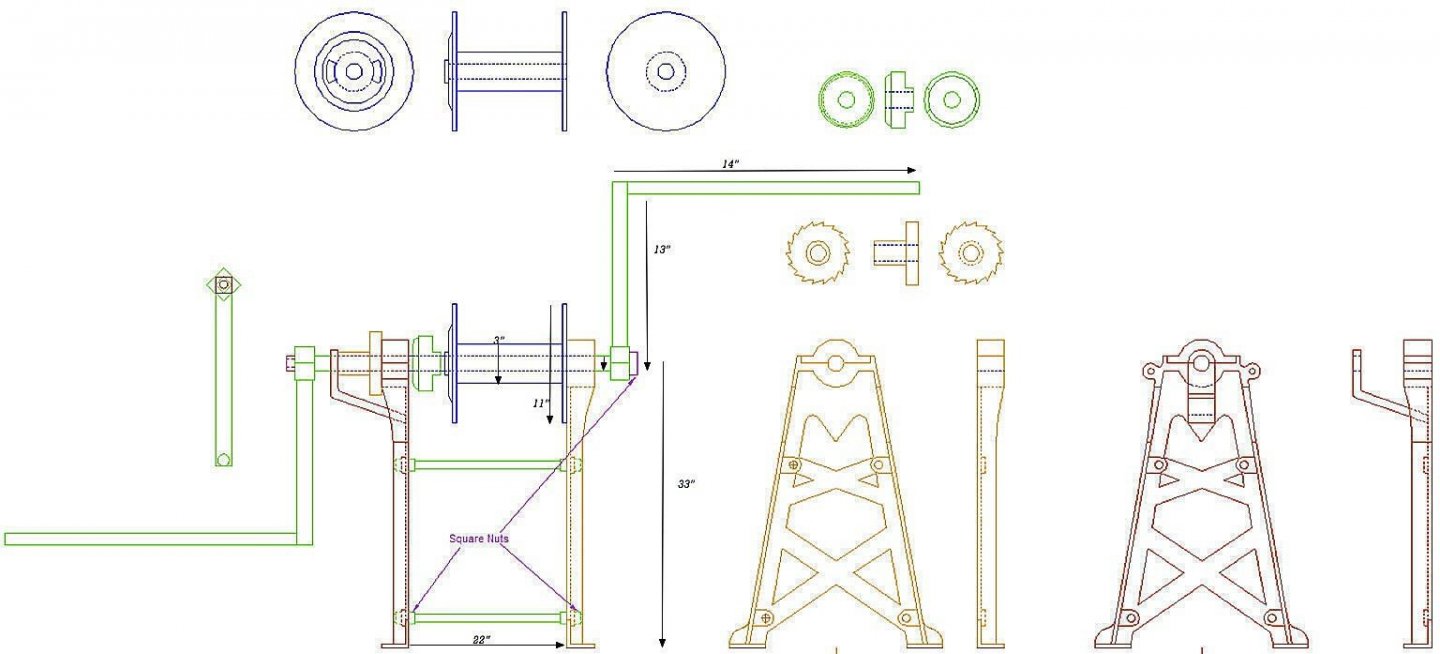
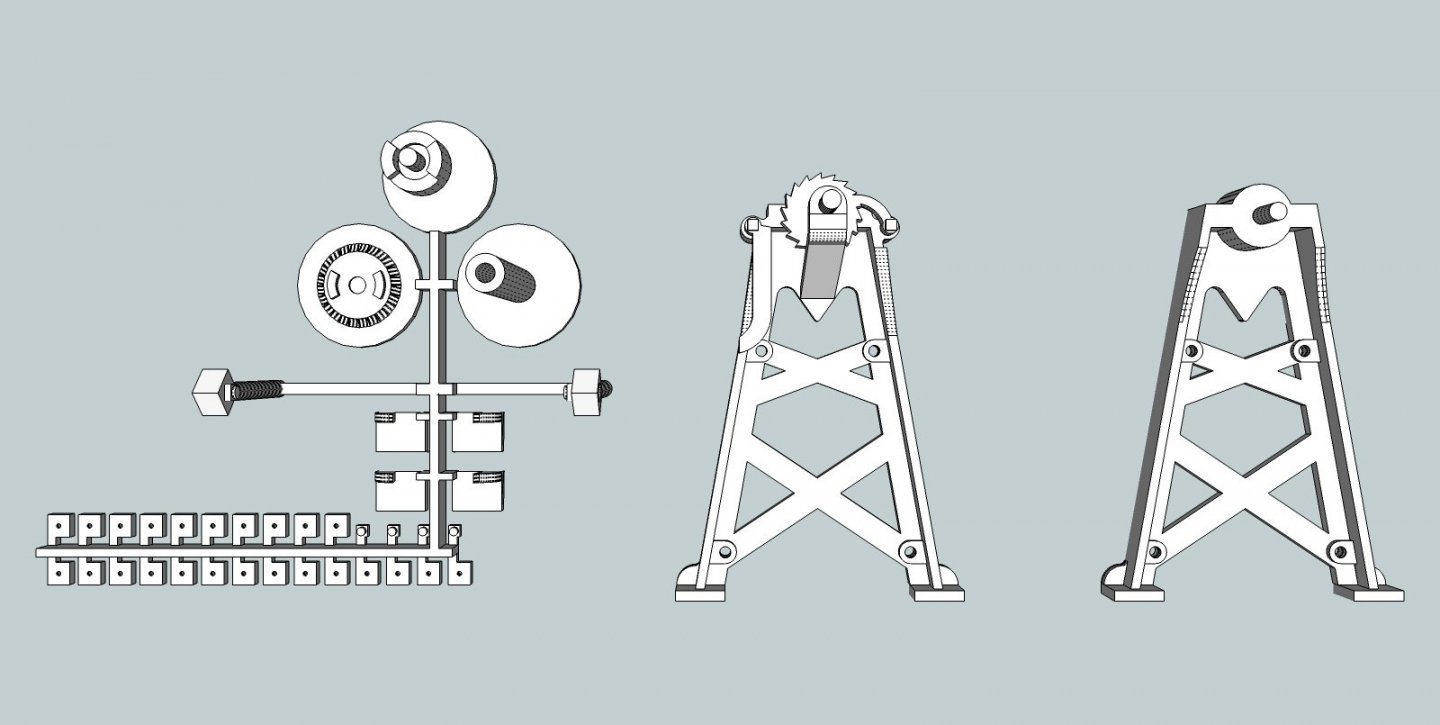
I was asked if I could make the files for the Skipjack Hand Dredge Winches available to my fellow modelers. I have decided to do so. Here are the SketchUp files for both the 1/32nd and 1/64th versions. They are to be printed in Shapeways "Fine Detail Plastic", the "Smoothest" option. Here are views of the CAD drawings, for reference. The dimensions shown on these CAD views may not be accurate, as I refined the design when I went to SketchUp, and never went back to correct them. The parts I had printed looked good, but I never actually completely assembled them, so some fitting may be needed. For both models the winch shaft and the support rods are to be fabricated by the modeler. The square nuts go on both the inside and outside surfaces of the legs to lock the support rods in place. The small nuts are for the top of the bearing covers, and were used to hold the bearing covers in place. These are not shown in the CAD drawings, but you can see them in the photos. The 1/32nd drawing meets Shapeways standards, at least as far as a couple years ago. Here is a shot of the layout. Note that all the parts must be sprued for them to print it. When I had my copies printed, this was not required. This is a shot of the 1/64th file as it is now. To be printed, you will have to add sprues, as for the 1/32nd ones. Note that you will have to cut the clutch housing off and attach it to the disk, with the two lands that mate with it. On the 1/32nd file the housing is printed in place, engaged. The winch shaft on this scale is part of the printed parts, but must be trimmed to length. The file for this size only has one winch, so you will have to copy a second winch assembly in and sprue them together. I'm not sure why I have an extra set of feet in the sprue, I'm sure there was some reason, I've since forgotten. Hand Dredge 32 New Layout For Spec Changes_21 Two Winches.skp Hand Dredge New SketchUp 64thFor New Specs_05.skp


- 1 reply
-
- 7
-

-
B-25 Mitchell "Meet Miss Runyon" by Javlin-HK-1/32
thibaultron replied to Javlin's topic in Non-ship/categorised builds
I read a book by one of the crew of a B-24 that flew 25 missions over Italy. They were assigned to train flight crews when they returned to the US. After a couple months they decided that the raw recruits flying abilities were more dangerous than their missions, and signed up for and completed another 25 missions! -
If I remember correctly, it was Admiral Vincent who was know as a bully and sadist at sea. Doing such things as calling Captains to his ship in strong winds, then refusing to allow his ship's captain to shorten sail, which was the normal procedure. He would gleefully watch them and their crew for hours trying to row to catch his ship.
-
Airfix 1/72 Mitsubishi A6M Zero
thibaultron replied to SigEp Ziggy's topic in Non-ship/categorised builds
Building a Zero, there's nothing to it! 🙂 -
turning a manual mill in to a CNC mill
thibaultron replied to garyshipwright's topic in Modeling tools and Workshop Equipment
One suggestion. If you are going to spend all that money to do a CNC conversion, why not get a larger mill to do it on. You may find other interesting projects, that a larger mill would be nice for. -
1:48 Seaman
thibaultron replied to cafmodel's topic in CAD and 3D Modelling/Drafting Plans with Software
Nice. -
Nice work! I'm here in SC also, and also a transplant.
-
Your going to need to display this on a mirror, so that all the bomb bay detail can be seen!
-
B-25J Mitchell by Tom E - Revell - 1:48 Scale - PLASTIC
thibaultron replied to Tom E's topic in Non-ship/categorised builds
Here is my standard recomendation to new airbrushers. -
I have a friend, who used to do a lot of sailboarding on the Chesapeake Bay. That is until he looked down one day, and saw two 5 foot bull sharks swimming one on each side of him! Fresh water only now.
-
That depends on the scale you are thinking of. Thought, in general, you would need to 3D print in plastic, and that brings in issues of failure of the plastic, over time due to the tension from the rigging. The fine detail plastics are brittle and quite weak, in thin sections.
-
Denis: Download all the info from that thumb drive, now! Soak it as recomended, above. However, never trust it again. The Pepsi will have already started to damage the circuit board. 34 years of experience as a digital engineer speaking. Thumb drives are cheap, lost data is not.
-
I'm the one who responded. The mini lathe has been buried behind stuff, as I have been renovating the shop. In the near future however, a change from being a 7X10 (actually 7X8 (Harbor Freight lies)) to a true 7X16, is in the offing. I bought an extended bed kit from the Little Machine Shop, and now that the lathe has been moved to where I can get to it, I will be changing it over in the next couple months. For now I have been concentrating time and funds to my HO train stuff. (I managed to burnout part of my digital control system, and had to buy new parts), and invested in two Santa Fe prototype brass steam locos.
-
I have not had a chance to use it yet, unfortunatly. Been busy renovating the shop, with what little spare time I have.