thibaultron
-
Posts
2,952 -
Joined
-
Last visited
Content Type
Profiles
Forums
Gallery
Events
Everything posted by thibaultron
-

A new angle in precision sanding
thibaultron replied to Arcticbeaver's topic in Modeling tools and Workshop Equipment
Been using the Dremel version of grsjax's sander for decades, it is indeed a workhorse. I wrote a log on improving the disk table a while back Modifications to a Dremel Belt/Disk Sander You'll have to do a search, I don't know how to paste a link to it. -
Craig; Thanks for the ICE link!
-
Resin not curing?
thibaultron replied to FoxtrotHotel's topic in Painting, finishing and weathering products and techniques
The resin used for autobody work, does not attach well to wood. Check out the epoxy resins used in marine applications. Those are designed for wood. Having said that, in the past I have used the Bondo type resins, and they have performed well on my models. I think the heat gun may be too hot, a slow gentle heat may be better. -
I scan the large plans on my regular size scanner, allowing a generous overlap. I scan them using the "Grayscale" option, rather than "Color", at 300DPI. For a more detailed scan for smaller sections, I scan at 600 DPI. All the scans to be combined should be at the same resolution. I remove the scanner cover, so that I can move the plans around freely, and use the separated cover placed on top of the plans, to hold them flat on the glass. Some of my scanners have had the top attached such that the hinges on the cover interfere with reusing it this way. Then I find some other object to use. A book, or even a piece of foam board, cut to the right size. After I get every thing scanned, I use the old MS Photo Gallery to combine the scans using the Panorama function. I find that it does a much better job than the Photoshop one. If that does not work for the scans (make sure you scanned with the generous overlaps), I align the scans in my CAD program. As far as distortions, use the advice above. Microsoft no longer offers the MS Photo Gallery as a download, but if you do a search for "Photo Gallery full download", there are sites that offer a download for it. I've saved a copy, and use it when I change to a new computer, have to fix a crash or failing drive.
-
Resin not curing?
thibaultron replied to FoxtrotHotel's topic in Painting, finishing and weathering products and techniques
I had to, several years ago, set a hull in my car's hatch back and park in the sun for a week to get the resin to set. The car stank for about two weeks after I took it out, but the resin finally set. -
Thank you for the service you have provided, and enjoy your family!
-
While a Type IX, for those Kindle readers the following book might be of interest. It is about the capture of U-505 by the US Navy in WWII. The book is written by the Task Force commander who lead the capture. Amazon has a free kindle edition. Twenty Million Tons Under the Sea: The Daring Capture of the U-505 Amazo
-
What is the purpose of these holes in this block?
thibaultron replied to Louie da fly's topic in Masting, rigging and sails
If the "bottom" holes are used for a tenon, perhaps the upper hole is an upper eye, for securing the other end of the rope used in the pulley system. -
This site might help https://www.techrepublic.com/blog/windows-and-office/quick-tip-flip-text-for-a-mirror-image-in-word/
- 133 replies
-
- 2
-

-
- alert class
- tugboat
- (and 1 more)
-
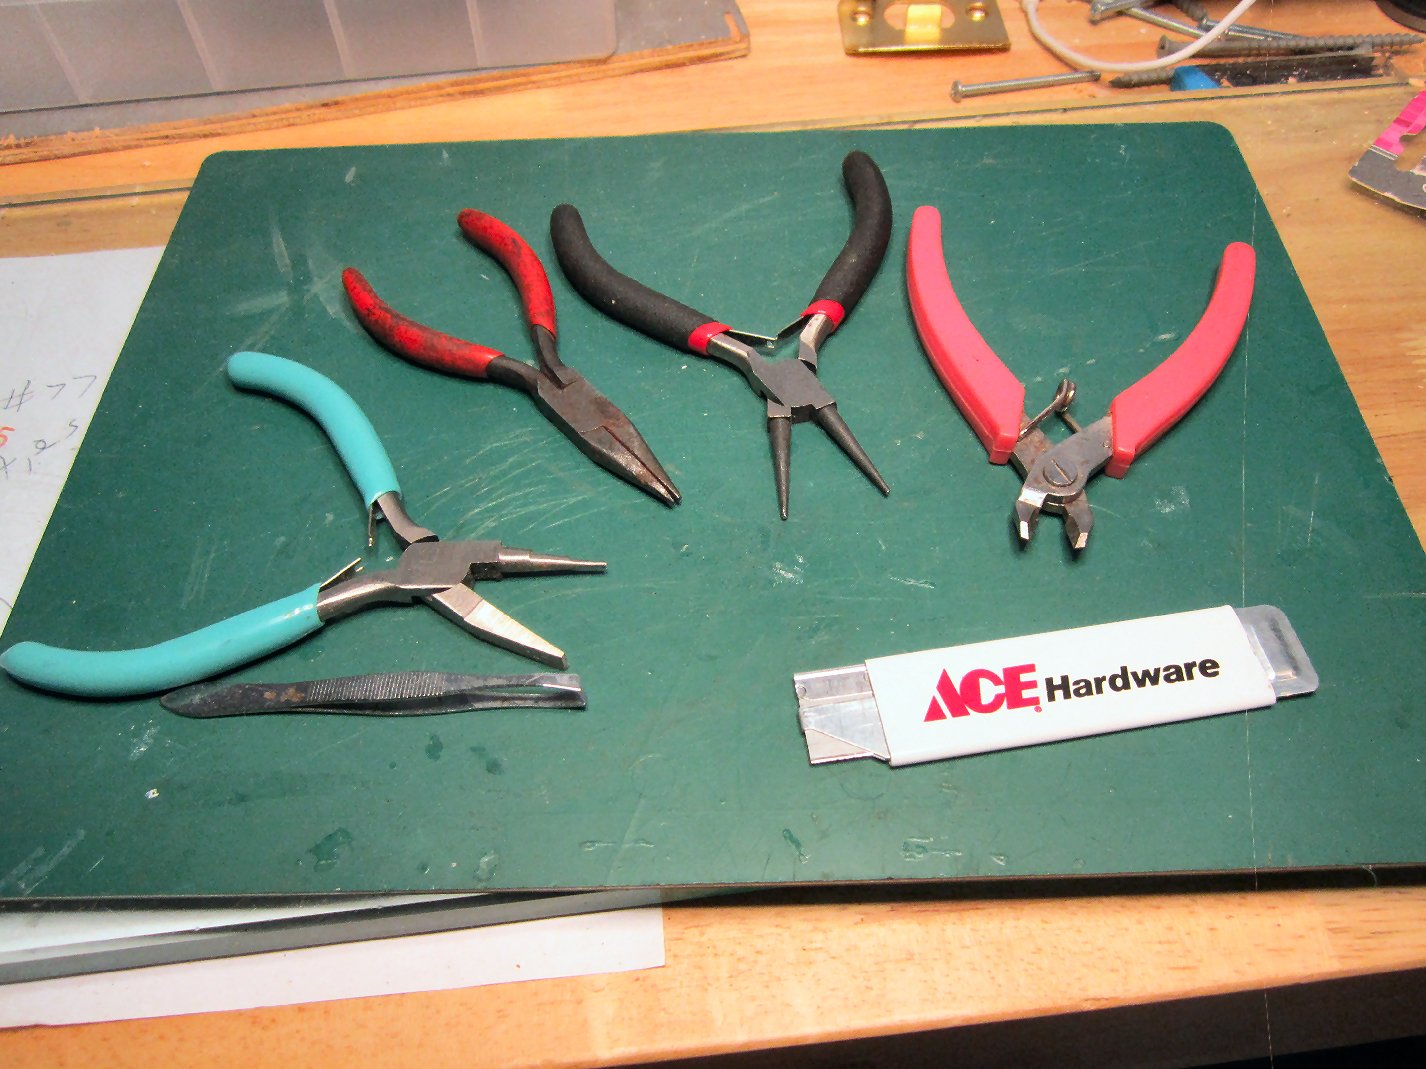
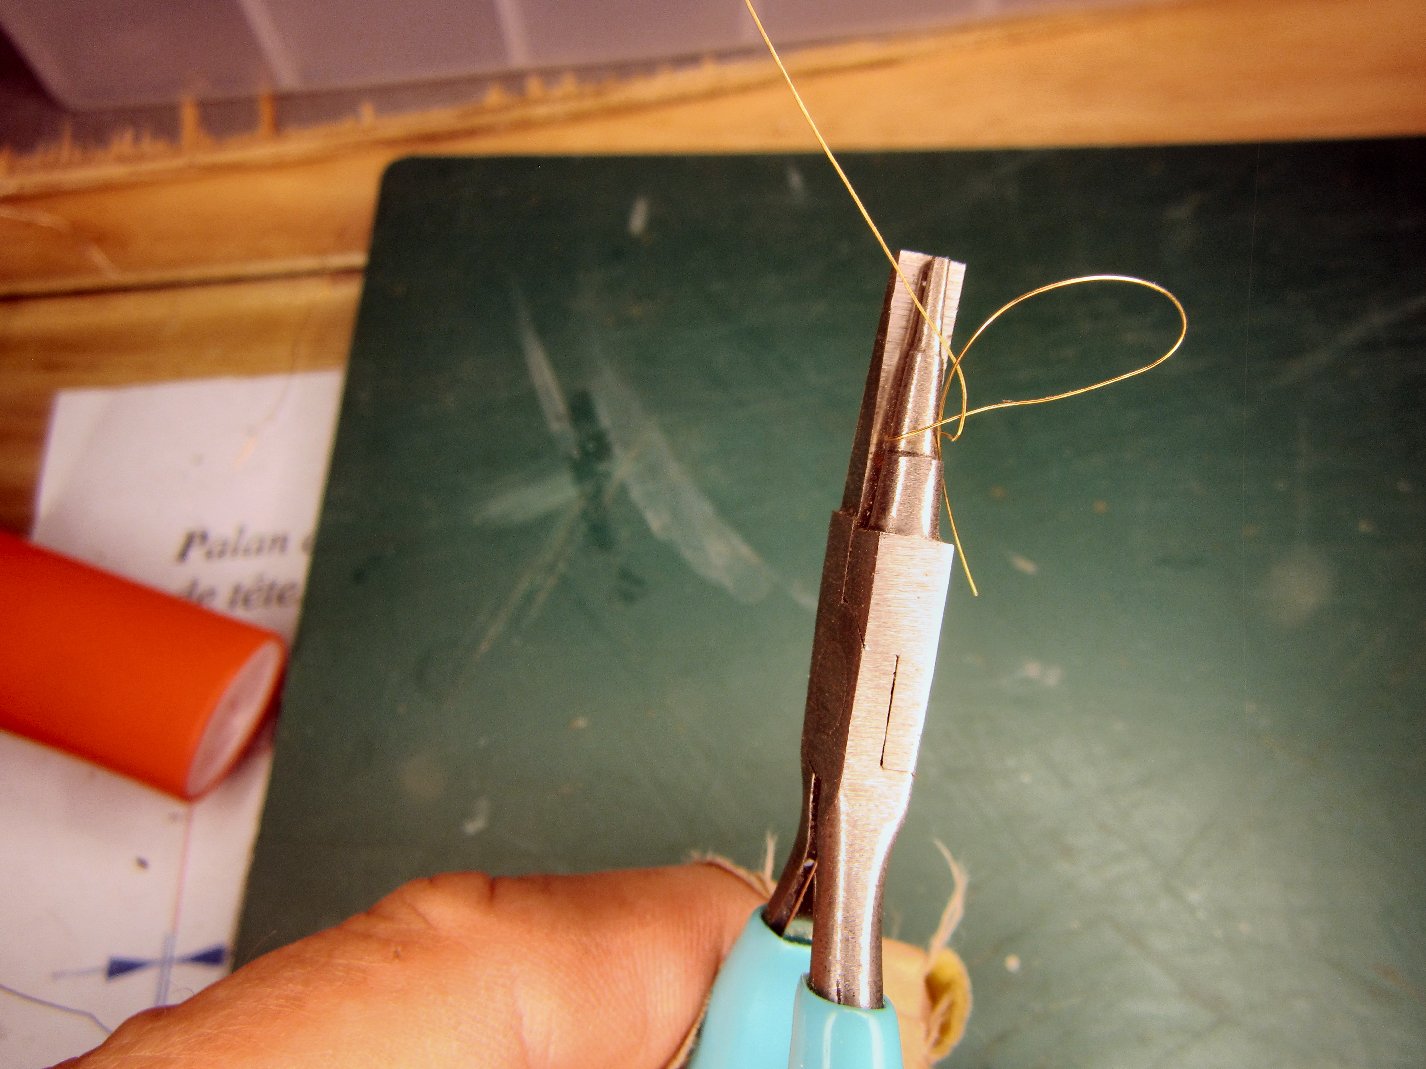
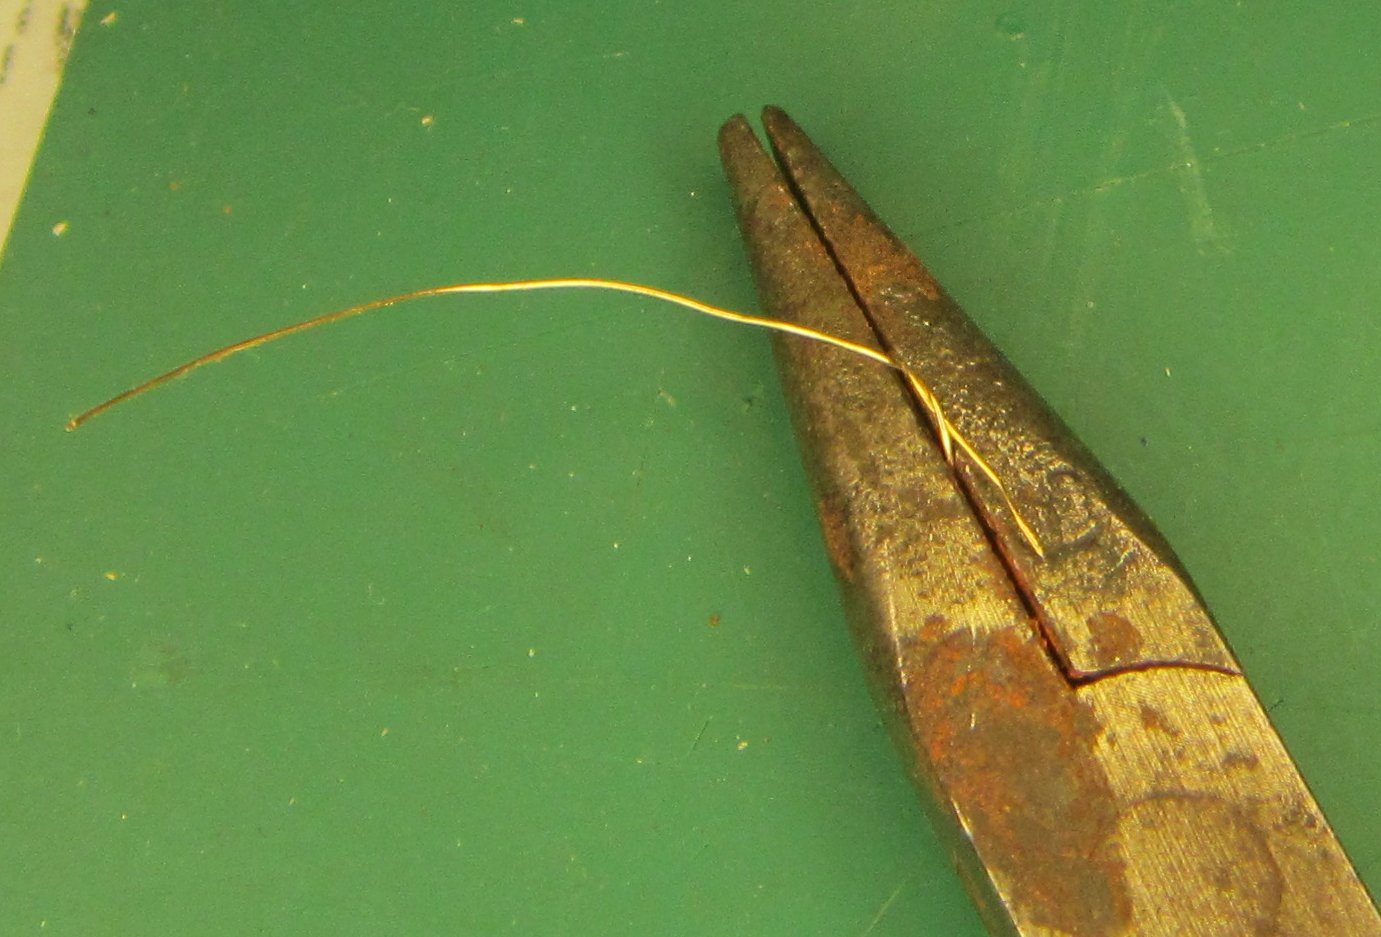
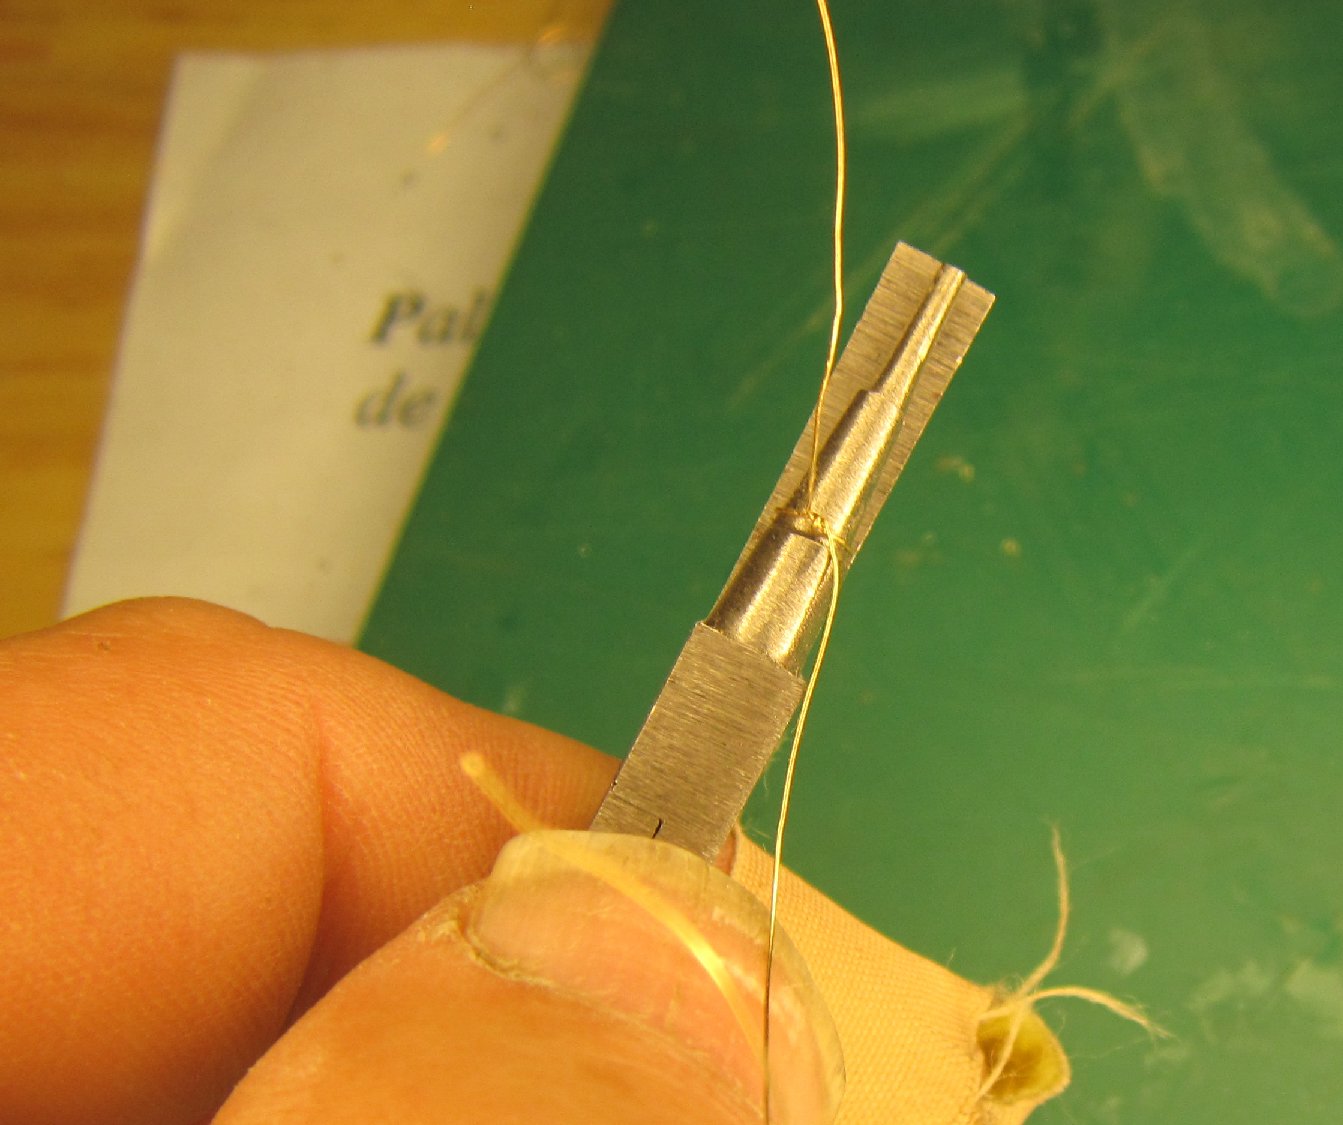
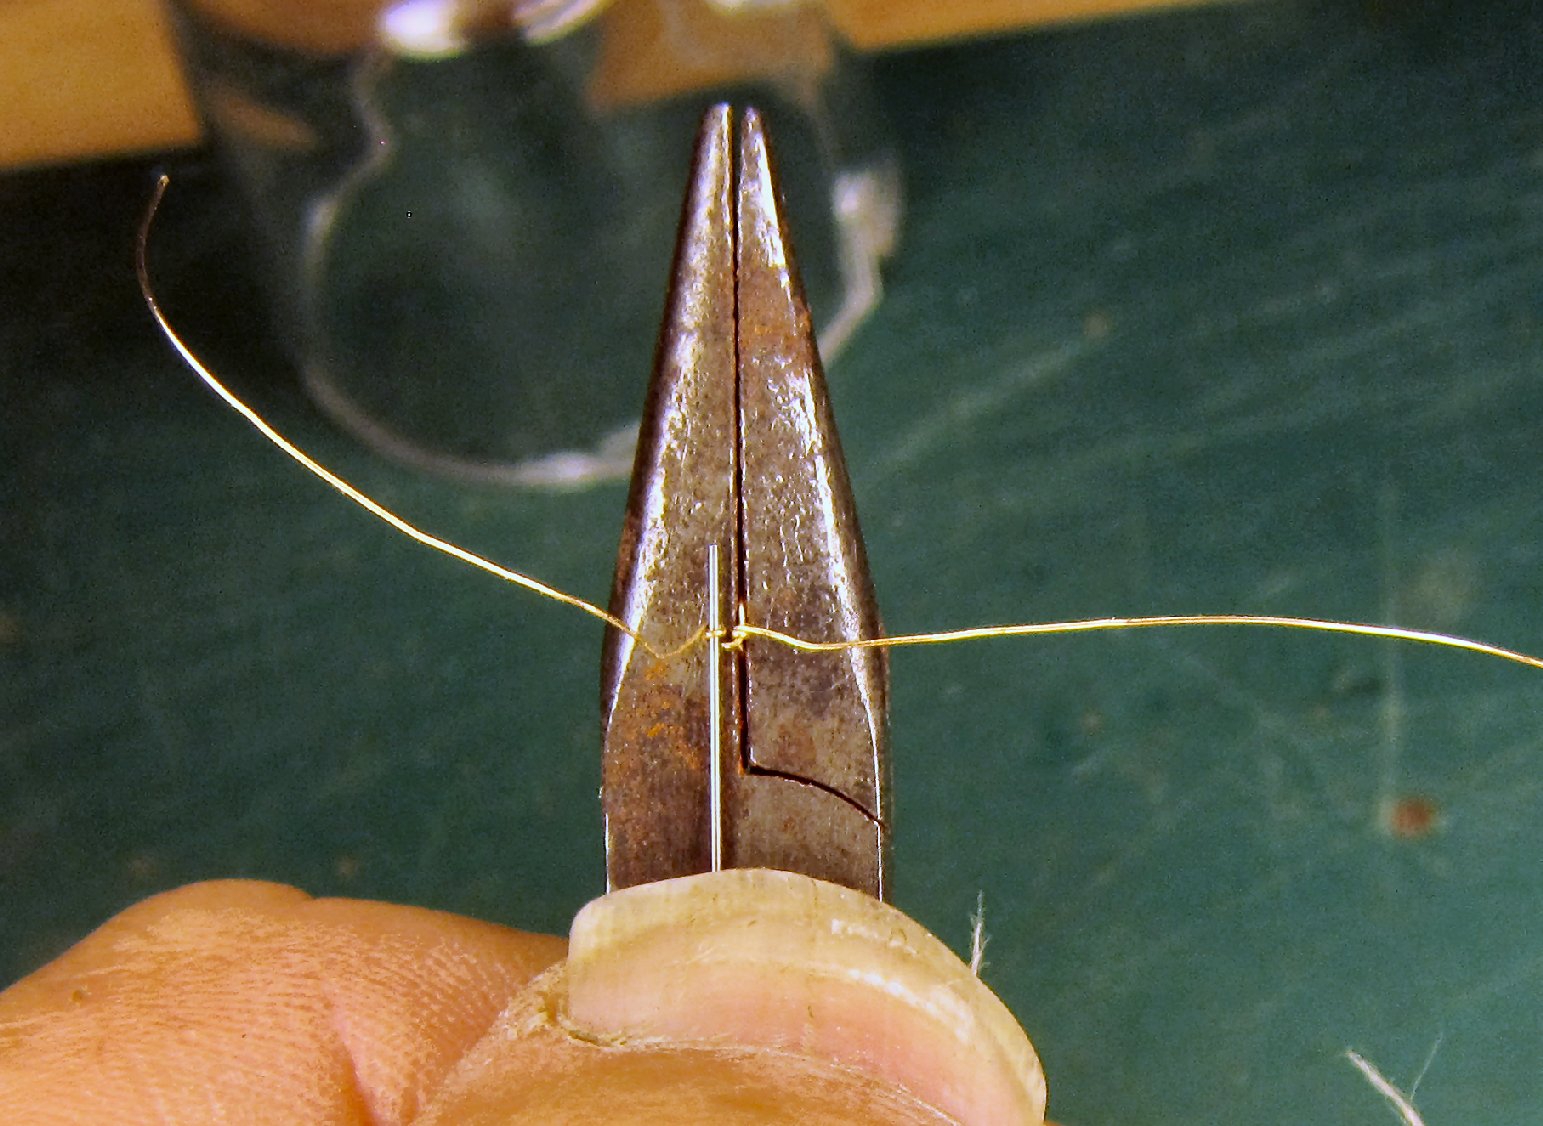
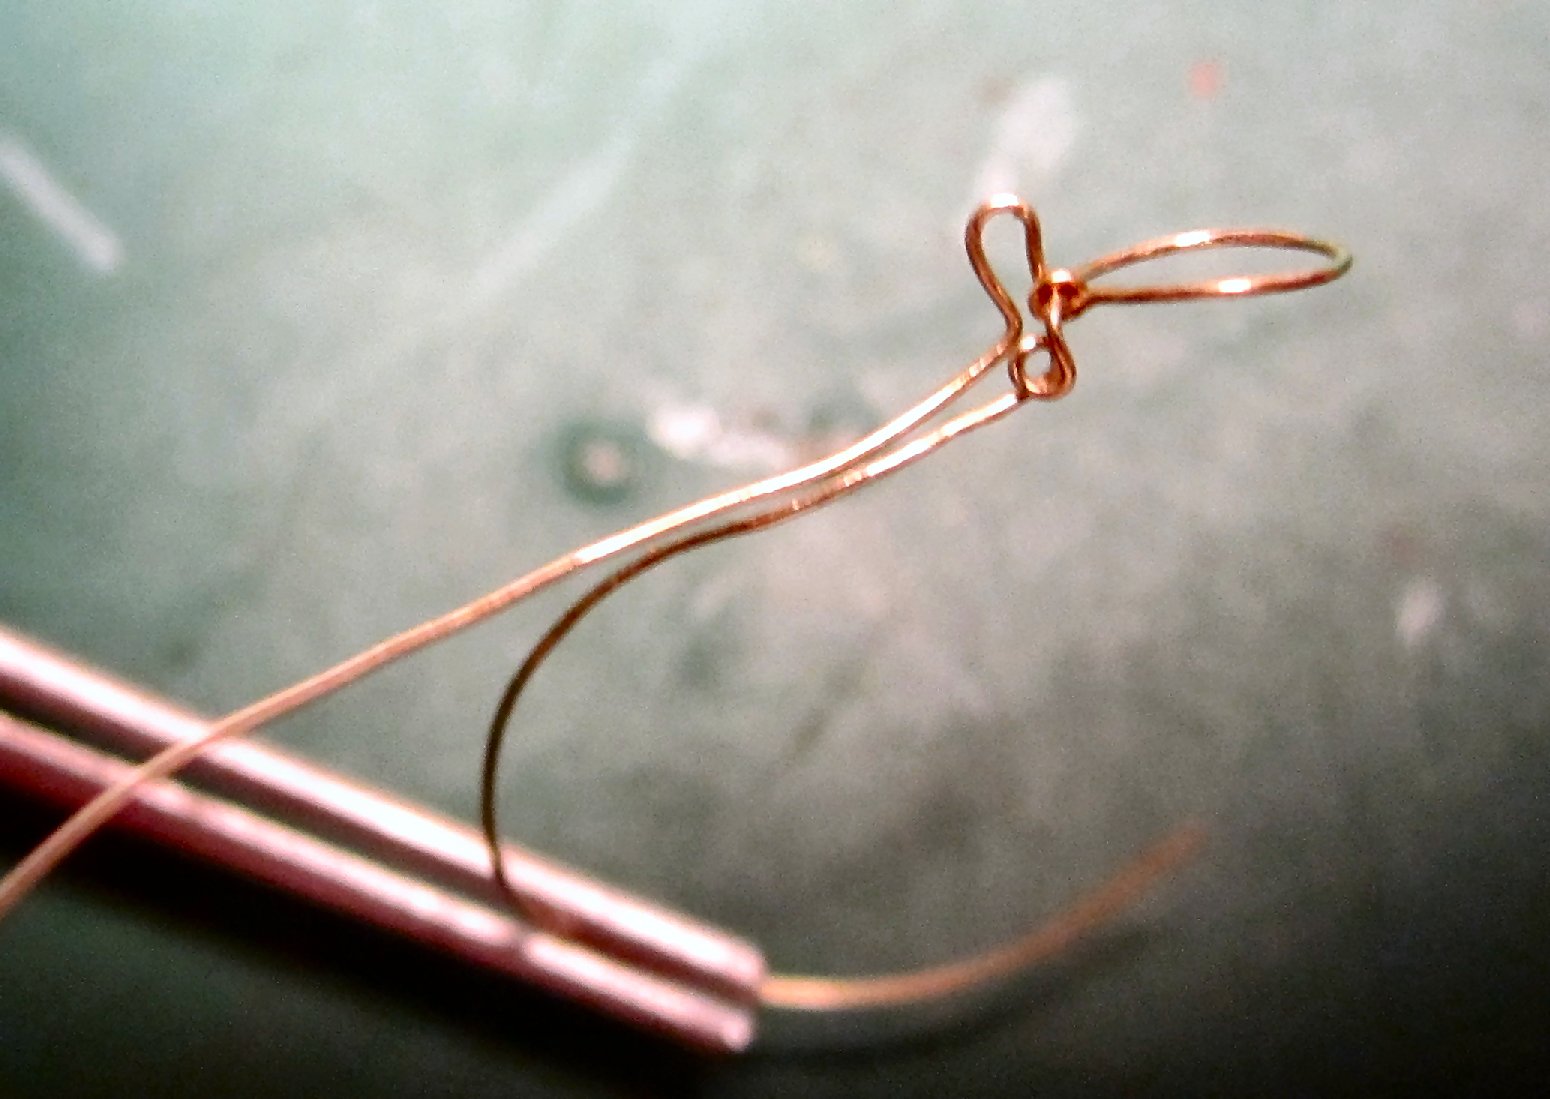
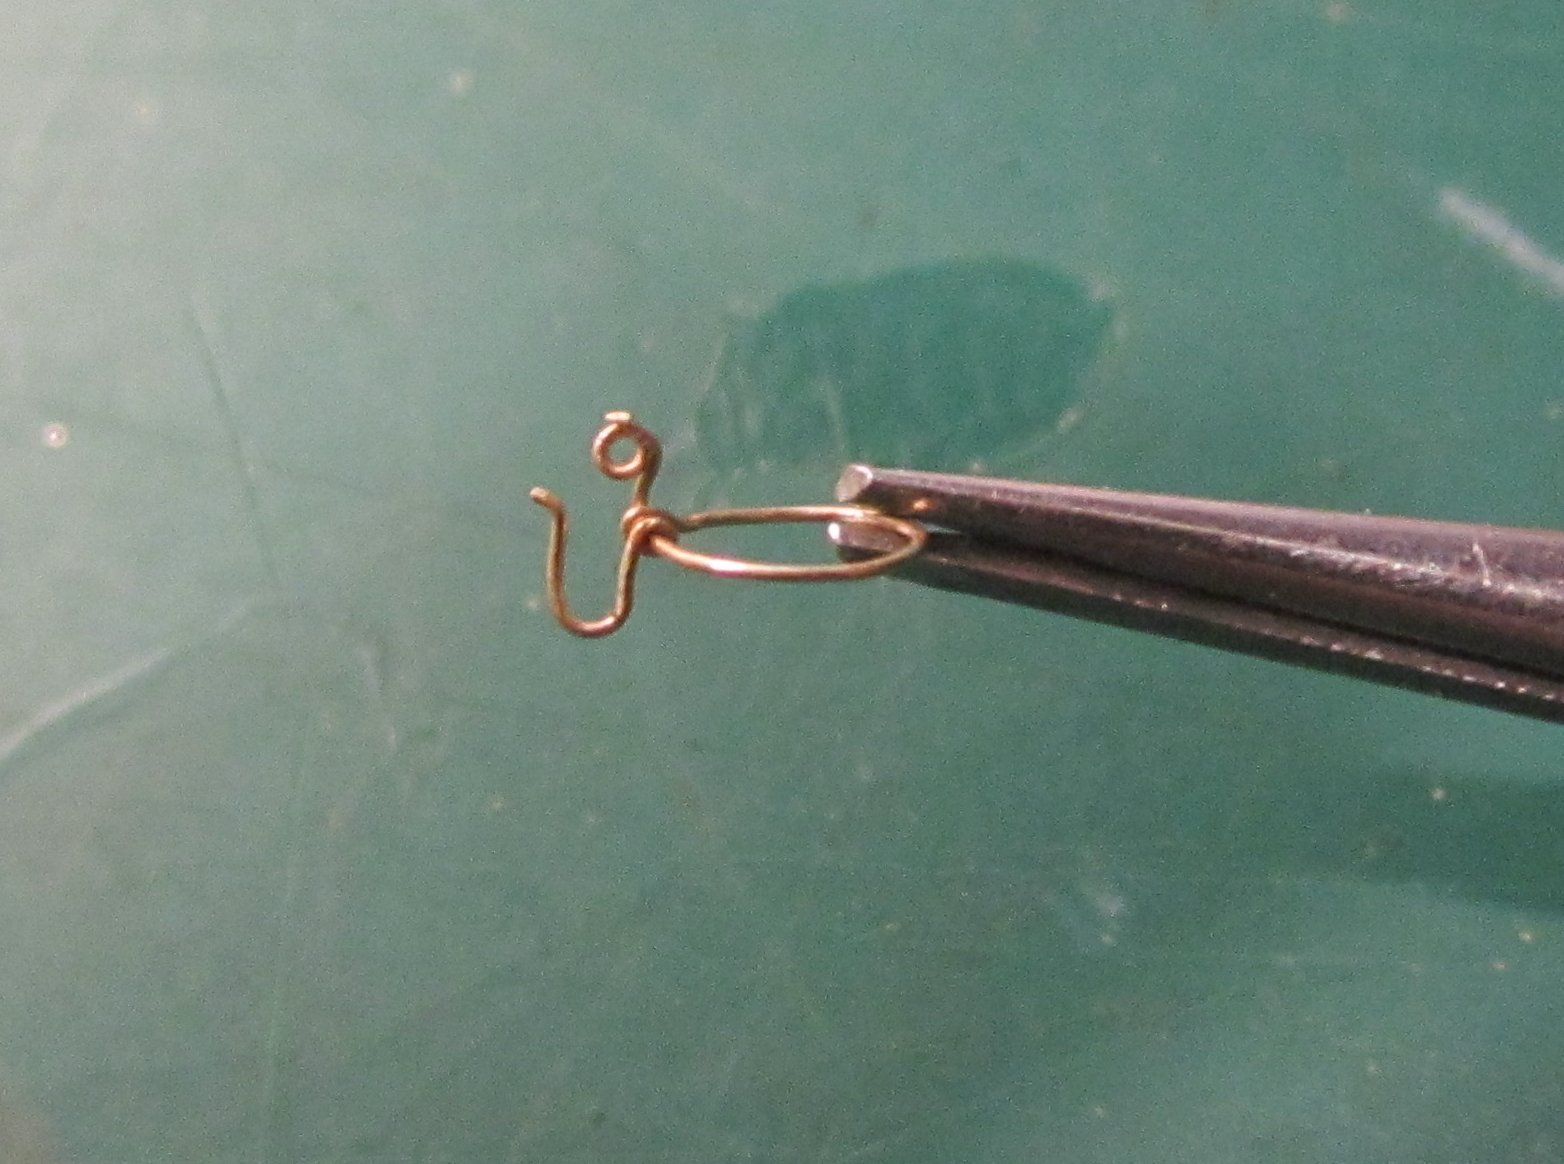
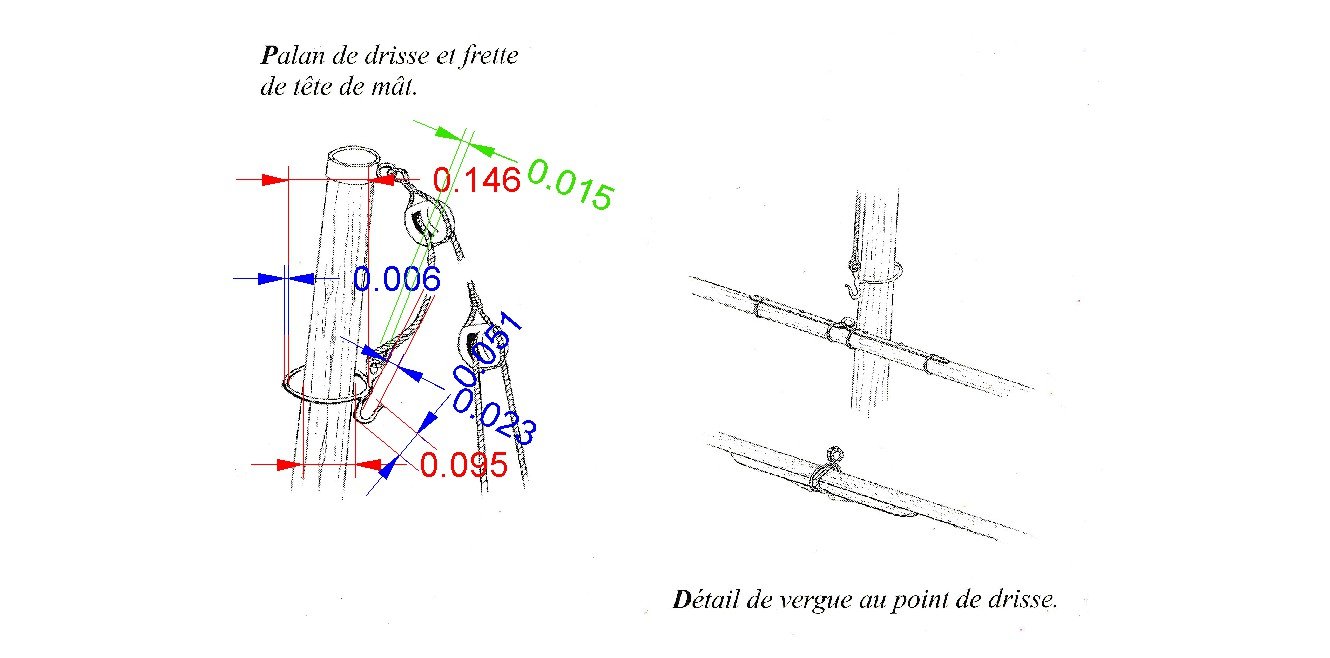
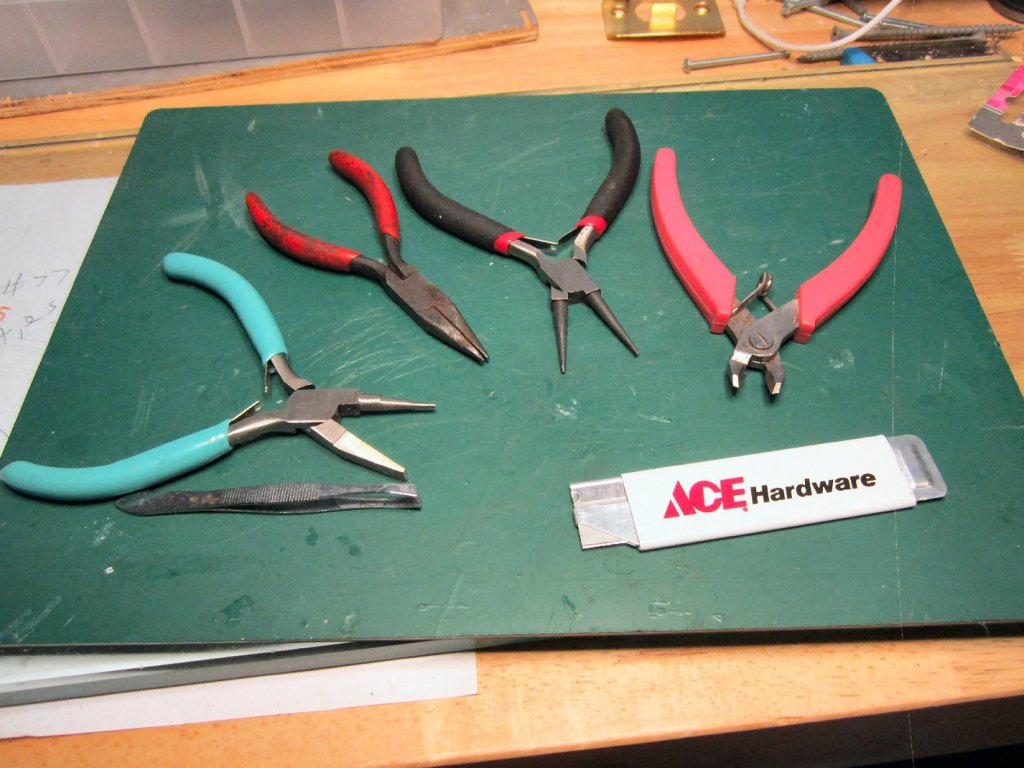
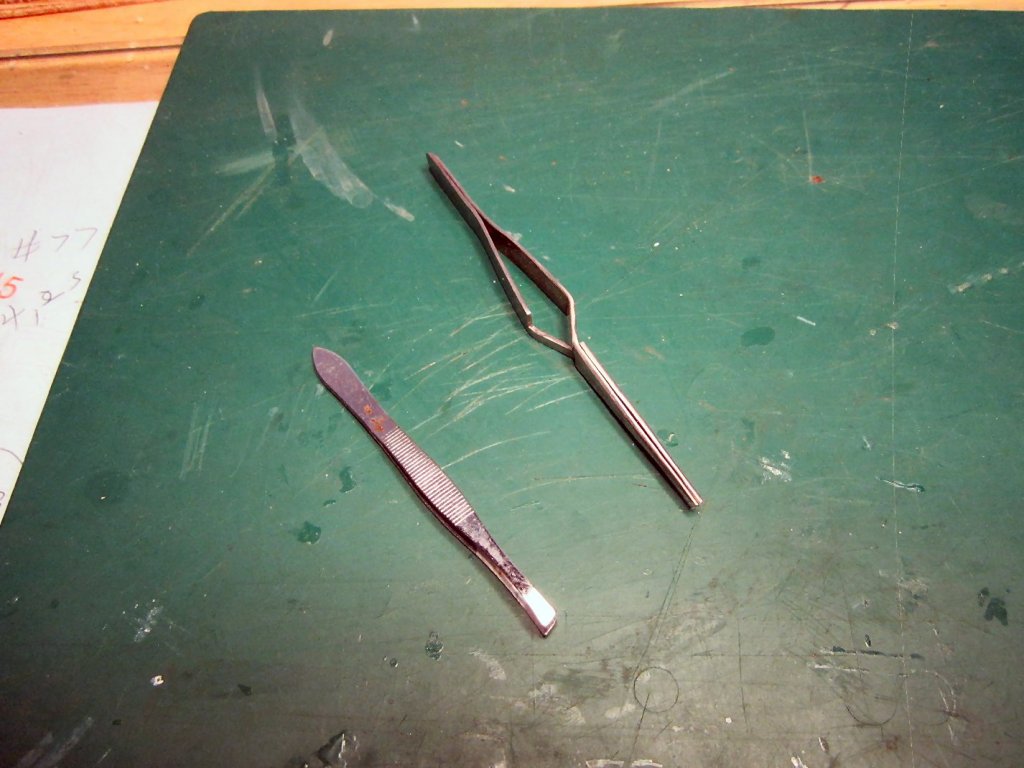
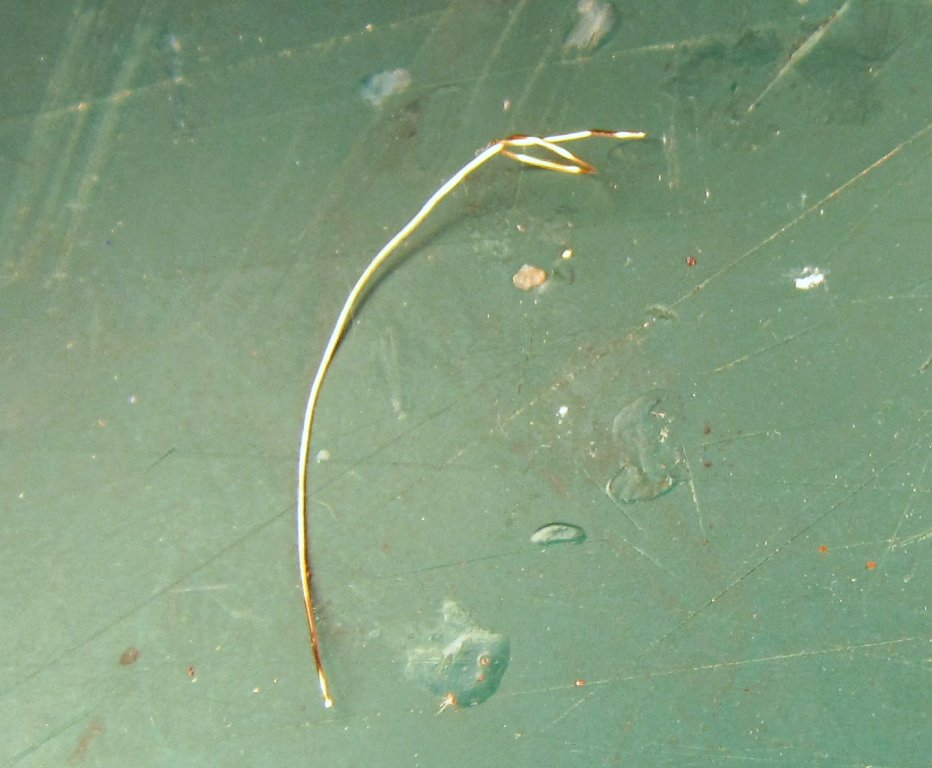
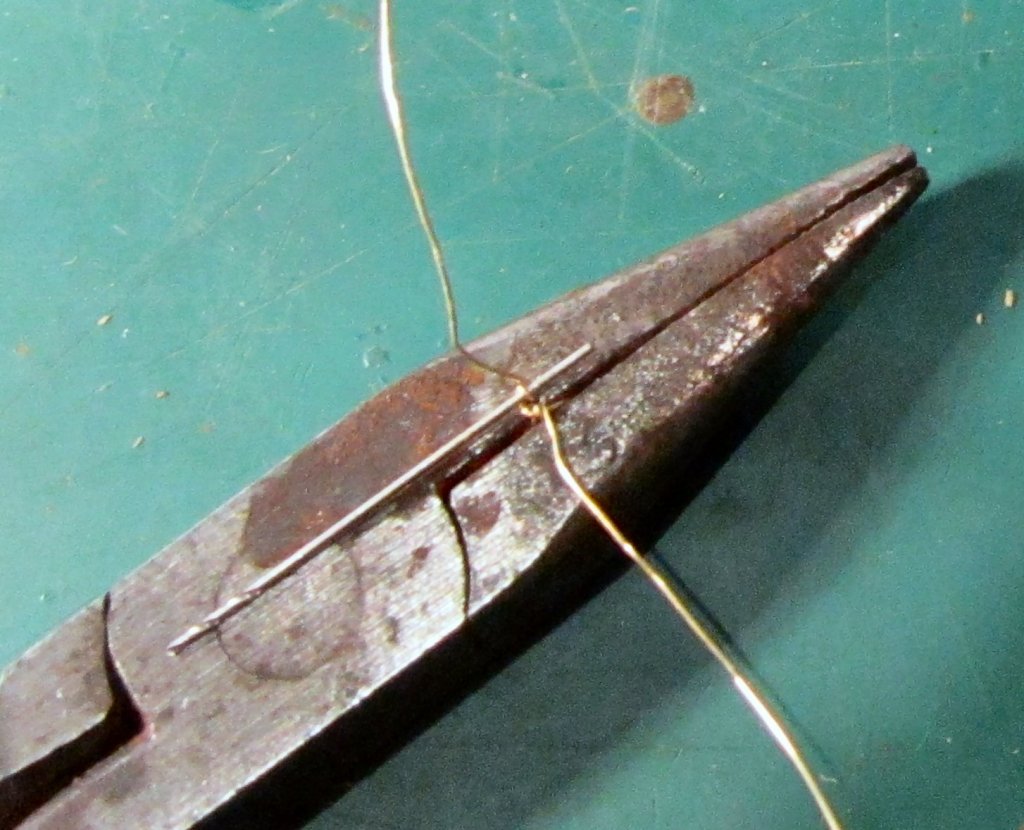
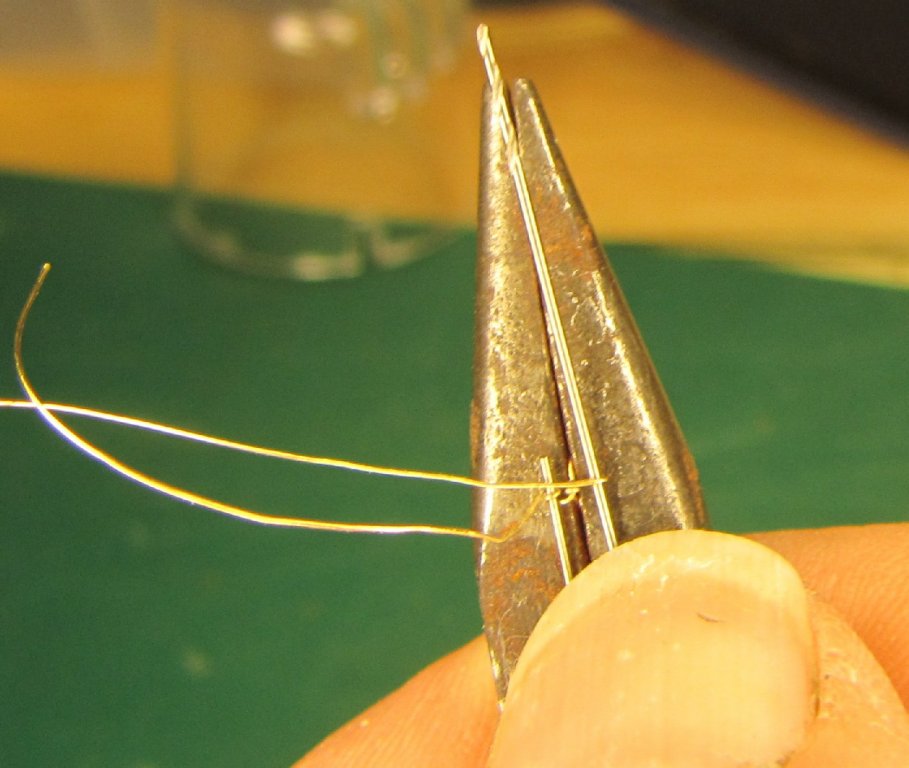
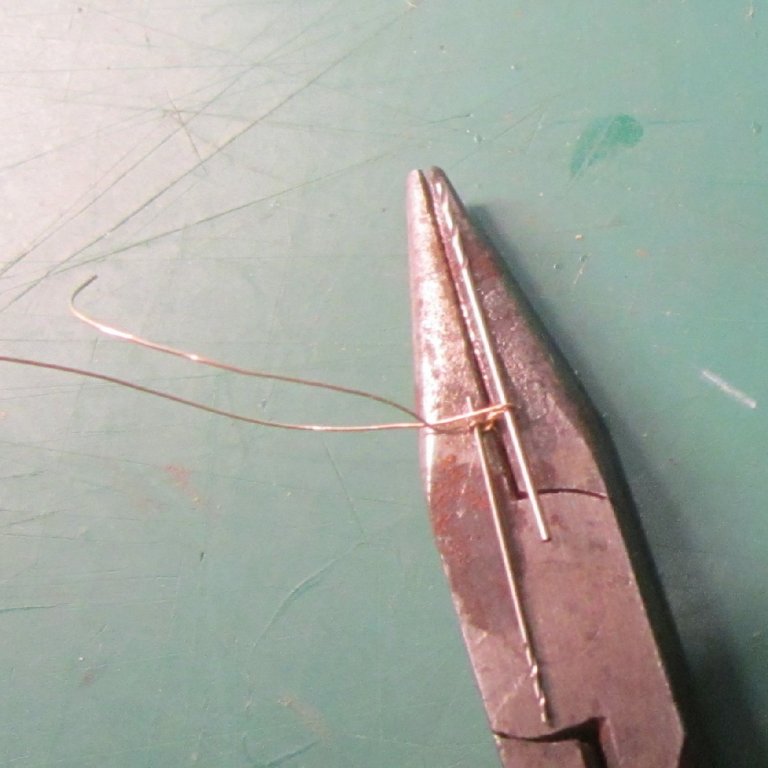
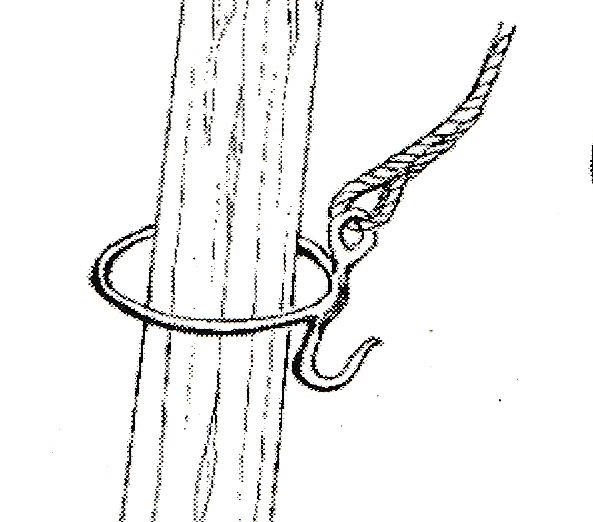
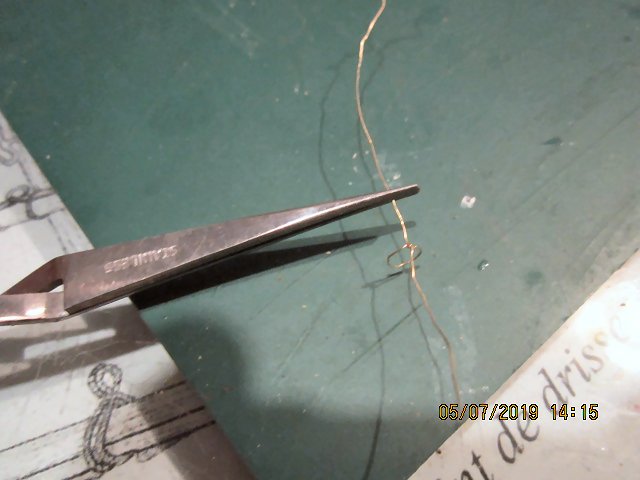
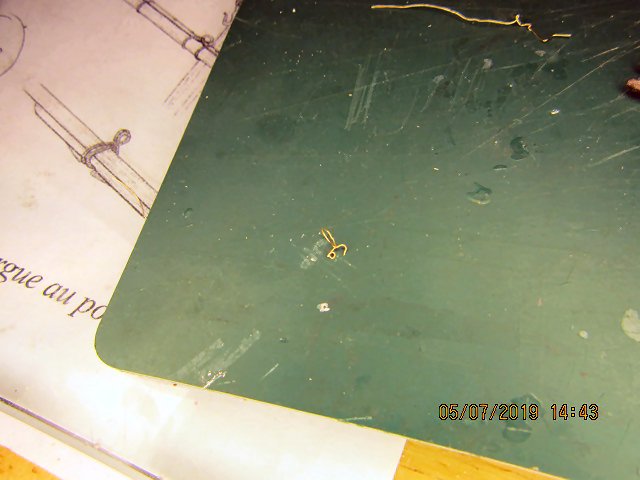
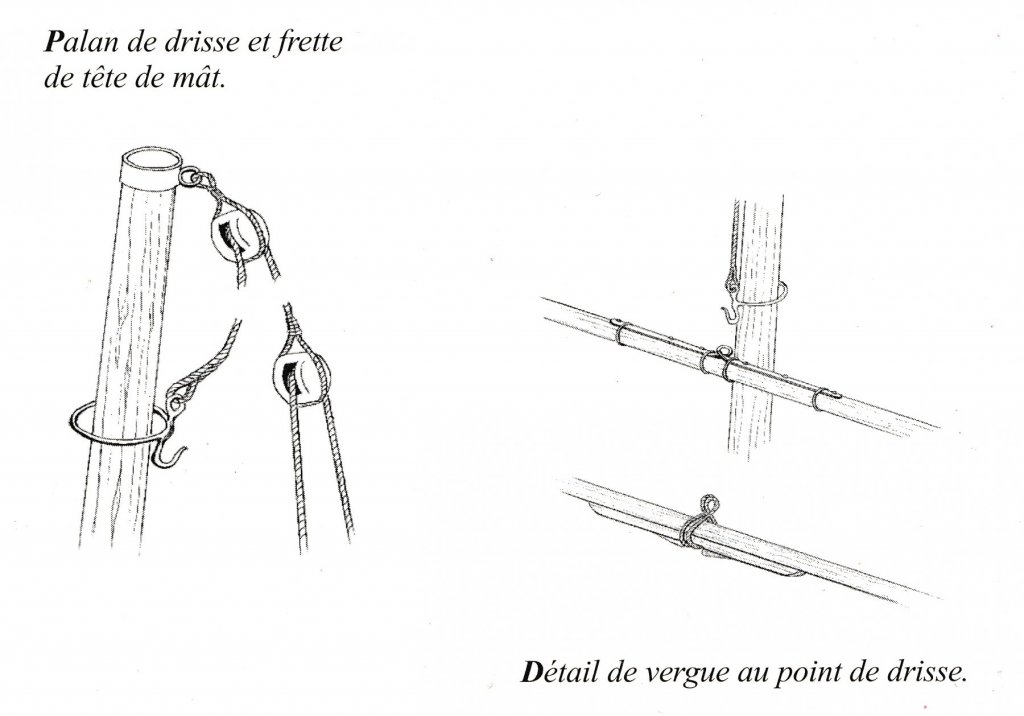
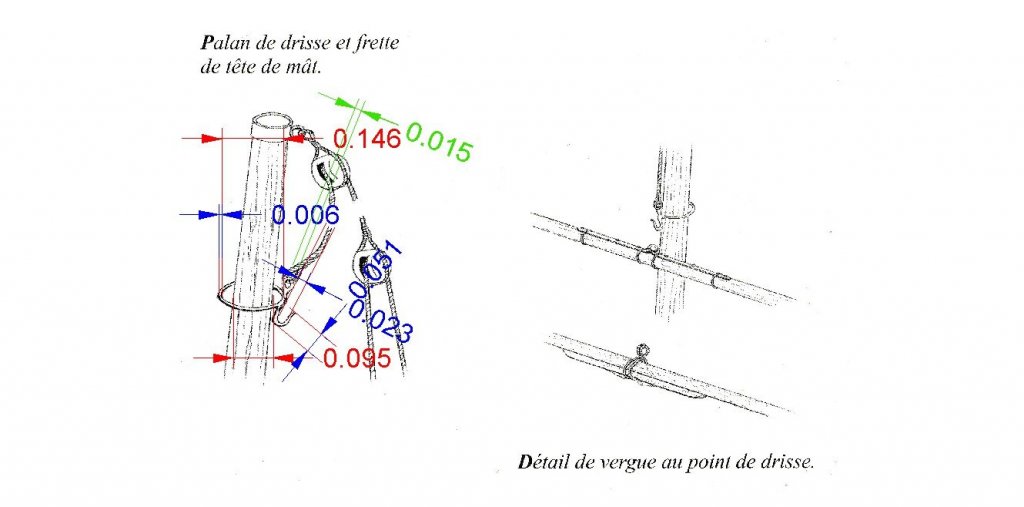
PART 12 Now that I’ve gotten the camera reset to the full resolution, I’m going to continue the Hoist Ring fabrication. One feature the “new” camera lacks that the old, failing, one had, is that in Close Up mode, there is no option to force it to use the flash! It only has No Flash , or Auto Flash settings. The camera seems to default to No Flash when taking close ups. This makes taking the pictures more difficult. For these shots I had to either have my magnifying lamp illuminating the shot, or take the picture through the lens of the lamp’s magnifier. As this part is so small taking the shots through the lens was a requirement anyway, but still this is a pain! I’m still getting used to the camera, so the shots are not always as focused as I would like. The 0.008” half hard brass wire worked well for this application, both for forming well through all the operations and holding its shape afterward. Here are two shots of the tools I used in making the ring. The , in real life orange, but here red handled cutters are “Rail Nippers”, used to cut track rails in model railroading. I need to buy new ones, as the cutting edges are dinged up from cutting HO scale rail and hard wire over the years. These are more robust versions of the similar ones sold for plastic modeling to cut the parts from the sprues. One of the pair of tweezers I used is shown in both shots. I started by holding the wire in a pair of jeweler’s pliers. I bent the wire to form a rough loop then fed one end back over the other side, under both, and then back out. This created an overhand knot. The knot is used to make a firm connection at the point where the ring, eye, and hook are forged together in the full sized assembly. In this small 1/64th scale, I do not have the dexterity to make the ring from “forged” parts. The knot is almost invisible in this scale, so will serve the purpose of forming the joint. This is a picture of the ring with the knot tightened. This left the ring smaller than needed, so I placed the wire onto one jaw of the set of pliers with both tips smoothly tapered (black and red handles), Then I forced the wire down the jaw expanding it until I was the correct size (no picture). The piece was then clamped in a set of flat jawed pliers, to flatten the ring, and start tightening the knot at the joint, by turning the ends 90 degrees and pulling. The part was then placed back in the first set of pliers and the knot worked to tighten it, using both pulling on the ends and the regular, as opposed to self clamping, tweezers to tighten the knot on itself, and rotate the knot so that it was at 90 degrees to the plain of the ring. After some work the joint looked like this. Note that the end of the step where the pliers jump to the next size, luckily, happened to be the correct diameter of the finished ring. This made sizing the ring much easier!. While tightening the knot I had to hold the pliers closed by clamping them between my legs, so that I could use both hands to work the knot. The part was then returned to the flat jawed pliers, and the eye and hook ends again turned 90 degrees. Then a #77 drill bit was held over one end and the wire wrapped around it a couple times to form the eye. After This shot was taken, I rolled the eye closer to the joint. Next a #73 drill bit was held over the other leg (while still holding the first bit with my thumb), and the wire bent over it to form the hook. Here is the part after this shaping. At this stage it looked like this. I then trimmed the ends with a single blade razor knife. I still need to trim the eye loop more and form the hook a little better, but that will wait until I’m ready to install the parts. Once I paint or blacken the part, the knot should all but disappear. Here is the original drawing again, for comparison.


-
I never installed them. I removed the slides from the leg pieces, before I installed them. The drawers and the center slide section are stored for possible use in the future.
-
Just ordered a set, thanks Chuck!
-
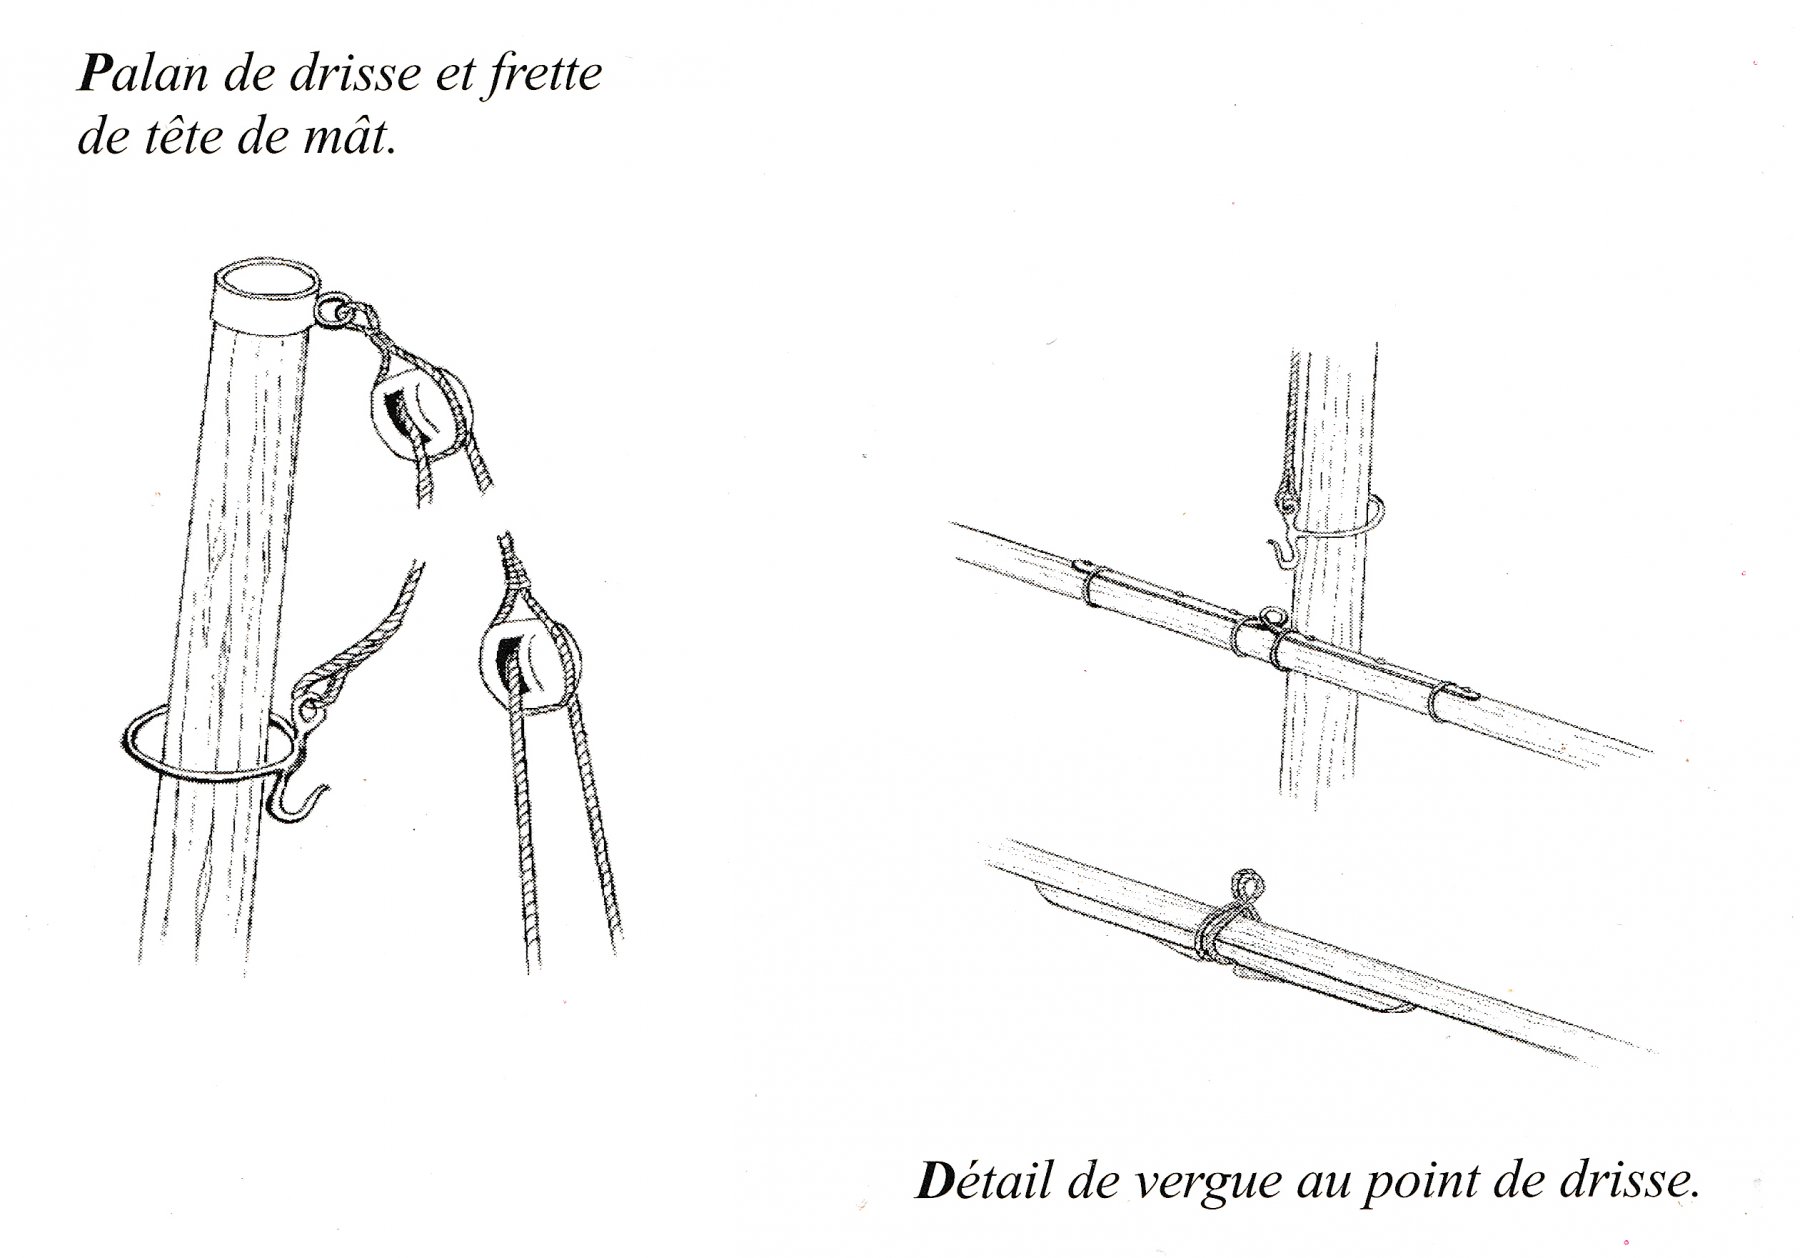
PART 11 I worked on the Hoist Ring today. This is the diagram I showed earlier, and the following one with dimensions. The critical dimensions are: Ring Diameter = 5/32” – 5/32 drill bit as form, initially (see below) Eye Diameter = 0.015” - #77 drill bit Hook Diameter = 0.023” - #73 drill bit This was just a practice/trial and error session. This is just as well, as the “new” used camera I was using was set on 640X480 resolution, as I discovered when editing the pictures! I bought 0.008” copper, dead soft brass, and half hard brass wire, to experiment with. The half hard is what I used, the copper was way too soft to hold a shape under handling. I skipped the Dead Soft, and found the Half Hard quite workable, and sufficiently sturdy. There will be no load on the ring as the spar will be glued to the mast. In this scale, 1/64th, I will not try to replicate the forged construction of the original. At first I tried wrapping the wire around the 5/32nd bit then folding the ends across each other, then vertical to form the hook and eye legs, forming a sharp corner, but no firm connection. This worked, but the ring did not hold its shape during further work. The two corners separated when the ring twisted. For the “final” version, I used a pair of needle nose pliers, with a stepped taper on one jaw and a flat mating surface on the other. For the area where the legs will be, I tied a simple knot by looping one leg back through the ring. After a bit of pulling and tightening of the knot, I got a firm joint at the legs. Next I used a pair of flat jawed needle nose pliers to clamp the ring in and stretched the legs to be at right angles to the ring. I then held a #77 drill bit on one jaw, on top of a leg and wrapped the wire around it, forming the eye. Then while also holding the #77 in place, I repeated this on the hook leg, using a #73 drill bit. This time I only wrapped it enough to form the bottom of the hook The assembly now looked like this. After playing with it a bit using pliers and tweezers to get everything in line, I cut the excess wire with a single bladed razor. Here is the final trial piece. You can see some kinks in the main ring. I was reusing the same piece of wire as I practiced, and it was distorted from prior attempts. For the final pieces I'll have to refine the eye, but I'm calling this trial Hoist Ring a success. When I make the finished parts, I’ll take a better sequence of pictures. I finally got the camera reset to take full resolution (14megapixel) shots, so the pictures will be better next time. It may be a few weeks before I can get back to the model. I’m about to start a month long 12 hours a day 6 days a week short term job.


-
Played a little with the wire for the hoist fittings. The .008" (0.2mm) is too soft. I was able to make a rough fitting, but it collapsed before I could finish. I'll try the brass wires today, with pictures this time. I may have to build a simple jig.
-
I would say a coat of epoxy or the old fashioned RC aircraft dope. I used the aircraft dope on the outside and inside of my RC Combat Warship models.
- 9 replies
-
- 1
-
-
- corel
- Chesapeake Bay Flattie
- (and 2 more)
-
Fantastic model!
-
Nice!
-
Table saw with a reasonable price
thibaultron replied to Clark's topic in Modeling tools and Workshop Equipment
How did the old Dremel saws stack up? -
I don't think you have to decorate both sides. I beleave the cross was only painted on the front of the sail.
-
Some do some don't, it would be nice if more did, but with the cheaper kits, it would add a chunk to the price.