robnbill
-
Posts
841 -
Joined
-
Last visited
Content Type
Profiles
Forums
Gallery
Events
Everything posted by robnbill
-

Brig Eagle by robnbill - 1:48
robnbill replied to robnbill's topic in - Build logs for subjects built 1801 - 1850
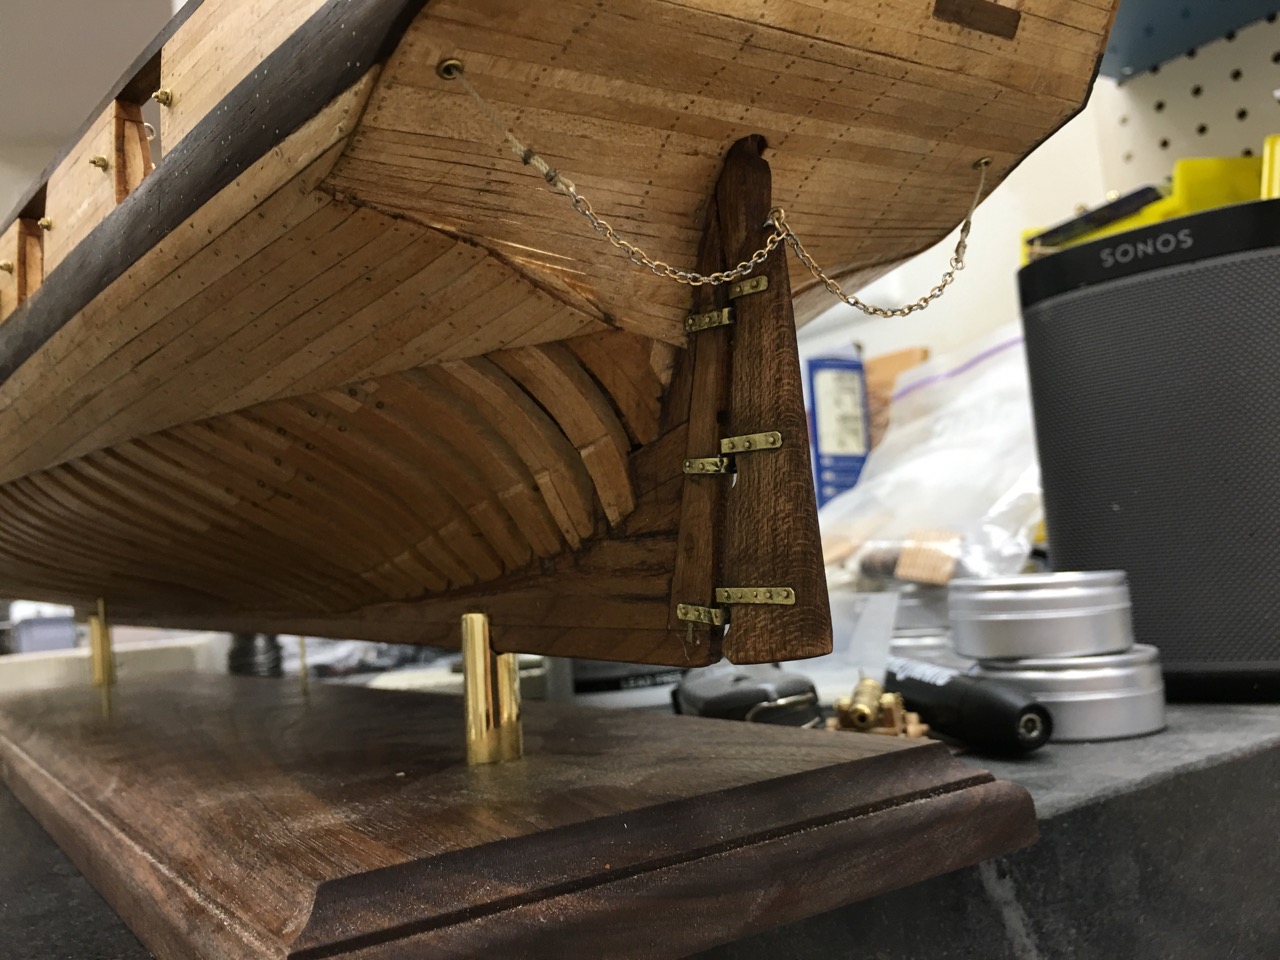
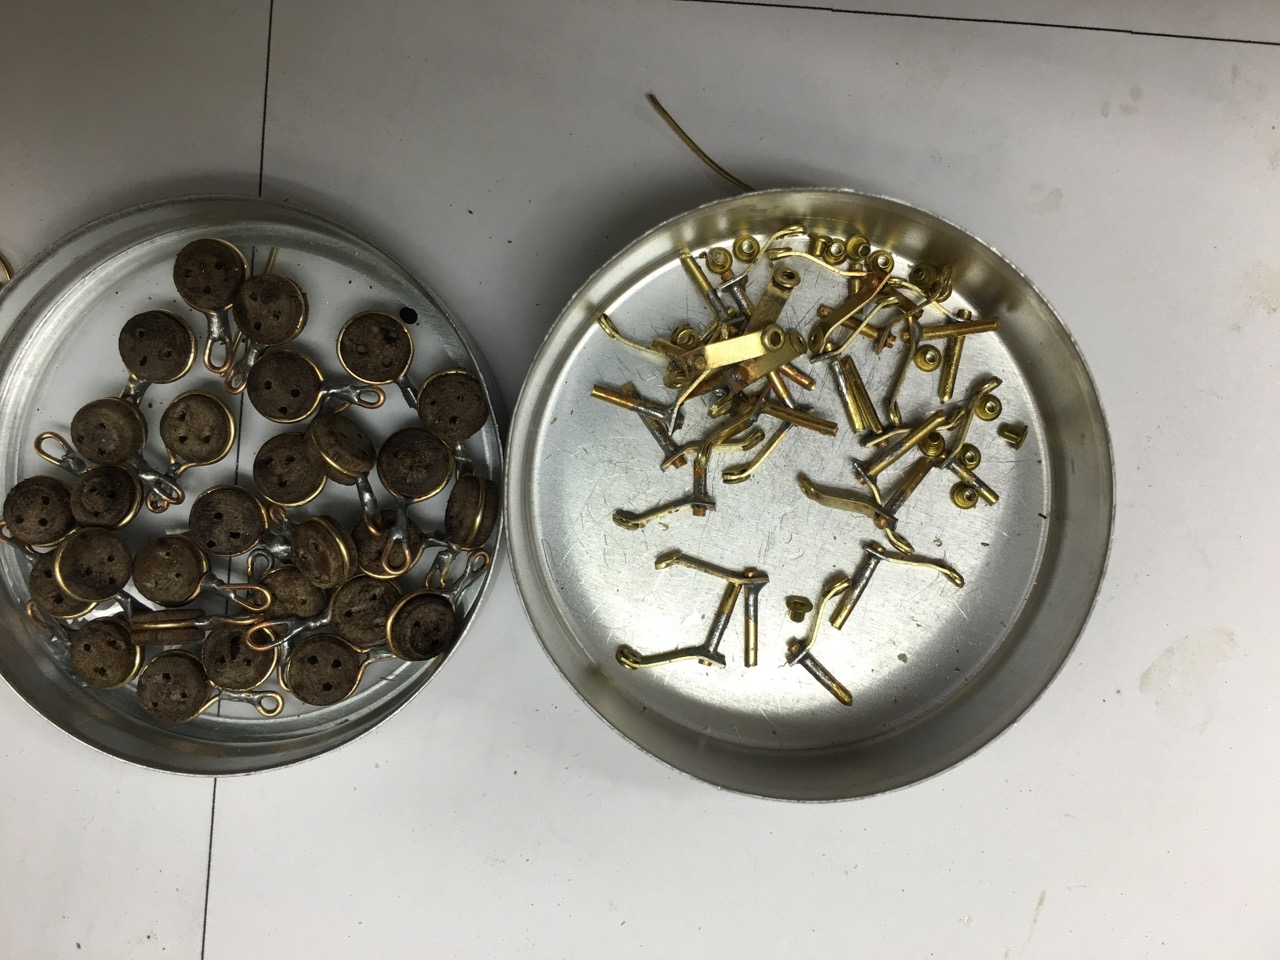
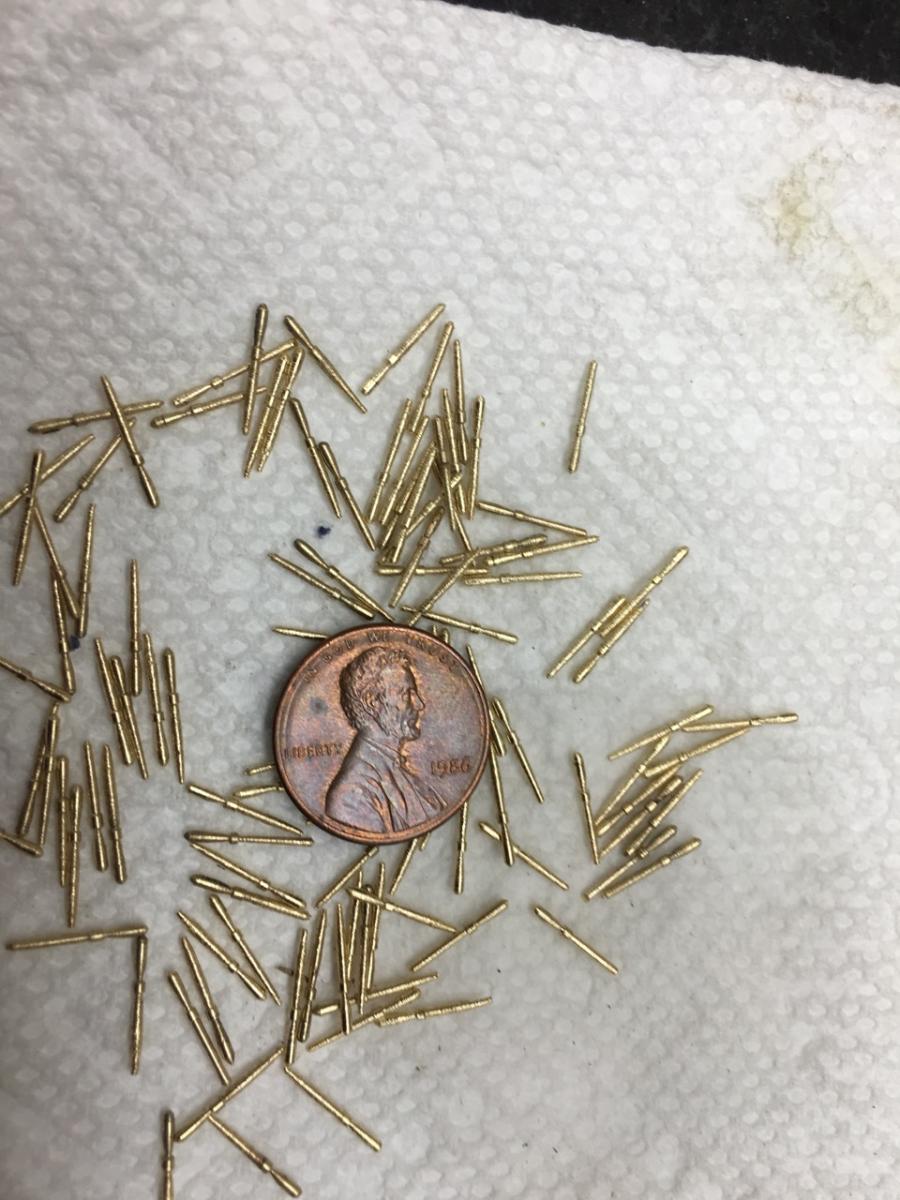
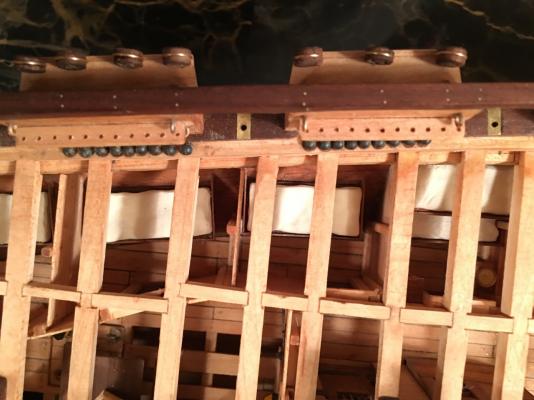
I have completed the rudder assembly. The ship would have had a rudder chain. In addition, since Crisman now feels the ship had a tiller, I wanted the chain to transition to rope and this to terminate at the main deck level as a backup for the tiller should the handle be shot off. Since I am trying to make as much as possible for this build, I tried my hand at the chain itself. I hammered brass tubing until it had the form I desired for the inside of the links. Then I wrapped it tightly in brass wire. This was then carefully cut off to form the links. I soldered half the links into individual links then joined them by soldering them with the additional links. Once all the links were soldered, I hung it between two arms of the helping hands to finalize the shaping of each of the links. I cut this in half and connected each side to a ring and eyebolt that mounted in the rudder. I drilled holes from each side of the stern to the main deck and inserted brass eyelets for the rope to pass. I terminated the rope to walnut cleats mounted to the waterway. On a side not, the rope is the first to be added to the ship. It was made on my Byrnes Ropewalk. It will be dressed at the cleats much later in the process. To make the pin rails I created a small jig to mount in my frill presses XY table. This allowed me to drill a hole, slide the hole over a pin in the jig and drill the next hole and so forth. With this I could set the distance I wanted between holes and be assured of consistent holes in the rail. In addition to those abreast the masts, I also added pin rails just forward of the catheads for the bow lines to terminate on. These with the addition of the fife rail at the main mast should allow enough terminations for the ship. While many of these will not be used since there will be no sails shown on the model, they still need to be available for accuracy. I also completed the chainrails and lower deadeye installations. The deadeyes were turned from walnut then soldered into the chainrail assembly. Now I will turn to the cannons building and rigging the carriages for the starboard side.

- 186 replies
-
- 16
-

-
To paint or not to paint, that is the question?
robnbill replied to ratskiss's topic in Wood ship model kits
One more thing to add here to that said above. Painting a ship is a lot more forgiving. If you are going to paint a hull you can use fillers etc on your hull prior to painting it. Paint covers a lot of sins.- 11 replies
-
- 7
-
-
- HMS Surprise
- Artesania Latina
- (and 1 more)
-
I will definitely try that. Thanks!
-
Tool for Shaping Brass Strip
robnbill replied to mikiek's topic in Metal Work, Soldering and Metal Fittings
There were also very few square edges on a ship. They tended to catch sails and lines. -
That is true. My problem (and this is just me) is I tend to overspray with canned spray - the spray seems denser. So I like the airbrush because I can really have a very fine dilute mist. It gives me more control that I get with a spray can.
-
I used an airbrush on my Connie. It worked very well. The key was to use lighter coats. I loved how I could get a smooth finish. Not to say I that I didn't also use paint brushes a lot on the details. That can't be avoided, but the air brush will give you a nice smooth finish over larger areas. One other use for an airbrush is applying a clear coat to the ship once the hull and furniture are done. Since different paints have a slightly different sheen, I apply a matte finish to the ship. This enhances the details seen on the ship and make it look better since all parts have the same matte finish.
-
Tool for Shaping Brass Strip
robnbill replied to mikiek's topic in Metal Work, Soldering and Metal Fittings
Mike, you are going to have some rounding when you bend anything. Even the excellent work that John showed above the corners are rounded. As you suggested you could pound the corners square, but that would tend to cut the inside corner through unless you were extremely careful. You could also make it larger and file the excess material off to give a more square look. Lastly the only real square way would be to butt and solder two flat surfaces together at 90 degrees. If you solder from the inside of the corner, you could get a square outside. -
Patrick, You are doing a fantastic job on this and at such small scale. I apologize for not being on here sooner. It is really fun to see it come together. And you cannot have too many watches!
-
Hey Elijah, I wanted to look in on your log again to see your progress. You are doing great. As others have said, this isn't a race. A ship model is at least months and usually years to get done. These are long term projects that are part of your life for a long time. What I do is to break everything down into small projects. A project has a beginning, middle, and end. When building, read ahead and picture what you will need to do to accomplish it. This is your homework (to use a dirty word). While you spend some time reading ahead and making plans on how to accomplish a task (this would be the beginning of a task), you are working on building what you already planned and studied. For instance, I am currently working on chain plates, but planning on how I will be building masting. By breaking it down like this it allows me to have a sense of accomplishment when I complete a task. I don't focus on the end. I will get there one small task at a time. You are doing fantastic work. Keep it up. Joining the NRG is like going to the candy store for a model ship builder.
- 701 replies
-
- 4
-
-
- phantom
- model shipways
- (and 1 more)
-
Brig Eagle by robnbill - 1:48
robnbill replied to robnbill's topic in - Build logs for subjects built 1801 - 1850
Thank you all for your likes and comments. Mark, you are correct, her story is fascinating. Such a great deal of work, done over such a short period for one battle. It is what makes working on her so interesting. -
Brig Eagle by robnbill - 1:48
robnbill replied to robnbill's topic in - Build logs for subjects built 1801 - 1850
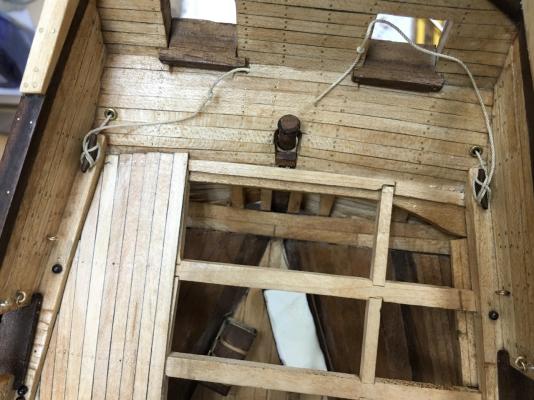
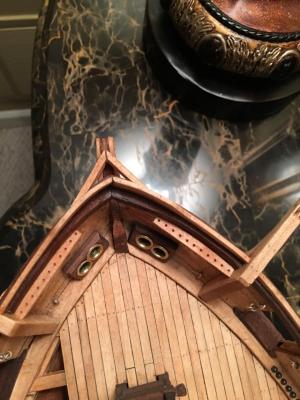
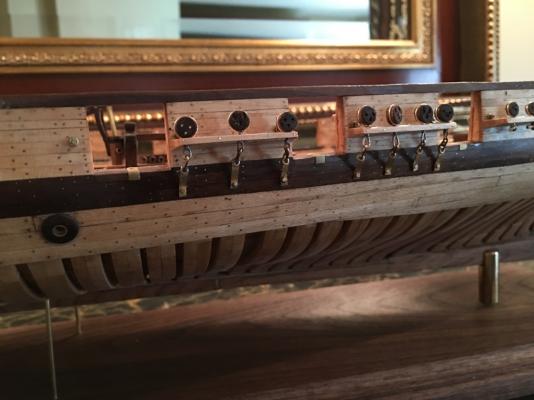
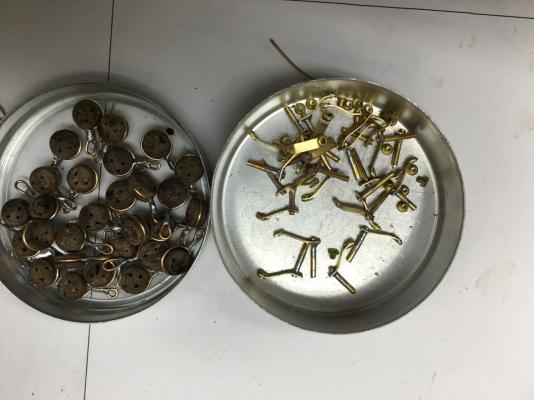
A quick update on the Eagle. I have completed the installation of the pin rails as well as turning the required belaying pins in brass. To do this I used Ed Tosti's process to create the jig for the lathe. This made quick work of it. After looking at the available belaying points with the rails installed I felt there would have been more to handle sails than were available with just the side rails. Chrisman used the Niagara for a modified sail plan for the Eagle. However other than the chainplates, there was no evidence of the belaying arrangement. I went back and forth on whether to add more towards the stern or as in the case of the Niagara, adding a fife rail around the main mast. While there was no evidence of any footers for this in the wreck, there was also no evidence of the bowsprit bitts but Chrisman added it where it would have been. So I added the fife rail to the ship. I installed all the rings to the bulkheads and simulated the bolts through the sides for the breeching rope rings. To do this, I threaded the brass ring, added small hollow eyes to the outside of the hull and glued small square tubing over the end to simulate the square nuts. I used brass tubing and walnut to create the hawse holes in the bow, then glued in the cannon balls to the waterway. Lastly I have installed all the channels to the sides. Next I will start working on the chainplates. Chrisman has documented these from the wreck.
- 186 replies
-
- 22
-
-
It is looking great. I ended up breaking both my rear bumpkins off several times before she was finally rigged. Thank goodness they were easy to put back.
- 1,348 replies
-
- 2
-
-
- constitution
- model shipways
- (and 1 more)
-
You might think about stain. A light stain is typically used on walnut and cherry in furniture to help even the streaks of sap wood. The worst case s you paint it, but at leadt a stain wood let the wood show. Just a thought.
-
If you look at the attached photo, this shows my Brig Eagle when I was planking the interior. The dark wood is Walnut, the white wood is Maple, and the intermediate wood is Cherry. I found it easy to work with.

-
I have a 16" Delta Bandsaw and a 16" Excalibur. If looking at my overall time in the shop mostly I use the band saw. I find it very easy and quick to cut on. However, when I need to do very exact cuts following inside curves, I would probably go to the Excalibur. However, that is me. When cutting frames, I tend to cut them on the band saw, leaving a little extra meat on them then using the disk sander and oscillating sander to remove the extra. I found that just works well for me. However when I was cutting very fine pieces for ship's boats, I used the Excalibur - hands down. The band saw and the scroll saw are very good at what they excel in. So it really depends on you, your building style, and what you are trying to do.
-
Brig Eagle by robnbill - 1:48
robnbill replied to robnbill's topic in - Build logs for subjects built 1801 - 1850
Thanks for all the reviews and likes. Tim, the answer is I do plan on rigging her. Keeping with my desire to make everything that I can, I purchased a Byrnes Ropewalk. The masting will all be out of maple with the spars made of walnut. -
Brig Eagle by robnbill - 1:48
robnbill replied to robnbill's topic in - Build logs for subjects built 1801 - 1850
I added the bow assembly based upon Chrisman's last drawings of the ship. Then I pinned everything including the top rails. Once they were pinned, I built out the stern davits. Rail Pinning Stern Davits I have been giving a bit of thought to how I wanted to mount it. I wanted the baseboard to be Walnut to match the ship, and I wanted to mount it to pedestals. I created pedestals out of ⅜" brass. I kept them simple support the ship, but not pull the eye away from it. I also added 2mm brass supports amidships. I felt with the size of the model it needed some lateral support to keep the strain from the keel. I made these out of brass tubing since the tubing is stronger than solid rod. To mount the ship, I drilled and tapped 3mm holes in the keel to accept a machine bolt. To strengthen the threads I coated them with thin CA and retapped them once the CA was dry. I found these to be pretty strong in testing. For the midship's supports, I drilled 3mm holes through a midship frame. The ends of the rod will be covered by the berth deck planking. Finally I reattached the rudder before mounting the ship. I epoxied the pedestals into sockets on the base board. This to both to provide a firm base for the pedestals and to hide the actual glue joint. After a test fit, I applied thick CA to the tops of the 3mm midship supports as well as in the frame holes and slid the ship onto the rods and threaded the bolts through the pedestals. Lastly I used a level to level the ship laterally before the CA had set up in the frames. Now I will start focusing on the remaining interior fittings as well as the channels. Below is a photo of the base board once it was ready for the ship to be mounted. Here is the ship mounted on the base. The bow assembly. And from above the bow. Here is a shot of the installed rudder.- 186 replies
-
- 21
-
-
I use a mixture of turpentine and beeswax to wax the line. However, I use a tiny bit of thin CA on the knots. I have never had a problem. The turpentine allows the wax to penetrate then it dries and leave the line with a wax matrix throughout. This is just what works for me. I know others have had issues with using bees wax or feel CA makes the line brittle. I have not seen any of these issues but my Connie rigging is only one year old and it is in a case.
- 2 replies
-
- 1
-
-
- Waxing line
- dilute PVA
- (and 1 more)
-
Brig Eagle by robnbill - 1:48
robnbill replied to robnbill's topic in - Build logs for subjects built 1801 - 1850
Thank you all. Elijah, the sheaves do work. I am not planning on having functional rigging, but where I can make a part, I try to do it. -
Brig Eagle by robnbill - 1:48
robnbill replied to robnbill's topic in - Build logs for subjects built 1801 - 1850
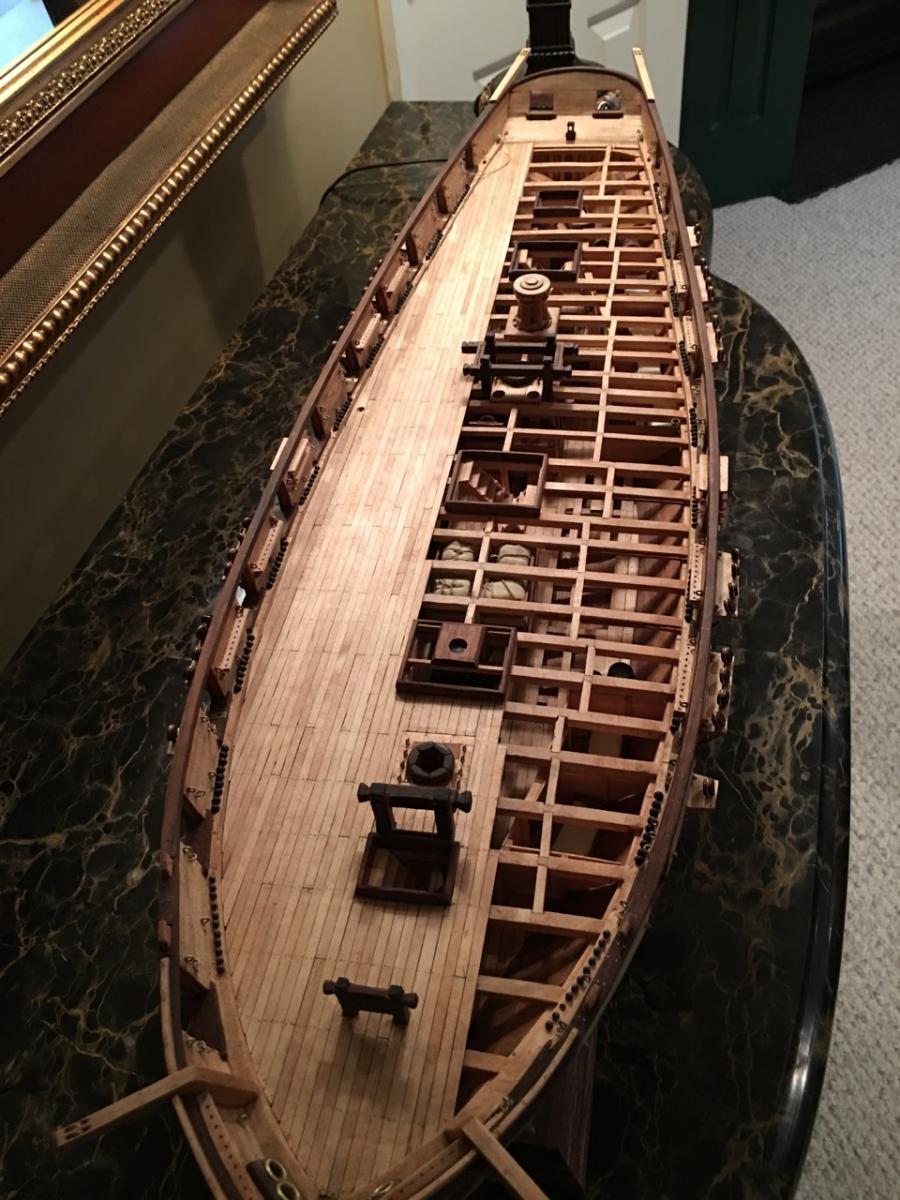
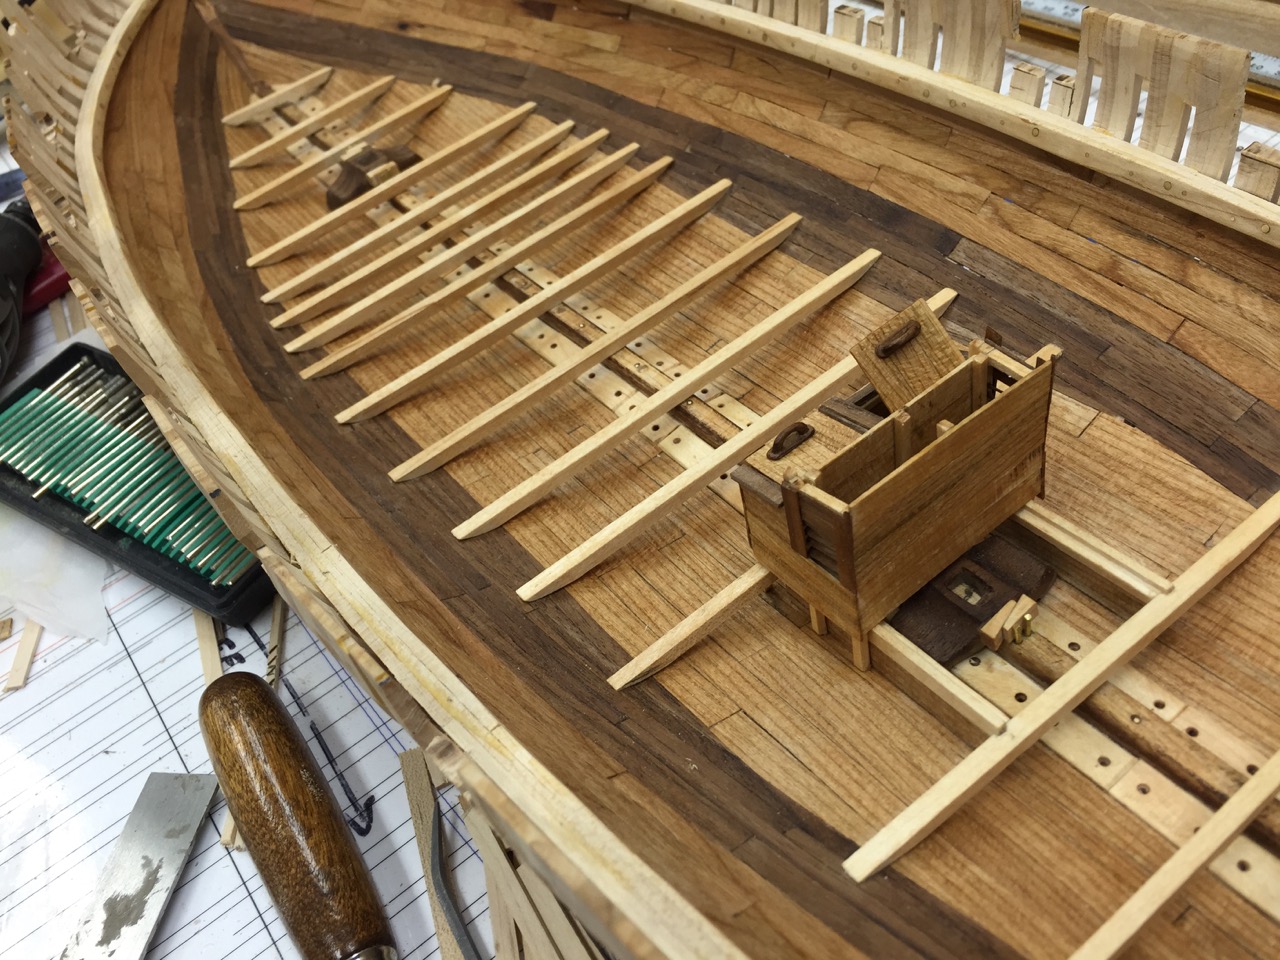
I built the mast partners based upon those shown on Ed Tosti's Naiad practicum. I extended the partner for the main mast to allow for the elm tree pumps. With the installation of these I was able to proceed with the planking. I decided to deck most of the starboard side. This still leaves plenty of visibility to the berth deck. I used the equivalent of ¾" pins on the planks and a 4 plank repeat. Caulking was done by heavily rubbing all sides of the planks with #2 graphite. I found graphite sticks for artwork on Amazon and these work much better than just a pencil. The image below shows the planking pattern and pins. I put the the test cannon and carronade both forward and amidships to test the fit. Once the planking was completed, I started work on the bow. The first step for this was the installation of the catheads. I turned brass down for the sheaves then mounted them into the cathead ends. I notched then handrail partially to allow the bottom of the cathead to be flush with the outside of the rail. This will facilitate the installation of the bow beams. The image below shows the brass sheaves prior to removing them from the lathe. I sized them to be slightly proud of the top of the cathead. Here is a shot of the catheads installed in the bow. Lastly, here is a detail shot of the sheaves mounted in the cathead.- 186 replies
-
- 13
-
-
Opinions. Did the Brig Eagle have boomkins? I could argue either way. I bow to the more learned among us
-
Brig Eagle by robnbill - 1:48
robnbill replied to robnbill's topic in - Build logs for subjects built 1801 - 1850
Thanks Jack. Some of the photos are taken with my iPad since I almost always have that with me. However, I try to take most of the photos with my iPhone 6S Plus. The photos taken in the shop are taken with florescent lighting. The last photos in the log tonight (which were slightly more golden in color) were taken with the iPhone and incandescent light. I admit I am an Apple fanboy, but the camera in the new phone is really nice. When we took our last vacation all of our photos were taken with the phones. The cool thing with that is then they automatically synched with all our other devices through the cloud. So when I take a photo in the shop, I see it automatically on my laptop where I keep my log. -
Brig Eagle by robnbill - 1:48
robnbill replied to robnbill's topic in - Build logs for subjects built 1801 - 1850
I hope everyone had a nice holiday season. The Eagle build has not been idle so I thought I would offer an update. My goal over the last few weeks has been to build the deck furniture necessary to allow for my decking. Items such as the Bitts, pumps, and capstan. I have also been looking at the rigging and masting in preparation for entering that phase. For the masting, and in keeping with the general woods used on this model I plan on using maple for the masts, and walnut for the spars. I started at the bow with the bowsprit bitts. To facilitate this, I also roughed in the bowsprit so it could be fit to the bitts. Next I built the fore mast bitts following the same pattern as the bowsprit bitts. For the pumps I used Cherry for the body with walnut and brass for the fittings. India Ink was used to stain the interior black. Lastly I tackled the capstan. I used Ed Tosti's Naiad practicum as a reference on the construction. Of course for the Naiad it was a double capstan and larger for that ship. I modified the design for a single capstan in DeltaCAD then built to that. This proved to be a fun sub-project. First I built the platform. I used a turntable I built for the XY table in the drill press to mill out the pawl groove in the maple plate. I glued small bits of maple into the groove for the stops then sanded them smooth. Later each of these also had brass bolts/pins glued into them. The Byrnes Table Saw proved invaluable in cutting the miters to the underside of the plate. I used the lathe to rough in an axle. I returned to the turntable to mill the two halves of the drumhead. The turntable also has an indexing locking pin to allow me to cut 8 or 10 slots in the plate. My design has 10 square holes. After gluing the two drumhead halves together I drilled the center out and glued it to axle. The end of the axle extended beyond the drumhead to allow it to be remounted into the lathe once the capstan blanks were glued to it. Next I cut a plate the thickness of the whelps and slotted both sides. Whelp blanks were cut and after rounding and thinning the back edge were glued to the axle blank. A final plate was milled on the turntable and glued to the bottoms of the whelps on the axle. This was all remounted in the lathe and shaped into the capstan per the drawing dimensions. The photo below shows the capstan during this process after initially rounding. It still needs to be turned to the correct dimensions. Once the capstan was the correct dimension, the axle was trimmed smooth with the drumhead. I plate was milled to glue to the top. The mounting plate was bored for the axle and an initially fitting was performed with the capstan. After an initial staining, I pinned the assembly with brass and sanded smooth. I cut and shaped the pawls out of brass sheeting and attached them with larger brass wire. This I filed flat but left proud of the pawl to mimic the bolt heads. Finally I glued the entire assembly together and did a cleanup and final staining of the unit. The following shots show the ship as it stands tonight. I assembled all the various parts currently made for her. The bowsprit, Charlie Noble, gratings, barrels, pumps, windlass, rudder & tiller are all on the ship temporarily. These will be mounted to the ship permanently once the decking is done, and the ship is mounted to it's base.- 186 replies
-
- 19
-
-
Gary, this is going to be a fantastic build! I have pushed my way up to the front to watch this one.
-
Brig Eagle by robnbill - 1:48
robnbill replied to robnbill's topic in - Build logs for subjects built 1801 - 1850
Sorry, all, I know it has been awhile since I submitted an update. With the holidays, and having a procedure done on my hand, I have not had a great deal of time I could be in the shop. However work has been continuing in dribs and drabs. I developed the drawings for the masting and have begun shaping the lower spars starting with the bowsprit assembly. I need these now since they penetrate the deck. My current plan is to start at the bow and work my way aft with all the deck furniture and planking (at least that to be done). The spars will not be glued in place since the rigging holds them. However they do give me the structure I need to build the deck and furniture around them as necessary. I promise to have some photos uploaded in a couple of days. Thanks for continuing to watch my log!