JPett
-
Posts
881 -
Joined
-
Last visited
Content Type
Profiles
Forums
Gallery
Events
Everything posted by JPett
-
 Ahoy Wayne I am watching "eagerly" to see how you deal with this. Inquiring minds want to know You build is coming along nicely BTW
 -
Ahoy Paddy "Planking Techniques for Model Ship Builders" by Donald Dressel goes into how to create frames and bulkheads from plans. I am sure you could use this information to create accurate templates for a solid hull model. The book is inexpensive and a good read for anyone interested in ship modeling.
-
Ahoy Ferit I will second Blue Ensign's remarks regarding your capstan. Your work is beautiful; putting aside personal preference to do the job right shows great character. The Wappen Von Hamberg is quite a project. She is an expensive lady. I see you have good taste too
-
Ahoy Buck Please reserve me a seat for this show, sounds like a good one
-
Ahoy Garward If you are saying that CA might work here too I would agree. I would still perfer epoxy because you can control its final harness by altering the ratio of hardener. CA is brittle and does tend to chip when drilled.
-
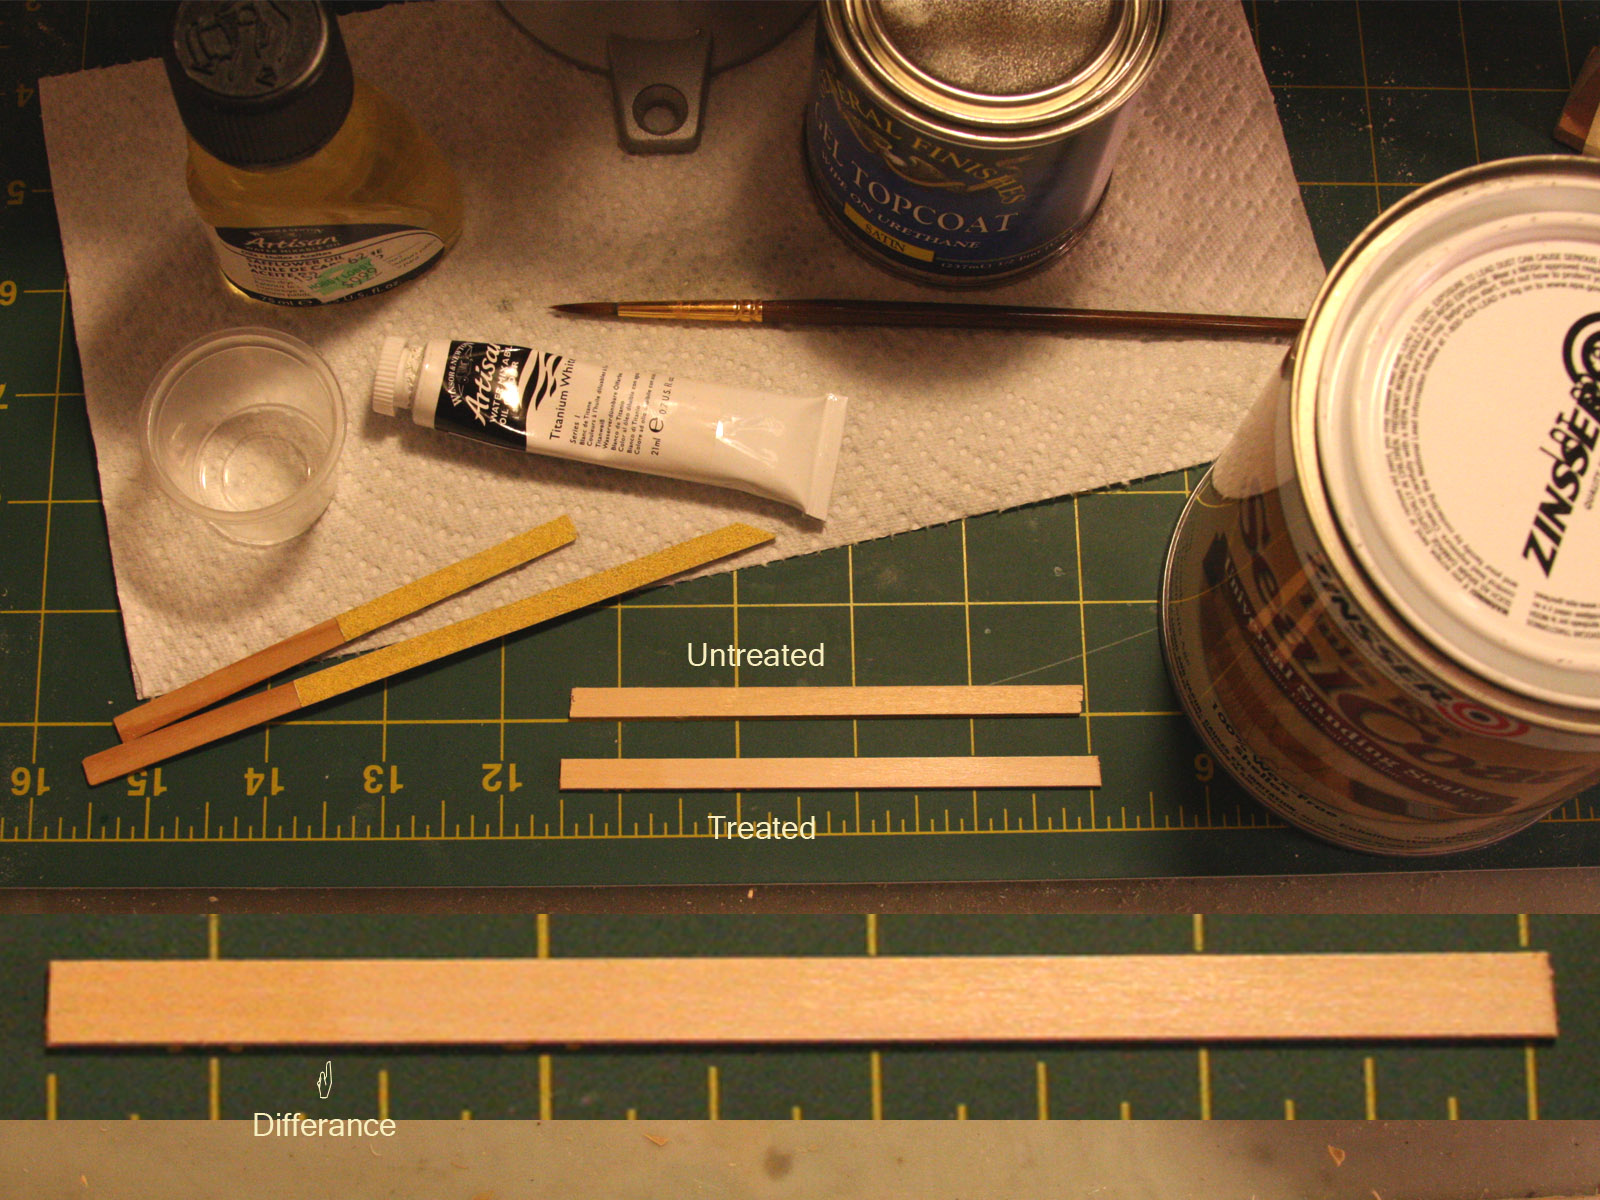
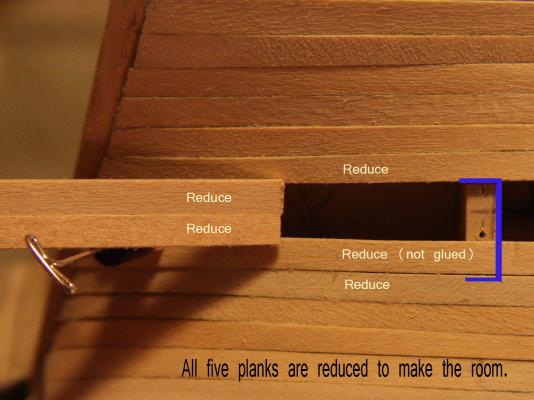
Ahoy Mates Thank you all for the compliments, I am very happy with the results of my first planking so far and hope my efforts prove to others that with limited skills and experience but a build log on MSW, anyone can do this. Russ: Tallow it will be. It is a very “very” subtle effect and I am thinking of further highlighting it by painting the keel and adding a pop of color somewhere as you suggested in your post. Augie: In order to live up to the original challenge it has to be a very light application. Unless of course I screw it up, and then it will be more like paint. Michael: I would love to take credit for the scarf joints in the keel but Model Shipways did those. I just did not and by any means on purpose (I can plead complete ignorance), not sand off enough of the laser burn to achieve this, which ended up highlighting them. Even a blind squirrel gets an acorn occasionally. Popeye: I did try to scarf in wood but it was beyond my abilities. Ripping them out and doing another “Redo” was out of the question. These things are to be expected and I do not make them my focus. I have found that the key to a great job has always been in the repairs and most importantly knowing when to let things go. Mark: Always a pleasure to have you aboard. Thank you for the compliment. A good friend once told me “if you don’t make any mistakes I don’t want you around. If you make too many, I don’t want you around either”. Patrick: Yes I started planking in January and it is now May and I still have a bit to do. Not rushing and little concern for completion is why I think it came out the way it did. It was in no way my experience or talent but simply patience and most importantly, the help I received here. Martin: I find your comment very interesting. As the Ratt was a “runner” of sorts and even though there was no standard paint scheme at the time; if I was “let’s say avoiding the authorities” looking like everyone else is not such a bad idea. Hummm I wonder ??? Blue: Your words are very much appreciated. I use words like “excellent” when I describe work of your caliber. The quality of your builds tells me that I have much to learn and there is much more fun ahead. Back to the build: I would like to document my closing technique. It will be for my benefit on future builds and I hope it is of help to others. Please feel free to comment, especially if anything I am suggesting might be to the detriment of others. I start when there are three remaining strakes to be fitted. This allows me five planks to work with. The two that are mounted and three that are not. I form the longest of the three required planks and start here. I have found that even though I have the hull marked off for the plank widths, this can be deceptive and does not give me an accurate assessment of the two planks widths required compared to those already installed (Seeing them does). Using two pieces of scrap planking the same width as my project plank, I test fit them (see pic) and all five planks are then reduced to make room for the next three. I use lengths of wood with sand paper glued to one side to very slightly reduce the width of the mounted planks on either side of the space when needed. I also reduce the width of my test pieces ( I have different ones for different bulkhead locations) along with the project piece so all five planks maintain a consistent width. What ever I think I need to take off, I take half and then recheck. This is especially true when reducing the planks already mounted. Extra care must be taken here to not sand in any curves that will create gaps between planks. Over sanding is not an option here. The key is to make very subtle changes through out all the planks. Once I feel I have the widths at each bulkhead, I glue on this plank. I make the next two planks, one at a time and then test fit them together. Again I will use a scrap piece to physically see the width of the next plank and reduce all planks equally. The fit of these planks also needs to be very tight. So tight that I cannot fully fit them both at the same time. I apply water to the outsides of the planks with a brush and glue to the bulkheads. The water softens the planks and allows me to apply some “brute force and superstition” to get them both in at the same time. It is a little unnerving but it works. You must be fully prepared and confident before proceeding with the glue. As for the Color. The pic shows how light this effect is. I am hoping to have as much control as possible over how pronounced it will be during application. I first apply the Sanding sealer and then wait fifteen minutes. Next, I mix the oil paint with the oil to retard its drying time and thin it out. Then I simply apply it with a rag. A top coat of the poly gel follows this. I will most likely apply multiple coats of the poly. I might paint the keel a solid tallow color to highlight this. Comments welcome. PS The sanding sticks mentioned in the planking notes are pictured with the stained/washed plank

-
Ahoy Yambo Thanks for the tip on drilling holes. I can see when using Basswood this process of drilling and filling could allow a very small scale hole with a smooth bore, and sharp defined edges be created. I am not sure if the hole needs to be completely filled or if just the inside edge coated and then redrilled but will be trying this thank you
-
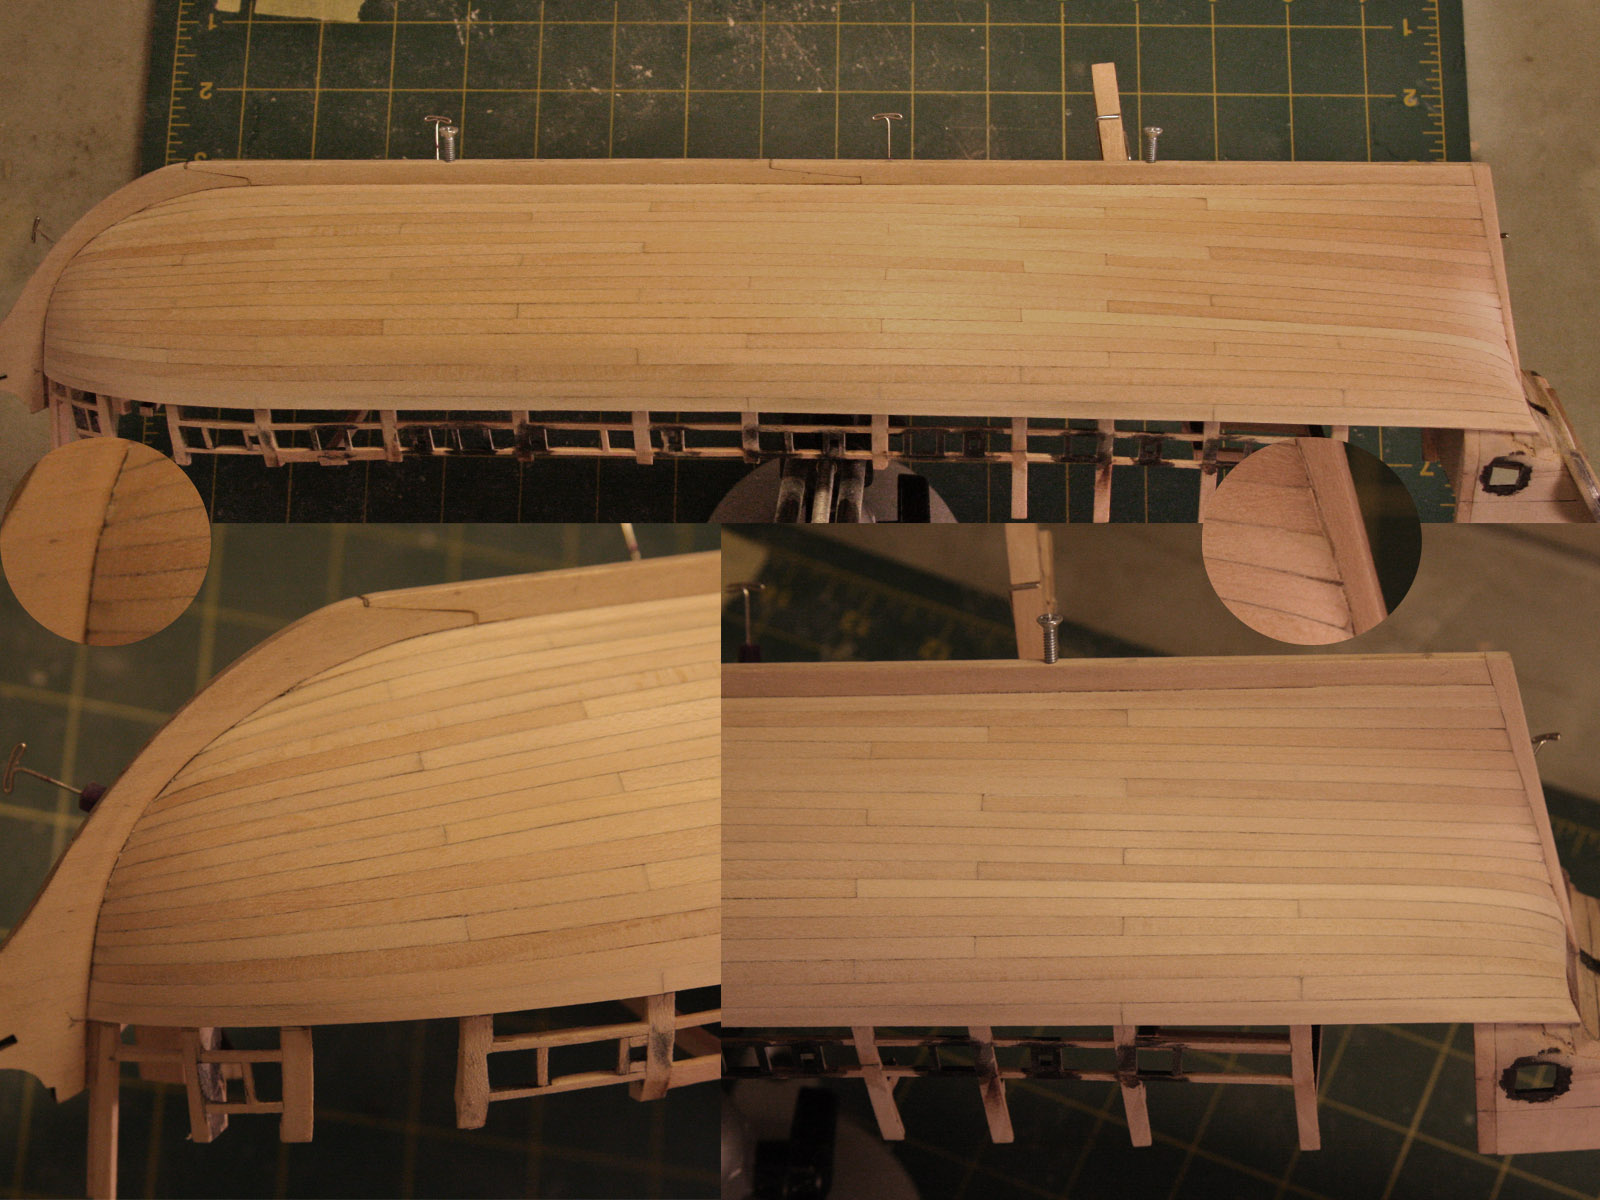
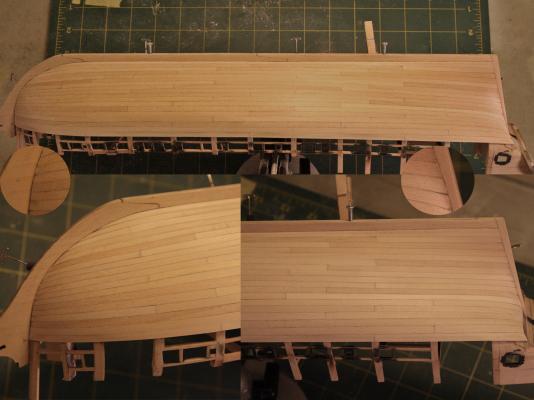
Ahoy Mates Buck: Always welcome here, I added balsa filler and H2O to that recipe Ben: thanks for all your help Back to the build Well I finally completed “one side” of my hull. The other is not far behind and as I waited for some planks to dry; I decided to sand this side. At first I told myself I would only do a ruff sanding. I did have a few issues. One in the stern another two in the bow. The bow was caused by spiling the wood across the grain. I had this problem while fitting planks too but could and did replace them. Small chunks of wood fell out where the planks met the bow while sanding, in the stern I have no idea how a corner got nicked but it is in my last post pic. I have highlighted them in the pic. I mixed some sawdust, balsa filler, water, and PVA. I was disappointed but also realistic. $#it happens and I am still learning. I thought the repairs came out well but I was shooting for zero filler. Please deduct another two points from the scale card. As for the planking, I thought my plan worked very well. The bow planks took a considerable amount of time to fit but I am proud to say I got both of them on the first try. The mid section followed; the bow and stern closed on different strakes had minimal if any effect here. I did not glue the last two planks in at the same time on the mid section either (as done on the bow and stern). As for the finish am really stuck. I am considering either doing a white wash (it will be a tallow white) or just a clear coat in shellac or poly. The shellac would introduce a slight yellow hue and darken the wood it a bit. Clear is easy but not very flattering. I am leaning heavily towards the wash, simply because of the problems I am seeing with stain. Suggestion and comments are welcome here. My staining tests have clearly demonstrated that anything except yellow in very low doses has a very high potential for disaster on basswood. I did have some nice results but consistently was just too a big and issue for me. Even with yellows Thanks for stopping by
-
Ahoy Jay As another sponsor of epoxy I would offer this and say it can be messy. Is it not more work that can lead to more mess compared to flipping the lip off a bottle of PVA. Epoxy also can be very messy should there be an "OOPs" too. There is no easy water clean up and It is one of those products that can spread like poison ivy if proper care is not put into effect. Due to its extended dry time it can be worst then CA in this respect. I love it but it does have a higher potential to create "mess" and to think otherwise might open a door to a place one does not wish to be. I treat it with the respect it deserves and use it when ever I feel it is needed. Maybe the correct statement is, it is "more work"
-
Ahoy Frankie Nice link, very informative. I liked the Sturgeon Glue but not the price I found this in regards to the book binding glue http://www.utrechtart.com/Lineco-White-Neutral-pH-Adhesive-Glue-for-Book-Binding--Collages-MP41492-i1015548.utrecht?utm_source=google&utm_medium=cse&utm_term=41493&gclid=CJzTqq2A9bYCFYHe4AodmwoAHA Is this what you are using. PS: I have found memories of Jersey City. I worked for Langer's son (Langer trucking) back in the day
-
Ahoy Brian I thought it a good choice. It covers everything. PS: The bum looks great too.
-
Ahoy Jerry WOW Are you sleeping The instructions say 2500 to 3000 hours to complete this build Somehow i do not think this will apply to you She looks great
-
Ahoy Augie Nice pics You have really done a first rate job.
-
I would keep the hull in reserve
-
Ahoy Mates I will second Augie’s comments. I use very little but in my opinion, nothing beats Epoxy for a solid bond between dissimilar materials. Yes, it is messy, requires additional prep but once dry, its strength cannot be beat. I would add that it is best to ruff up anything to be bonded and clean it with alcohol, just not 71% isopropyl alcohol. It contains oil, which 91 or 99 do not. Mixing it on wax paper also might actually improve its sand-ability, which is much better then CA even if you do not. Use toothpicks to apply very small amounts precisely. I have added wood dust, plastics, fiberglass and many other things to change the properties of epoxy in my lifetime. Pigments can be also added to color joints that will be seen creating interesting effects. Right now my glue use is 90% PVA, 5% CA, 5% all other products including epoxy.
-
Ahoy Ferit Thank You Most appreciated
-
Ahoy Jerry I could be wrong but I do not see how starting over will resolve this. Can you post just one Did your try posting a photo already excepted in a past post. Perhaps something has changed on your camera setting and this new image is not excepted You can delete this post if the test is sucessful I saw the same error when my photo was too large. I now post 1600 by 1200 images (JPEG). I right clicked my last image and selected properties. The "On disk size" is 112 KB (114,688 bytes). I edit mine in Photoshop and select a high setting (not the highest) Hope this helps
-
Can the Acetone be used to remove it from the side being finished
-
Ahoy RiverRat Amazing
-
Ahoy Garward How do you handle mistakes. This is one of my larger concerns It also seems that you treat the wood first then glue it. Is this correct. Issues with staining CA bonded wood was another problem I had. Perhaps I was doing it backwards
-
Ahoy Muggebigge No Problem Lots of pictures will do just fine. Your english is also much better then my Swedish
-
Ahoy Muggebigge I will get my chair for this one. Thanks for posting. Great start. I find a little irony in that (less the layup) it can take as much time to build this model as it took to build the real one, sometimes longer.
-
Ahoy MSW I have reposted my original reply and addressed it to the community to whom much of its content was also directed. My hope is to restart the conversation in this thread that I enjoyed up to its abrupt and might I add “rude” interruption. Ahoy MSW I do not use CA glues very much on my ship models but use the accelerator anytime I use thick CA and highly recommend it. In my opinion, it is the only reason to use the thick CA. Set your part, one positioned introduce the accelerator and your parts are bonded. If I am looking for maximum strength, I use epoxy. No reason to rush, PVA glues. I even use it with the thin CA (just not all the time) if I am not getting the bond I want such as when tacking something being glued with PVA where I cannot maintain pressure. The problem is most people do not know how to use it. Only apply the accelerator directly to the CA in extreme circumstances, the reaction is too strong. Apply the accelerator to a Q-tip and then bring it near the glue joint preferably underneath it. Do not make contact the fumes will cure the glue. If you can not get under the joint waft some air directing the fumes towards the joint (Don’t blow) That is all that is needed.