JPett
-
Posts
881 -
Joined
-
Last visited
Content Type
Profiles
Forums
Gallery
Events
Everything posted by JPett
-
 Ahoy Tex I use pins that I add small sections of dowels to (see my Ratt log) I paint them with a sharpie, the color depending on the length of pin sticking out. I also coat them with thin CA to prevent the PVA glue from sticking to them. I will put small scraps of planking between my work and the pins. These come free with your kit. Larger dowels are drilled off center creating a concentric wheel to turn and apply pressure. I find sideways pressure is better then downward to secure planks. It reduces seams. I also have two sizes of small cloth pins that I customize Cheap and effective Bought them all at Hobby Lobby
 -
Ahoy David Very interesting post by Robert. I am curious, the sanding in the stern, you could see at what point on the hull the line curved that the two sides were not the same. Is this correct?
-
Ahoy Sarah, A little late to the party "as usual" Beautiful build and “Congratz” on this milestone. It is quite an achievement to finish one of these kits. Many will attempt, but only a few will succeed. It speaks highly of your character and my hat goes off to you. Best Wishes on your next adventure
-
Coppering wear
JPett replied to drtrap's topic in Building, Framing, Planking and plating a ships hull and deck
Ahoy Stergios Beautiful build, I think it looks great I am a fan of the "clean" copper look and would question that after plating, would the ship have not looked this way. I might tone it down just a bit with some compound but that is just my personal taste. I am unaware of any painting or treatment to the copper plating when first applied, was there?. As for the weathered look I like that too but have seen the lower half of a build overly weathered and the top half looking like it just rolled off the dry-dock. Not too fond of that -
Ahoy Michael I am very much enjoying your build. It is a fine rendition of this beautiful ship I find the ornamentation and color scheme of the Wasa very interesting. It is bold and colorful; she would have been an unmistakable site on the horizon.
-
Ahoy Tom Those instructions would work for Britannia and I am sure, most metals. I always recommend testing first though, not using the model as the guinea pig. I have heard of this issue with white metal and also read that it was the reason some manufacturer's switched to the Britannia (whether that is true or just them promoting Britannia I do not know) Although I did not mention this in the original post, thinning your primer and doing multible coats will make for a nicer finish. I generally will sand off most of the first coat and then re-prime, using the first coat as a filler.
-
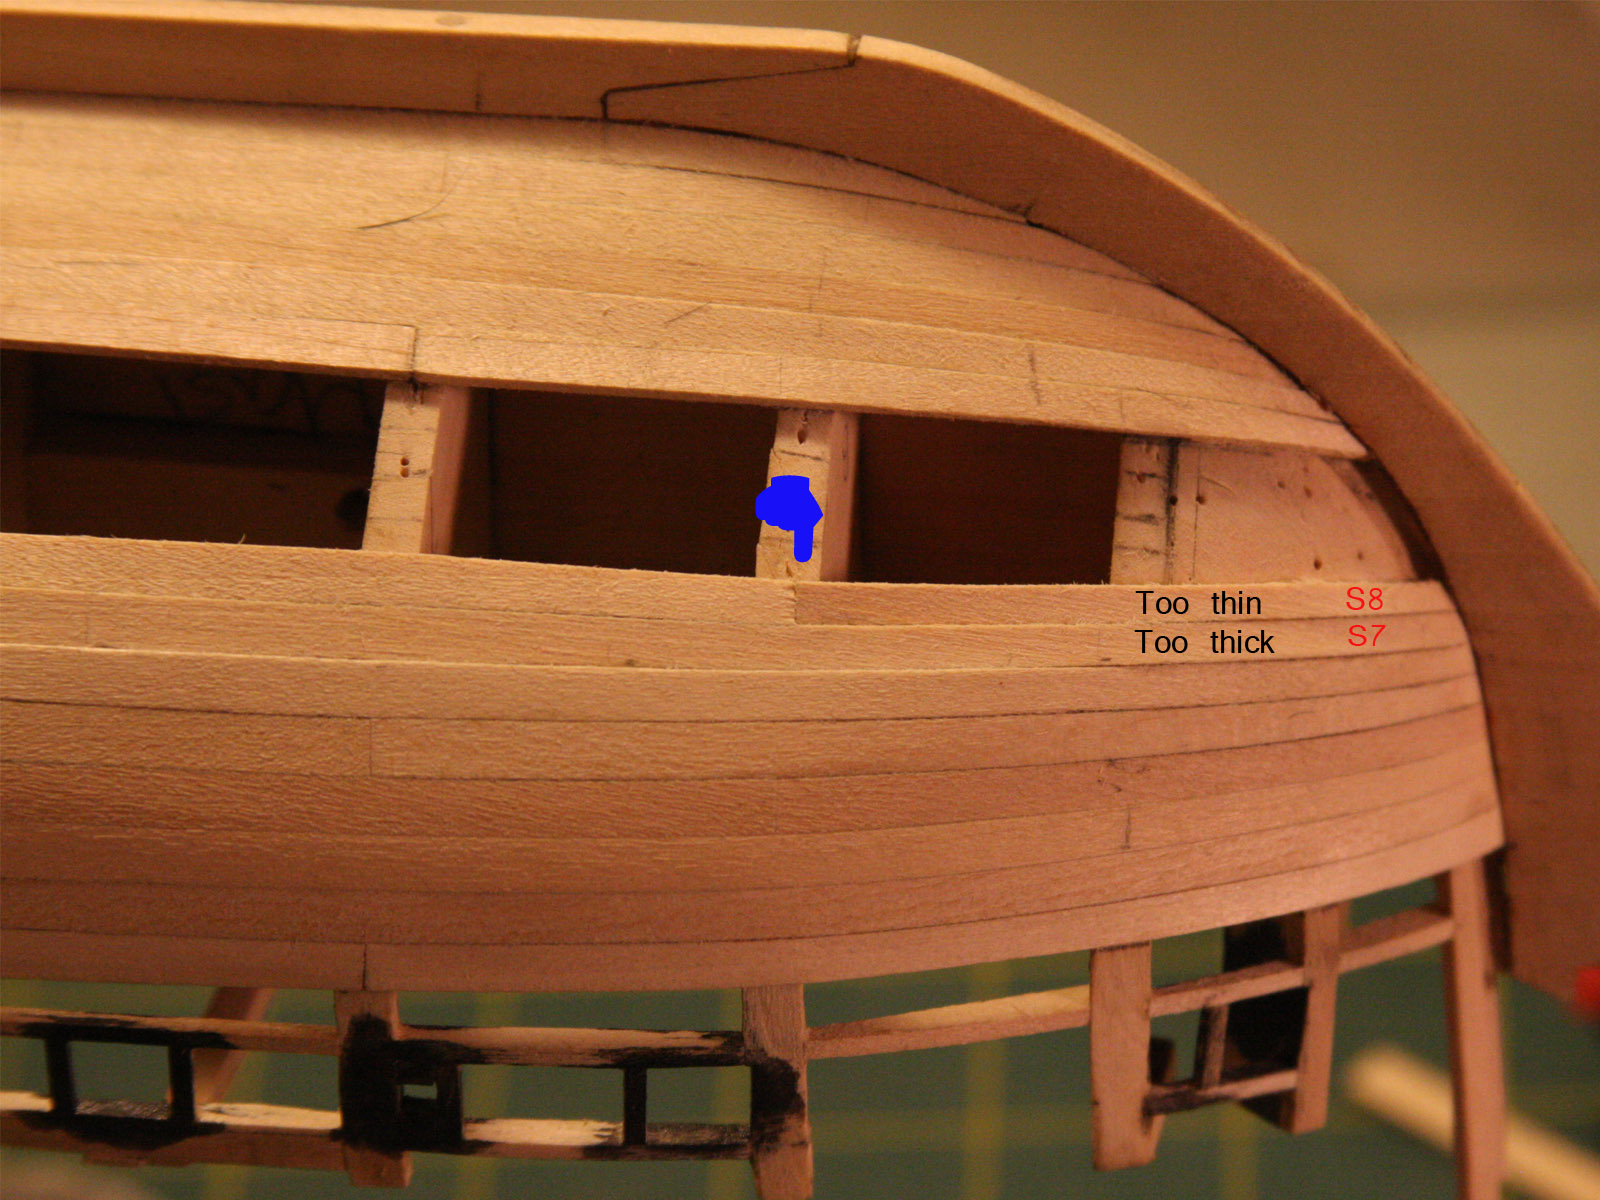
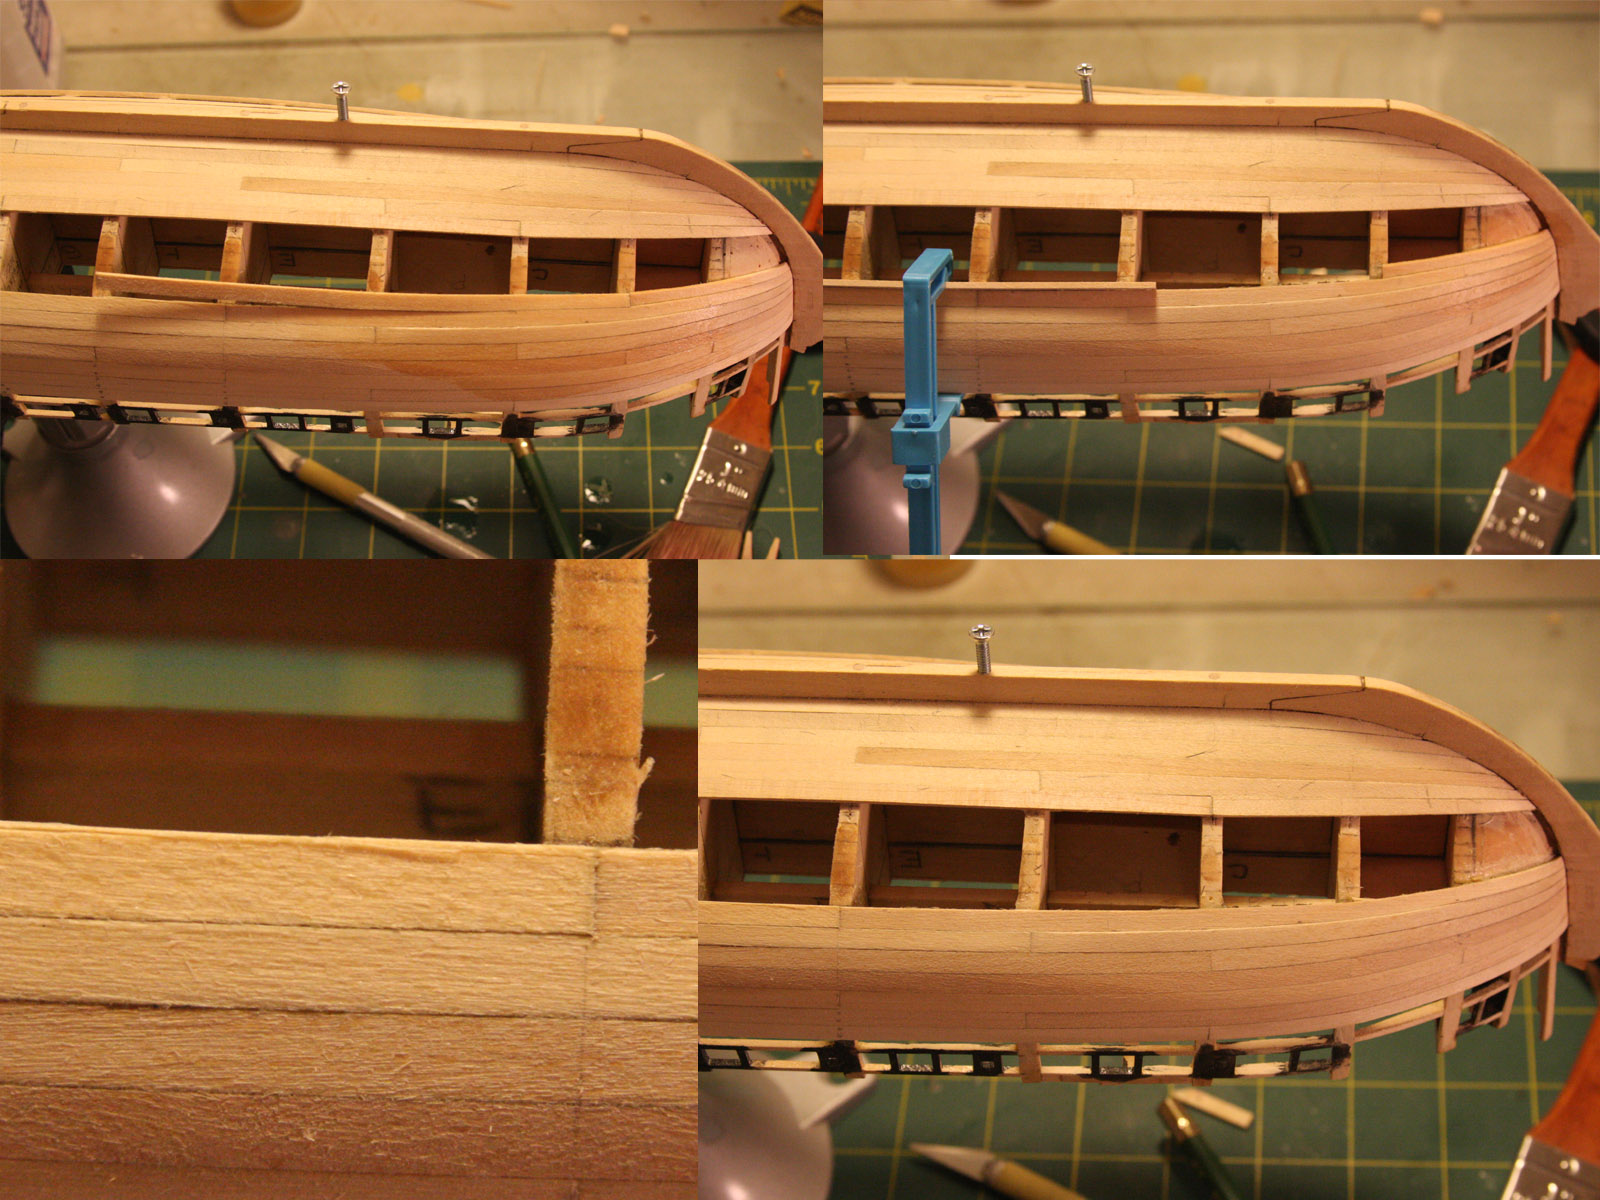
Ahoy Mates Eric: Don’t count your chickens and there is always, filler, paint or another layer of planks. In the end, it is only a hobby. Augie: We both know what happens on this build when I let things go. Here it would have included a paint color and we know that is not the goal. Martin: I like the new pic size too. The new image size is 1600 by 1200. I might go slightly smaller as this size is kind of “overwhelming” Bob: I think my problem is I never fitted a plank. I have a concern that when I get there I will find that I could have done something to have made this easier. Worst, that I did something to make it harder. I have already made another change to this plan by completing two more strakes reducing the number of remaining strakes. I will now attempt to close up the stern with only three strakes remaining. Russ’s comment tipped me off. I have learned there is much wisdom in those words. I should also add that it was reading your first log in MSW 1.0 that inspired me to make my log as helpful to others as possible. Thank you. Further notes: What I have learned here is; “when you plank, errors grow”. Just as with many other aspects of shipbuilding, what you do now, effects what you do next. I would have spent an hour or two dealing with this later, either by fitting planks made harder by the line this would have introduced or trying to even it out over the next few strakes. I chose to just spend the time now and fix it. It is a fine line “yes” and there might be a complimentary snack or two along the road but: It seems there are no free lunches for the shipbuilder. Just my two cents.
-
Ahoy Mates Thanks for stopping by David: I use the Cannon 40D and love it. Had an original D30 and also own a 10D Eric: NP, It was posted on my original site and a big help to me Russ: I’m going for it. Blue: Thanks, great post Tex: Welcome aboard Vern: Thank you Bill: Does this mean I’ll be carving a beautiful figurehead too Popeye: Welcome aboard Back to the build: Well I do not have any excuses. I put the plank on and right away knew it was wrong. So what do you do? Put the next one on in hopes that it would make it go away of course “lol” That is my story and I am sticking with it Needless to say, they had to go. I used a 50/50 mix of 99% isopropyl alcohol and hot water. After soaking it for about two minutes, I brought in the big guns (RC heat gun). Using a paintbrush, I continued painting on my mixture while heating the surface. When I could smell the glue, I started pulling of the planks. Well kind of ripping and I did damage one when using my Xacto knife seems like a good idea. The knife was a bad idea and was in the end, not needed. Because the first plank in the strake was almost completely glued to the filler, there was some reservation but after some heat, it came right off. Back to Spiling Pics show before, during, the repair (it will look better with a plank on top of it) and after The stern is almost closed. pics soon
-
Ahoy Garward Very nice. I would not have thought to use the blacken it on these parts
-
PS You need to do a clear coat after you apply them
-
Ahoy Tex Dry Transfer is one way. They are like stickers but you rub them on. Hobby stores carry them http://woodlandscenics.woodlandscenics.com/show/Item/MG745/page/1
-
Ahoy Tex There are some nice pics of the completed CM here http://modelshipworld.com/index.php?/topic/1523-a-visit-to-model-expo-in-hollywood-florida/?p=31714
-
Ahoy Ira Bill Short sells a carving practicum. If you read his build log you will see he started as a meer mortal. http://modelshipworld.com/index.php?/topic/1356-sovereign-of-the-seas-by-bill-short-sergal-1637-scale-178-port-side-as-built-starboard-side-as-presented-to-king-charles-i-for-approval/?p=27728 Link to the practicum http://carvingbook.weebly.com/
-
Ahoy Eric Thanks for the tip on the windows As for your transom. Realize the bottom was cut by the same person who did the cannon wheels. It does look good. Just a warning: I broke stuff on my build while planking. I use pins and pushing them in had its moments. Being a newbie I am sure only added to the destruction. Broke something today as a matter of fact. it used to bother me, now I just add it to the list and move on. I save the parts in a small box
-
Ahoy Augie The yards look great Thanks for taking the time to include the "how to" part I am hoping that there will be some rigging in my future
- 1,668 replies
-
- 1
-

-
- syren
- model shipways
- (and 1 more)
-
Advanced painting tips Once they are dry get a darker color, If they are white I would use a light brown Acrylic paint Dip the brush in the paint then wipe off as much of the paint as possible on a paper towel Then gently stroke the brush over corners. The tiny amount of paint still on the brush will rub off highlighting the corner. This will get rid of the stark, bland look. Super advanced tips After priming paint all the surfaces facing the boat a darker color then your primer. Use acrylic. This will cause a subtle change in the color of the final paint color creating a shadow effect. It needs to be barely noticeable but to your brain it will make it look more realistic.
-
Ahoy Mick This is what I would do. Get some enamel thinner and a small brush and strip them back down to the metal. Use a file and or sandpaper to clean them up. Use thick CA (super glue) to fill any voids. Clean them with soap (must not have any hand softener, check ingredients for lanolin, Ajax dishwashing soap is my choice) Let dry. Cut the end off a round toothpick and using thick CA tack the flat side (cut) to the under side of the parts. You will want to snap the toothpick off when you are done so don't go crazy with the glue. This will allow you to paint them without touching them. Just put it somewhere that you will not see. Get something to stick the toothpicks into. A piece of heavy cardboard or foam works well. Prime them. The guys are right, Tamiya is very good, better is Mr. Hobby, but really many other products will work. Just make sure it is a primer for metal. Testors is another excellent choice and so is Krylon if you want to spray. If you do spray, shake the can for no less then 10 minutes placing it in a container of warm water before using. (Not hot) Check them and repair anything that shows up now (last chance), wet sand and re-prime any repairs. Let dry for 24 hours. If you used enamel thinner to strip them, I would use enamel paint. It is more durable and does not have to have a clear coat. Acrylics should be protected with a clear coat. Thin the paint. I would take the paint out of the jar. Drying inside the jar contaminates the paint leading to lumps and other undesirable effects. Use a straw, your stirring stick (did I mention to stir the paint really good. Do not shake, stir) and pull out a few drops. Use a tile, Aluminum foil, glass but not a paper product to put your paint on. Only bring out enough paint for a few minutes of painting. Add thinner. The paint should be slightly translucent but not so thin it runs all over. When you paint, you should see the brush strokes dissolve into the paint right after your stroke. Practice if you need it but not on your work. Start with the hard to reach areas, do the big area staring you in the face last. Try not to go over your fresh paint either, work away from the fresh paint. Plan the job. If you cannot get it now, get it on the next coat first. If you beefcake something let it go and move on. Once the paint dries wet sand it out. (wait 24 hours to fix mistakes) Plan to do no less the two coats, more is better. The paint needs to dry between coats. If the paint covers in one coat, it is too thick and you will lose details. When you do a second coat over your first, the medium in the paint will reactivate the first coat. Do not work the paint (back and forth strokes). One stroke and move on, remember it is faster to come back with another coat then to do a repair. When done put them in a box or somewhere where they are covered. I use a second shelf. This is the hardest part. “Leave them alone”. Once dry (48 hours) snap off toothpicks. The furniture is a perfect choice to start with. Do not rush. You will be much happier later with the results if it takes a few days then rushing to get it done. Good luck and have fun.
-
Ahoy Bill Your journey is an inspiration. You light the way Thank you for taking the time to repost your log.
-
X-Y Attachment for Dremel
JPett replied to Martin W's topic in Modeling tools and Workshop Equipment
Ahoy Bob Thanks The board is a great idea -
X-Y Attachment for Dremel
JPett replied to Martin W's topic in Modeling tools and Workshop Equipment
Ahoy Hopeful I see on Blue Ensign's log he uses what looks like the Proxxon vise Pic is from Blues log http://modelshipworld.com/index.php?/topic/332-hms-pegasus-by-blue-ensign-victory-models-enhancing-the-kit-a-build-log-of-sorts/?p=39732
-
X-Y Attachment for Dremel
JPett replied to Martin W's topic in Modeling tools and Workshop Equipment
Ahoy Hopeful I was kind of waiting for a response to this post. The Proxxon XY table does come with clamps but I can see that addtional items will be needed to secure the material being worked. I am on the fence as to whether I will get the Dividing Attachment with the table or later on. -
X-Y Attachment for Dremel
JPett replied to Martin W's topic in Modeling tools and Workshop Equipment
Ahoy Bob http://www.proxxontools.com/store/pc/viewPrd.asp?idproduct=66 Maybe I should have said Dividing Attachment Sorry -
X-Y Attachment for Dremel
JPett replied to Martin W's topic in Modeling tools and Workshop Equipment
Ahoy Martin I will be getting the Proxxon XY base Reasons: Feedback here seems to indicate that it will do the job. It is less then 2 lbs, which will make this set up an easy to use/put away hobby bench tool. An affordable Dividing head is available. I will post a review after I get my new toys (estimated delivery is 3 weeks from Vanda-lay) -
X-Y Attachment for Dremel
JPett replied to Martin W's topic in Modeling tools and Workshop Equipment
Ahoy Martin The step blocks are much cheap cheaper here (14.95) http://littlemachineshop.com/products/product_view.php?ProductID=1813&category= I also ordered the Drill Press Plus, not the Mill The Mill would need to be disassembled to be used as a drill press. I also liked having the table as a separate part, as this might open other uses The Drill Press Plus does allow you to lock and adjust the vertical position with a separate set and stop screw. I am hoping this will allow me to mill at set hieghts. Manually adjusting it between passes It is funny that your thread has come full circle for me, which "X-Y Attachment for Dremel" do I want to buy. The Proxxon: Small size works, not thrilled about the 1 13/16" Y movement or the aluminum construction. But it does come with clamps and a reasonably priced Dividing Attachment is available http://www.proxxontools.com/store/pc/viewPrd.asp?idproduct=66. Hopefully Joe will respond and add to this. The Little Machine Shop 2008: 2.76" Y travel, Solid construction, which should create a stable platform from which to mill on. But is it some cheap Chinese POS. Will it fit on the base centered under the Dremel bit. ( I could live with slightly off center) Will the Proxxon Dividing Attachment mount to it. The difference in cost is minimal and not an issue. If I could not use the Proxxon Dividing Attachment that would be an issue. I have not been able to find one of those for under $250.00. -
X-Y Attachment for Dremel
JPett replied to Martin W's topic in Modeling tools and Workshop Equipment
Ahoy Mates Could I ask how some of you who already own mills are securing your work As was pointed out earlier in this thread “accessories” can be expensive Thank you