JPett
-
Posts
881 -
Joined
-
Last visited
Content Type
Profiles
Forums
Gallery
Events
Everything posted by JPett
-
 Ahoy Mark REALLY "horrible detail" . I see lots of detail, none of it however fits that description
 -
Ahoy challenger86 She sure is a fine kit Looks great so far. I had a small issue with B14. There are some posts in my log if your interested (link in my signature) Good luck with your build. I have it tagged and look forward to your progress
-
Ahoy Mates Although I agree that smaller planks are easier there is something to be said about getting off to a good start. I like to form a full length plank for the first one. Then I cut it into sections and install it. I find doing this helps to ensures a good line for the rest of the planks. On the planks that follow I find trying to fit a full length plank and getting a good seam the length of the ship much harder then doing it with smaller more manageable planks. I don't get too hung up on the scale length thing though, just the pattern, run of the planks and the seams.
-
Ahoy Kenny No the fan just gives you the width of your planks for a distance http://modelshipworldforum.com/ship-model-framing-and-planking-articles.php The fan is near the bottom but the page is a plethora of information This is what I know about battens First I have not completely figured them out. Your supposed to use them to check the bulkheads and confirmed they are sanded correctly. You will find a very small amount of sanding on Bulkhead "C", "D", or "E" will change where a plank will end up in the bow. Considering the crowding you can have here or the spiling that you might have to do this can adversely effect your fun. If you make these corrections correctly you will see that you can then use these battens to create three or more evenly spaced belts for you to plank. Its the "if" part that I still struggle with. All this also works the same in the stern. This is where i am at After a light sanding. I take the widest bulkhead and use the fan to mark out all the planks. Then i do the same for the bow and stern. Next divide them into equal belts. Now I pin a batten on. Then see where it wants to go as it lies up against each bulkhead. I now know where it should go and if it doesn't I see if i can help it along with a slight change to one or more bulkhead. Marking the bulkheads is very important when you do this. Remember; you really only want to sand one side, For the bulkheads in the front half of the ship; it is the side facing the bow. The back side or side facing the stern of these bulkheads should be highlighted (I run a pencil along the edge) and not touched. You don't want to change the shape of the hull while making these corrections ****. You only want to change the way the bulkhead is tapered or "faired" and how the plank contacts it and in doing so, where it contacts the next one. How the batten or your plank lies on the bulkhead can be changed and in doing so, so will its path. As i said a small change on "E" can make a big difference on where your batten or plank will end up on the bow. ****Really you will find you want to change the shape of the hull as little as possible and this is the conundrum. These kits are not perfect so when is it time to stop and spile. Sanding less is always better. Use caution if you go down this dark and very lonely road. This is the biggest post i have ever seen on this subject. Sorry if i hijacked your log a bit with it . PS: On the stern post you will find that planks needed are slightly wider then your wood. This is "OK" because these planks will sweep up and be cut at an angle greater or less then 90 degrees . They sweep less on the bottom so this belt should be the slightly smaller then the ones above it.
-
Ahoy Mark Nice Sadly mine does not have the "Sweet" dockyard name but does have two sides. One with groves and the other is a flat leather surface. I mostly use the flat side "mostly" "lol"
-
Ahoy Kenny Realize that you will be trimming the sides of the planks to prevent a gap as you cover this convex shape This means the side of the plank contacting the hull will not be the same width on the inside as it is on the outside. The planks are also 3/16 which is really 4.7mm and times 17 comes to 79.5 mm Another way to look at it is that by adding planks you will be increasing the Outside Diameter by the thickness of the planking. When you add the thickness of the wood to your 1/4 circle ( if you look at it this way) your 75mm OD now becomes a 78mm OD when measured with the planks installed: So you are actually closer then you think I only know this because I was here too .
-
Ahoy Kenny The planks will only be full width on the fattest bulkheads. Did you use the paper and fan method or take those plank measurements another way. PS: Those battens should work on the stern too. If they don't get the sand paper out before you start planking Sweet dreams "lol"
-
Ahoy Kenny I had 18 planks per side which is what the plan showed Are you including your battens. 15 +3 was 18 the last time i checked PS: The garboard should only come forward until it starts to curve up. Use the plank above it to get your measurement. I put the garboard in (no glue) and then temporarily lay the next plank above it. It will cross over the garboard in the bow. Pencil that and cut the garboard there. That should get you close She looks great
-
Ahoy Mates I have been using a Flexcut Slipstrop for a few years now with excellent results. It cost under 16 bucks. I highly recommend them for the hobbyist. I did a post on it here a while back http://modelshipworld.com/index.php/topic/346-flexcut-slipstrop-review/?p=3290 It has more then paid for itself. I just recently tossed the blade I was using when I posted the review 20 months ago. I have found that new Xacto blades are only half as sharp as you can actually make them. All of my tools are now insanely sharp. I can cut curly Q's that are almost transparent with a 10 dollar Home Depot brand mini plane. It will not hold that edge but now holds one plenty sharp enough for my needs. There is a small learning curve. Xacto blades are easy. My carving knifes took me some time. The plane took me a while and i am still learning how to sharpen some of my other tools. There is a flat leather surface not shown in the picture that I use most of the time. I also found adding baby oil to the mix and creating a slurry made it easier for me to get super fine edges. The included compound was a little dry. Here is a link if your interested http://www.woodcraft.com/Product/143657/Flexcut-Slipstrop-Sharpening-Kit.aspx if your still putting the pink stuff in front of the pointy thing; don't get one of these. You'll only be able to count to 9
-
Ahoy Scott Nice work Regarding your technique, At this scale I feel you have to be creative. The end result looks much better when you minimize and just show the important stuff. The fun part being "what's important" is totally subjective and up to you. Well almost "lol" Your kit looks great
- 264 replies
-
- 1
-

-
- rattlesnake
- model shipways
- (and 1 more)
-
Gluing painted parts
JPett replied to lazyguy's topic in Painting, finishing and weathering products and techniques
Ahoy Lazyguy I came from plastics and like you found that coloring these wooden ships is not a simple task. This is what I have found so far Wood bleeds so you need to plan out how you will color your ship I stain or dye wood then put on a light coat of wipe on poly first. Lightly sand or scuff the poly and tape off for the paint. Then sand the tape line, apply another light coat of poly to seal it, sand again, then paint over the poly with acrylics. Because the grain and natural tones of the wood can really add to your kit I always try to preserve them. The problem is wood bleeds so you can't get an even delineation between different colors but can use paint to get that good clean line which I apply last over the poly. You can also use a piece of wood trim instead of paint to separate the different finishes. Prepare/finish it first and then glue it on. To glue small wood items to coated areas I sand the part to expose the wood and use a pin to perforate the coated surface or lightly sand it if i can. For larger parts I pin them with a treenail (do a search here for treenails) I use PVA glue for wood and for non wood items I use epoxy. I will also use poly after I glue on wood parts to create a stronger bond. Blue scouring sponges are great to prep poly or knock down the shine. Diluting paints with mineral spirits is a great way to color wood Poly will smear paint. If I am second coating and area that has different finishes, I only do one really light pass with the poly and never drag it across the two different finishes. I do the line that separates them first, following the line then each side. Stain and poly coat; brush paint small details or corners. Then use sand paper or sponges to clean them up. The paint sits on top of the poly and can be removed without damaging the wood finish to achieve nice effects or super sharp lines on corners. Always test on scrap first. My rule is to get the results I want twice before I do it on my kit "once". Hope this helps .- 1 reply
-
- 4
-
-
Ahoy Mates First and foremost "THANK YOU ALL" for your comments and support. I am overwhelmed And Happy Holidays. May these times bring to each of you the joy and happiness that makes life so special Dbot: This build has drifted towards the dark side more then once. Sam: Thx, It actually was not hard. Just slow. Even for me. Augie: And I was so looking forward to being a Rear Admiral. "lol". The deck already has a coat of wipe on poly in the pics Mark: Always a pleasure to have you aboard, thx for the comment. I see your gal has a little yellow-heart tattoo on her jeans "Sweet" Kenny: It has been a great journey so far. I wish you the same. Good luck with your Ratt too Blue: Thx for stopping by. Your log has been such an inspiration. Carl: The only master in this shipyard is the one who puts the worm on the hook, Thx for the compliment though MIcheal: I got them at my local hobby store. There in the back by the wood, in the rack next to the plastic. Yea over there. It's sold under the K&S brand. It you can't find them PM me. I will send you a link. Dragzz: Sooo very far. I think we are on our forth anniversary. Martin: I am going to go with karma. I did kind of go nuclear on a post one time. Never poke the bear, Really Kenneth: Always good to hear from you. Thx. I am hoping the Fore and Poop will look as good. It can be a bit of a trap sometimes. Ben: Thx,. That is an amazing build you have. I was happy that I could do them but I am not thrilled about how they look. I knew that they would get hidden going into it, It was a really good learning experience and that was all i was looking to get out of it, . Scott: Thx, your build deserves as many compliments. I will be using your anchor practicum on my build. The Shipyard is Closed for the upcoming holiday Enjoy everyone, Yummy
-
Ahoy Augie Happy Thanksgiving to you and yours Just to be safe I will add that the your arsenal looks great too
- 2,191 replies
-
- 1
-
-
- confederacy
- Model Shipways
- (and 1 more)
-
Ahoy Mark Nice She is really starting to take shape I know it works for the shipwright and can effect spelling but what does this do for the wood
-
Ahoy Jon I agree. The color is excellent. The whole deck came out really nice. Could you share with us the product you used and anything important you did to achieve this color. Stain and Basswood generally don't play well. Thx
-
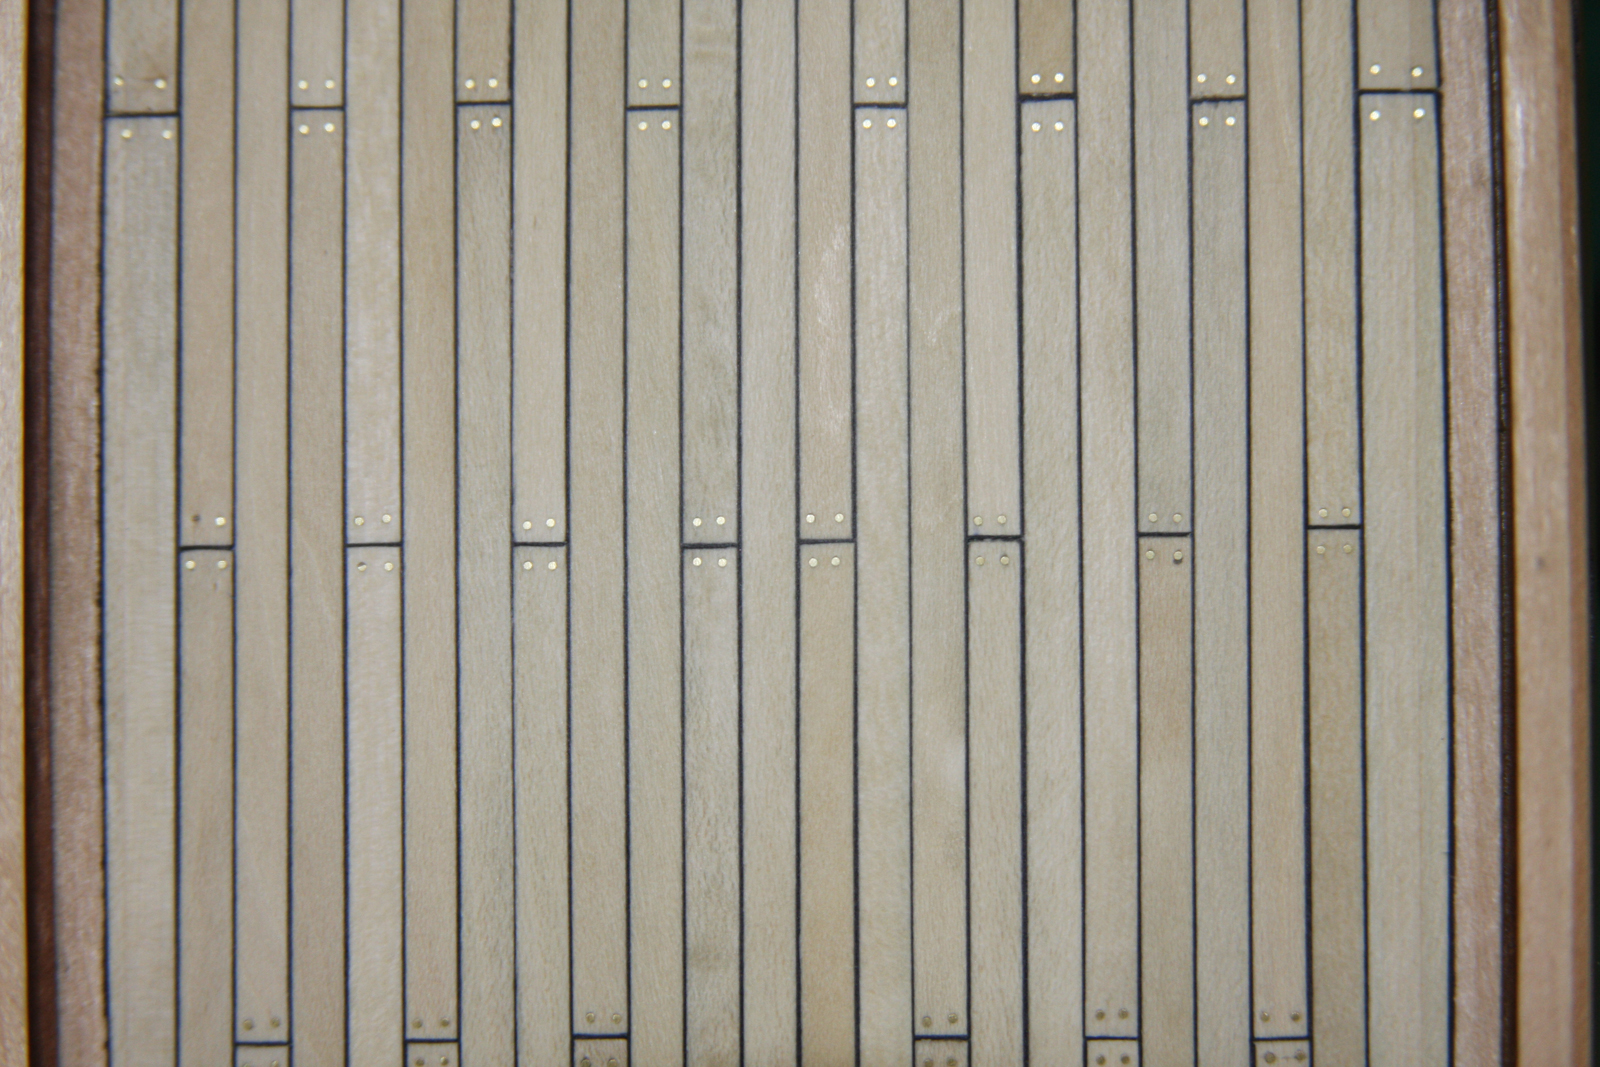
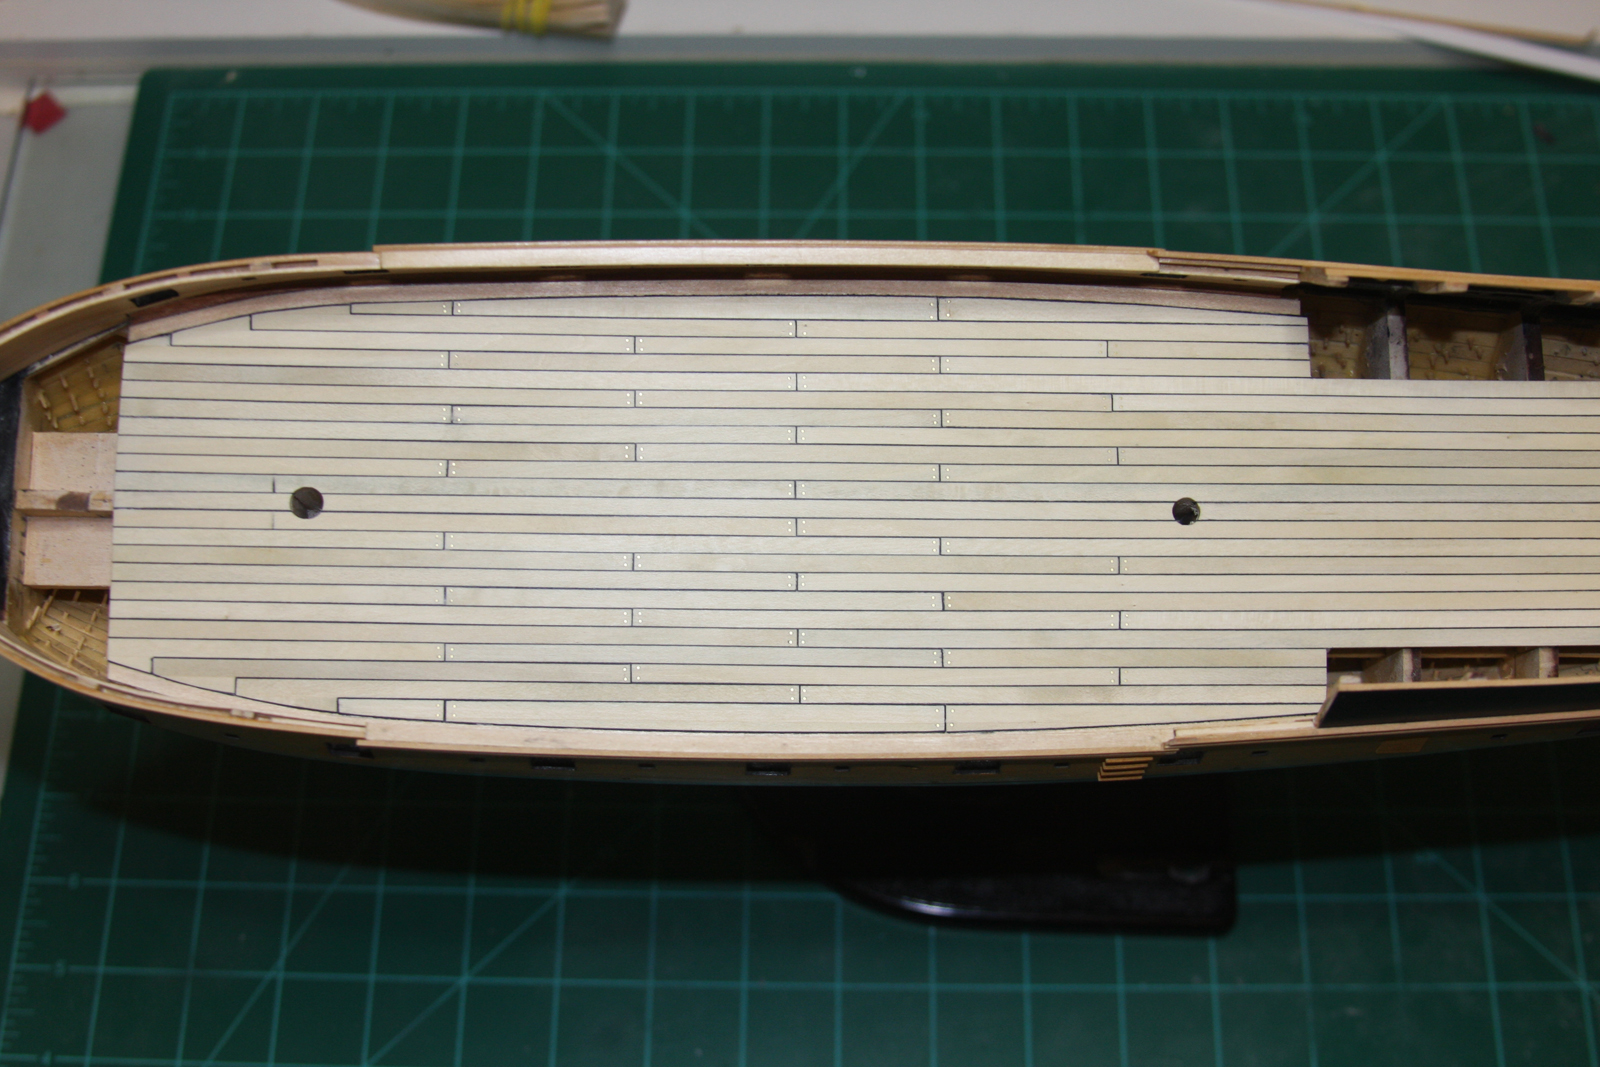
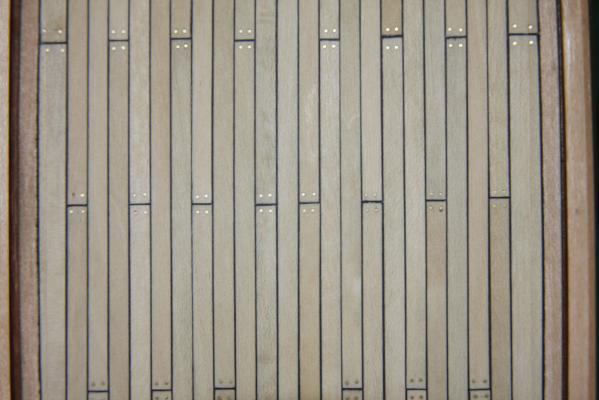
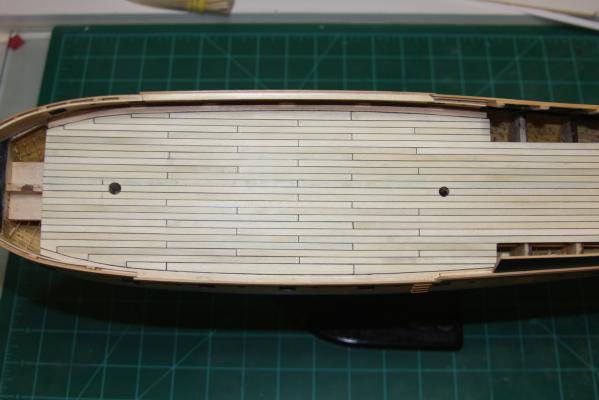
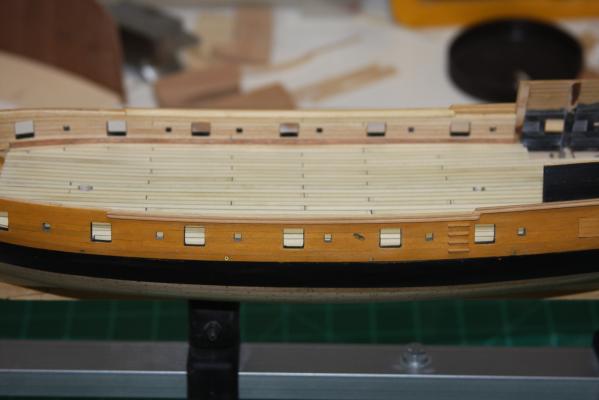
Ahoy Mates This being my 1000th post I would like to thank all of you here at MSW who make this site what it is. I would not be here without you. :) Thank you :) Mark: We both know; "As always" would be me redoing it at least three times. Augie: I was inspired by a pear tree of all things. Or what's left of one on someone's deck, thx Dragzz; She is my first; Martin: I really like your choice of words. Sam: Sadly the Beaminator was lost. RIP Popeye. I am now using concentric pins to push Evergreen strip styrene (.100 x .250) against the planks; it works even better JSGerson: Byrne's saws for everyone "lol" Scott: For a quite while there; you were not alone Back to the build; Ahhh! The joys of learning. I am hoping that if anything my kit shows that a cavalcade of errors can still look pretty good. Criticisms aside I am very happy with my results here; warts and all. I will apologize right off for the length of this post. Yea its a bit of a whopper "I know" but it is my 1K. I will make sure 2K is worst "lol" That, hopefully will be a rigging post. For anyone wishing to do their deck in this matter I will share here what I learned. First; this takes a bit more time to do then just marking the planks. Although it is more work, My personal opinion is paper used to simulate caulk on the deck looks much better, making it worth the extra effort. It's not really much harder either: It is a few more steps. Each plank needs to be checked and fitted as you would with or without the paper. The convex curve of the deck will cause uneven seams if planks retained their 90 degree cuts. Uneven seams really stand out with paper caulking making "seam management" slightly more of a concern. Planks were tested fitted twice. Once before the paper to get their shape and then again after the paper was glued on to confirm there would be no fit issues during the final installation. I used a length of styrene plastic and my concentric pins to apply side pressure to install planks. The Beaminator snapped early into the project. The styrene strip is the better way. Fitting the last plank which required paper on both sides was actually much easier then I anticipated (only a few redo's). All clamping had to be worked out and tested prior to the installation of any planks. Once a plank goes in there is only a few seconds to position it. The paper tears or deforms as soon as the glue starts to get a hold on it. I used non waterproof PVA so redo's were not difficult; but removing the paper aftermath was a bit messy. Although it made the paper more prone to tearing or delaminating, I found that moistening the paper on the plank a minute or two before installation really helpful. I am not sure but think it may have softened the glue used to put the paper on (tighter seams were much easier) and it may have prevented the glue used during the installation from bonding to the paper right away. My though is that the dry paper was like a wick. Before I came up with this I was having problems with "bunch ups". A thin layer of paper would separate and then accordion back on itself if the plank was moved seconds after being placed. I only put glue on the wood surfaces too, never the paper itself. Either way, there were less plank installation problems and more seam consistency once this simple trick was employed. I thought I did well with the line of the planks, I did rip out my first attempt for this reason: Butt joints on the other hand are still a problem for me. Hopefully once the deck is populated my errors here will not be as noticeable. Thankfully the deck is pretty busy. I think I will try marking the bulkhead centers on my next outing. I recall having this same problem during hull planking. Any suggestions would be appreciated. I still have the poop and forecastle to do. My filler planks are slightly asymmetrical near the bow too and I attribute this to my earlier hull shaping debacle. I knew this going in and why I installed the basswood edge filler. Keeping on with complaints; I am not 100% sure about my scarf joints. They were made by edge gluing planks. I found cutting off and using a section of the same plank the easiest way to maintain color/grain and hide this cheat. I did not have any wider stock. Martin: Use thin super glue next time, its waterproof and you can soak them afterwards. To me my scarf joints just seem big and out of scale compared to the rest of the deck. Thankfully they are placed where no one should see them. I might try "hooked scarp joints" on the fore deck. Not sure if my skills are up to this task. Time will tell. To keep with full disclosure; I sanded a soft spot on my deck. Its not horrible but I can see I still have not yet learned to control my obsession with sanding. I also still need to work on my wood selection. There's a knot where a treenail should be and some unattractive color in other pieces that I could have easily not used. I'm learning and the knot is now a treenail. On the bright side; I added a new type of treenail (0.020 brass rod), I got the brass rod idea after seeing NMBrook's work on his decks grates and Piperjoe's Skipjack. I developed a simple trick to better align my treenails too; this really was a very productive project. I always used a pin to make a starter hole for my drill/pin vise. But now I only do a very small "prick" first using a ruler for the spacing. Then I come back, and if necessary, angle the pin to move or fudge the hole as needed to create the final larger starter hole. I used to try to do this correction with my pinvise when I drilled the hole but finding you are off your mark with the hole already drilled isn't very productive. The brass also let me use a smaller diameter treenail then I would have been able to achieve with wood. I actually used my hobby hammer to drive some of them home. I really do love treenails. In more ways then one, for me; this post is a milestone. Thanks everyone for stopping by, your help, comments, and your likes. You guys ROCK. PS: My favorite view is of the deck seams through the ports. I will try to preserve this as I litter the deck.
-
HMS Victory by JPett - Corel - 1:98
JPett replied to JPett's topic in - Kit build logs for subjects built from 1751 - 1800
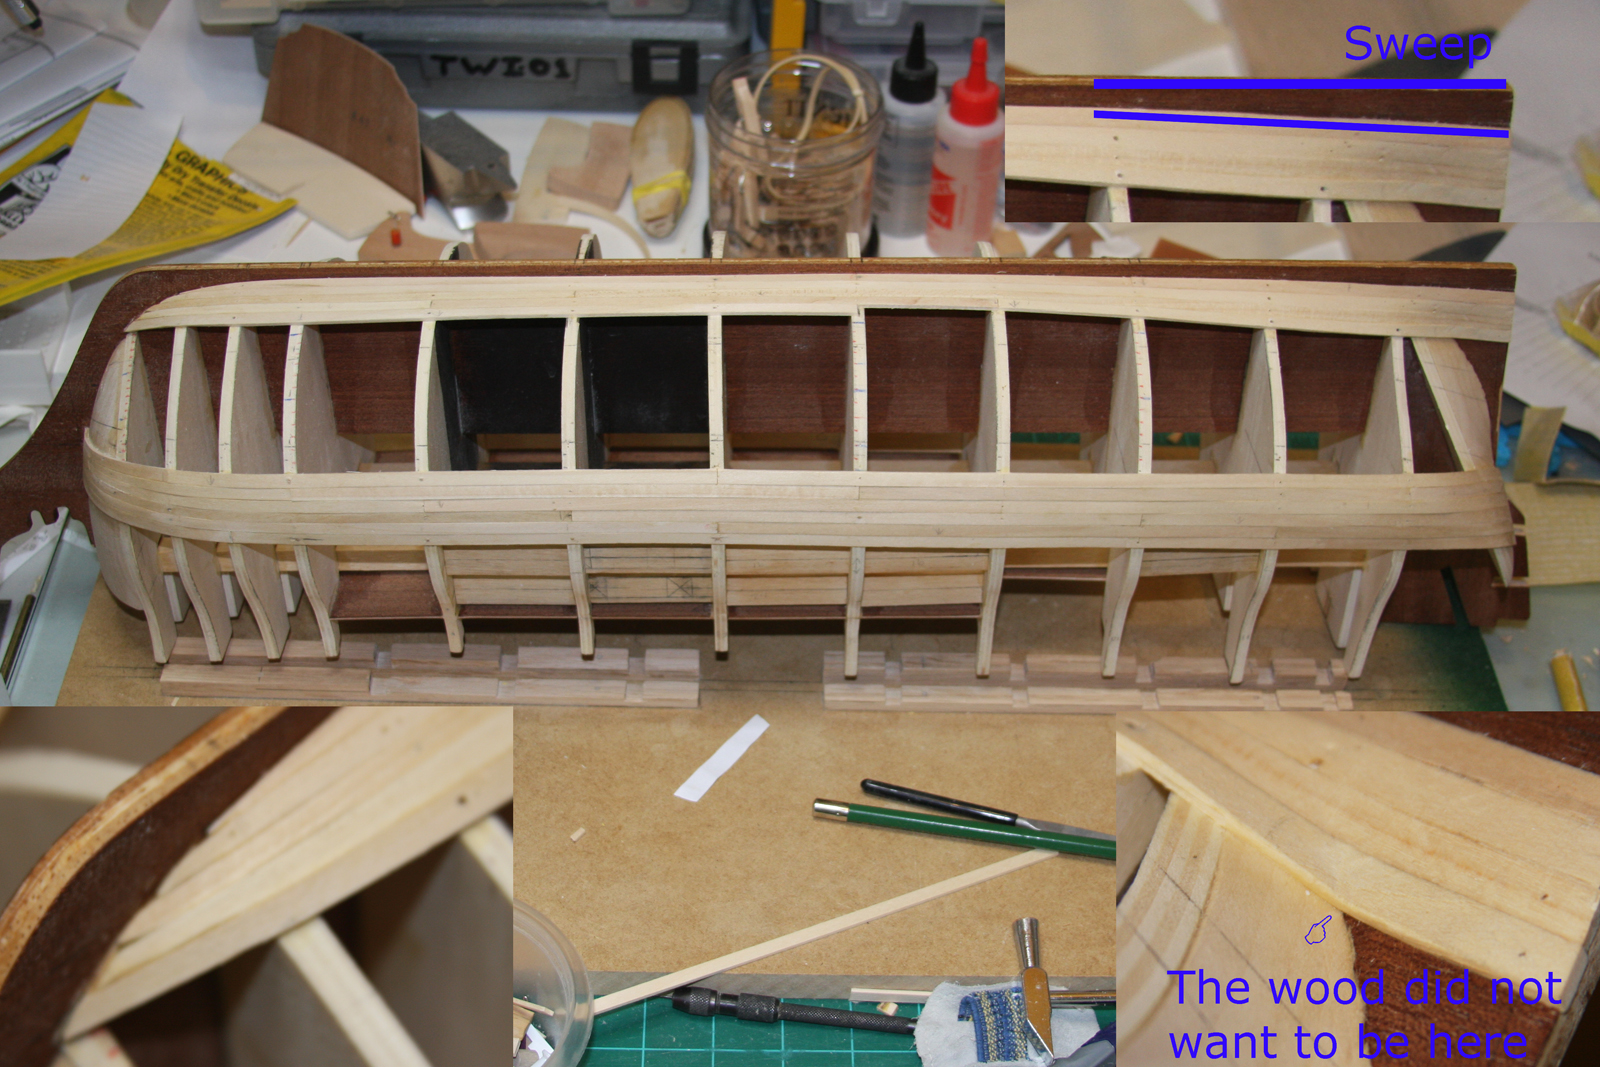
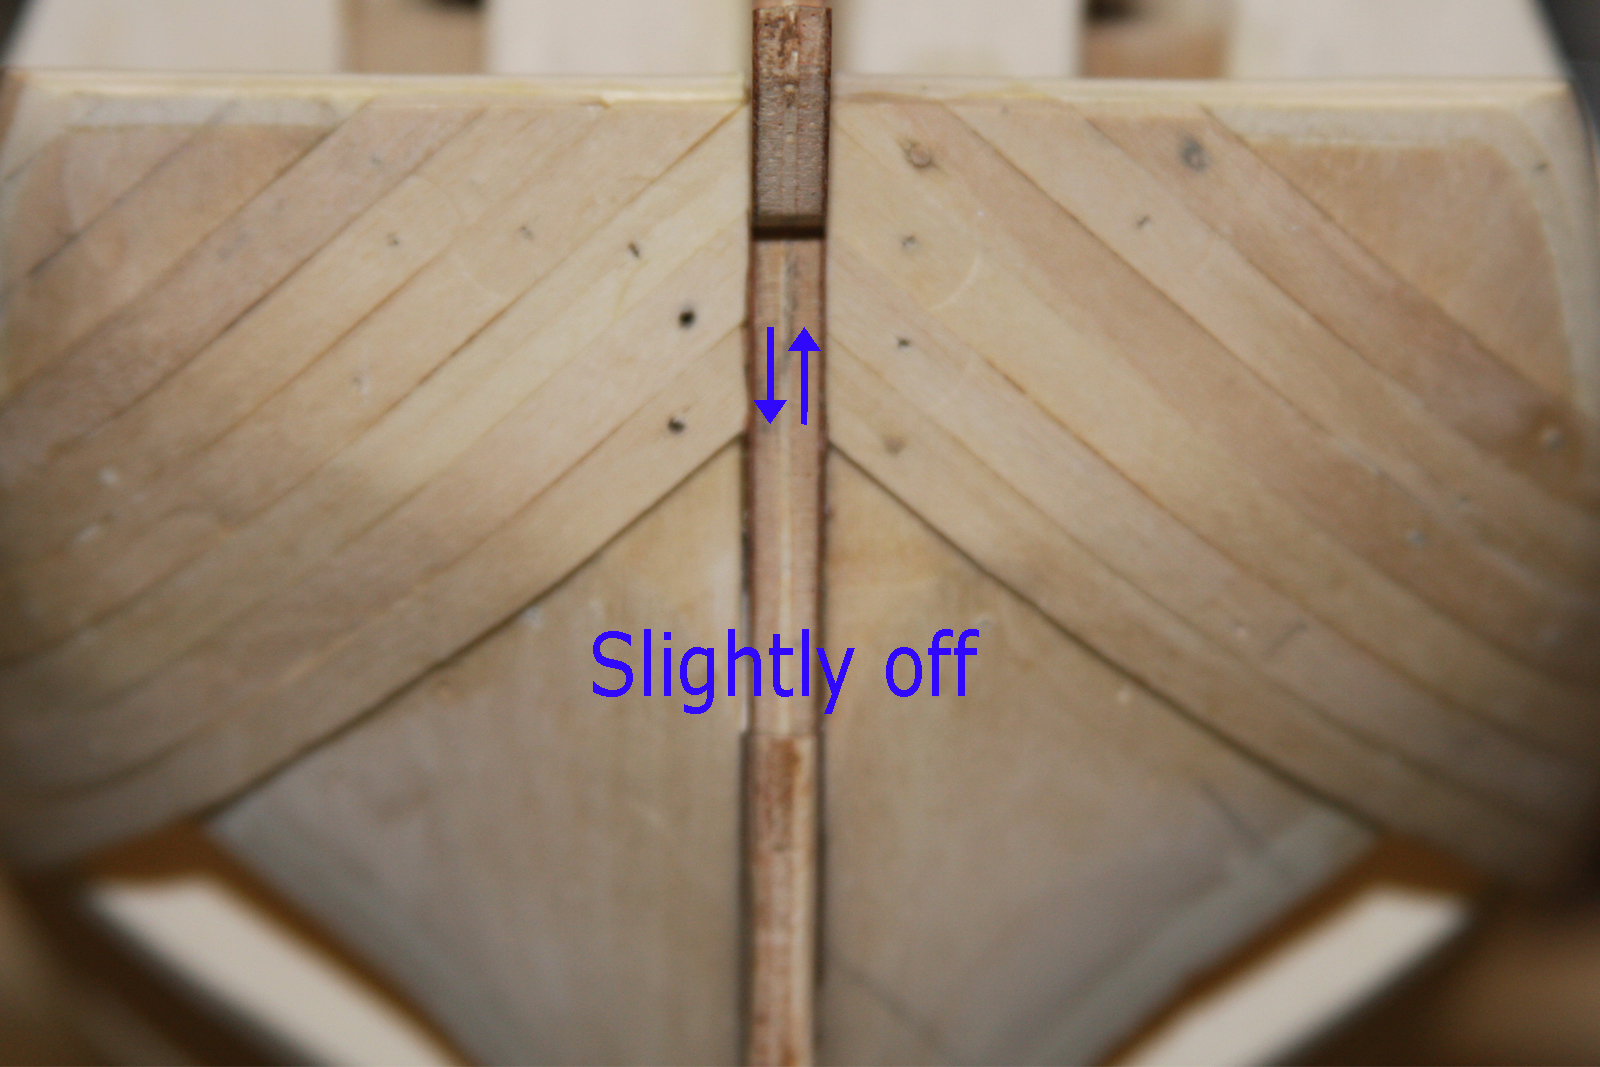
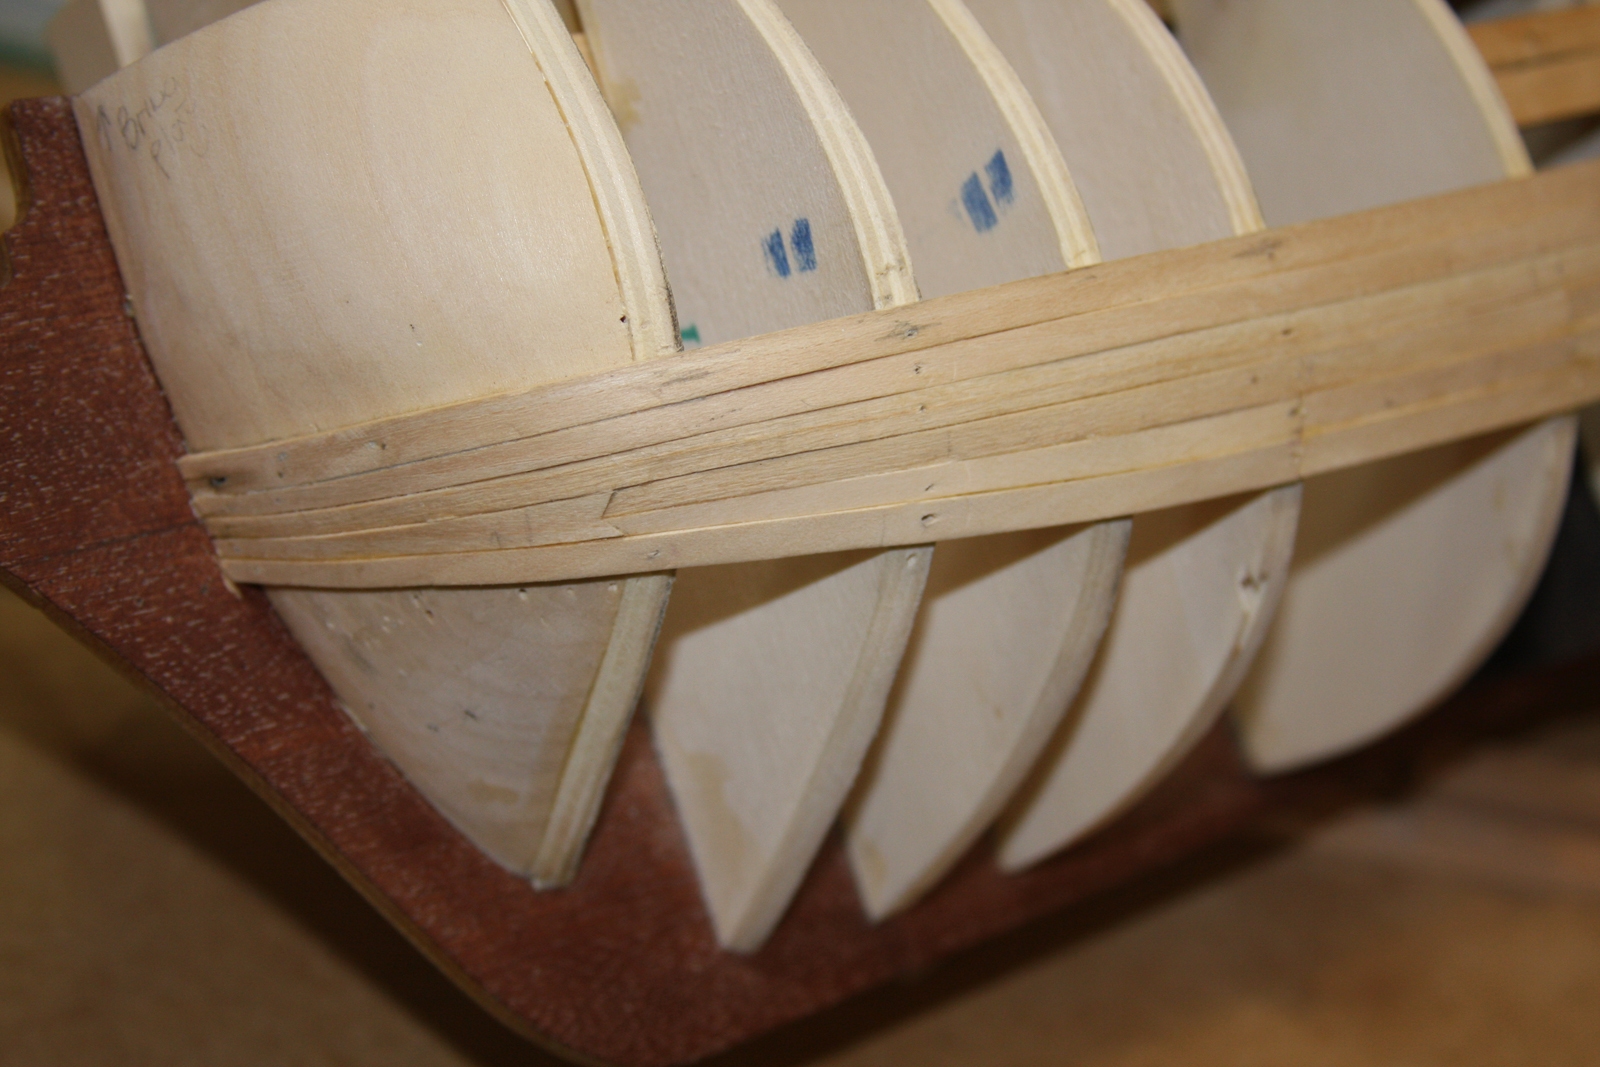
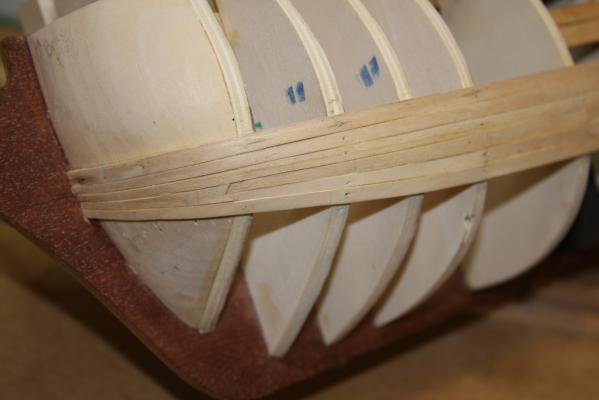
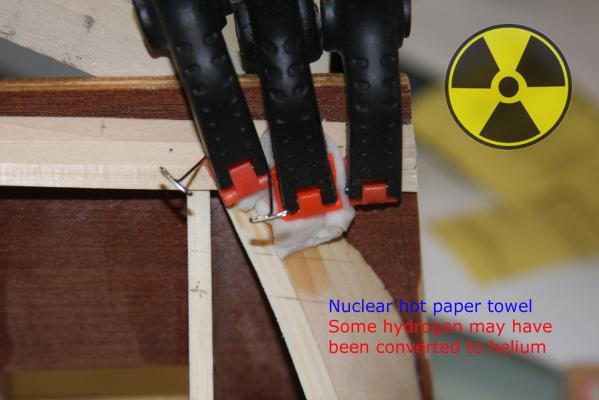
Ahoy Mates This should be my last post as a Commander Dragzz: That build is amazing Scott: It's the edge bending Lawrence: It just looked odd but its yours to do as you please. The wedges are coming in quite handy on this first planking. Not sure if they will be good on the second Back to the build Well planking this beast is sure turning out to be a learning experience. I still can not seem to get my head around belts; that and the edge bending is really getting a little out of hand. I have completed the port belt and decided to do the Garboard belt next. My hope is that once complete I will be able to better plan the next two belts. I am winging the plank widths. I am going with "they need to taper just before the stern and then flare" as my last model did. So far it looks like I am close and any errors should only cause minor problems. Fingers crossed. The edge bending has me concerned on all three belts. I am hoping the thinner walnut will be a little more receptive to the curves. The drop plank on the port side had to be done three times. I now have some "franken planks" as a result of my changes. I normally would have just replaced the complete plank but do not know how much extra wood Corel has included. Currently my waste is less then one strip. Possible only a half. In the stern my planks do not line up on both sides and I will have to pay better attention to this with the walnut. I am debating whether to make a correction on this or not. On the bow I had to pull back my drop plank due to all my mistakes and there were quite a few. I was happy with the way it turned out until I saw this picture. I see I have one more issue to address. I am hoping all this experience will only help me on the final planking. Trust me when i say the thought of just slapping all these on and then throwing a sanding party; then inviting some filler is entertained quite frequently in the shipyard. The bow end of the garboard plank was much easier then I thought. I just terminated it at bulkhead 2. Any further and it was curving up which I was told is something this plank should never do. I have some doubts as to how much and how I tapered the following planks as this led to considerable edge bending to get compliance. I went slightly wider on the last plank to hopefully reduce it for the ones that follow. If I were to do this again I would put a filler here. In the stern getting the planks to conform and contact the plywood keel was not so easy. I found that nuking small pieces of paper towel in a shallow dish of water and then clamping them to the wood very helpful. Getting the wood to make full contact with the plywood keel took no less then five sessions.. Because I believe I will be sanding most of this all the way back down in some areas I felt full contact necessary. Its just which area???, that is why it all needs to be put down. Sanding here, fitting the walnut and the keel post are one of my biggest concerns with this project. I also pulled up the garboard strake where it met the keel post. The plans do not show the planks sweeping up as mine do but I felt that if I matched the plans with this layer I would not be able to with the final one. I did this plank two times before I realized this and then did it another two more times to get this. . I am be big believer in water solvable PVA. it really is a newbies best friend.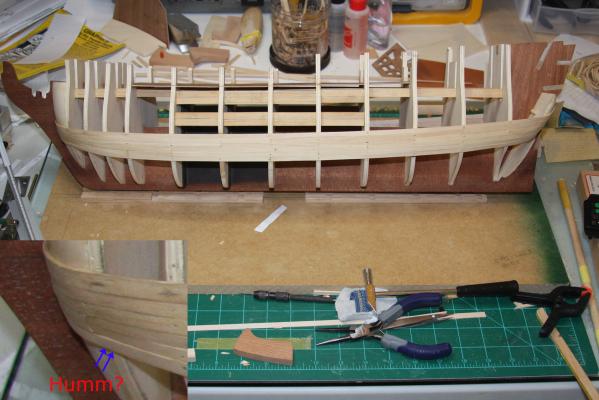


-
Ahoy Kenny Put half of them back in. Wood is always better then putty
-
Clear Shellac Sanding Sealer
JPett replied to grsjax's topic in Painting, finishing and weathering products and techniques
Ahoy Mates I found shellac to be very problematic on my ship model. Not only does it take a long time to dry enough so you won't leave fingerprints but it also seems to react to laser burn. On my model the caulk lines were laser engraved. I could not get the shellac to fill them or where it did, it would always contain bubbles. I put a coat on every day for a month before I finally gave up. It was like a morning ritual. The lines are still not filled. Its good to hear that I can go over this with Poly. Thx -
Ahoy Kenny "lol" Learning to read the plans is something that only comes with time. I am amazed now at what I wish I had seen earlier. There are actually 4 images of these parts in the plans. Three of which are on the sheet with the planking layout and include an image aptly named "Bow Pictorial View". It seems to be the way of the newbie shipwright that these images will only make sense after the fact. At least that's the way it was for me. As you progress you will see that a picture truly is worth a thousand words PS: In my second to last post I incorrectly named the parts. The knightheads come through the deck trim and the timberheads come up to it. So I installed the knightheads first. It really is amazing what you will see if you just look at the plans "lol"
-
Ahoy Kenny That will work; but just realize that you have a gunport there. As far as directions go the ME ones are really good.. It is best to work from the plans 90% of the time and use the manual as a supplement. It took me a while to get this. I think if they wrote out all the instructions it would be a 5 volume set and no one would read it. Everything is there in the plans, you just have to learn to read them.
-
Ahoy Kenny I pinned the forecastle deck trim to the tops of the bulkheads to align those parts. They both will act as supports for the wood when you plank here so look at them in that way The knightheads come up to edge of the trim and the timberheads will pass through the holes. I did the timberheads first and then used them to better support the Deck trim to align the knightheads If they're giving you a hard time "your not alone"
-
Ahoy Micheal, Most do not use airbrushes. They are done by building up many thin layers with a brush They are amazing though
-
Ahoy Micheal Search for "warhammer figure painting" on YouTube I think you will find these guys are excellent at painting items like this and some very good tips.
-
HMS Victory by JPett - Corel - 1:98
JPett replied to JPett's topic in - Kit build logs for subjects built from 1751 - 1800
Ahoy Mates Brian: I did a grain matched wedge. They might work too good. The seam between the planks has almost completely disappeared. It looks a little off, the lack of any seam kind of highlights it. I should be able to cut a new one with the Xacto but it does work. Lawrence: Thx: did you change your signature Dragzz: Thx I am just posting this link as it is very helpful. http://www.shipmodels.com.ua/eng/models/elite/victori/index.htm The images of the stern are very good. There are not many of them on the web. I also really like the color scheme. I might like it too much Thx to Pronto for directing me to this site http://modelshipworld.com/index.php/topic/5399-mordaunt-1681-by-nmbrook-euromodels-160-beyond-bashed/?p=252941 I also found Danny Vadas's Vic http://www.shipsofscale.com/gallery/danny/victory/index.html