JPett
-
Posts
881 -
Joined
-
Last visited
Content Type
Profiles
Forums
Gallery
Events
Everything posted by JPett
-
 Ahoy Sport Shes coming along nicely. I see you are now the proud owner of a Byrnes saw. Looking forward to seeing all the new additions you will add with your new toy. Give yourself to the Dark Side and you will see the true power of the force
 -
Is a waterline marker useful?
JPett replied to CharlieZardoz's topic in Modeling tools and Workshop Equipment
Ahoy Charlie I find them indispensable for accurately transferring measurements from the plans to your hull. It only works if you also construct a building jig and I highly recommend those too. -
Ahoy Brett I would suggest you first find out what the Admiral wants if this will be "hers" to see. As for the practicums there are plenty of logs here that offer more help then you you could ever hope for. Why not sit down with the Admiral and show her some pictures of finished kits; ask her what she would like and build whatever she wants. You never know: The Connie might look good with pink gunwales and lavender trim.
-
Ahoy Scott Impressive job on a very difficult part of this kit. It will be a nice addition to your ship Looking forward to seeing her deck side, and thx for sharing Best wishes to you and yours in the new year too
- 264 replies
-
- 1
-

-
- rattlesnake
- model shipways
- (and 1 more)
-
Ahoy Martin I love the "without the light" its looks much better comment. Might borrow that one for my log. I almost fell off my chair. . Don't forget that the wheels, cannon, and hardware will completely change the way your eye interprets that red
- 467 replies
-
- 1
-
-
- fly
- victory models
- (and 1 more)
-
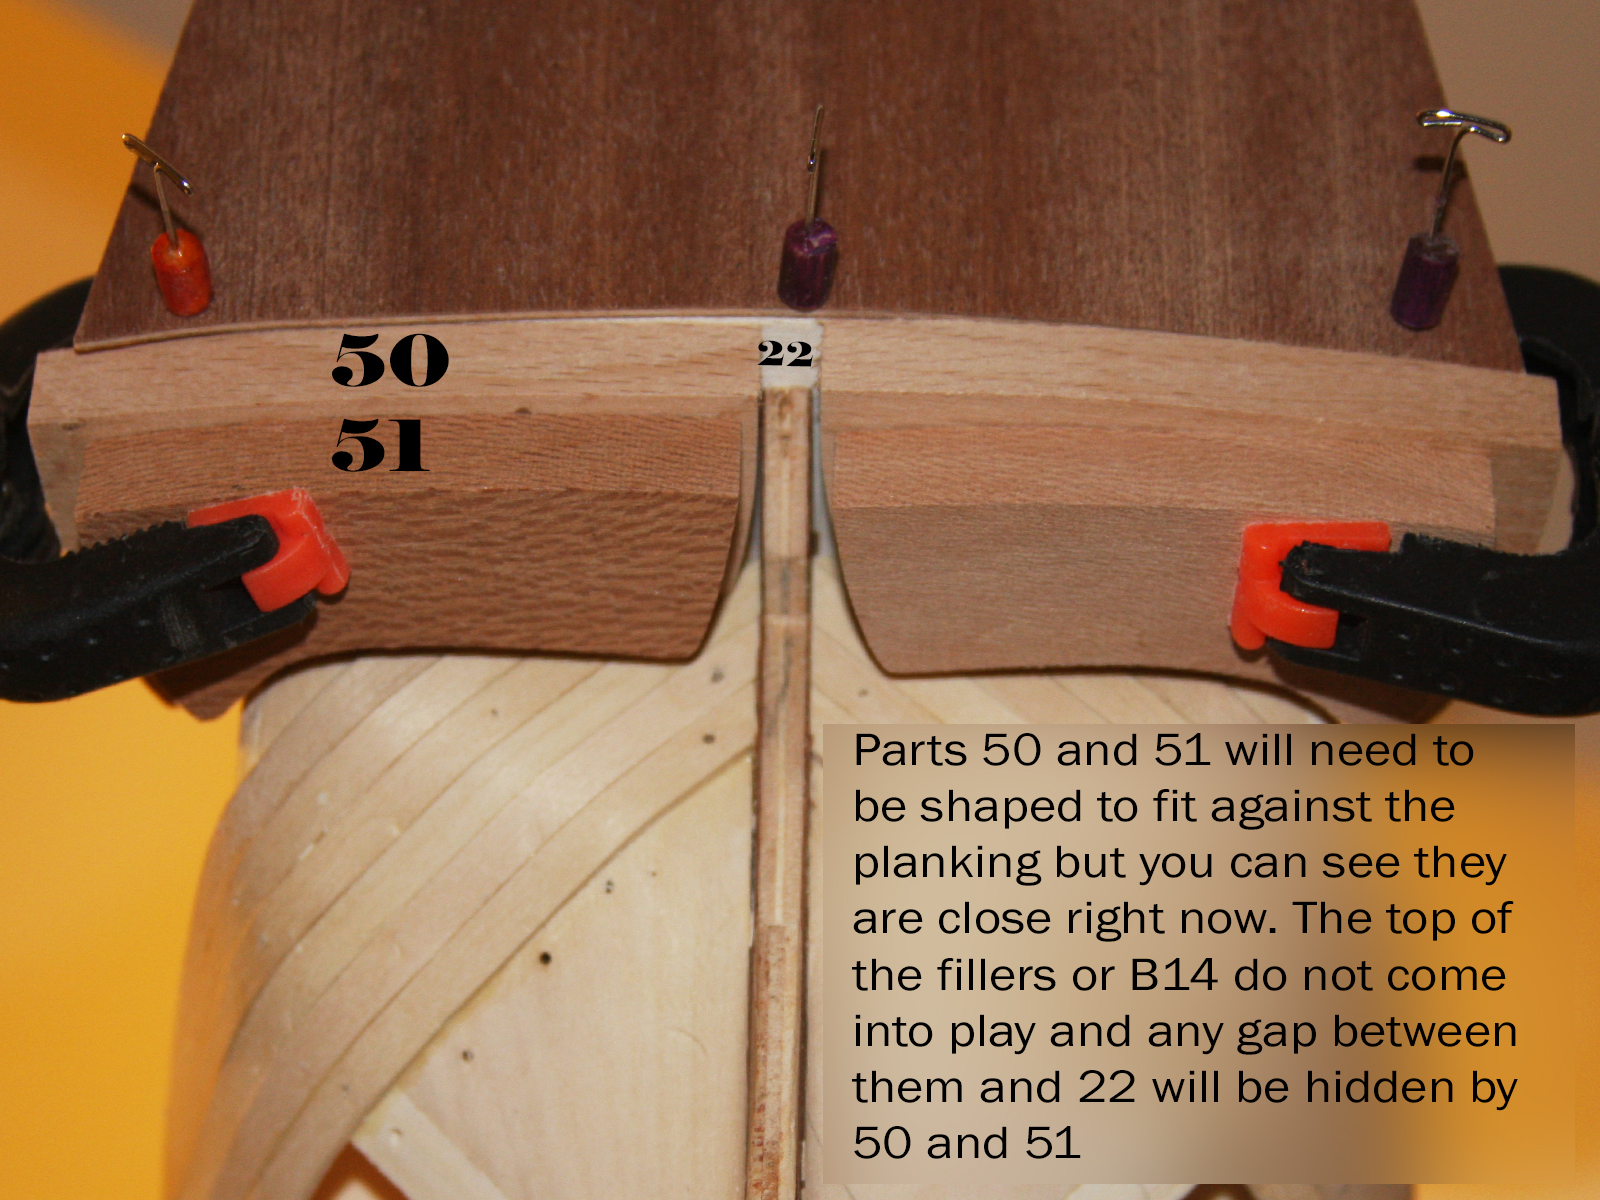
Ahoy Robert I am not sure. I have not gotten that far. I remember when I did this. That curve on parts 50 and 51 completely confused me. I kept trying to install them so the larger gap where they meet the keel was the other way. Thankfully there wasn't too many different combinations. PS: Use these parts to check the curve of your fillers.
-
Ahoy Robert I am not seeing that at all and apologize if my last post lead you to this You are correct that " there's a hollowed out area so the the rudder fits up into it" shown in F on plate 4. It is made by parts 50 and 51 which do not sit on top of 14, but behind it and are mounted (stacked) to the bottom of Bulkhead 22. . I did a mock up of the stern a while back. Here is a pic. I hope it helps. I added some text

-
Ahoy Augie I am really enjoying this long winded side of you The stove is a really nice addition to your deck. Could I request another gale about how you did those bricks
- 2,191 replies
-
- 3
-
-
- confederacy
- Model Shipways
- (and 1 more)
-
Ahoy Martin Happy Holidays to you and yours The ship looks great BTW
- 467 replies
-
- 1
-
-
- fly
- victory models
- (and 1 more)
-
HMS Victory by JPett - Corel - 1:98
JPett replied to JPett's topic in - Kit build logs for subjects built from 1751 - 1800
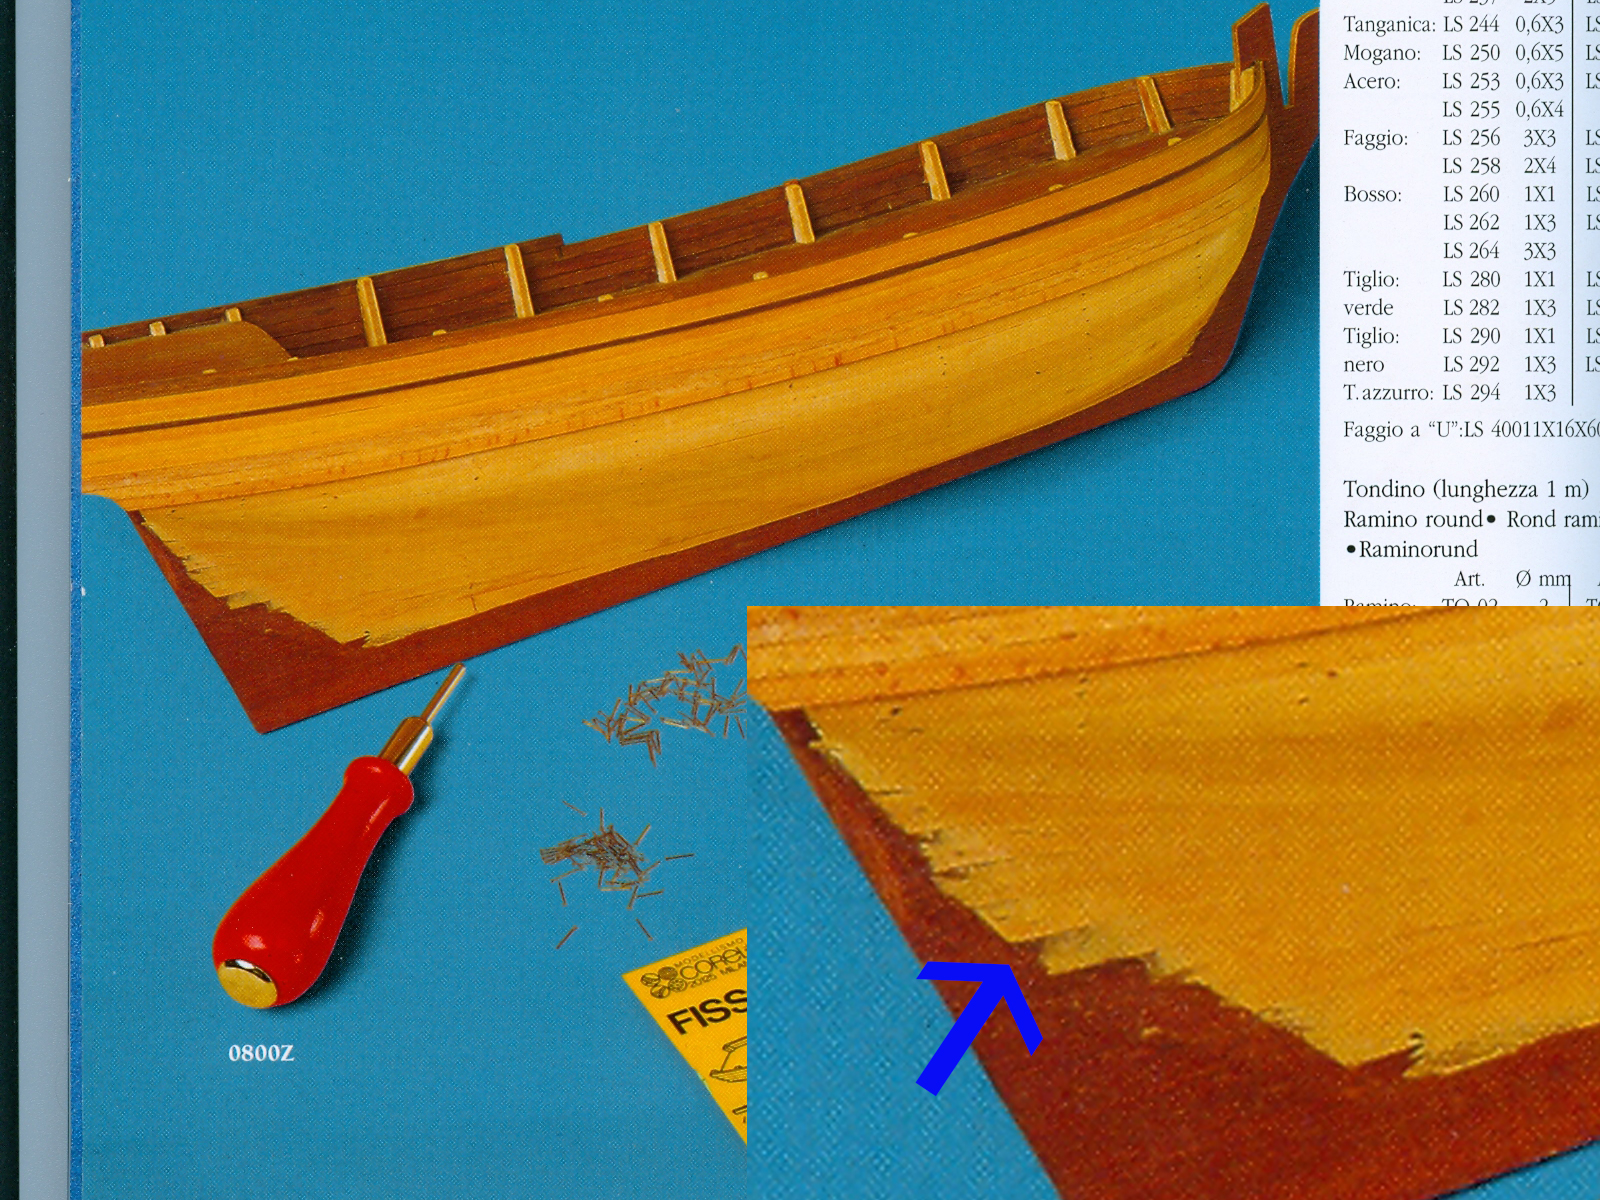
Ahoy Mates Augie: "they need to taper just before the stern and then flare" Seems we both had it wrong. Scott: My professor said that science covers it all. Go figure Lawrence: I agree. Even the admiral liked a good planking. Dragzz: Thanks D Martin: Got to go with the @#$%& on this one Michael: Looks whose talking. If you have some kind of quark based microscope over in your shipyard you need to share it Robert: I already got you Back to the build: Well not really. We have been a little preoccupied and work in the shipyard has been a little slow. Stagnate might be a better word. I have been studying and while helping another member I found this which is a real game changer. It was in the back of the Corel catalog included with the kit I also solved the riddle of the upper stern post. The entire keel is covered with planking (thx Mark). I believe this would also include the rear of the keel where the ply is exposed. This will add 2mm here and should be just fine for me. The little bulb is glowing. Time to get to work

-
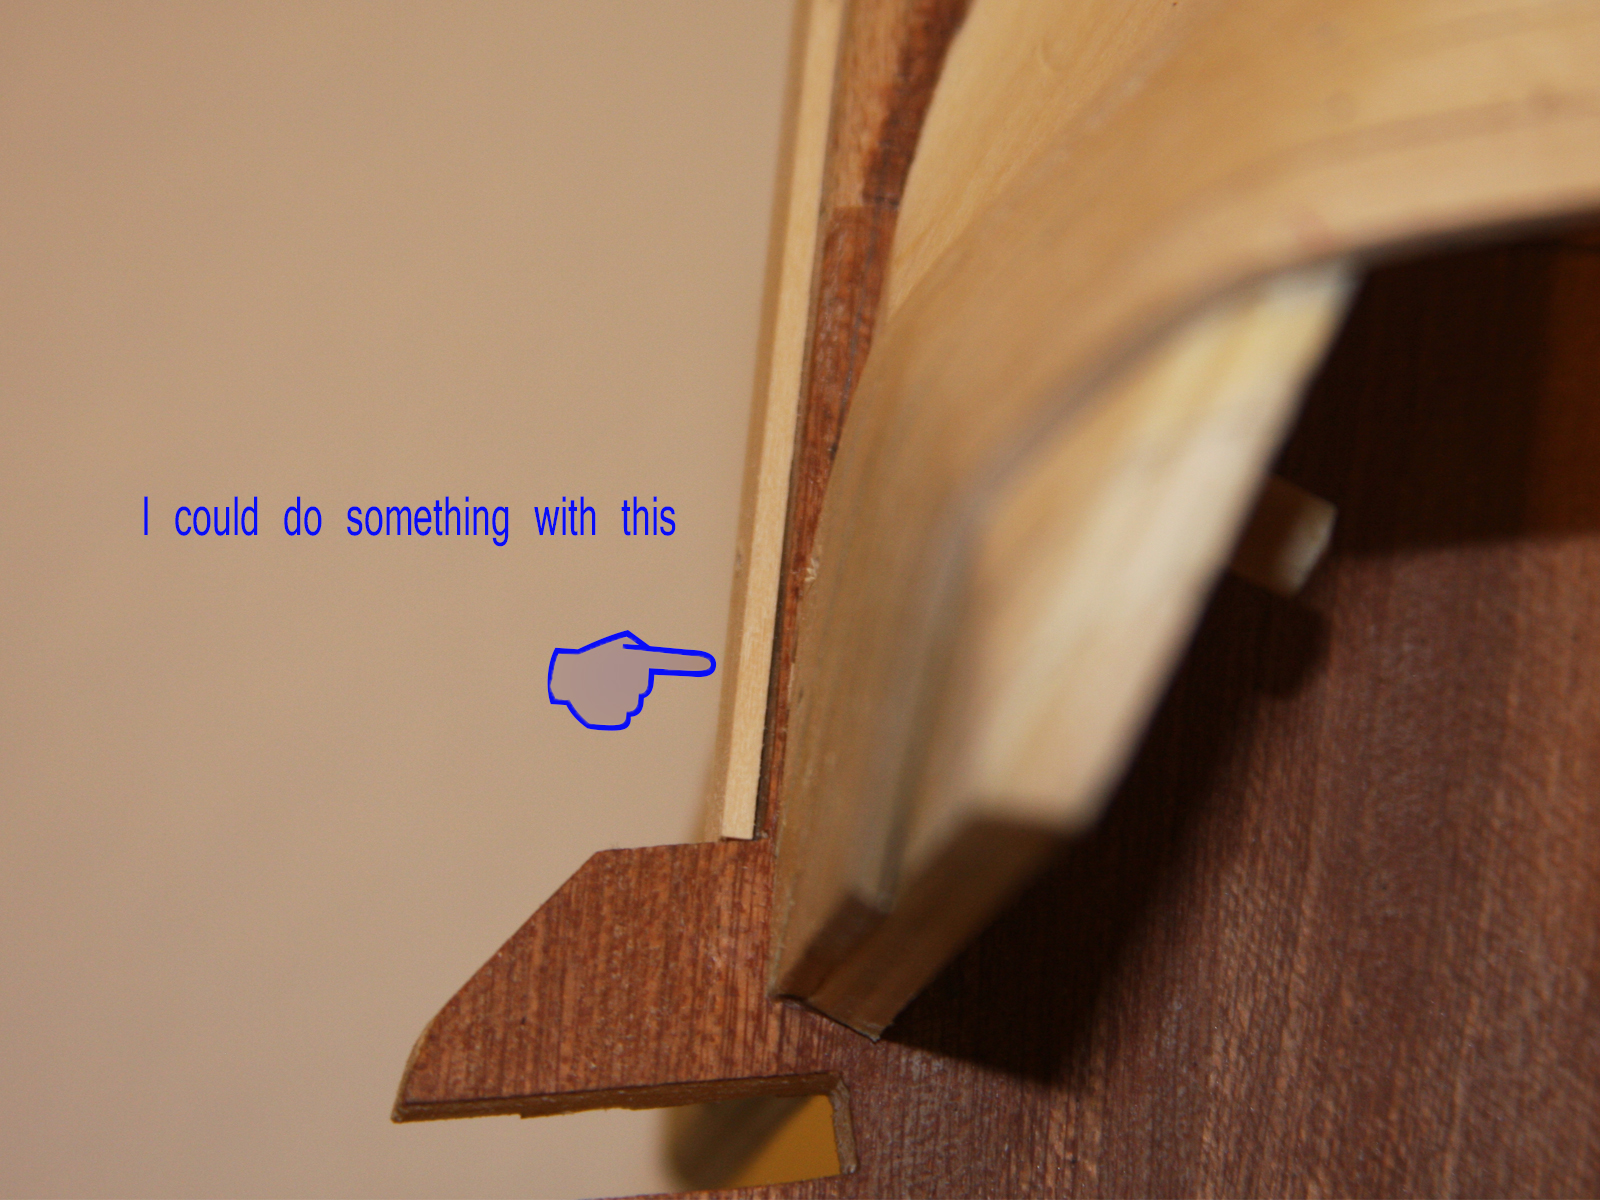
Ahoy Robert Before you add anything to the top of your filler look at plate 4 image E. Parts 50 and 51 mount below bulkhead 22. They will come all the way down past, and cover that flat on the top of the keel post which your are already above with your filler .
-
Ahoy Adrieke I bought my saw used on Craig's list. Not sure if they exist in AU but there are always outlets for used tools where ever you live. I build kits so I hardly use it, For me it is one of those "nice to own tools" and why I went used. I waited for a deal and did my homework which really paid off.
-
Ahoy Buck As usual your work is amazing Did you consider just painting them on.
- 515 replies
-
- 1
-
-
- artesania latina
- whaleboat
- (and 1 more)
-
Ahoy Jon Really nice work. I like the fact that you have included so much of the cannon rigging and managed to keep it looking neat and uncluttered. As for the ropes I have worked in theater and find the coils I see on many builds something that may have been done for inspection but I can assure you that was it. If this is something of interest you could neatly coil another piece of line and position it on top of your existing one hiding the two ends. I have had my eyes out to try and find out how the line was handled during battle. I am quite sure there was a procedure that did not involve spending the time to make pretty little coils. My guess is they 'over, undered' the line or laid it in a figure eight or pattern which could be done quite quickly and would ensure the rope did not foul in the block. Which BTW would have been catastrophic. Looking forward to seeing what you do
-
Ahoy Robert http://modelshipworld.com/index.php/topic/3709-hms-victory-by-jpett-corel-198/?p=247879 Here is my post on this. If I add 2mm to the rear and then reduce the rudder 1mm I am only 1mm off which should not effect the stern gallery. Even if you could sand the bulkheads enough to allow the planks to make that curve without the fillers it would be way too much and really change the shape of the ship. You might be right in that sanding the fillers down even more then I did might be the correct solution. I will let you know that how much I sanded the filler getting the planks to make that curve pushed the wood pretty close to its limit. More sanding will only make this more difficult. See the third pic in this post http://modelshipworld.com/index.php/topic/3709-hms-victory-by-jpett-corel-198/?p=248055
-
Ahoy Robert As I too am struggling with this I can only offer what I have chosen. I have come to the conclusion that the first layer of planking on the stern where it meets the keel post will need to be almost completely sanded away. I found this through queries in my log and confirmed it by comparing the rudder thickness to the keel thickness. Depending on how far forward you were able to mount B14, you may even have to sand down most of the second layer to allow for the upper section of the keel post to be exposed. I have a bit of an issue here. I am considering adding the Keel Post as an additional piece of wood and pushing the rudder position back a bit should my current efforts fail here. I would however prefer not to take this route . I will be following along to see how you handle this. Where some see a problem others just see a challenge. Good Luck
-
Ahoy Robert Really nice video I am sure the community will really appreciate the effort you put into this.
-
Ahoy I always liked enamel based paints and lacquers for airbrushing plastic kits. They are so much easier to spray and you can work the finish with polishes . The trade off is a respirator and you must have a spray booth set up of some type. The hobby industry is moving towards water based paints and i have been trying to adapt. I do think it is a good move but it does have a ways to go. . It is my opinion that the current hobby Acrylics are a lot harder to use with an airbrush. The over spray drying in the air before it contacts the surface of your work is a hard work around.. It prematurely drying on the tip is another problem. Mr Hobby Retarder will fix many of these issues but you will need a respirator and booth. This stuff is the poster child for banning paint products. I also find Acrylics finicky, they don't like PE unless primed or any oil (fingerprints/mold release) anywhere which means parts need to be super and I mean super clean. A primer will solve this but with PE at 1:700 scale one extra pass and you just obscured half the detail you spent hours bending under a microscope. I find Painting a primer, a color (or two) and then a clear is just asking for trouble at this scale.. I have recently found on the Tamiya site that you can use lacquer thinner with their paints and improve the finish. I plan to try a mix of 25% in the paint and then use their acrylic thinner for the final reduction to spray my current project. Dragons 1:700 Bismarck with Eduards, Toms and White Ensigns PE. Plus the kit comes with PE. Yea I really like PE. I will keep the Mr Hobby Retarder around just to be safe. I am open to suggestions. What are you guys using.
-
HMS Victory by JPett - Corel - 1:98
JPett replied to JPett's topic in - Kit build logs for subjects built from 1751 - 1800
Ahoy Robert "LOL" That my friend is the 69 cent question. As you can see in my earlier post I have them at 8mm in from the bulkhead edge on the cannon center for the 2 lower decks and for reasons unknown, slightly less on the upper gun deck. See plate 5 http://modelshipworld.com/index.php/topic/3709-hms-victory-by-jpett-corel-198/?p=250111 My plan is to be close. Close enough that I can space them out with a washer or counter sink them to match. Do not make the mistake I made in mounting them on the same plane as the waterline. This was wrong and I may have to remove or make an adjustment on some. I used my pencil jig to transfer the height of the gunport center from the plans to each bulkhead. Then measured in 8mm on each bulkhead and use a square off my building board to get that line. Here is that post. http://modelshipworld.com/index.php/topic/3709-hms-victory-by-jpett-corel-198/?p=249707 My next attempt involves plotting a line across the bulkheads on the plans using the gunport center and then transferring those measurements to the bulkheads on my kit -
Ahoy Charlie I like and recommend the Iwata Brand. Their HP line is sweet but their Neo line is all 99.99% of us will ever need. Although you could buy the best airbrush ever made I have seen people take a cheap plastic Testor's airbrush and lay down paint better then 99% of us ever will. Money will never replace the practice and time required to master this craft.
-
Ahoy Mark I don't know. It looks like there are some planck length deviations right there where up quark meets the charm. Best to redo the whole thing. Better safe then sorry "LOL" She looks great mate.
-
Ahoy Ken If it makes you feel any better I went through a "boat load" of wood. Remade some planks four or five times. My local hobby store carried the same wood and I bought quite a bit of it. I found the challenge of fitting planks very therapeutic and totally enjoyed the experience. I also found the wood the hobby store sold to be of much higher quality. Good luck and happy planking. She looks great
-
Ahoy Robert It does look better. I was writing something just as you posted I was concerned because you have not yet installed parts 28 which will raise the deck 2.5mm (3/32") in the center of Bulkheads 4 - 10. which is very close to what you were seeing. Part 26 does need to taper off as it connects to the bulkhead so I think you are good. I was just going to suggest installing them before sanding
-
HMS Victory by JPett - Corel - 1:98
JPett replied to JPett's topic in - Kit build logs for subjects built from 1751 - 1800
Ahoy Robert I have not installed the upper deck. I saw that Dragzz had this same problem. What I am doing is leaving the upper deck (part 18) off until after I plank most of the hull. Realize you also have to remove the upper section of a few bulkheads for gunports on the lower deck, then install those cannons but only after cutting out the gunports which will require the hull to be planked. This would be insanely difficult if you follow the instructions by severely reducing your access here with part 18. ATM I do not see this deck as being anywhere near necessary before planking at least up to the lower gunports either. Not to mention the curve in the bow which may or may not need an adjustment. I plan to leave the last few rows of my first layer of planks off as i come up to this deck and then decide how to proceed. I have not even planked the lowered deck yet either.I will most likely only start the lower deck once I reach it with the hull planks and finish it only after I planked the hull enough to cut those bulkhead sections out for the gunports. Cutting them out after planking the deck is going to leave a something undesirable. Not to mention what an oops might do to the deck cutting out gunports. My plan is to have most of the planking done, bulkhead sections removed, lower deck planked, gunports cut, and maybe even all the cannons mounted on the lower deck before I mount part 18. Read some of the Caldercraft Vic logs. That's what I used to developed this plan. What I did so far was to plot the line which separates the wales from the hull and am currently planking the first layer of the lower hull. I will then use this line in conjunction with more measurements with the hull in a building jig and the plans to get the sweep of this deck. easy peasy lemon squeezy Your build looks great so far BTW I have not seen this plan done in any other logs or completed it myself so please keep this in mind. Oh and i don't know what i am doing either.