DONATION DRIVE - SUPPORT MSW - DO YOUR PART TO KEEP THIS GREAT FORUM GOING!
×
.JPG.ca33079f5815b861e67b9c2cccd37982.JPG)

Blue Ensign
-
Posts
4,566 -
Joined
-
Last visited
Content Type
Profiles
Forums
Gallery
Events
Everything posted by Blue Ensign
-
 Sorry to confuse, The cut of the recess of the crutches should be angled slightly inboard so that the boom rests in them when moved across from the central line of the mast. B.E
- 562 replies
-
- 3
-

-
- vanguard models
- alert
- (and 2 more)
-
Great start to the deck planking. 👍 I can't quite tell from the photos did you check the angles for the boom crutches atop the counter timbers? B.E
- 562 replies
-
- 1
-
-
- vanguard models
- alert
- (and 2 more)
-
The Rudder coat is a tricky thing to make and not a particularly pretty thing as it does need an element of bagginess to allow movement of the rudder. I make mine using fine cotton sheet cut to shape and stuffed with cotton wool to provide the bagginess. Details of the making and fitting process are shown in my Cutter Alert build log, I will follow the same procedure for the Sphinx build. ps. I like your Snatch block enhancement Ron, and the Capping rail is spot on. 👍 B.E.
- 542 replies
-
- 4
-
-
- Sphinx
- Vanguard Models
- (and 3 more)
-
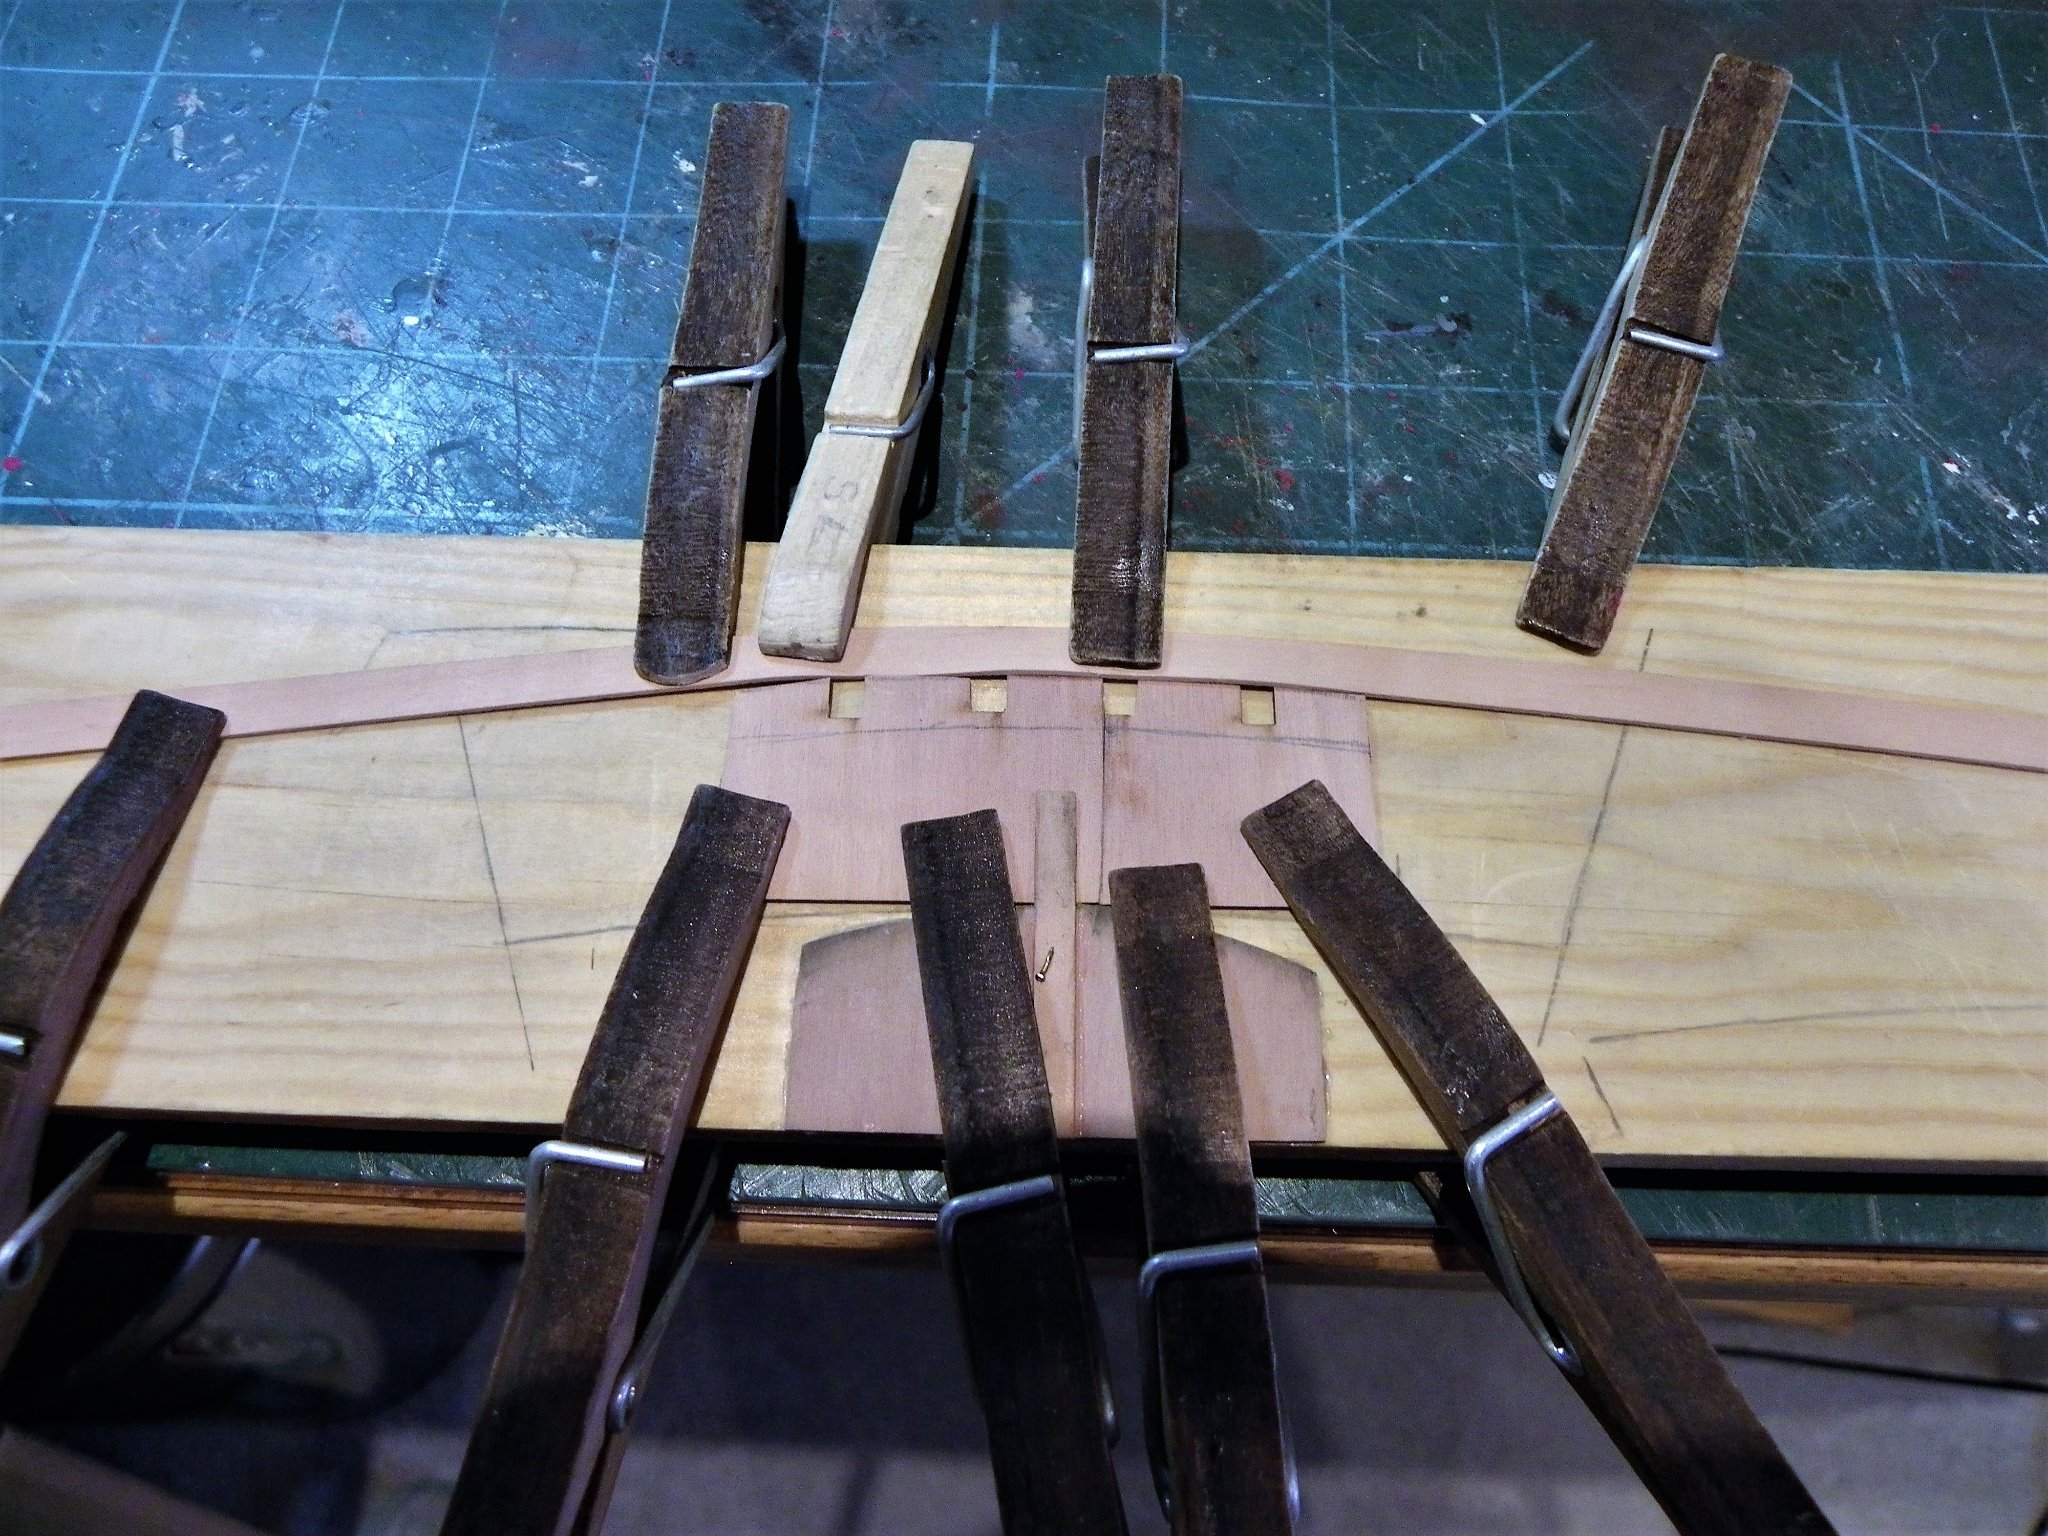
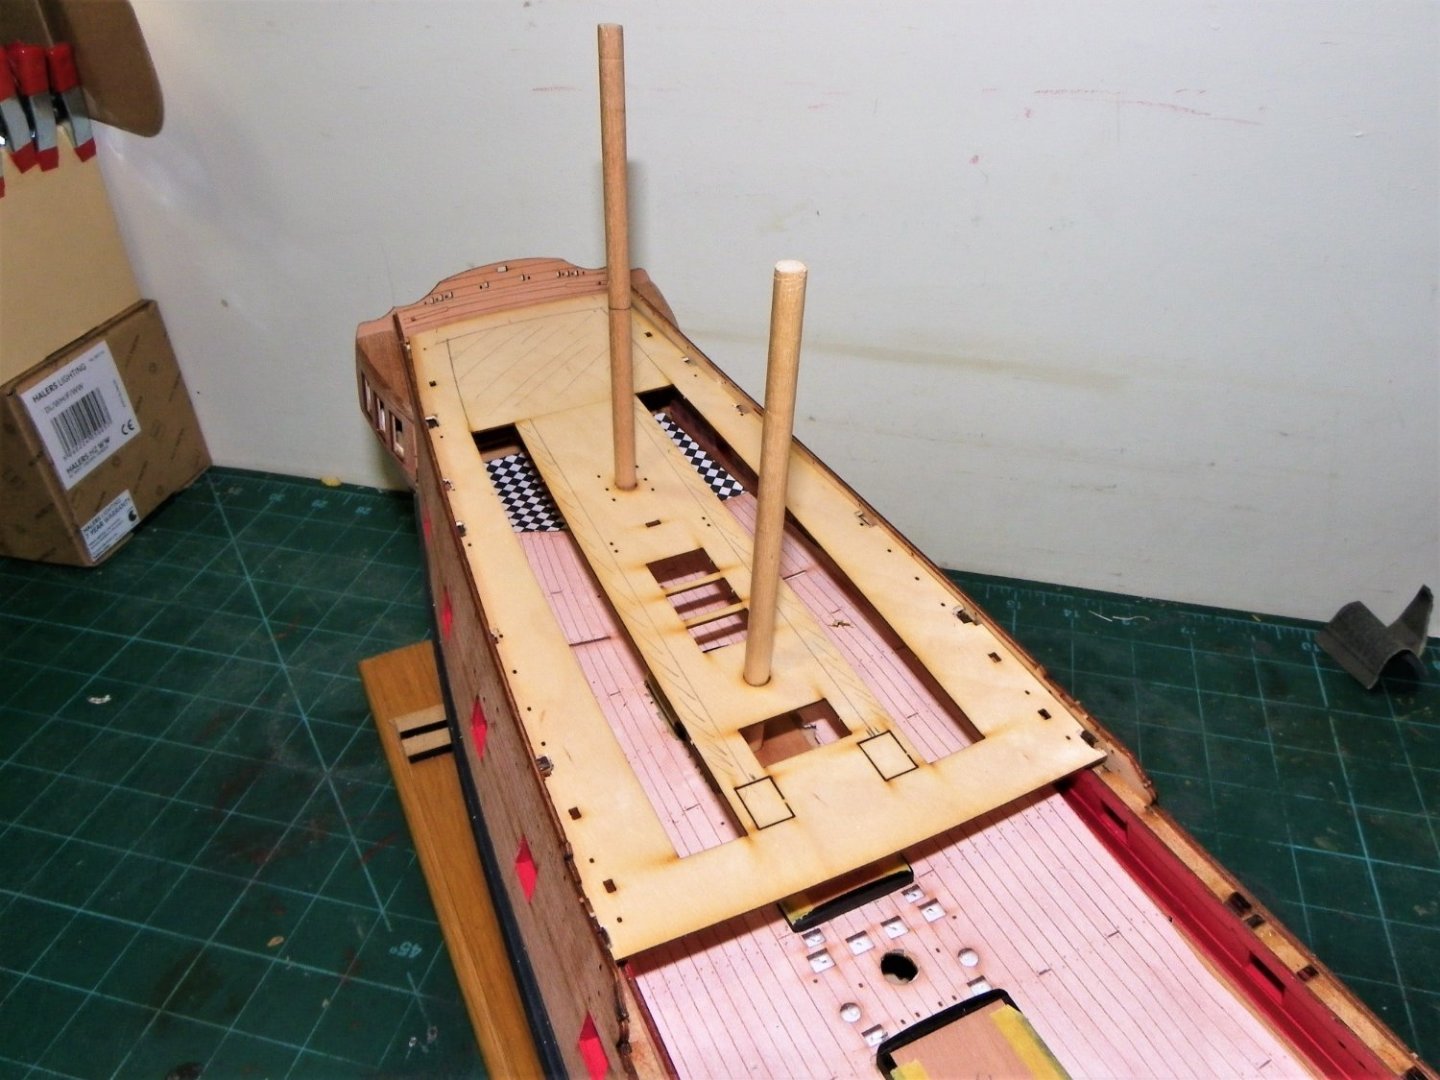
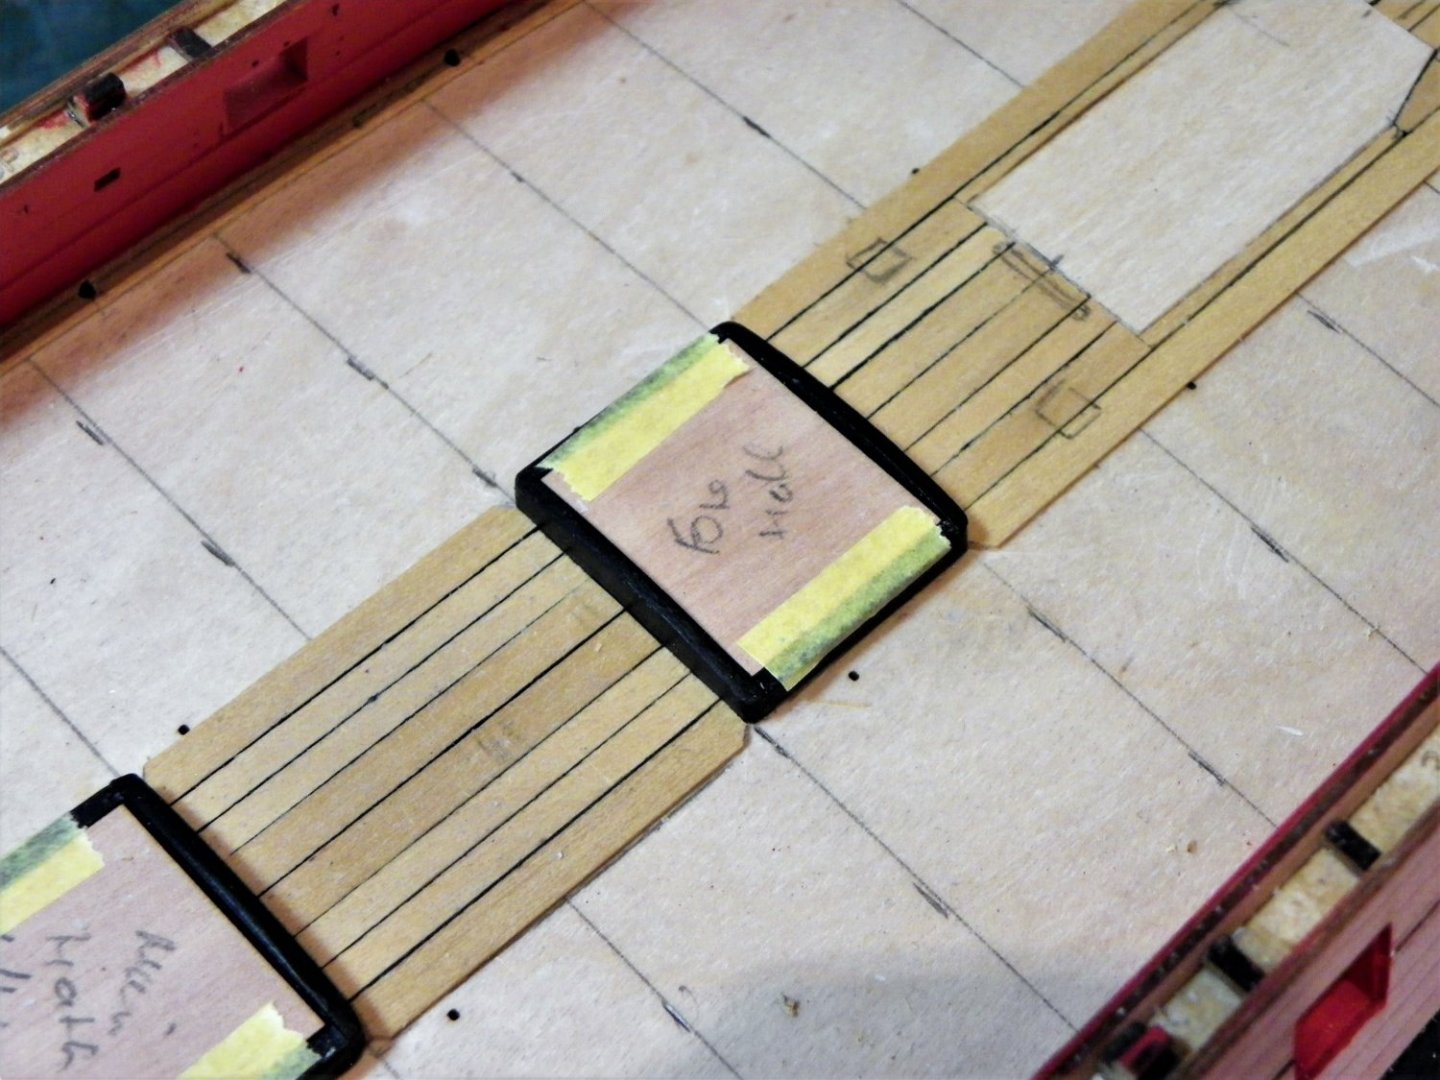
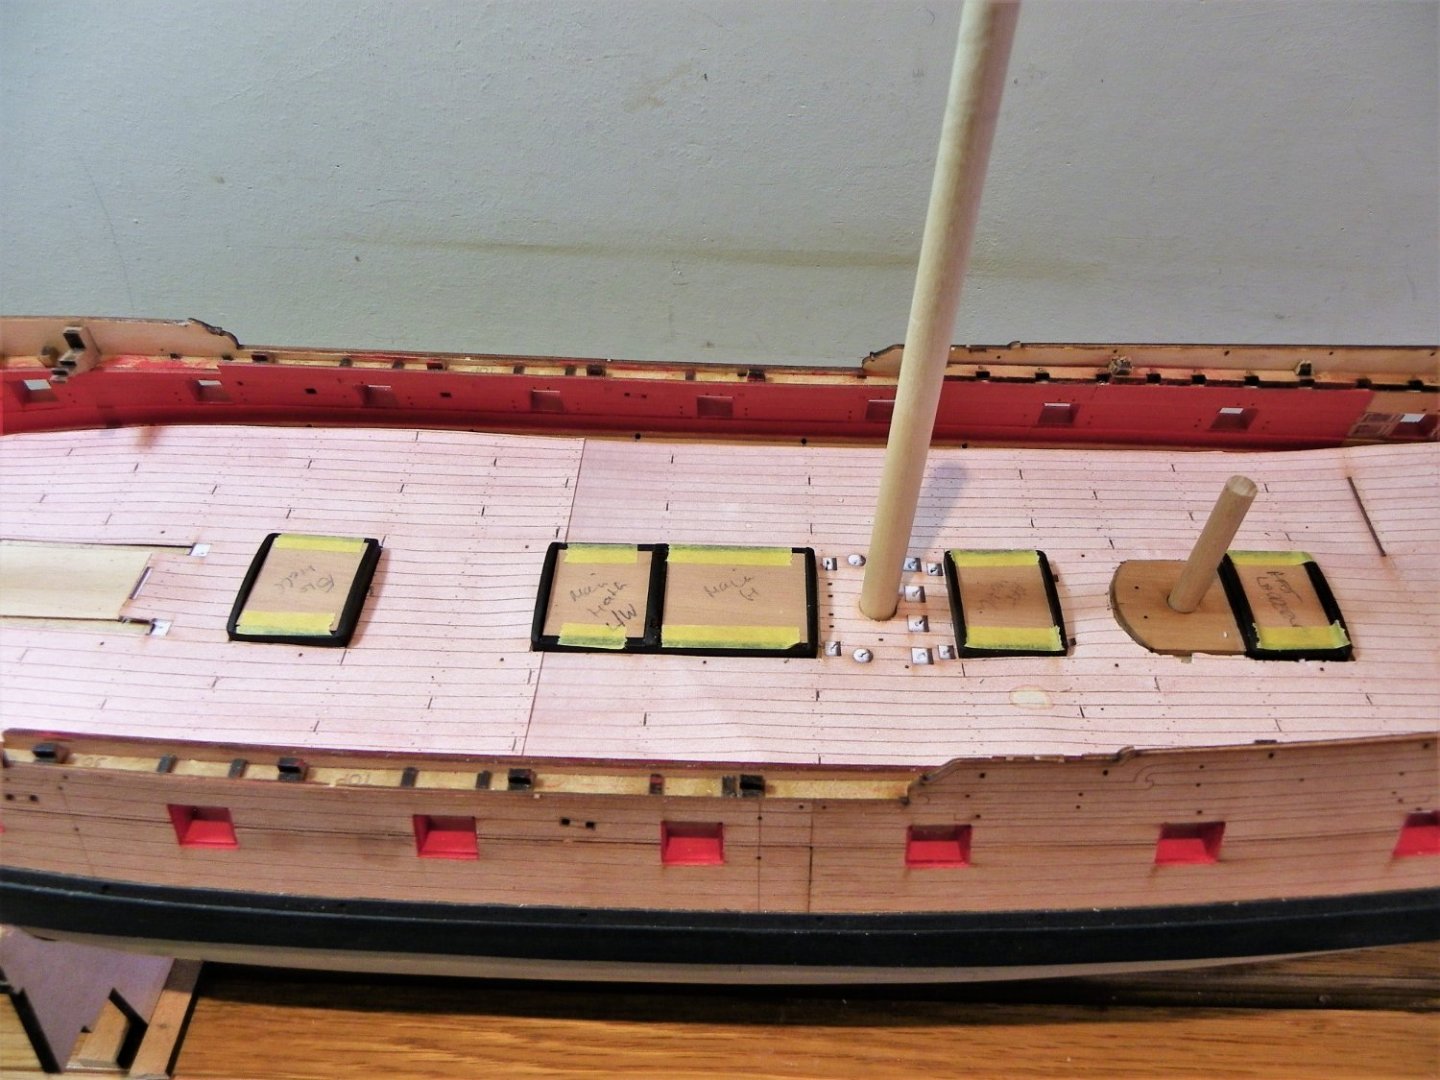
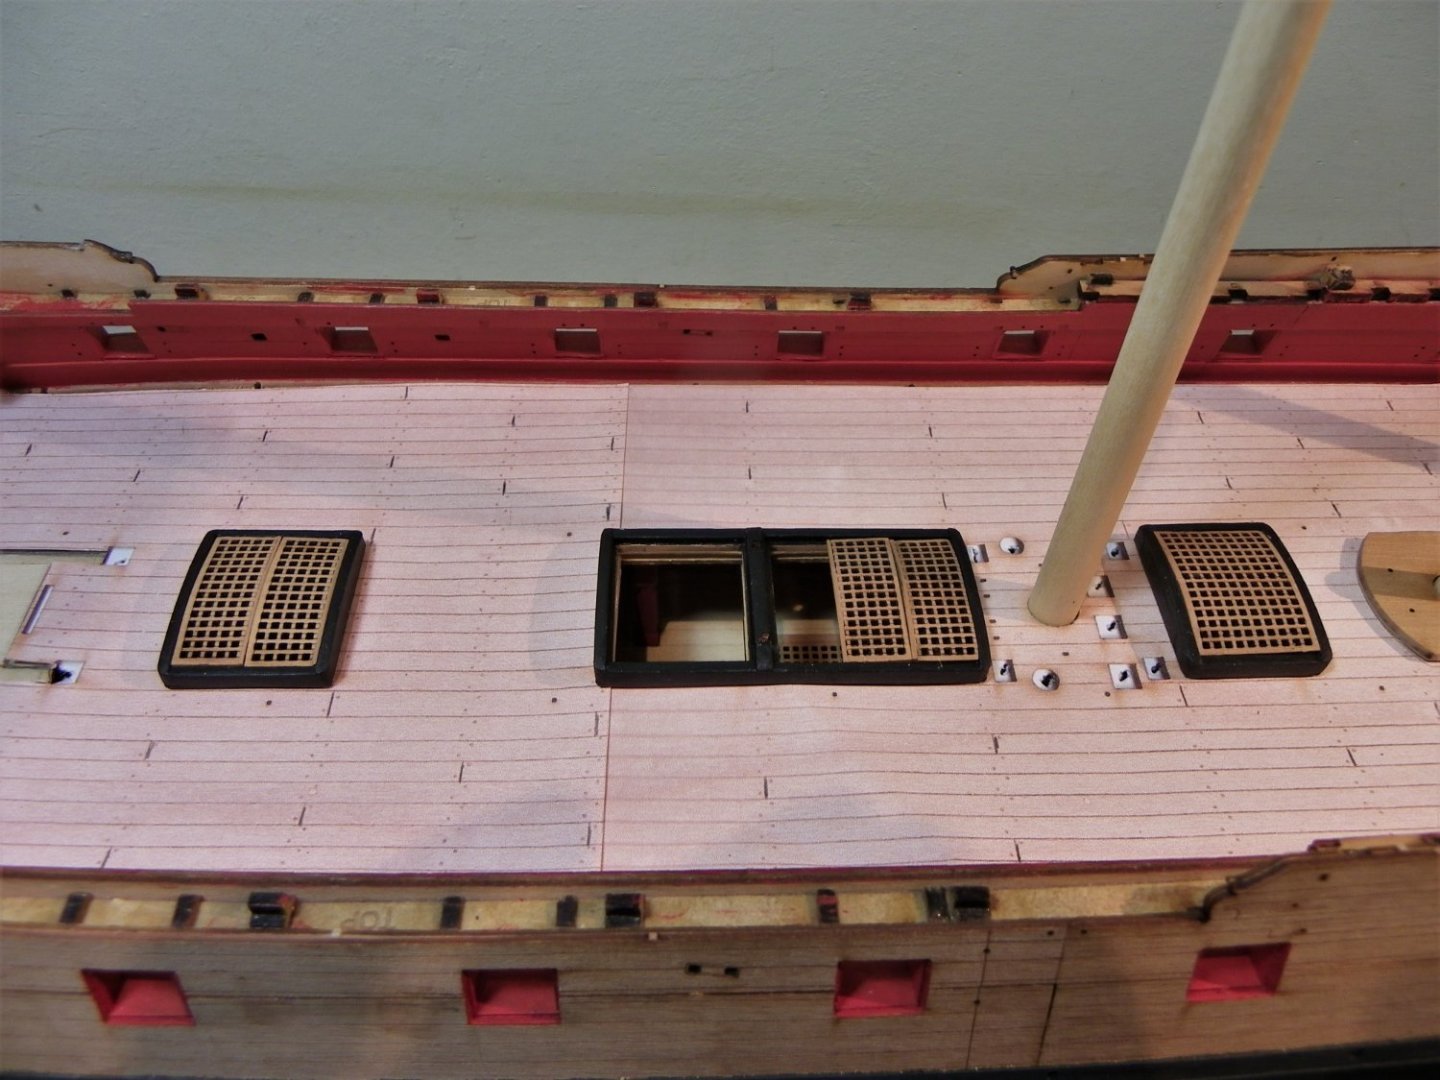
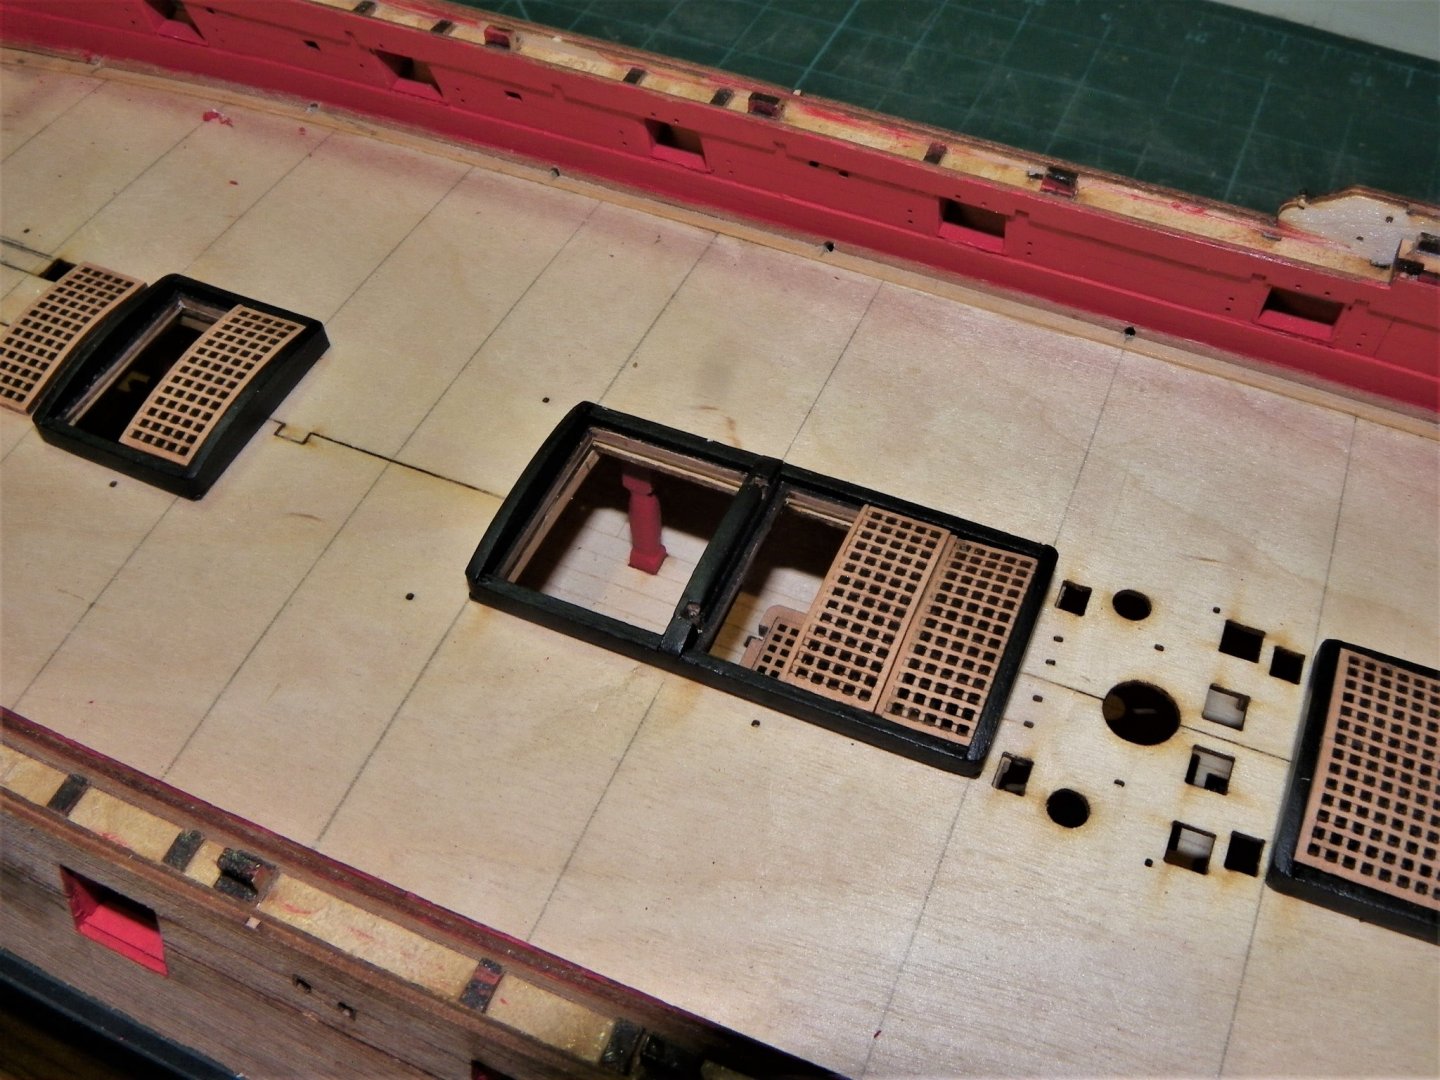
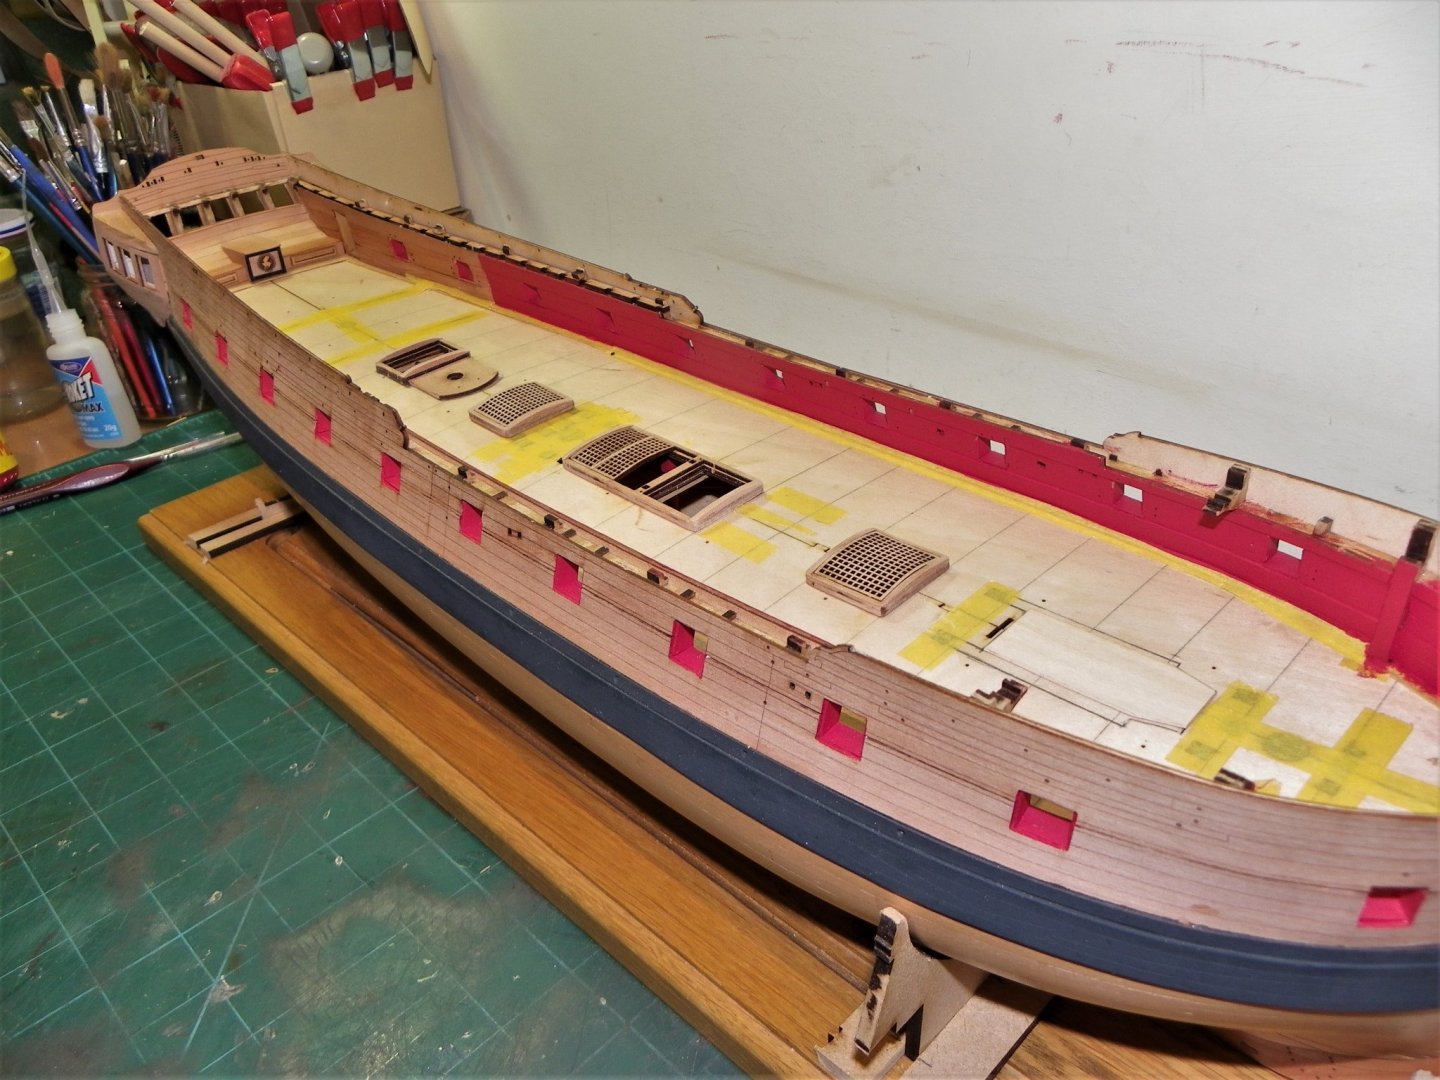
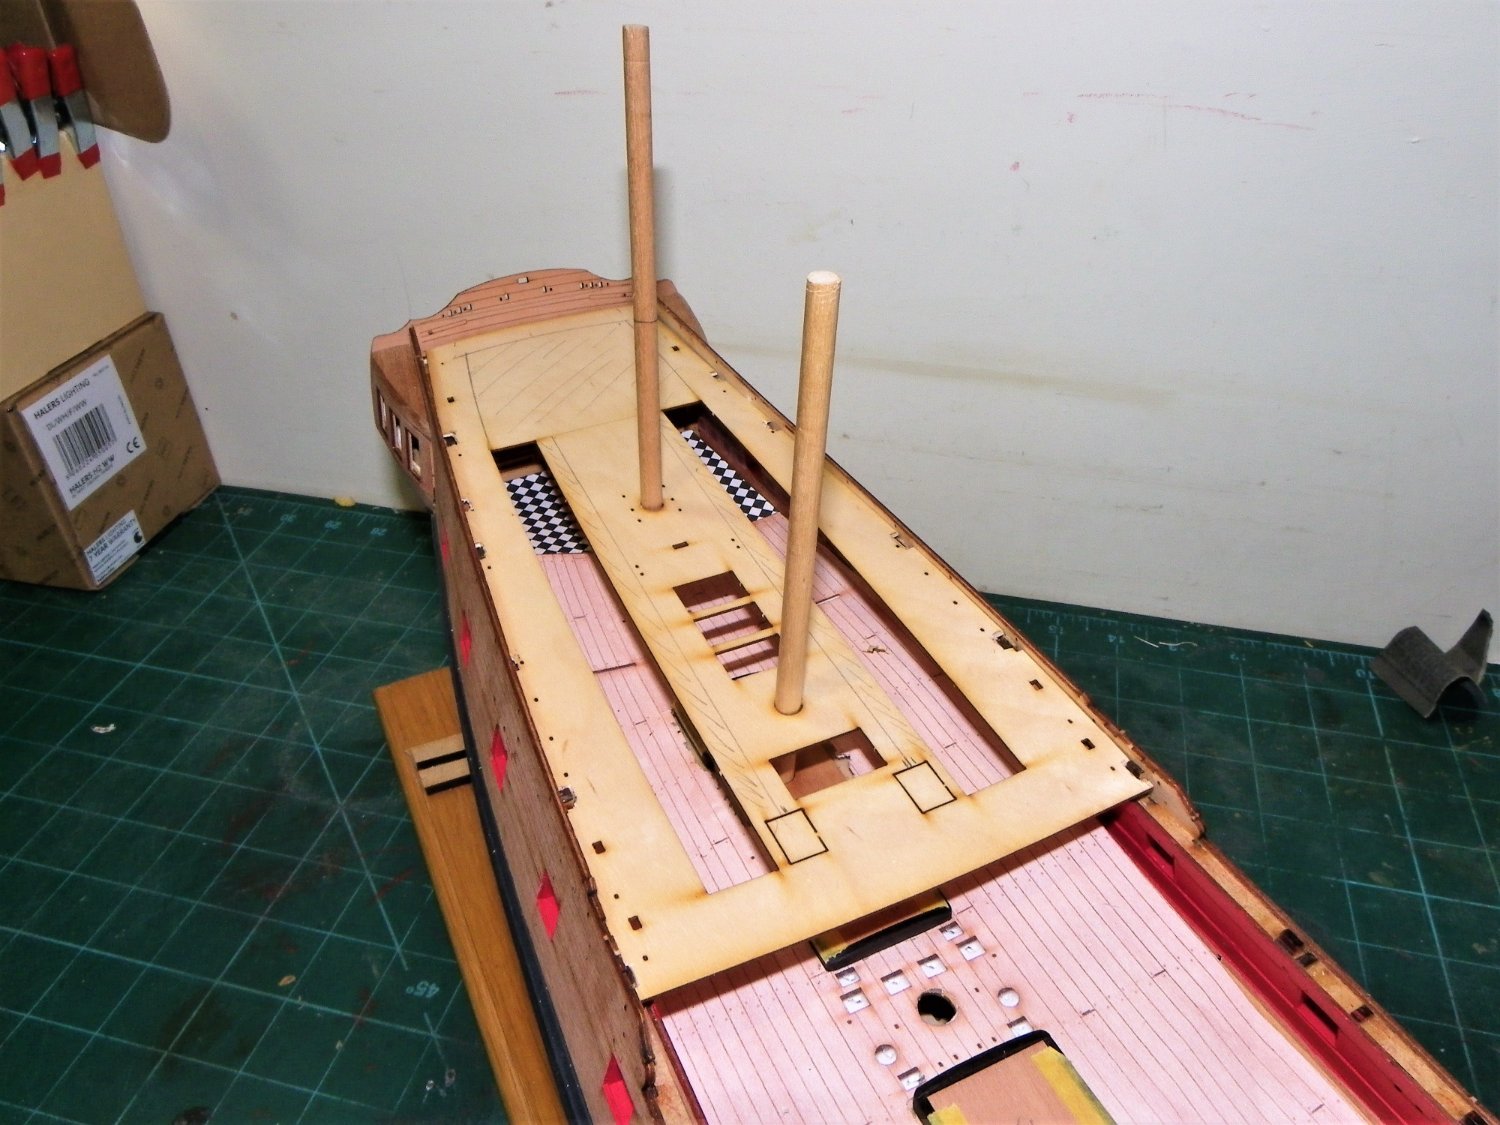
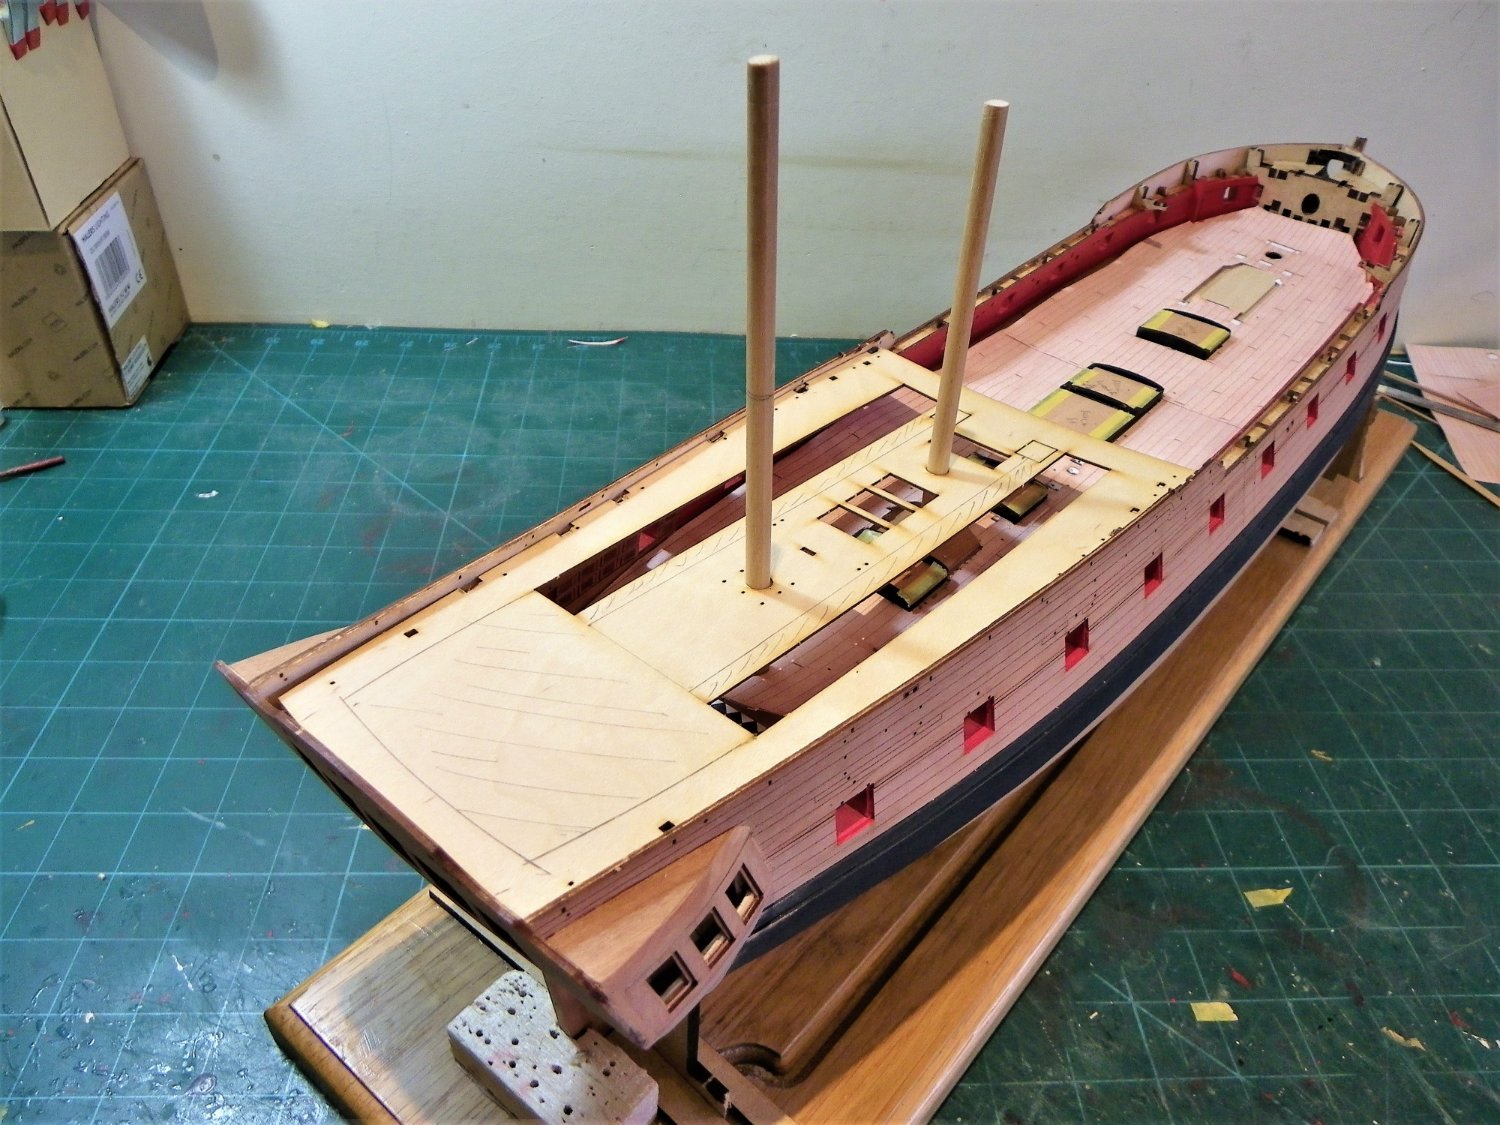
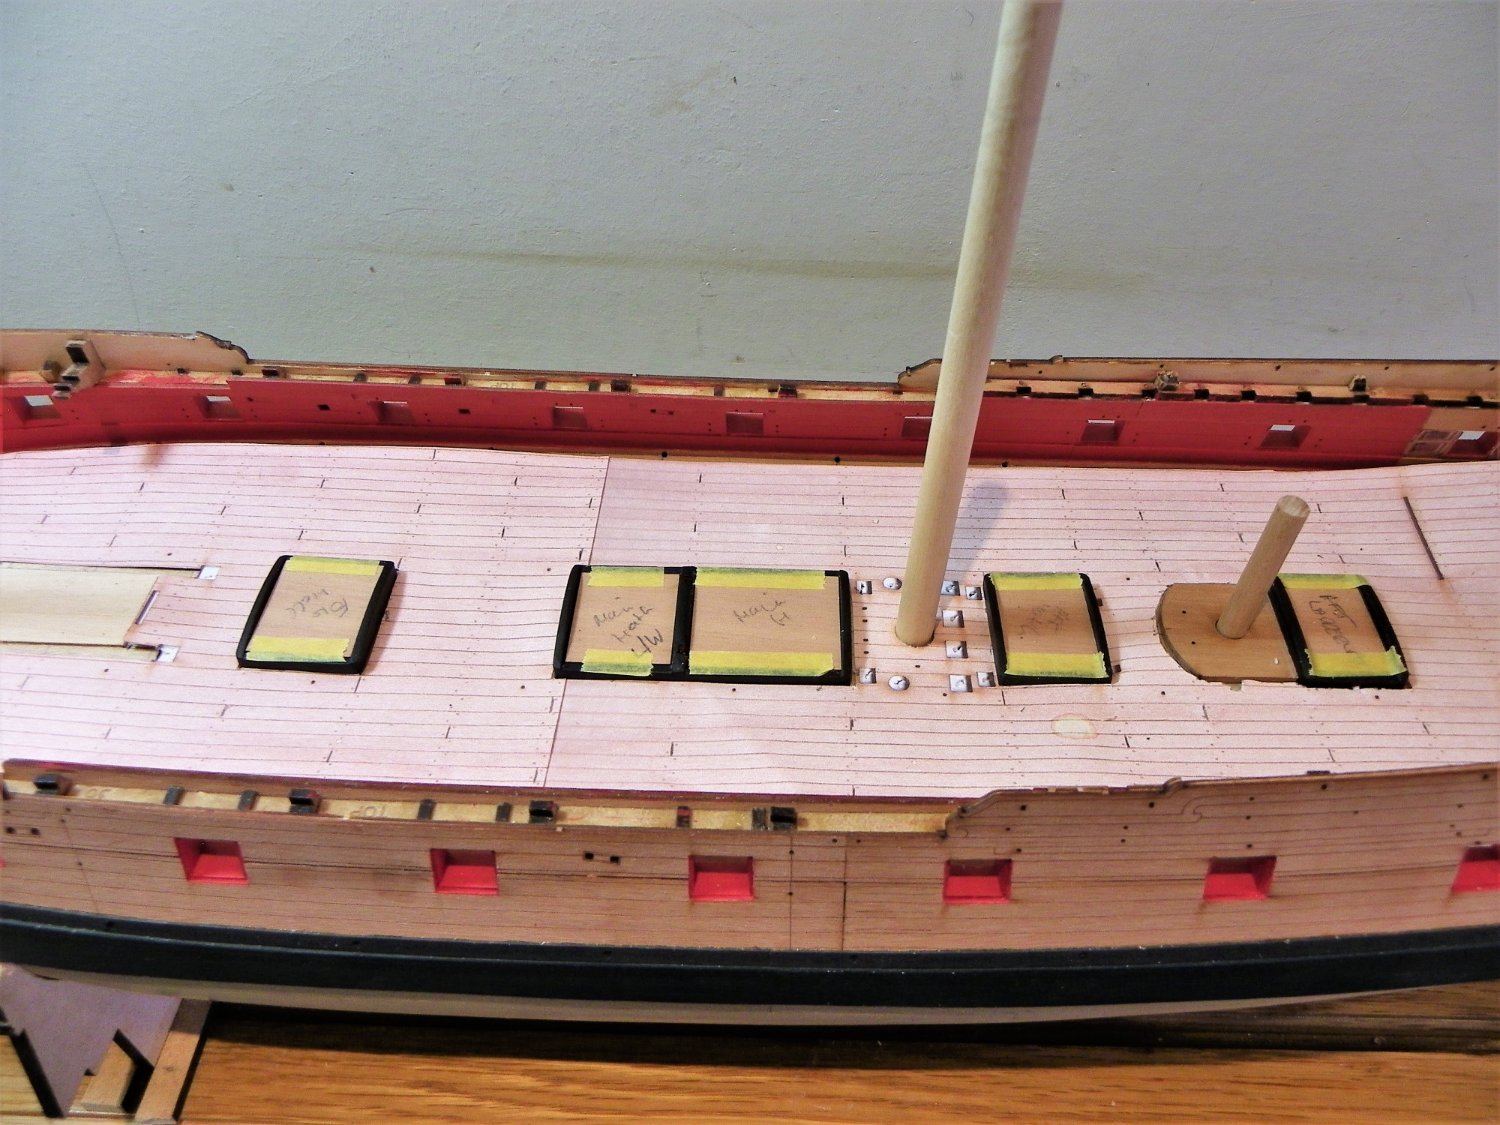
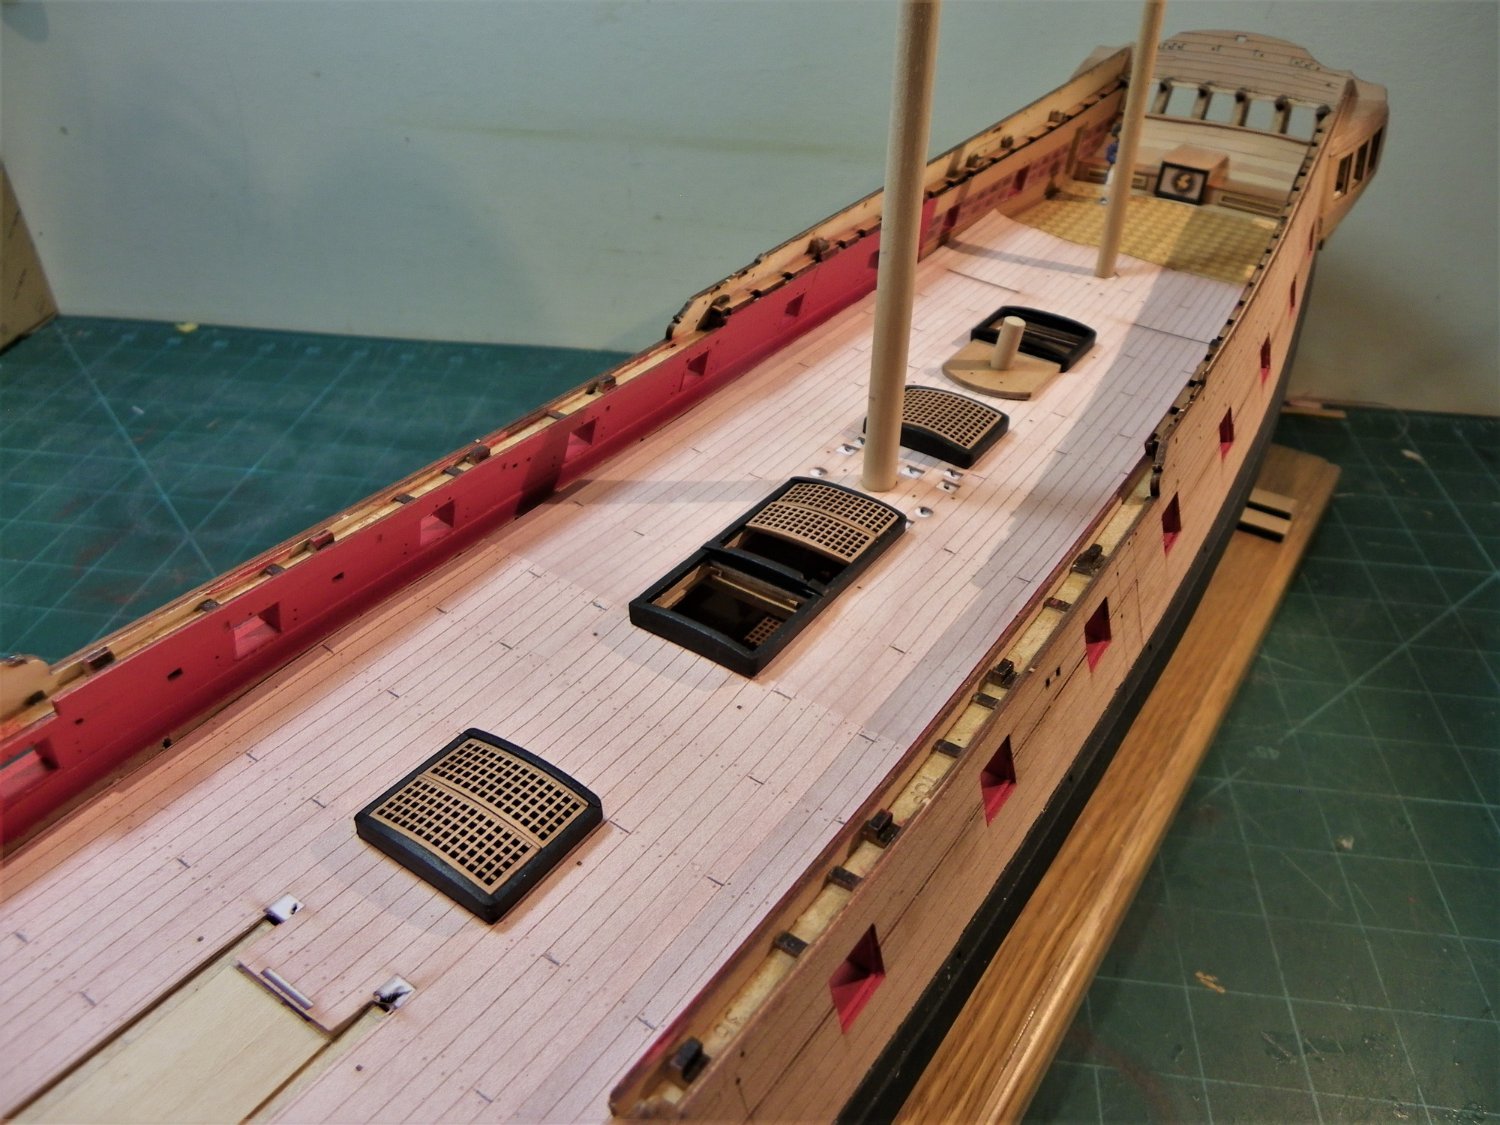
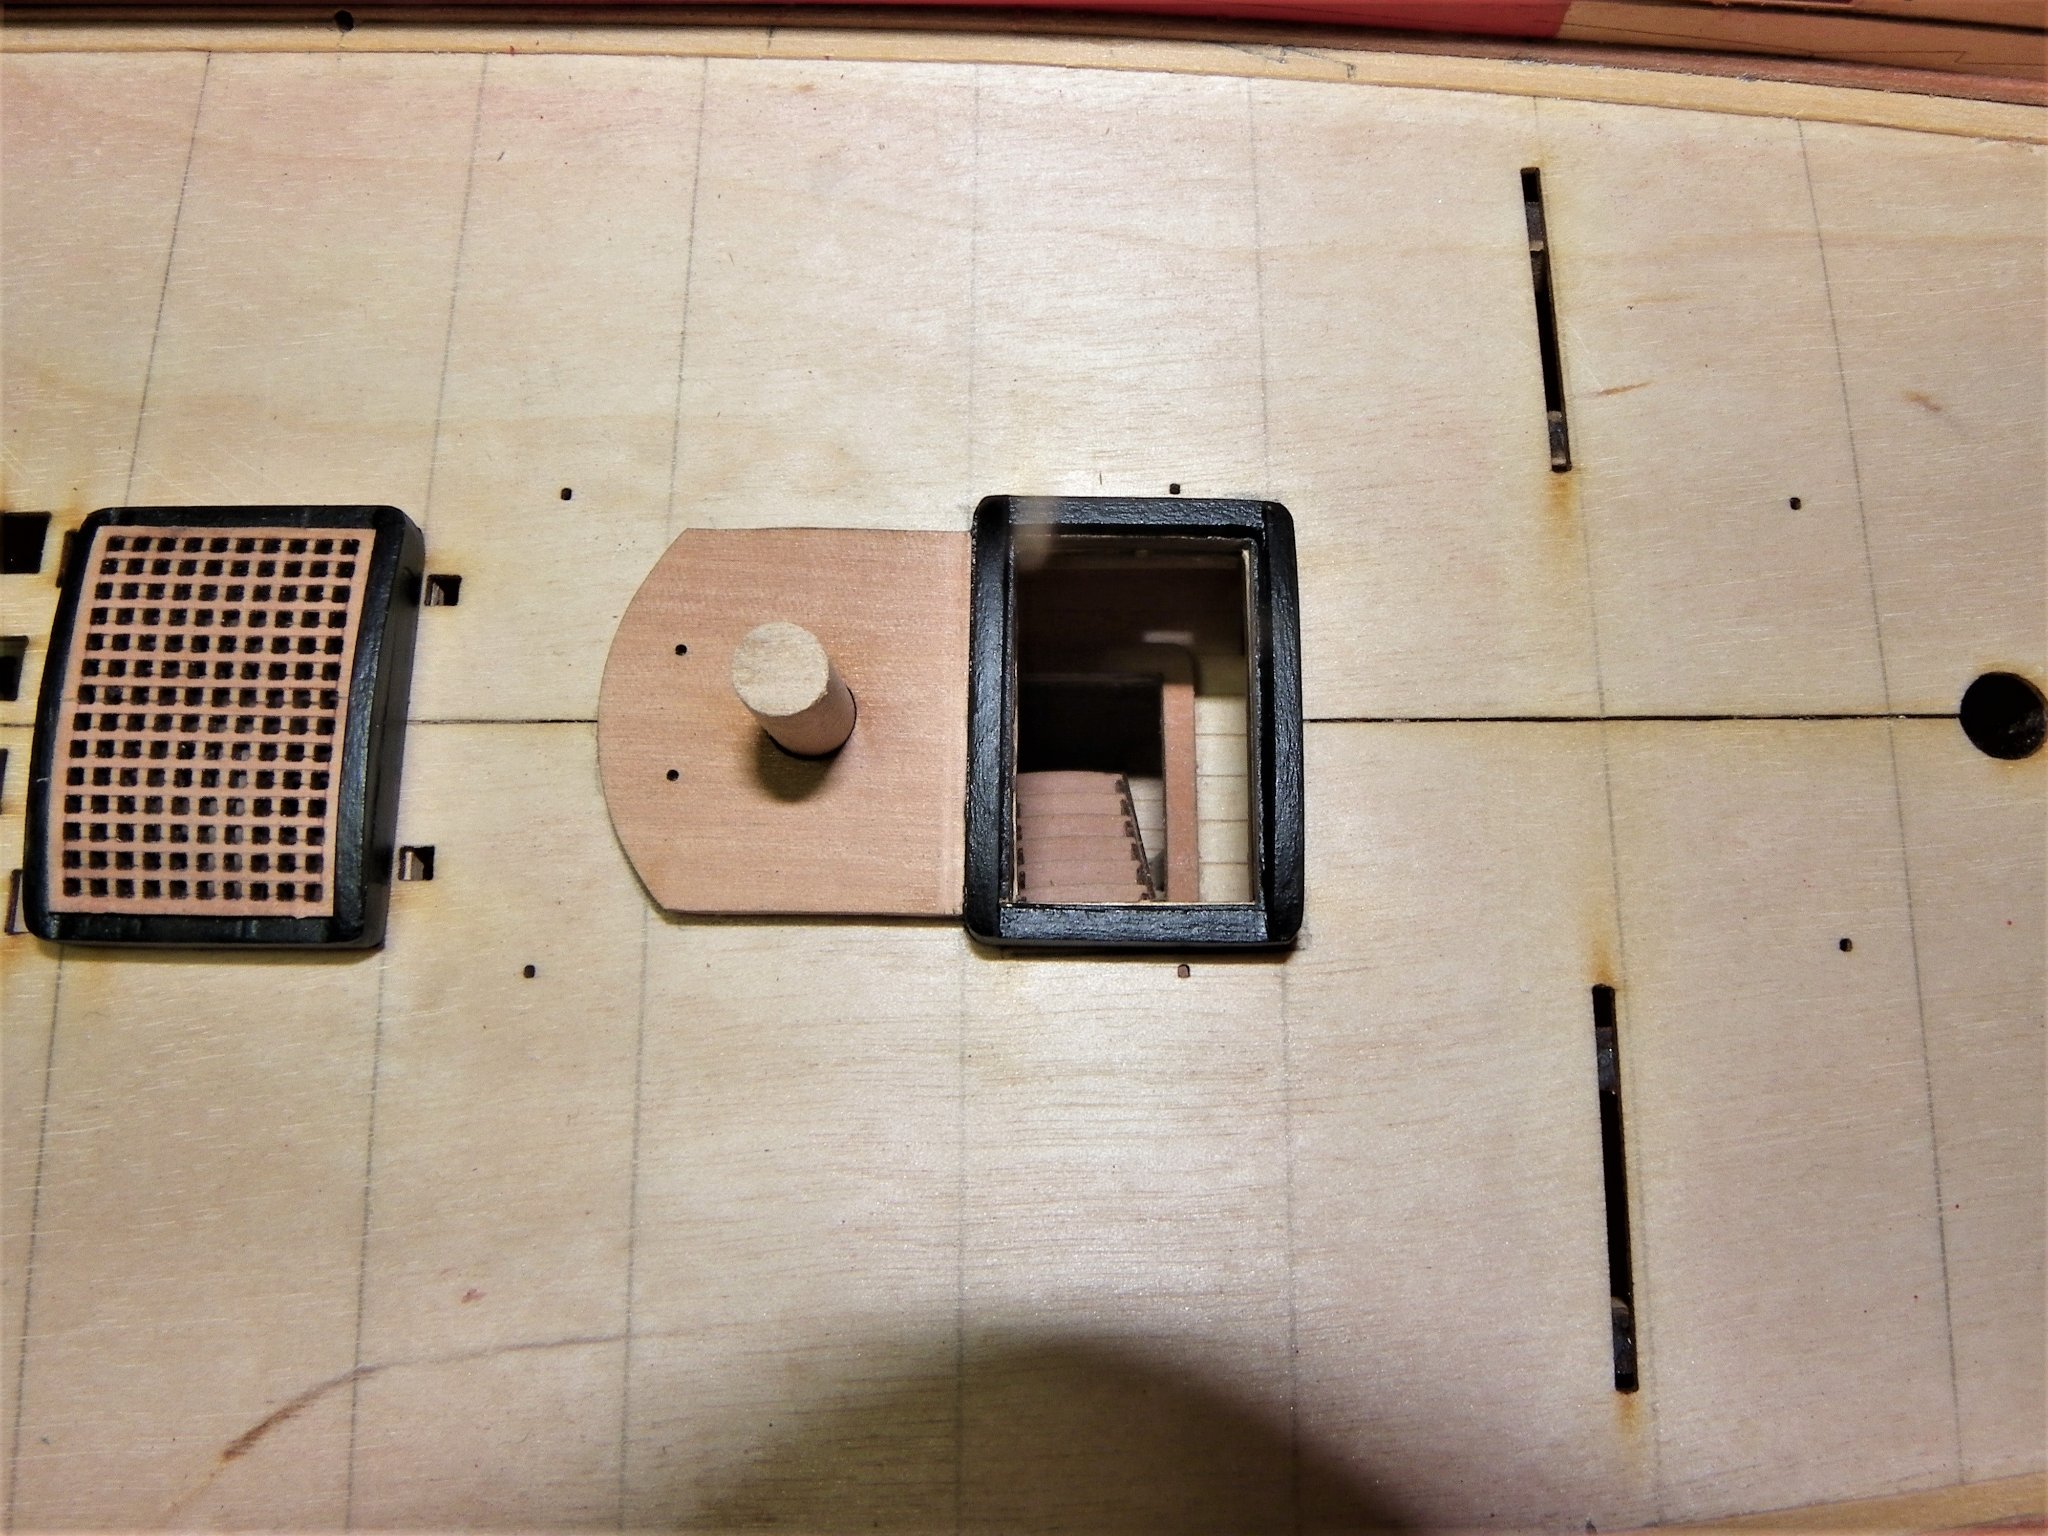
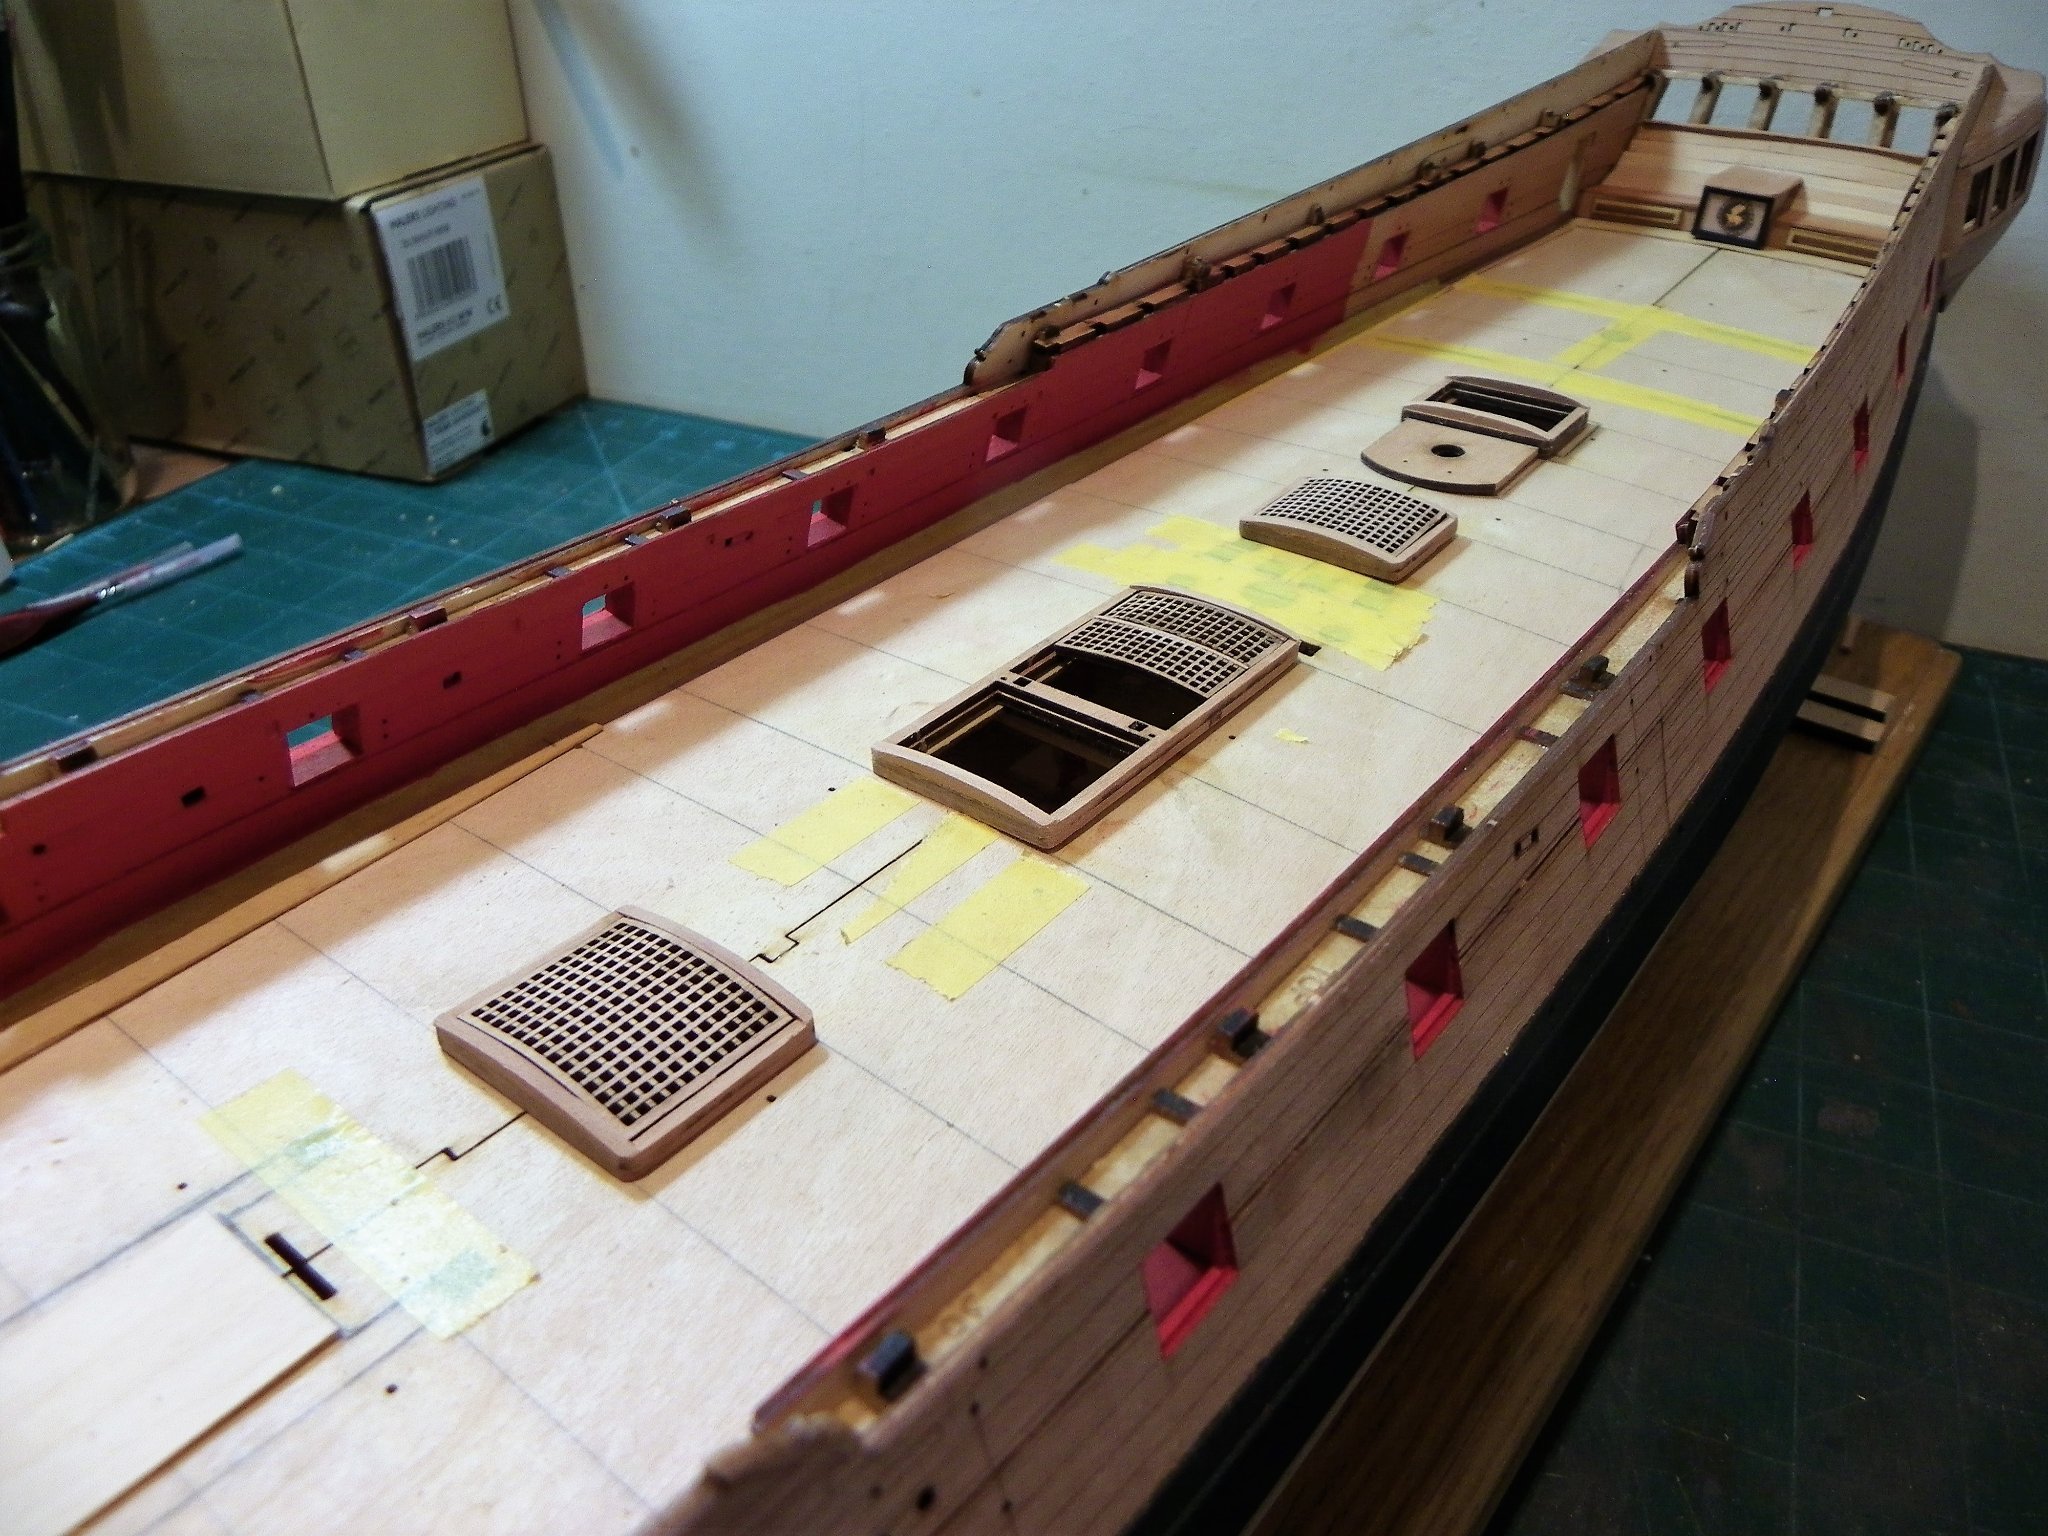
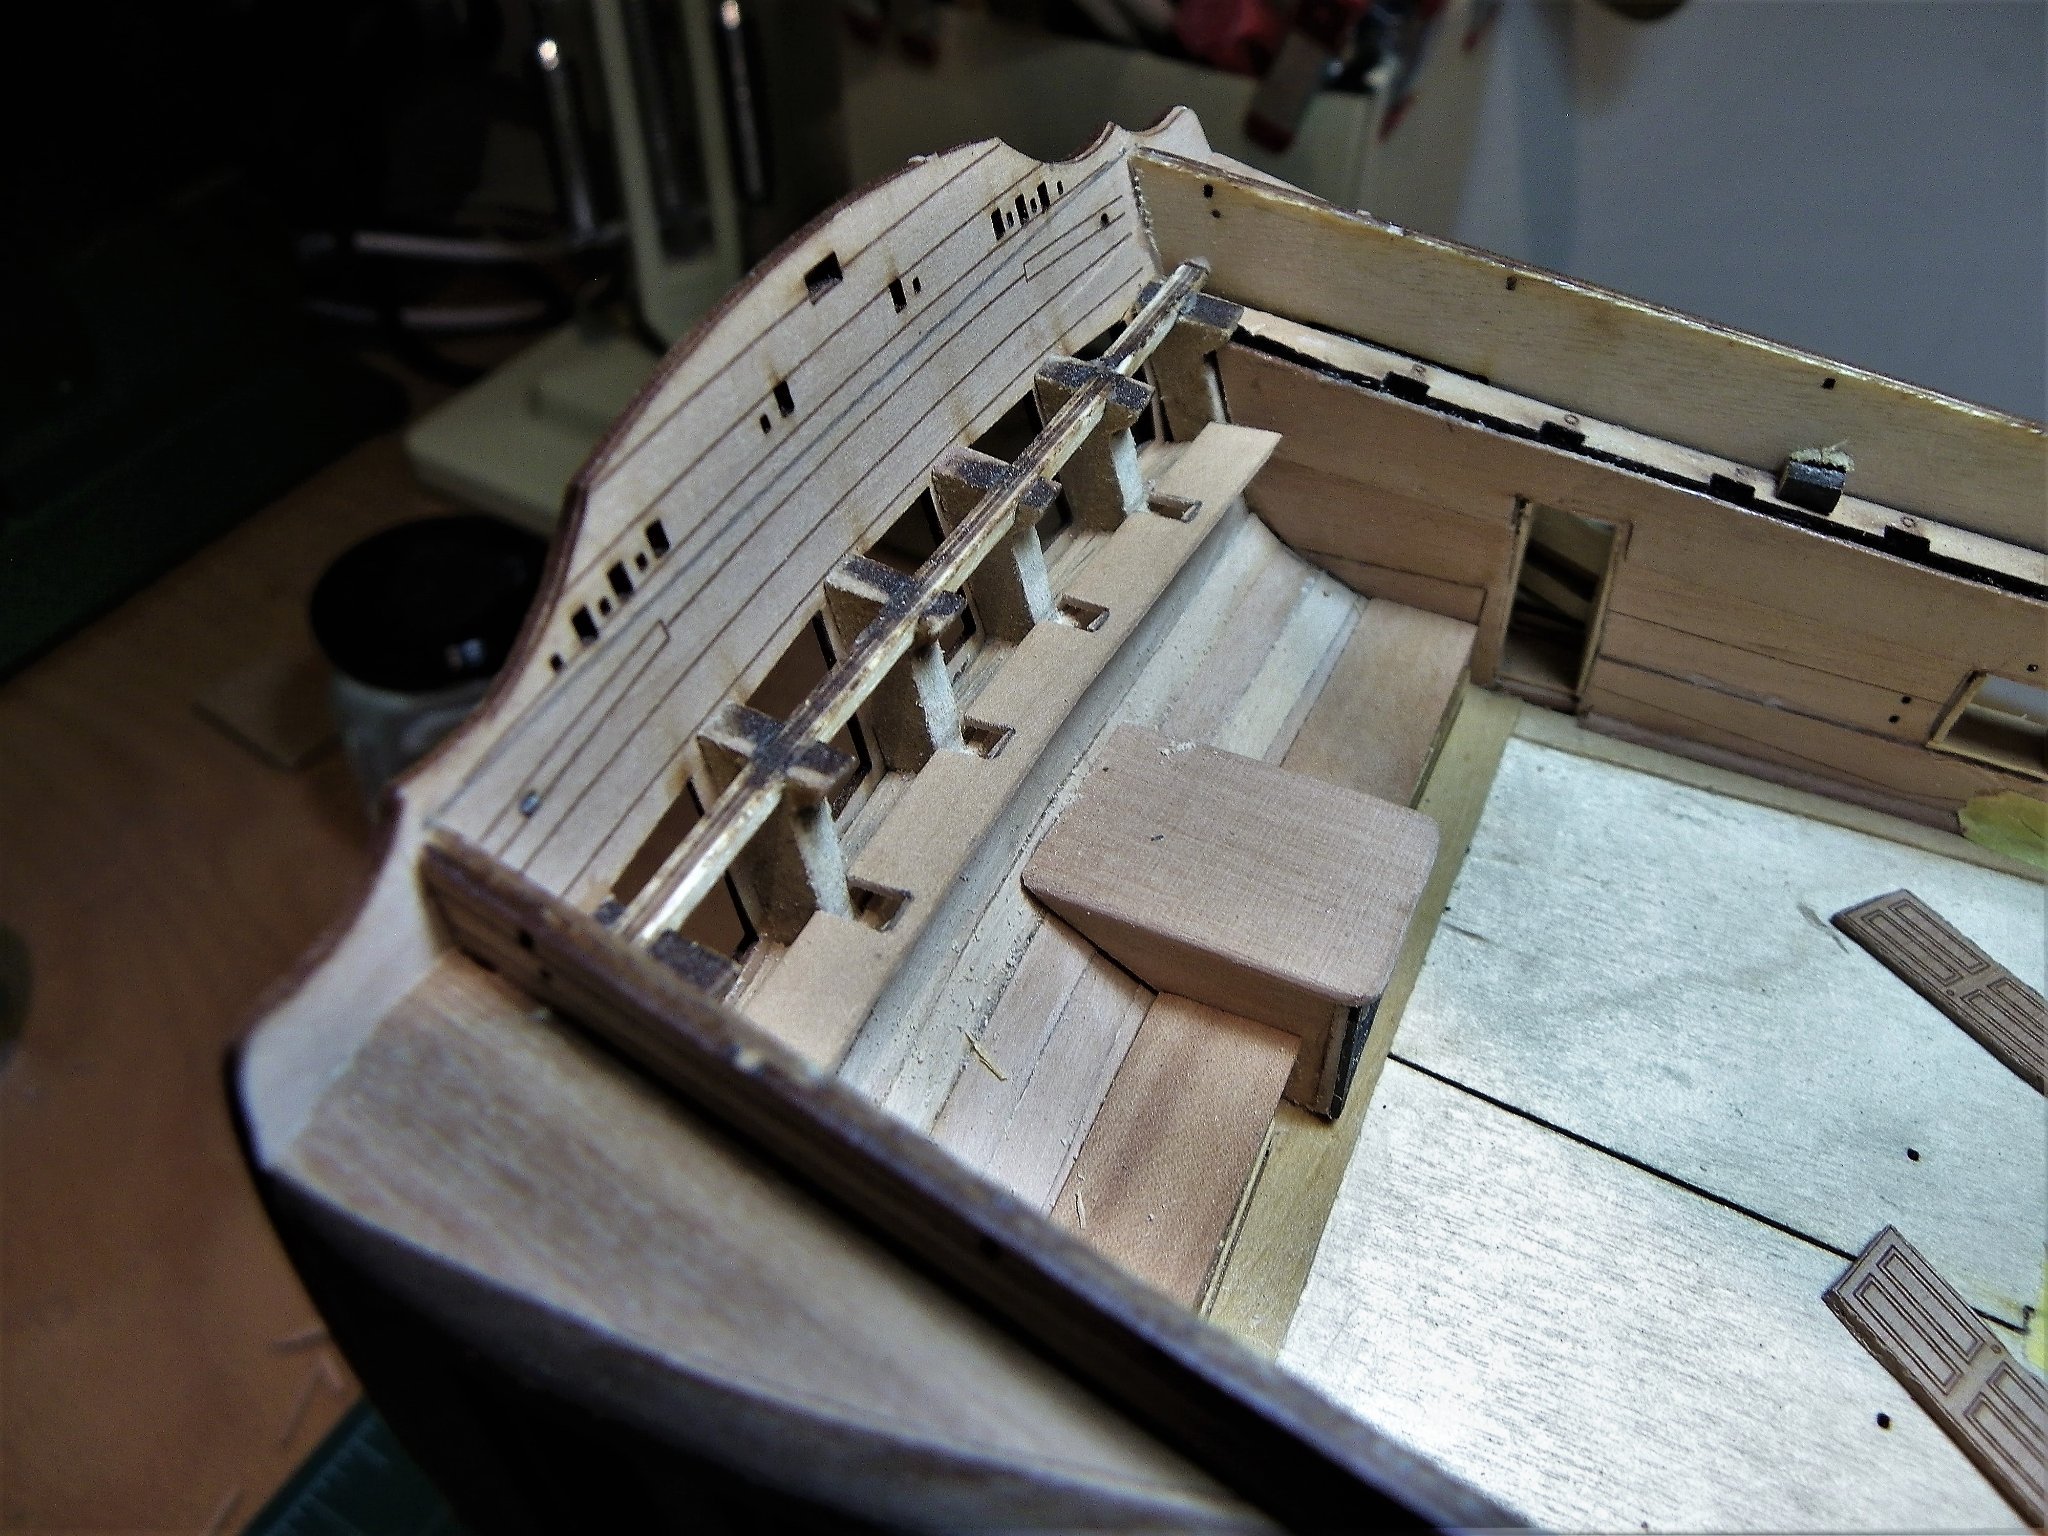
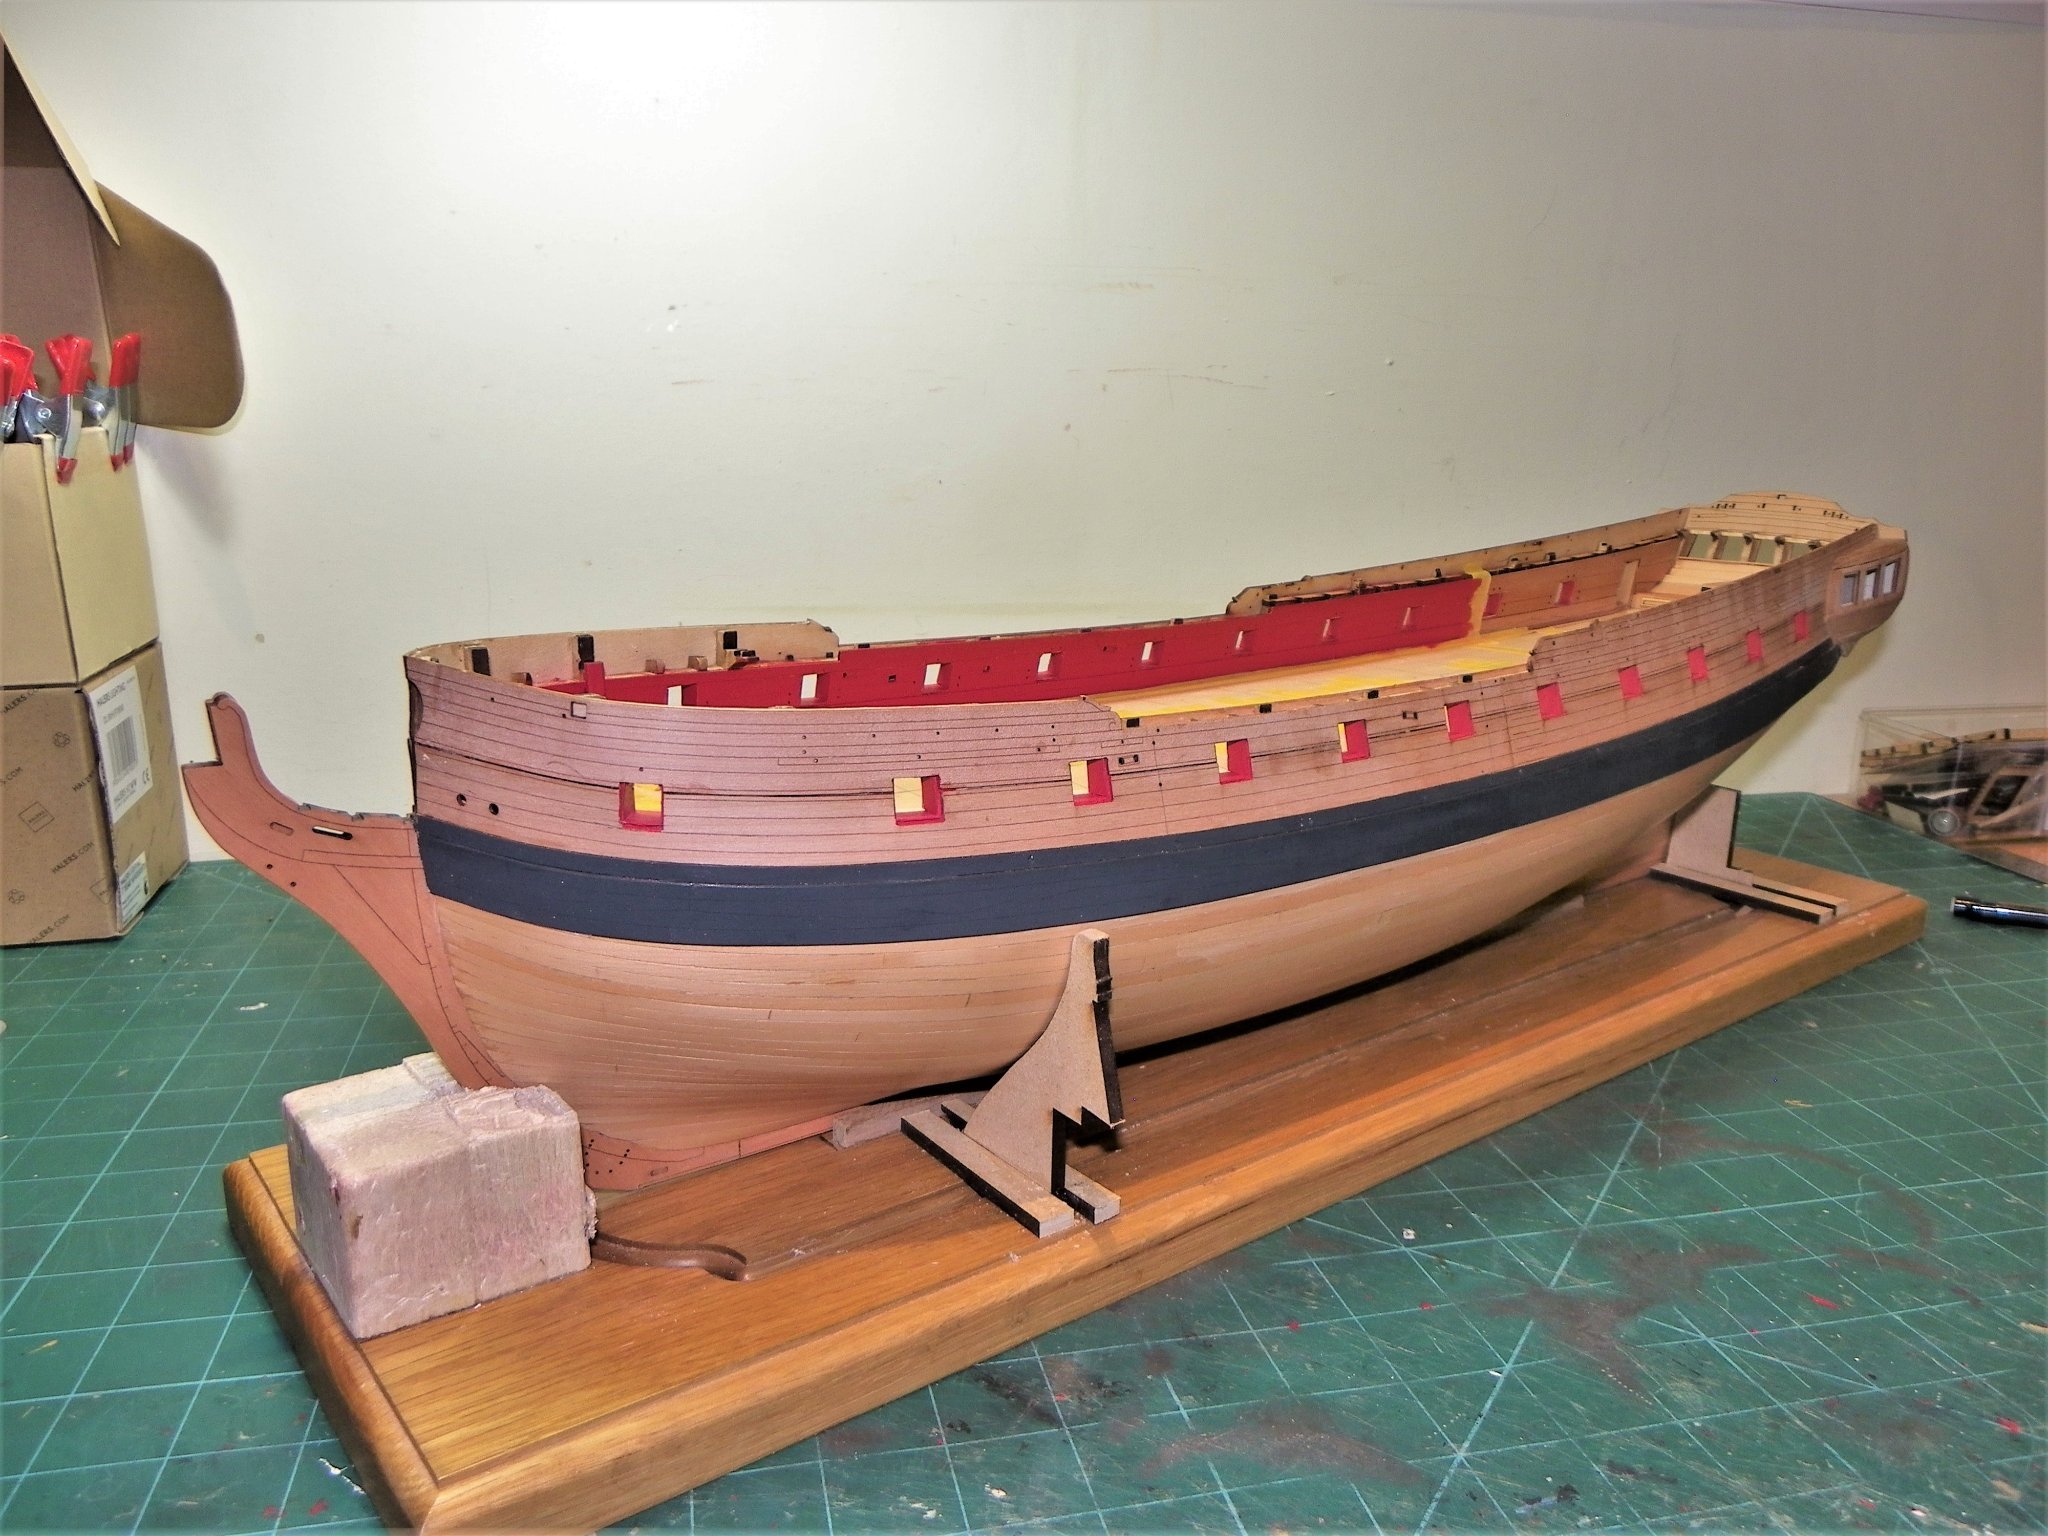
Thank you Theo and Ron. 👍 Post Fifty-nine Planking begins. The centre line coamings are at last glued into place and the gratings are temporarily replaced by the fret cut-outs to prevent stuff falling down the hatches. 2028 2029 Always worth keeping these pieces which also make good templates. One final check, the Quarter deck sub deck is tried in place to confirm that the Capstan link between the two decks aligns, along with the Mizzen Mast, I don’t want any nasty surprises down the line. 2019 2023 The hatched areas are part of the reduction in planking area, but until the deck beams are in place this can’t be progressed. As we all know there is no need for butt shifts between the hatches etc; the shorter plank lengths preclude such requirements. My primary planking strips will be of 3.4mm and 4.5mm. I trialled different approaches to the initial planking layout; a plank along the middle line of the deck, or planks each side of the middle line. I settled on planks either side of the middle line. 2066 2064 The kit plan butt joints and shifts are marked on the false deck, but in practice there will almost certainly be variations as planking progresses. 2067 These are a combination of 3.4mm and 4.5mm wide planks to give the best result between the hatches. The binding strakes will have tabs to meet the coamings and avoid the otherwise narrow planking strips. 2053 2048 2052(2) Work will now continue on the planking. B.E. 04/01/22


ps.thumb.jpg.01135987890a3a02539fff112c5737e4.jpg)
- 857 replies
-
- 24
-
-
- Sphinx
- Vanguard Models
- (and 1 more)
-
She looks very nice Andy, and I like the blue ground to the Topsides . Good to see you progressing the build. B.E.
-
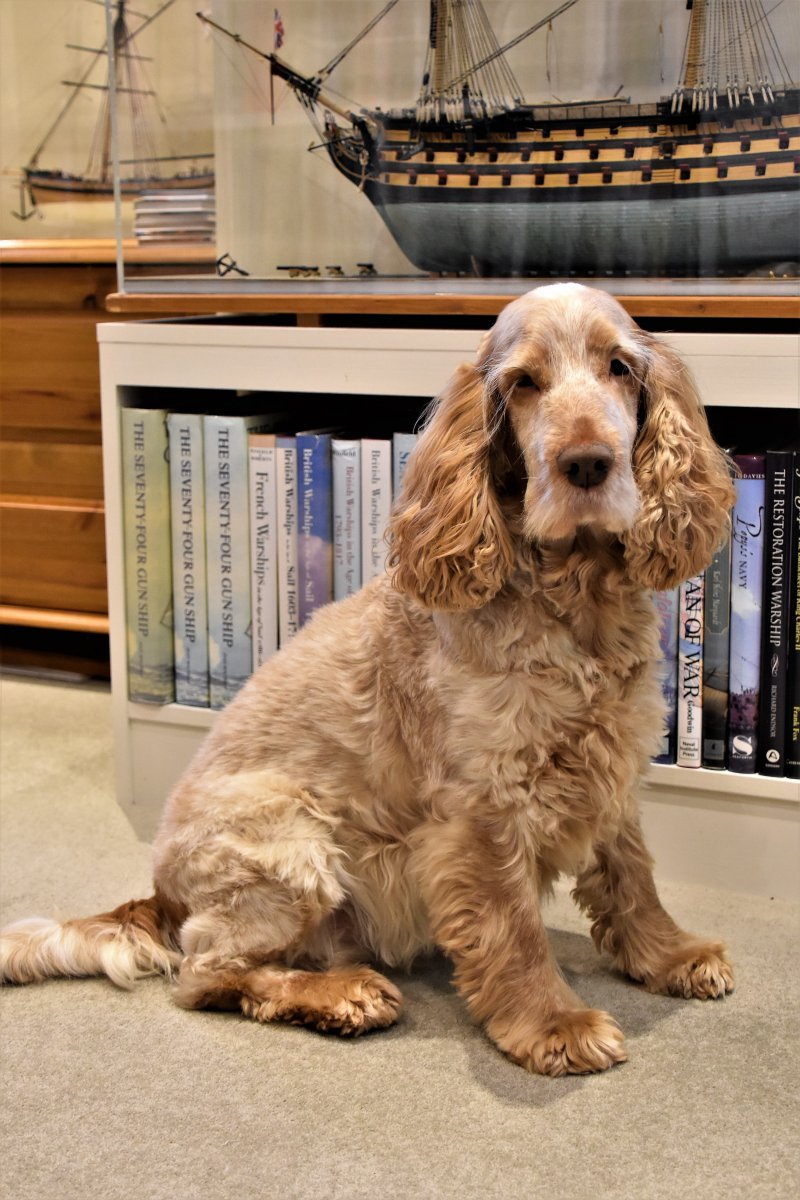
Nice one Glenn, rest assured I will be coaming thro’ all my options to resolve the issue. @ Derek – there’s a great British tradition of blaming it on the dog, and I’m sure Hector is simply lulling you into a false sense of security, dogs are great at playing the long game. Cheers, B.E.
- 857 replies
-
- 7
-

-
-
- Sphinx
- Vanguard Models
- (and 1 more)
-
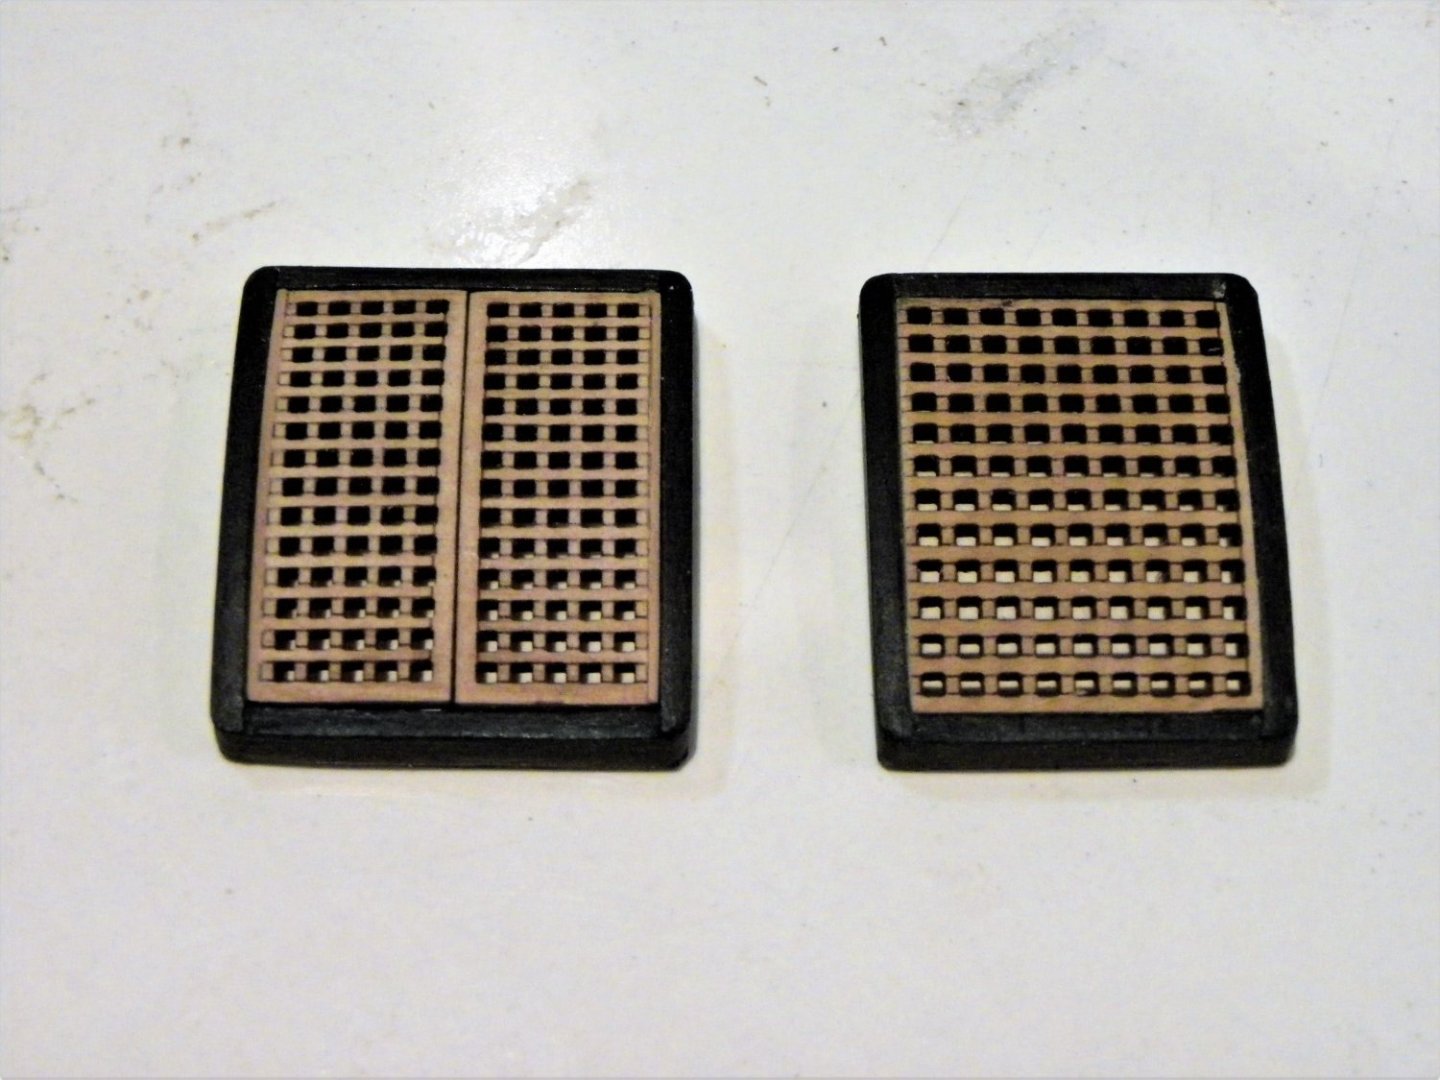
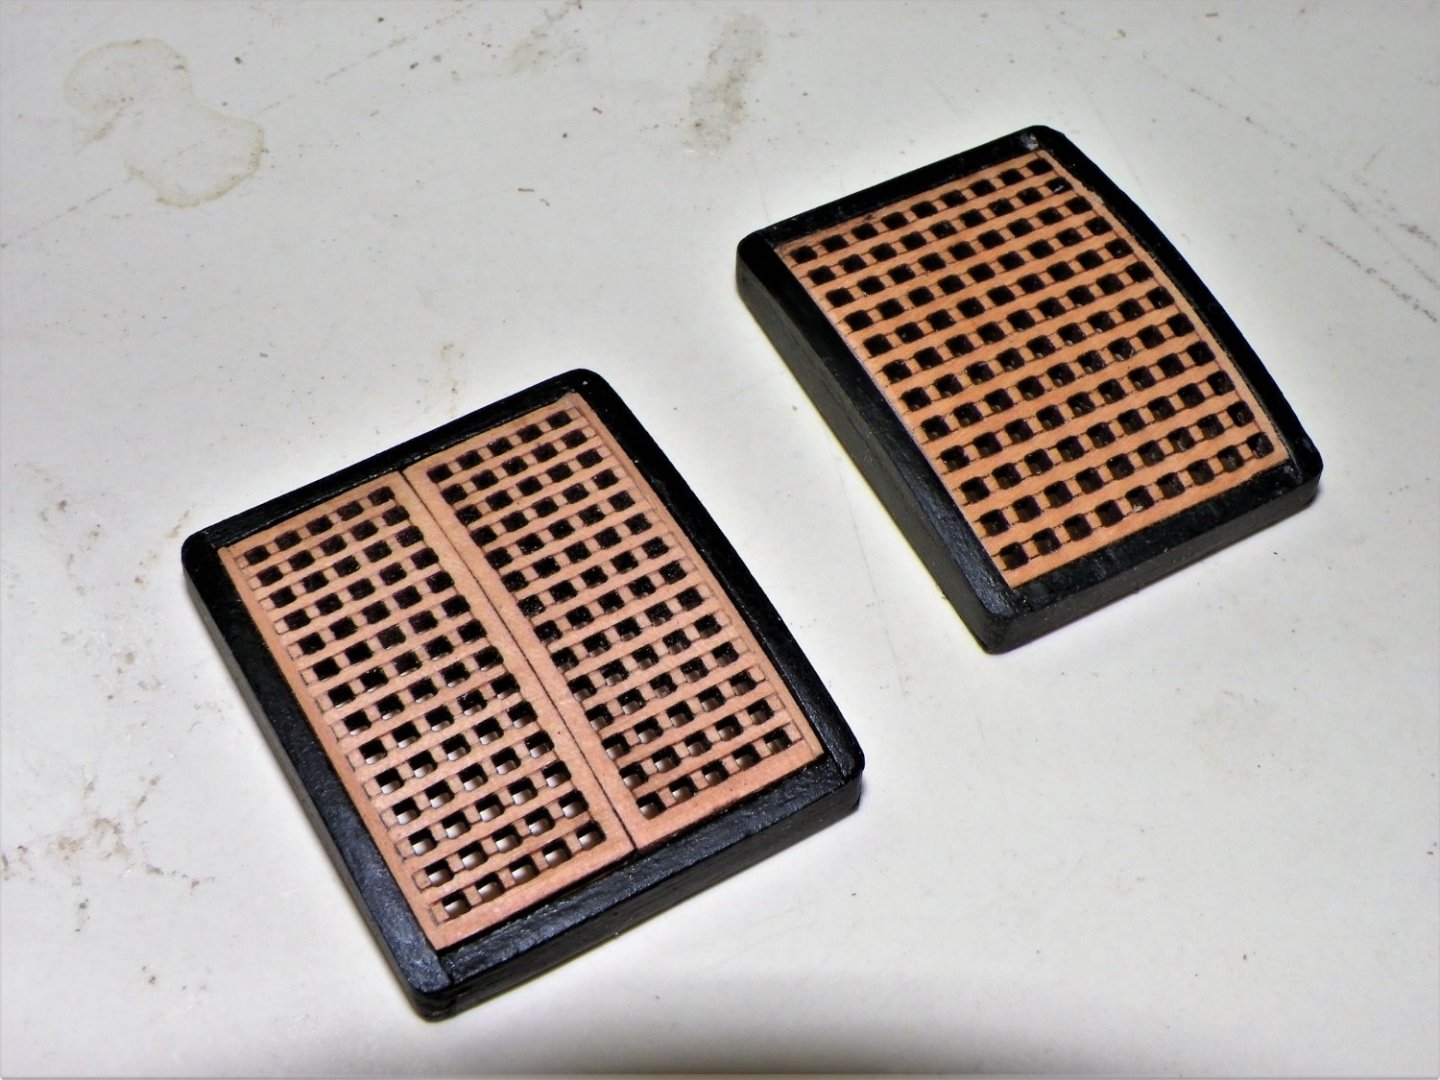
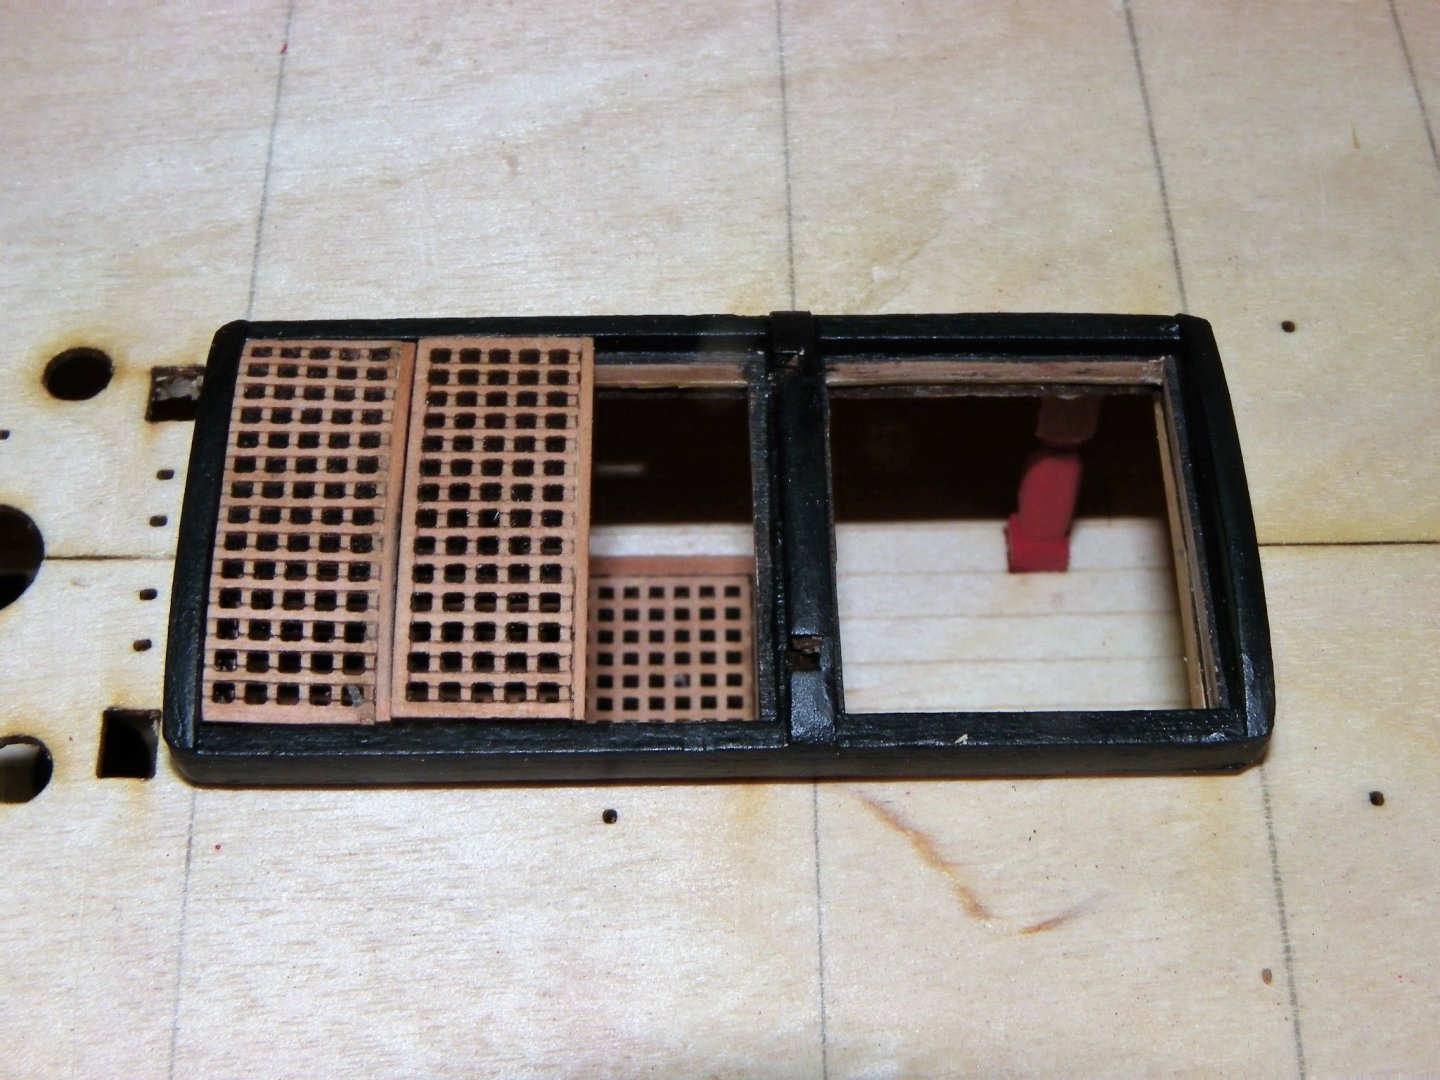
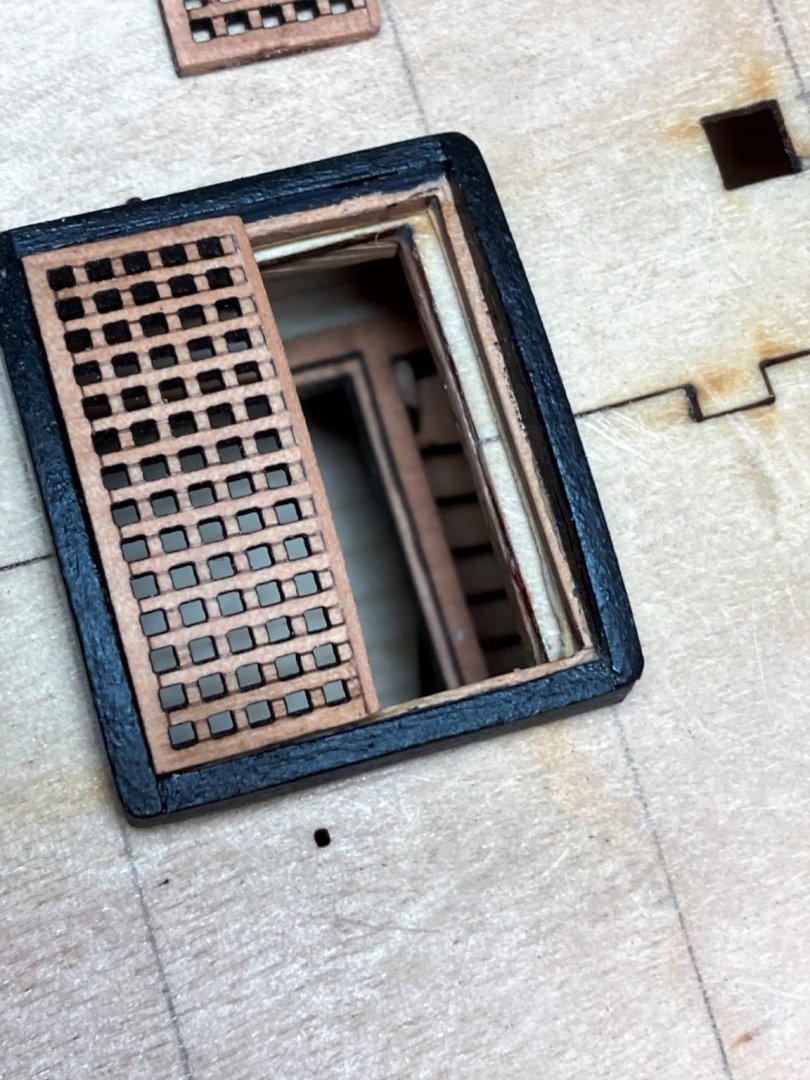
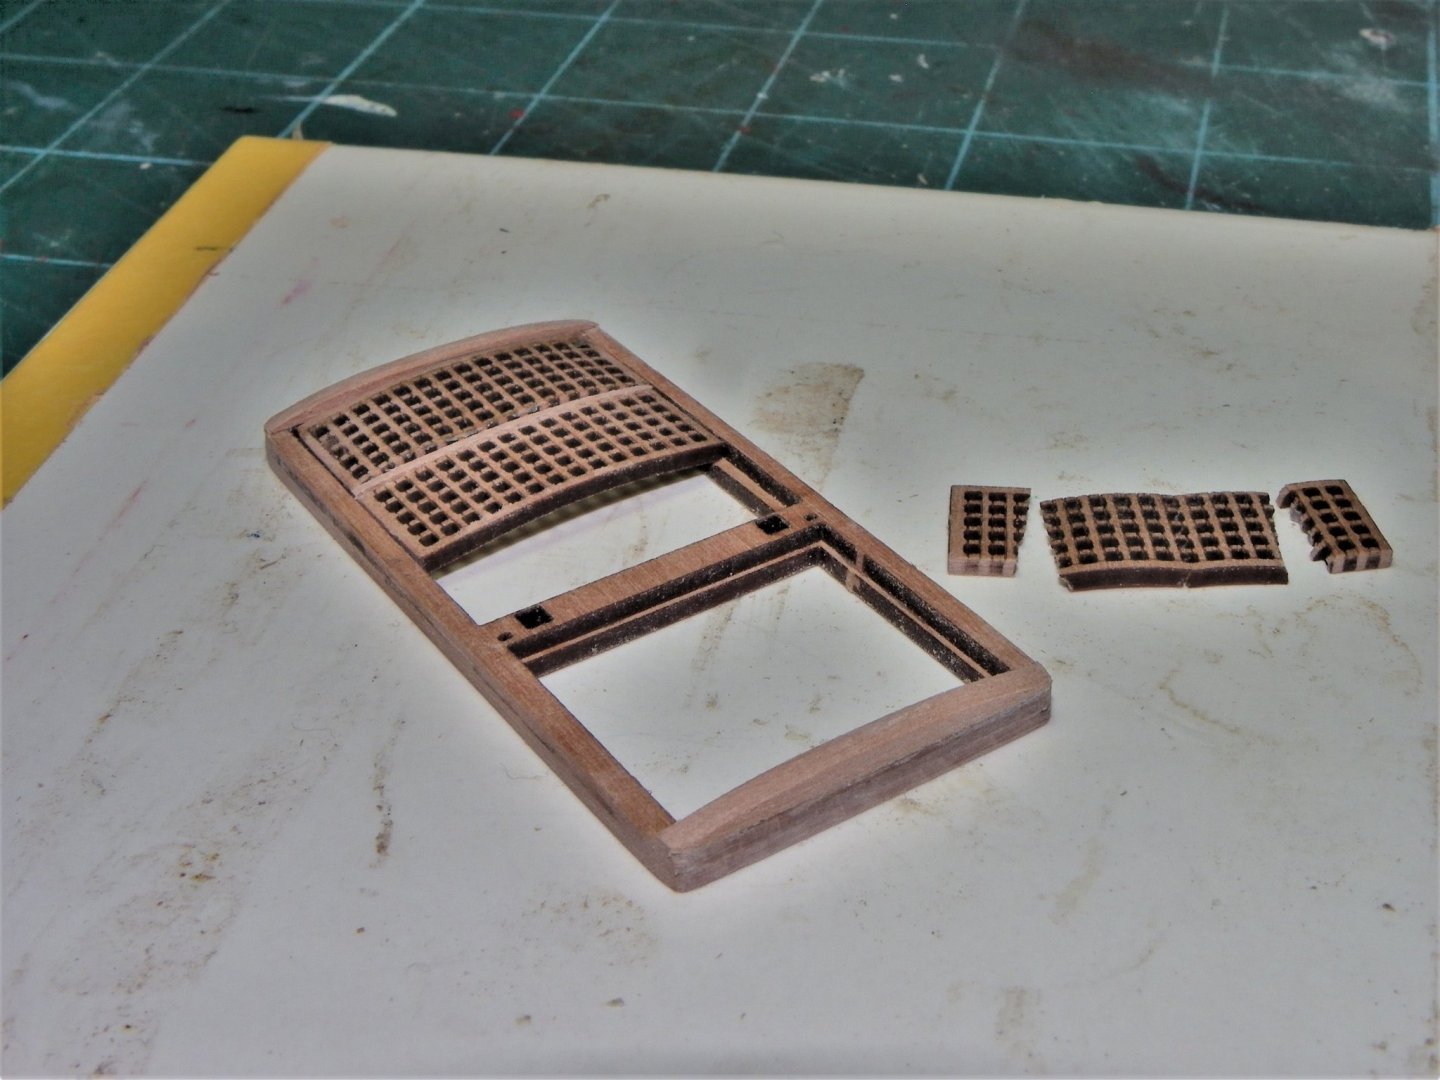
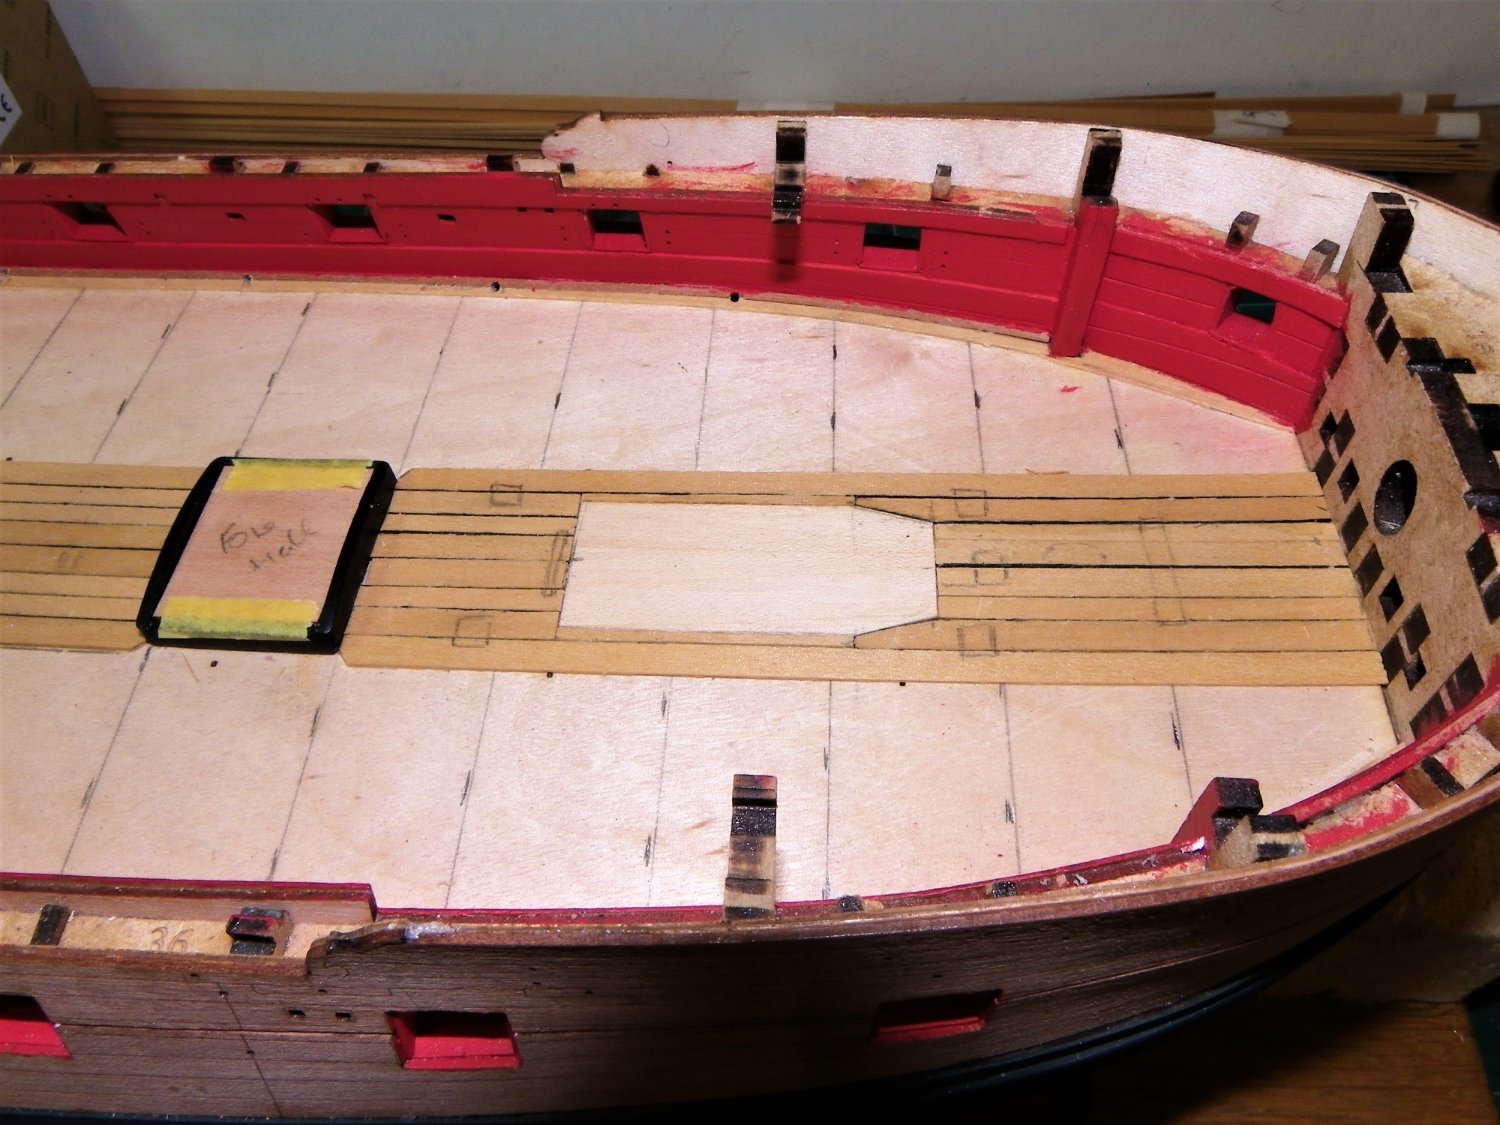
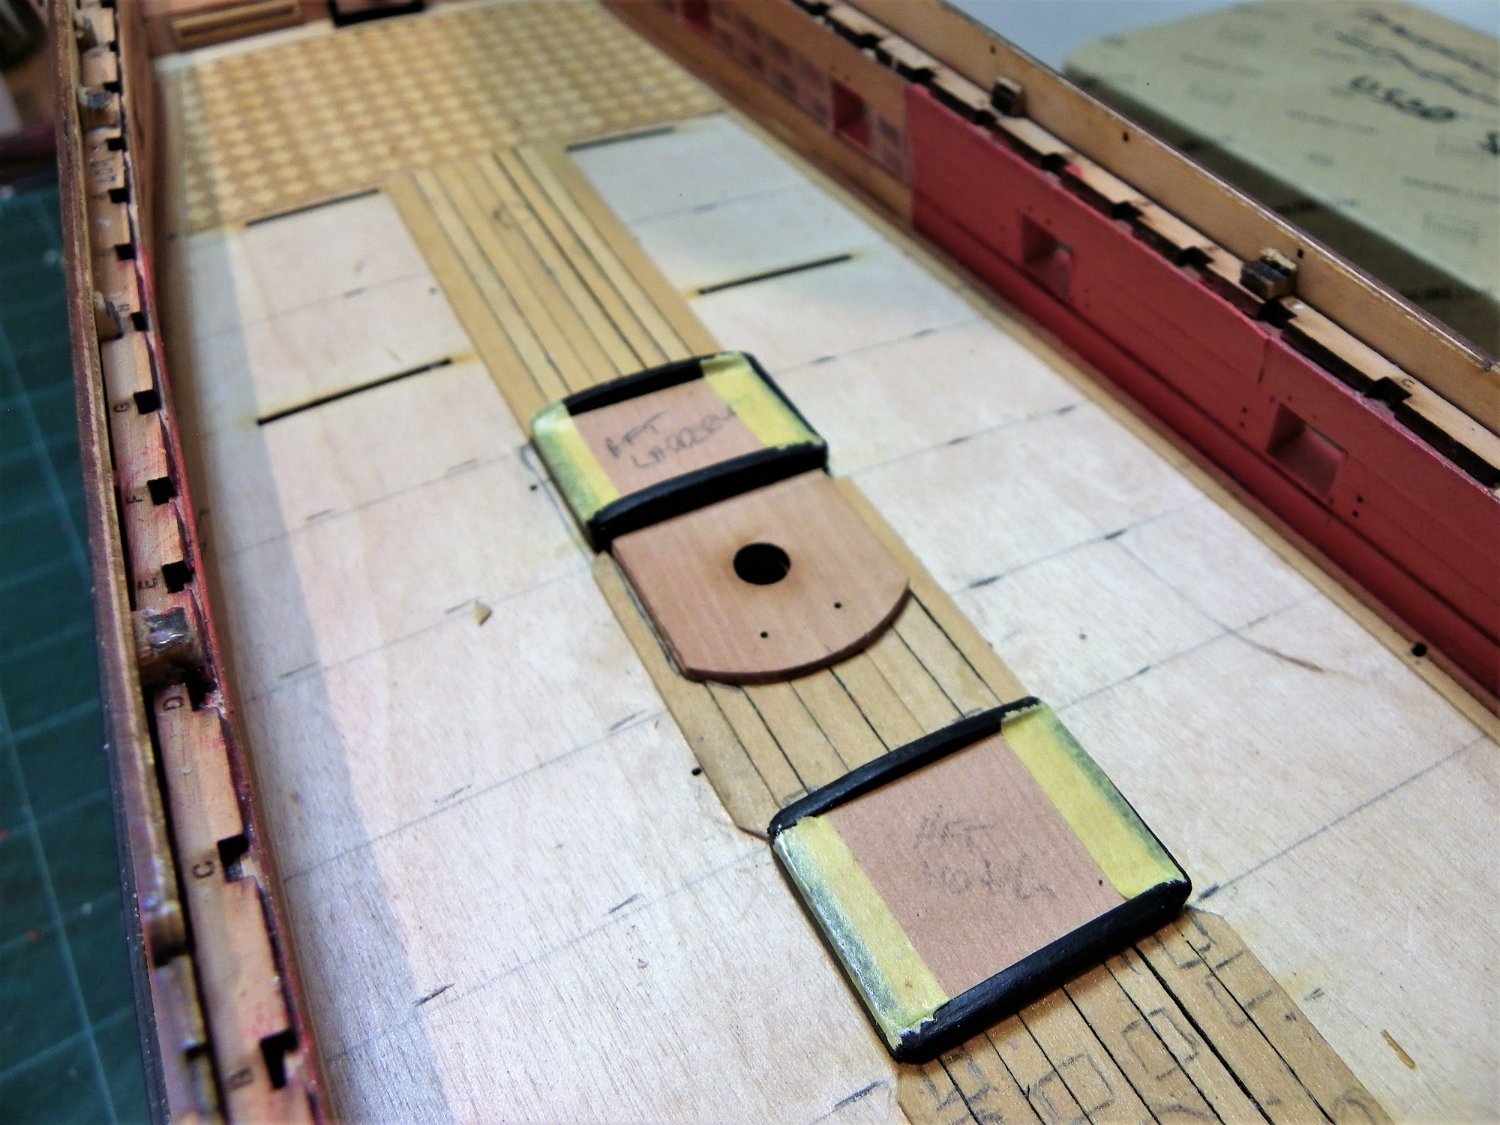
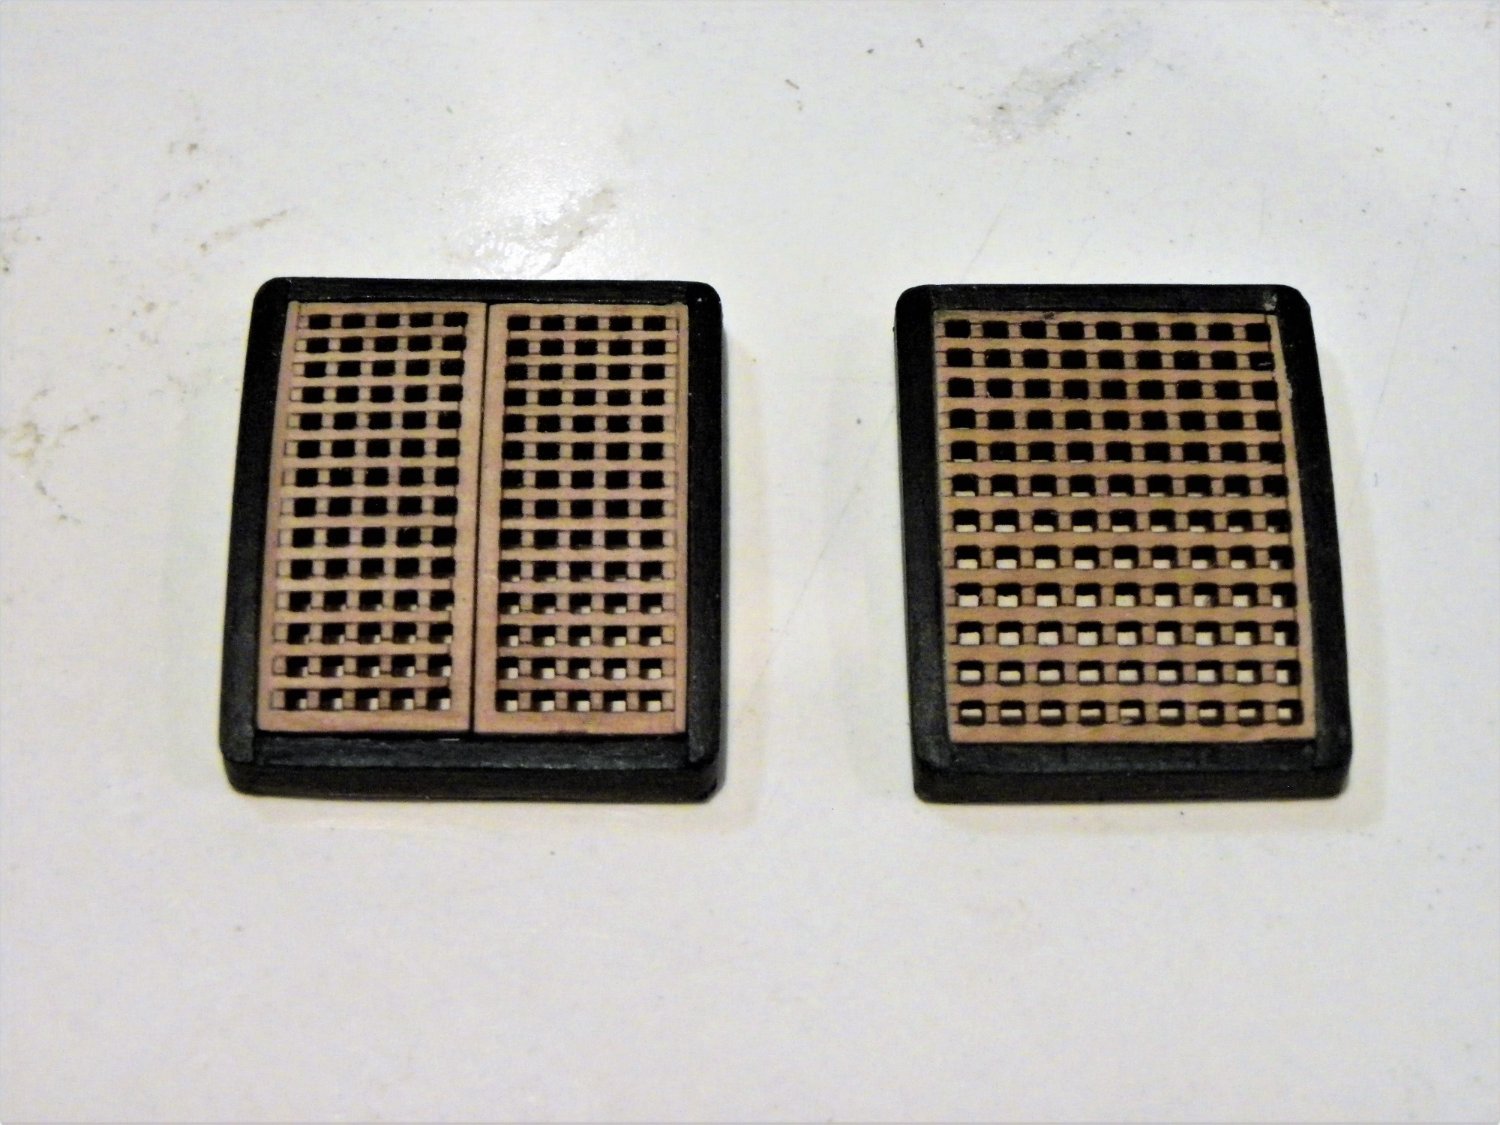
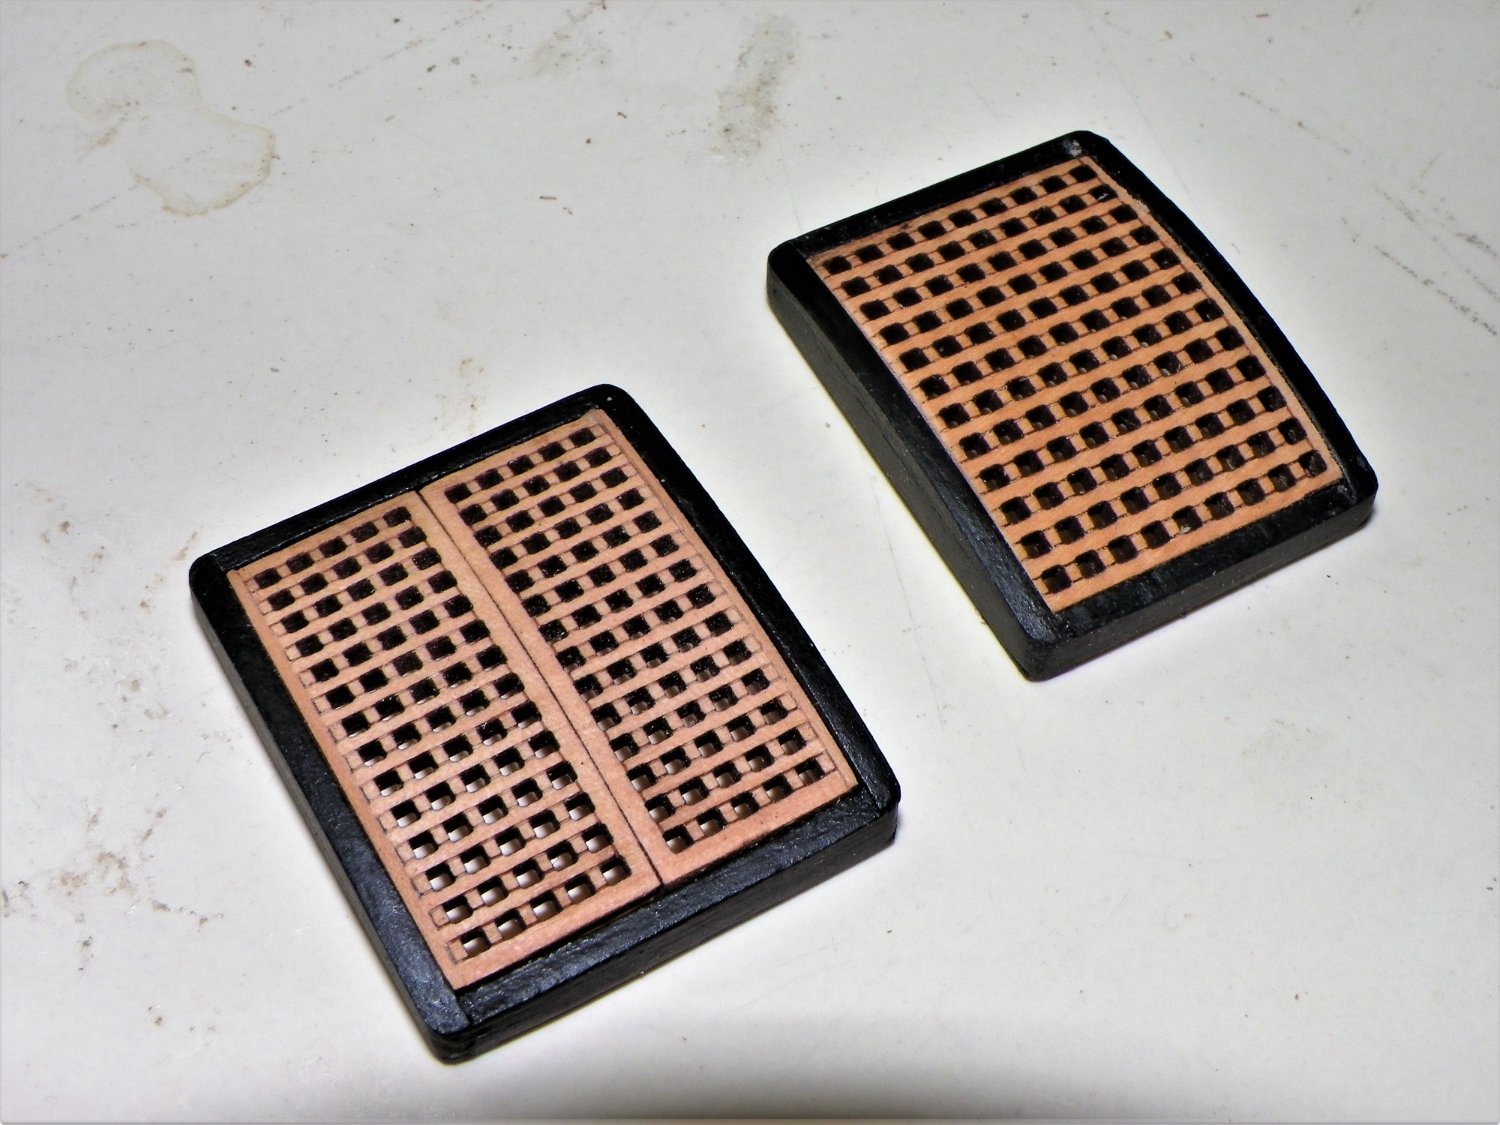
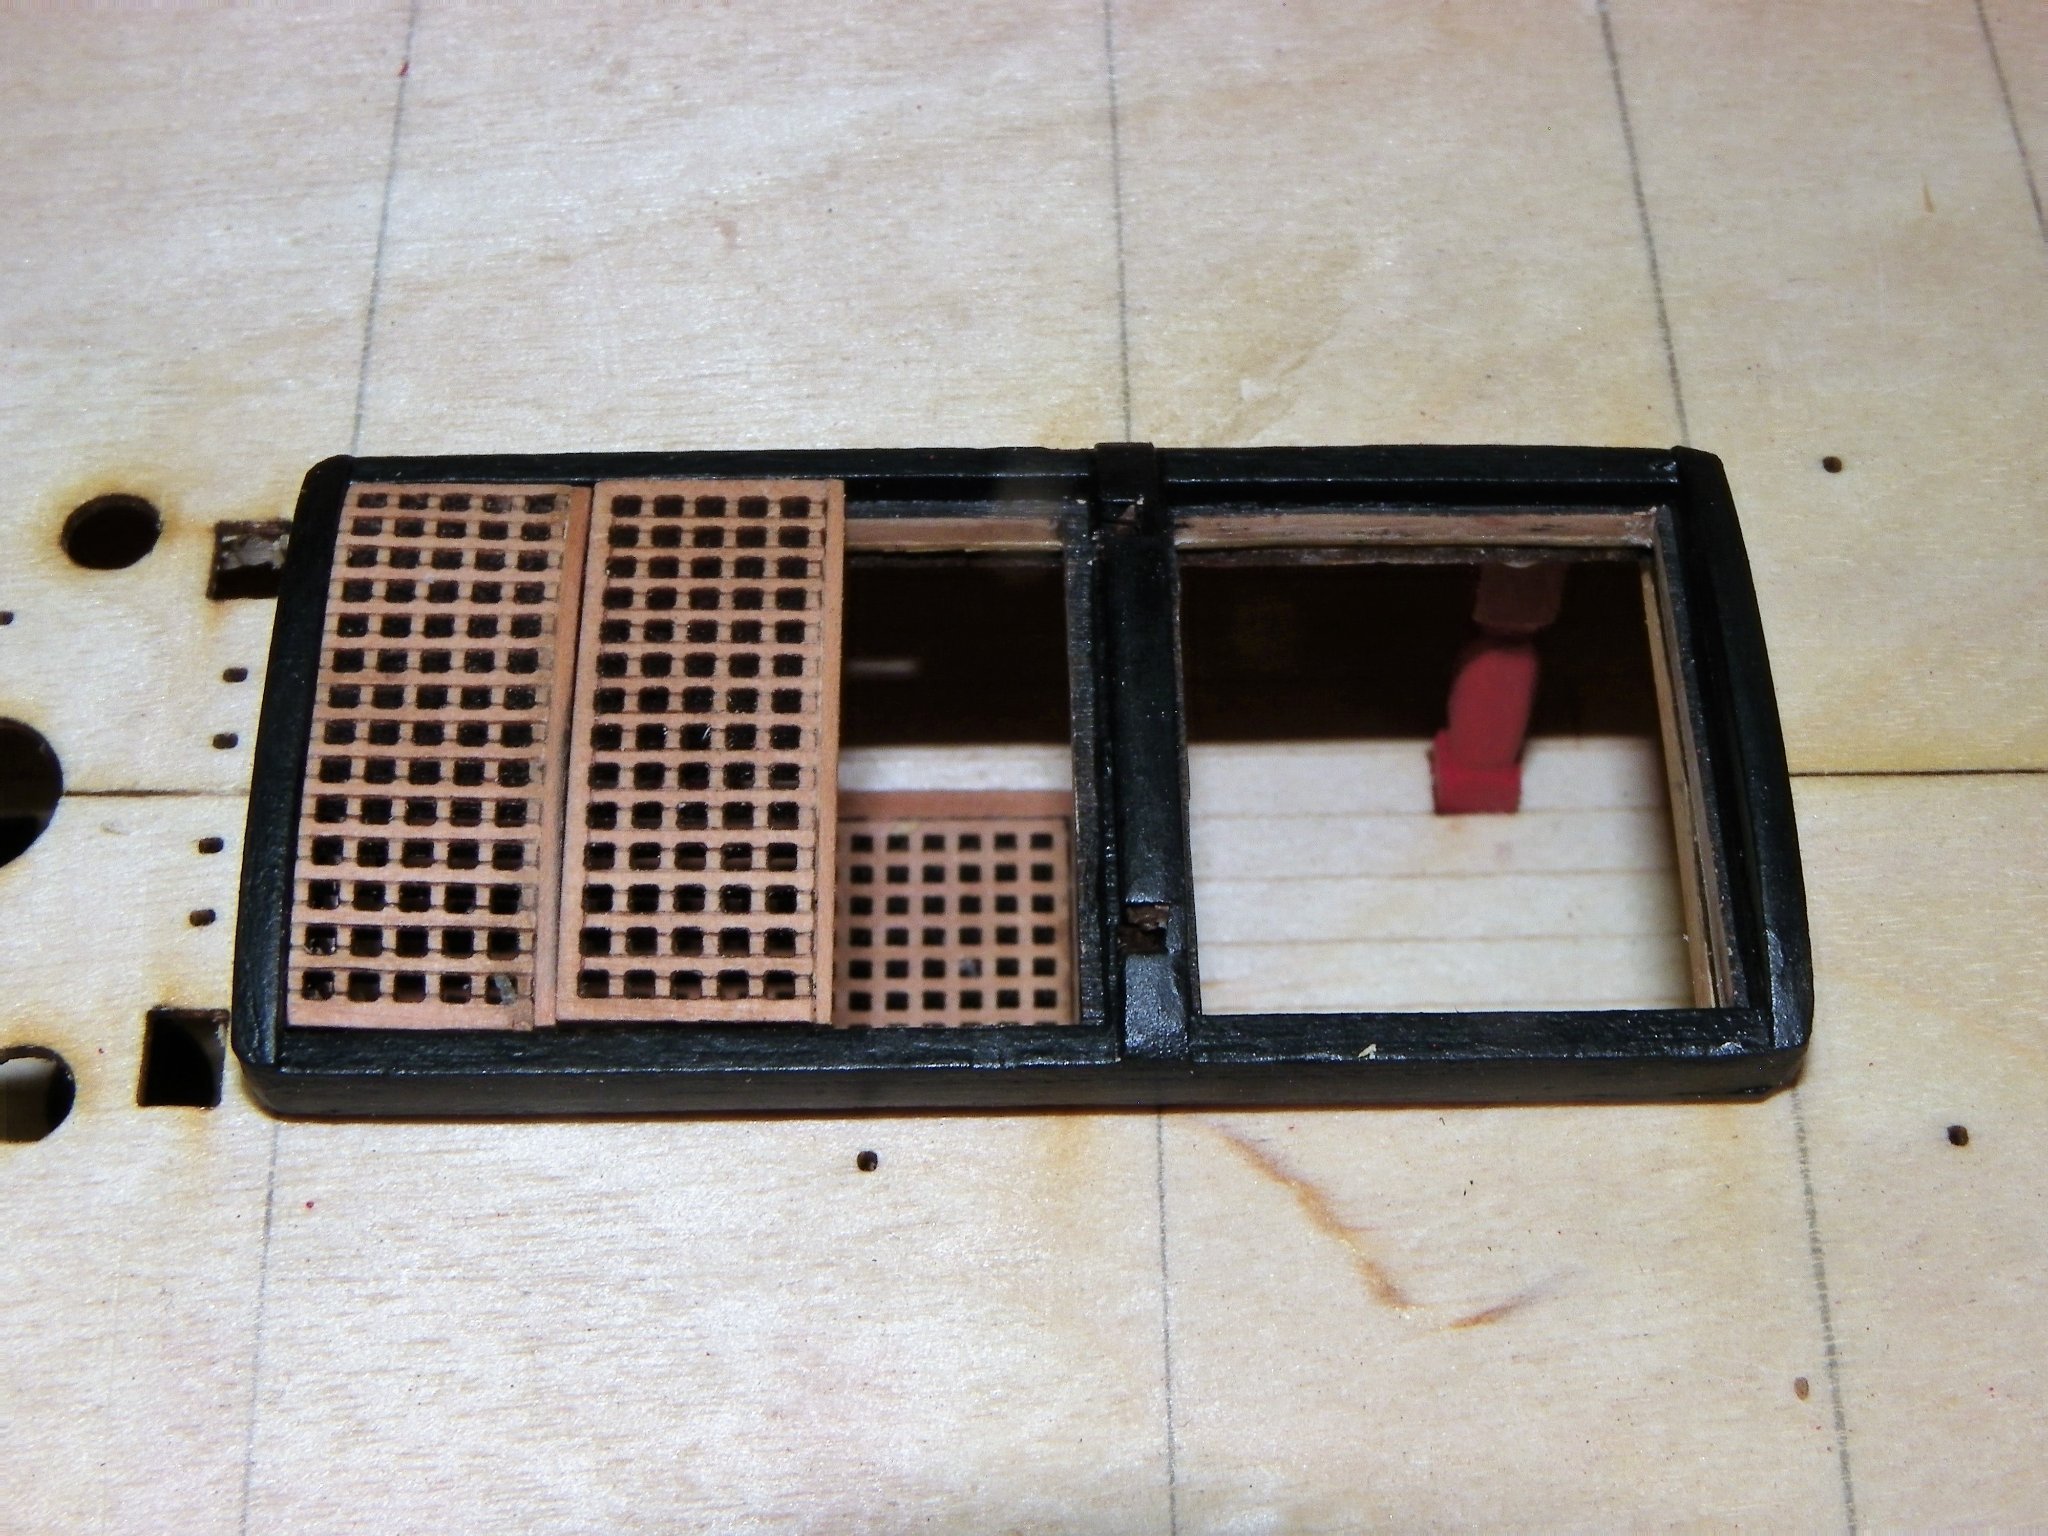
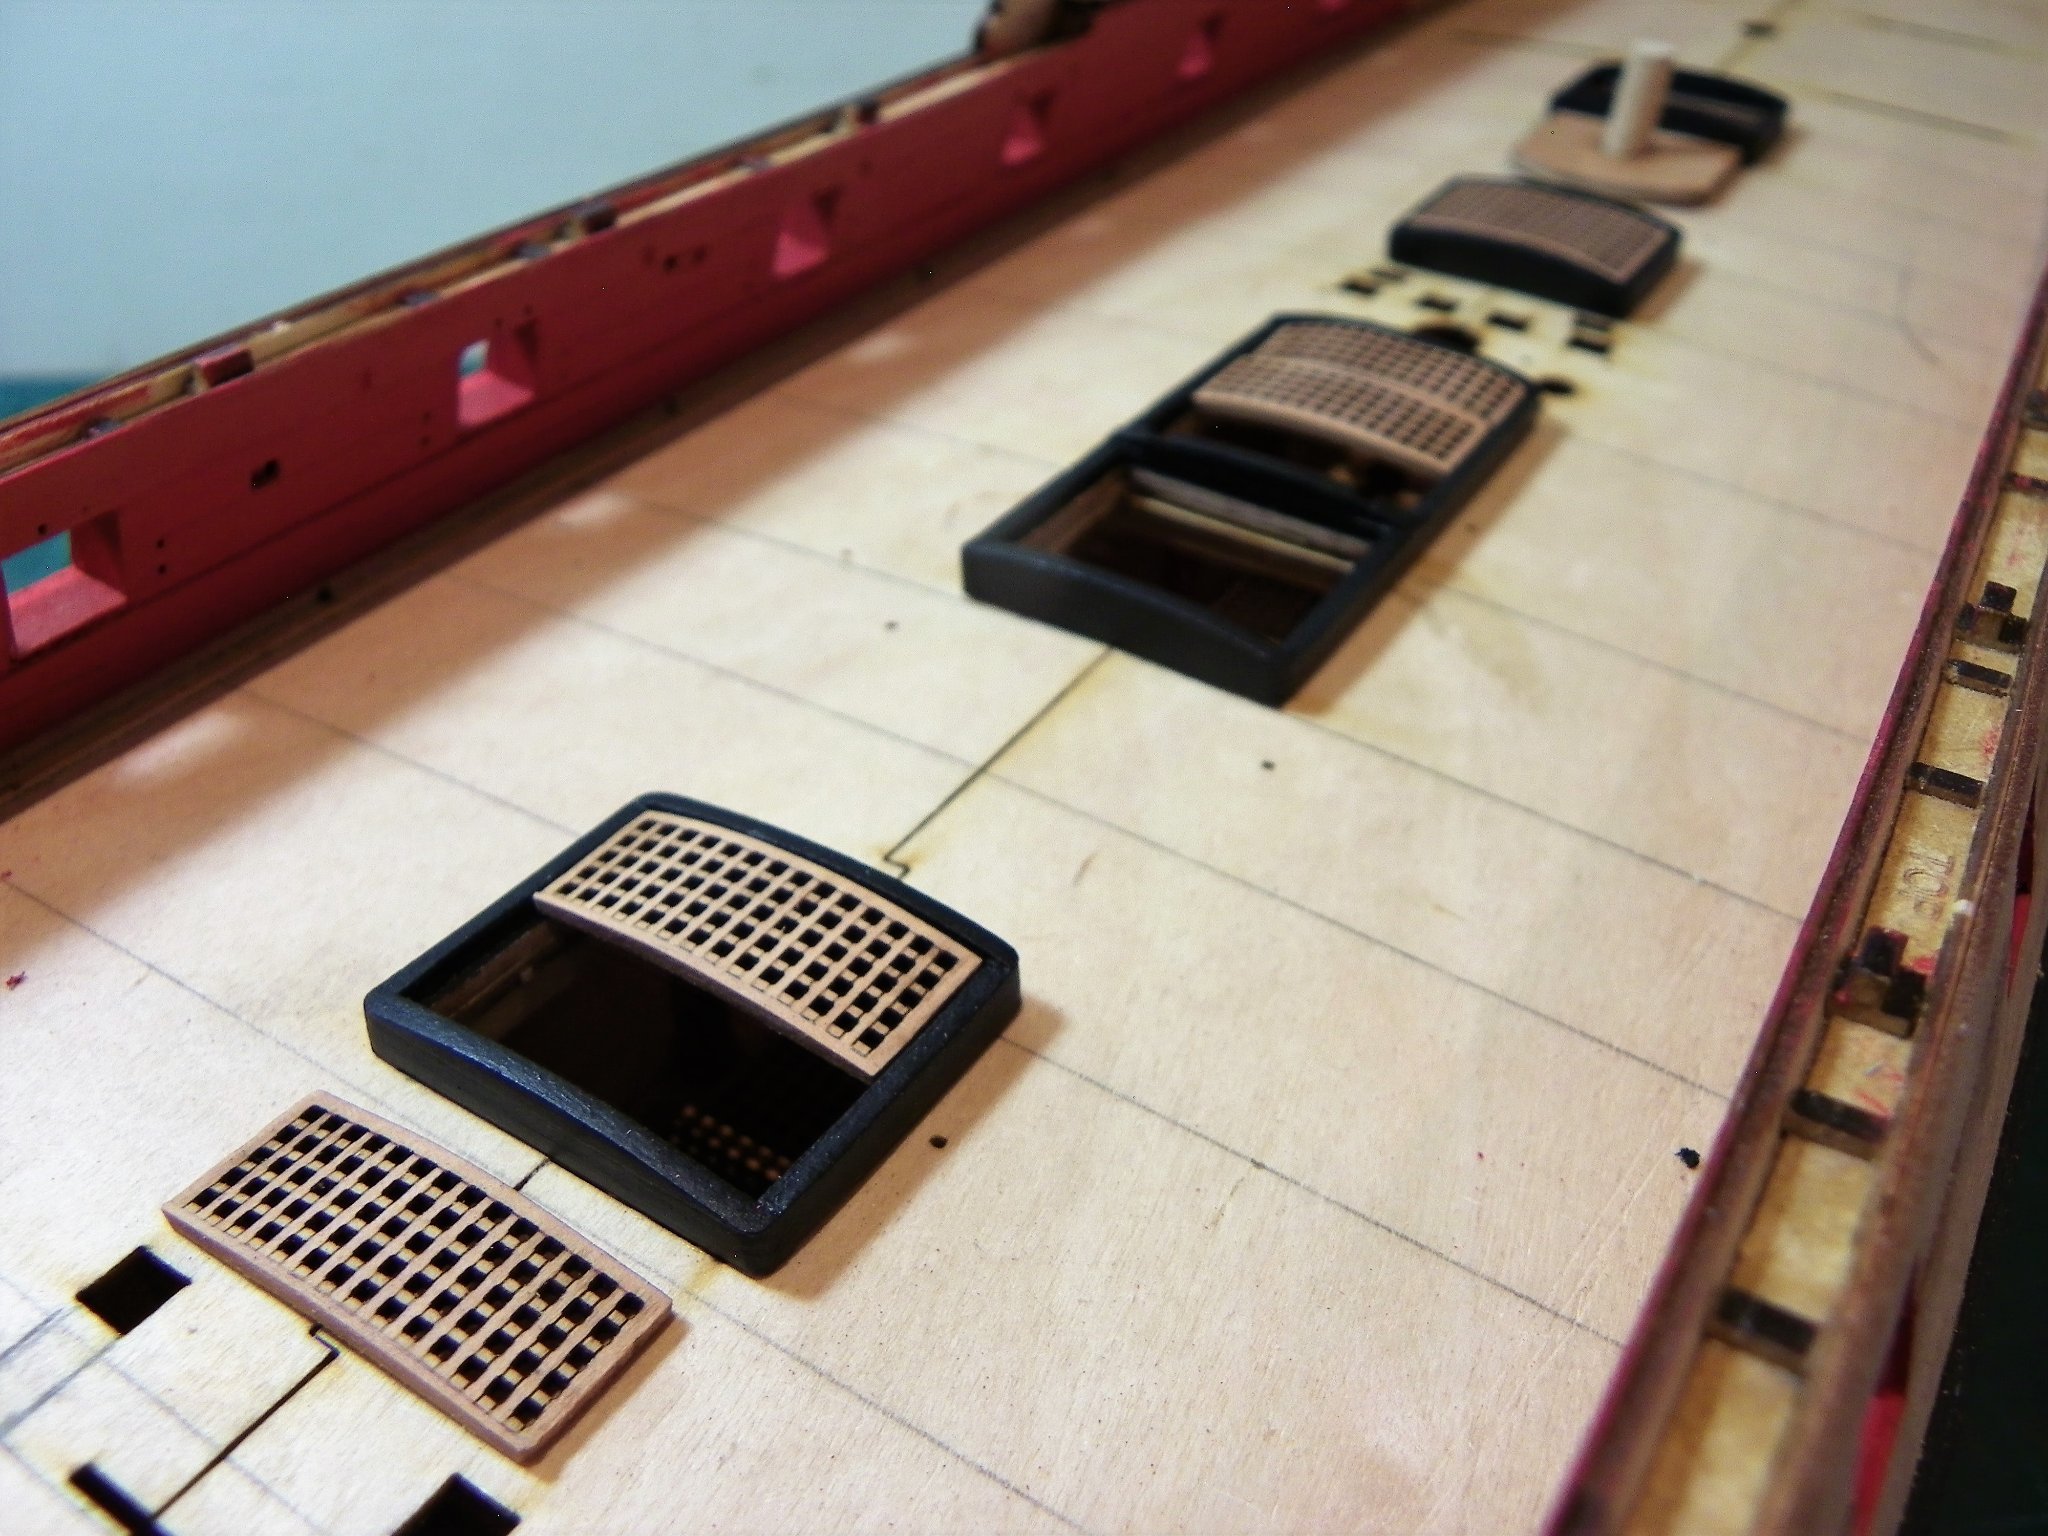
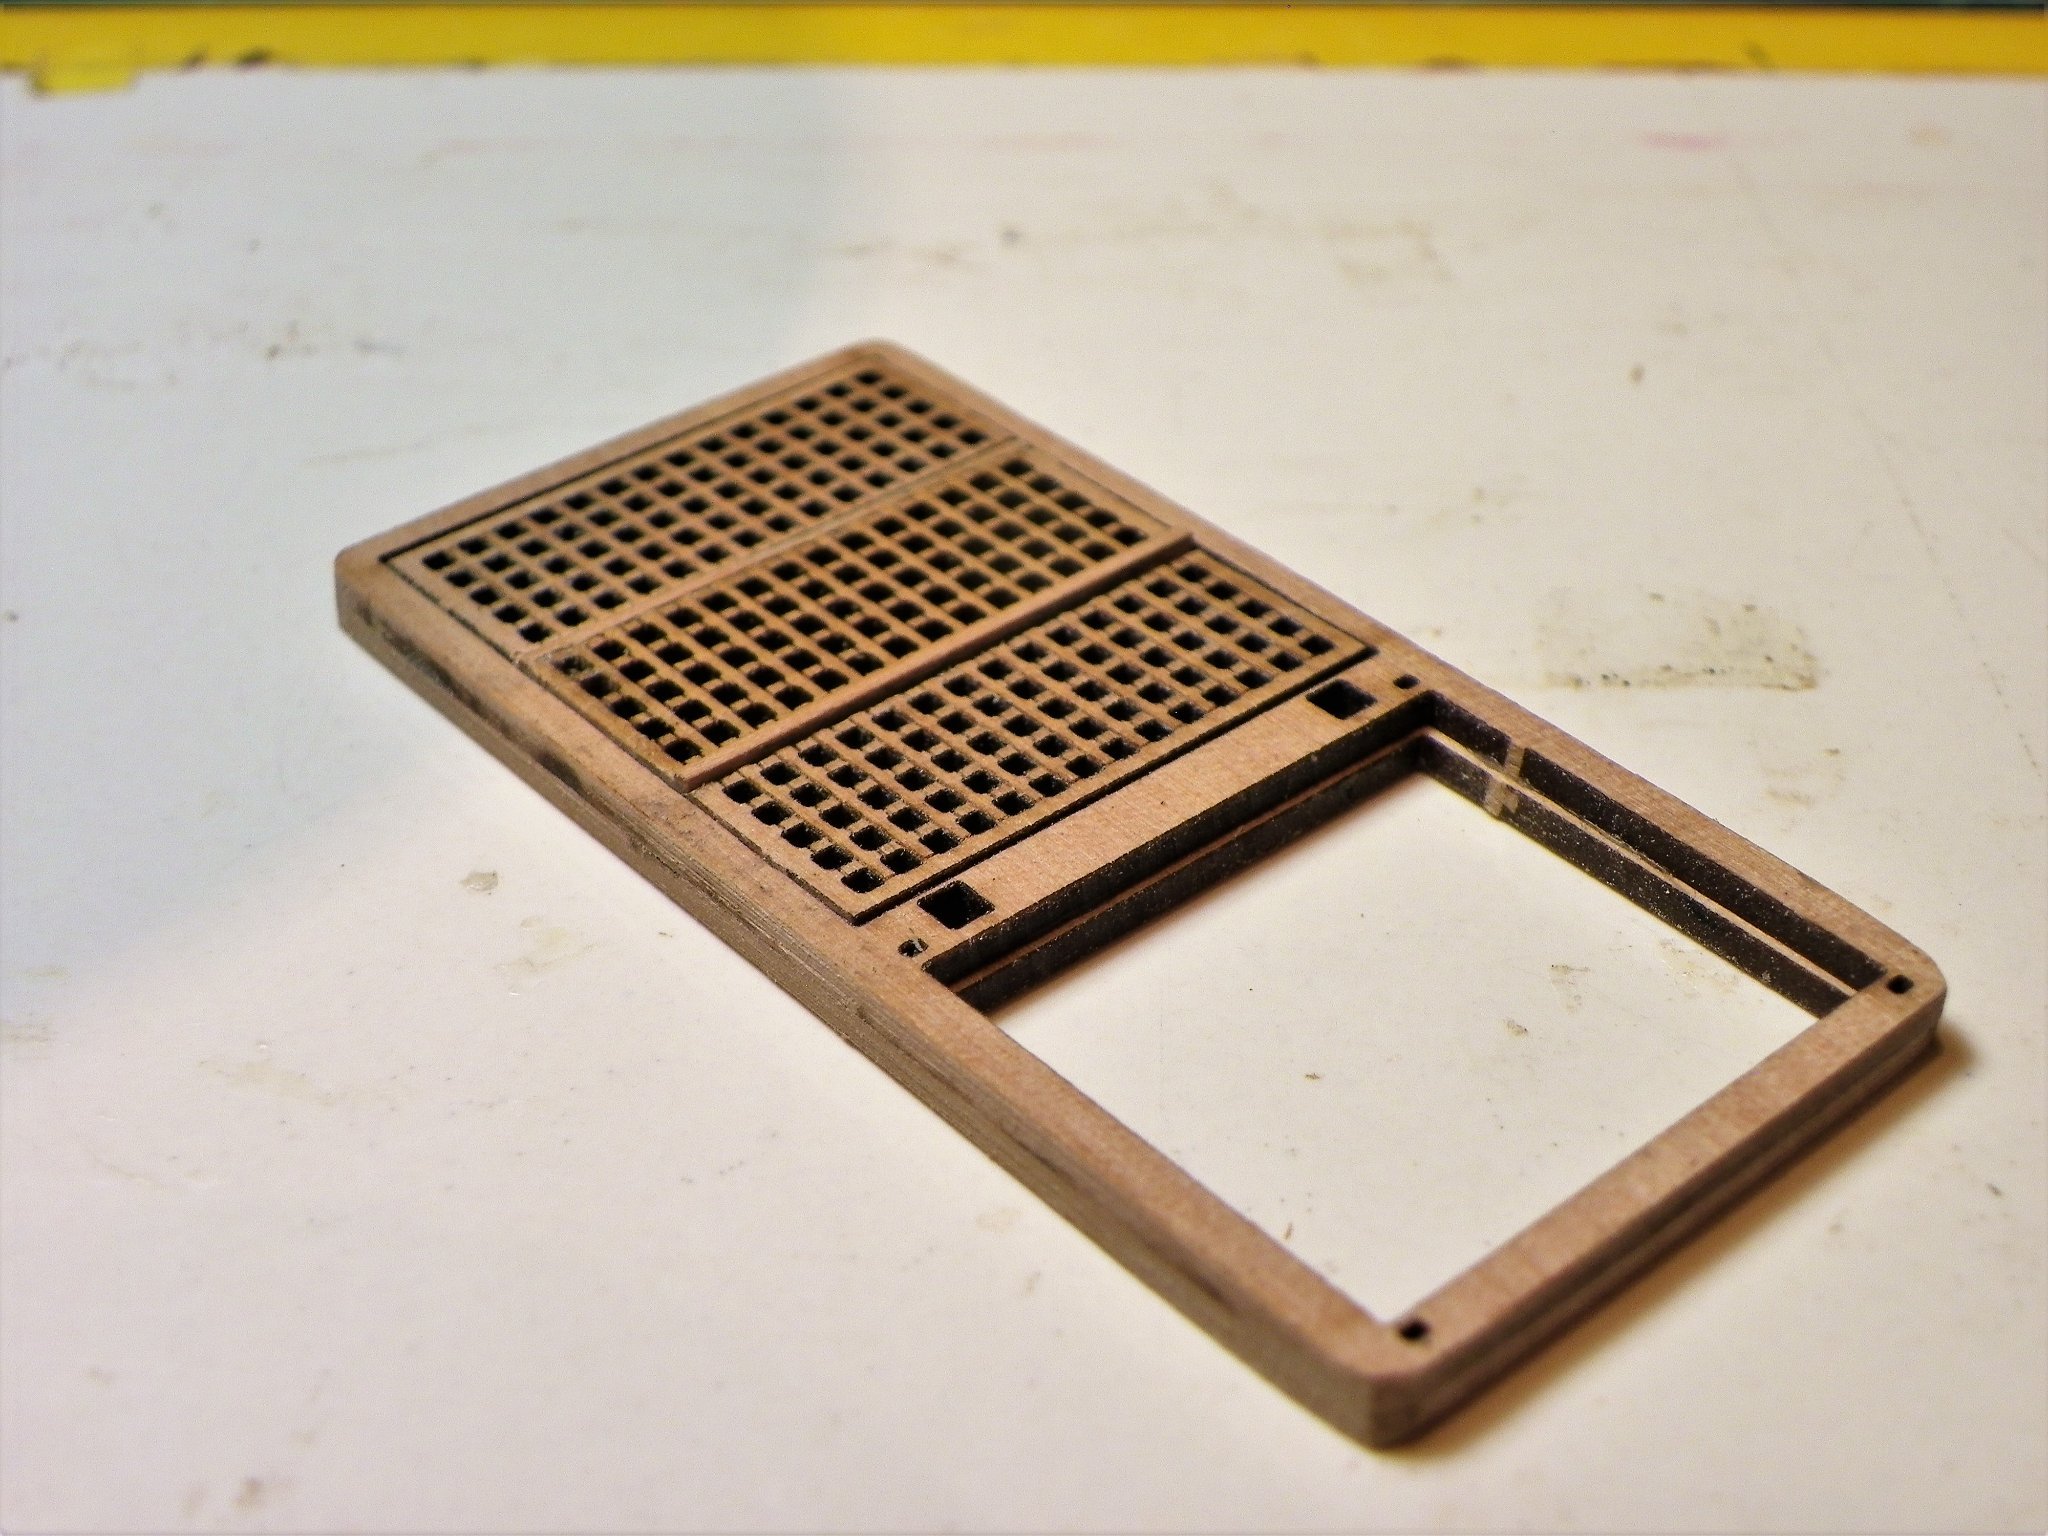
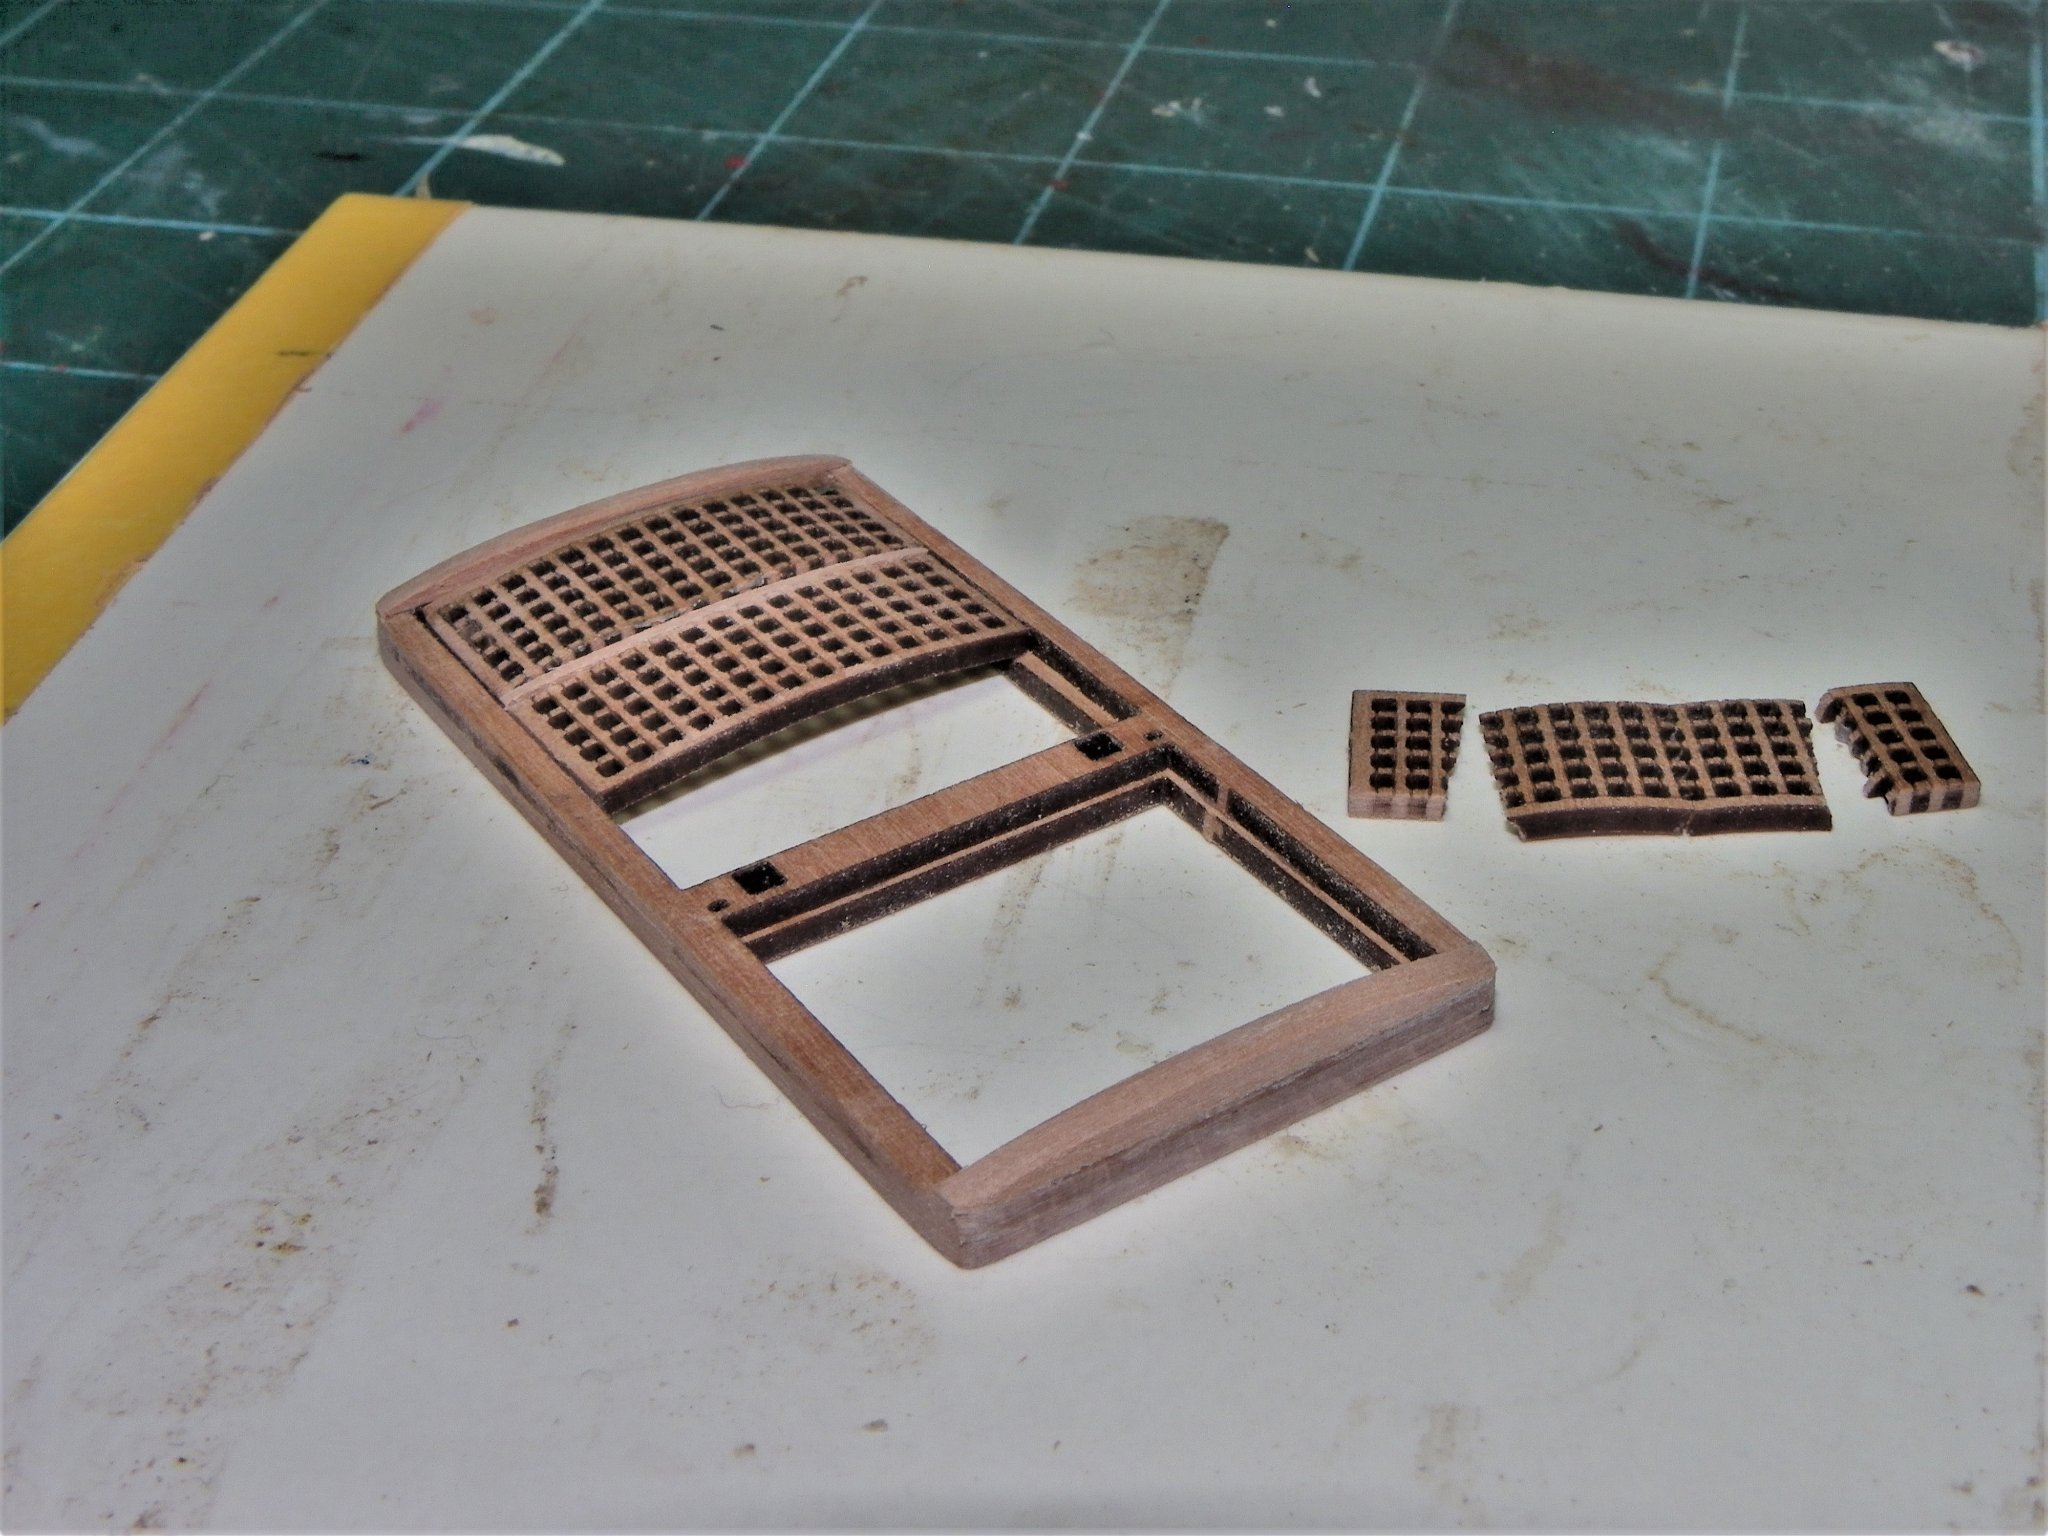
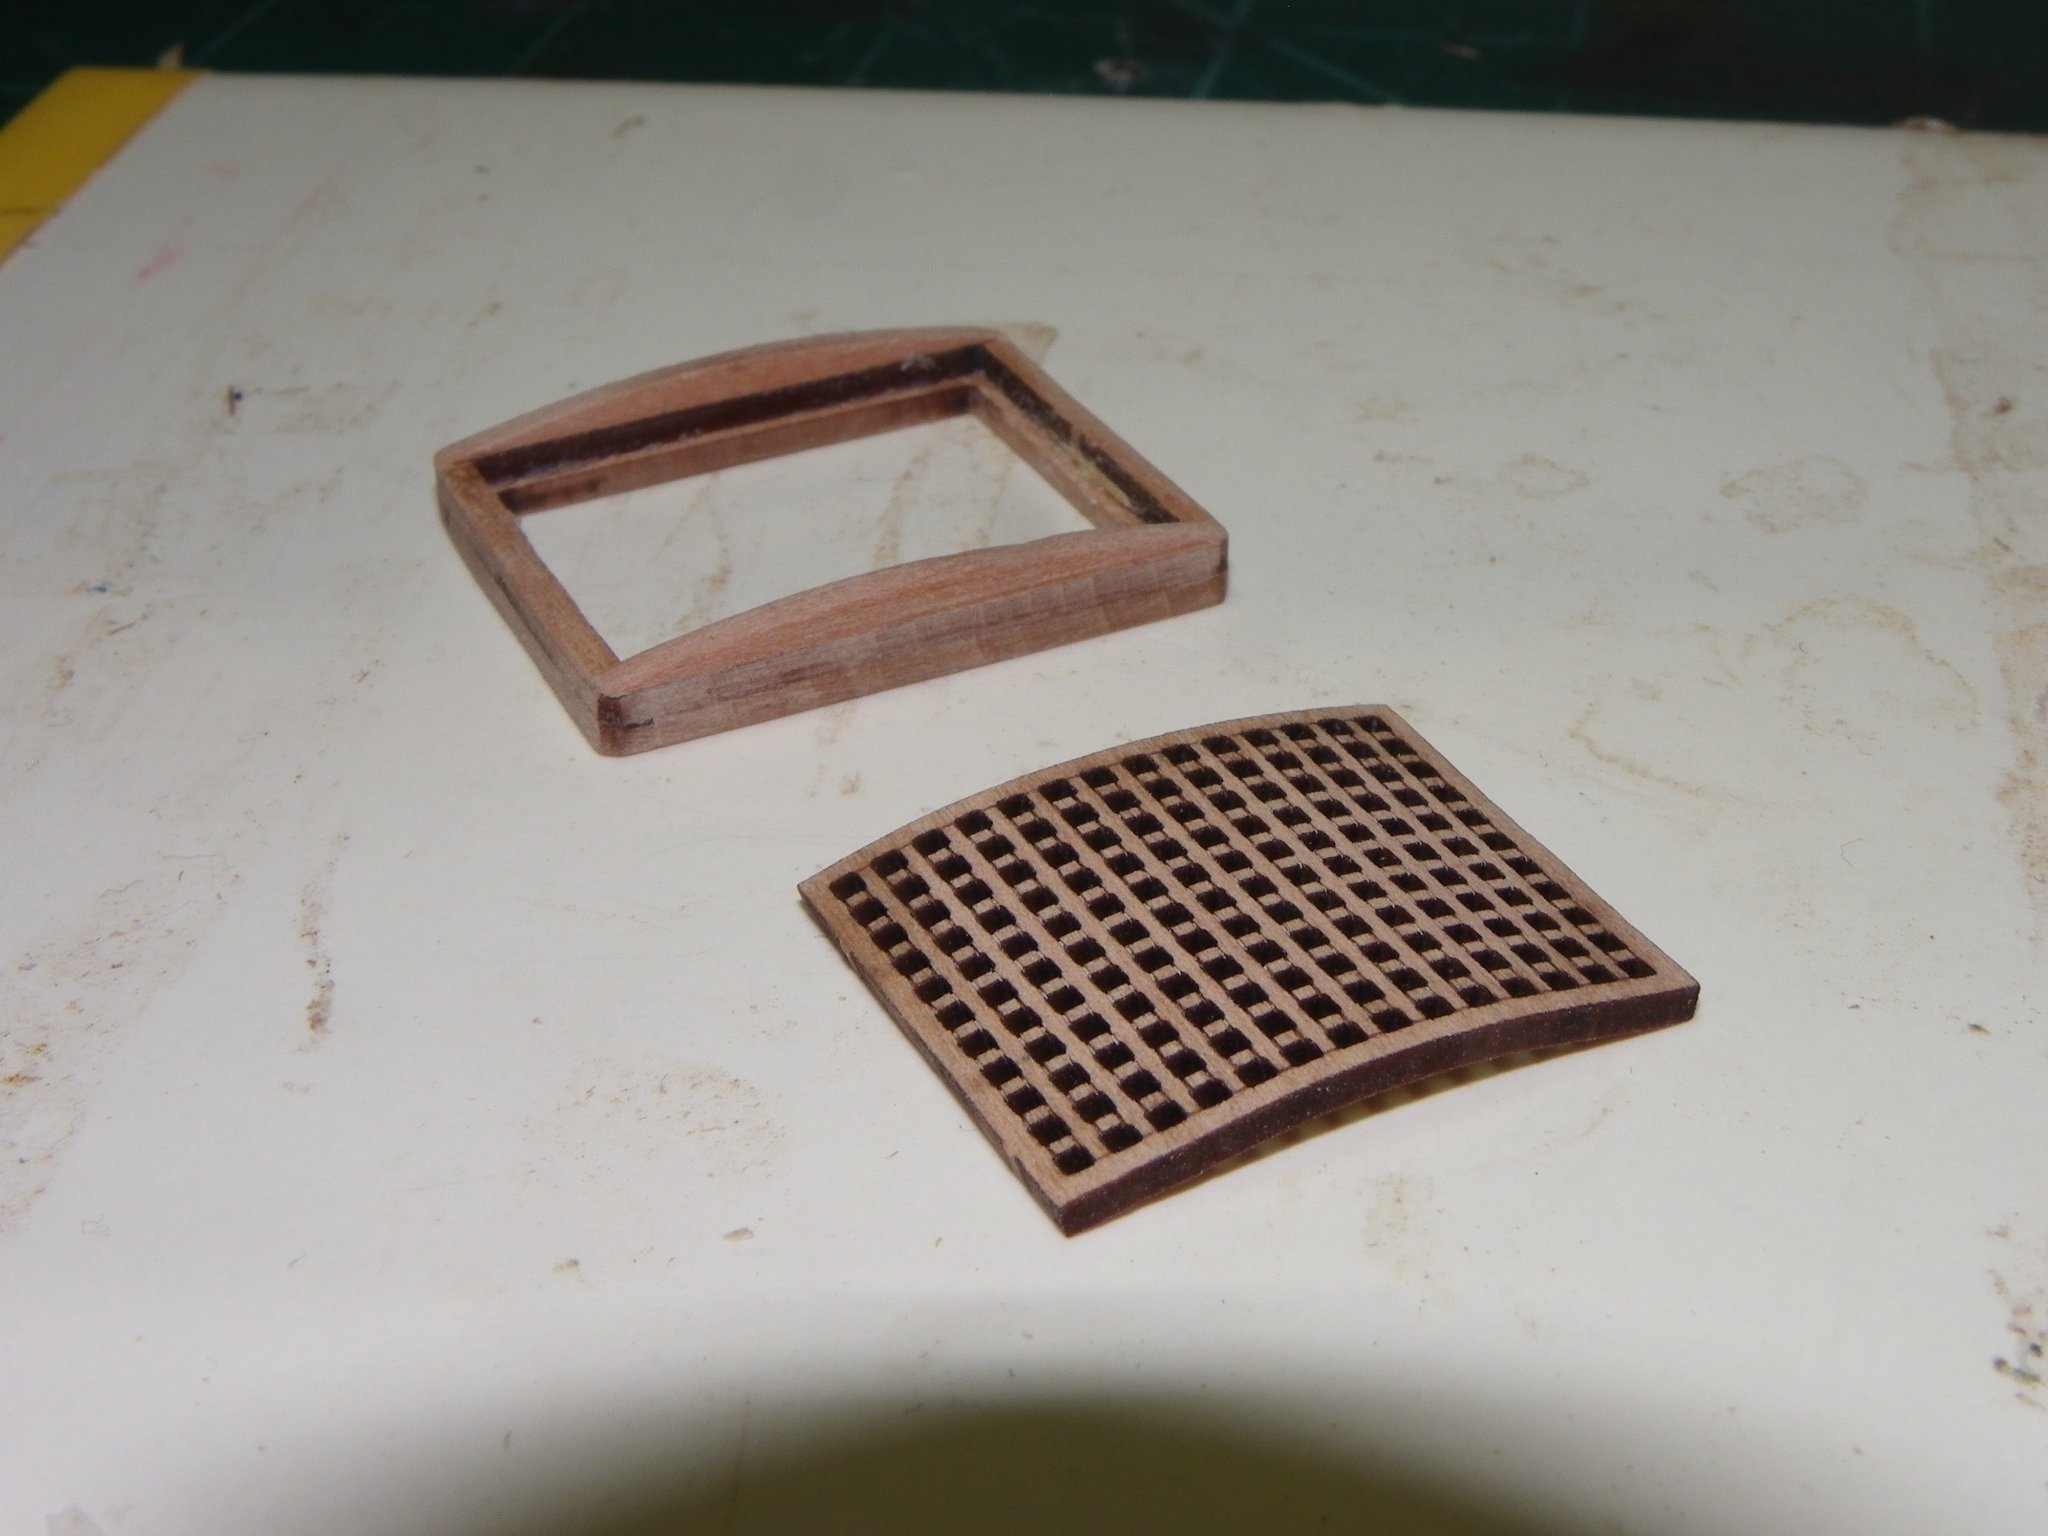
Post Fifty-eight Back to gratings. The replacement gratings (separate sets of 1.1mm square holes) have arrived (thanks Chris) so I return to creating gratings with a ‘round’. Somewhat disappointed as these sets have a subtly different look to the kit provided ones, not quite as fine, and they are less accepting of messing with than the originals. Chris did tell me that the gratings are made using the same timber and process but that The Sphinx ones were specifically made for the kit, as with much of his stuff. 1997(2) The ones in the frame are originals the others the after market grating squares. So far I am happy with the originals for the Fore Hatch, and the two sections for the Main Hatch. 1995(2) My meddling with the Aft Hatch resulted in an acceptable result as above, being destroyed when I decided to split it into two sections. The replacement had to be made using the newly arrived gratings. Even there I destroyed one square cutting the grating the wrong way; those who know will know that the longitudinal strips run fore/ aft on a grating. With careful cutting I eventually managed to create the size and round, but I’m back to square one as far as having two sections. 2004 The difference in look is clearly apparent here between the Fore Hatch (original) and the Aft Hatch (aftermarket) 2014 I am unable to split the aft hatch into two sections due to the hole spacing. 2013(2) The one saving grace is that if I have to use the Aft hatch as is, it is below the Qtr deck, but then there will be very little planking on the Qtr deck. Not sure my eye will accept the difference. I may have to approach Chris cap in hand, to sell me replacement kit specific gratings for the Sphinx, or live with the consequences. 5095 A last resort may be to plead with Chris that the Dog ate my gratings. (he does have form) Anyway, Happy New Year to everyone from me and my shipyard liability assistant. B.E. 01/01/22

.thumb.JPG.d0c80fa2e19d635d939f3ab48bbffda1.JPG)
.thumb.JPG.52c9b308c2d8adc3ecc9b3ce644c4b42.JPG)
.thumb.JPG.9172fe83beddaa880cbe4f07f93a17a1.JPG)
- 857 replies
-
- 22
-
-
- Sphinx
- Vanguard Models
- (and 1 more)
-
That's a great shot of your 'Swan', looks as if it should be on a book cover, I'd buy it. B.E.
- 542 replies
-
- 1
-
-
- Sphinx
- Vanguard Models
- (and 3 more)
-
Those gratings over the scuttles made no sense to me, they are shown solid and flush on Victory and are depicted as such by David Antscherl in his ffm Swan books. They are designated Top rope scuttles to give access when raising the Topmasts, but otherwise not used. The same issue re-appears on my current Sphinx build, which will be given the same treatment. B.E.
- 419 replies
-
- 3
-
-
- Victory Models
- Pegasus
- (and 2 more)
-
Good progress Ron, Those rudder pendants were also used to steer the ship were the wheel or steering lines lost or damaged. The pendant was usually secured in the Mizzen channels, and if required tackles were attached to help steer the ship. I used thin Evergreen styrene strip for the stern Capping rails on my Pegasus build. It easily follows the curves of the Tafferal, and as it was to be painted the material type wasn’t critical. As your Camilla is to be sea-set do you intend to fit a Rudder coat? That’s a big hole for a following sea to enter.🤔 B.E.
- 542 replies
-
- 2
-
-
- Sphinx
- Vanguard Models
- (and 3 more)
-
Looks nicely done to my eye Paul, your planking looks excellent. 👍 B.E.
-
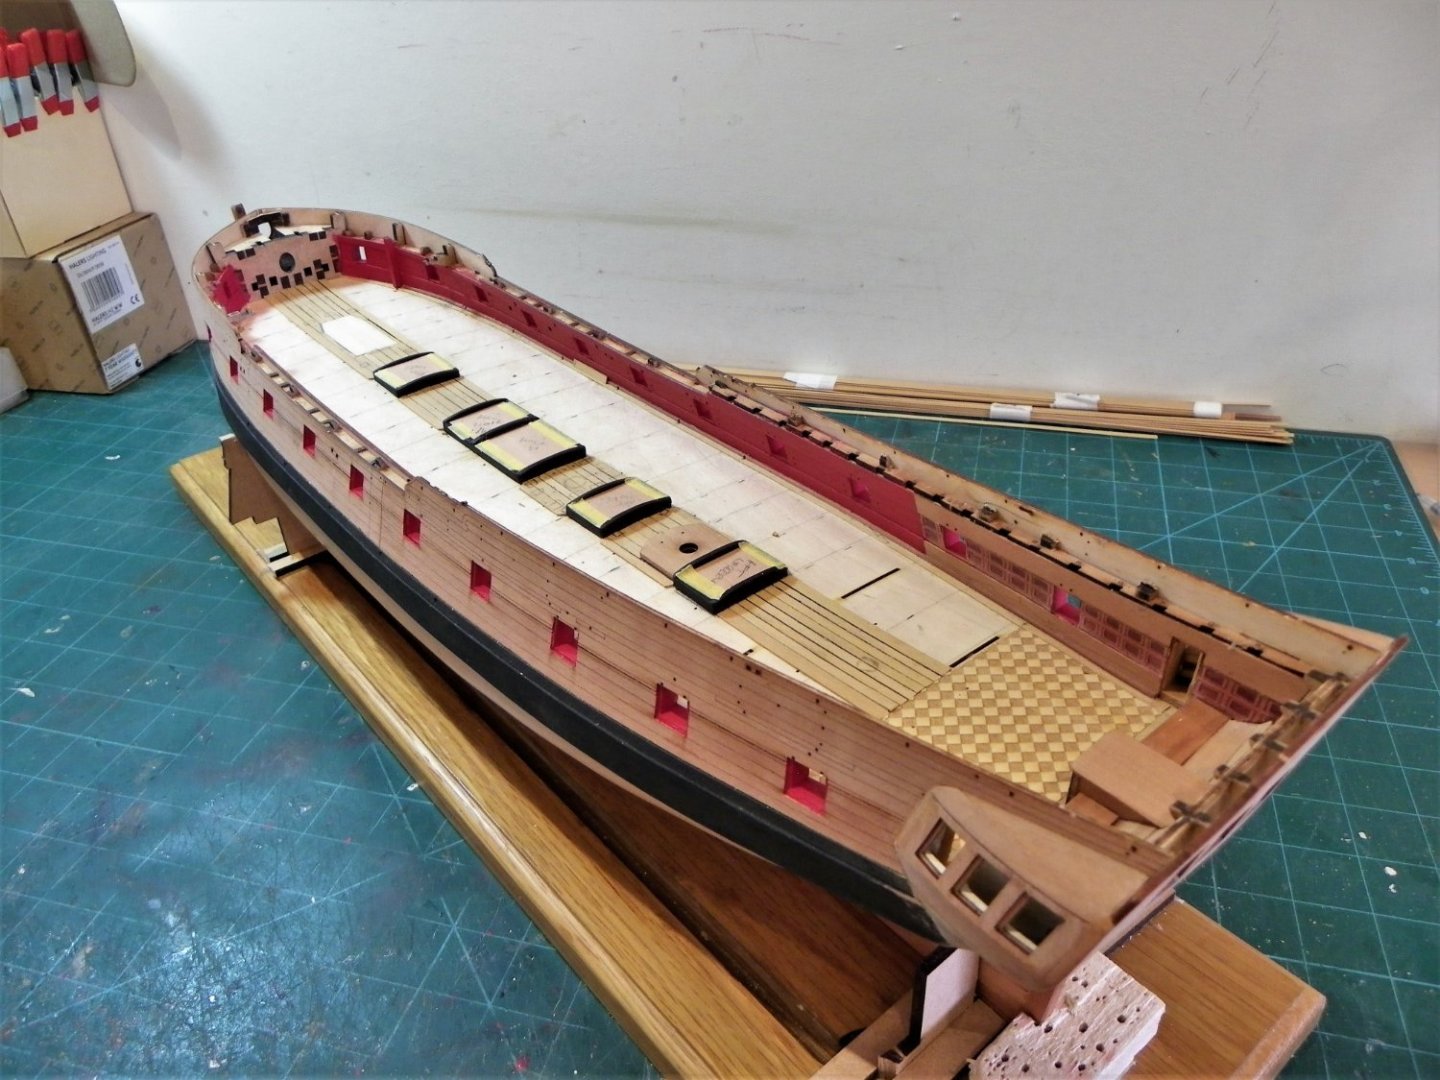
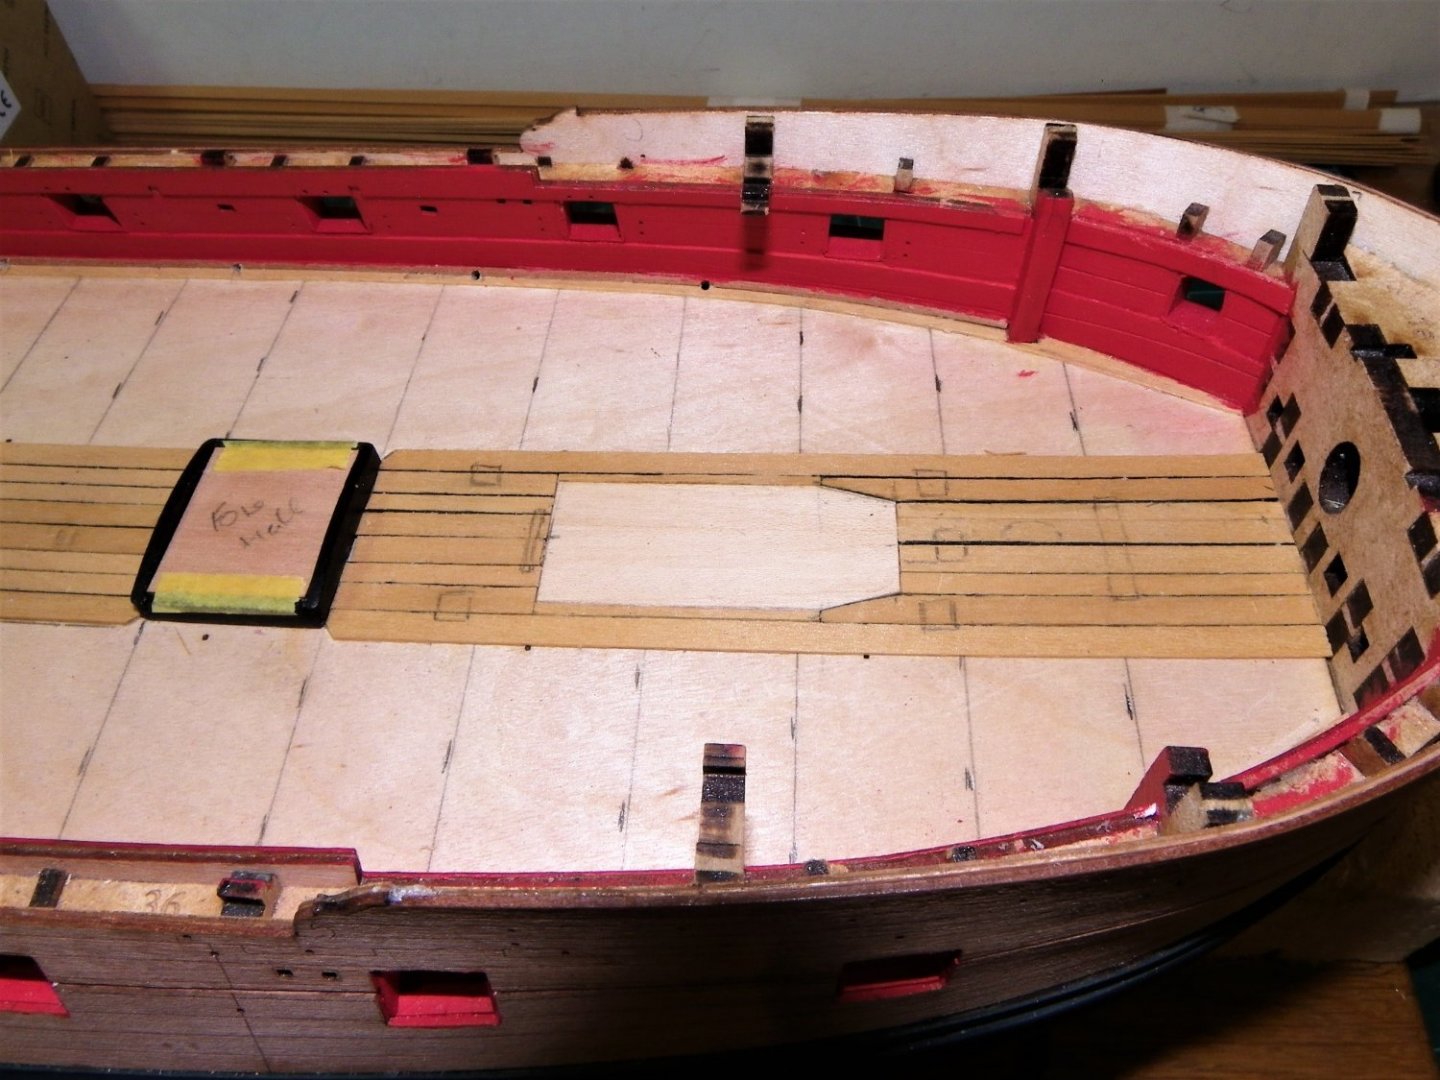
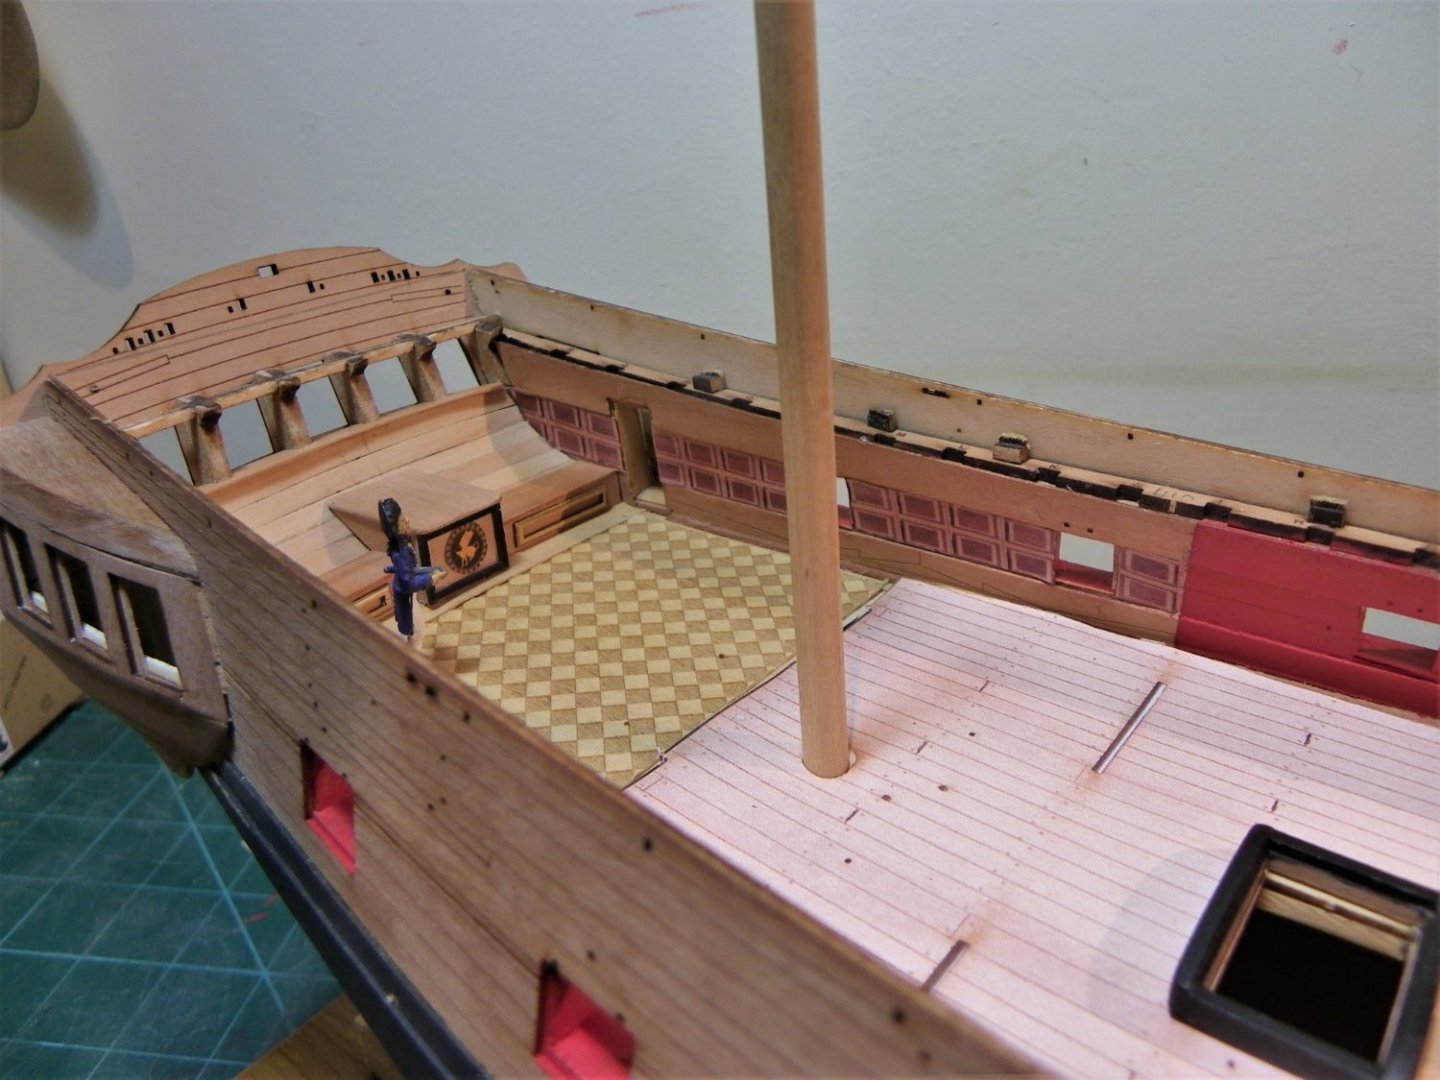
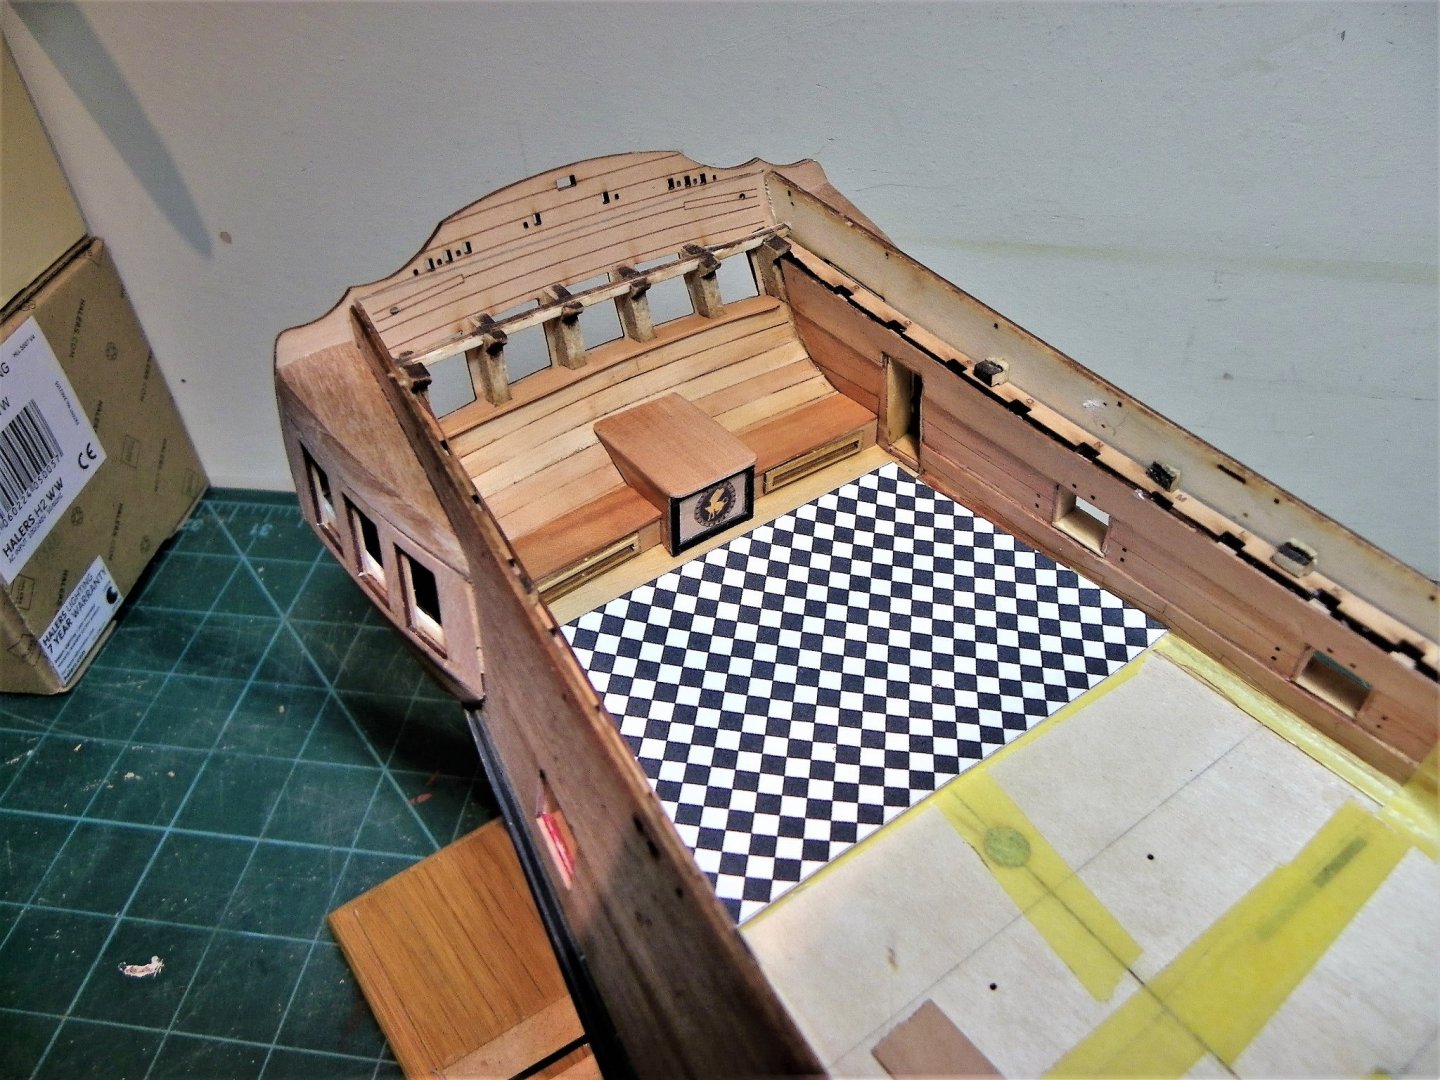
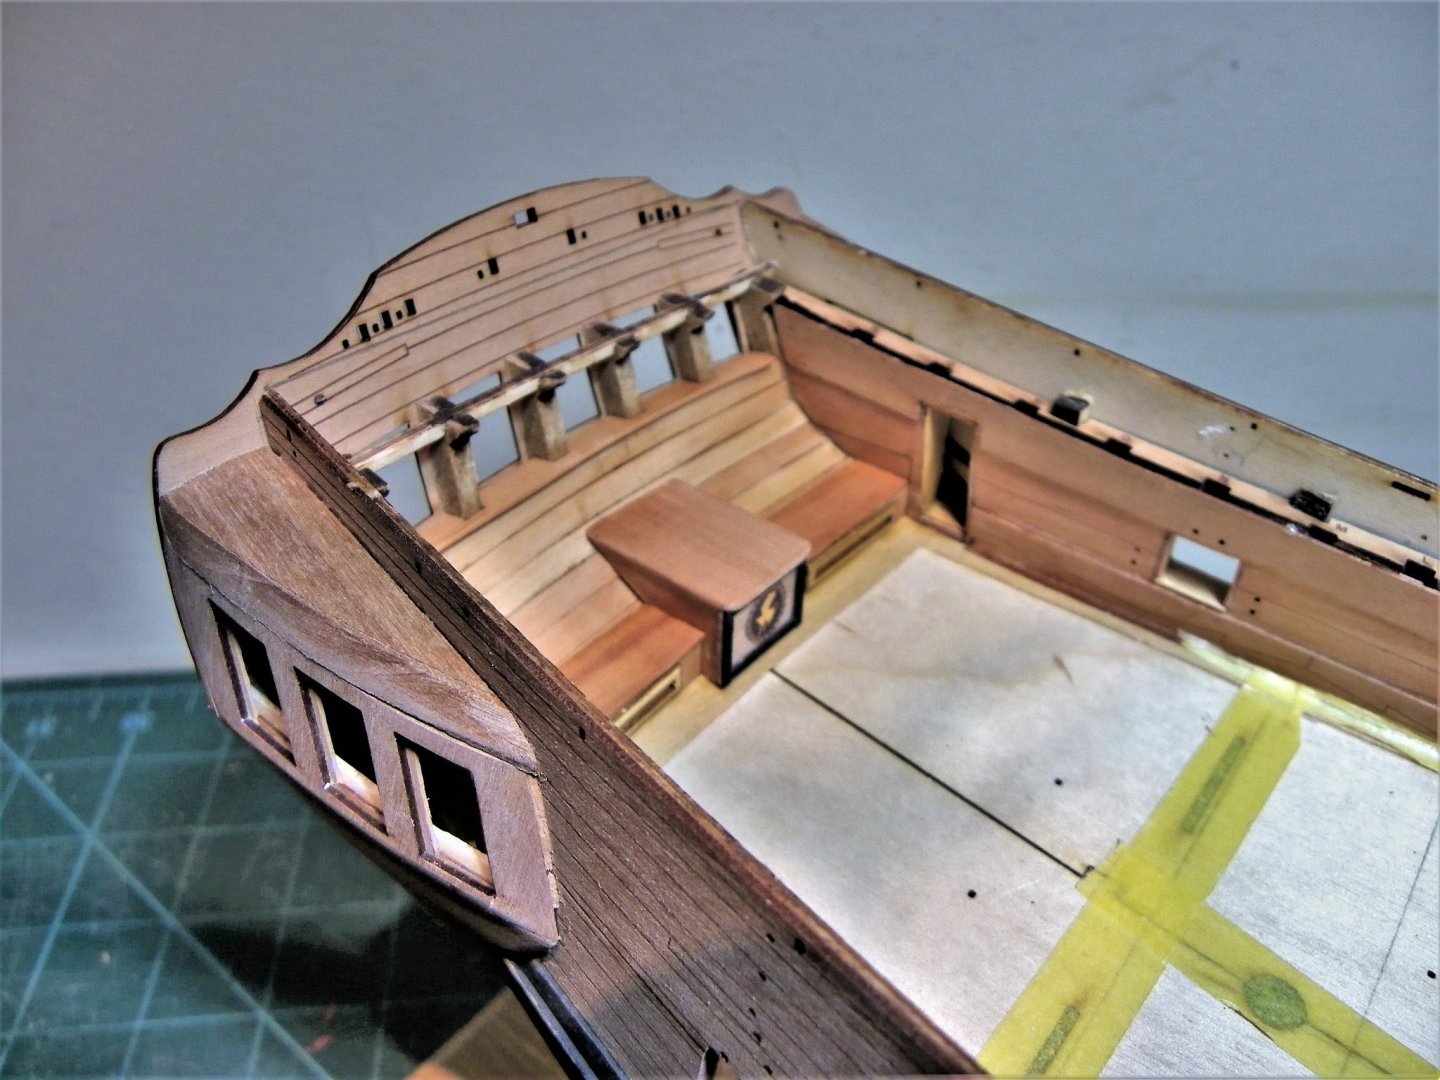
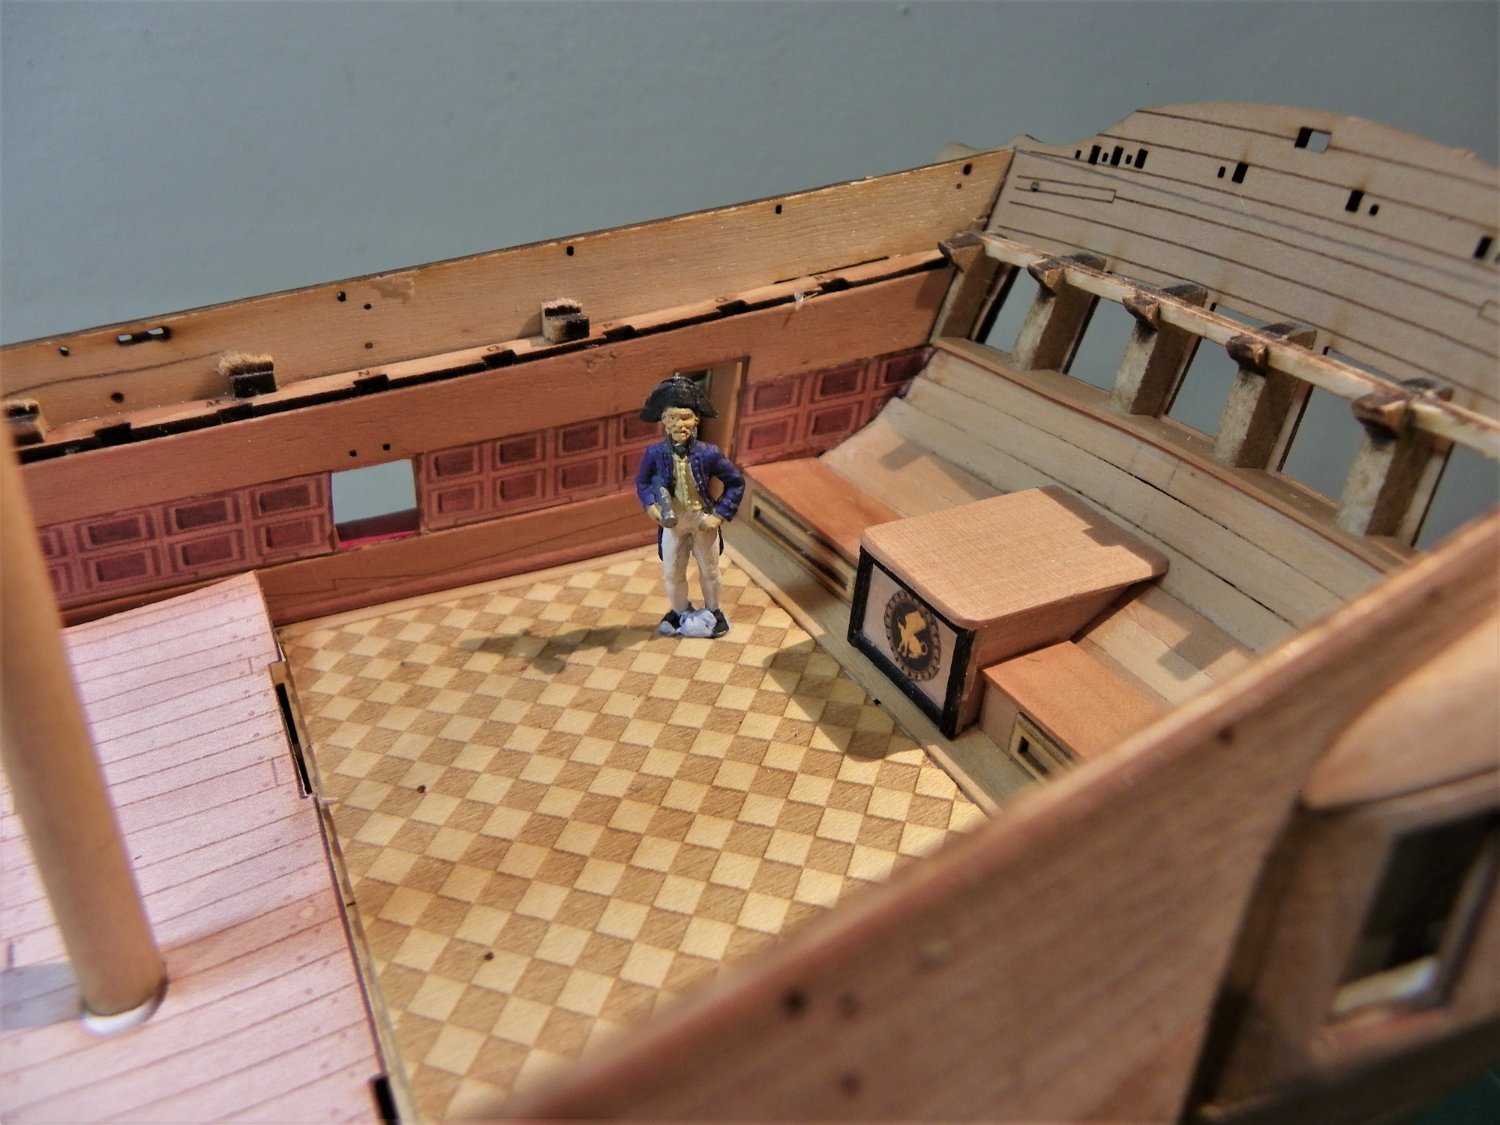
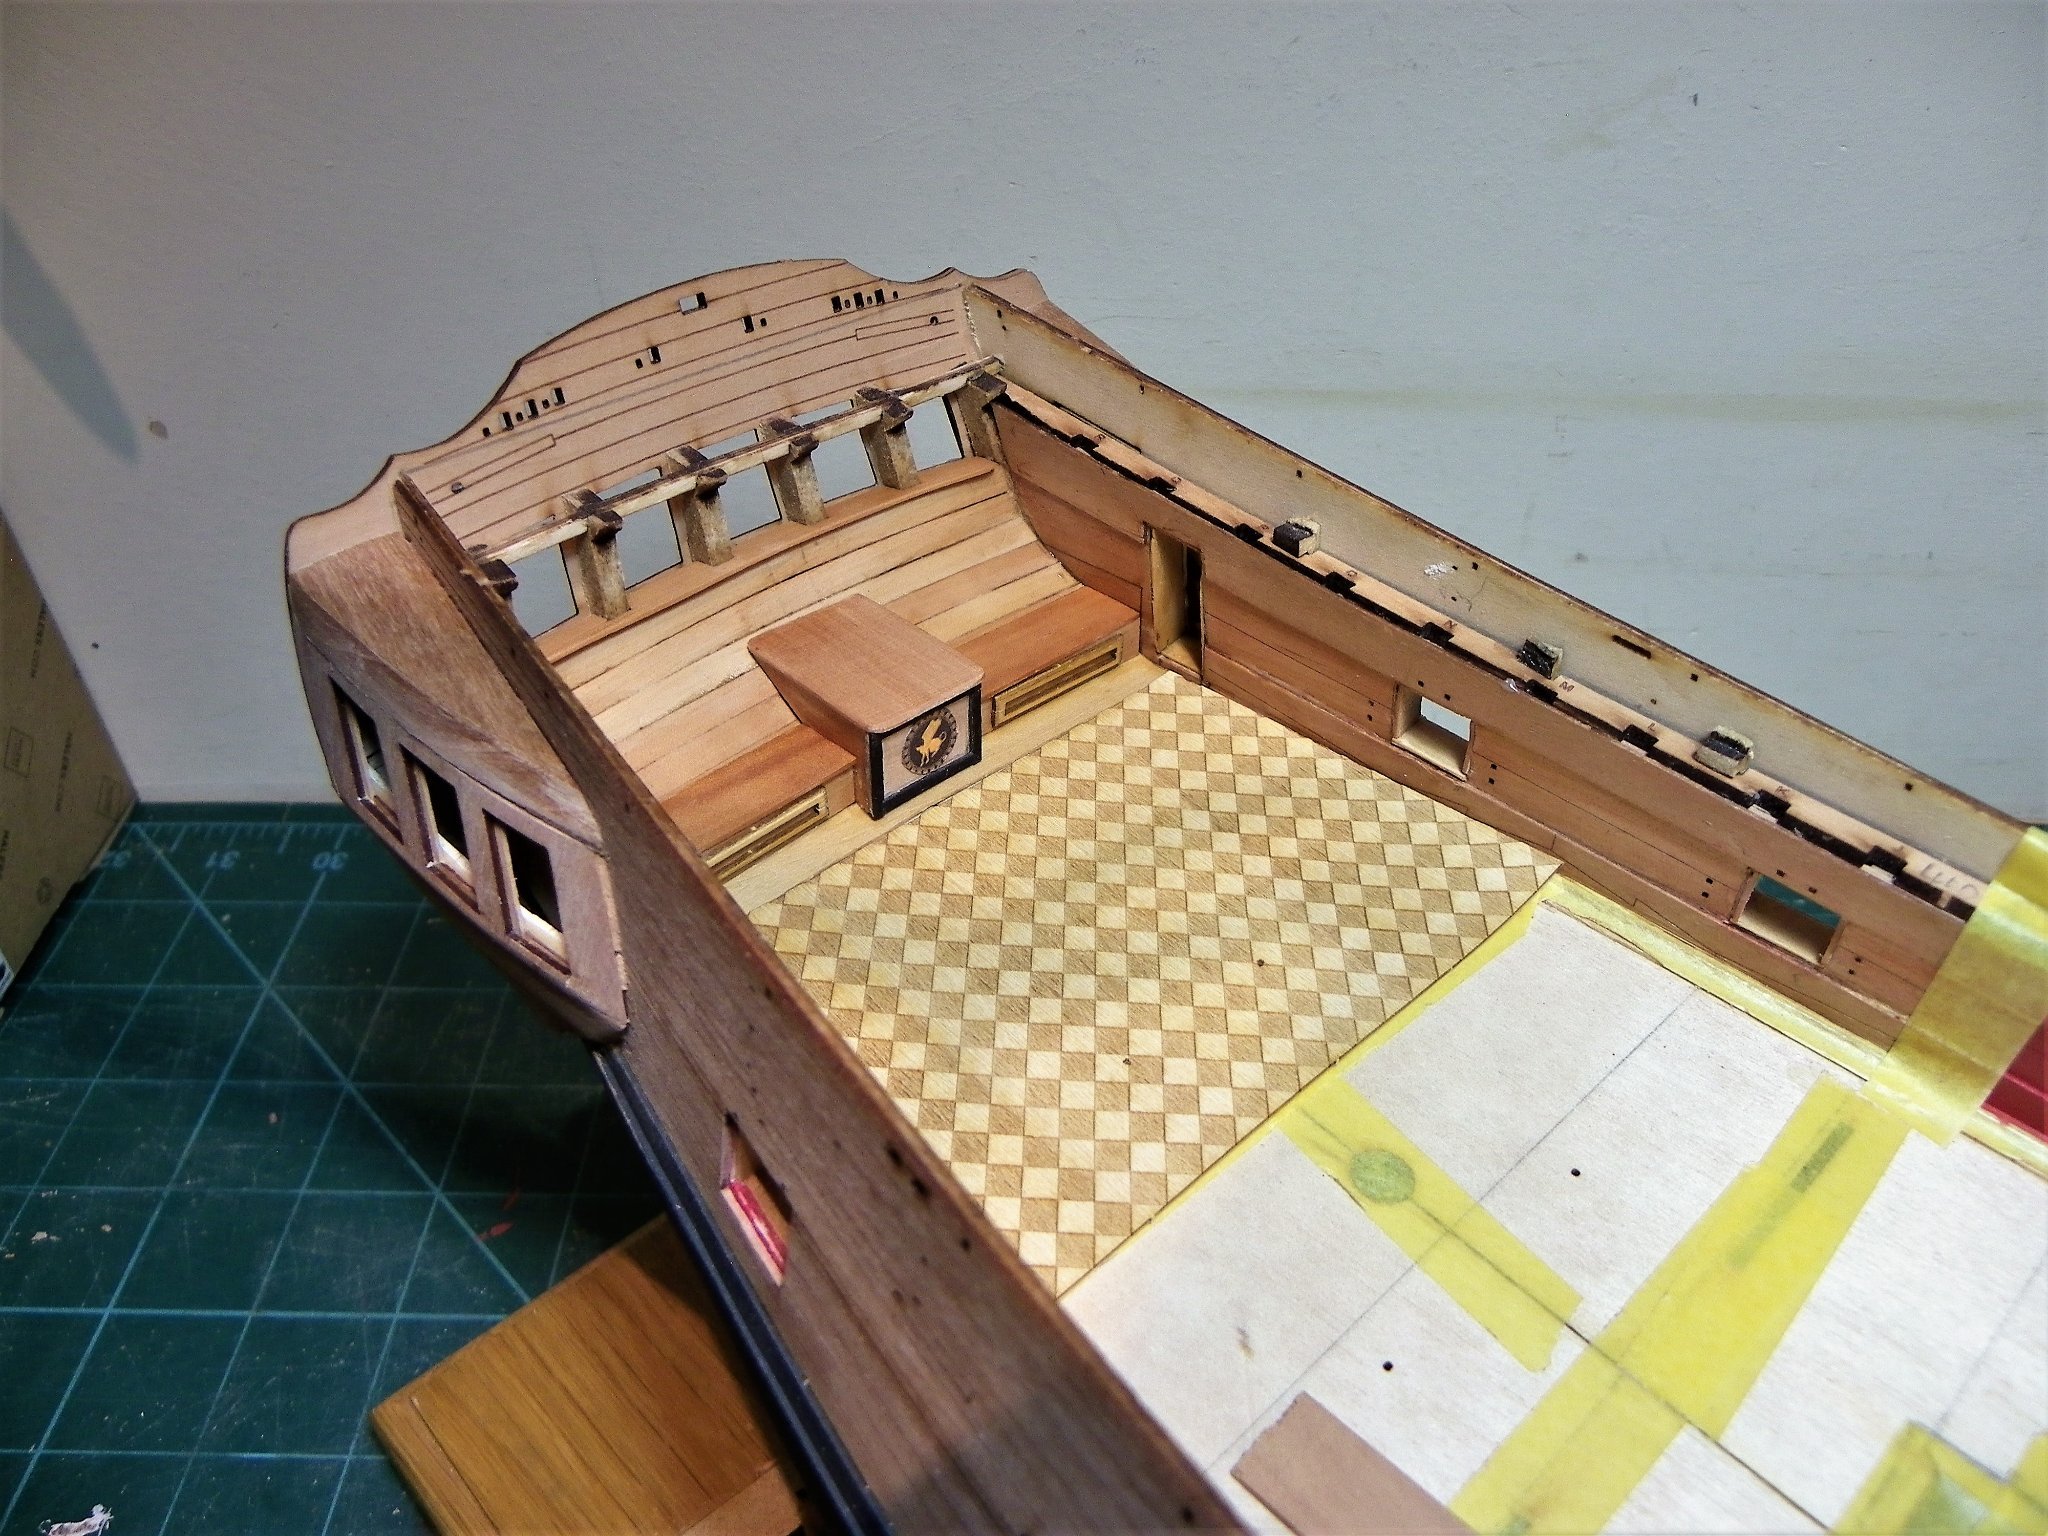
Thank you Ron, a very generous comment, I think we both enjoy 'tweaking ' kits to hopefully add interest to our builds. B.E. Post Fifty-seven Great Cabin The parquet flooring is glued into place, it is reduced in size due to the cabin modifications, and w-o-p was applied before fitting. I did experiment with various wood dyes on the offcuts to see if the pattern could be enhanced, but none were successful. 1986 Still not convinced whether I like it or not, but there’s always the fallback use of the b/w chequer. I rather thought that a degree of panelling was appropriate to the Great Cabin but at this scale and with the available views, I considered a printed version would suffice. 1990 I used the simple expediency of printing off the kit panelling and scaling it to fit with a little bit of tweaking here and there. Thinking about deck planking. The Upper deck will be planked using 0.6mm x various widths of Boxwood strip, mostly 3.4mm and 4.5mm. Wider strips will be used to work around the hatches. The first task will be to plank between the centre line fittings. 1995 I have the idea of using a photo copy of the kit deck plan to mark the butt joints on the false deck as a guide to work to. This will save me the job of working out a schematic and an appropriate butt shift. The kit arrangement is a four butt shift which looks fine to my eye. 1982 The overlay will also be used to mark and cut those awkward fittings cut-outs, particularly around the Mainmast. Here’s a mock up of how things will look. 1974(2) 1975(2) Before all this happens I need to invert the hull for the last time to apply one more coat of w-o-p and complete the fettlin’ of the finishing pieces of the Quarter Galleries. B.E 29/12/21

.thumb.JPG.cd2691f7f560a89aa0e46d70dffb139b.JPG)
.thumb.JPG.ba55cddcc5ad55ee7425760f998069ea.JPG)

- 857 replies
-
- 21
-
-
- Sphinx
- Vanguard Models
- (and 1 more)
-
Thank you, Bob, Kirby, and Jean-Paul. I think the black coamings will be enhanced once the Boxwood deck planking is down, while I wait for the new gratings to arrive I am looking at panelling for the Great cabin. B.E.
- 857 replies
-
- 2
-
-
- Sphinx
- Vanguard Models
- (and 1 more)
-
I will be following the Joseph Marshall painting which includes channels, deadeyes, and Chainplates. I think they add to a 'Navy Board' style model. B.E.
- 505 replies
-
- 4
-
-
- vanguard models
- Sphinx
- (and 1 more)
-
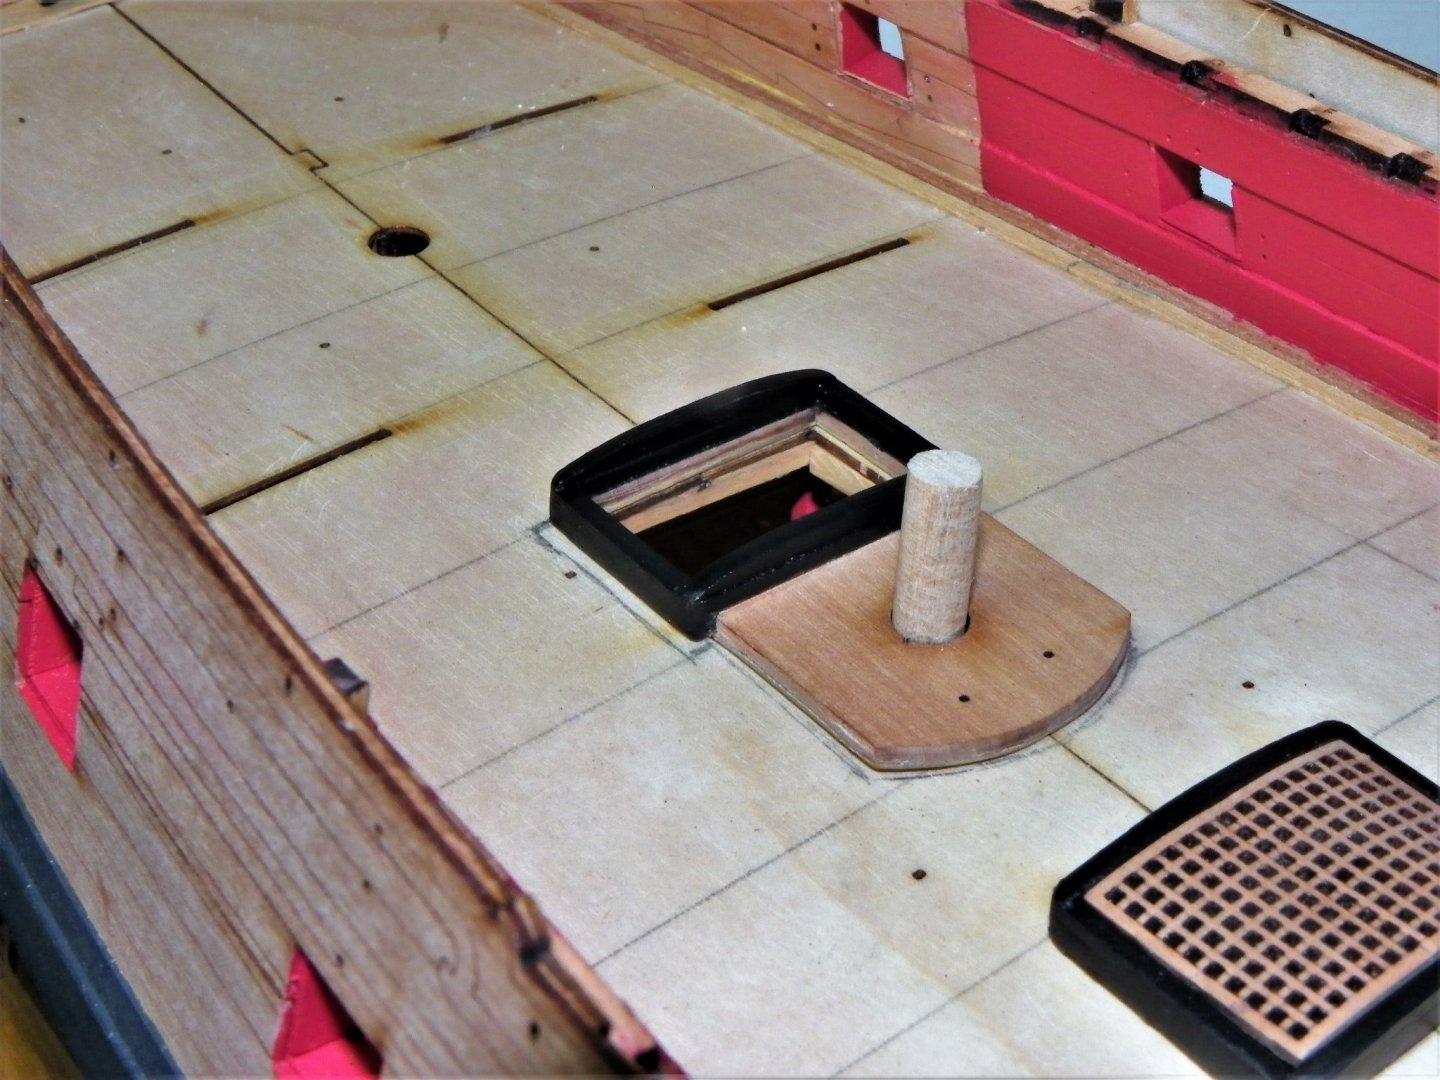
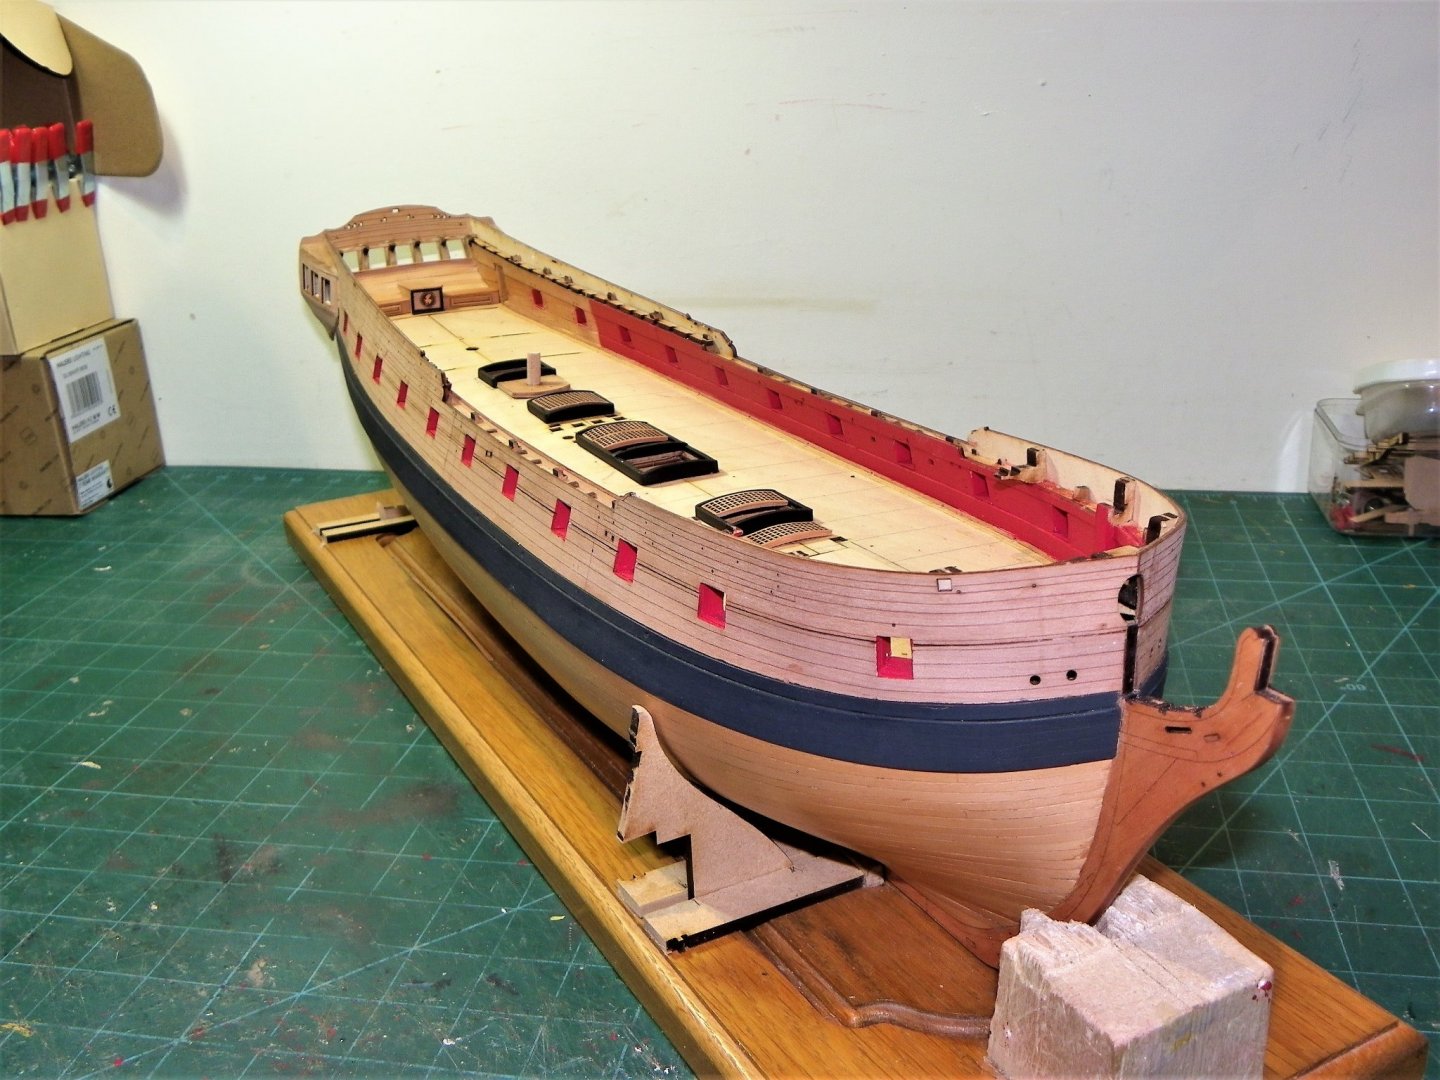
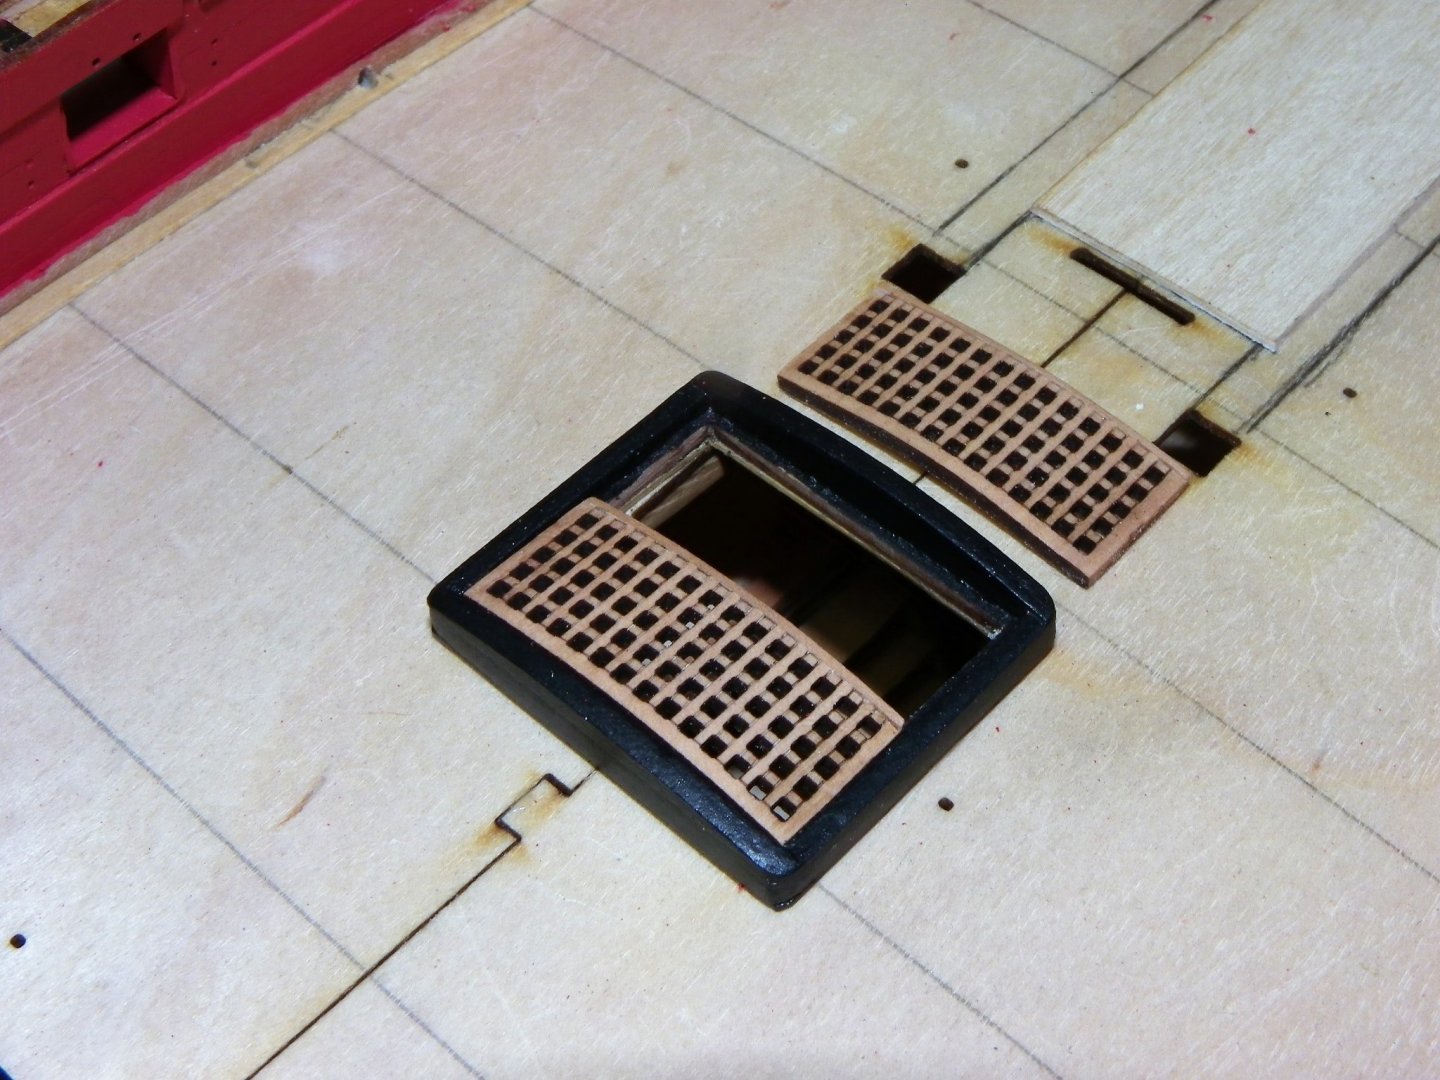
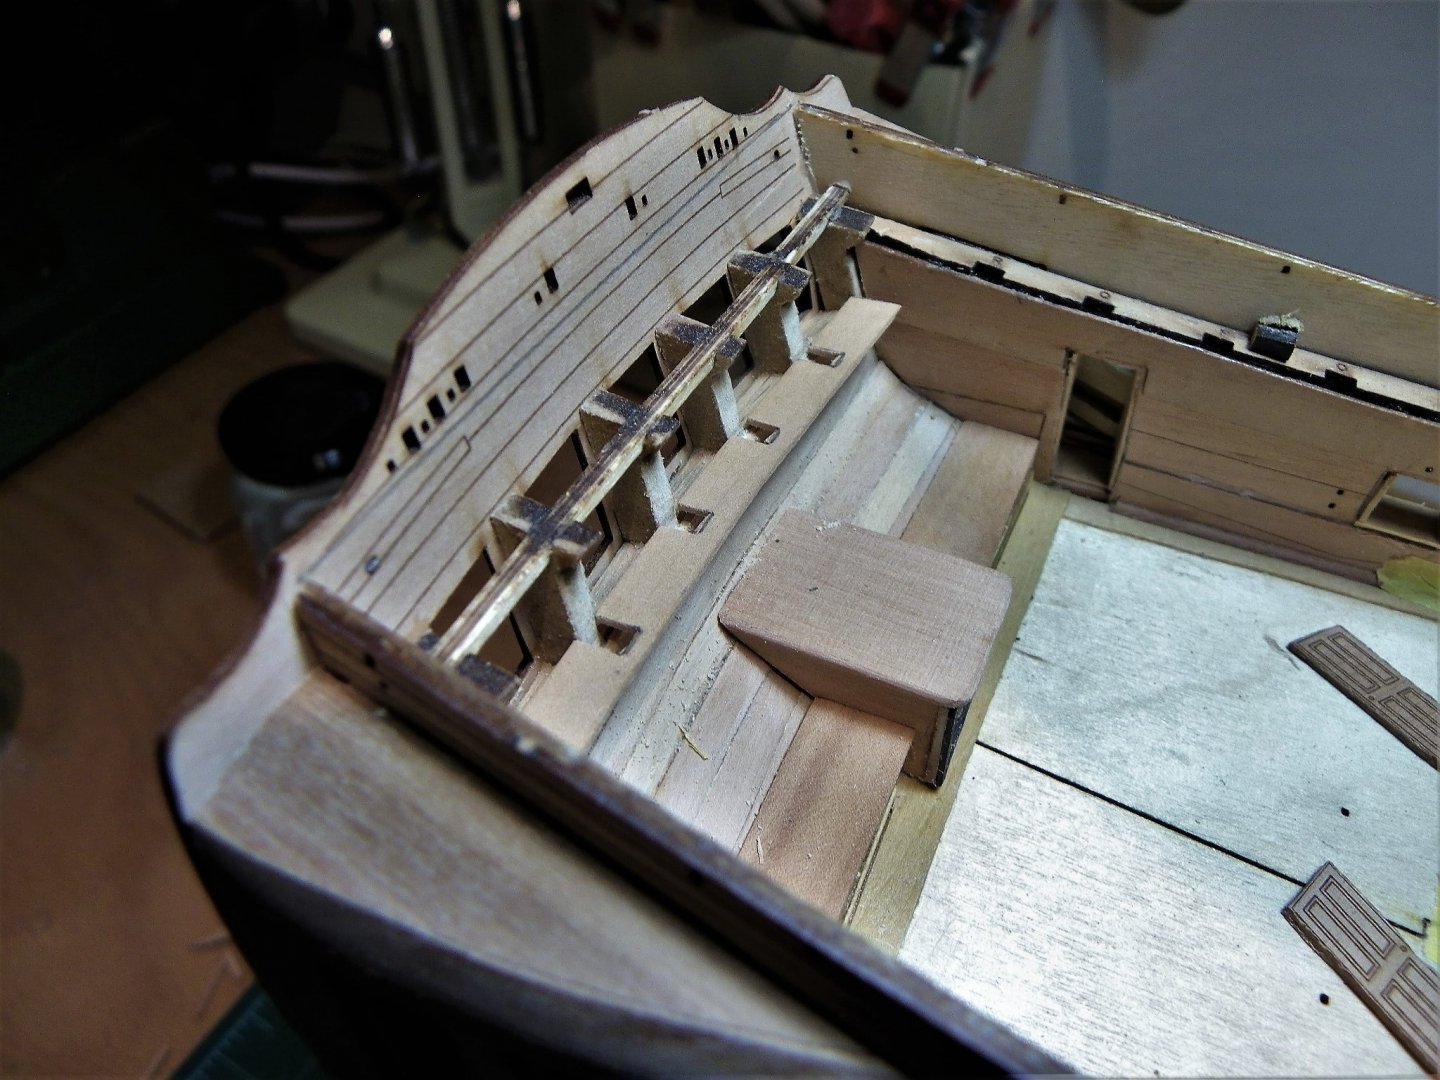
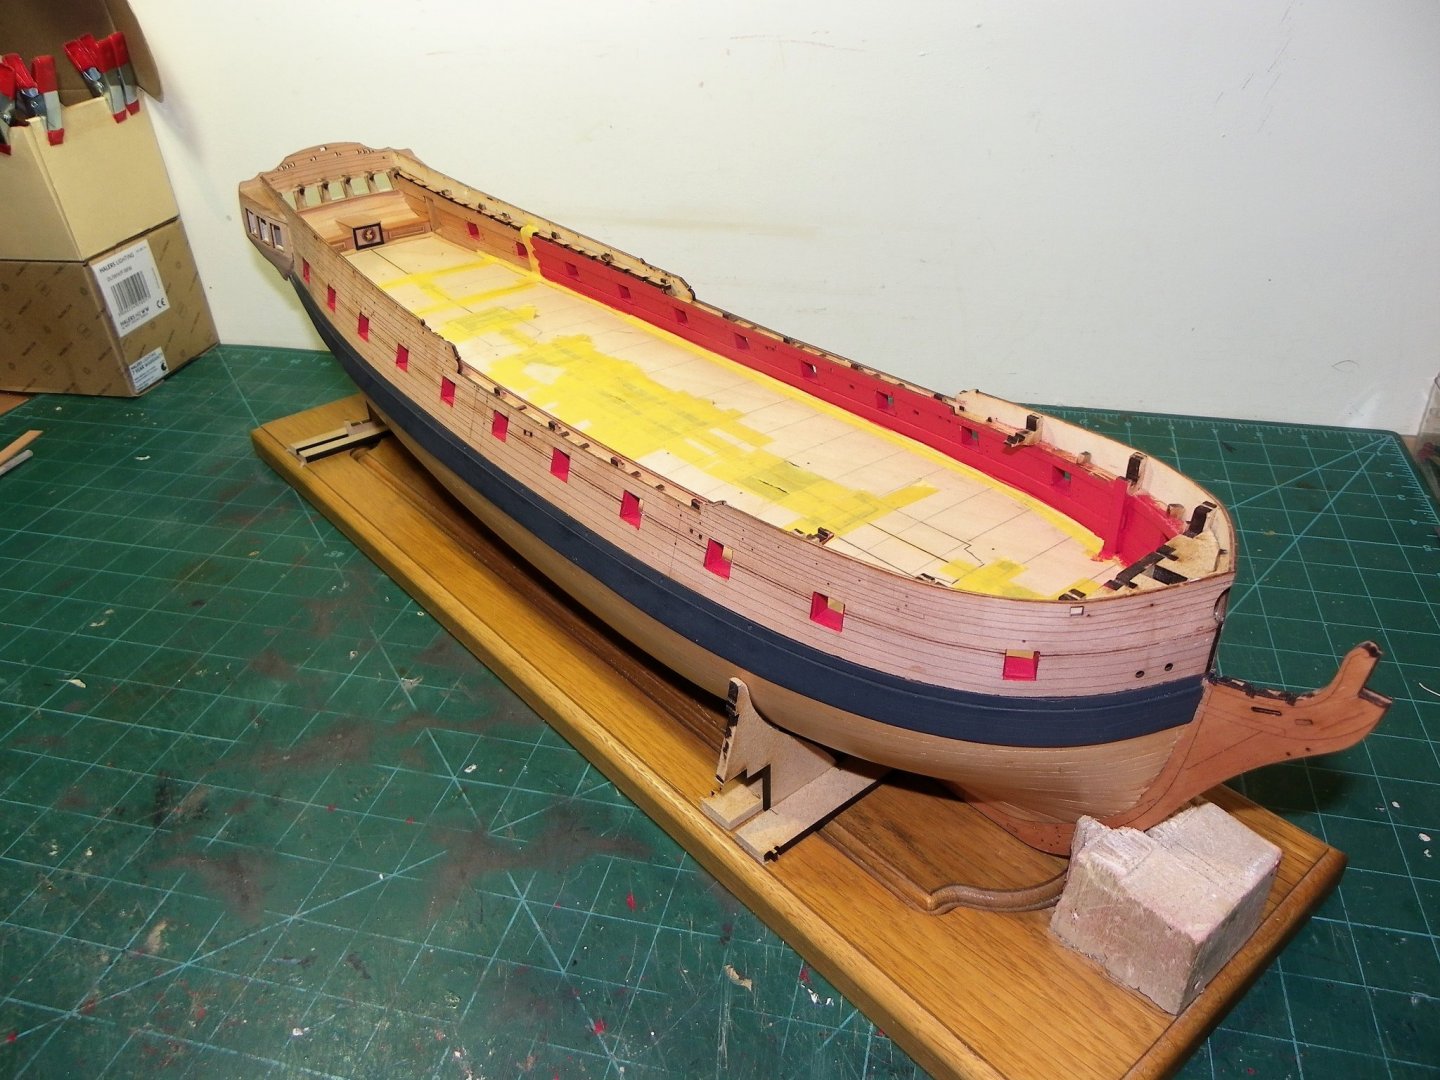
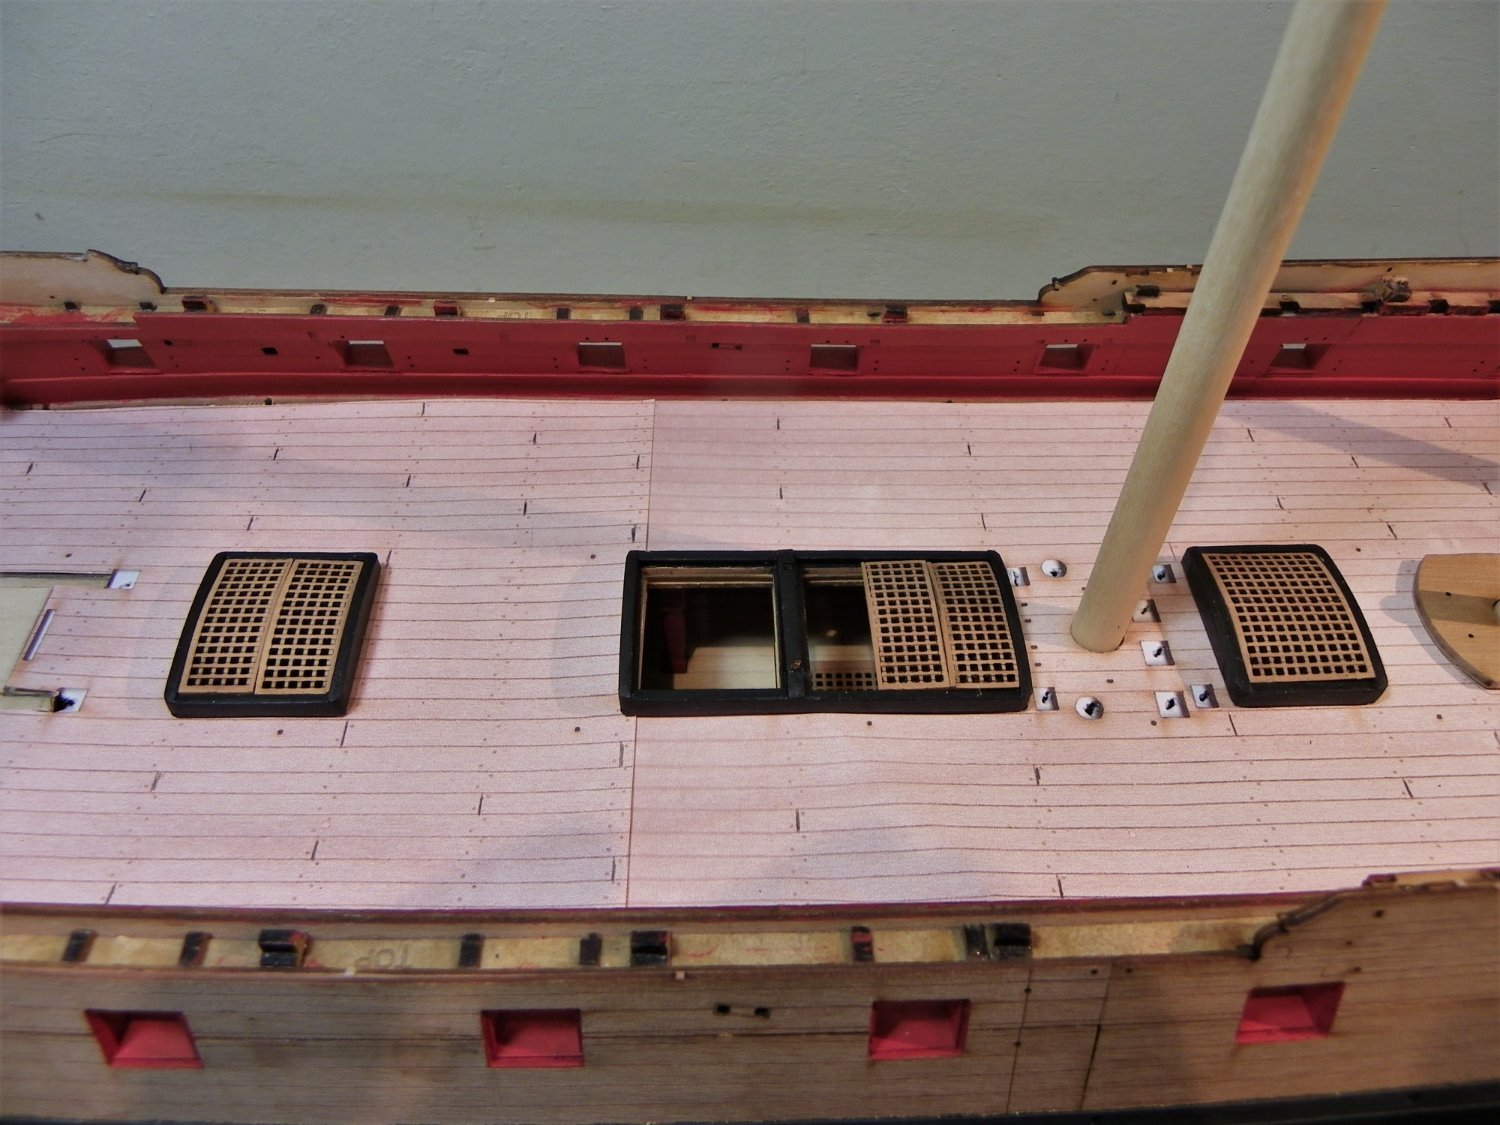
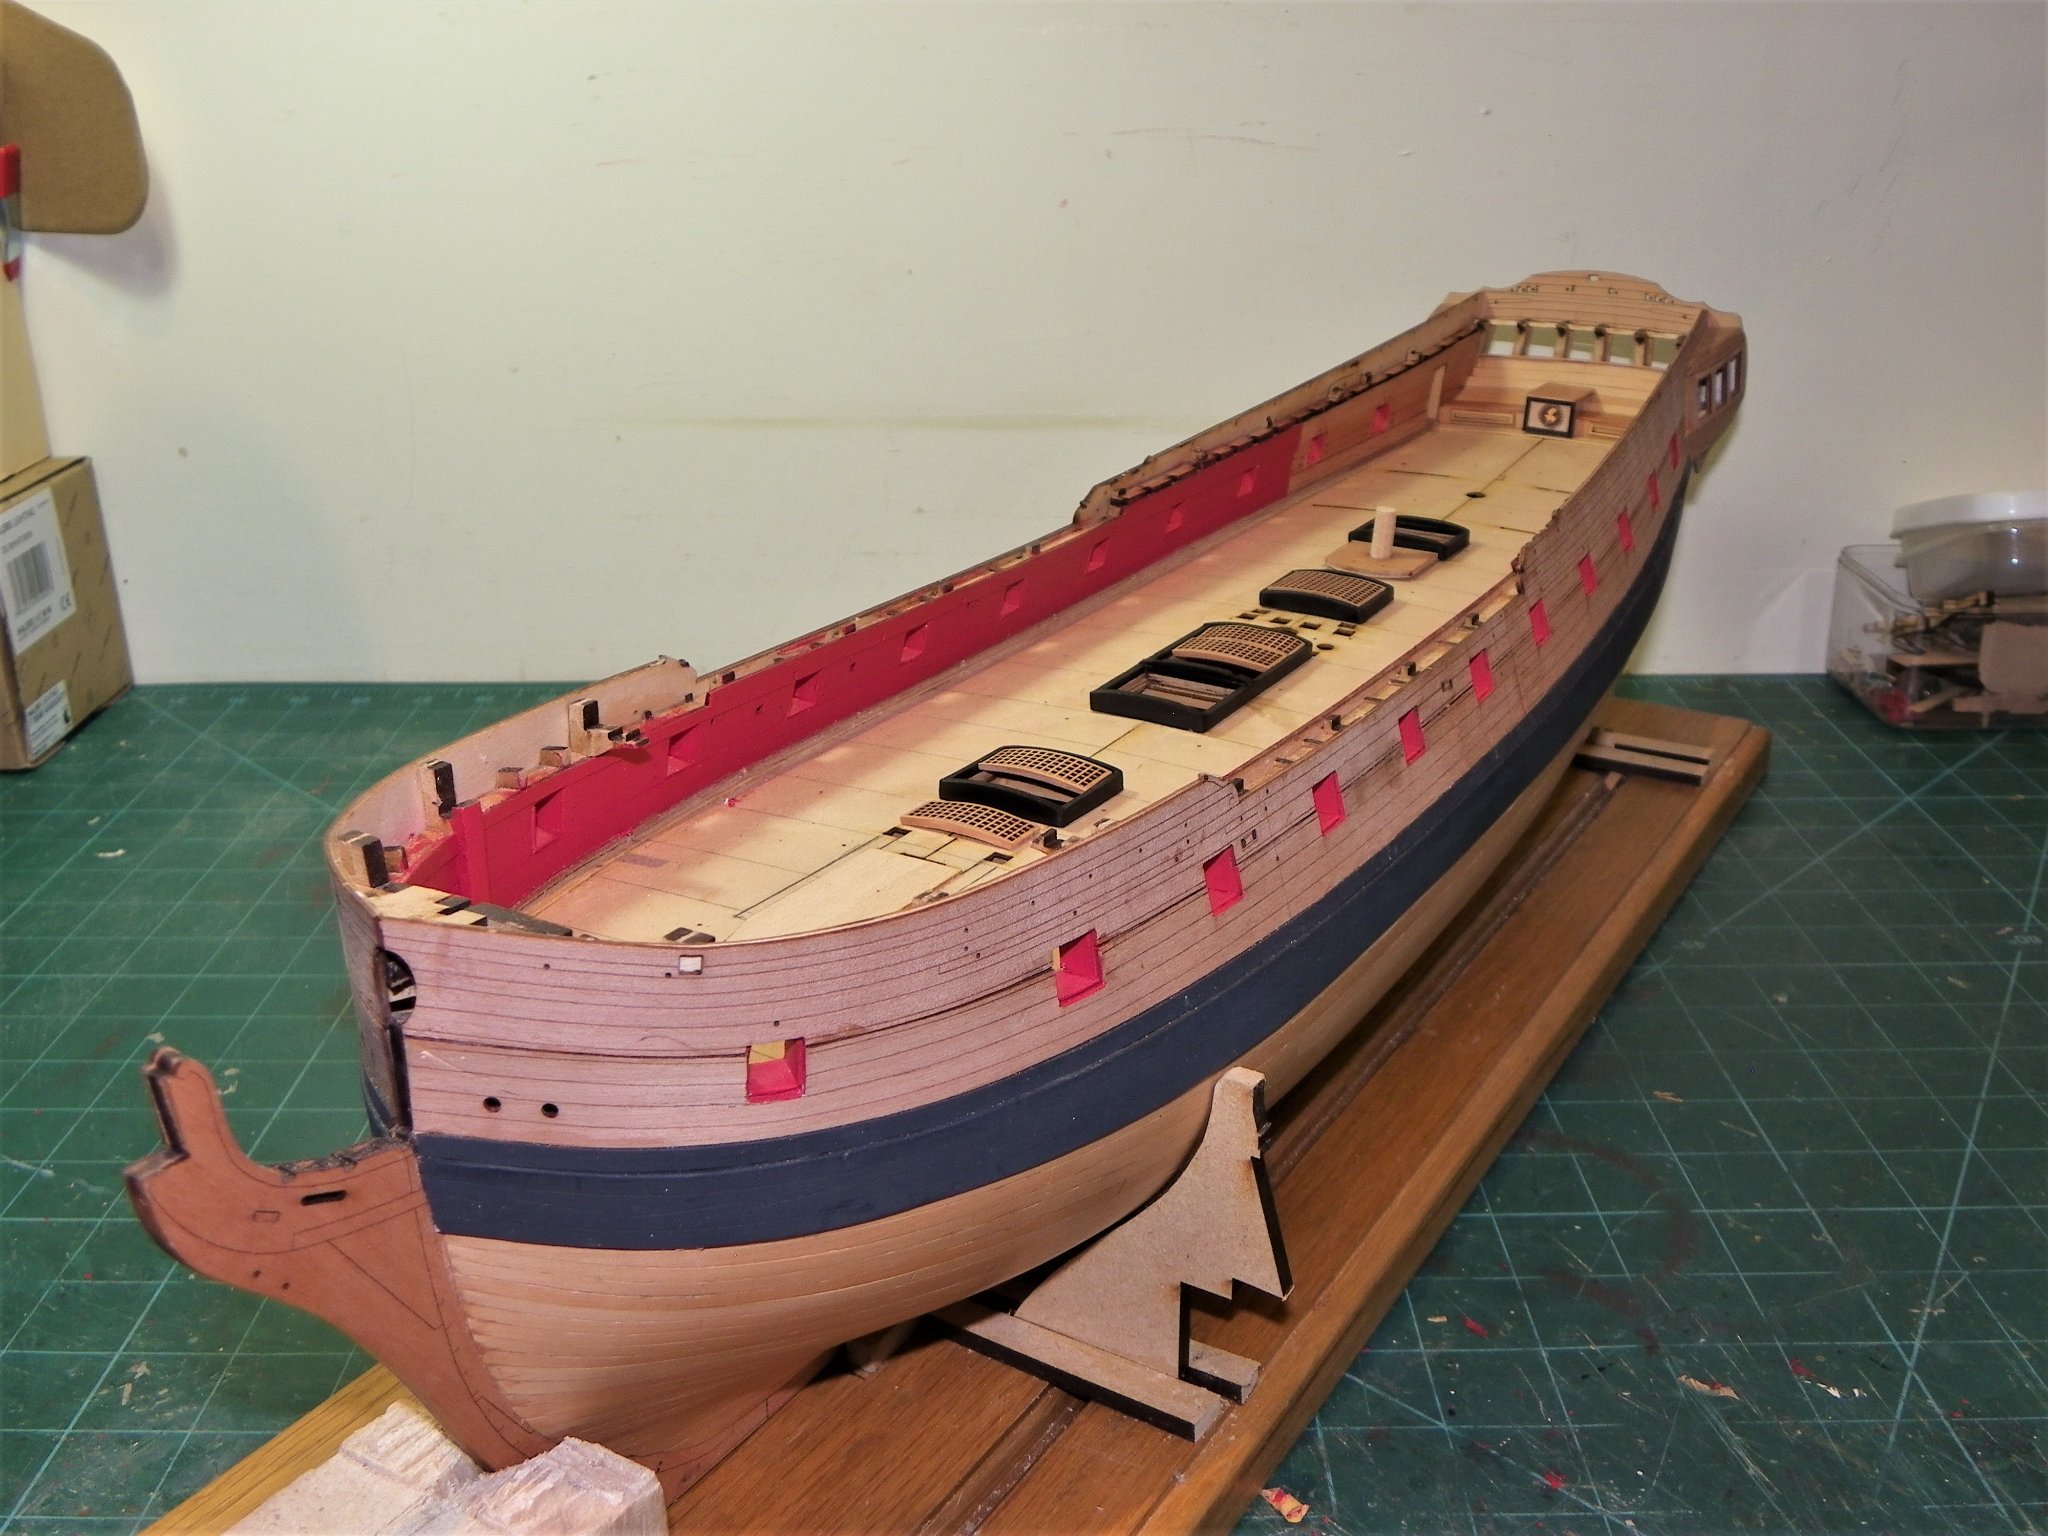
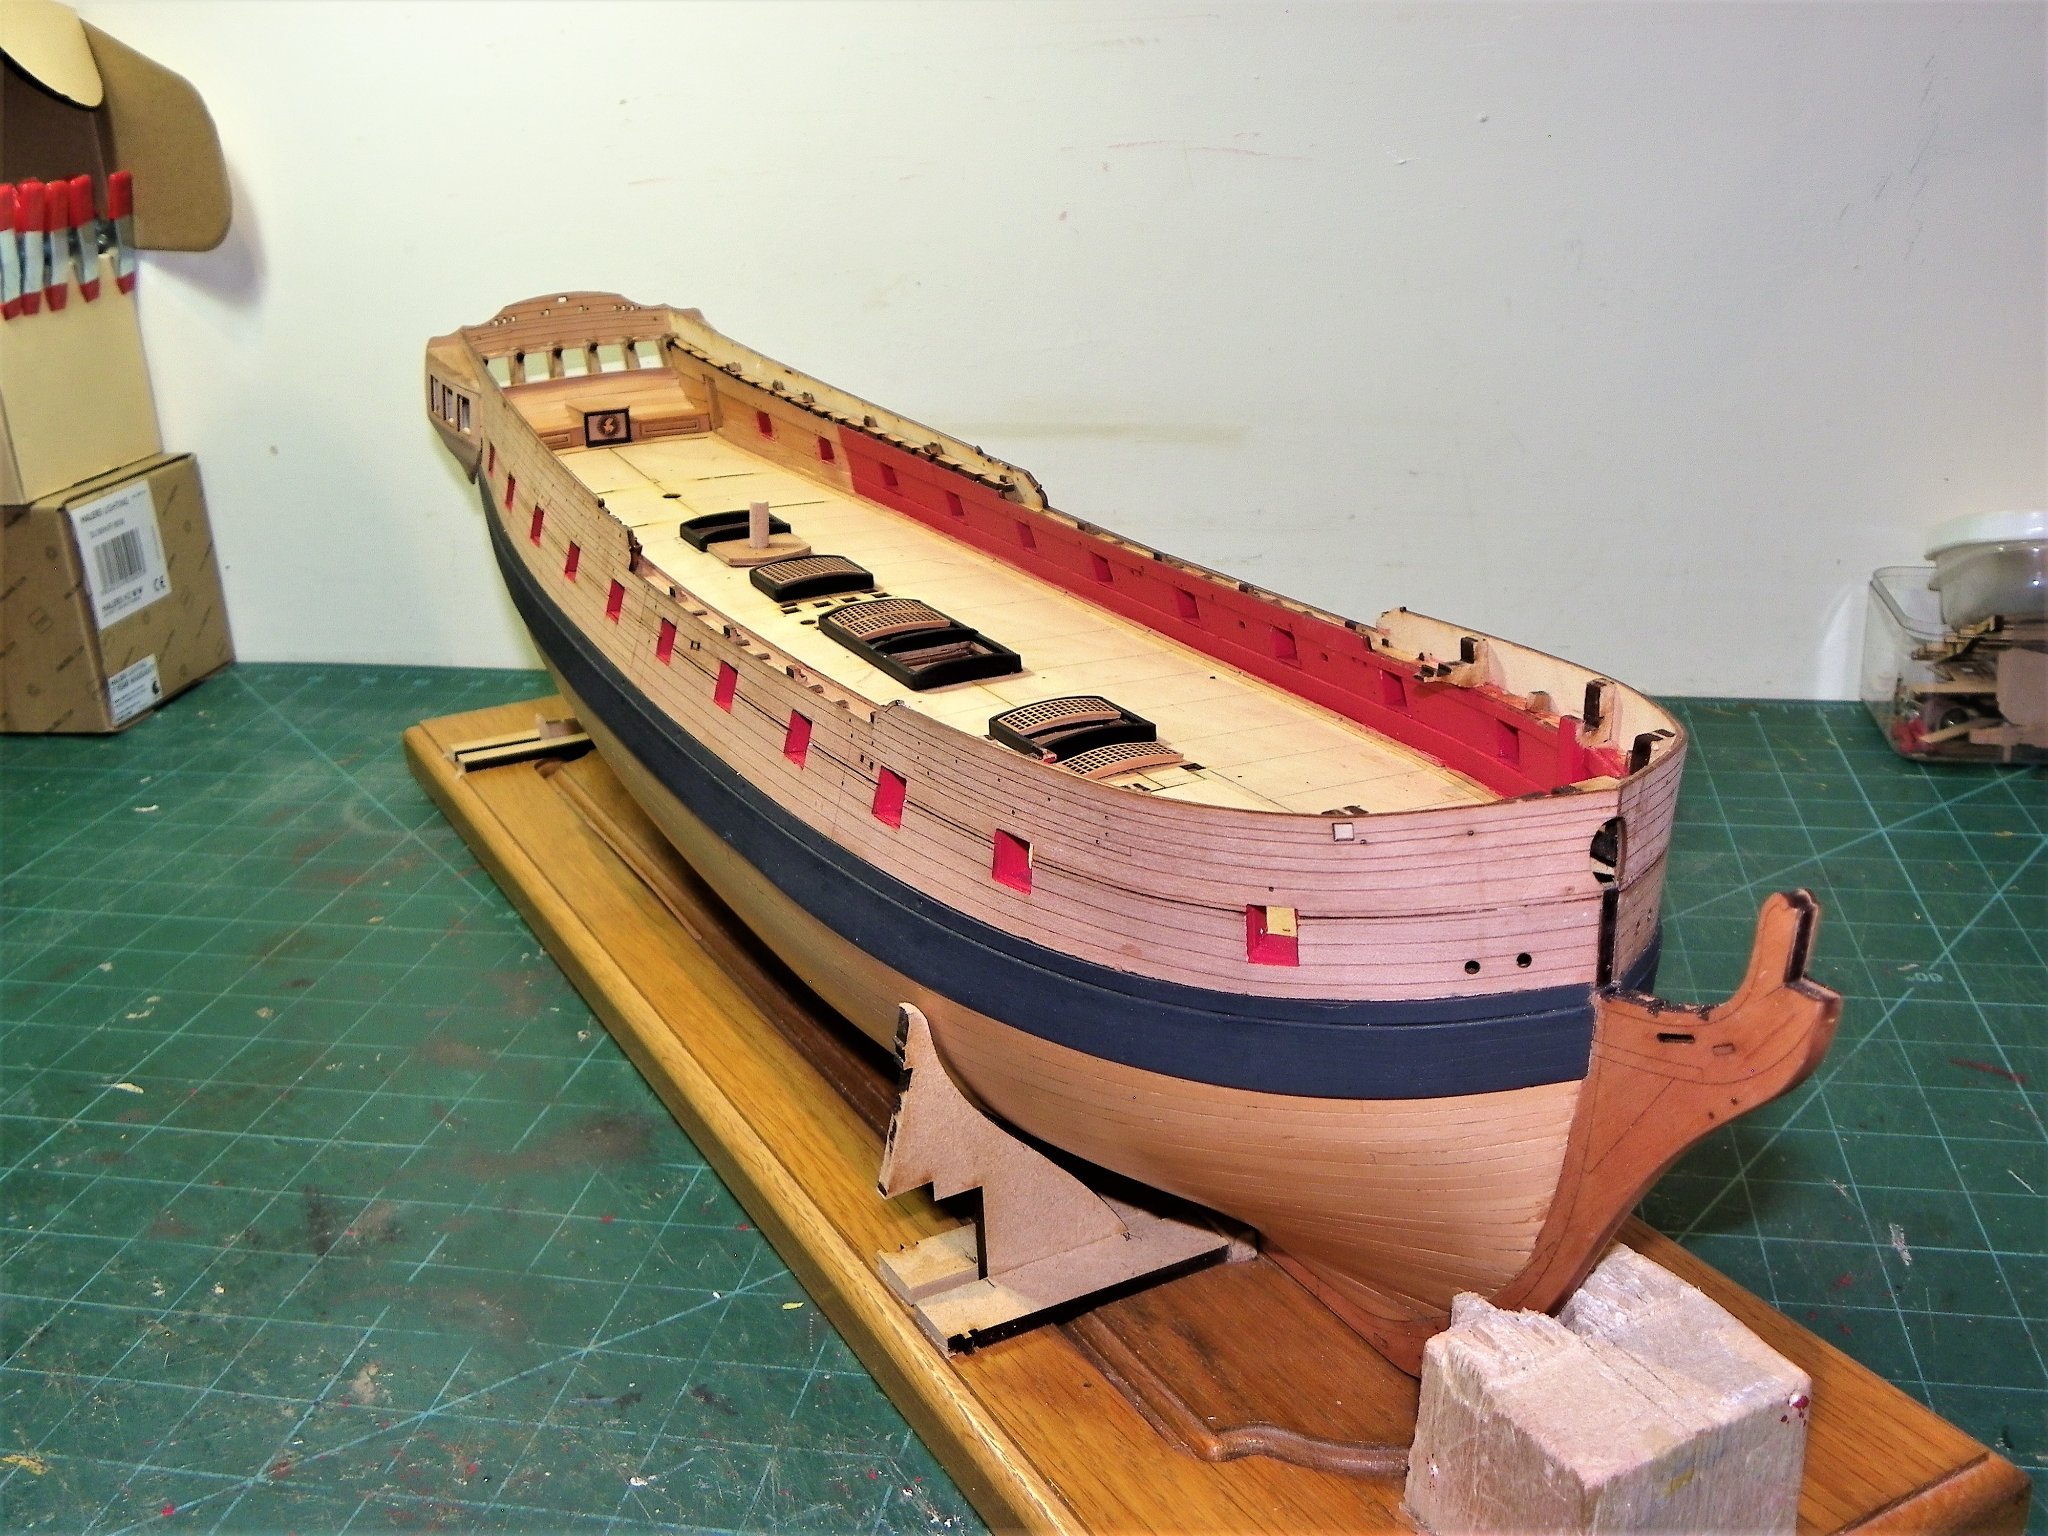
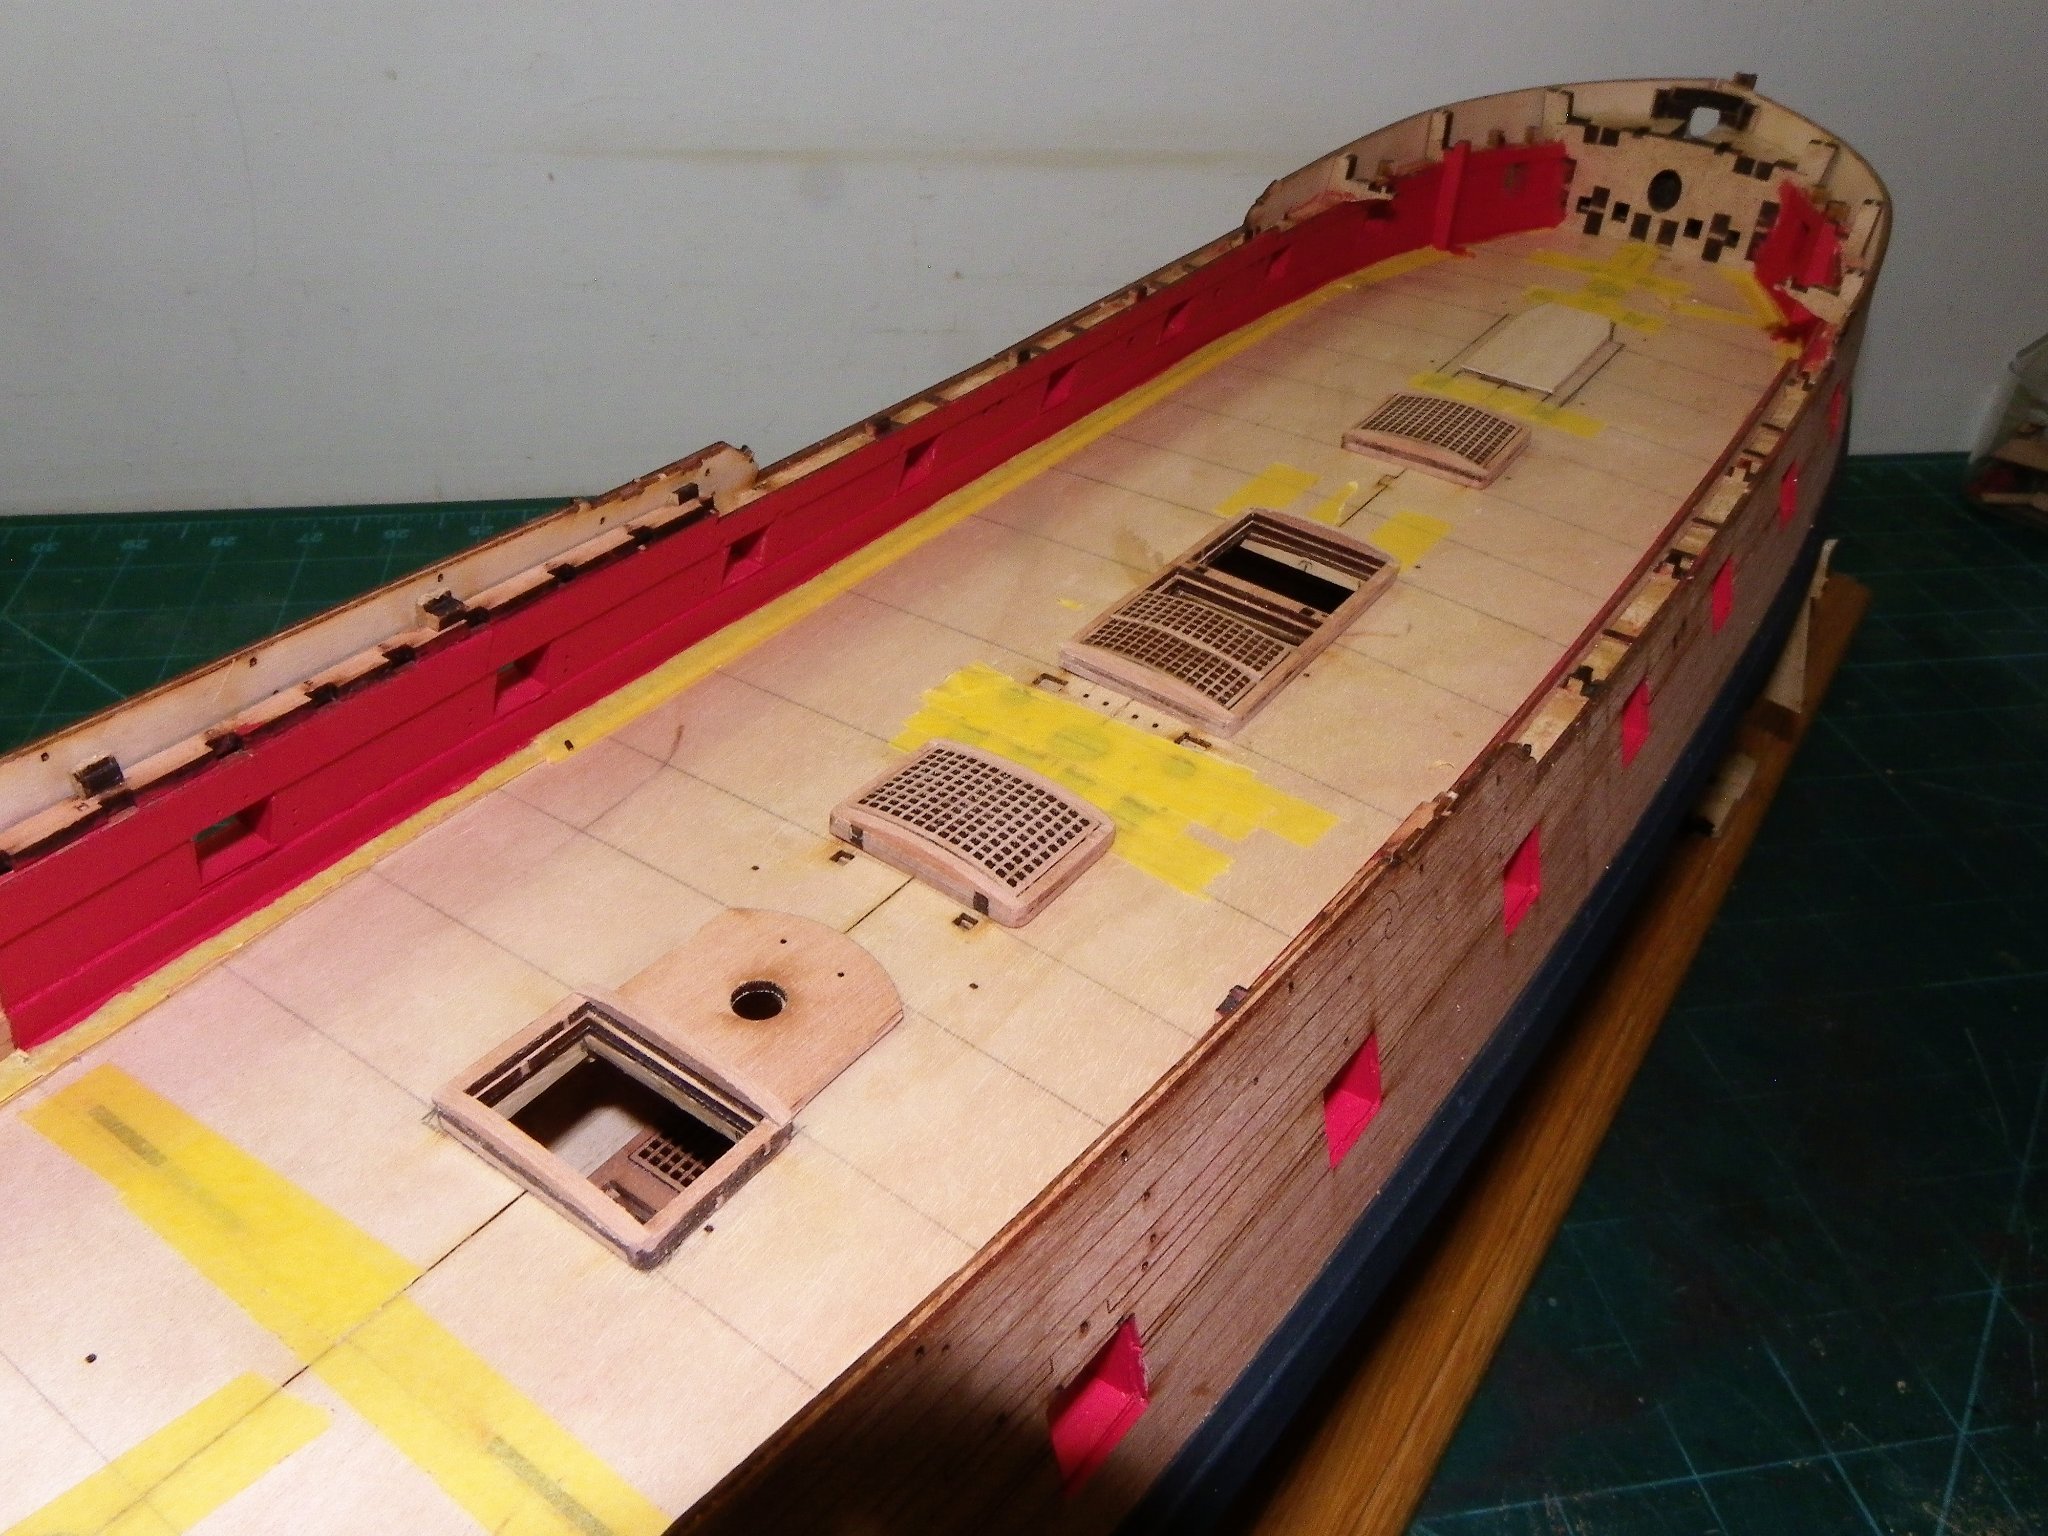
Post Fifty-six Upper deck fittings continued Colouring the Coamings. There is a lot of Red ochre on the model so I decided to paint the coamings black. I felt this would give a nicer contrast to the Pearwood gratings which I will lightly varnish using w-o-p. The coamings were shaped on the underside to match the deck camber, and plank thick strips added to give the correct height above the deck planking. These pieces took a lot cleaning up and removal of laser burn, before painting. Below the grating rebate the coamings were simply varnished. Admiralty Brand Ironwork Black was used to colour. 1952 With a grating section removed there are glimpses of the Lower deck thro’ the Main Hatch. 1941 The trickiest part of modifying the main hatch/ladderway combo, is working a round-up to the head ledge between the hatch and ladderway. Through this section pass the forward stanchions of the pump handles. (412) which continue through the Upper deck to seat on the lower deck. The holes need easing to allow passage of the stanchions without stress, and a ‘round-up’ is cut to fit around the stanchions. The Fore Hatch grating has been cut into two sections, and looks much better to my eye. 1939 0063 I now have the option to leave the forward section off giving a view down through the Lower deck to the Hold, and the ladderway to the forward platform. The aft ladderway with Capstan step. 1938 1951 Looking thro’ the aft ladderway coaming down to the Lower deck ladderway to the Orlop. 1968 With these modifications the impression is thus given of a model with all decks represented. 1958 1956 The next stage is to glue the centre line fittings to the false deck, but a couple of the gratings are not as good as I would like so I will defer until I receive the replacements from Chris. It is easier to fine tune the gratings with the hatches off the model. 1959(3) Overall it’s going to plan, so I’m happy with progress to date. Happy New Year to you all. B.E. 26/12/21


.thumb.JPG.d73302ddadbbd3d76380879874ce7002.JPG)

- 857 replies
-
- 27
-
-

-
- Sphinx
- Vanguard Models
- (and 1 more)
-
Hi Chris, Presumably this is round stock, which would give a nice finish to some of the Booms, yards, and masts, but can you get Square stock? Square stock allows for nicely profiled heels and heads on masts, and forming octagons on yard centres, but the round sections obviously have to be turned. This may be beyond the remit for your target kit market, but simple masts such as on your Fishing boat kits would benefit from such an enhancement as Pearwood dowel. In preference to the standard Walnut (too dark for my taste) or Limewood dowel (tends to warp) I use Ramin for lower masts and Boxwood square stock for Topmasts. A Pearwood alternative I would find appealing. Cheers, B.E.
-
A pleasurable catch-up Derek what a fine job you are doing with the Duchess, she looks splendid. The only downside of looking at your log is that it cost me money, another three items of interest to follow up including those wonderful looking chisels. Have a good Christmas, and a safe New Year. B.E.
- 345 replies
-
- 4
-
-
-
- Duchess Of Kingston
- Vanguard Models
- (and 1 more)
-
Thank you Glenn, I think 'Merry' is the traditional greeting in England too, certainly the written version on cards. A quick look around all the cards we have received would suggest so. I'm a Christmas baby so Merry and Happy get rolled into one.😄 Merry Christmas and a Happy New Year to you and yours. B.E.
- 857 replies
-
- 2
-
-
- Sphinx
- Vanguard Models
- (and 1 more)
-
Thanks Ron, an interesting idea about darkening the 'parquet' flooring, I'll bear that in mind.👍 Post Fifty-five Deck fittings With the port linings completed I return to the Upper deck and the centre line fittings of hatchways and gratings. I have decided to fit these first and plank to them. All the deck fittings are designed to sit atop the deck so these will need beefing up on the underside by the thickness of the planking. Firstly there are modifications to make. The kit provided hatch sets lack a round-up to the head ledges; many contemporary models show this feature and a camber to the gratings. This look appeals to me, and my eye expects to see it. I have also carefully removed the shot garlands which in the kit are an integral part of the coamings. For the Navy Board style model I envisage they seem an unnecessary and fussy addition, and I can always re-install them. Modifying the kit Coaming/gratings arrangements. Fore and after hatchways Using 2x2mm Pearwood stock the head ledges are created. 1925 I had bought some Pearwood timber from Hobbymill E.U. in anticipation of this modification. I was a little apprehensive about messing with the pre formed Pear gratings, but I thought if things go pear shaped (no pun intended) I could buy some from Chris, Vanguard sell Pearwood gratings with 1mm square holes. 1901(2) The kit gratings are soaked and heat bent around a tube to create the camber in the top. This went well for the gratings of the Fore and Aft hatches. Main Hatchway 1875 The main Hatch grating is firstly divided into three sections before soaking and heat bending. 1905 Such meddling does have its risks as can be seen here. An order is already winging its way to Chris. 1921 The general look I’m aiming for. Still a lot of work to do and decisions to be made about the finish to the coamings, Natural, Black, or Red ochre. 1919 Looking forward from the aft Ladderway. 1914 I think I will also split the Fore Hatch grating into two sections and have one removed from each of the Fore and Main Hatches to allow a view directly down to the hold and lower deck. So fettlin’ the hatches is what I will be working on over Christmas. I take the opportunity to thank all my fellow modellers who have shown an interest in my builds, and wish all a very Happy Christmas and a safe New Year. B.E. 23/12/21 ps: no issues in uploading these seven photos.

.thumb.JPG.53584abc32661868d7e14cac15cfcd3e.JPG)


- 857 replies
-
- 24
-
-
- Sphinx
- Vanguard Models
- (and 1 more)
-
A wealth of interesting info in the last couple of posts, Ron, she should look very impressive set in her seascape. 👍 B. E.
- 542 replies
-
- 3
-
-
- Sphinx
- Vanguard Models
- (and 3 more)
-
Well worth repeating Ron, this is an expensive kit and deserves careful construction. I like your comment 'this is no "slam dunk" of a kit' , sort of sums it up. You have a good point Glenn about the flooring, I am far from convinced myself. The b&w pattern is simply scaled and printed off, it's how it will look thro' the deck beams that will be the final decider, and the kit version may well better suit the understated look I am aiming for. B.E.
- 857 replies
-
- 3
-
-
- Sphinx
- Vanguard Models
- (and 1 more)
-
Thank you Christian and James. @ Christian - This is a great kit and the design is such that rapid progress can be made from the early stages, but it is a two edged sword. Great care and forward thinking is required to avoid poor fitting and compounded errors. The danger is that the many pre formed parts can beguile you into thinking it is a simple fit and glue job, in my experience it certainly is not. @ James - I now remember your good advice, but as it happens I forgot to do it, 🙄 fortunately there was no bleed.. Cheers, B.E.
- 857 replies
-
- 5
-
-
- Sphinx
- Vanguard Models
- (and 1 more)
-
Error code 200
Blue Ensign replied to Blue Ensign's topic in Using the MSW forum - **NO MODELING CONTENT IN THIS SUB-FORUM**
It looks like Algo Rithm has developed critical judgement of photos and is rejecting any it doesn’t like.😳 I found that Glenn, if I fiddled around with the photo in photo editing, it may eventually accept it. I hope it doesn’t decide my logs are not worthy and summarily removes them😬 B.E. -
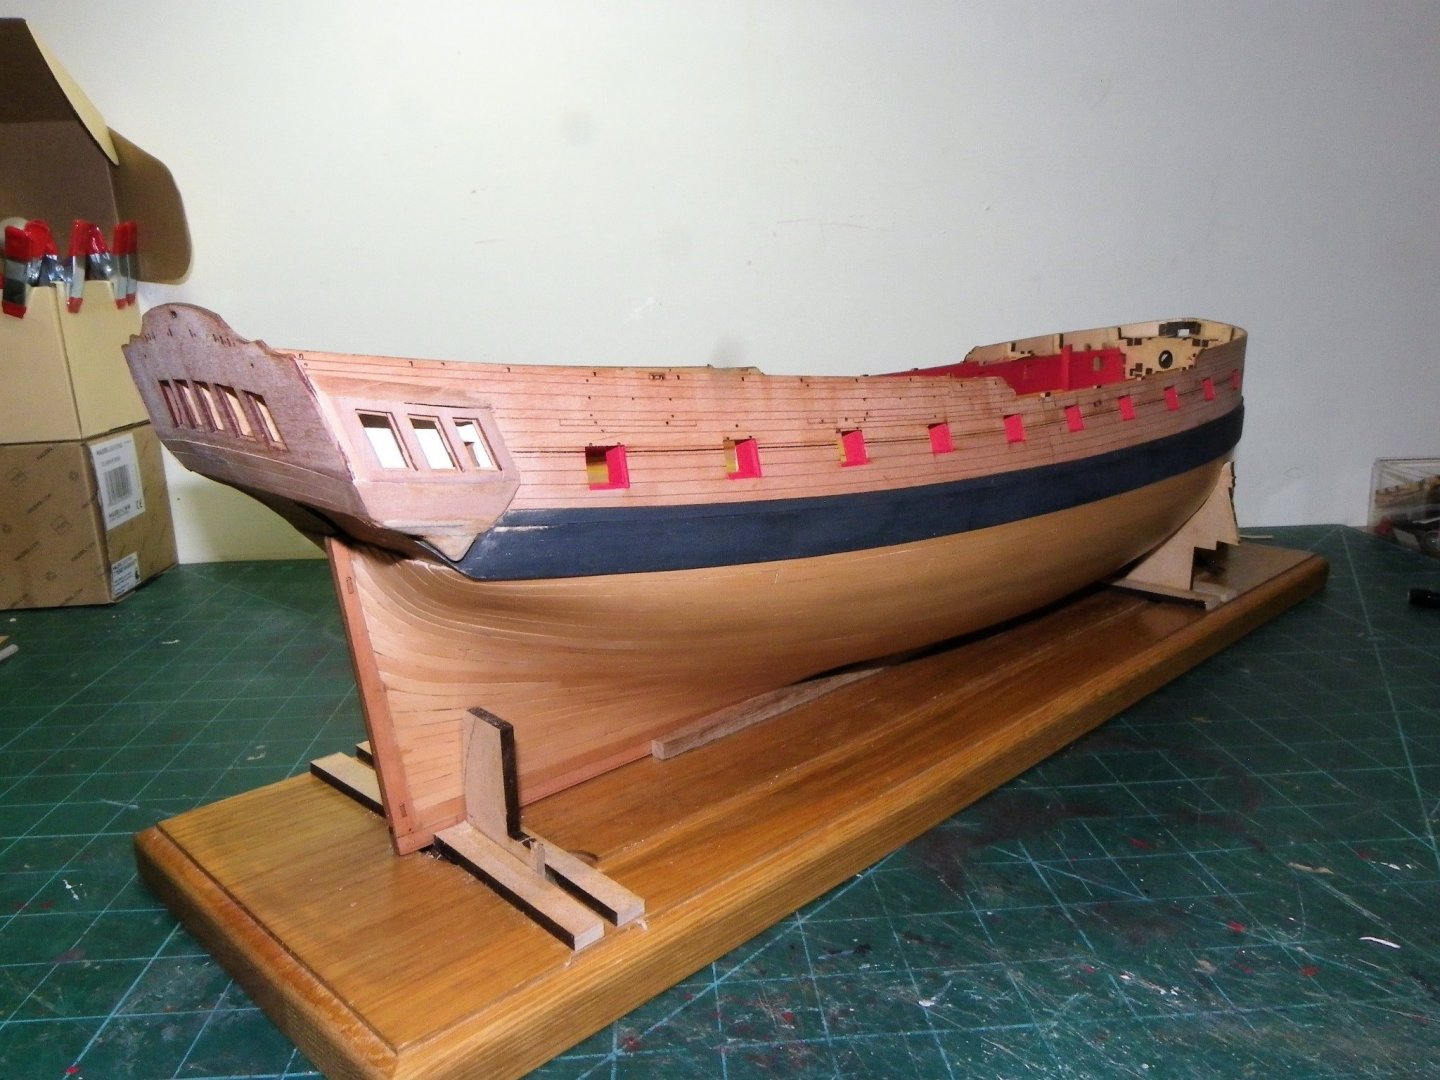
Post Fifty-four Completing the Great Cabin. The cills are made using 0.8mm x 6mm Pearwood strip. 1832 The unused seat pattern (198) made a good template for cutting the cill to fit between the frames. 1838(2) The slots were cut out on the scroll saw. 1835 Fitting was a case of slowly adjusting the slots to fit. 1841 The process went far more smoothly than I dared hope. 1846 The bulwarks have been given the w-o-p treatment and I’m still not sure whether to paint the panelling with an ivory tone. Also wracked with indecision about the kit provided ‘parquet’ flooring or use of the alternative b/w chequer. 1845 This I can defer until I see how things look between the Qtr deck beams. The Gallery doors present something of a problem, I removed these when I modified the Qtr Galleries, and the question is how or whether to refit them. I don’t think Chuck fitted doors to the Quarter Galleries of Winchelsea. The doors are engraved on one side only, are not square, and if to be displayed open need reversing to show the patterns. If hinged on the left they open against the bench arrangement, and either way they open onto the spirketting and deck clamps. Another feature that I can’t get my head around and I’ll leave them off for the present. The port linings and inner bulwarks have been painted; careful masking of the port surrounds is required to avoid getting paint on the ‘bright’ outer planking. 1850(2) Tedious business this, using a fine brush and not too thin a paint mix to decrease the risk of bleed. I note that Chuck leaves the inside edges of the planking around the ports clear of paint, an arrangement I followed on my Cheerful build. I do like this effect, but it is not one reflected on many contemporary models and I think I would struggle to replicate it on the 1:64 scale Sphinx. 1867 1861 1859 1857(2) Four months into the build and I am now ready to set out the centre line deck fittings. B.E. 21/12/21

.thumb.JPG.afff895f6c737edb69d6e6c392ebe0b2.JPG)

.thumb.JPG.d3a1906a91bc41c0e8b6b819f9522d99.JPG)
.thumb.JPG.677c2a26d3011a42a0e89426bb4c392a.JPG)

- 857 replies
-
- 26
-
-

-
-
- Sphinx
- Vanguard Models
- (and 1 more)
-
Recently when I upload a series of photos for my log, the system seems to randomly fail to upload some of the photos stating 'unknown error'/ error code 200. There is nothing unusual in these photos, file size for instance. Any thoughts? B.E.


ps.jpg.30d920ed01d3fde97e682bea2427e686.jpg)
.JPG.7dd203a76daa8704715abda0e4e3300d.JPG)
.JPG.68cc4d09852be849cd88dbaaa498ba46.JPG)
.JPG.33053fa80419b751267396e11dd81e03.JPG)
.JPG.b74a2952f7e17dd47a817f12942baeee.JPG)
.JPG.13a4f330fb9778b5b3fd31035d9affc0.JPG)


.JPG.fcdf24c3b98ddc470051ce406c907855.JPG)


.JPG.bffae02e13729d5abc252b75aeb4129d.JPG)


.JPG.ecfff32b125775945df6b5c5df1b233a.JPG)
.JPG.659f91f2c0c1d9aa874c04f8b6219ee9.JPG)
.JPG.3c6d5de67c9d0c7d32bf5f580ffd5763.JPG)