HOLIDAY DONATION DRIVE - SUPPORT MSW - DO YOUR PART TO KEEP THIS GREAT FORUM GOING! (Only 13 donations so far - C'mon guys!)
×
.JPG.ca33079f5815b861e67b9c2cccd37982.JPG)

Blue Ensign
-
Posts
4,564 -
Joined
-
Last visited
Content Type
Profiles
Forums
Gallery
Events
Everything posted by Blue Ensign
-
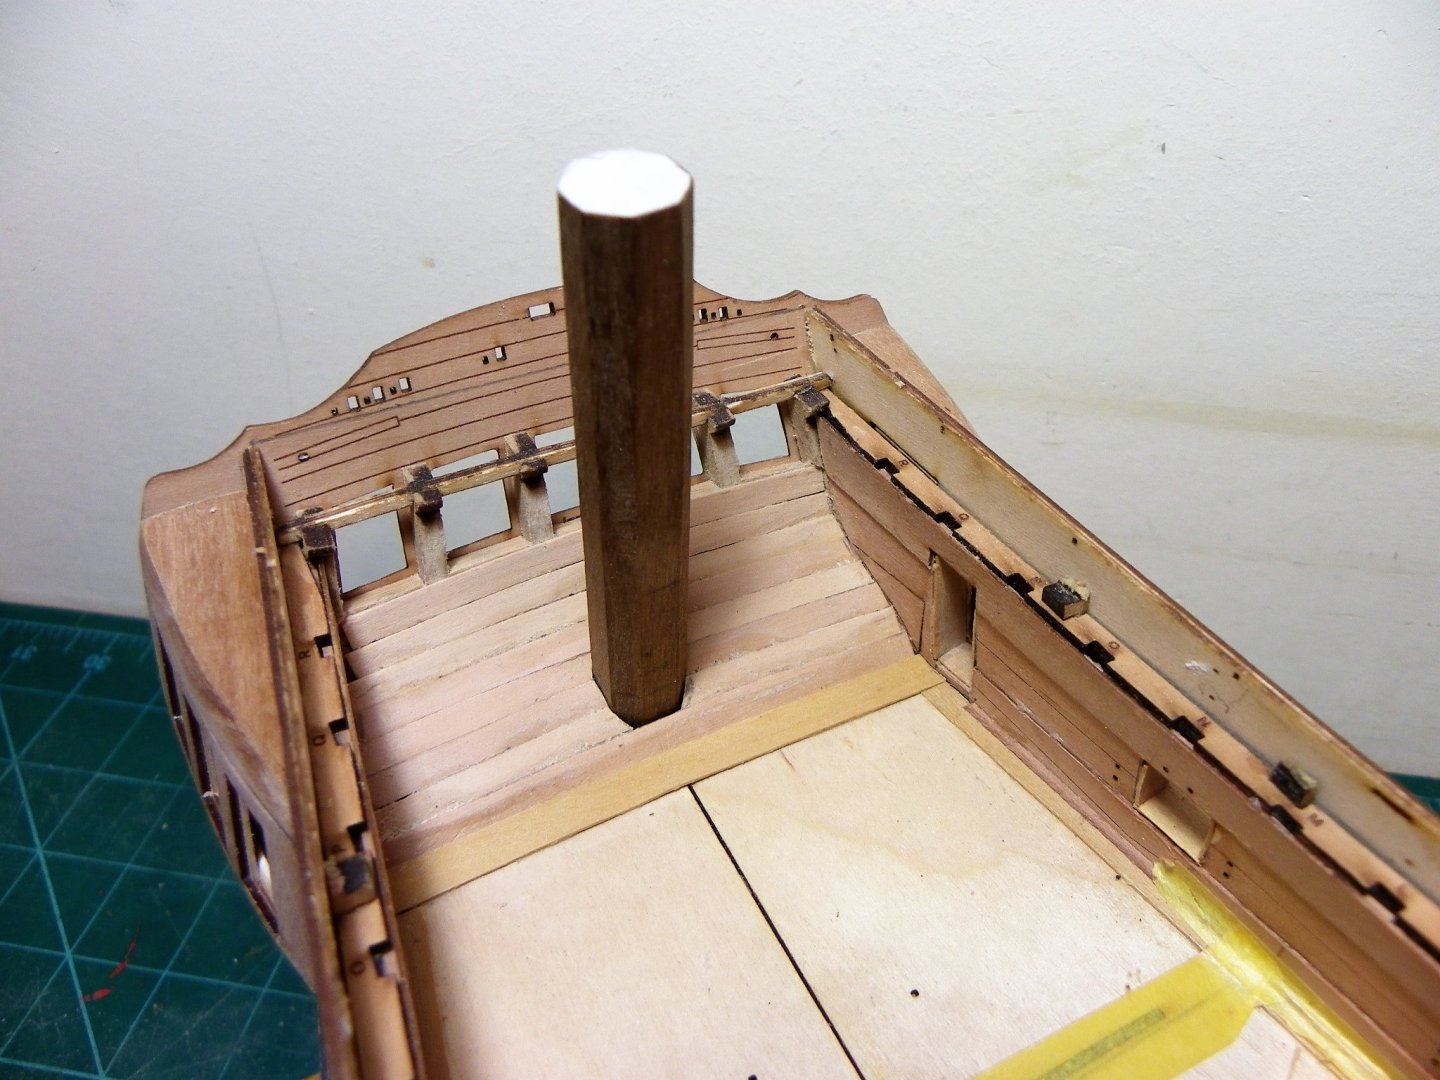
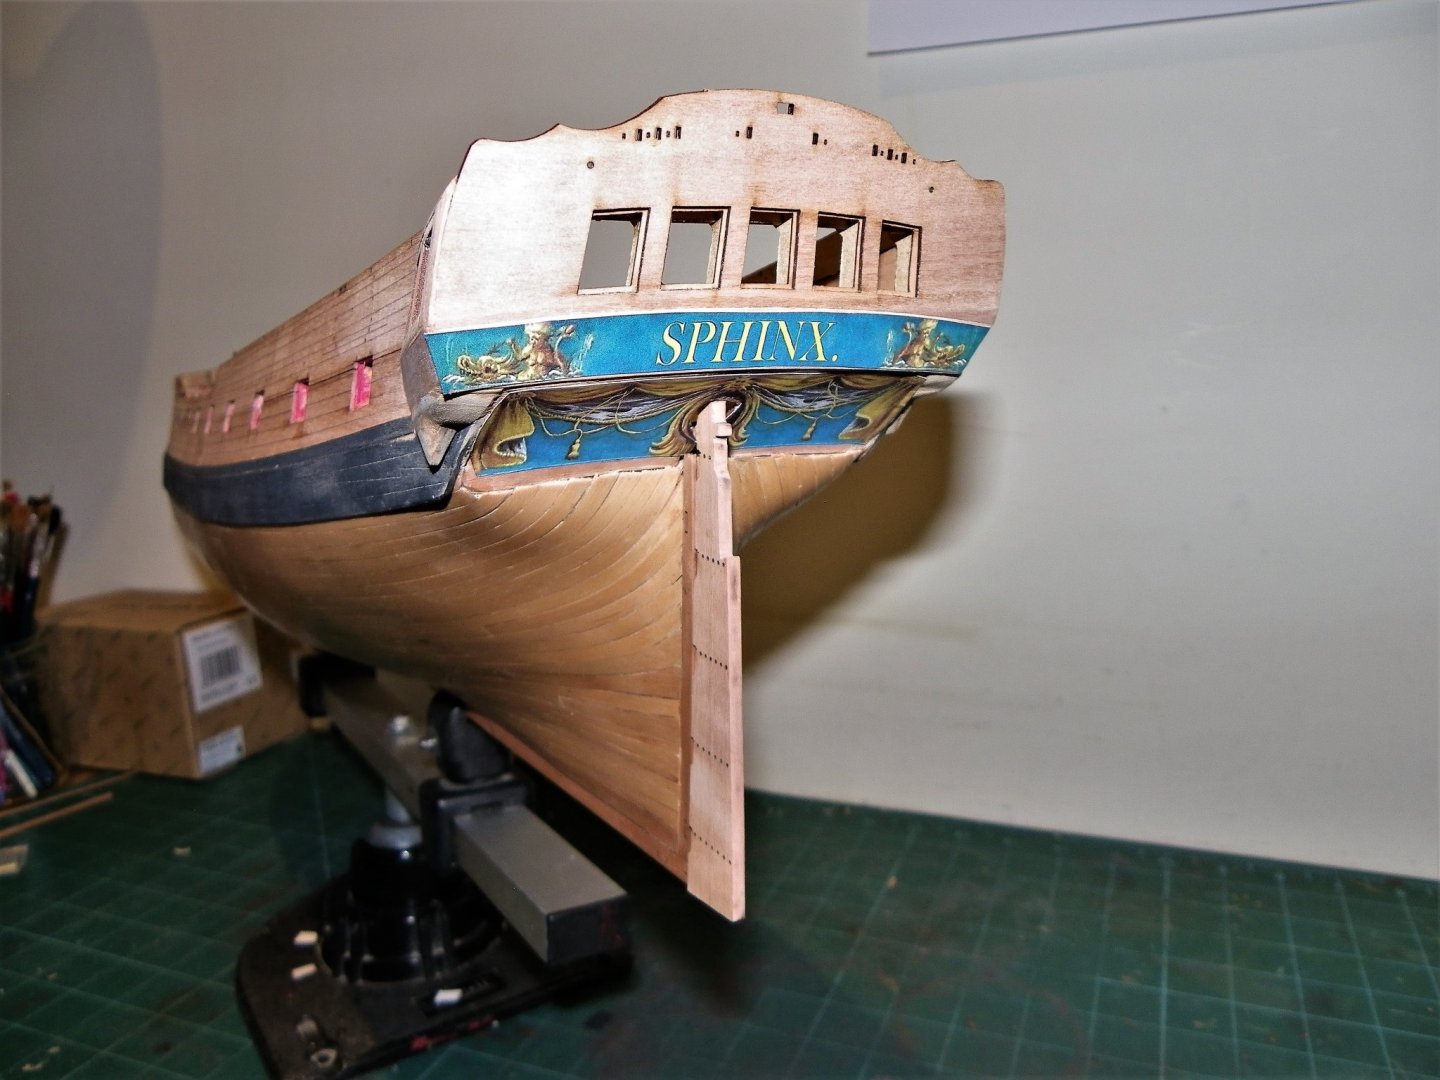
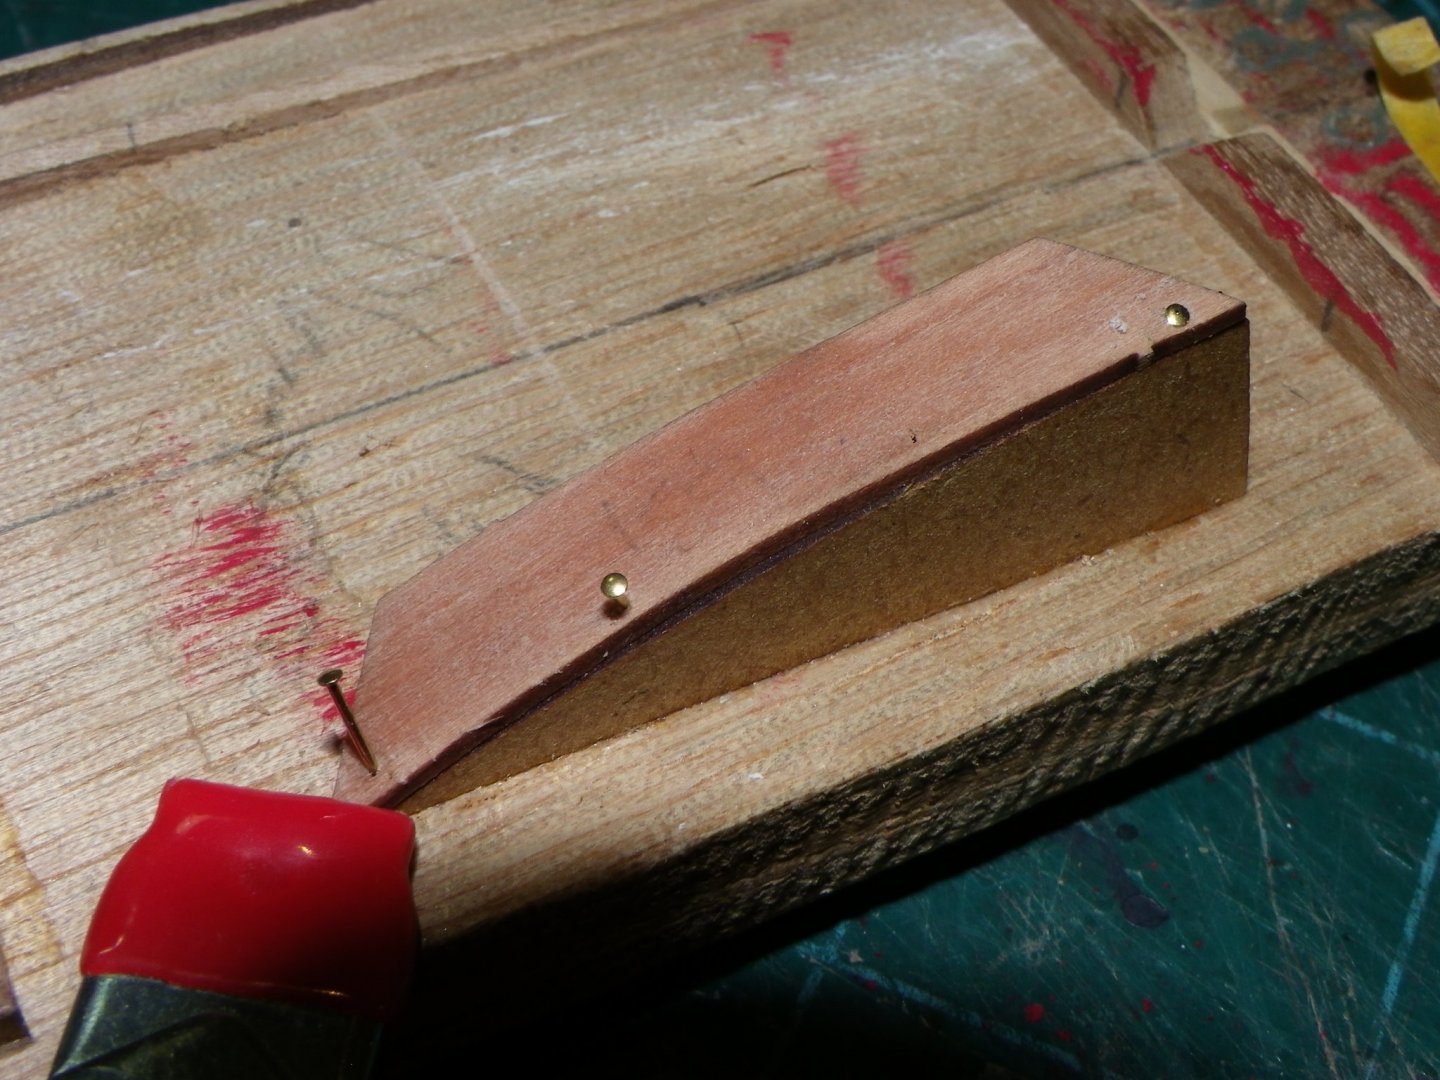
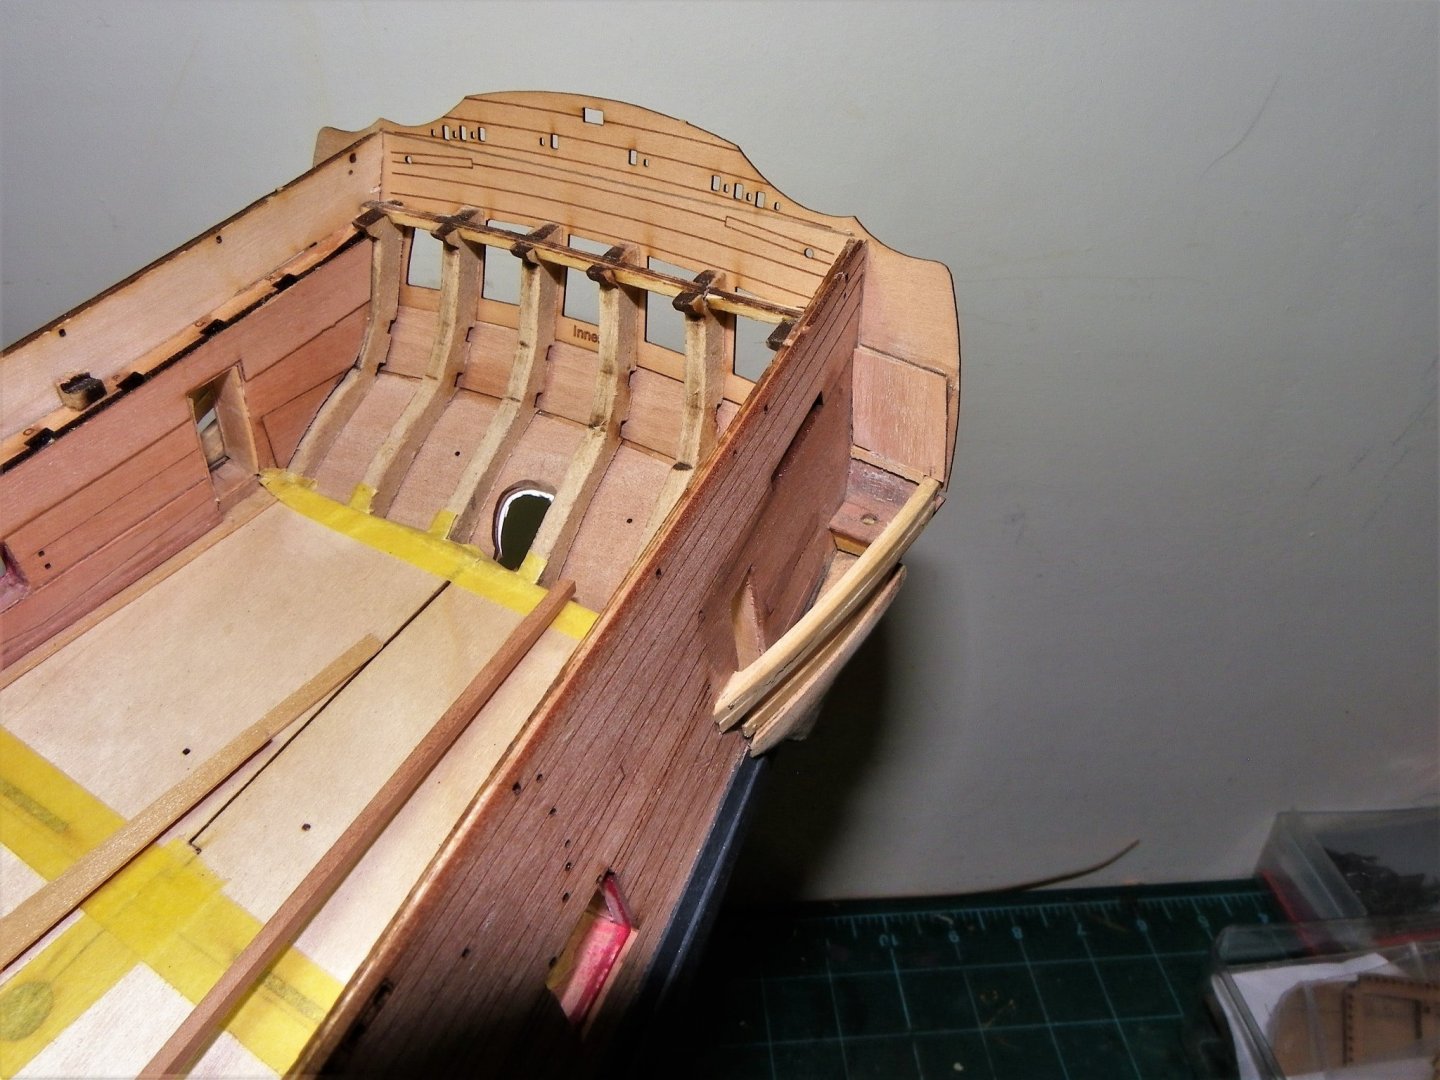
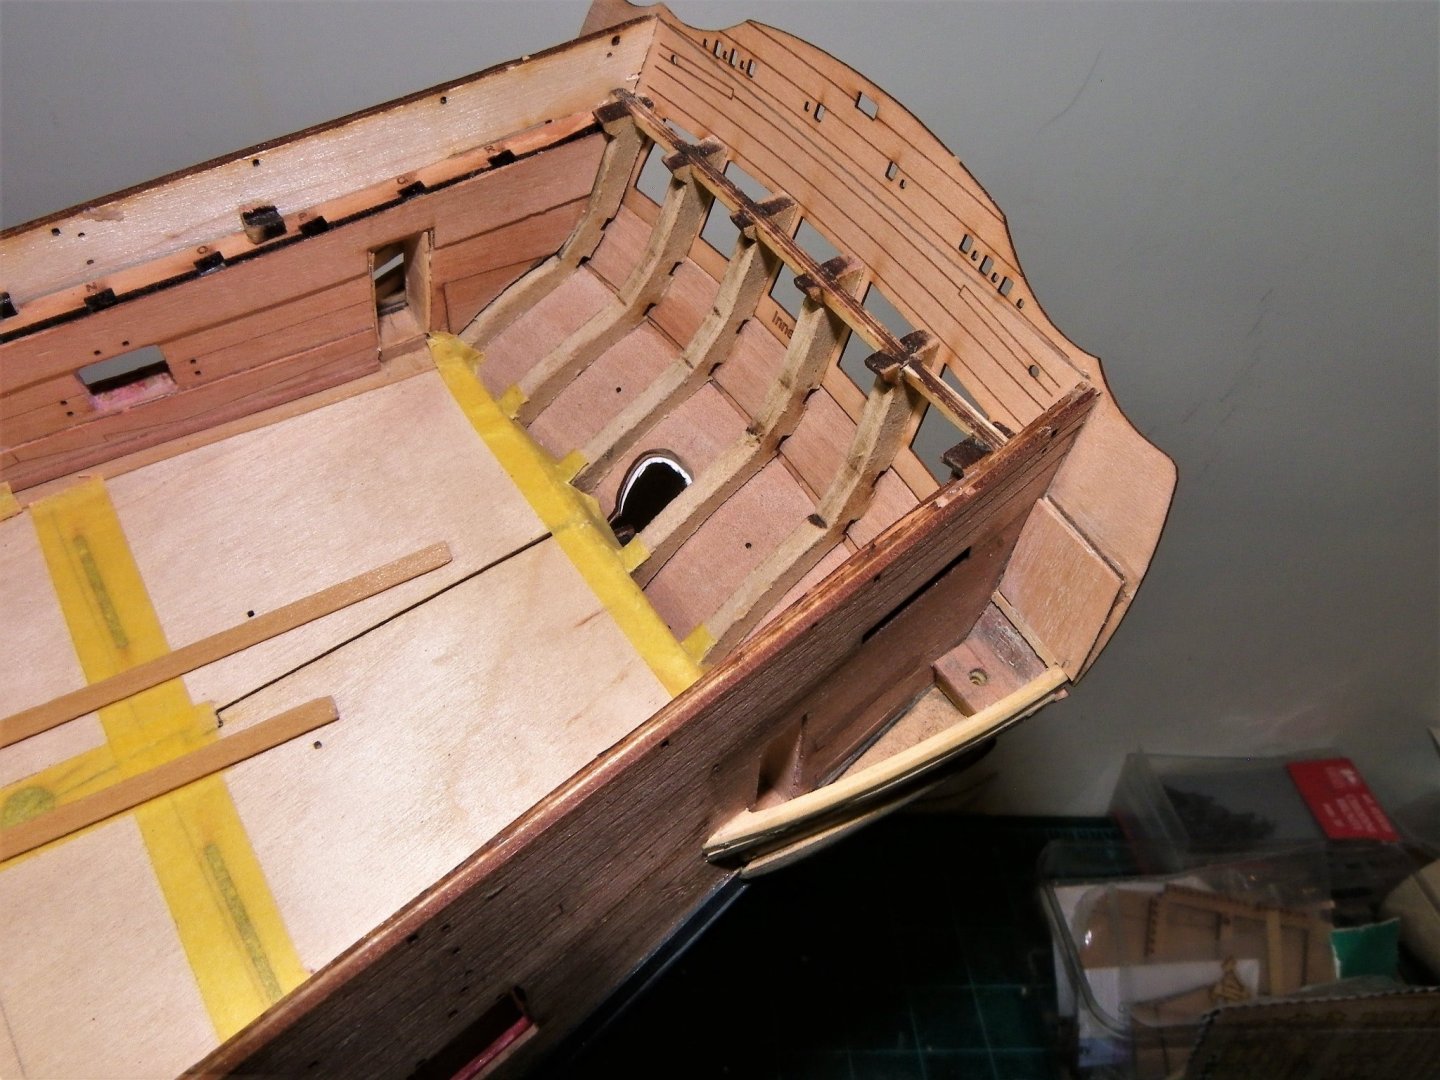
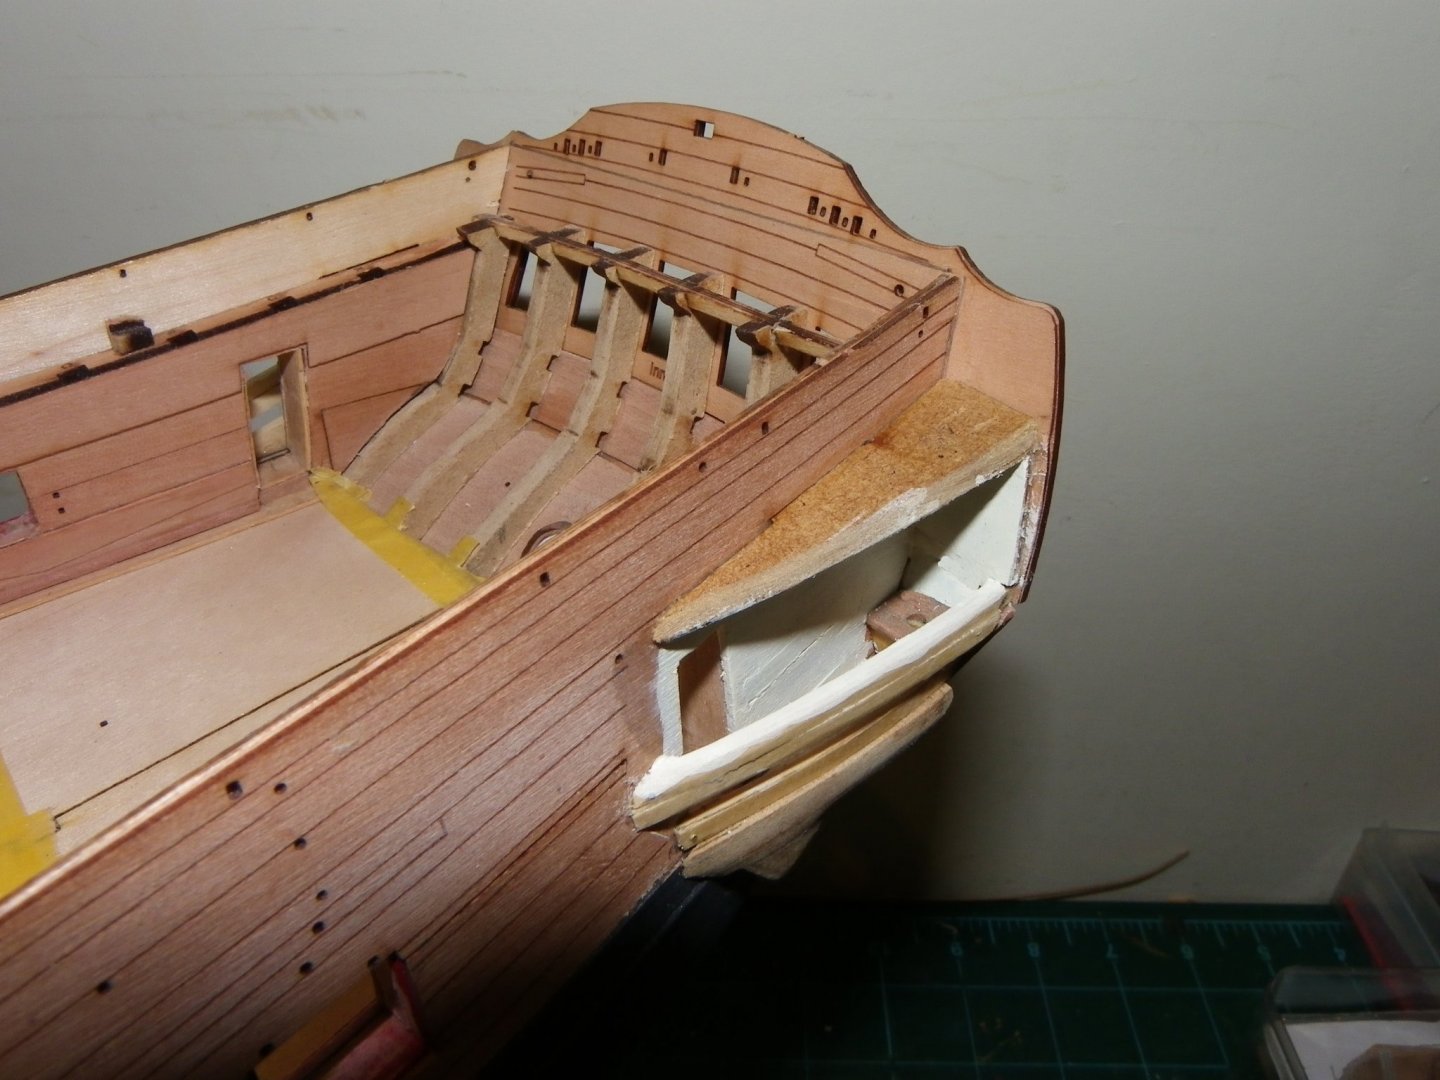
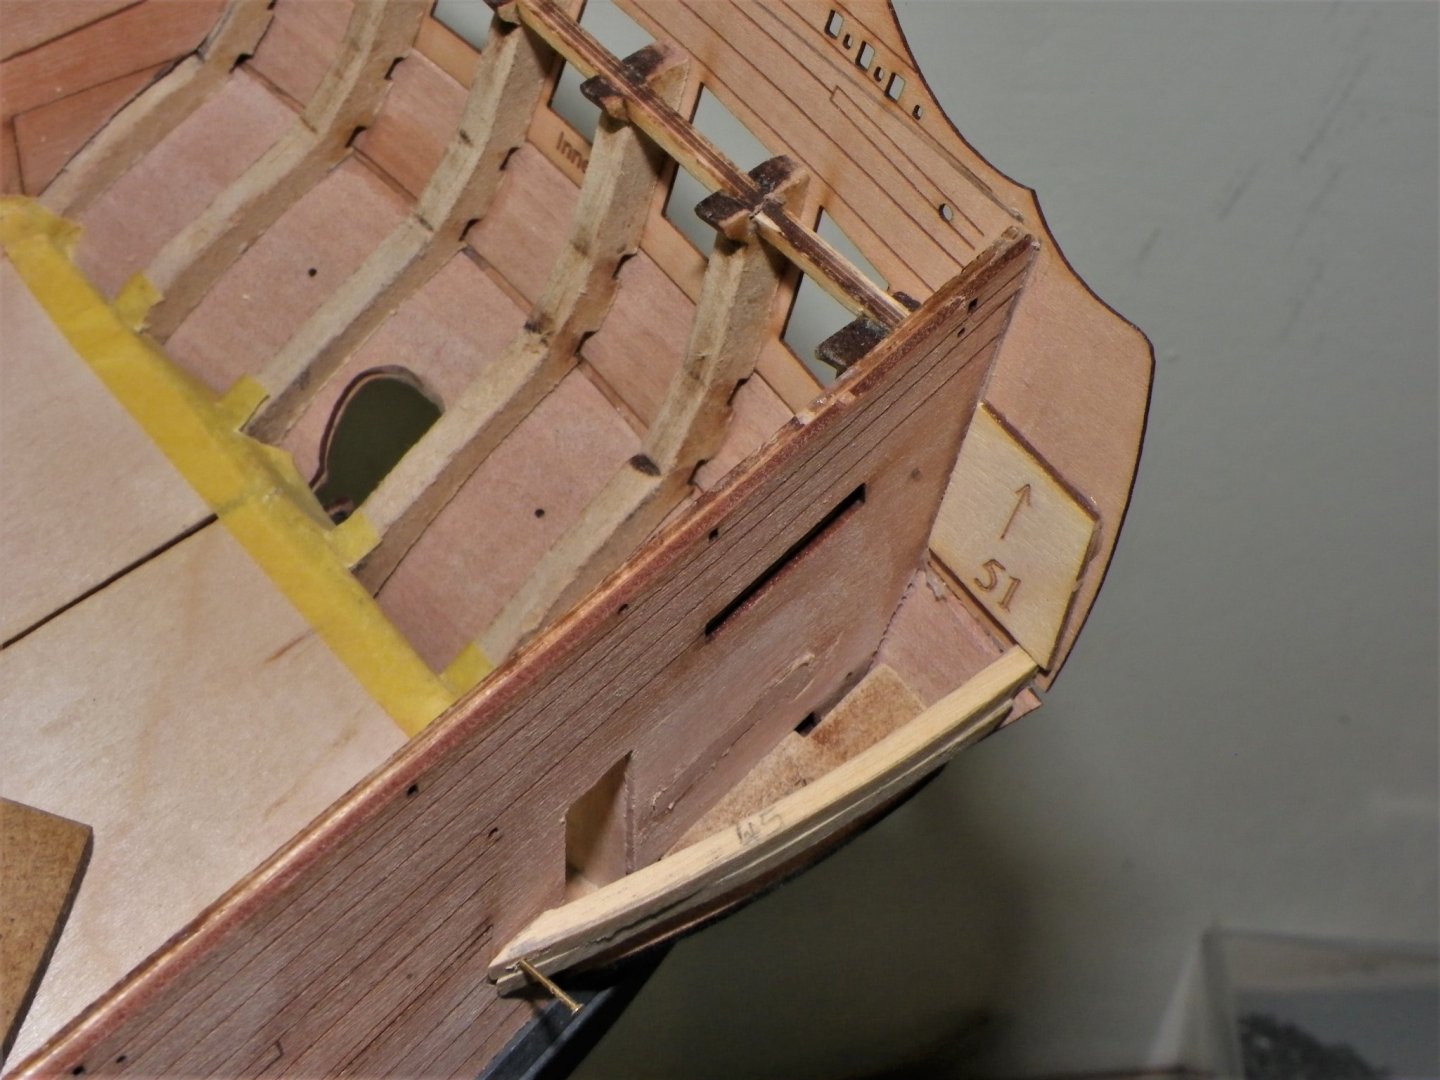
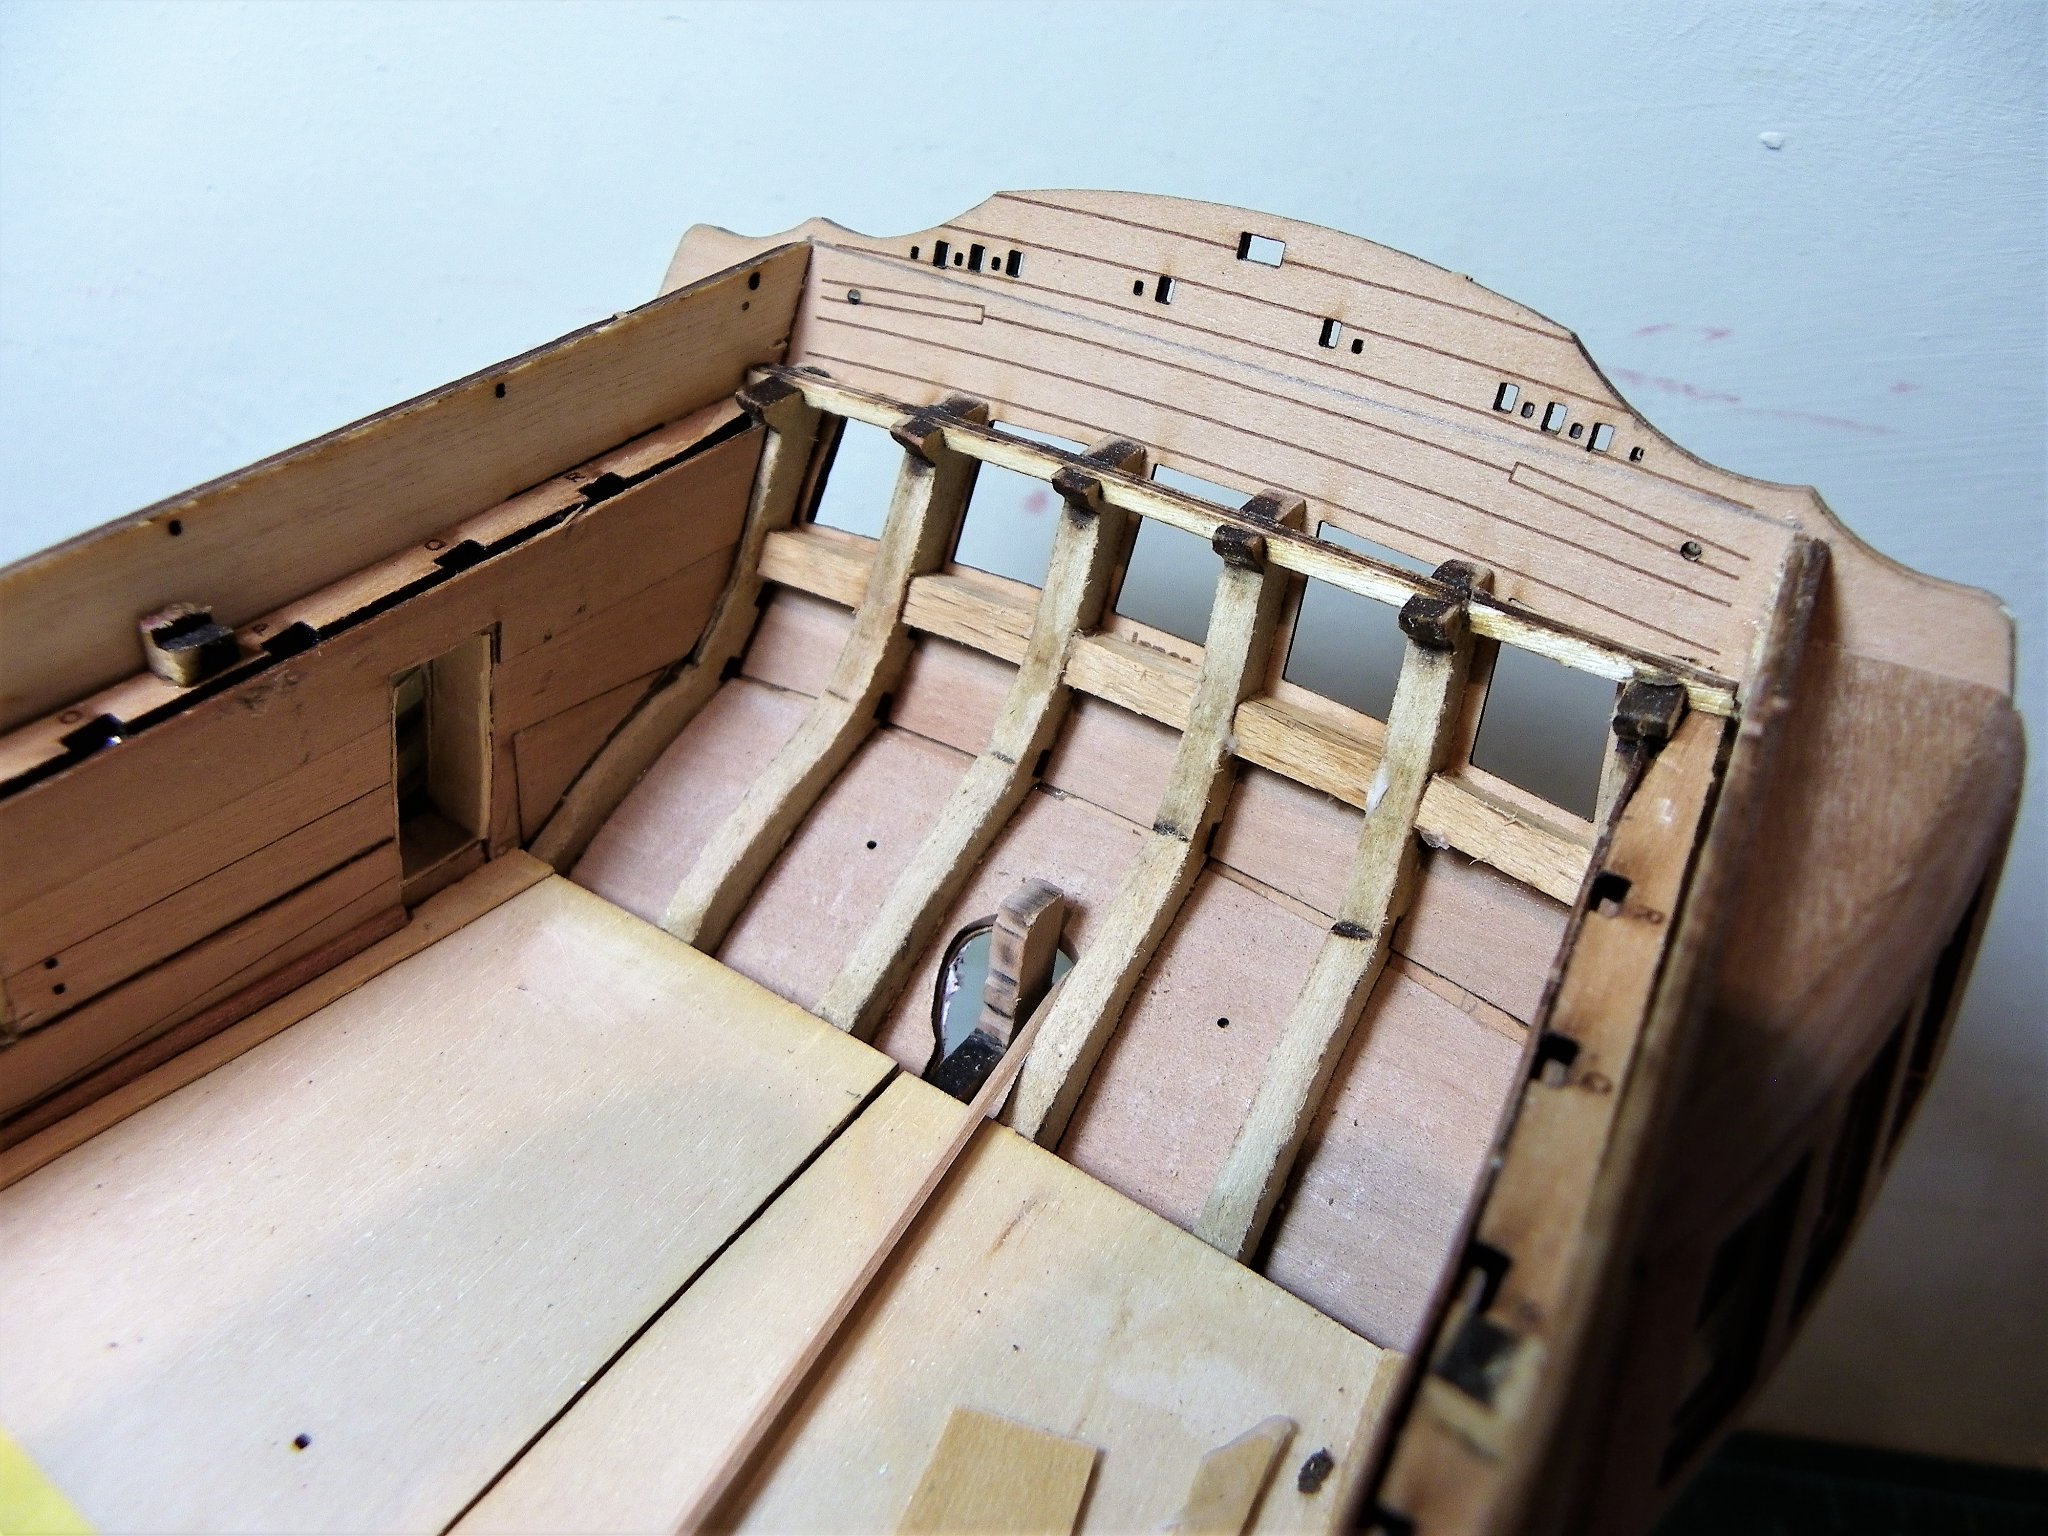
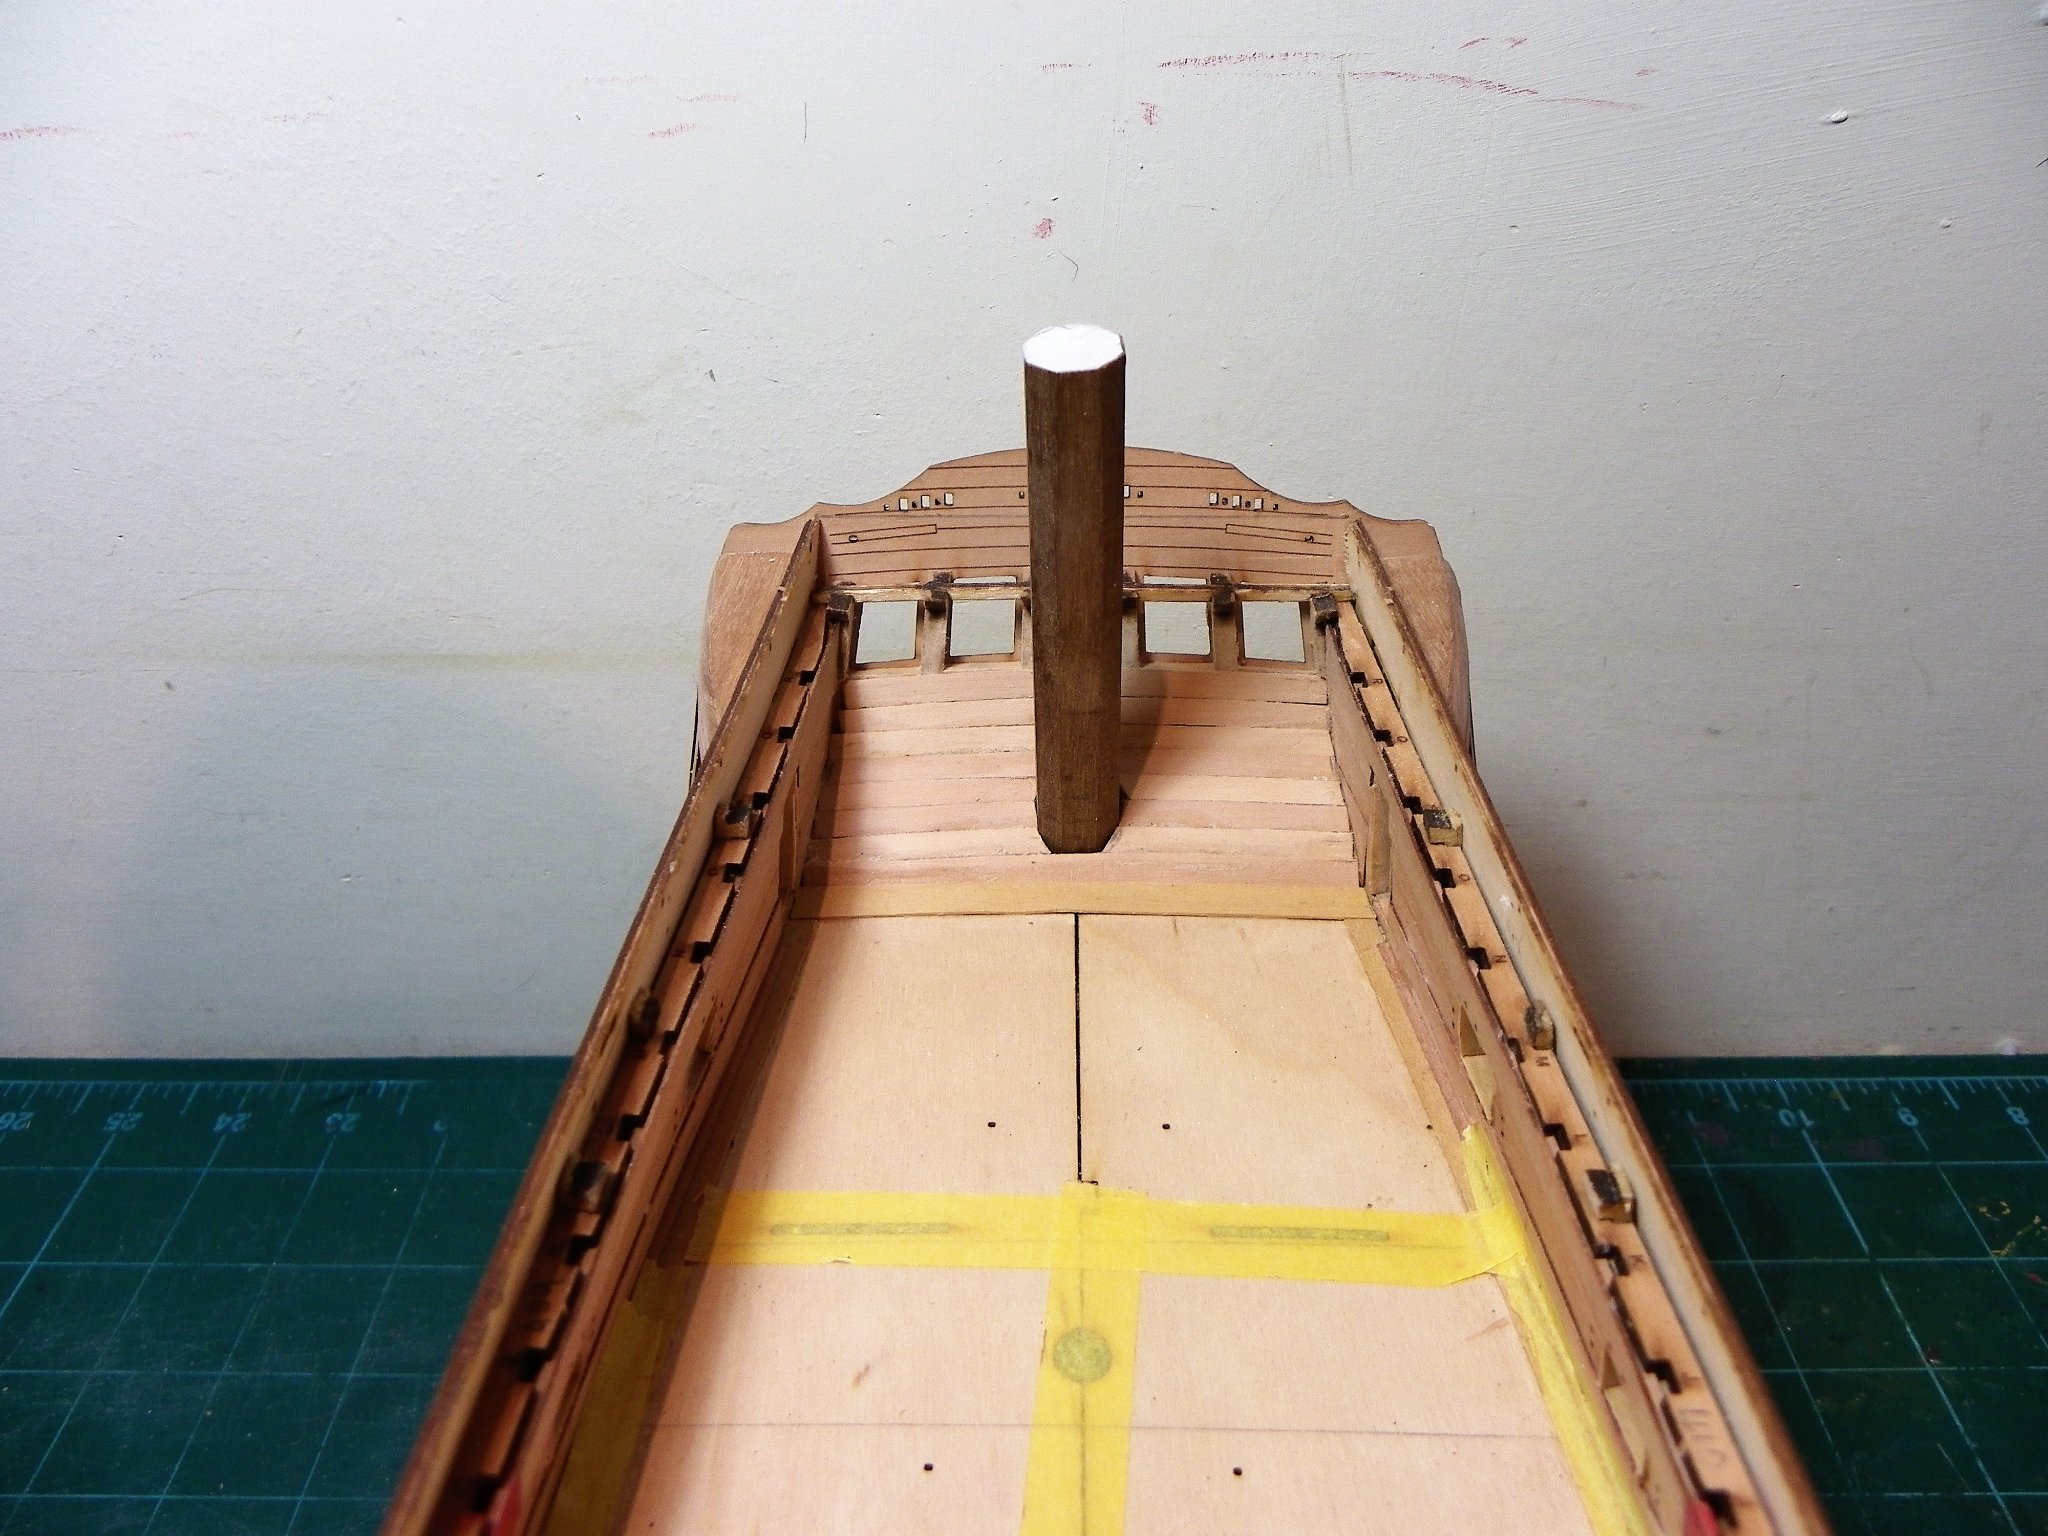
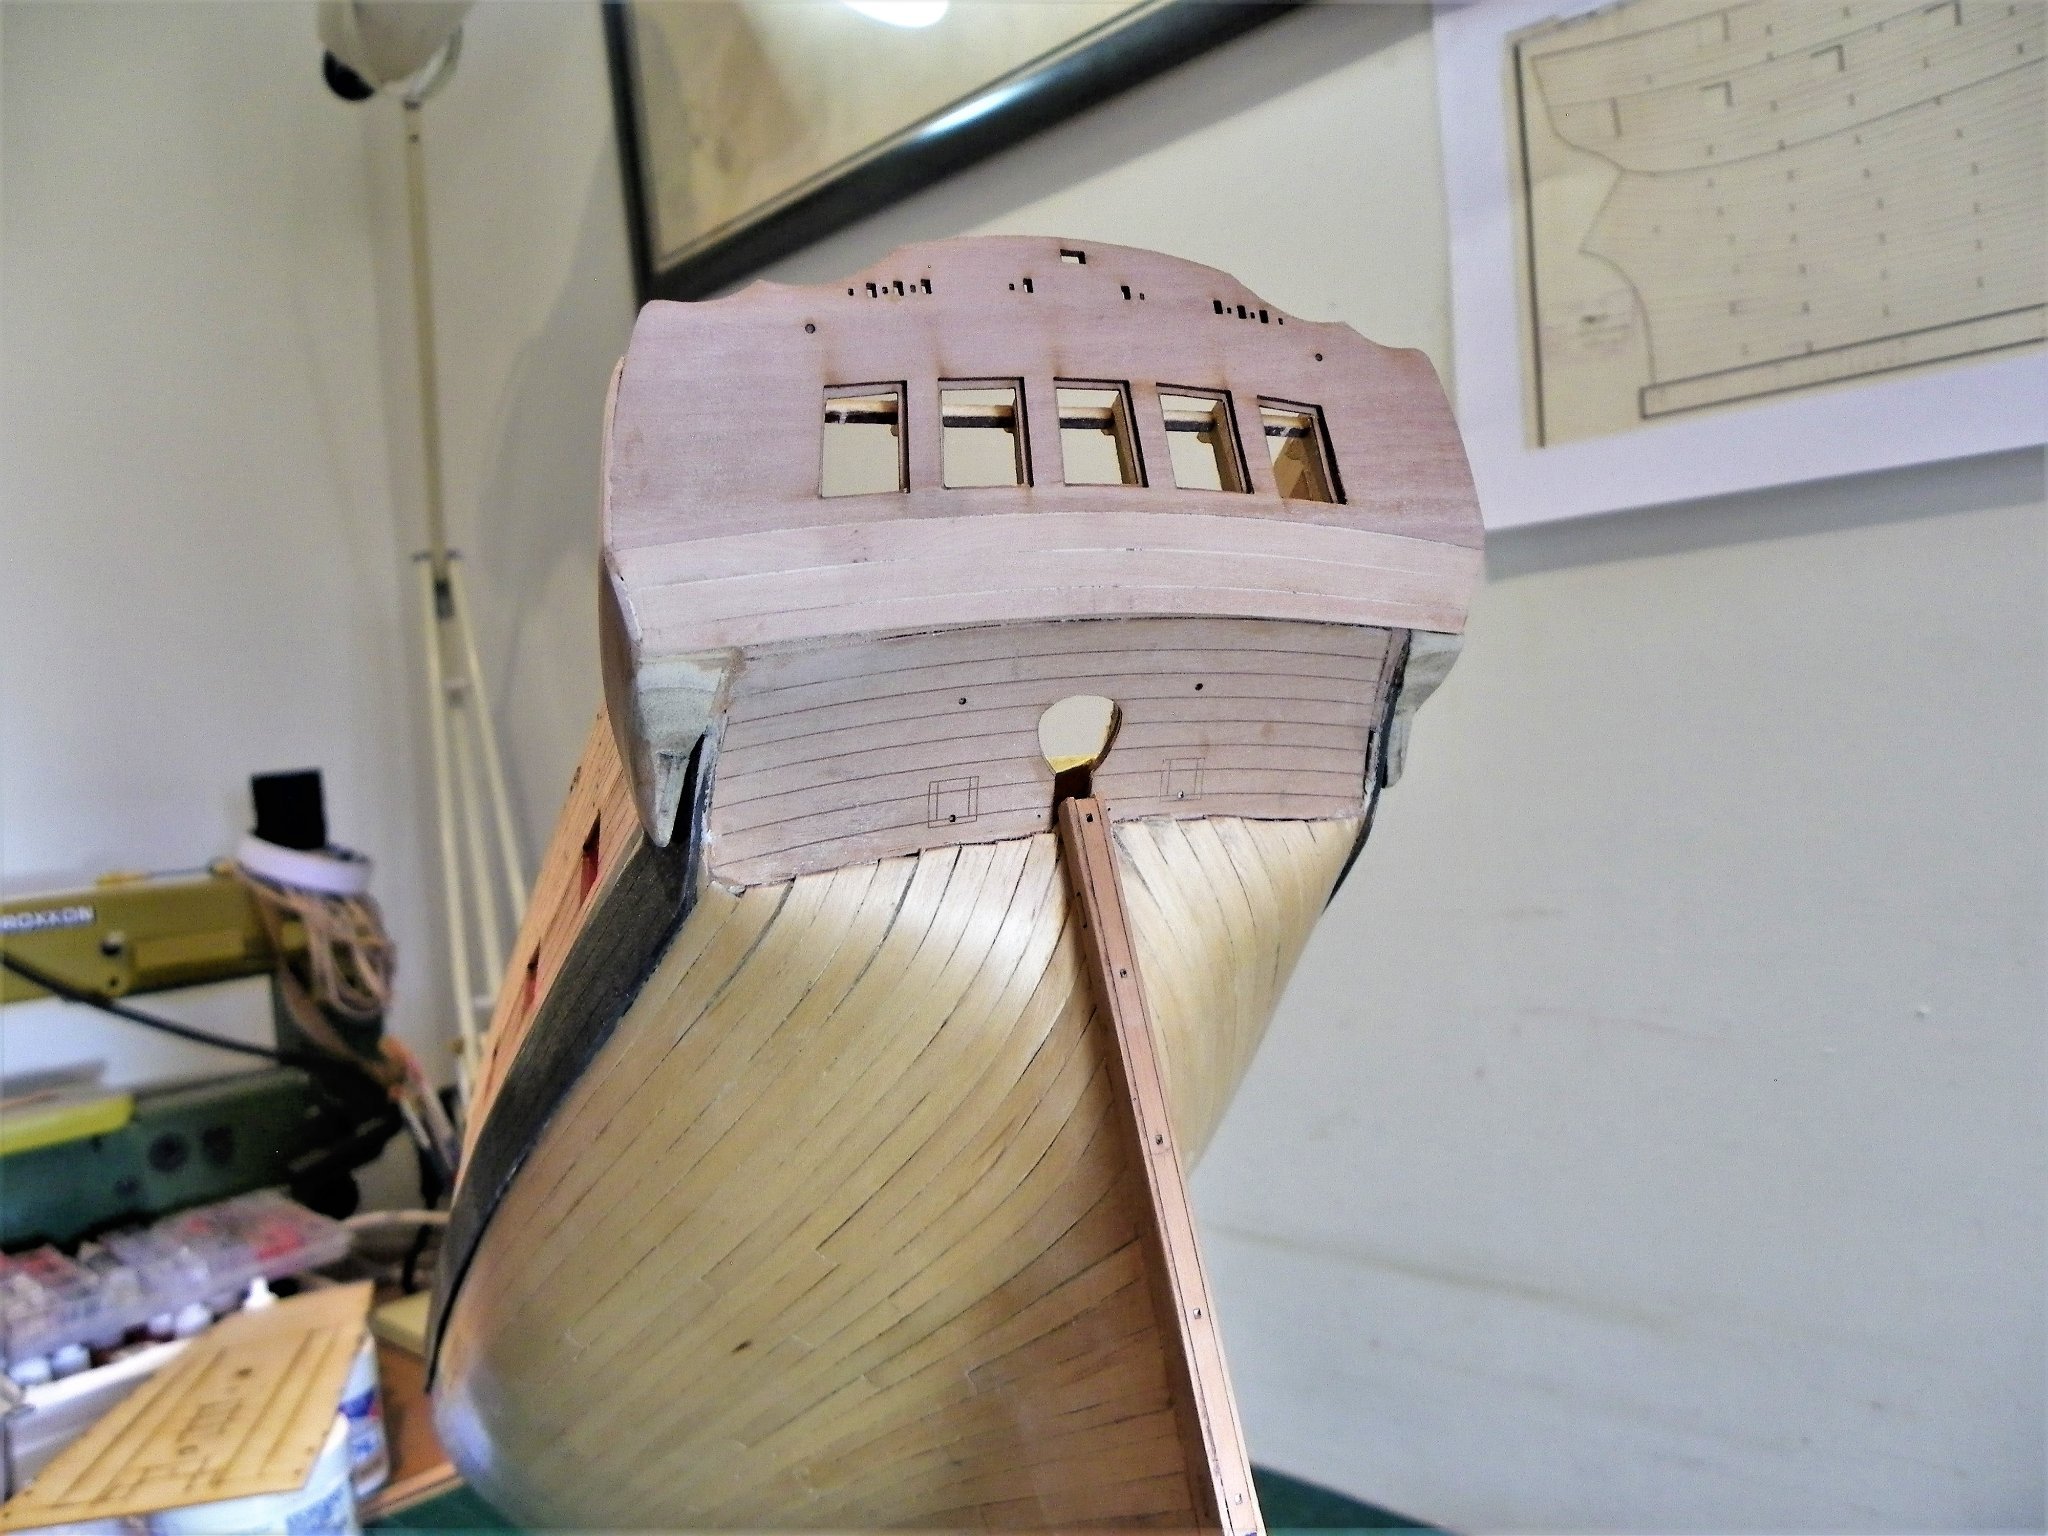
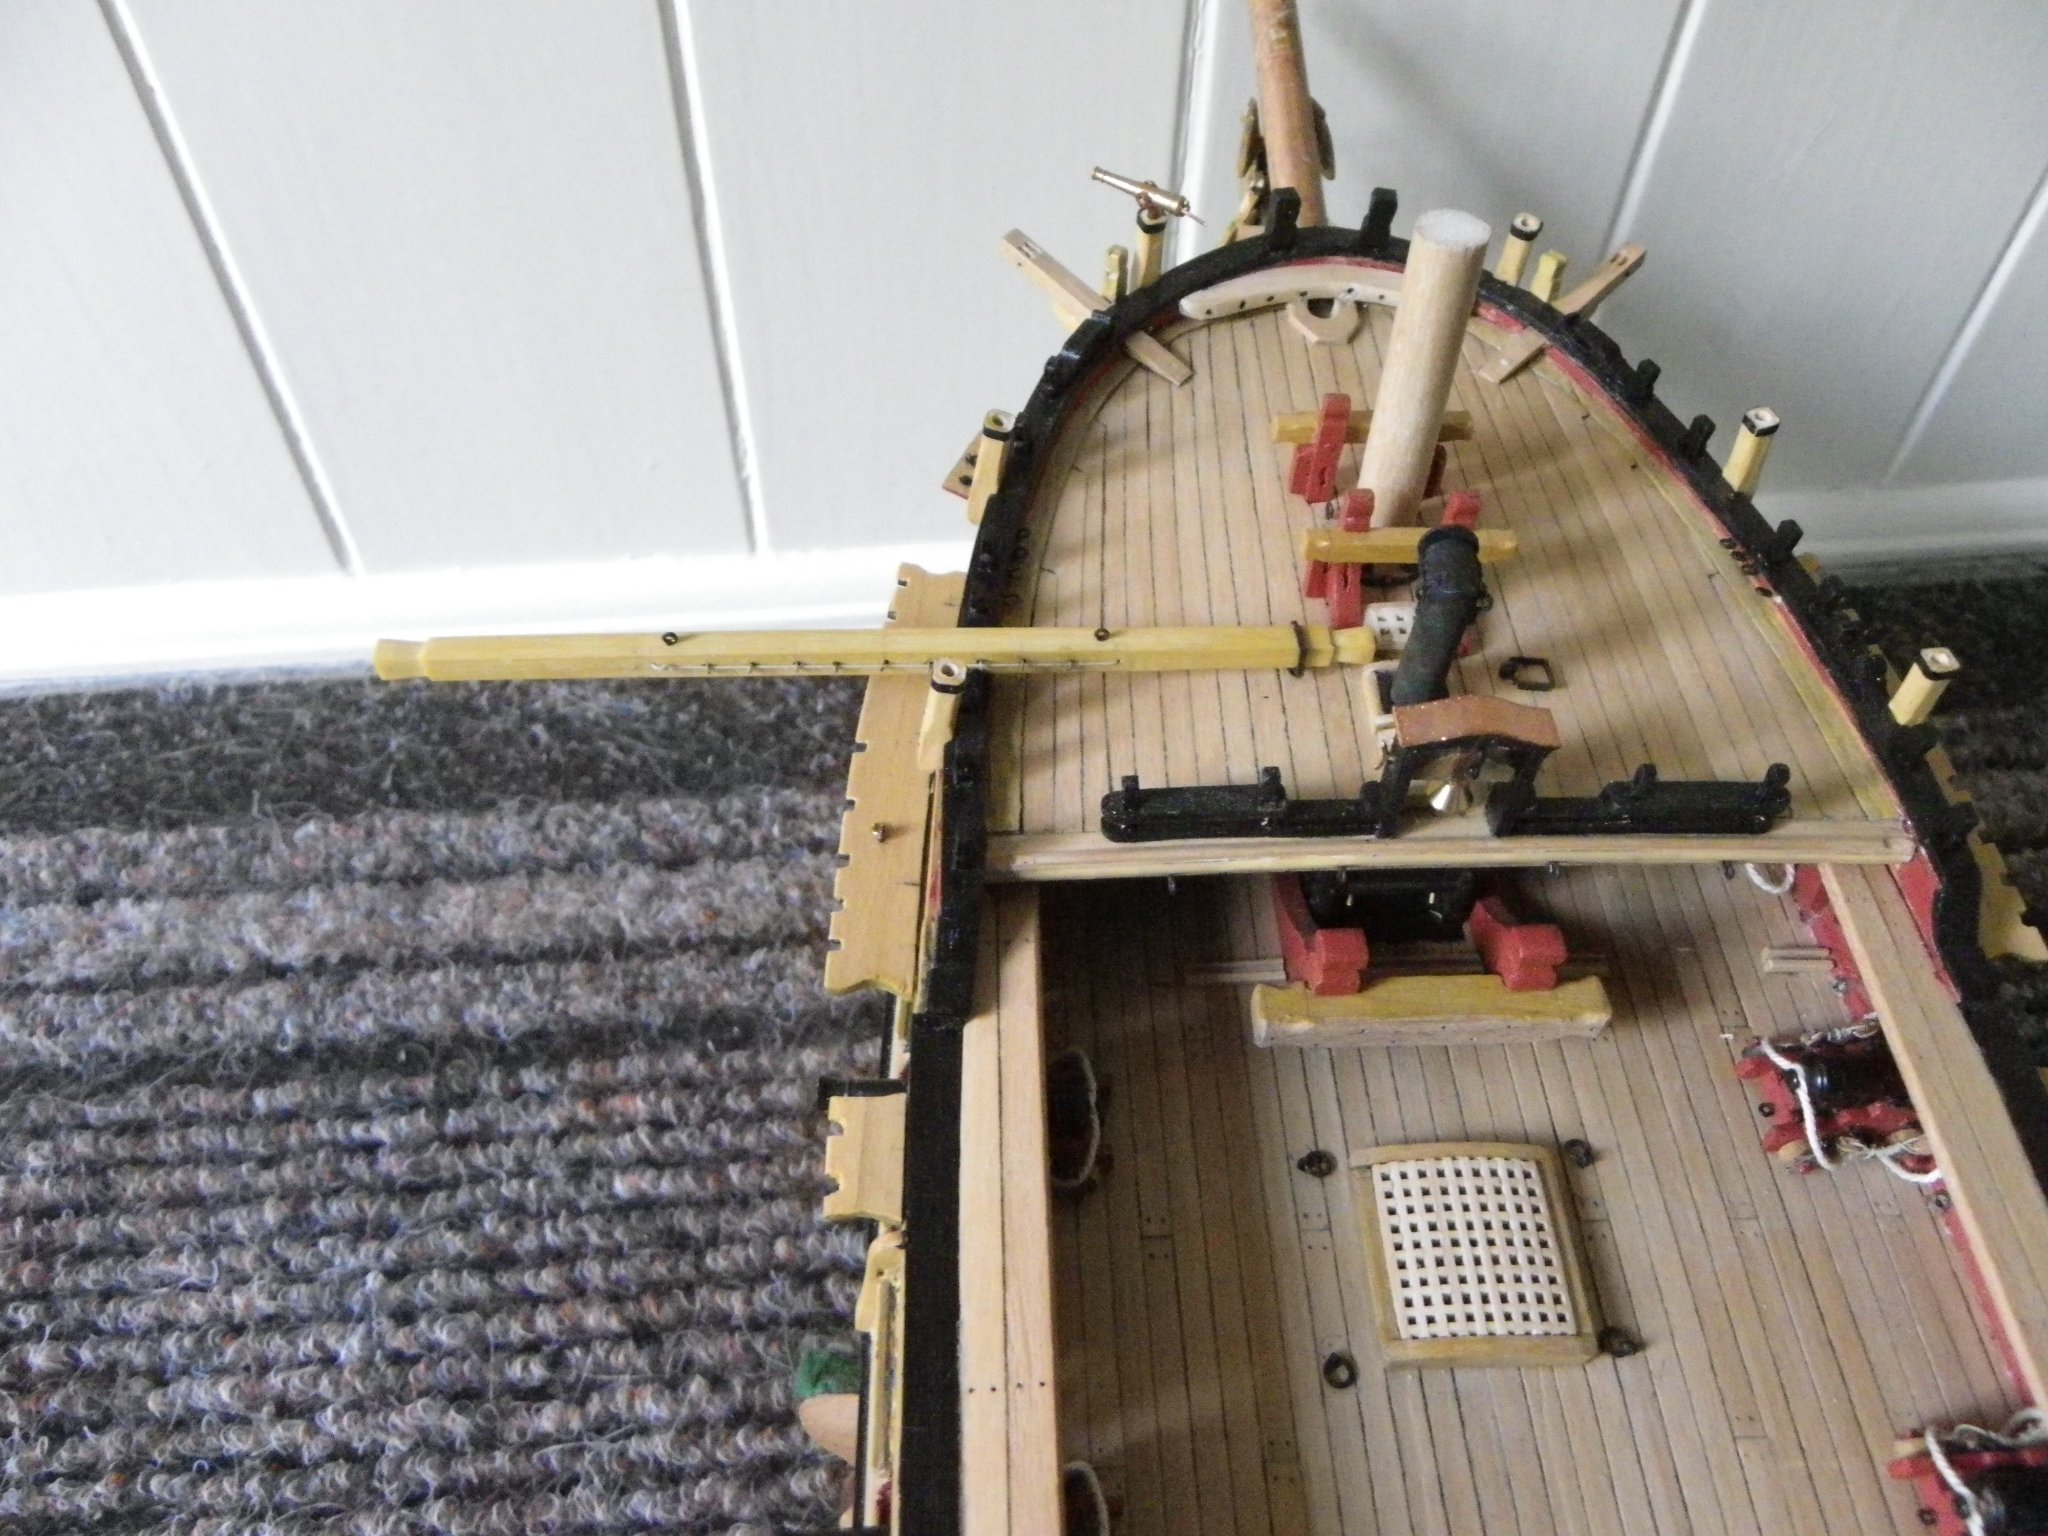
 Post Fifty-two Great Cabin modification With the Qtr galleries now in place I can move onto an area of the build that excites my interest, the fitting out of the Great cabin. Chris’s design lends itself to this type of Navy Board style conversion, but is perhaps less relevant if the Qtr deck is to planked over and the model fully rigged. Having said that I would probably have done it anyway. Again I will be using Chuck’s Winchelsea example as a guide. This shot from Chuck’s wonderful build shows a typical arrangement altho’ with Sphinx the head is octagonal and of smaller proportions. There are drawings of the Rudder cover and bench arrangements in the Pandora book, good for dimensions, but not a good fit for layout. The first task is to create the internal framing to support the cill and internal horizontal planking. 1794 Small sections of 4x4mm square stock are used for this and fit between the vertical stern framing just below the window frames. For the internal planking I am using 4mm x 0.8mm Pearwood. Strip. 1798 This continues down the stern frames to the deck allowing for the rudder head space and cover. I have cut the octagon shaped cover from a section of square stock Walnut, hollowed out to fit over the rudder head. The octagonal Rudder Head cover, which scales to a diameter of 30” (12mm) and a height of 35.3” (14mm) sits between the central stern frames. 1804 1807 I am constrained in the actual positioning of the cover by the position of the Rudder head and stern post, and this will ultimately determine the layout of the bench and other fittings. 1800 I think I am likely to have more than one nibble at producing the cover, my preference is for Boxwood with Pearwood mouldings. 1808 If I can’t get the Octagonal cover to work I may have to follow Chuck’s example of a rectangular box which would give me more leeway. Before I do further work on the cover I need to see about the bench arrangement. The bench seat scales to a depth of 15” (6mm) and a height of 20” (8mm) Without a formal plan to work to a lot of trial and error will be involved, and I expect to be faffing around with this set-up for a while yet. B.E. 17/12/21


- 857 replies
-
- 19
-

-

-
- Sphinx
- Vanguard Models
- (and 1 more)
-
The Bellona model is the one I recall as having the stop, wonderful craftsmanship, and if it’s good enough for the artists of the time............. B.E.
- 857 replies
-
- 3
-
-
- Sphinx
- Vanguard Models
- (and 1 more)
-
If before you re-glue the patterns you pin and use a few clamps to hold the patterns in position you can then run a tape directly below the patterns which will give you the line, and an immediate visual check when you come to glue them in place.. B.E.
- 476 replies
-
- 7
-
-
- sphinx
- vanguard models
- (and 1 more)
-
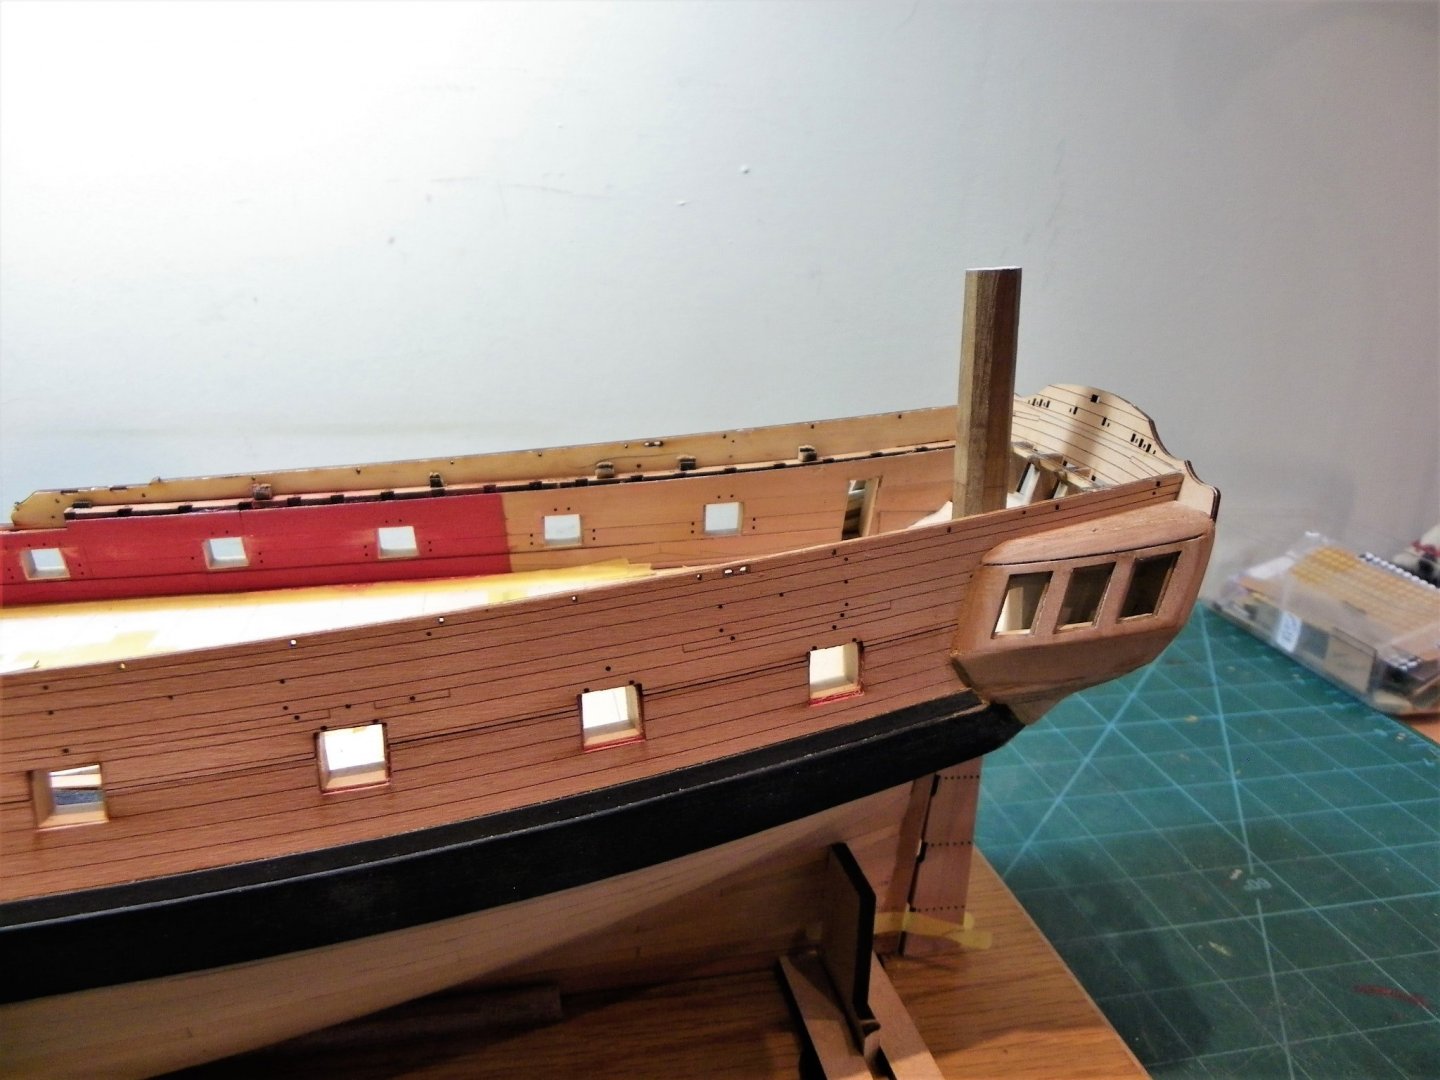
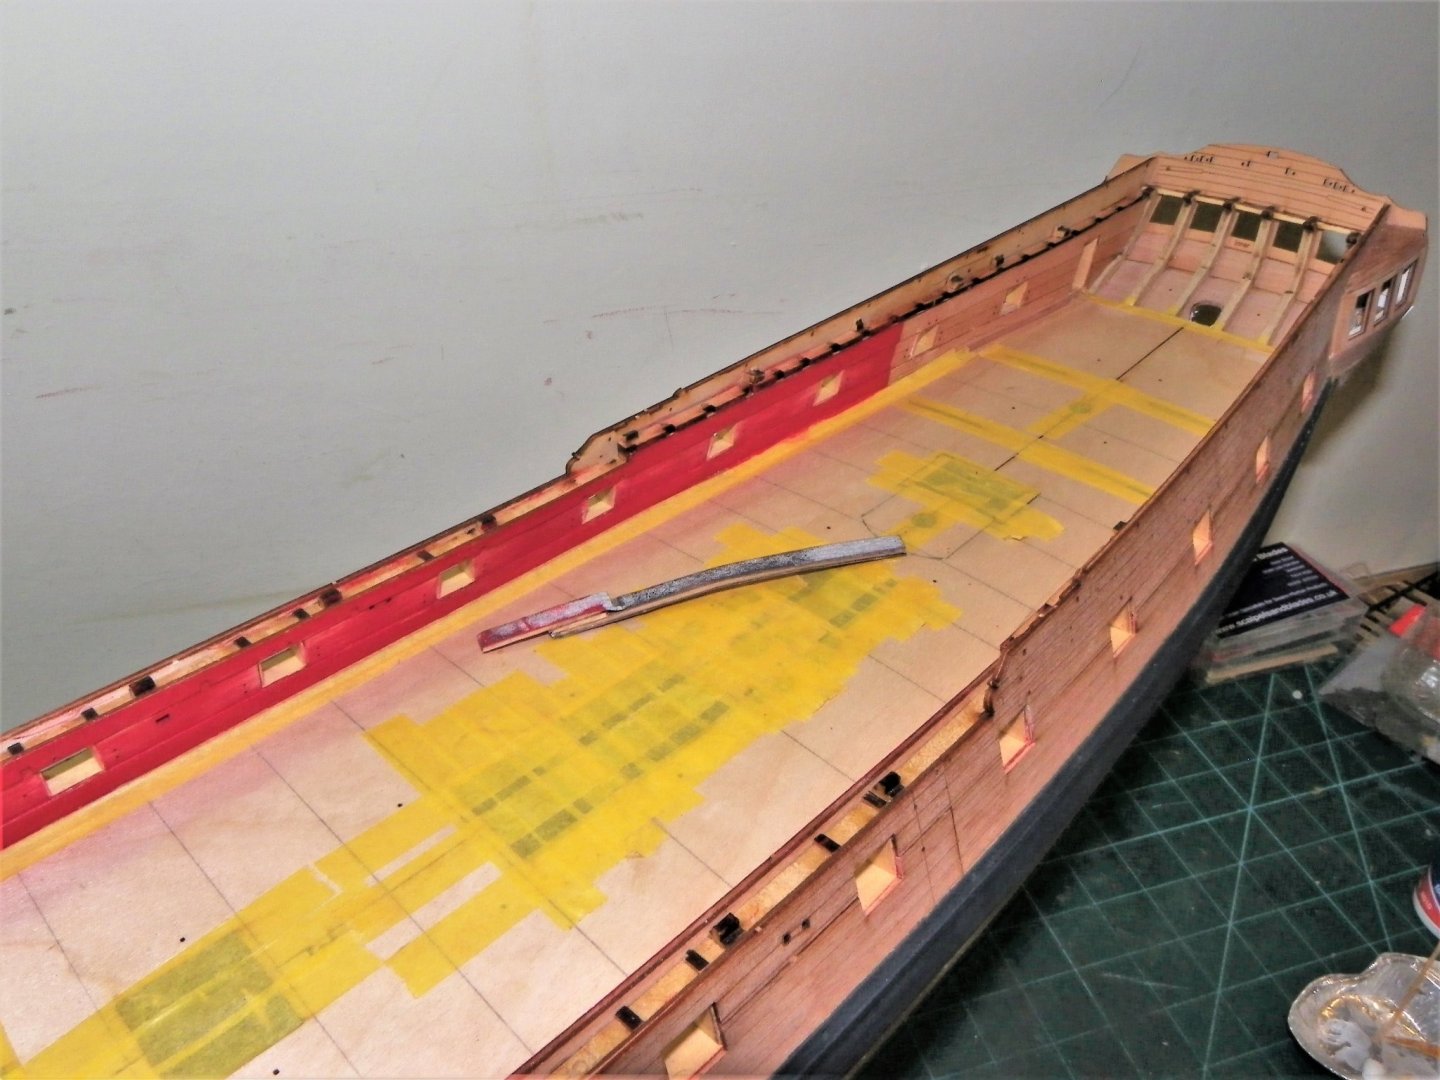
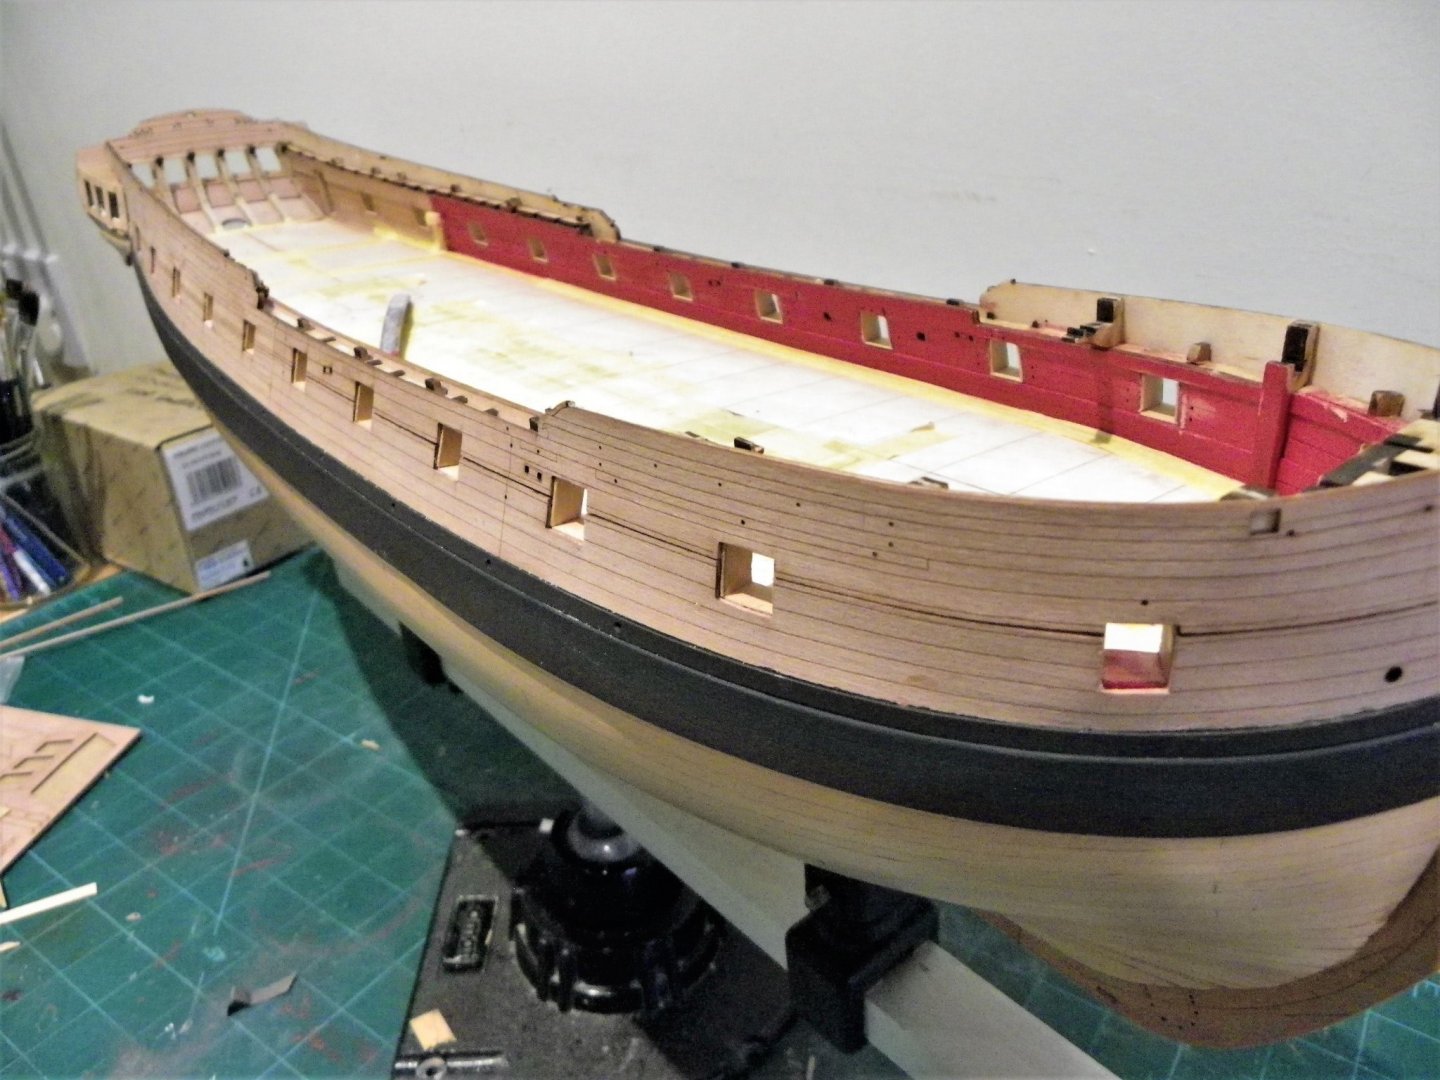
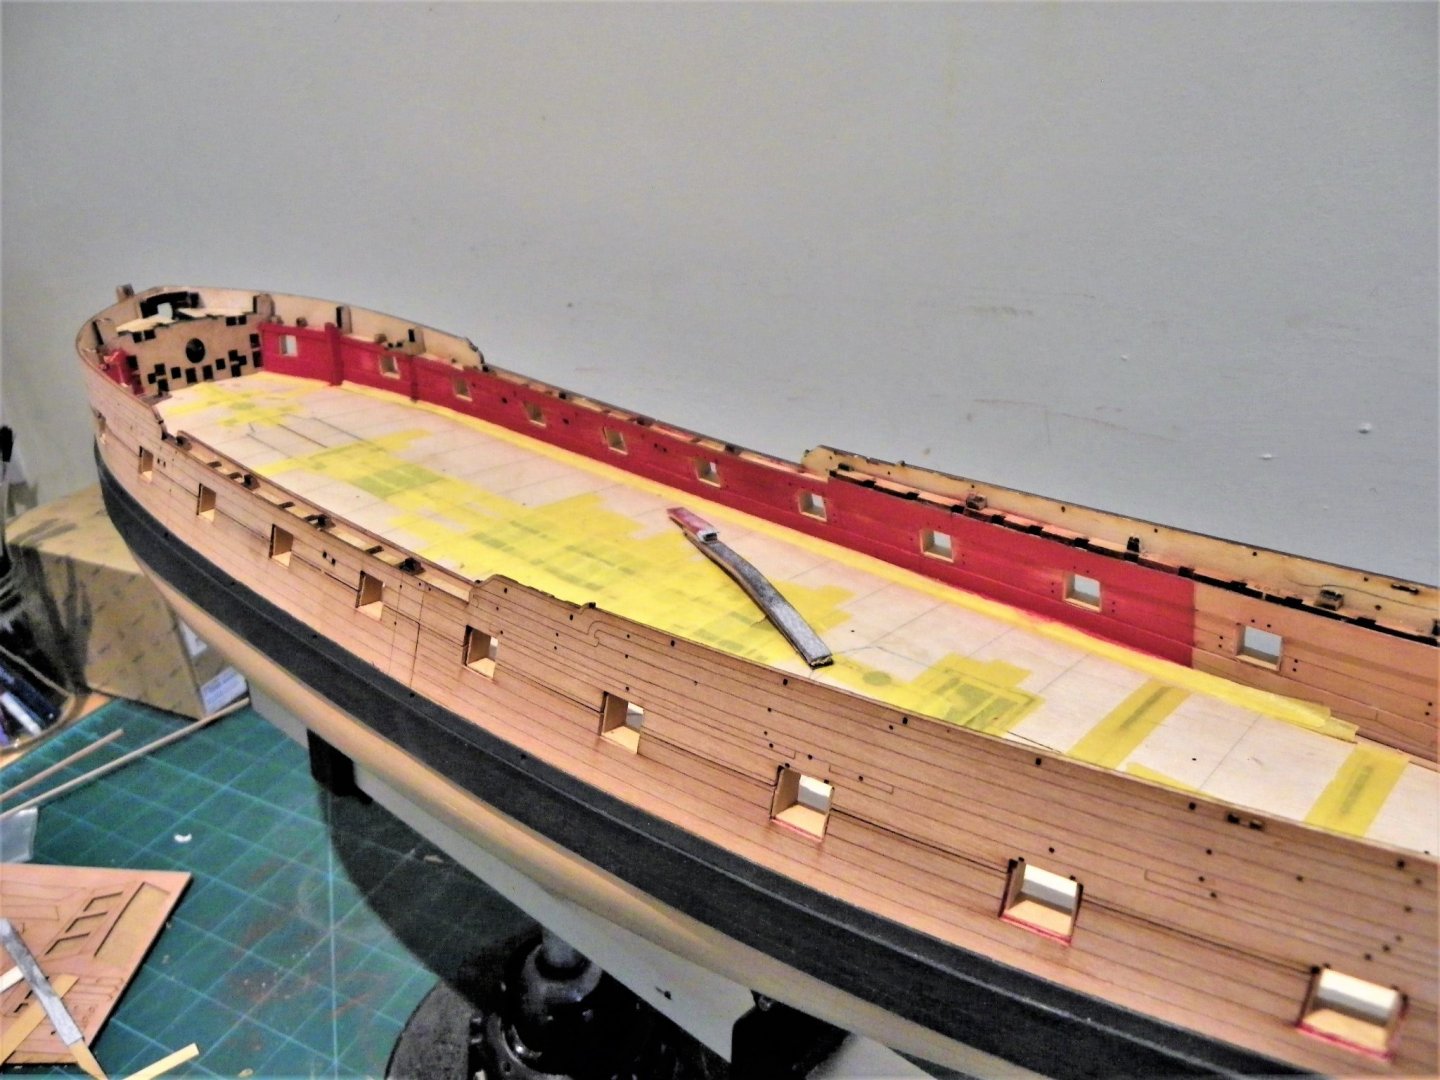
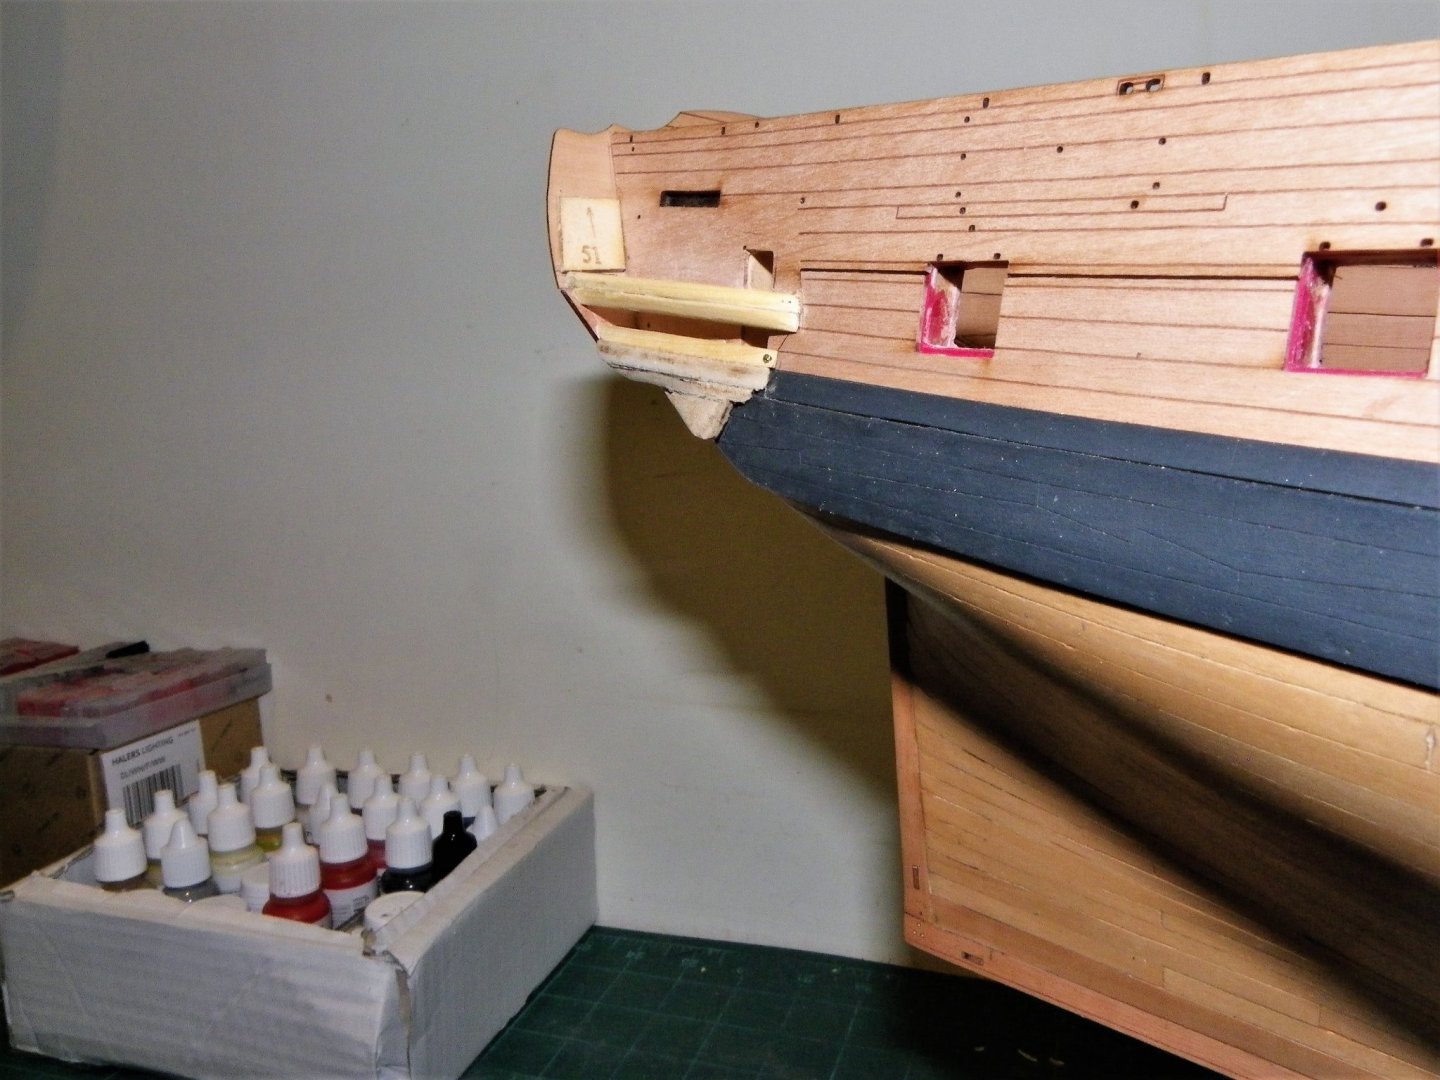
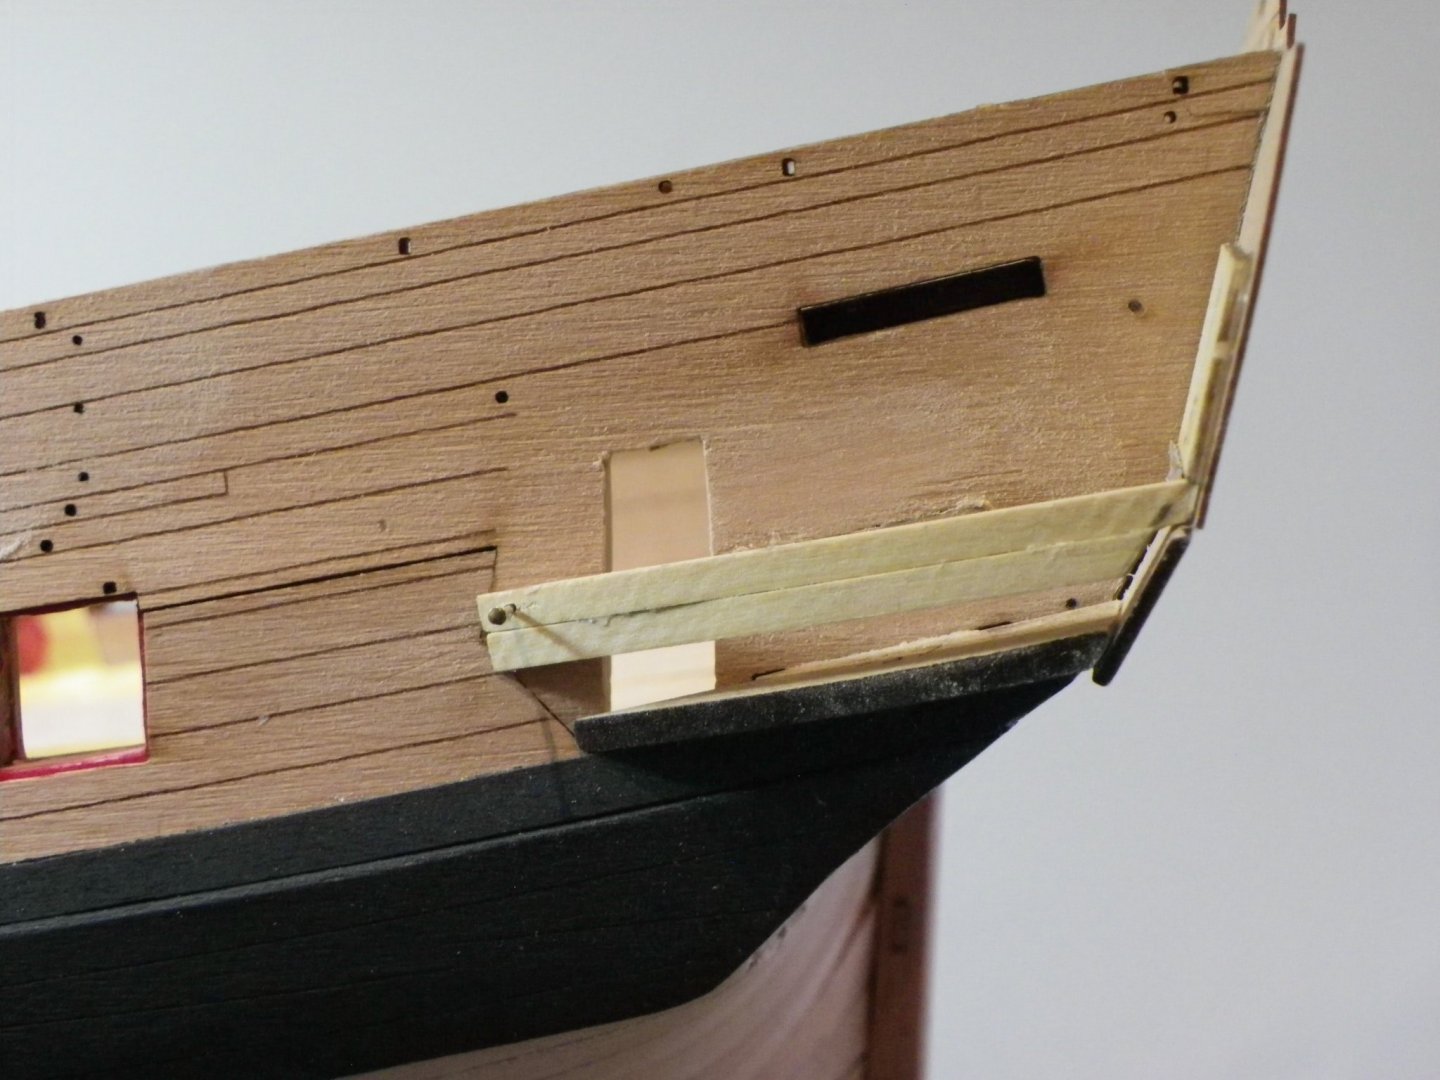
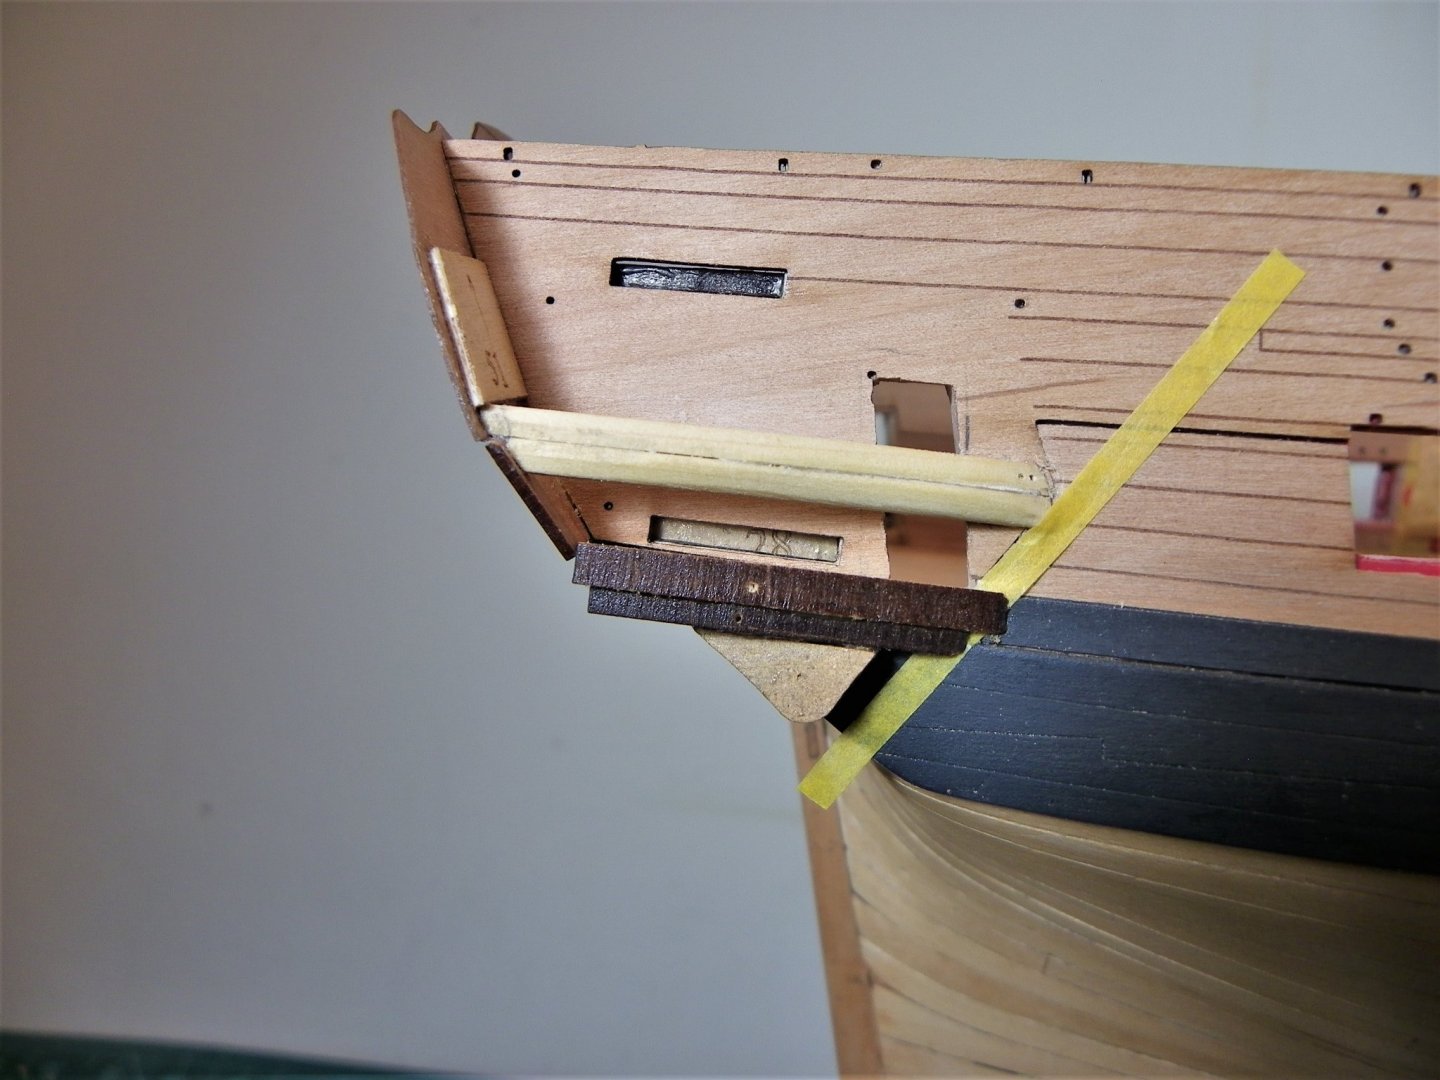
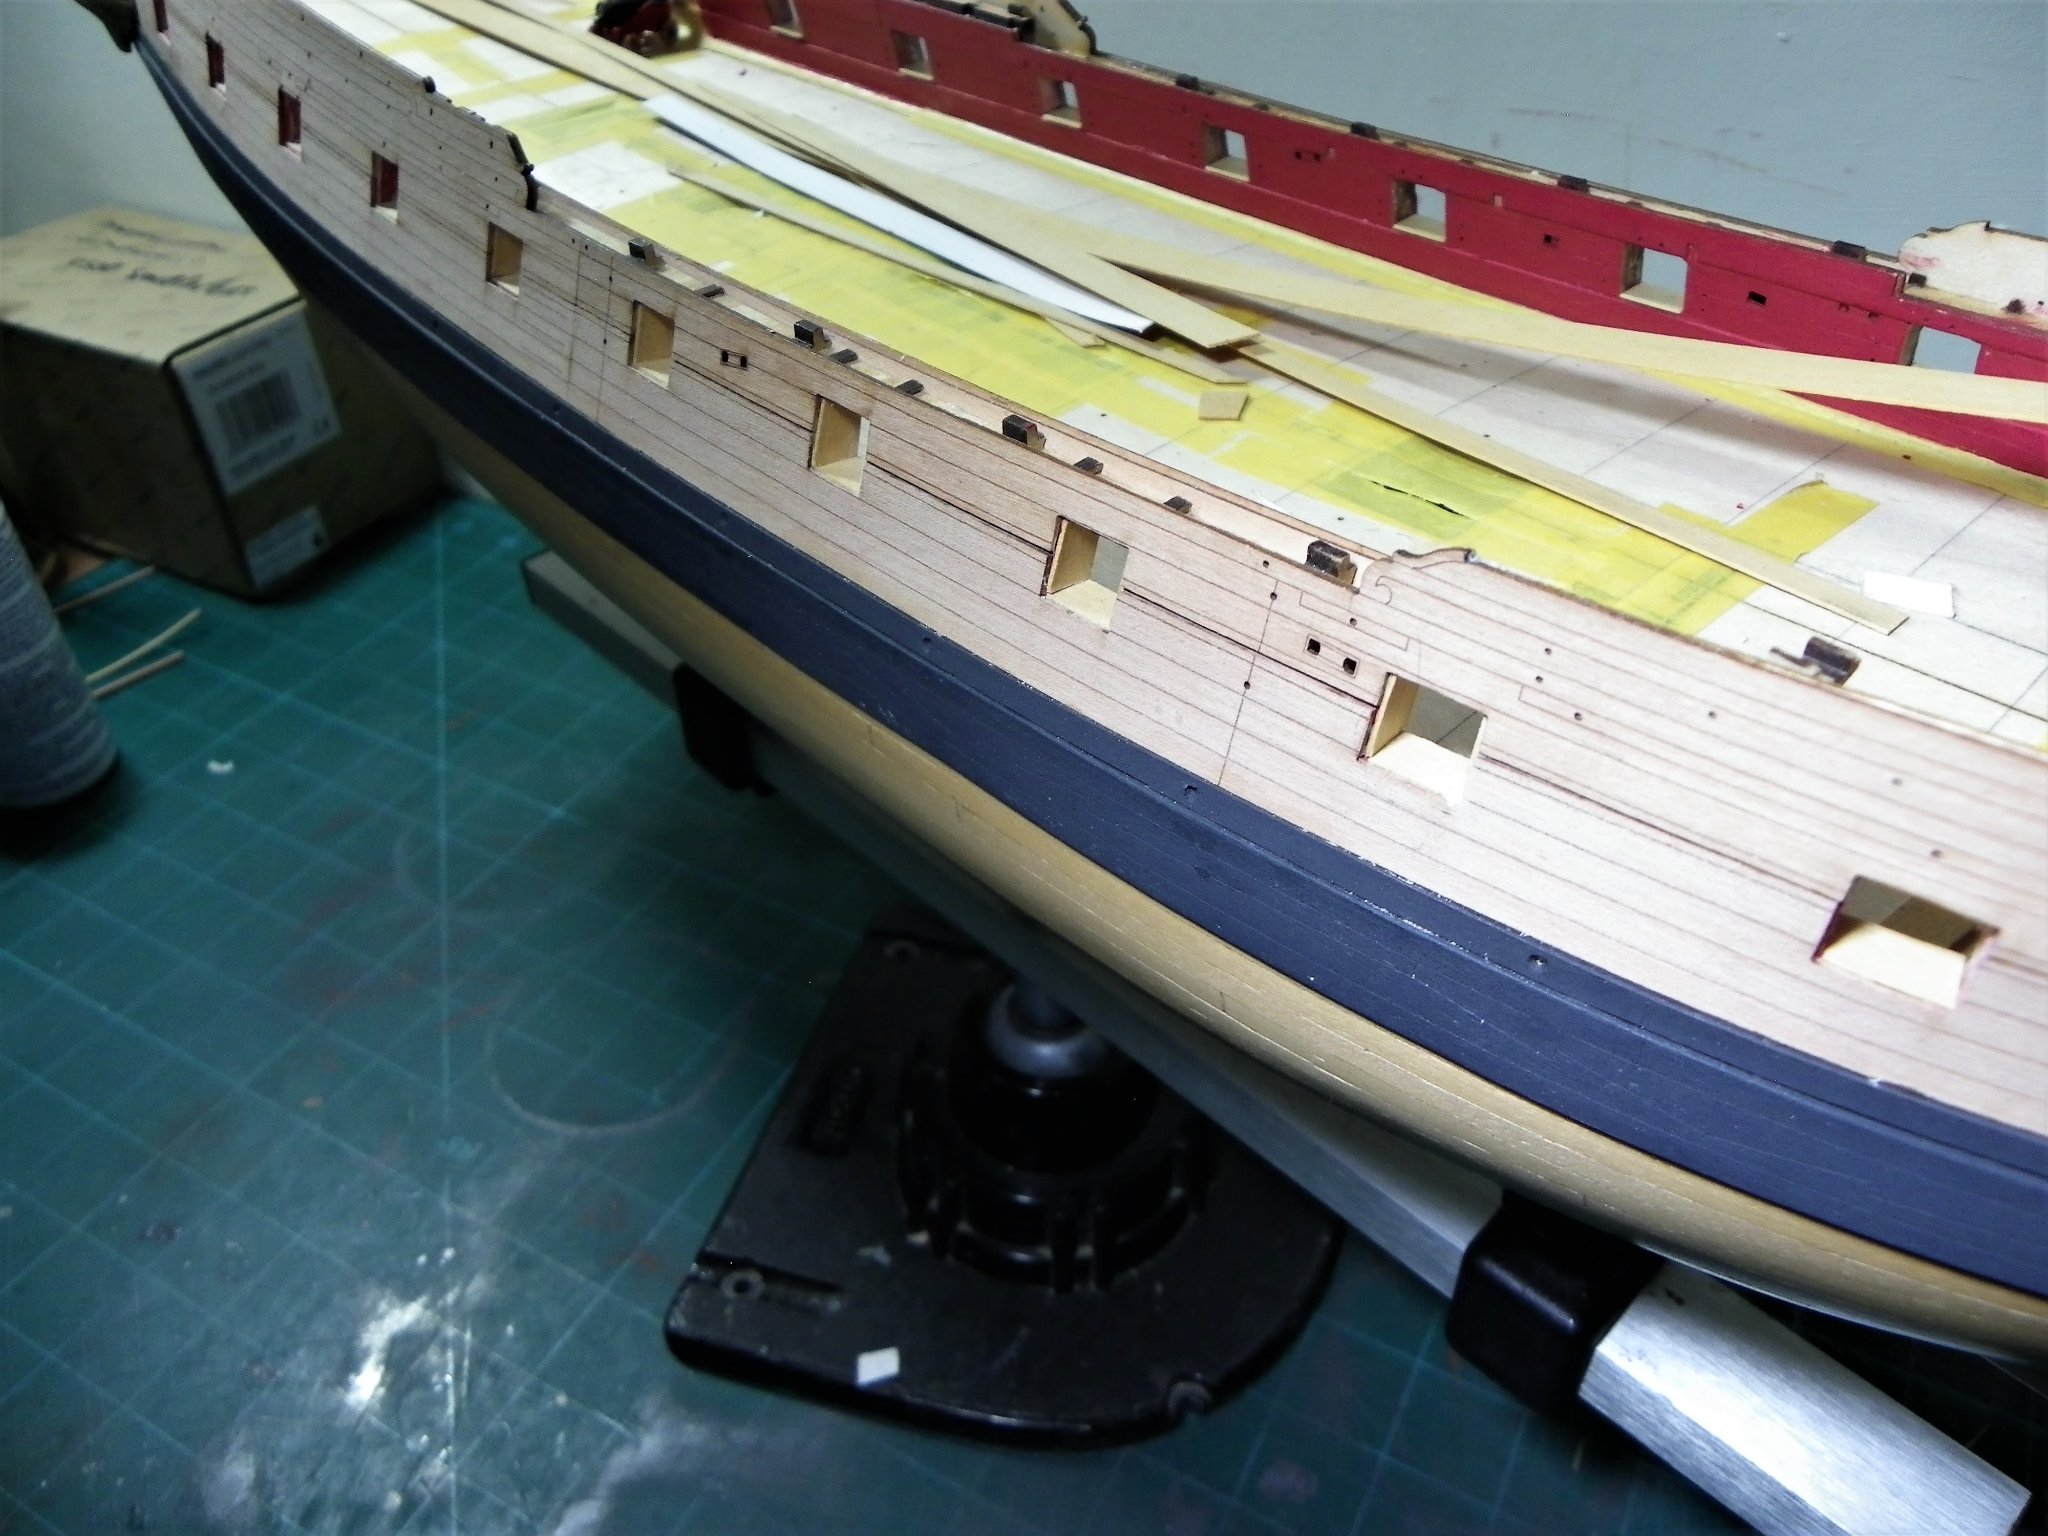
Post Fifty-one Port Linings – again. I am using 0.6mm Boxwood strip for the purpose. The cills are the easy bit, the side pieces with their angles not so. 1751(2) A card template was made to cut the sides from 10mm wide boxwood strip. Each side needing final sanding and fitting, forty-four pieces in total, quite a time consuming business, and not a very exciting one. Waiting for the replacement Quarter Gallery part to arrive gave me the impetus to get stuck in. 1757 Fitting in progress, to my eye the ports look better lined. 1790 It has taken 3 days to complete the fit, but the tricky part remains of painting the linings without marking the topsides planking. 1781 Cleaning up the inside bulwarks. A specifically designed sanding stick was required to avoid catching the spirketting and deck clamps whilst smoothing off the inboard linings. In reality the Quick-works should extend over the inboard linings but having used the pre-cut inboard bulwark patterns this option was not available. 1787 I will leave any further work on the linings for the present, as the replacement gallery window patterns have arrived, (thanks Chris) and I can now complete the Starboard Quarter gallery. B.E. 14/12/21
.thumb.JPG.7eca7904db35d064296f329c8775df72.JPG)
- 857 replies
-
- 20
-
-
- Sphinx
- Vanguard Models
- (and 1 more)
-
Me too Glenn, We know the dates when names were introduced on the sterns,(1771) we know when the arrangement changed from small letters in a cartouche, to large as possible. (1772) We know they were always painted, never raised block lettering, and that Keppel had the names scrubbed out on his fleet in 1778, during the period of that year. .... but why the stop, yet another of the myriad of questions constantly buzzing around my head that I don't have the answer to. B.E. ps. I note that Marshall in his painting of Sphynx in 1775 did not include her name on counter.
- 857 replies
-
- 2
-
-
- Sphinx
- Vanguard Models
- (and 1 more)
-
Fine little model the Fifie, I found it a pleasure to build, I’m sure you will too. B.E.
-
Thank you Mark, I will apply the fixative before I attach them to the model. The beauty of print your own is you have endless goes at the process. 😊 B.E.
- 857 replies
-
- 2
-
-
- Sphinx
- Vanguard Models
- (and 1 more)
-
It is such a damn tricky business getting the paint lines right, drives me mad at times, spend hours doing countless re-touch ups. I'm sure you will get there in the end Mark. 👍 B.E.
- 505 replies
-
- 6
-
-
- vanguard models
- Sphinx
- (and 1 more)
-
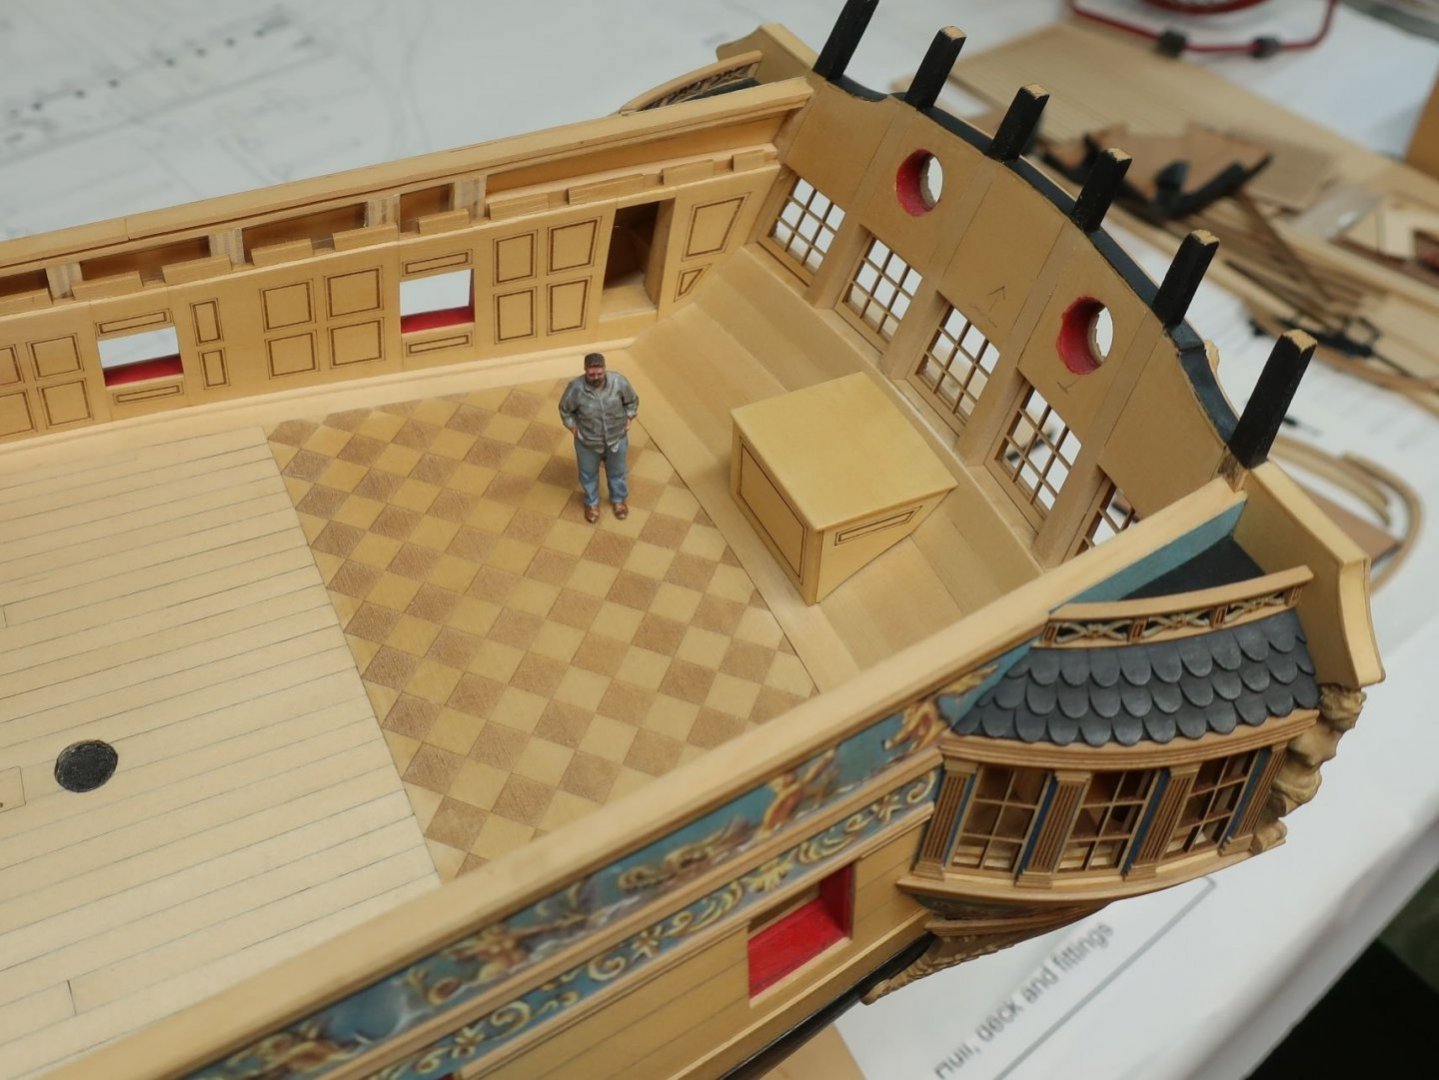
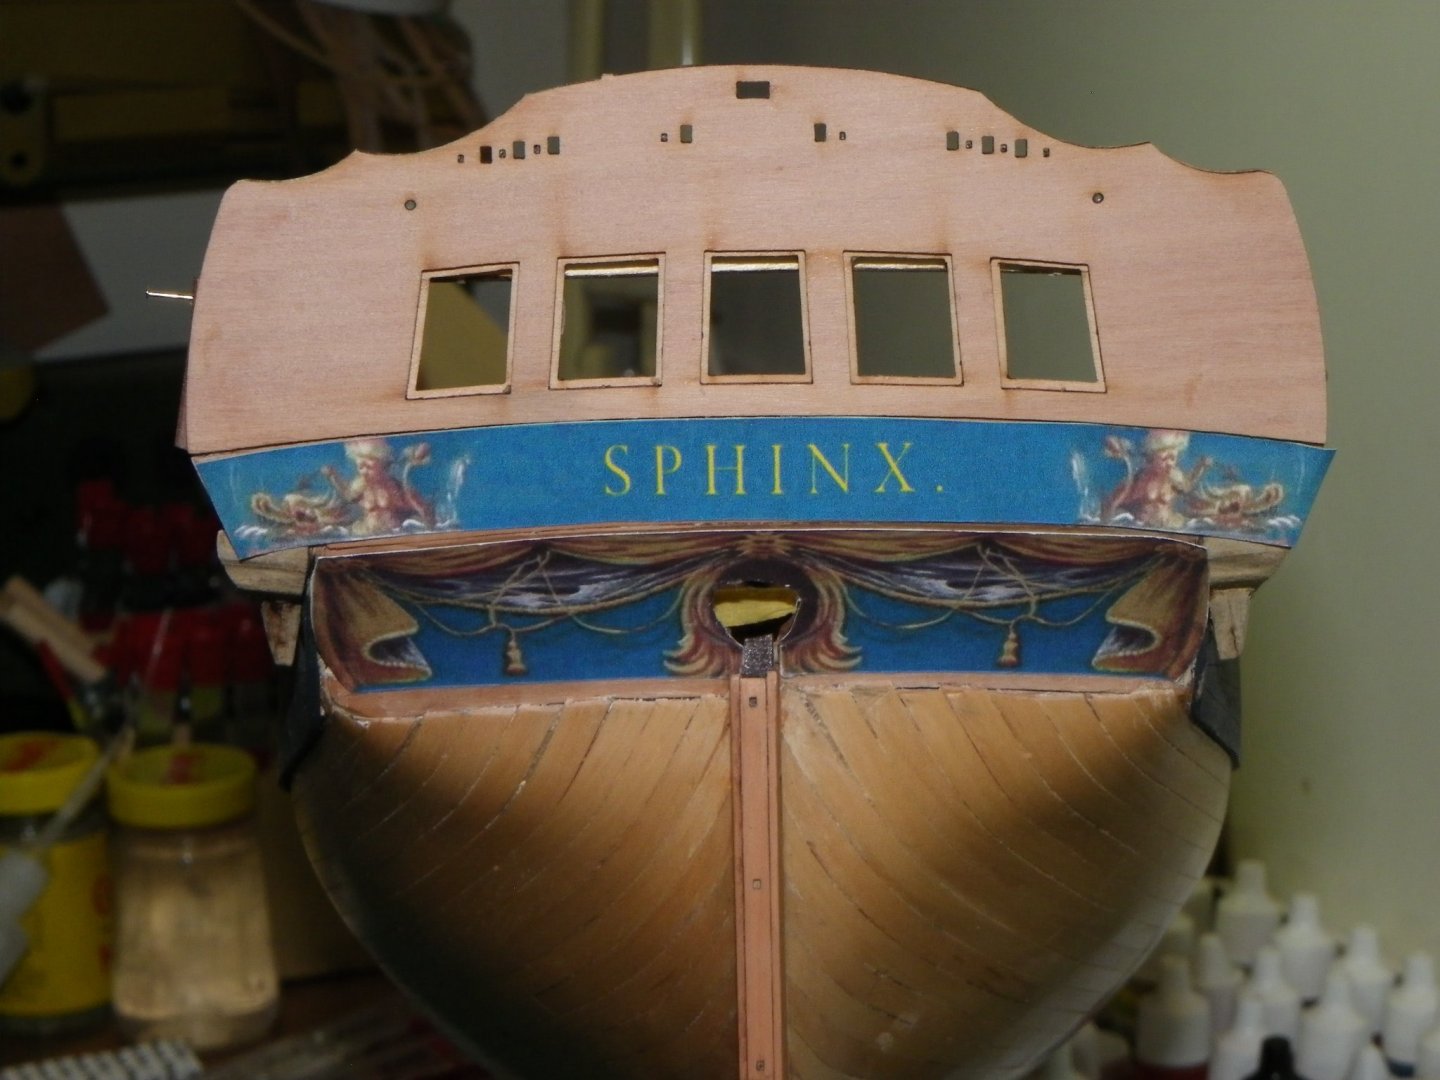
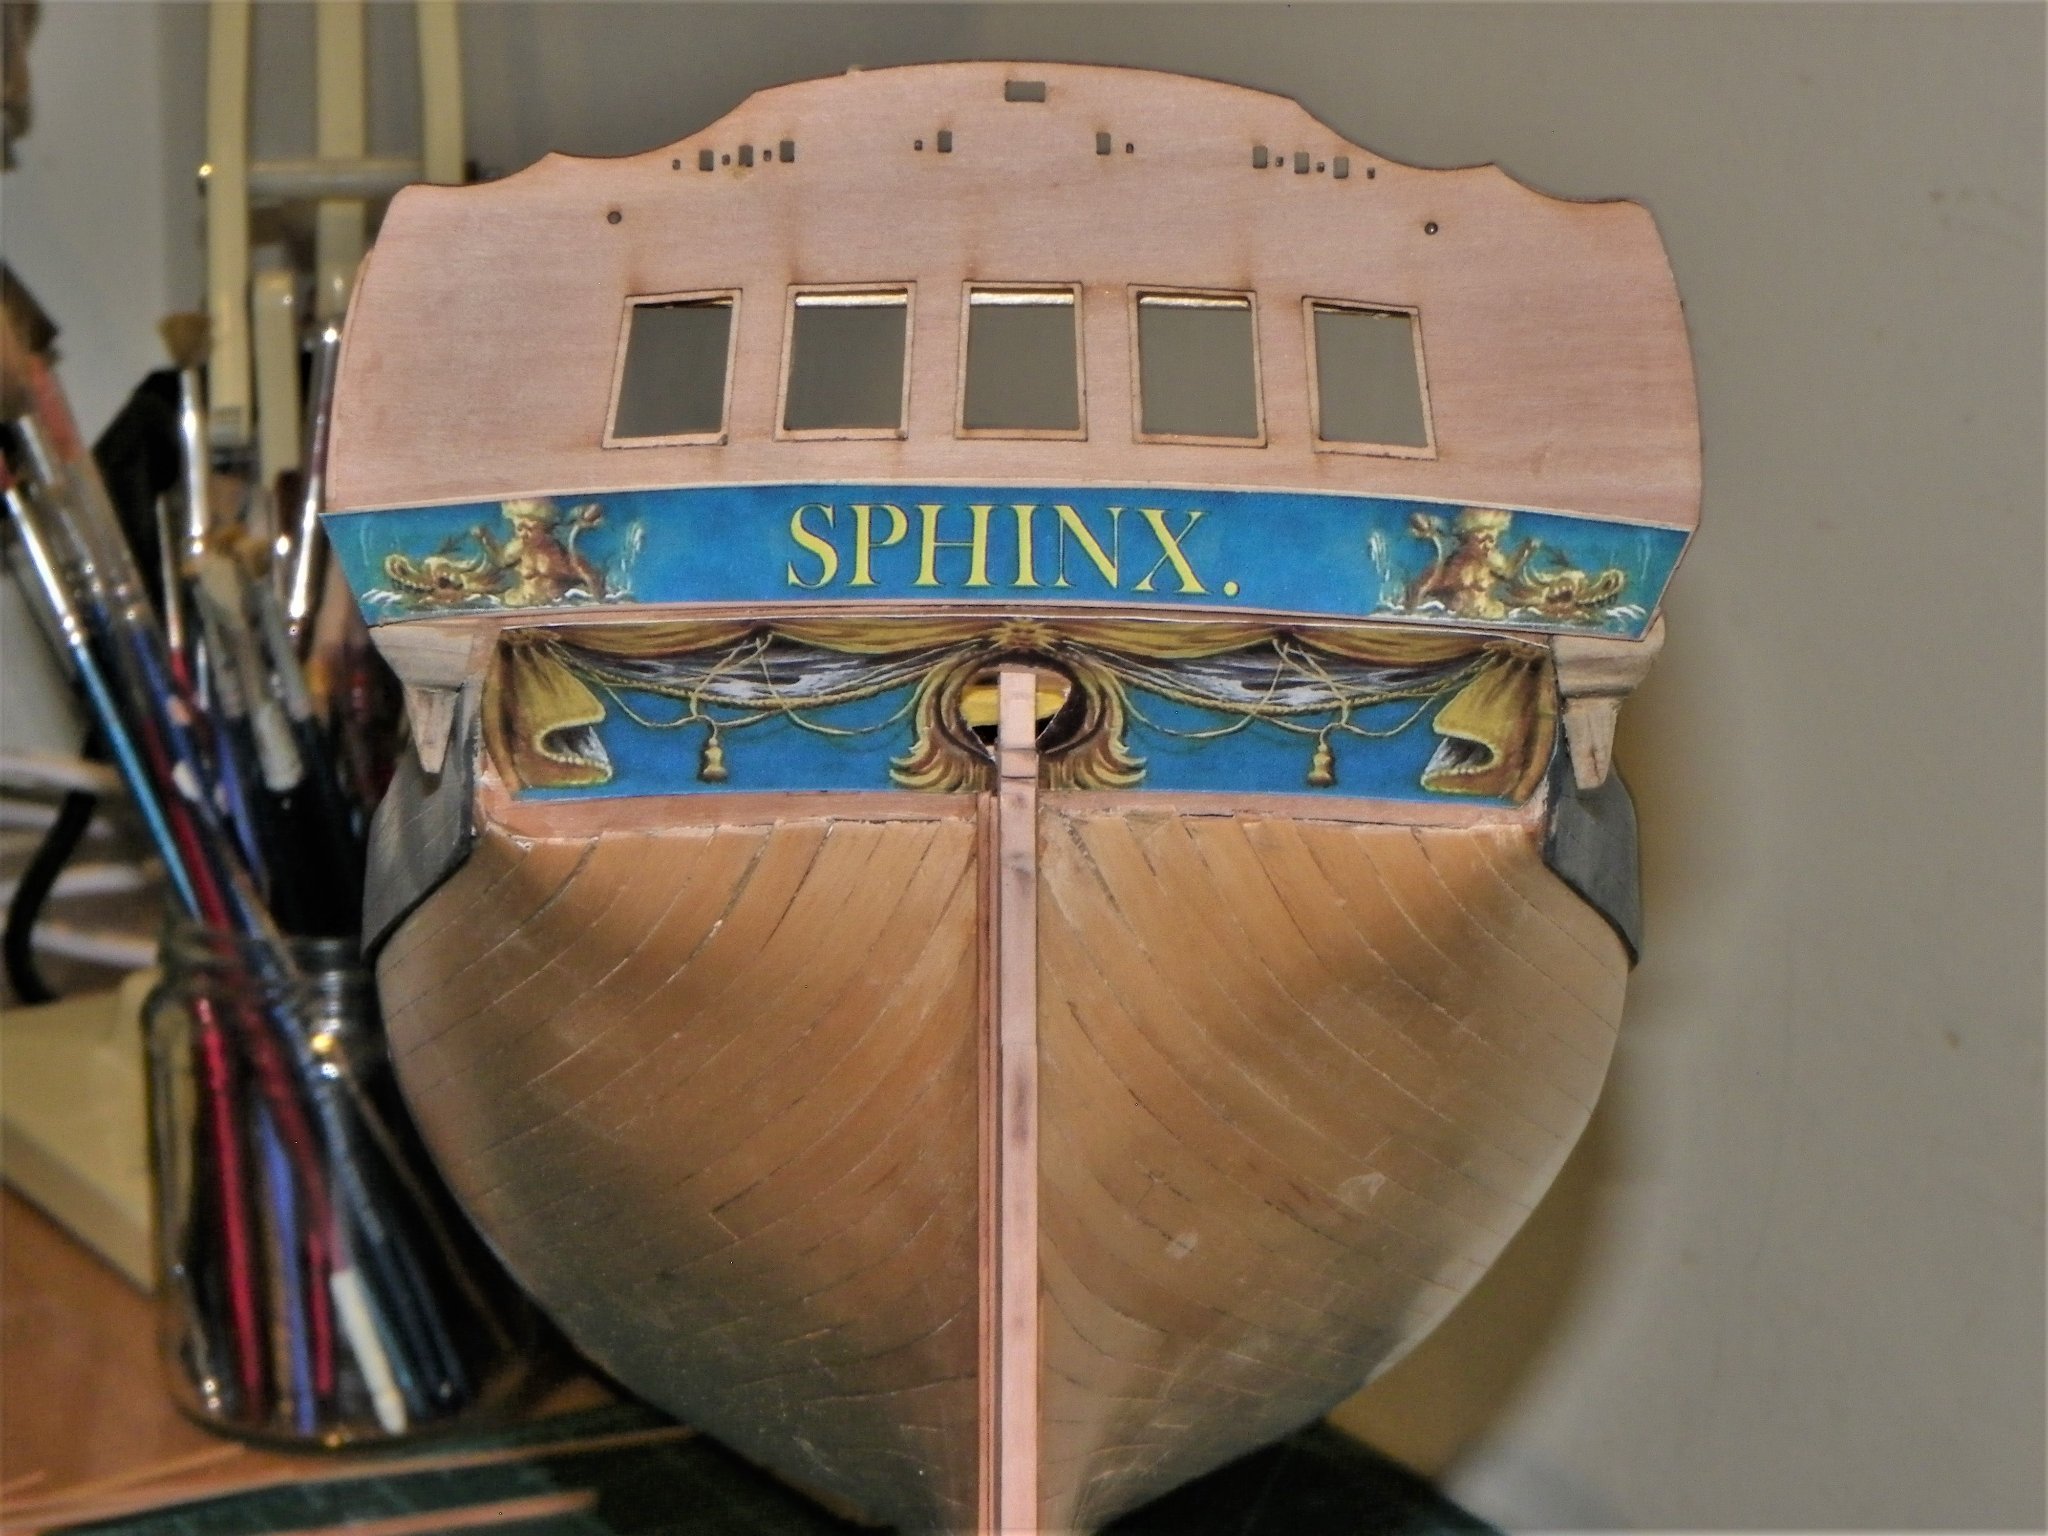
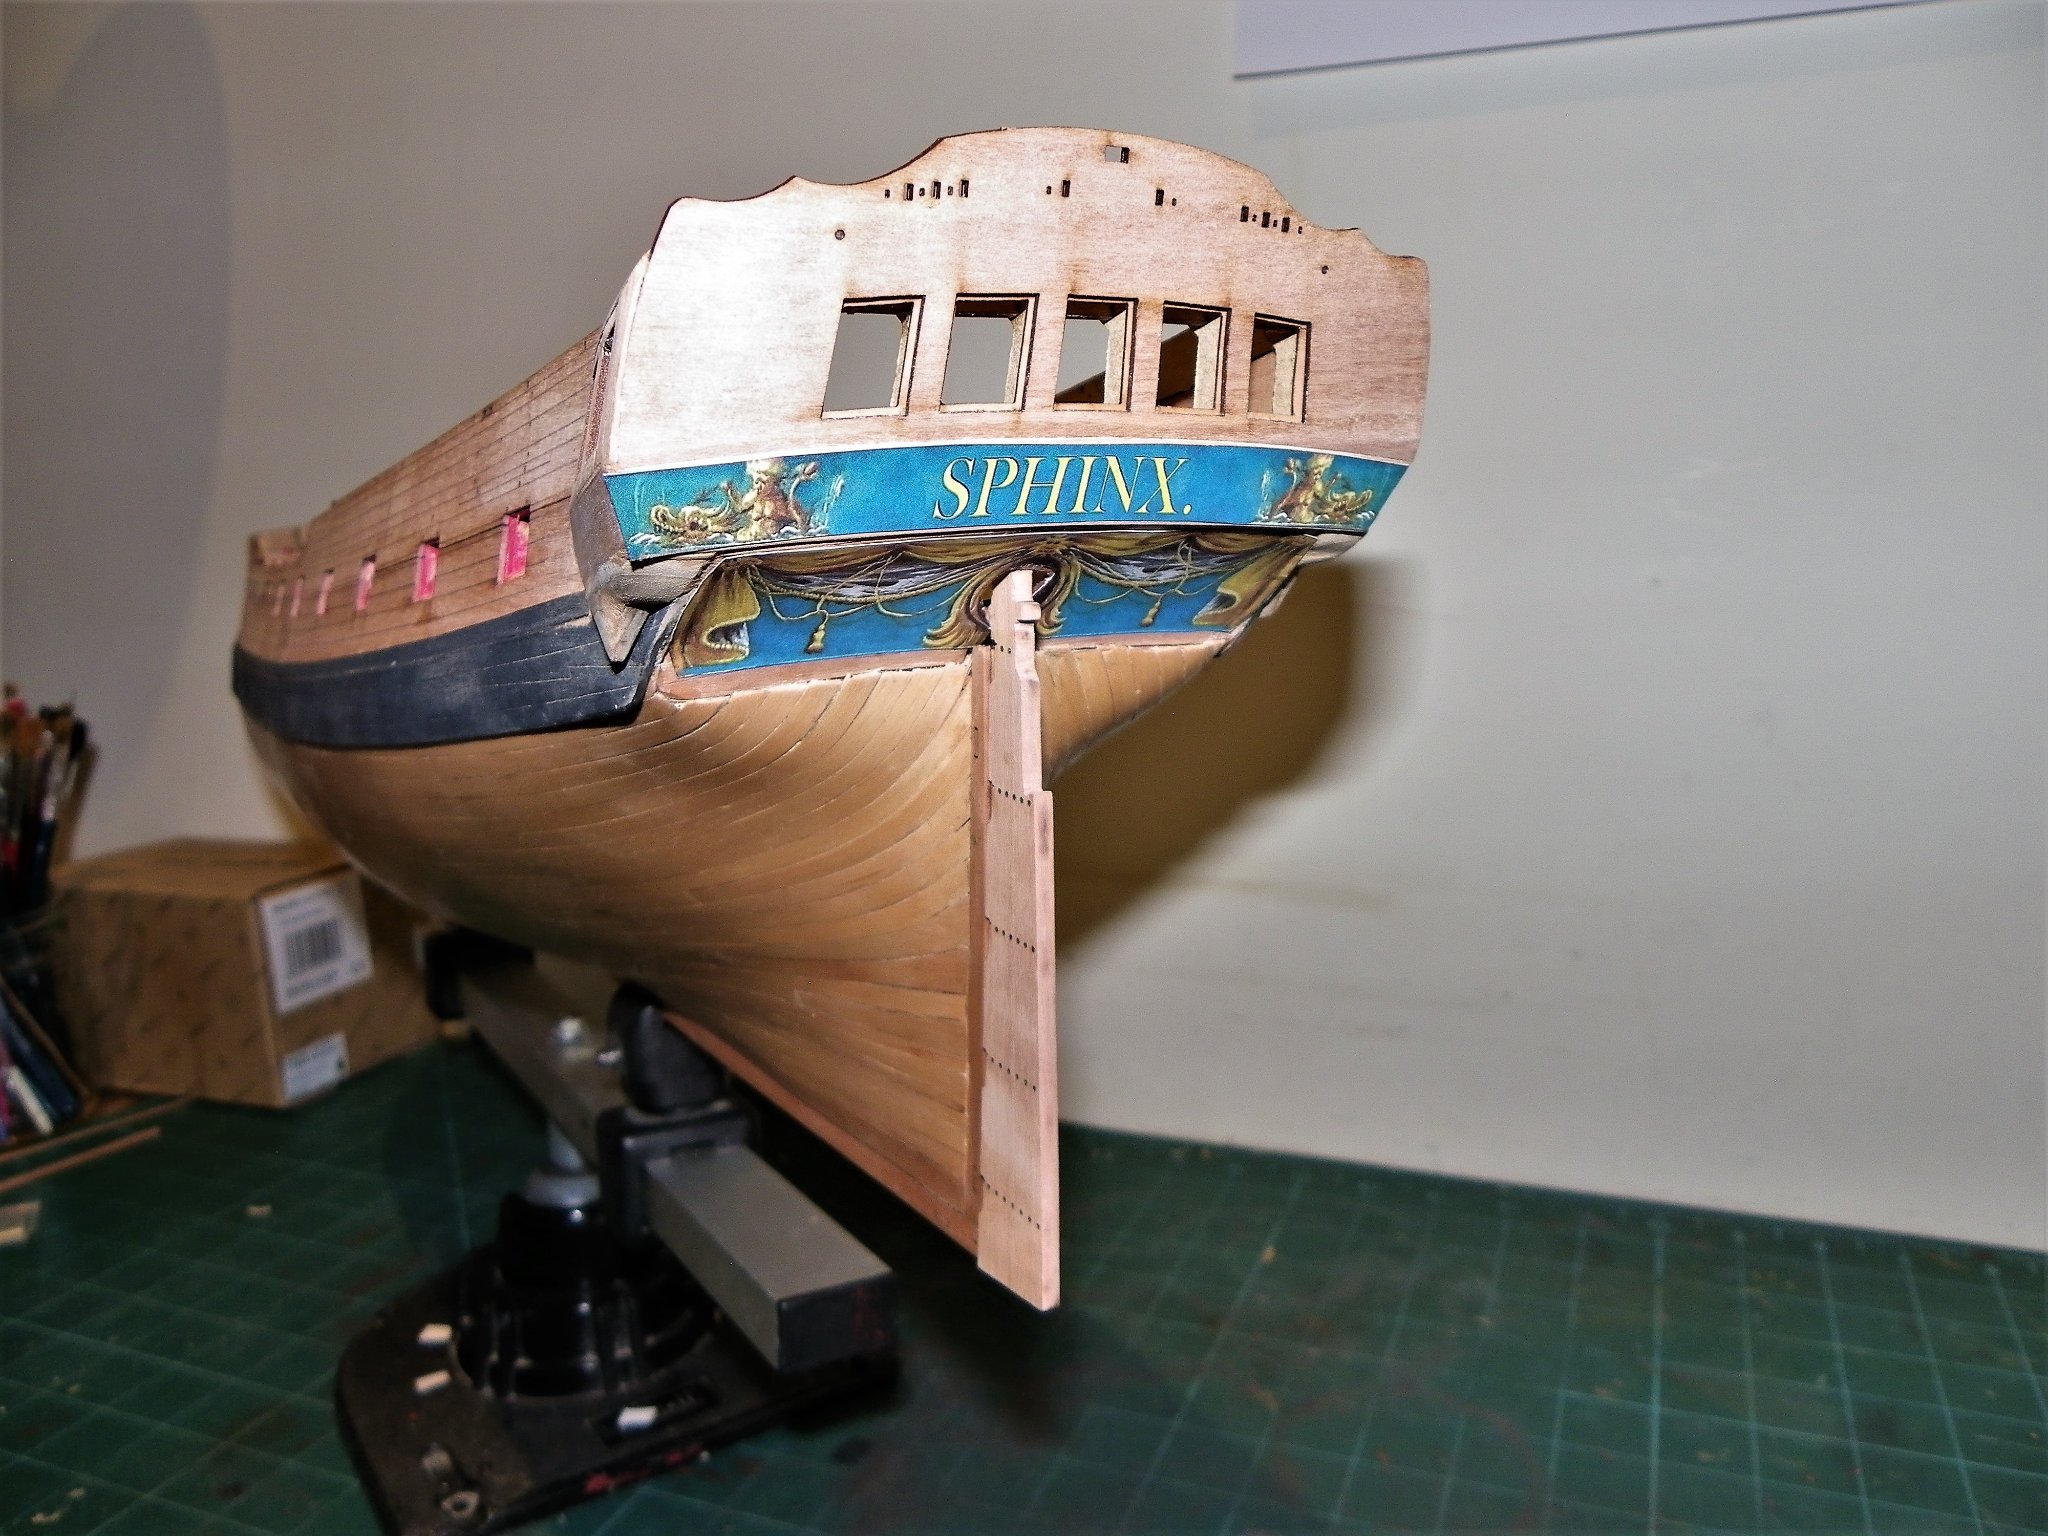
I was keen this morning to see how Chuck’s magic looked on Sphinx. I am not disappointed. 1763 1762 The arrangement will be enhanced once the decorative rails are applied top and bottom of the counters. 1768 Before the final pieces are applied I will lightly spray with artists fixative which may slightly change the colour. I will need to create a paint mix close to the final tone for areas where background painting is required, but that’s a way ahead. Thank you so much Chuck, what an asset you are to the ship modelling community. 👏 B.E.
- 857 replies
-
- 27
-
-
-
- Sphinx
- Vanguard Models
- (and 1 more)
-
My plan is to just use the printed paper strips a method often used on contemporary models, and as used on Chuck's Winchelsea to great effect. I believe at some time in the future Chris is thinking about a decal version for use on his models, but I doubt that will be in the time frame of my build. Cheers, B.E.
- 857 replies
-
- 2
-
-
- Sphinx
- Vanguard Models
- (and 1 more)
-
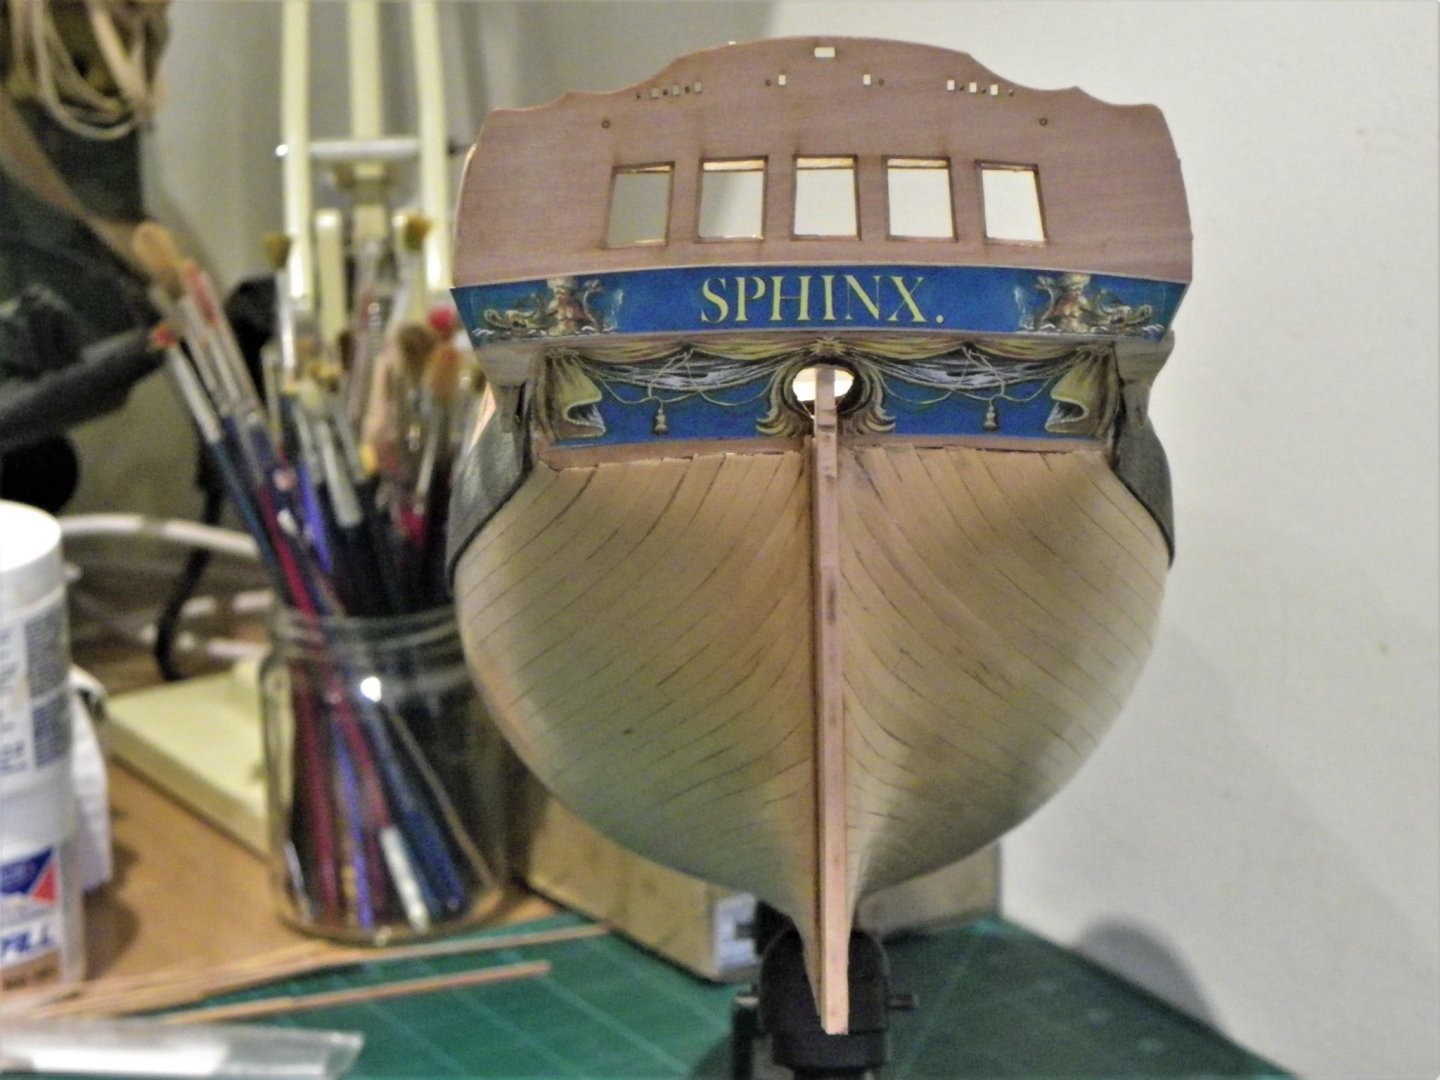
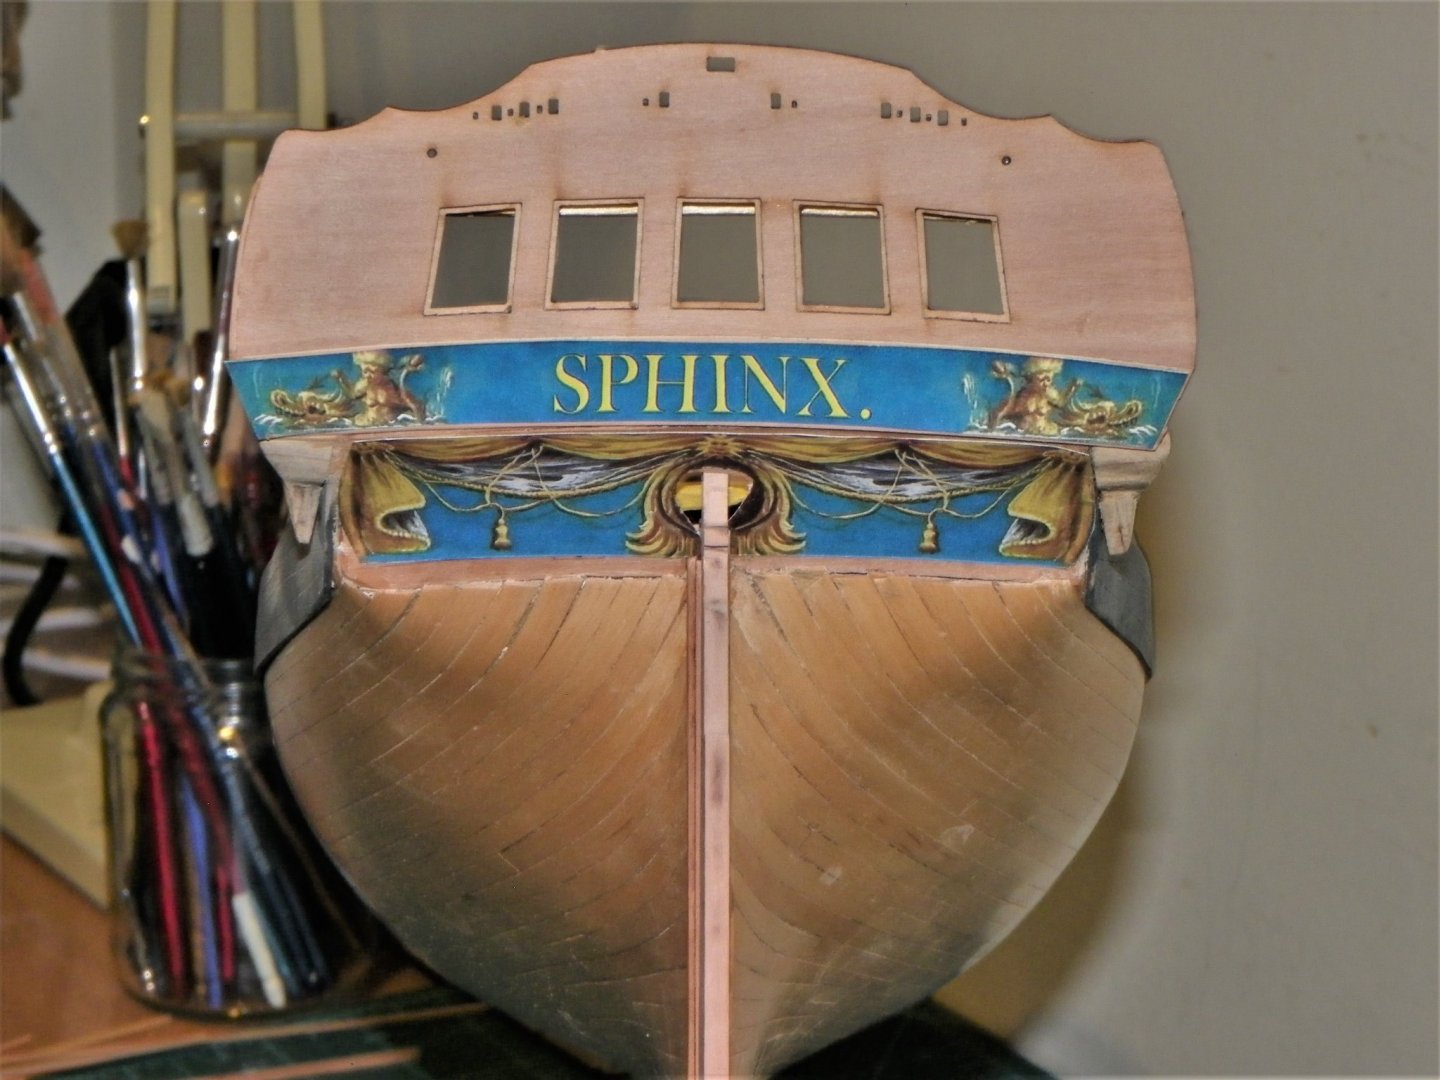
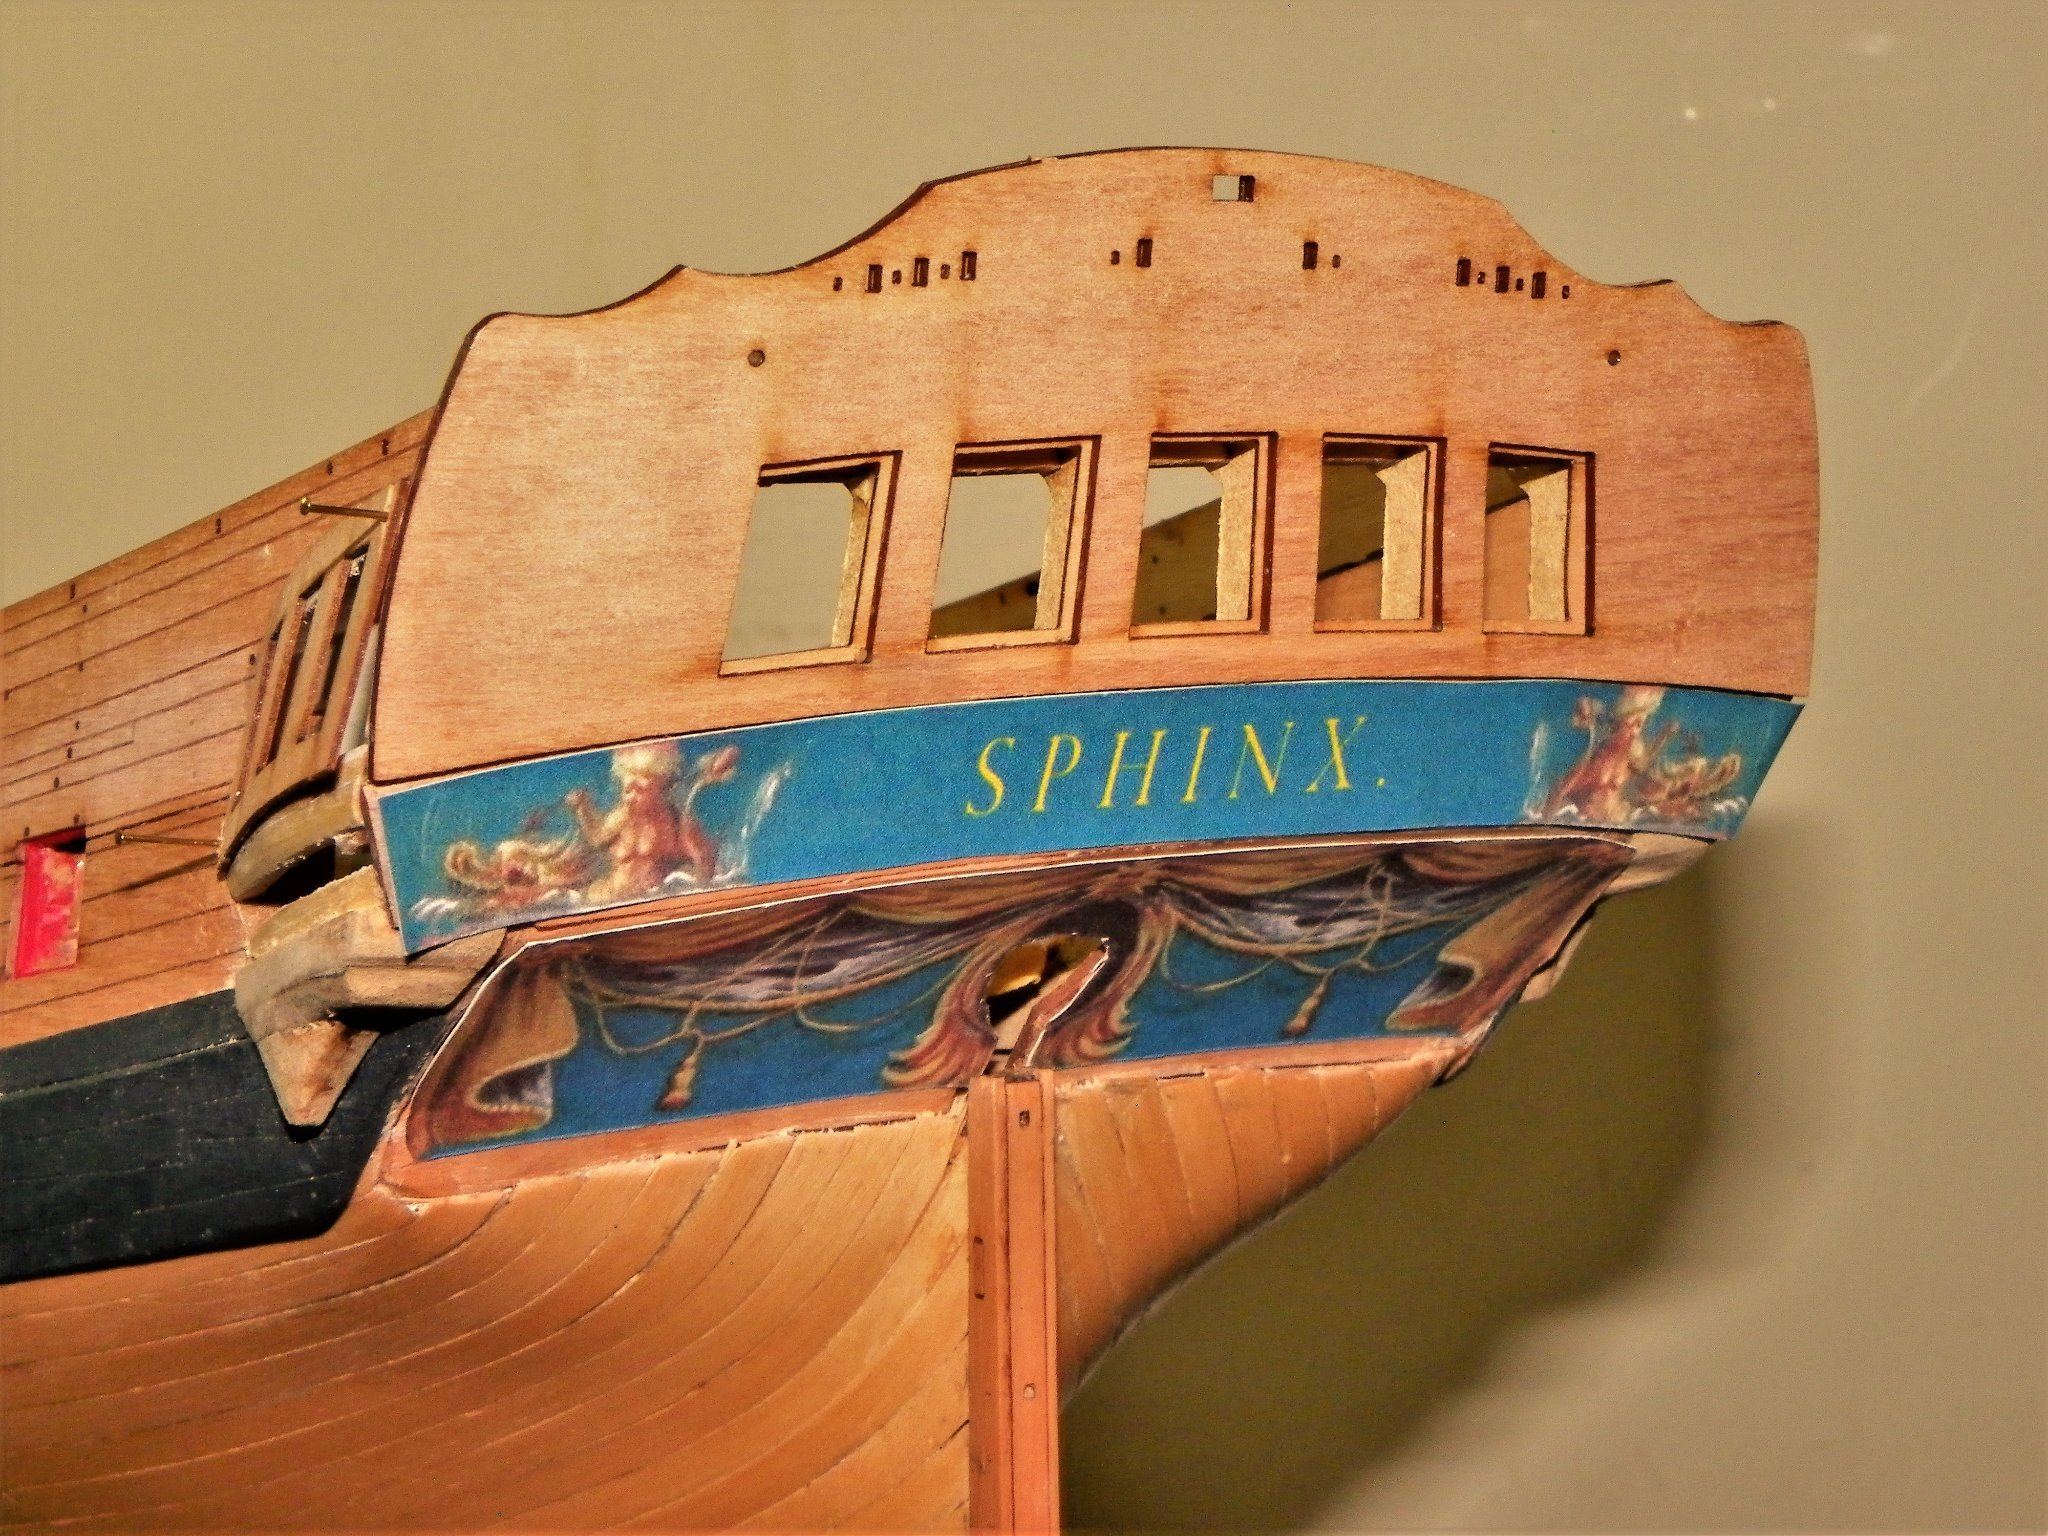
Hi Kirby. Generally, and particularly on small ships like Sphinx the frieze work and counter decoration would be painted, but often in a style to represent carved work. In reality such painting would be very limited on small ships, and probably not present at all. Actual Carved work of varying degrees was applied to the stern facias particularly on prestige ships, but even this reduced significantly as the 18th century moved towards the early 19th century. I think there was a fair bit of artistic licence used by artists and contemporary model makers, to impress potential funders of the real thing, but they probably all knew that the Navy Board put strict limits on how much they would pay for such decorations. The budget got tighter and tighter as the American and French wars dragged on. Sphinx as painted by Joseph Marshall, shows her highly decorated with a Blue ground to the frieze and counter work, it makes a very nice looking model. In reality the blue work officially should be black, but I am happy to follow the Marshall example. B.E.
.jpg.d126b7334780aa1564b74b624462ebfb.jpg)
- 857 replies
-
- 4
-
-

-
- Sphinx
- Vanguard Models
- (and 1 more)
-
Wow Chuck, thank you so much, that is brilliant. I can’t wait to scale and print one off tomorrow. Thank you John, I wasn’t aware of the Photoshop option, my version is very old (2013), but it looks like Chuck has done the business. B.E.
- 857 replies
-
- 3
-
-
- Sphinx
- Vanguard Models
- (and 1 more)
-
Thank you Guys for your supportive comments. @ Ron – early days but I will probably go for something like Baskerville old face, based on a style originally developed in 1766. I would aim for a slightly less strong colour contrast with the lettering, but all this is in the future. B.E.

- 857 replies
-
- 7
-
-
- Sphinx
- Vanguard Models
- (and 1 more)
-
Wishing you a swift recovery Mark, hope things go well. B.E.
- 505 replies
-
- 5
-
-
- vanguard models
- Sphinx
- (and 1 more)
-
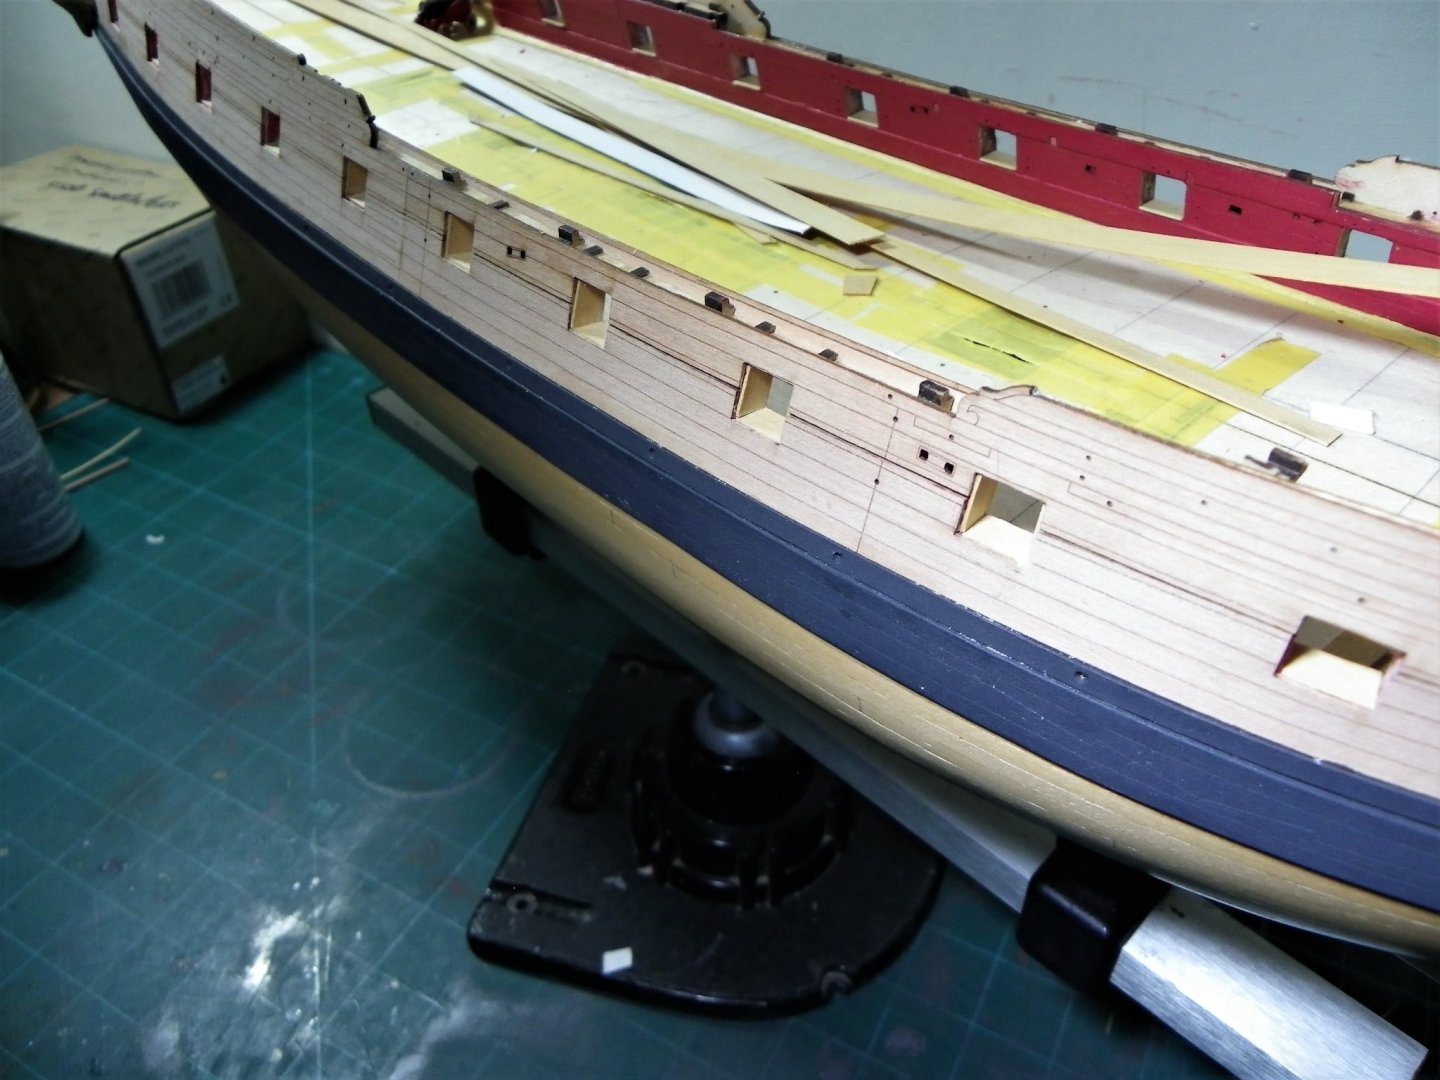
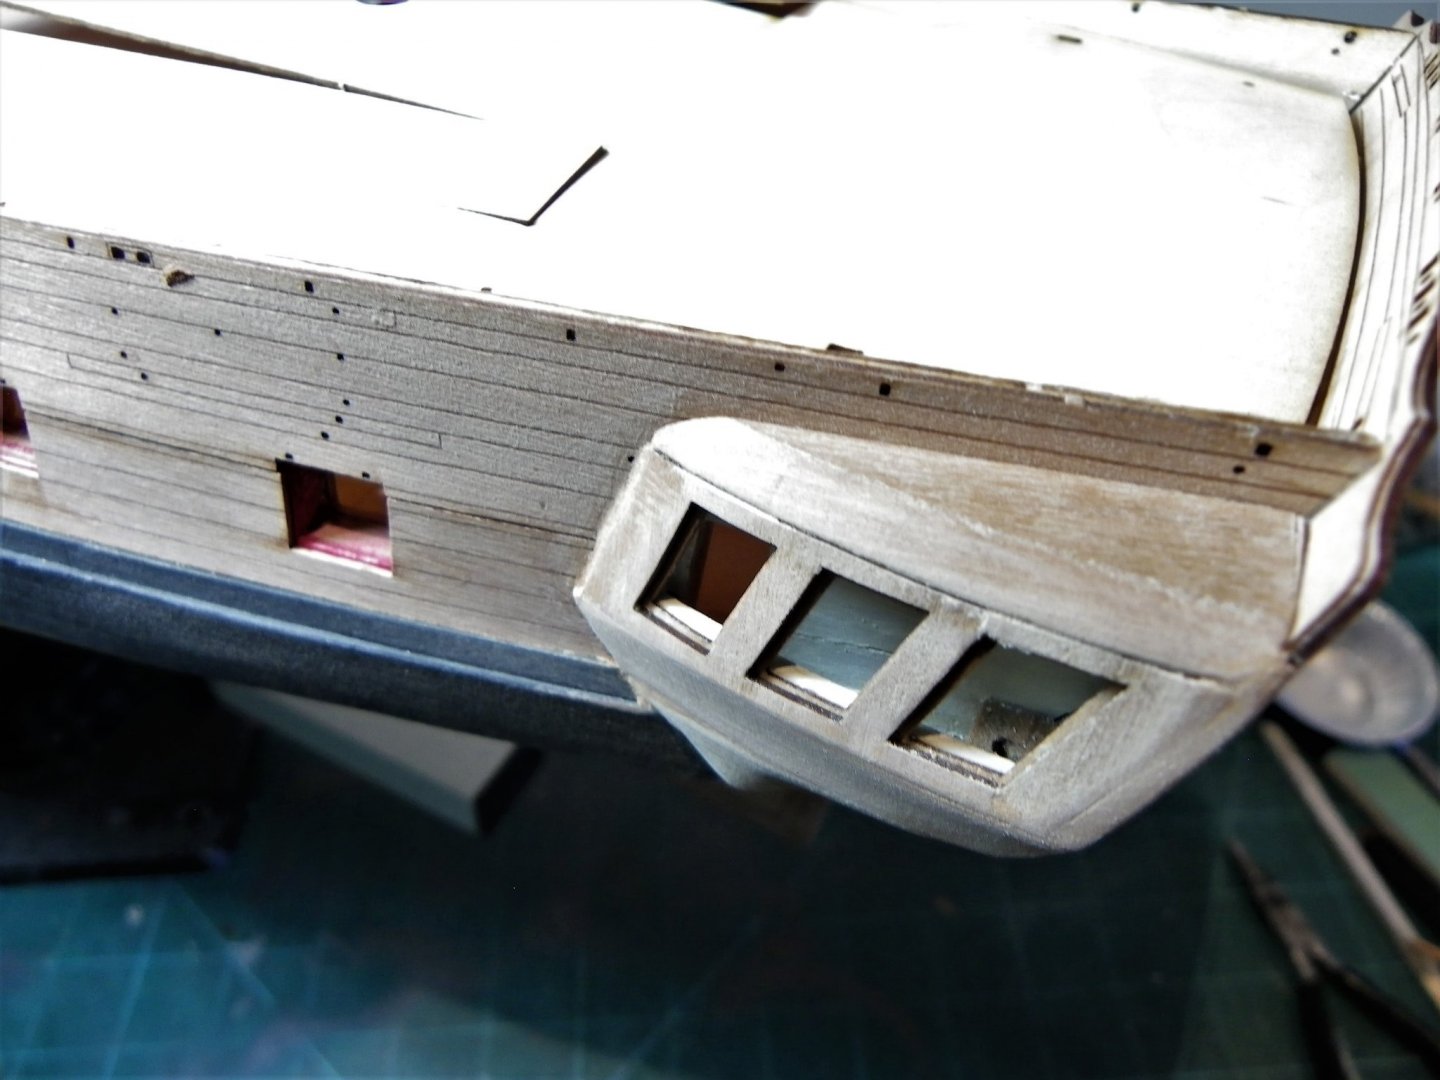
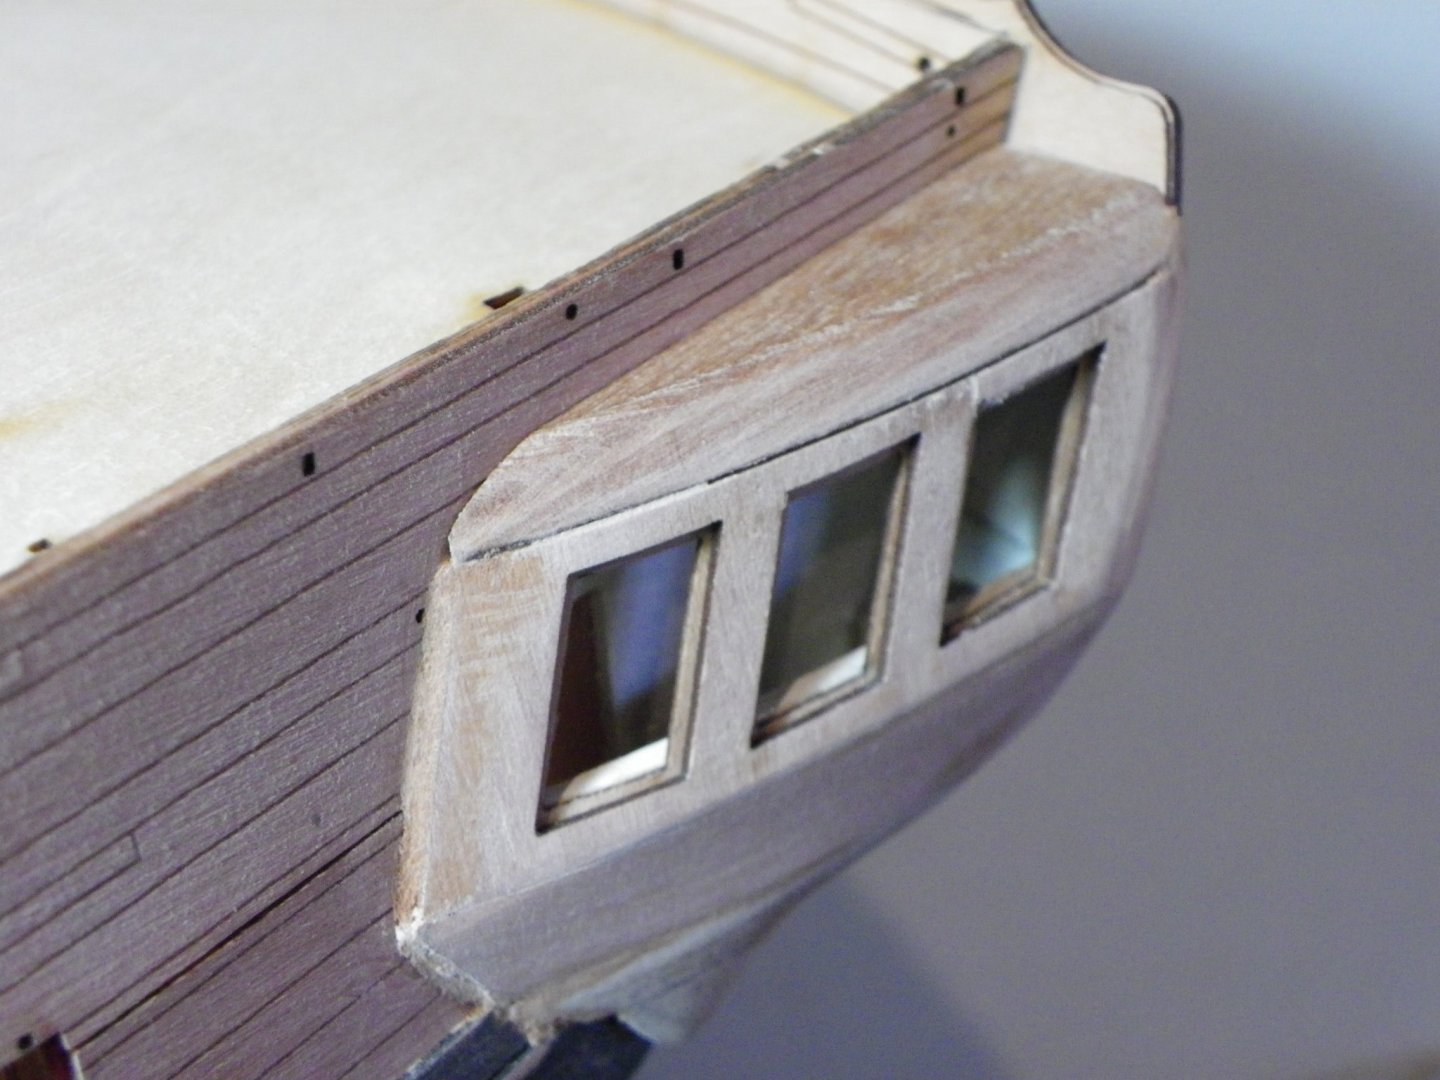
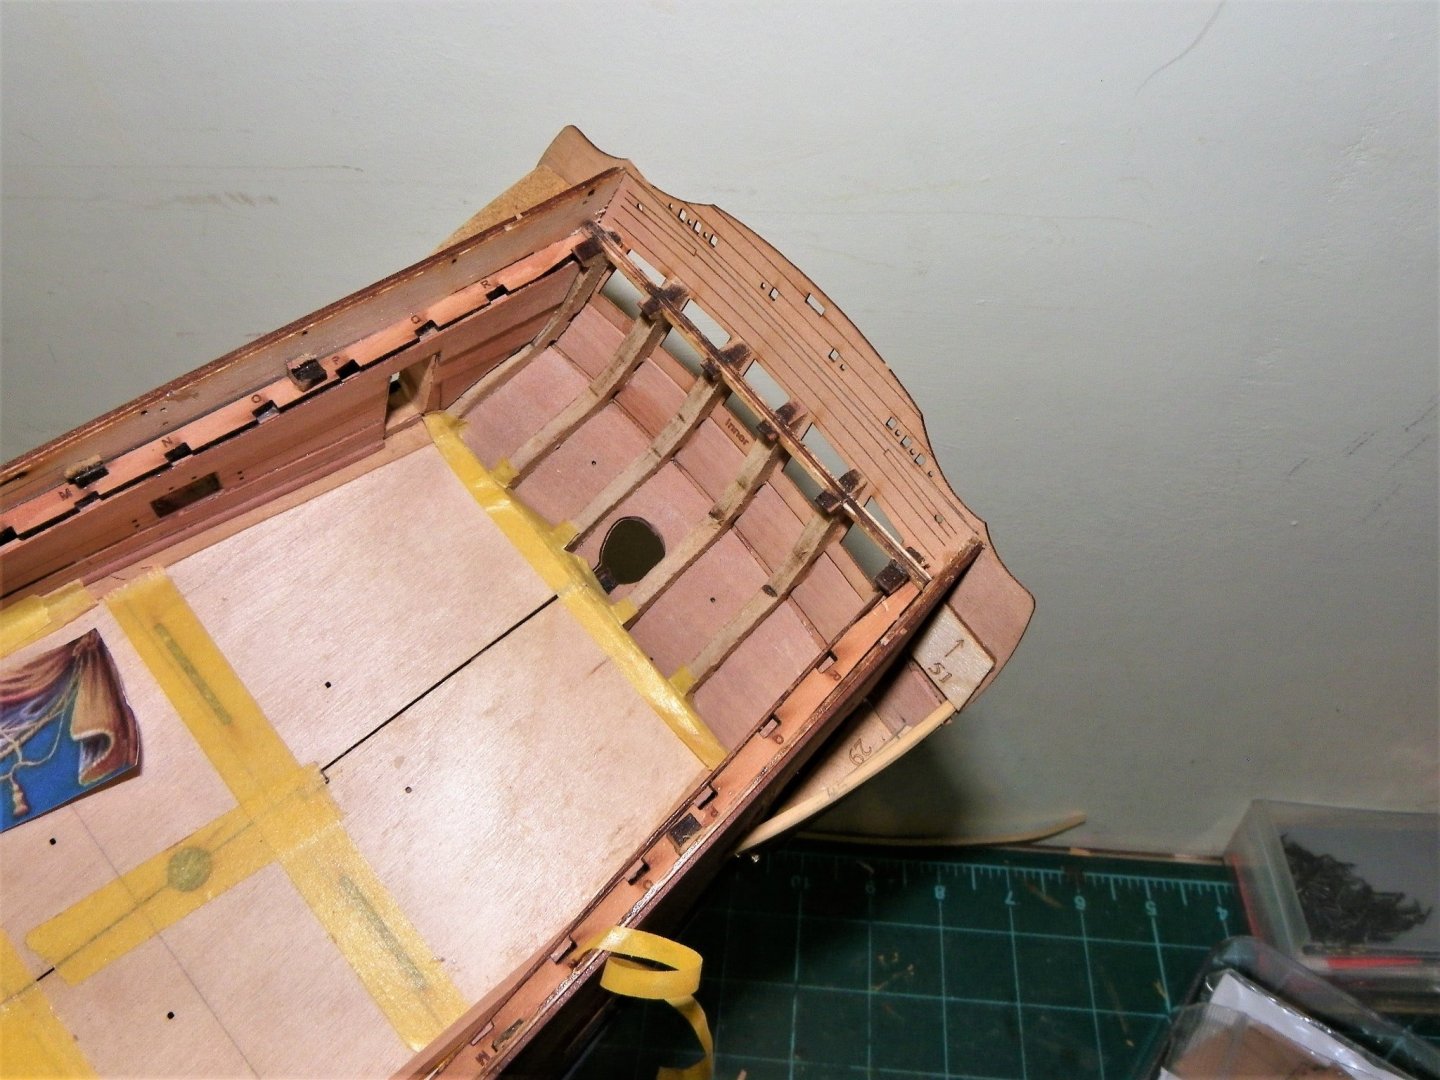
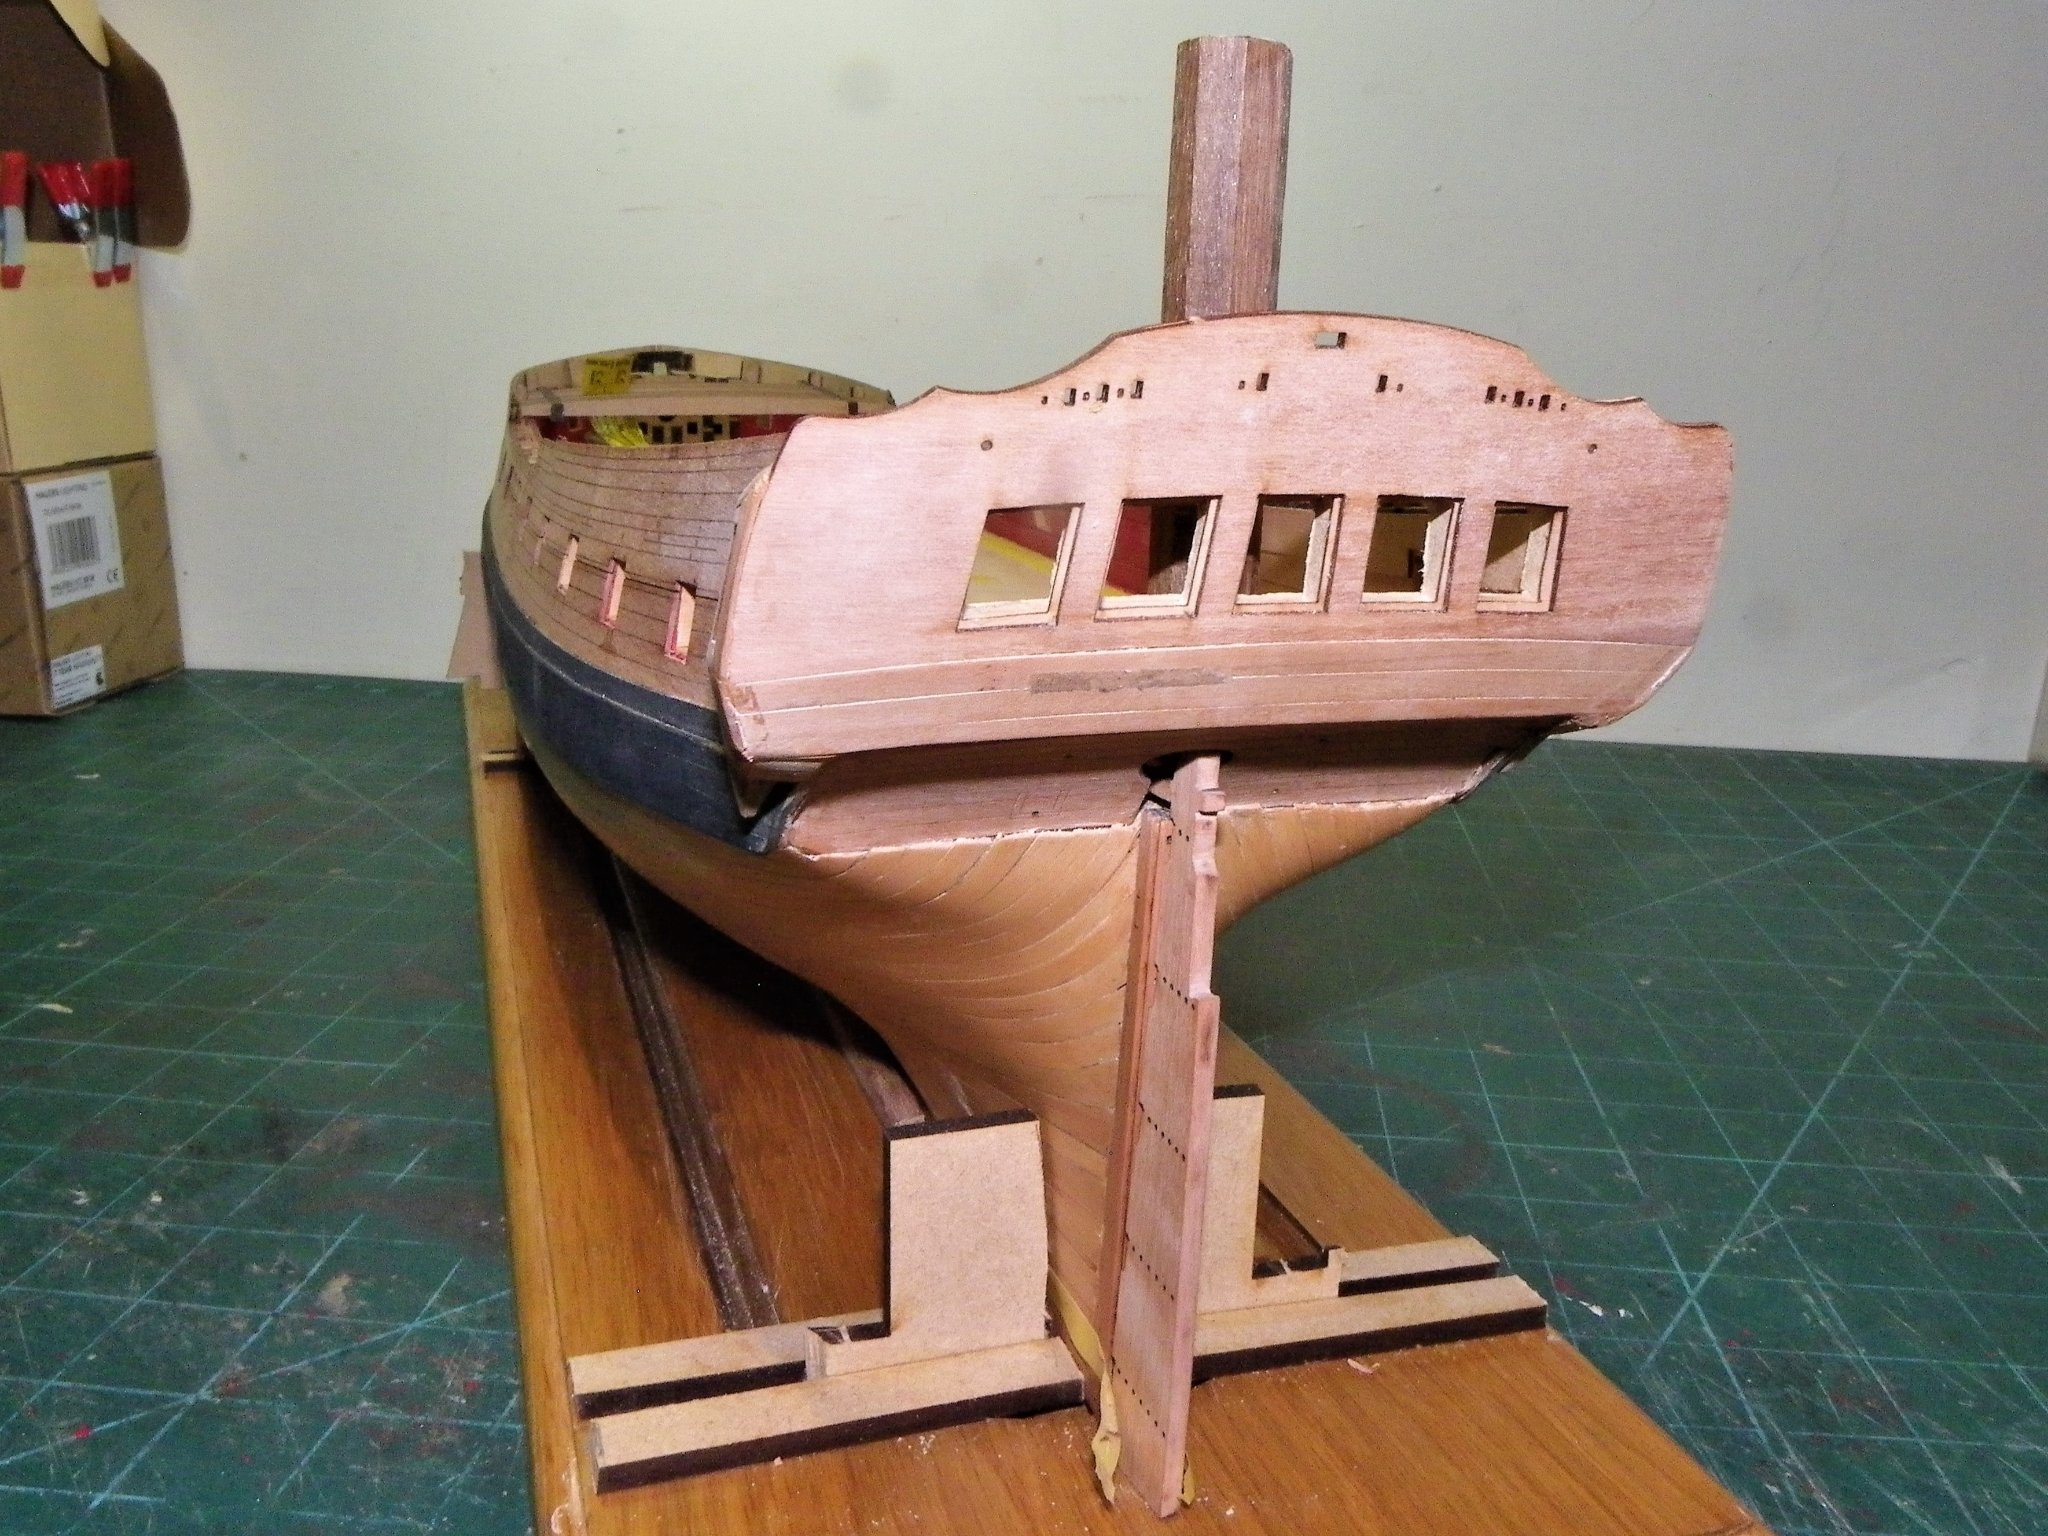
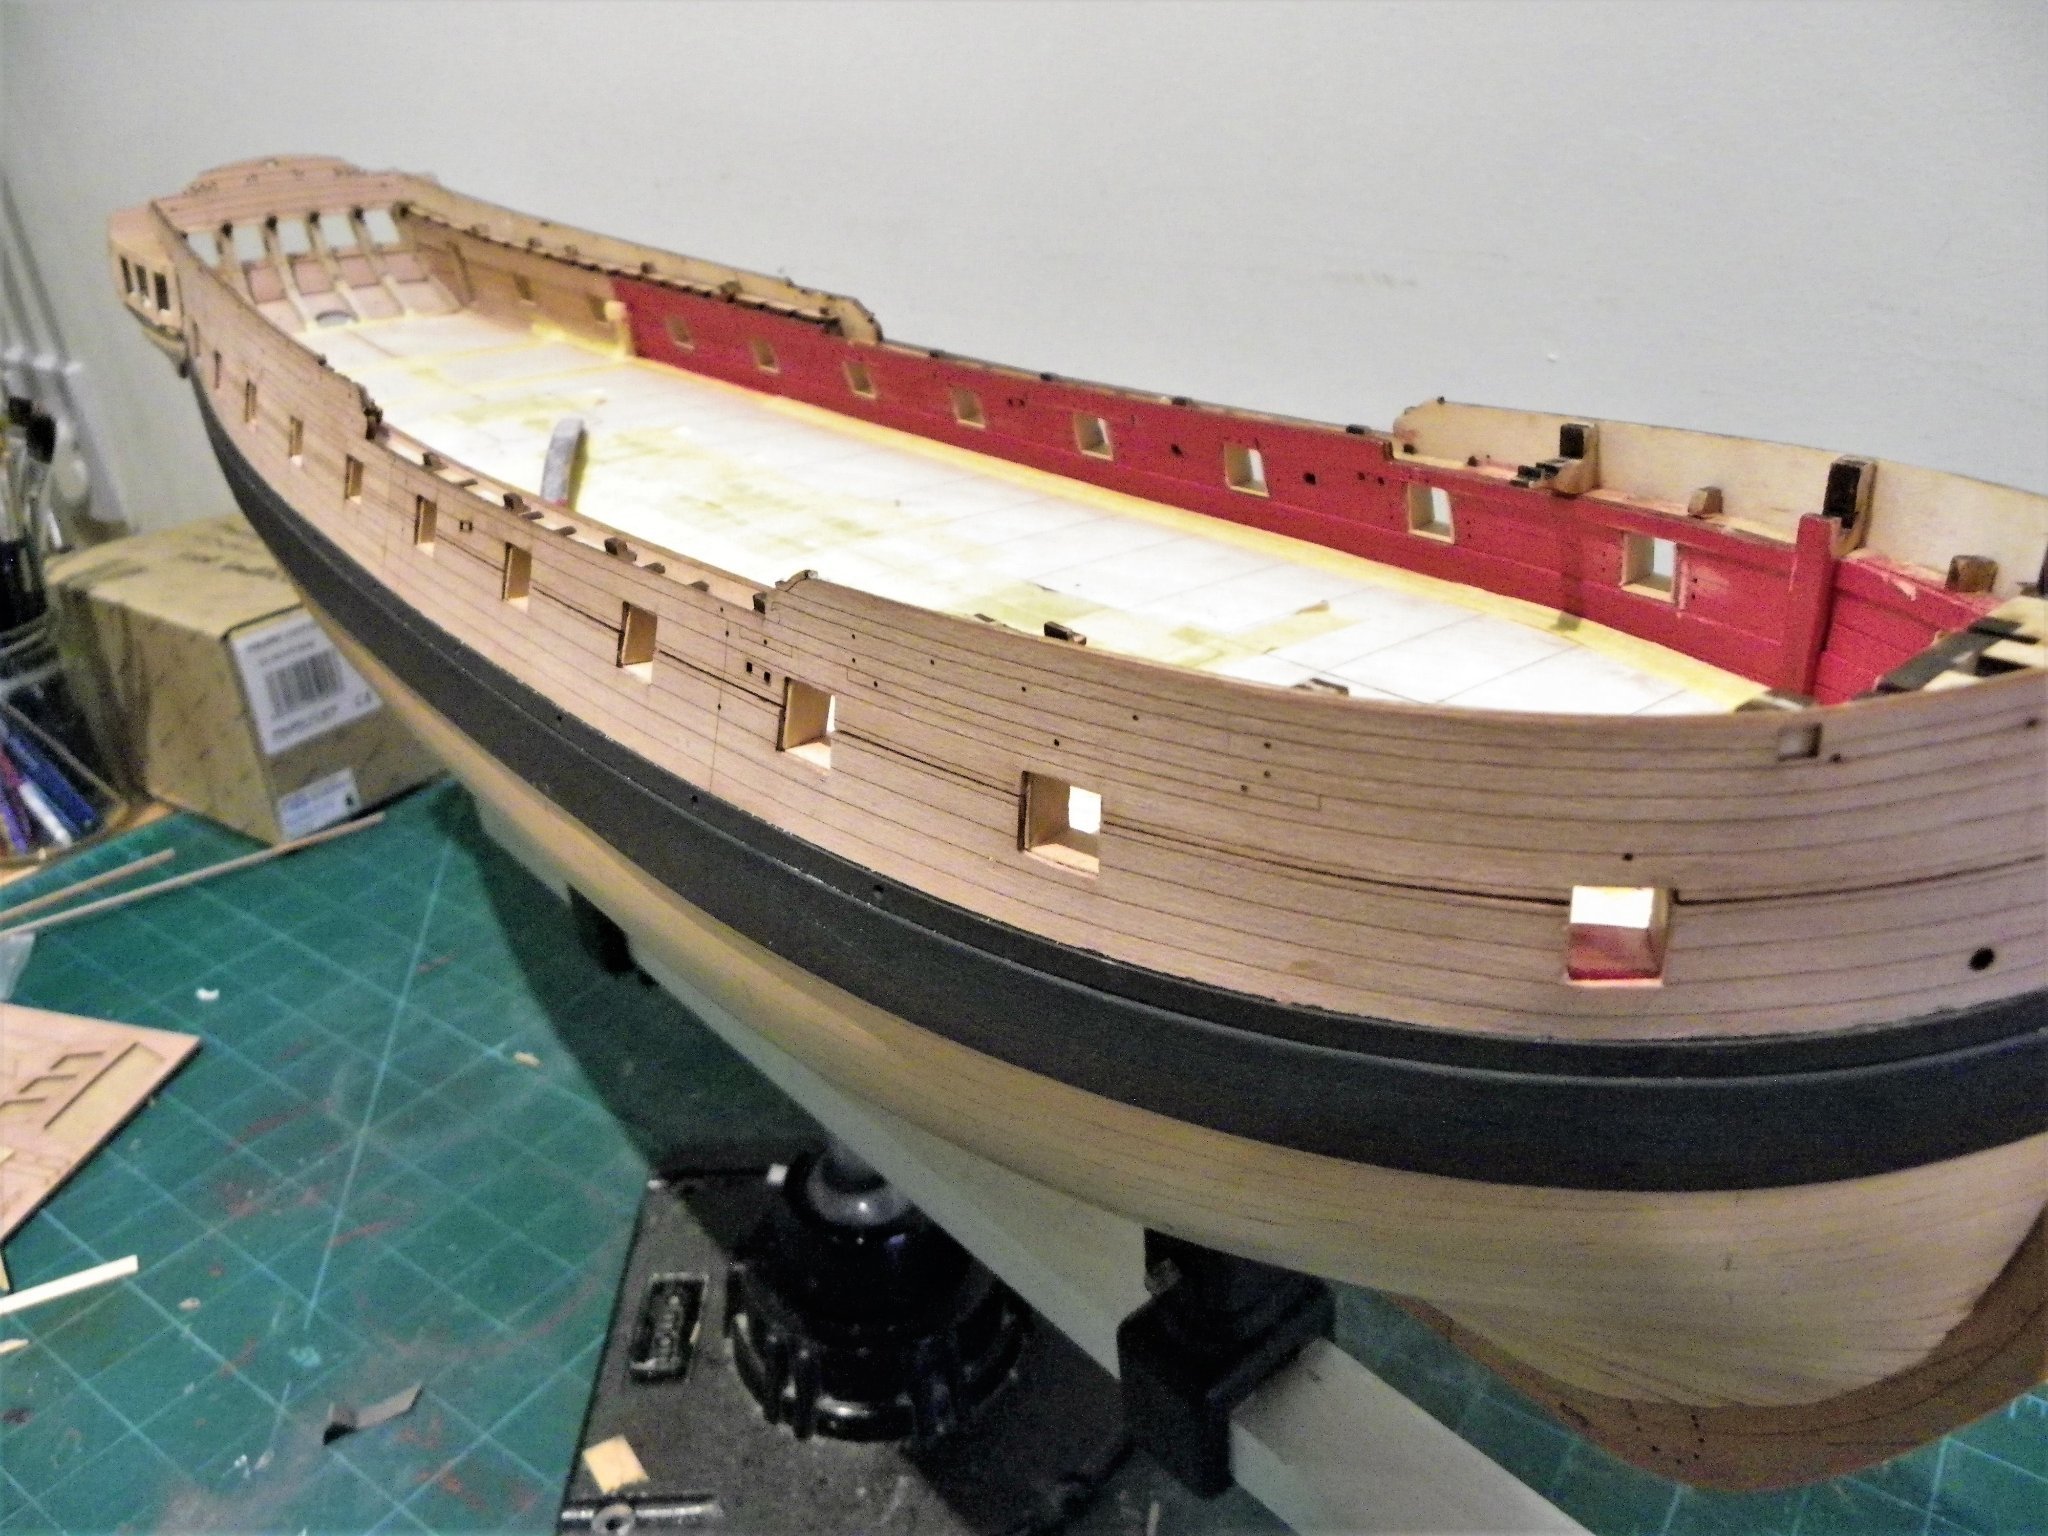
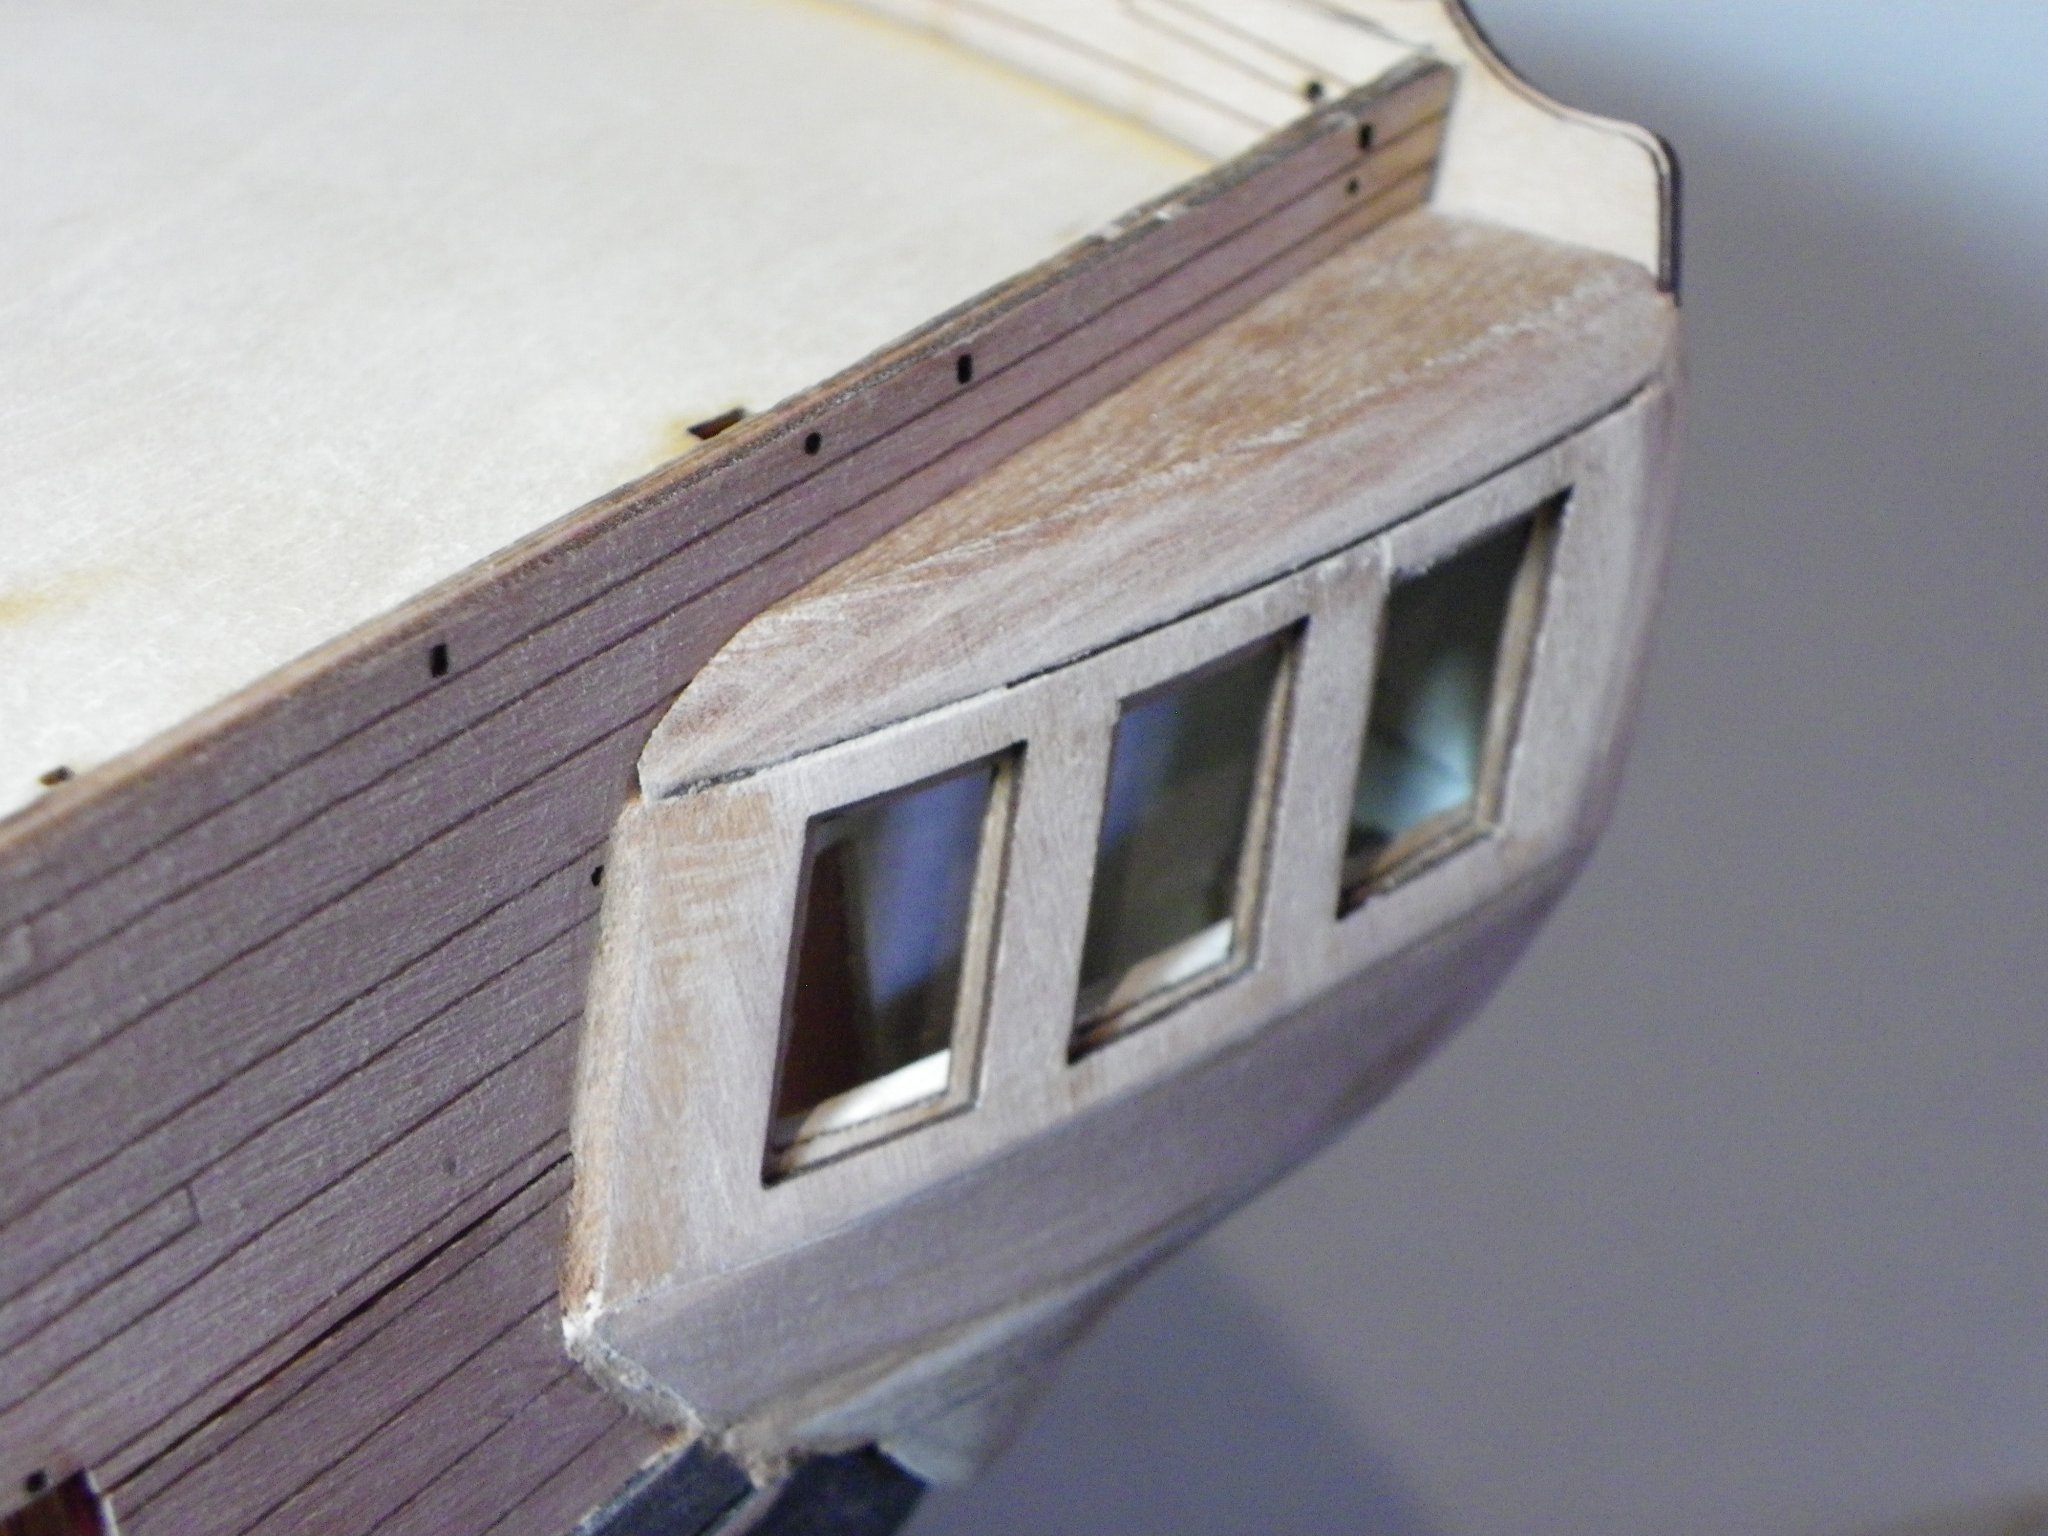
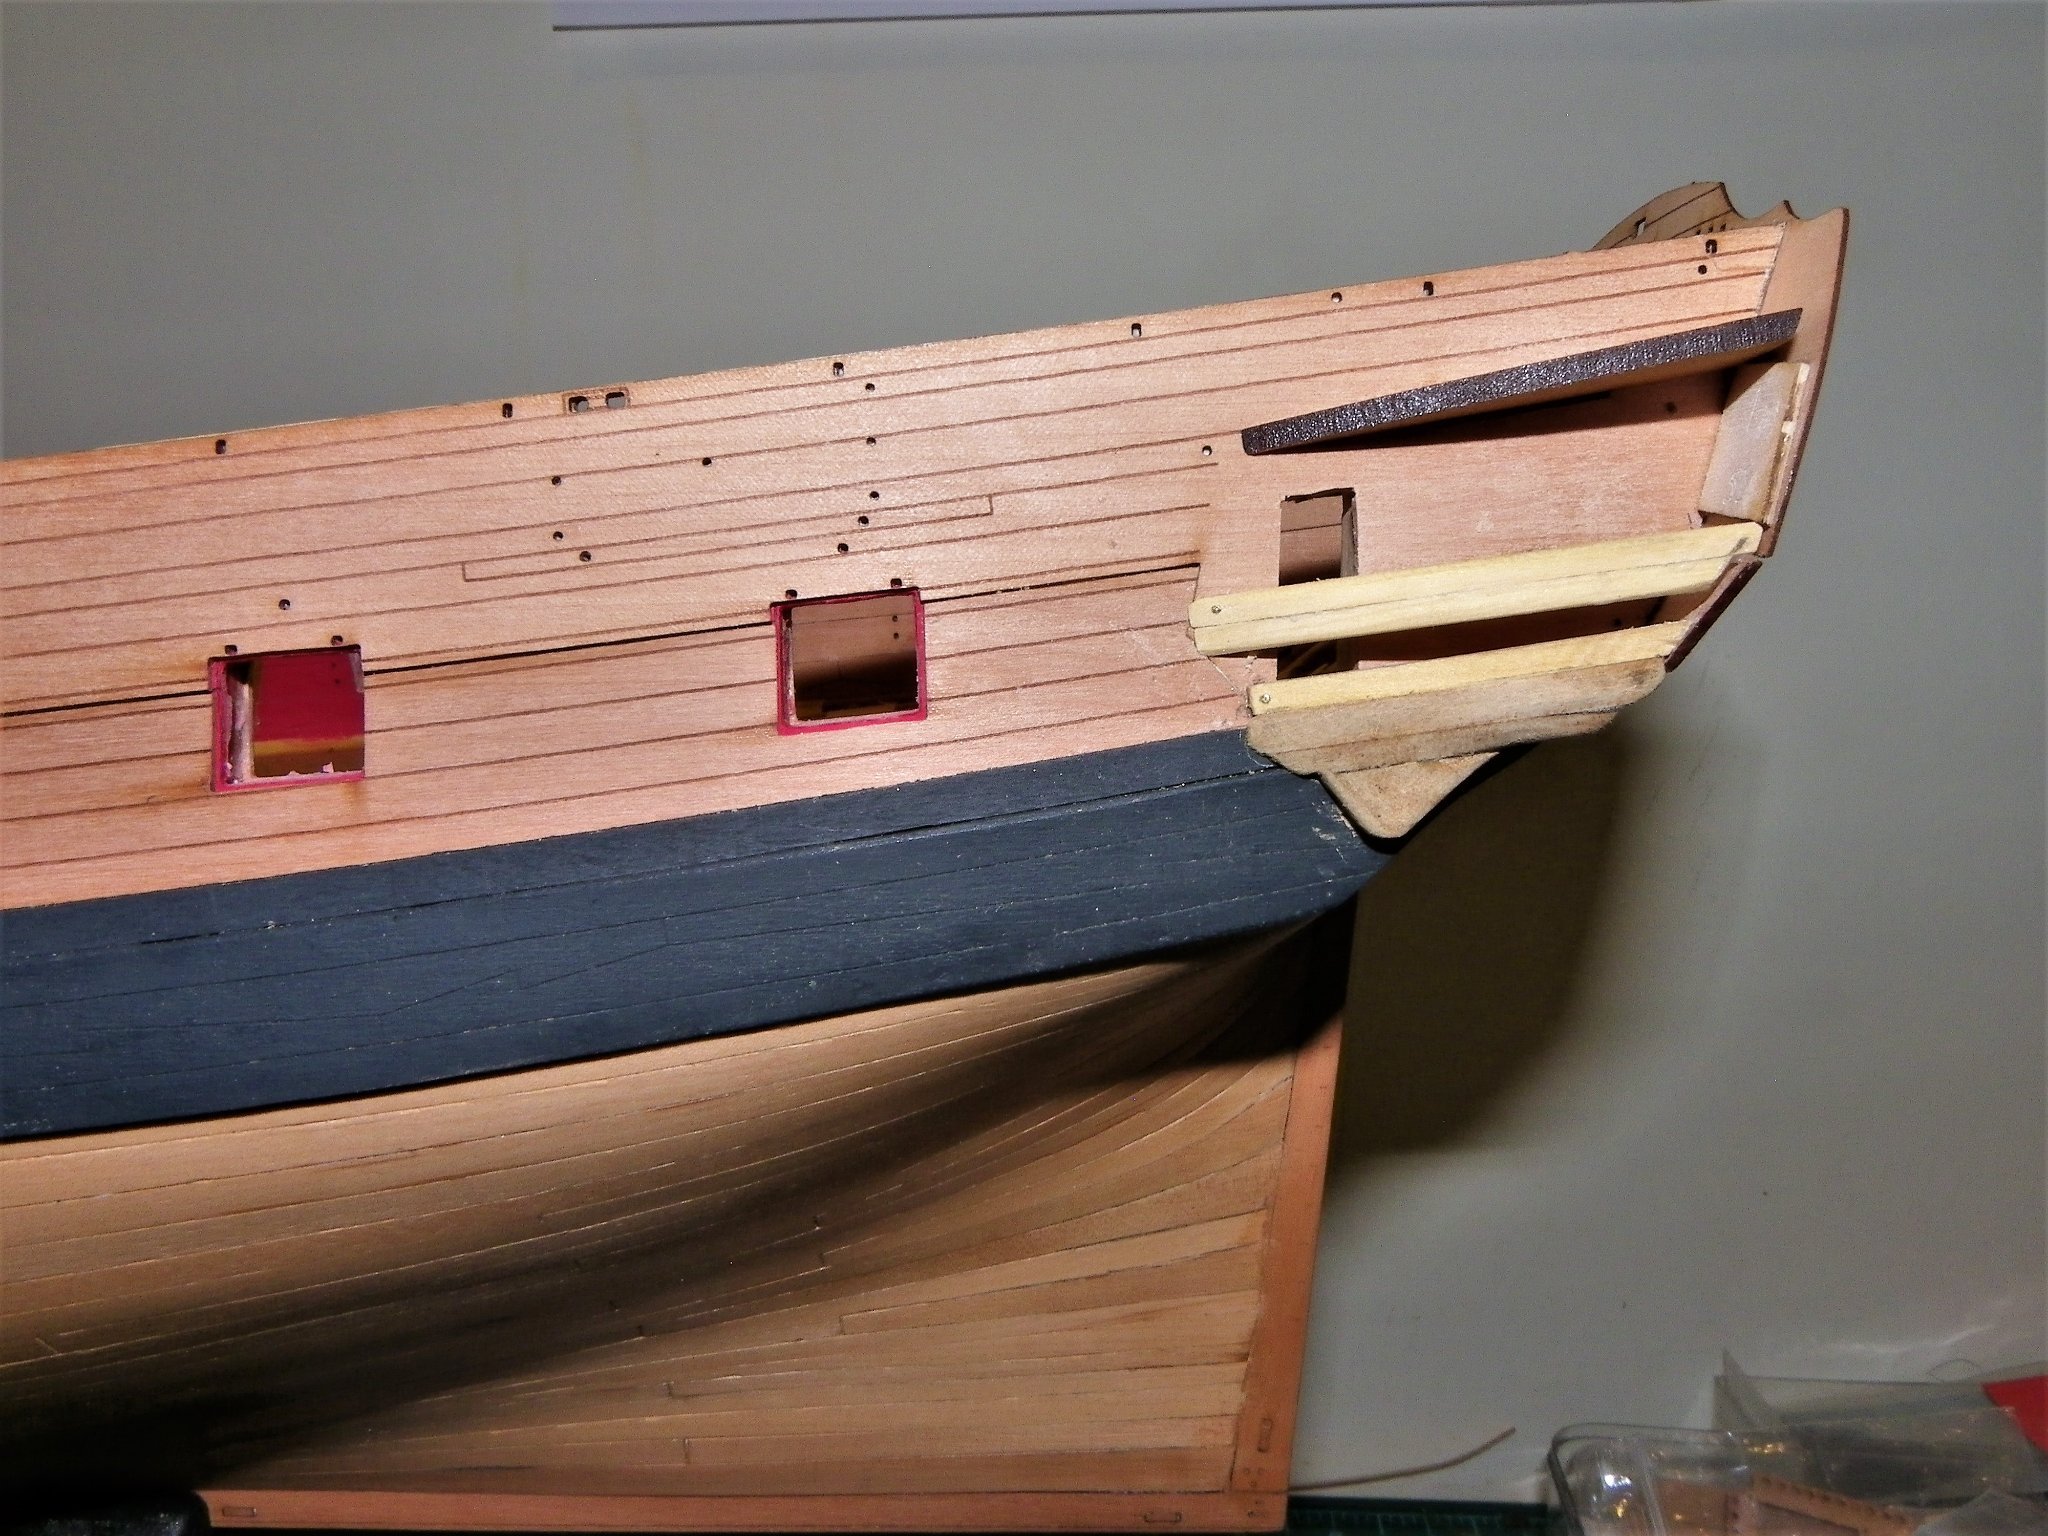
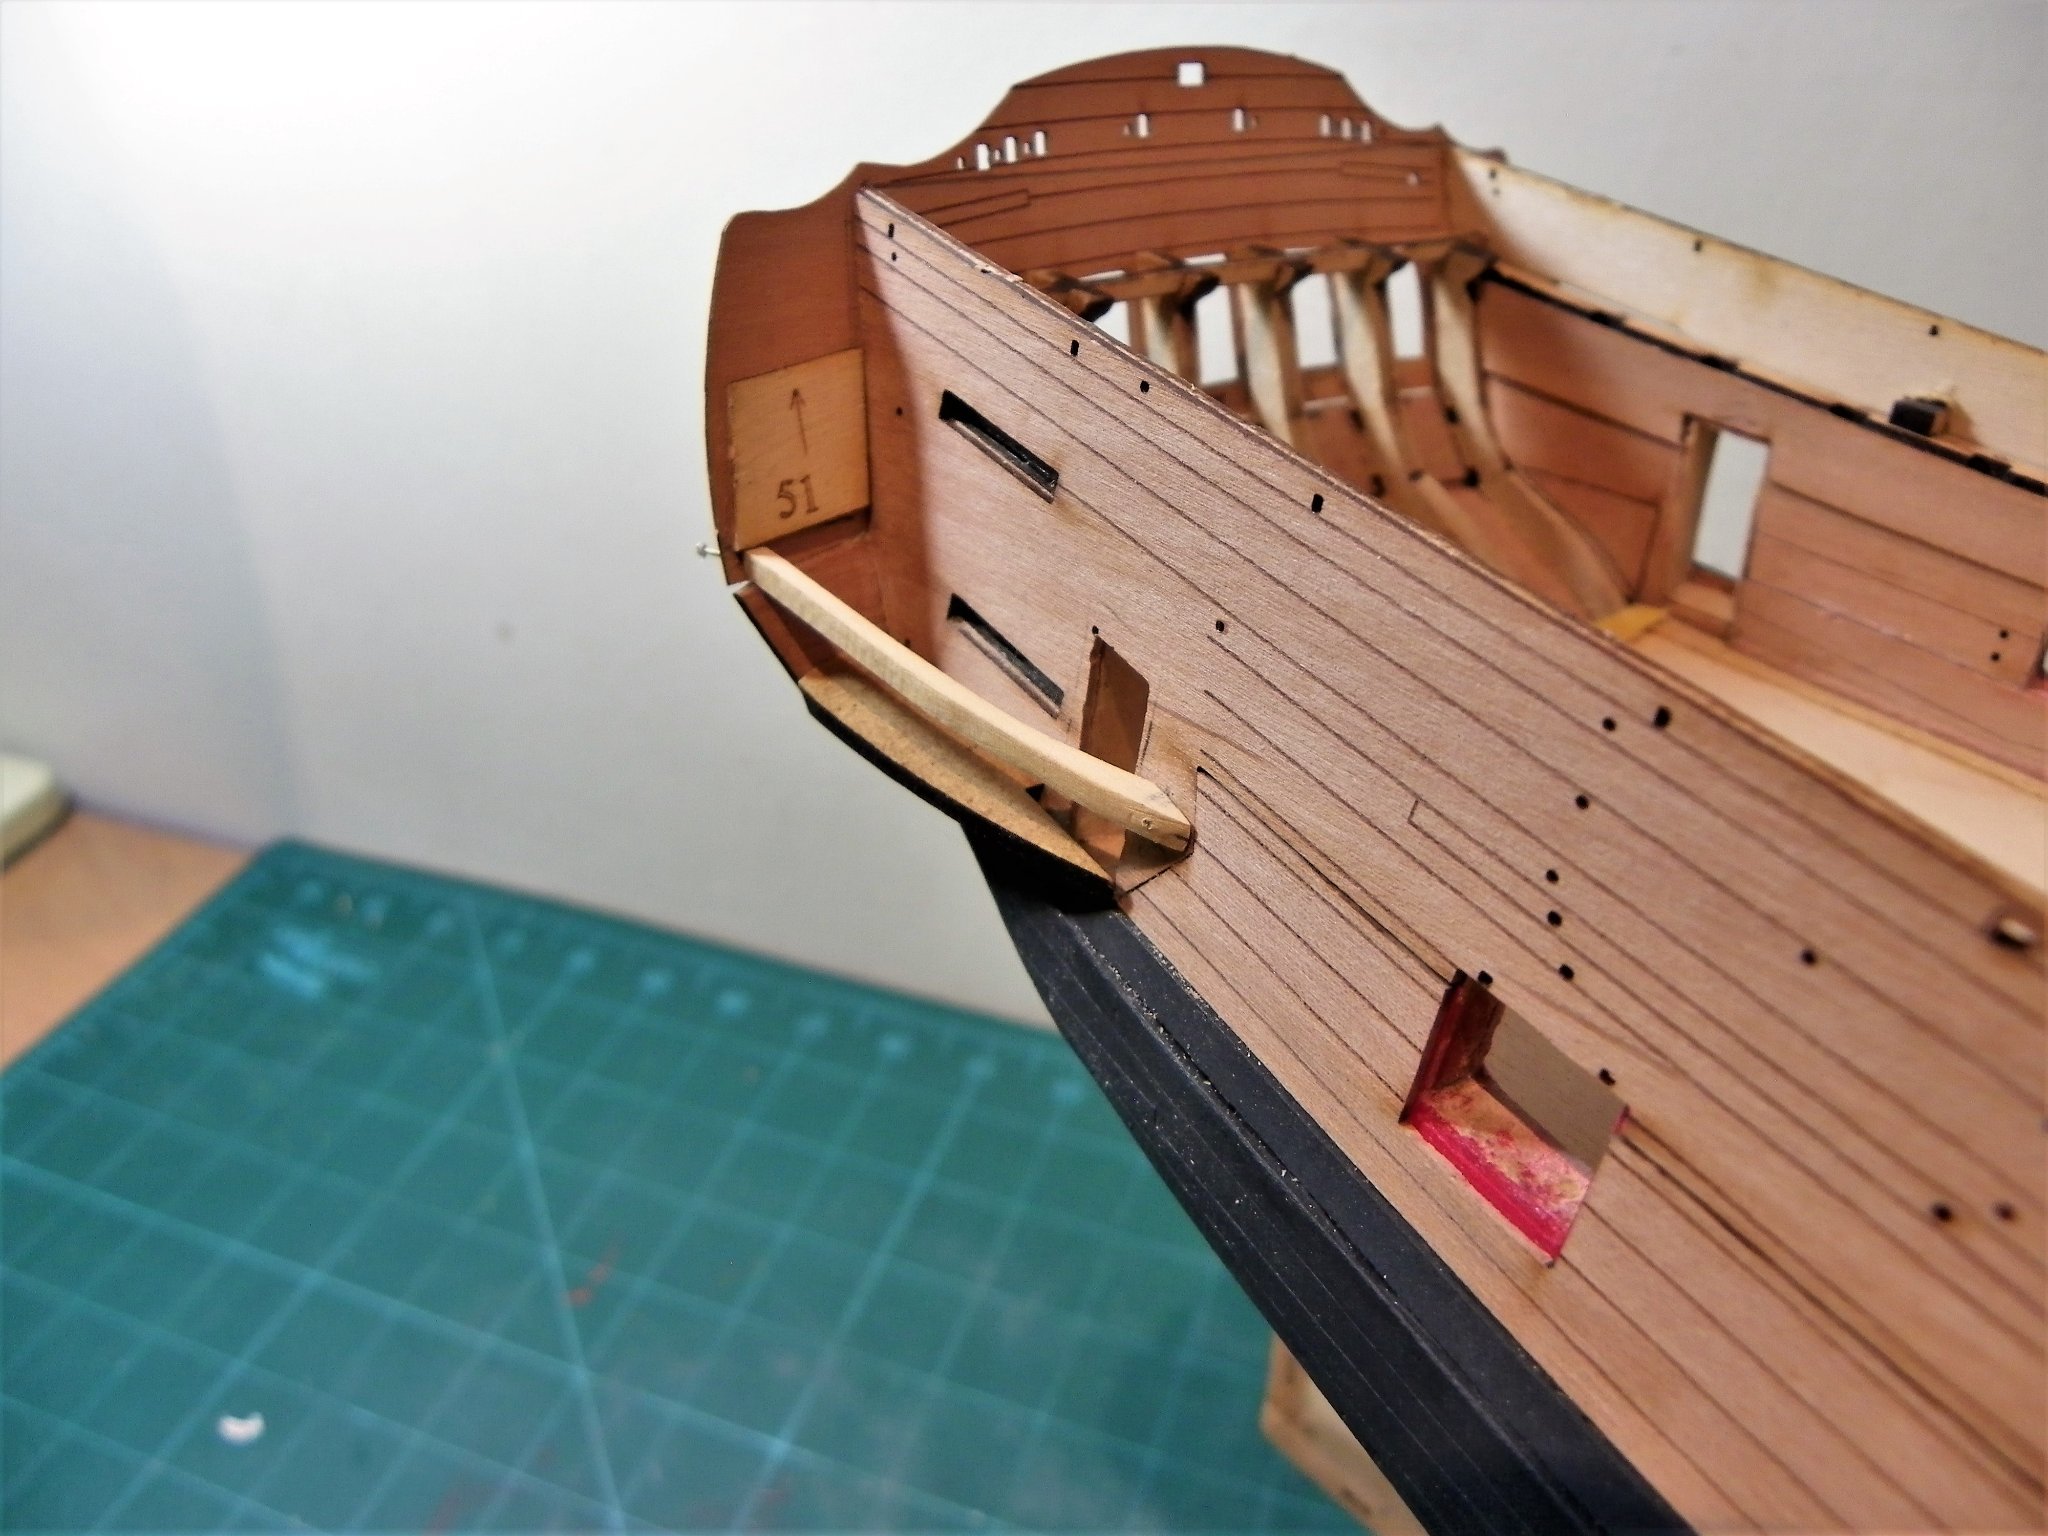
Post Fifty. Completing the Galleries. Now is the time it will become apparent whether my meddling has adversely affected the proper lie of the window and berthing patterns. 1696 Starting with the inner window pattern. I have worked on the basis of keeping the frame unaltered and running along the top line flush with the top of the frame. I am using pva for this fixing to give me time for minor adjustments to the position. The outer pattern is checked for fit before the inner sets. I was always expecting to have to do a fair amount of fettlin’ as I had gone off piste with the gallery construction, and so it came to pass. The day didn’t start well, the dog ate one of the outer window patterns another split during fitting, and the back edge of the assembly seemed to overhang the stern facia by 1mm, almost certainly due to my fiddling with the frames. Not an unsurmountable issue as I will fix a work-around. The Berthing piece is a short strong section of Pearwood that should follow the curve of the pattern (45c). I felt the need to soak this piece and shape using the pattern I no longer needed as a former. 1694 In the end I scratch made the Berthing patterns to better fit my build. The Berthing was pinned over this former and left overnight. On the subject of Berthing patterns I had some discussion with James about which way around they were fitted. 1700(2) It would seem that the end with the broader angle (on the right here) fits at the stern end and butts against the Upper counter. As the decorative mouldings follow the relative lines top and bottom around the stern counter and gallery this makes sense. So, the basic portside gallery is completed. 1721(2) 1722 1720 My purpose in undertaking this modification is to bring a sense of light and element of depth to the Quarter Galleries rather than a dead black space behind the lights. Opening up the doorway and the absence of planking on the Quarterdeck will fully achieve this. 1730 Rather than use the provided Upper counter outer pattern I planked the counter with individual Pear strips. I don’t intend to use the etched brass lettering on the counter and I didn’t want the pre marked positions limiting my choices. 1745 A little more work is required on the lower finishing piece where it meets the wale but overall I am fairly satisfied thus far. 1731(2) 1732(2) 1733(2) I’ll leave this aspect of work until I receive the replacement window part for the Starboard Gallery. In the meantime it’s back to port lining, at least with the outer Topsides patterns now in place it is easier to see how the linings should sit. B.E. 10/12/21

.thumb.JPG.622491cc0b76dd7547f442b1624b3538.JPG)
.thumb.JPG.66bce4a4e10a6096940f3ee7df350f19.JPG)
.thumb.JPG.e5f4171b0b0a108e93cd3f210916a529.JPG)
.thumb.JPG.3674623a283ecea1d46e405cd6ff2171.JPG)
.thumb.JPG.b80f2f3b66edacd03090a3fa579d6e99.JPG)

- 857 replies
-
- 26
-
-
- Sphinx
- Vanguard Models
- (and 1 more)
-
That's a generous thought Bob, but he applies Spaniel rules - if it hits the floor, it's mine. I live in fear of stuff dropping off the bench that may harm him. My biggest fear are needles and scalpel blades, he's had both. Unable to find a missing needle one day I had to take him to the Vets for an x-ray. I dropped him off, returned home to find the needle on the kitchen floor- he had had it. That episode cost me the price of a medium sized kit, I'm now paranoid about needle and blade control. B.E.

- 857 replies
-
- 1
-

-
- Sphinx
- Vanguard Models
- (and 1 more)
-
Sabotage in the Dockyard ……..and things were going so well. Until Mrs W arrives and asks is this something to do with you? 1698(2) I had minutes earlier been searching my bench and floor for a missing Window pattern. 4447 The face says it all, and the perpetrator is confined to Quarters for the present. So unless I can prevail upon Chris to supply a replacement I will have to fashion one from some scrap, and I was hoping to complete the Galleries today. Hey Ho B.E.

.thumb.JPG.5cb6145e6ee547358577bdca036f8f16.JPG)
- 857 replies
-
- 13
-
-

-

-
- Sphinx
- Vanguard Models
- (and 1 more)
-
In my own defence I merely followed the arrangement on the contemporary model Lowestoft, but as I wasn't there at the time I simply can't confirm. B.E.

- 542 replies
-
- 5
-
-
-
- Sphinx
- Vanguard Models
- (and 3 more)
-
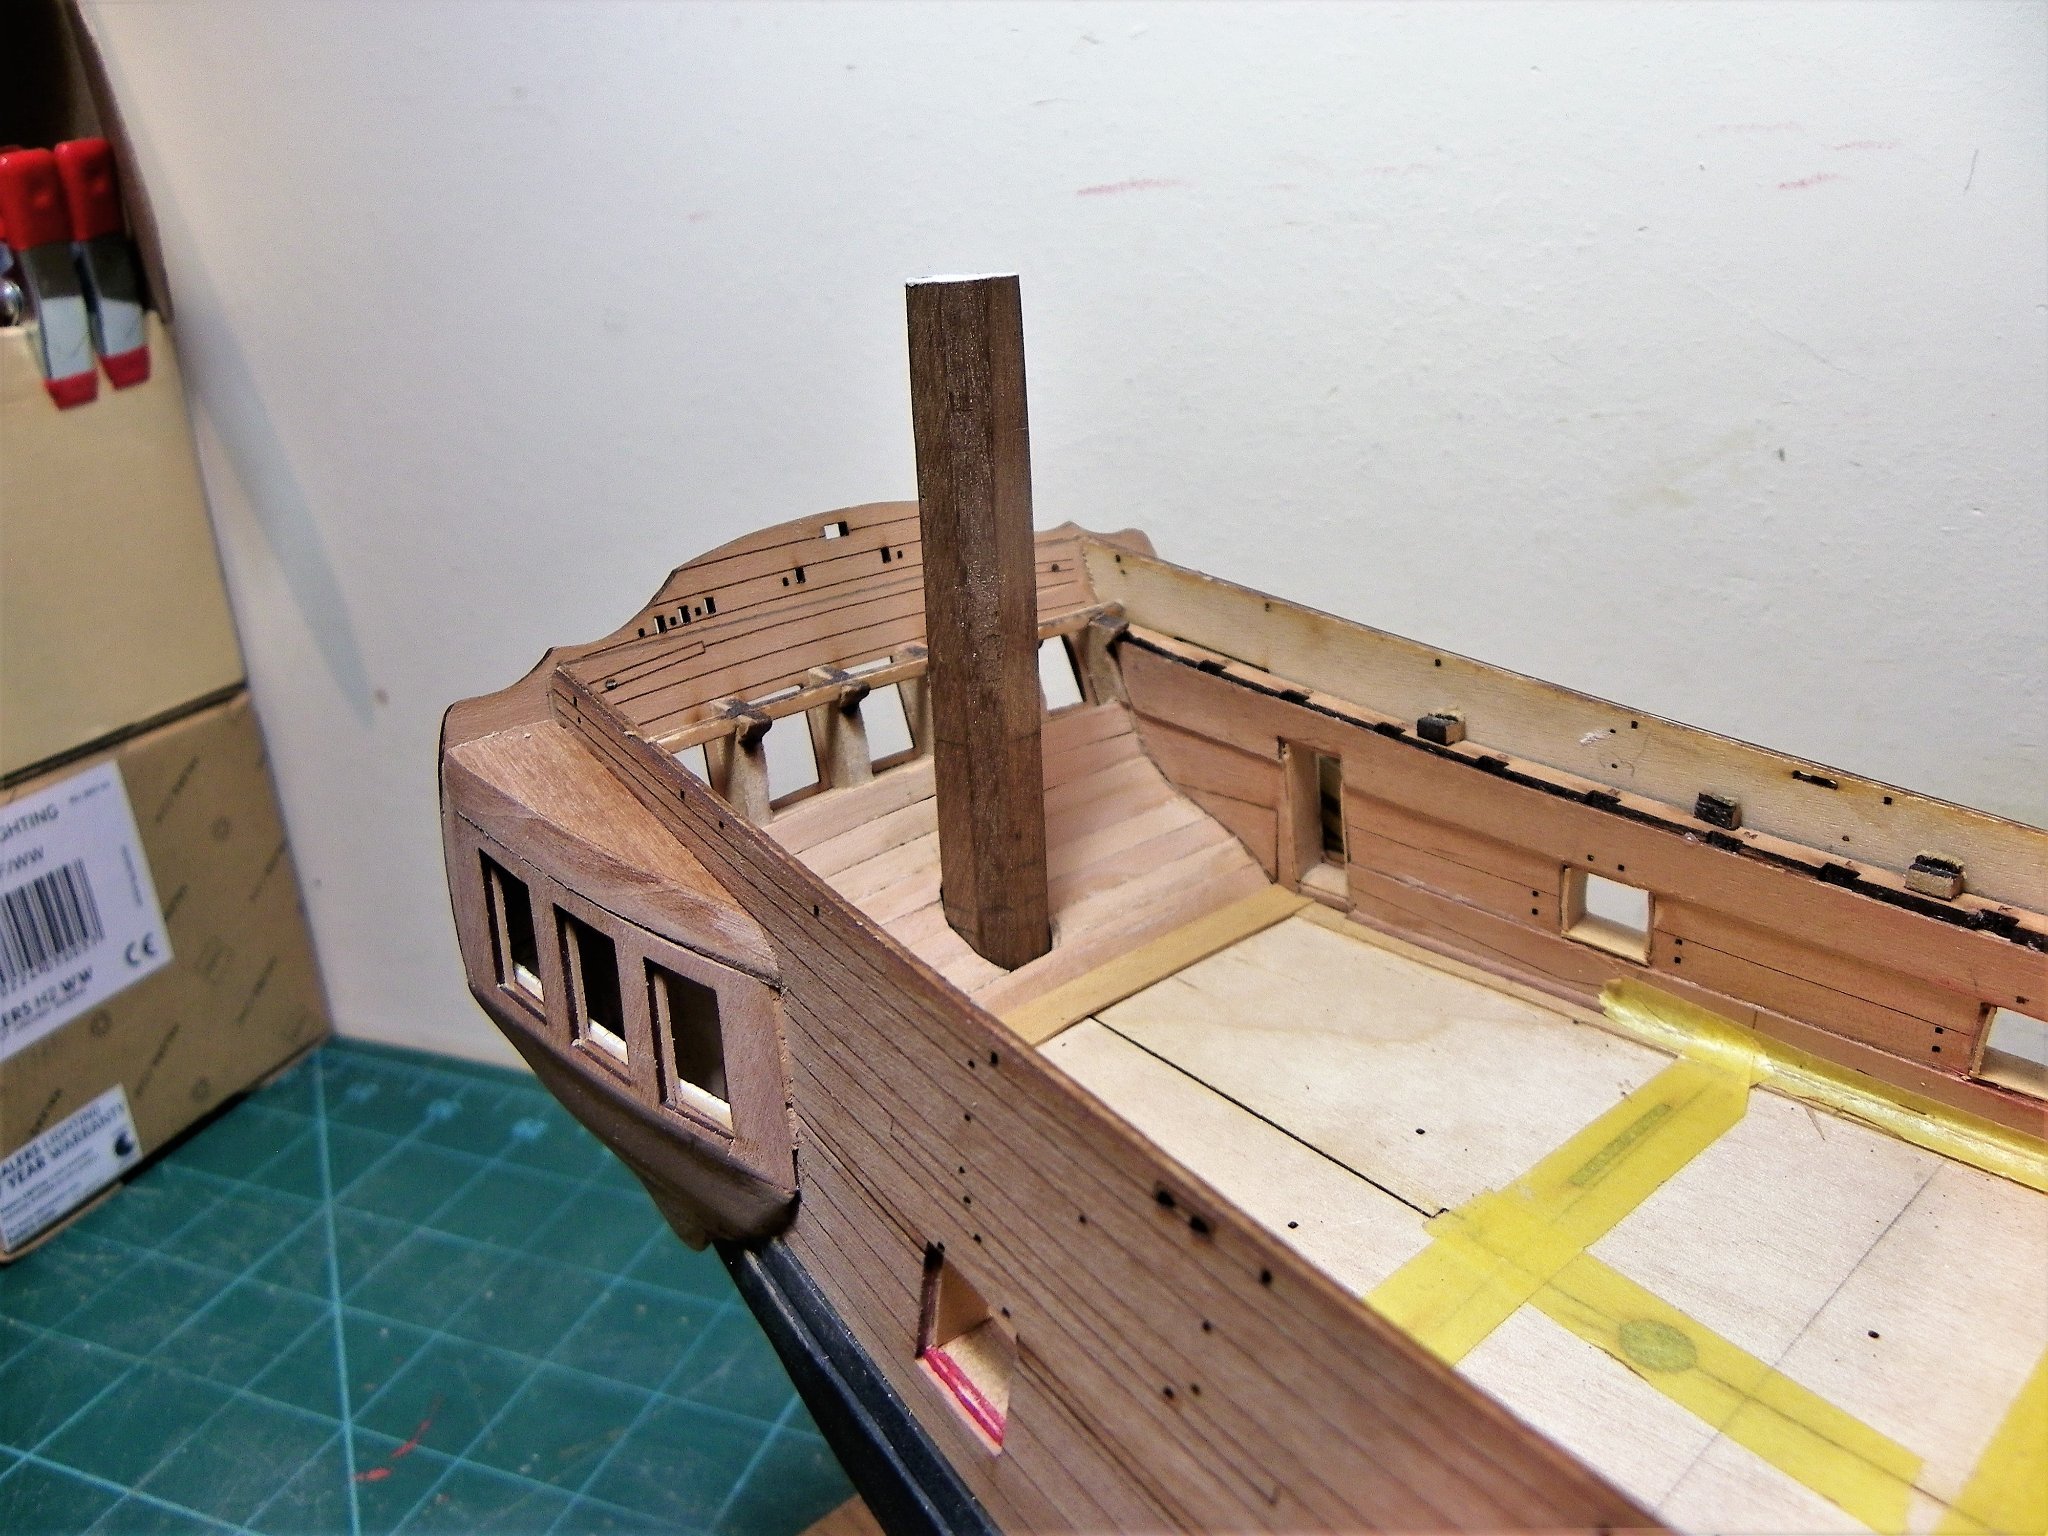
Post Forty-nine Gallery-Part three A seat of ease is constructed using Box and Pear and is fitted to the Portside Gallery. Brian Lavery (Arming and Fitting) suggested that only one gallery was fitted out as a head, the other used for storage and observation of the sails. 1652 1657 1658 I can now fit the top Qtr gallery pattern (45) followed by the outer stern facia pattern. This now protects the somewhat flimsy inner pattern. 1672(2) On the kit version inside the gallery is painted black to hide construction detail. On my open gallery style I have painted the insides Vallejo Ivory which will help light the interior. 1665 At this point I’m not sure about fitting the Upper outer counter pattern as I’m not a fan of the raised etched Name lettering provided in kits. My favoured approach is to use dry-rub lettering which has a more authentic and period look to it. I had a play around (with Chuck’s permission) using the decorative friezes and panels applicable to Winchelsea. 1689 1677 The name was replaced using Photoshop and Paint, only mock-ups at present, and the letter style needs adjusting, but I’m rather drawn to the paper frieze approach. I will return to this much later in the build. The next post will hopefully see completion of the gallery assembly. B.E. 07/12/21

.thumb.JPG.aac88e730a49eeb68b0a80f7848bb332.JPG)

- 857 replies
-
- 19
-
-
-
- Sphinx
- Vanguard Models
- (and 1 more)
-
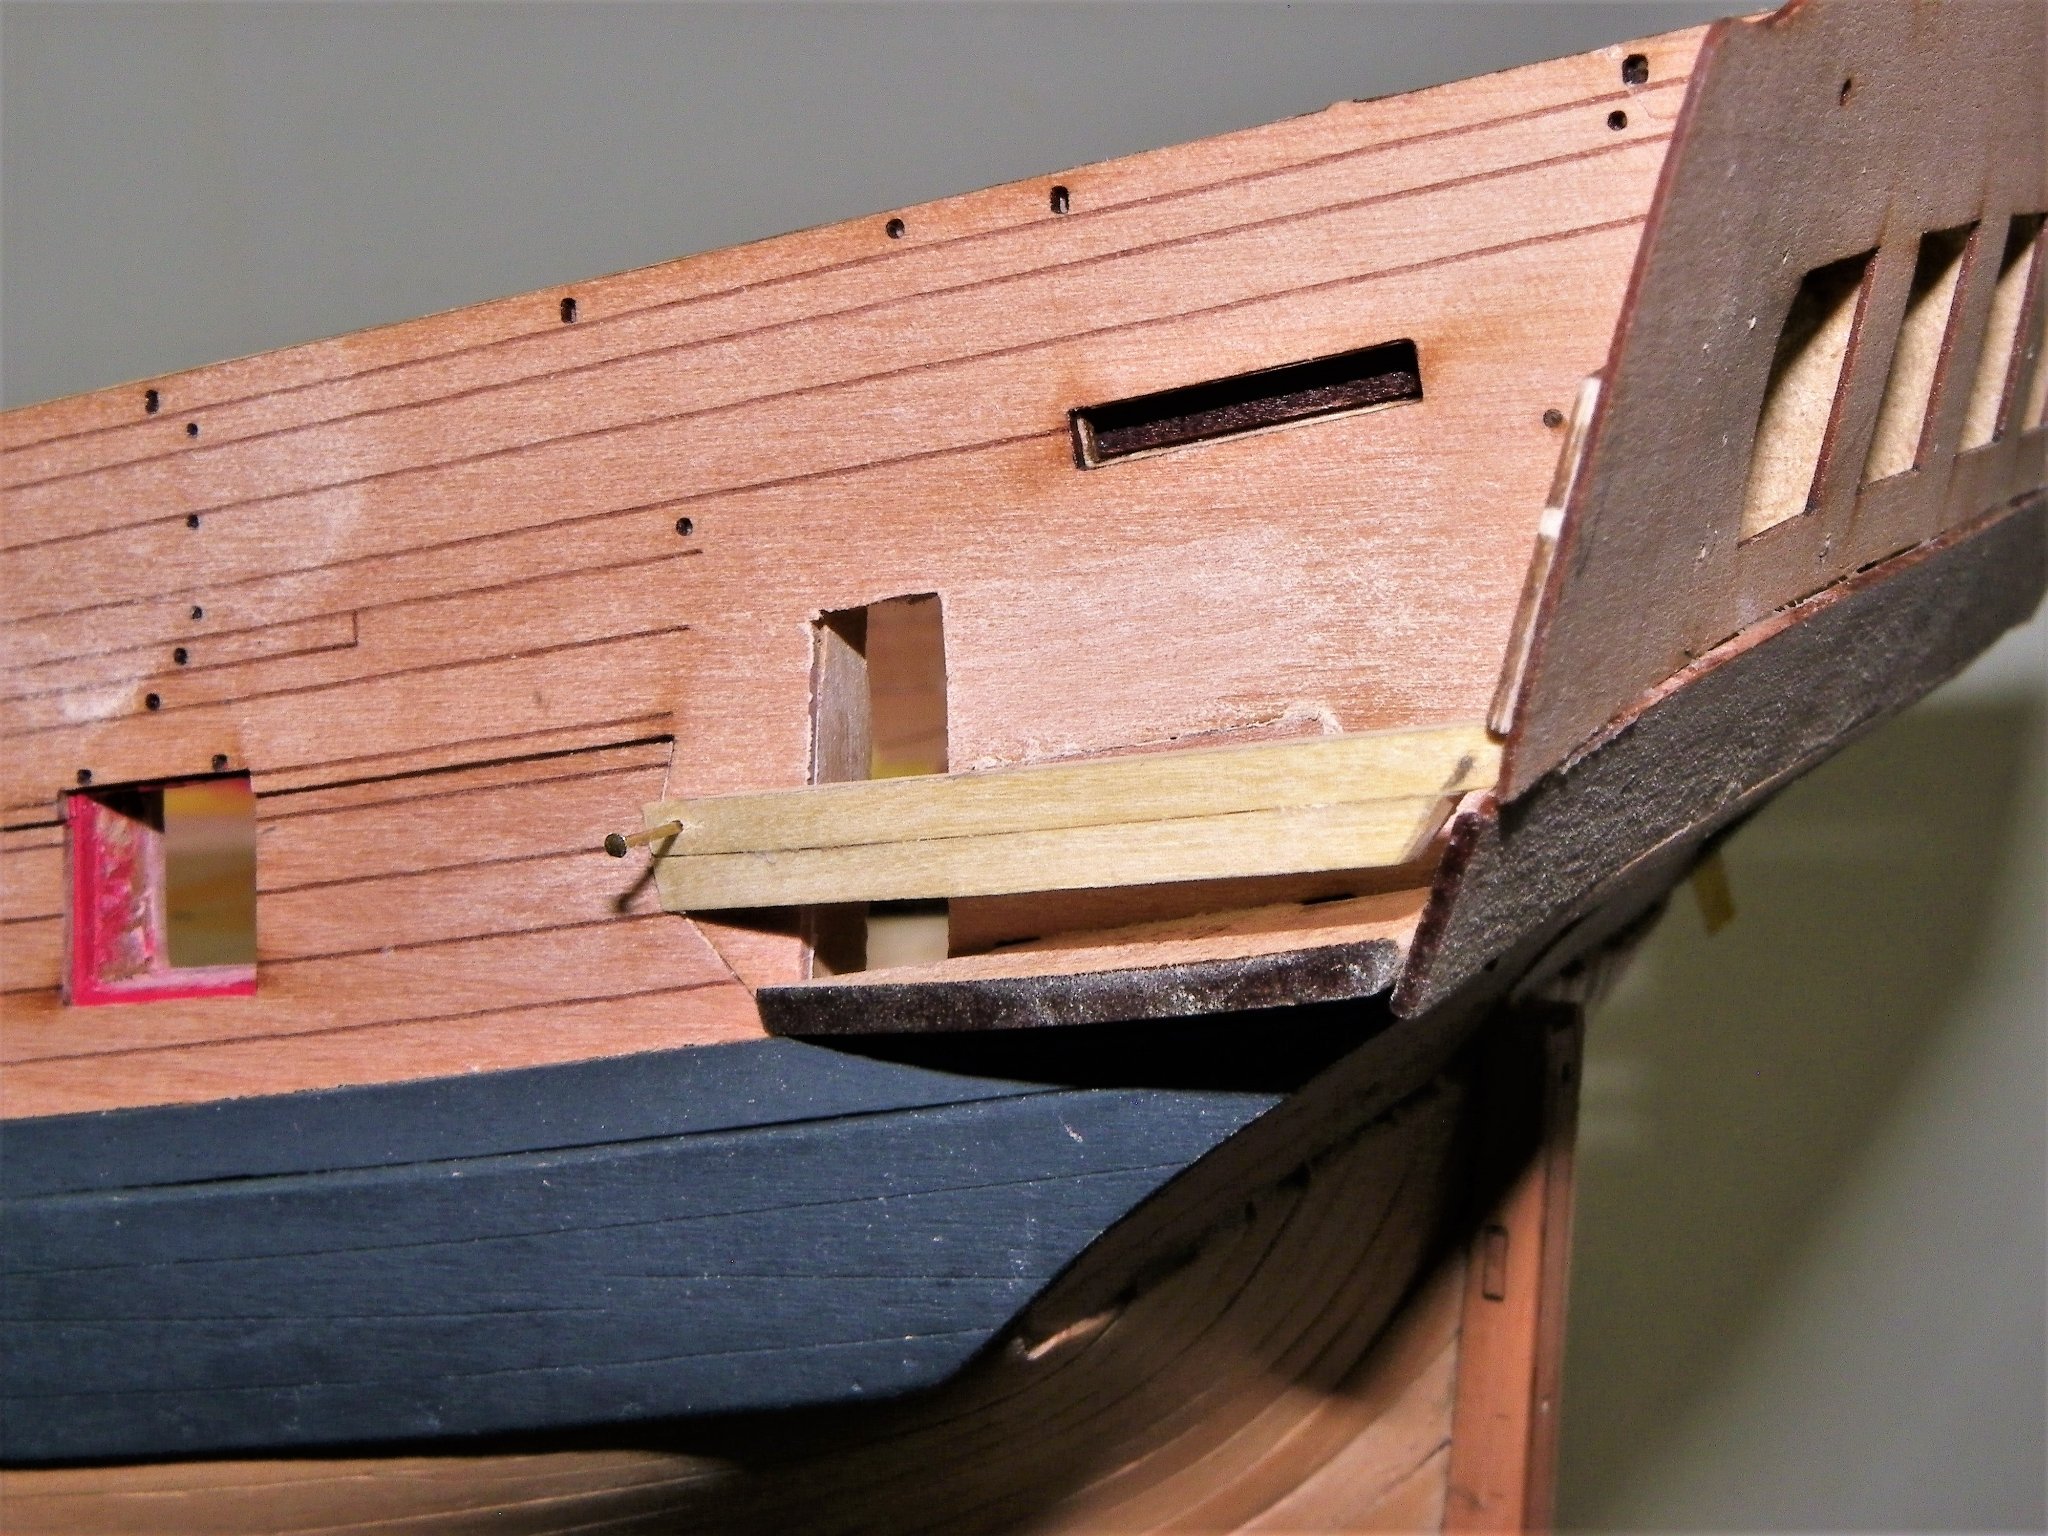
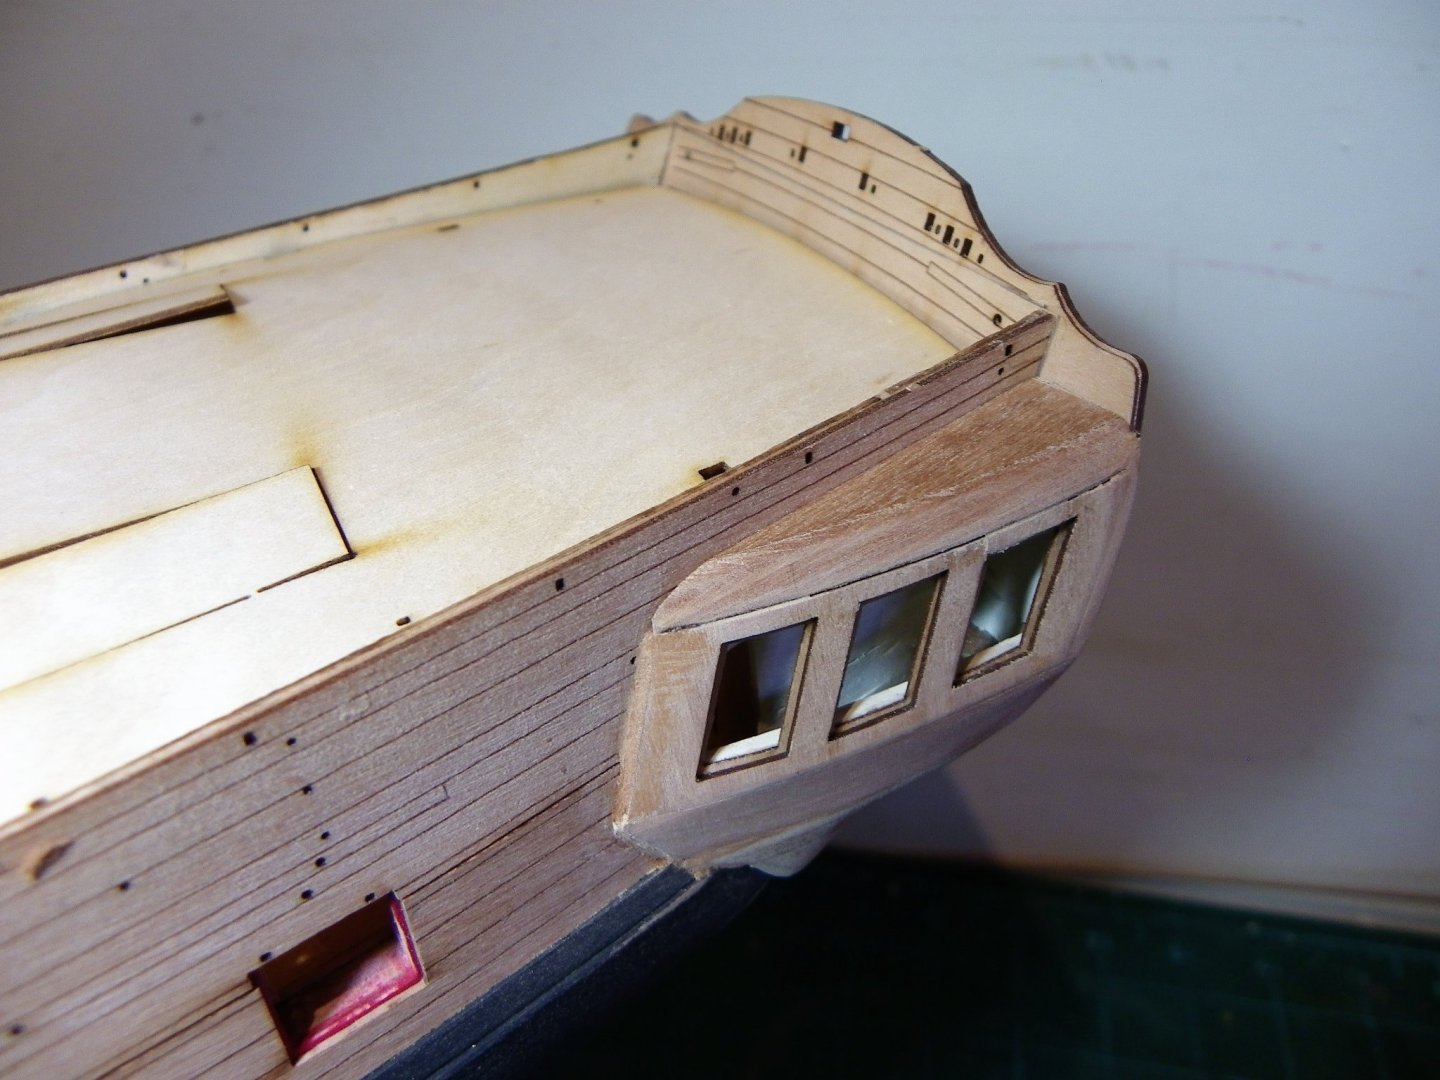
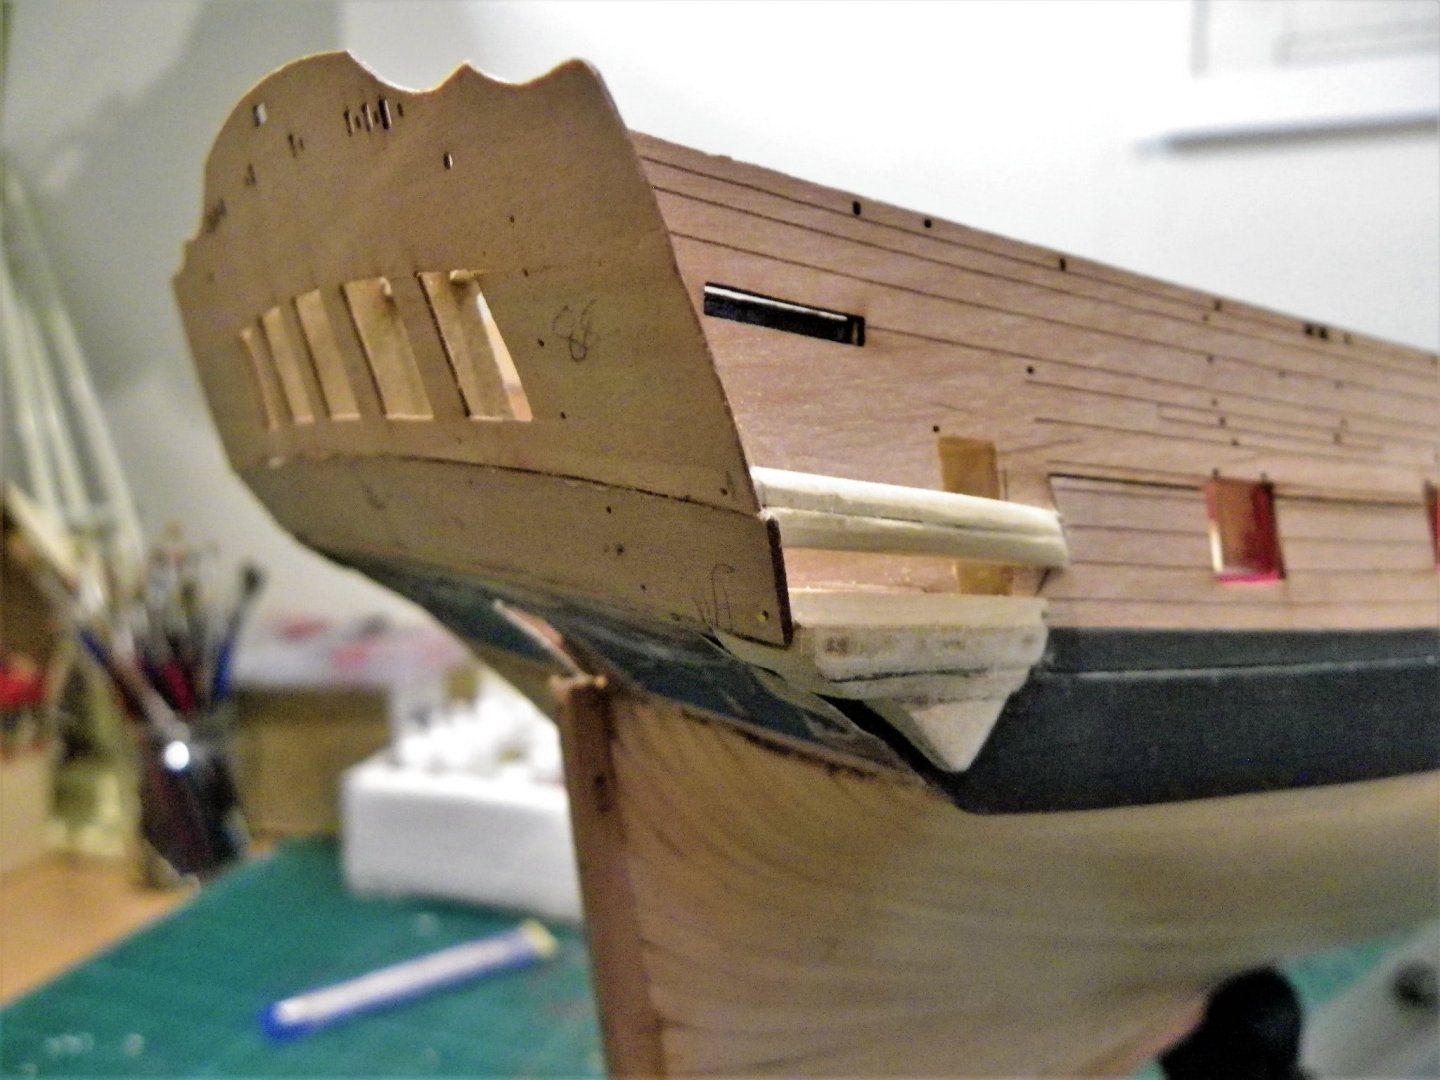
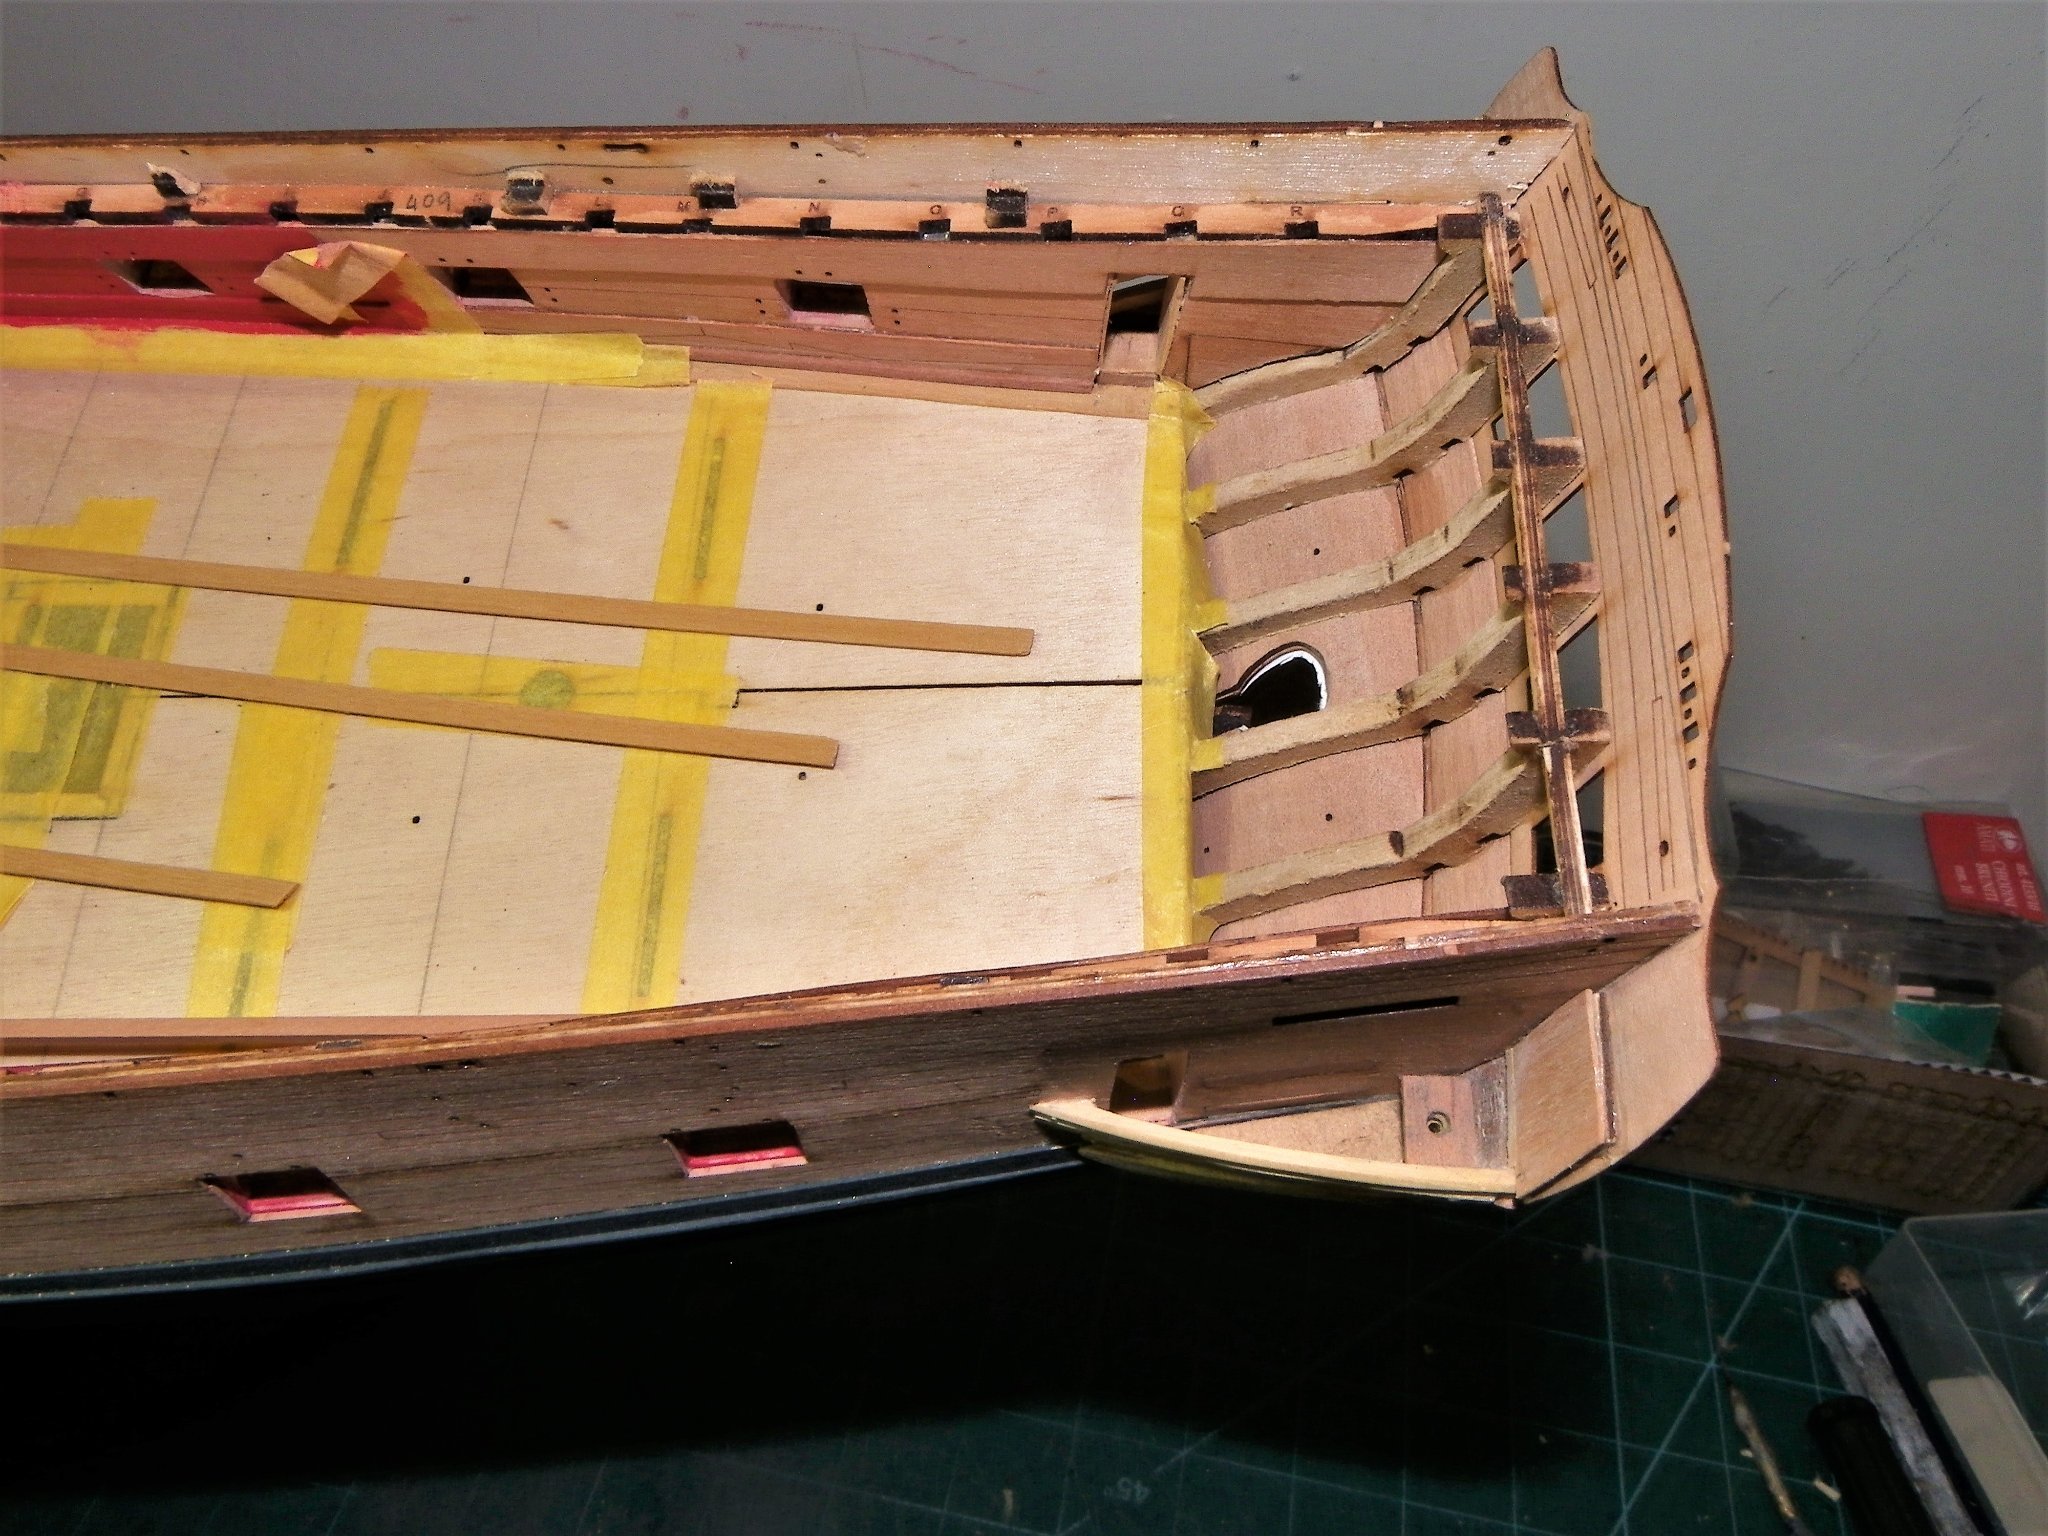
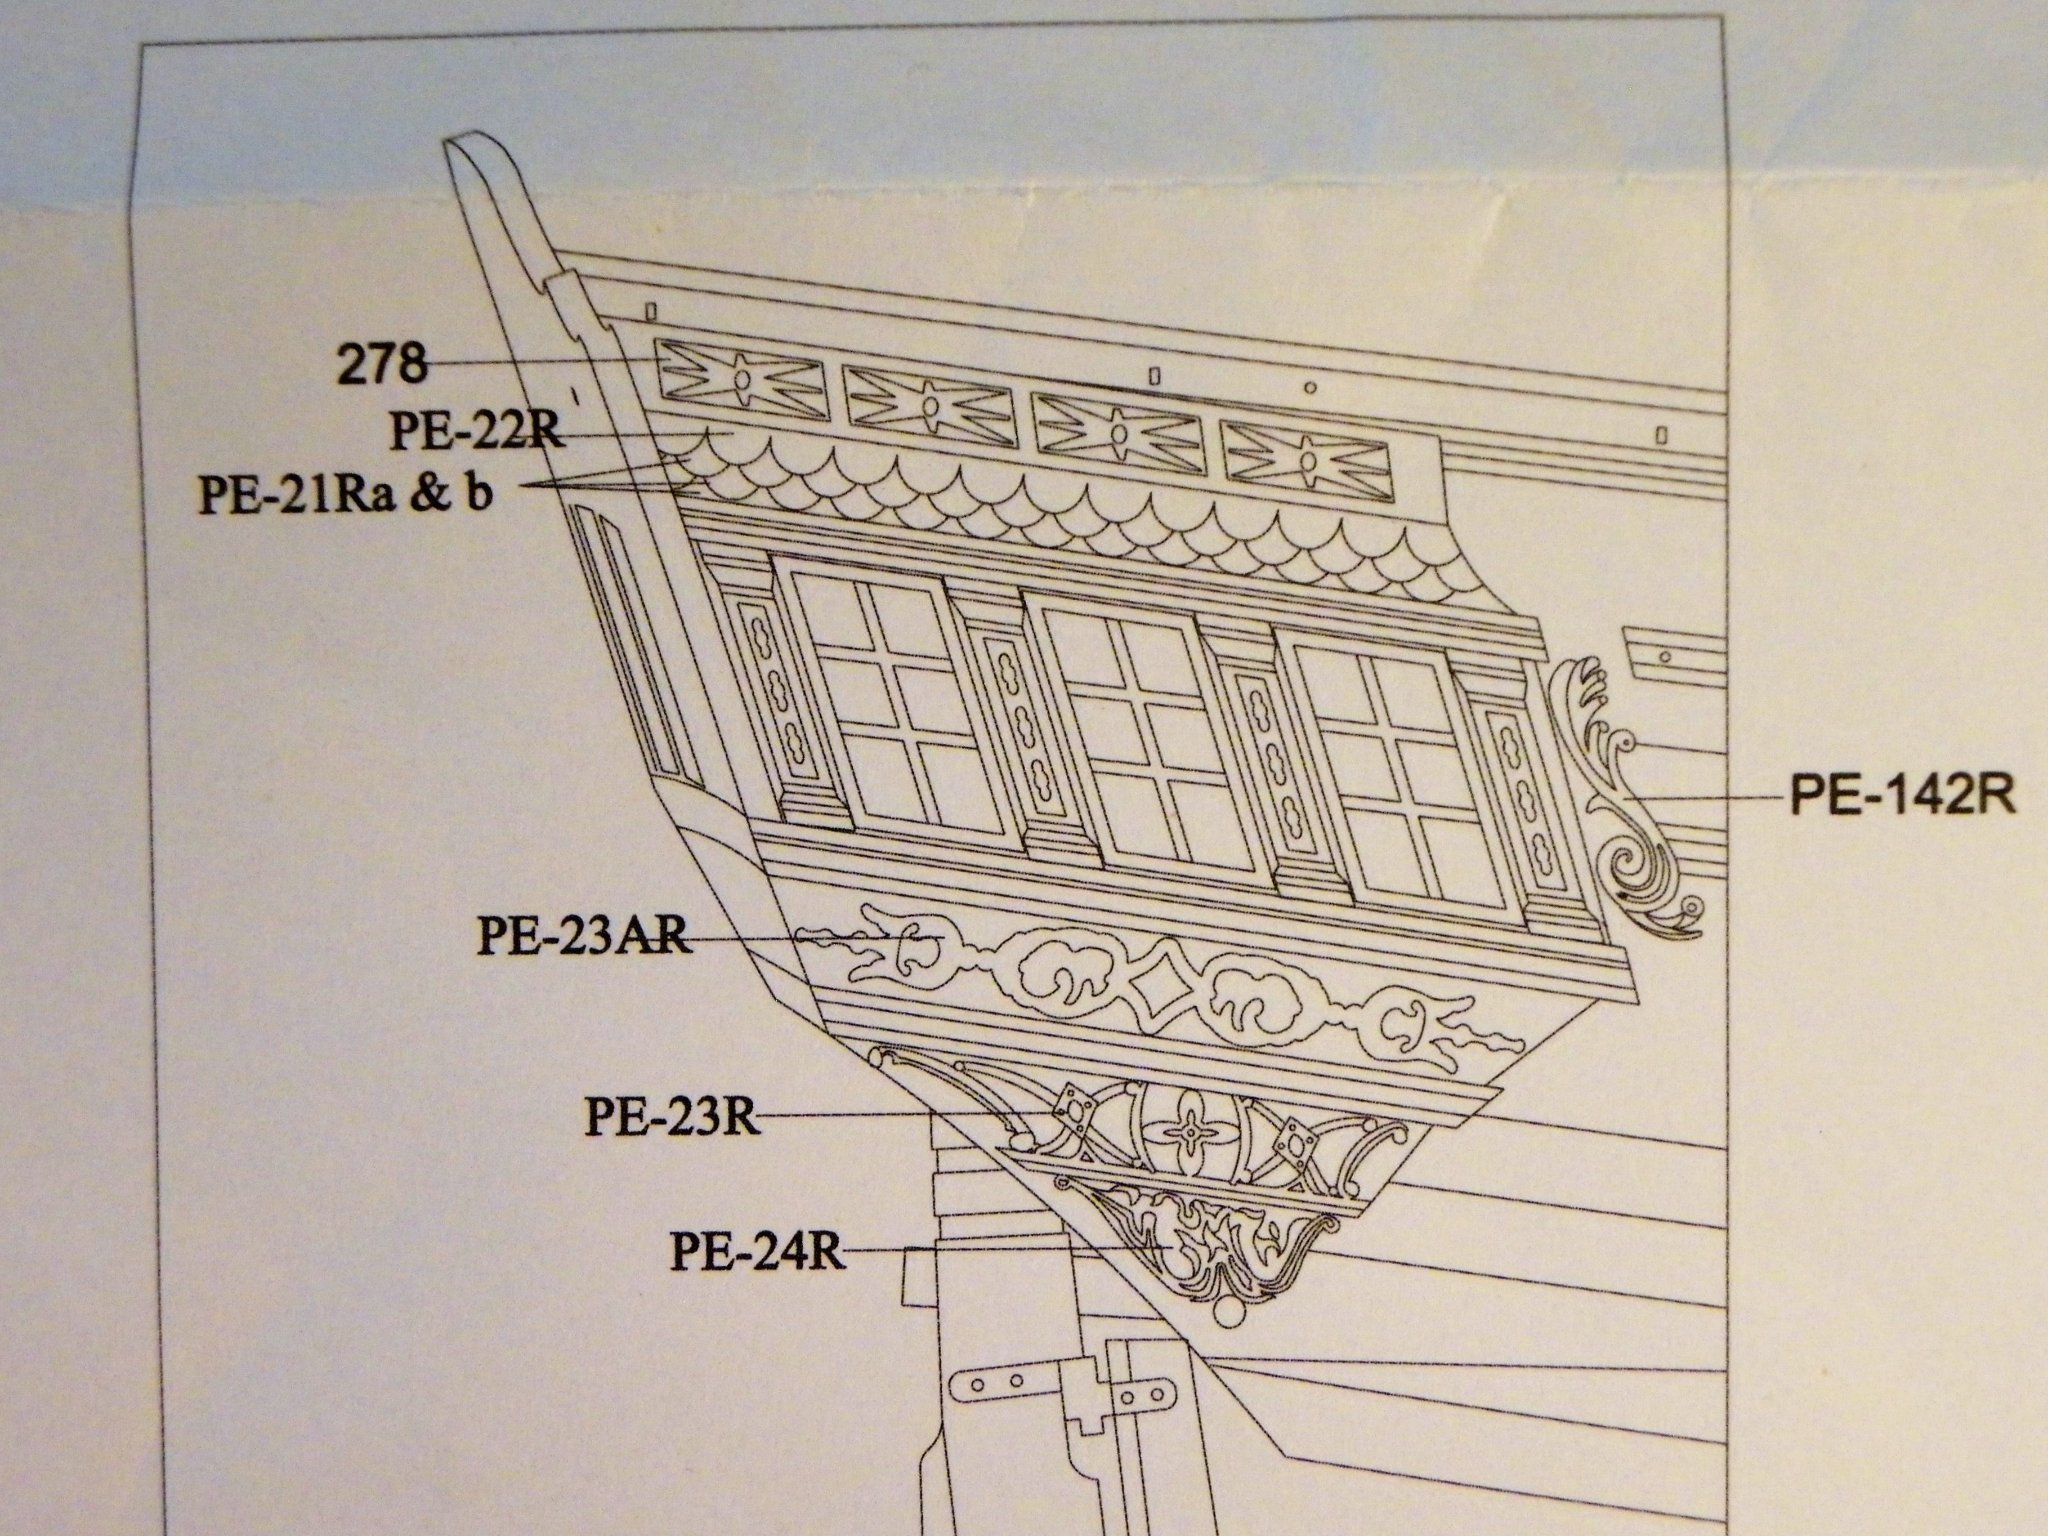
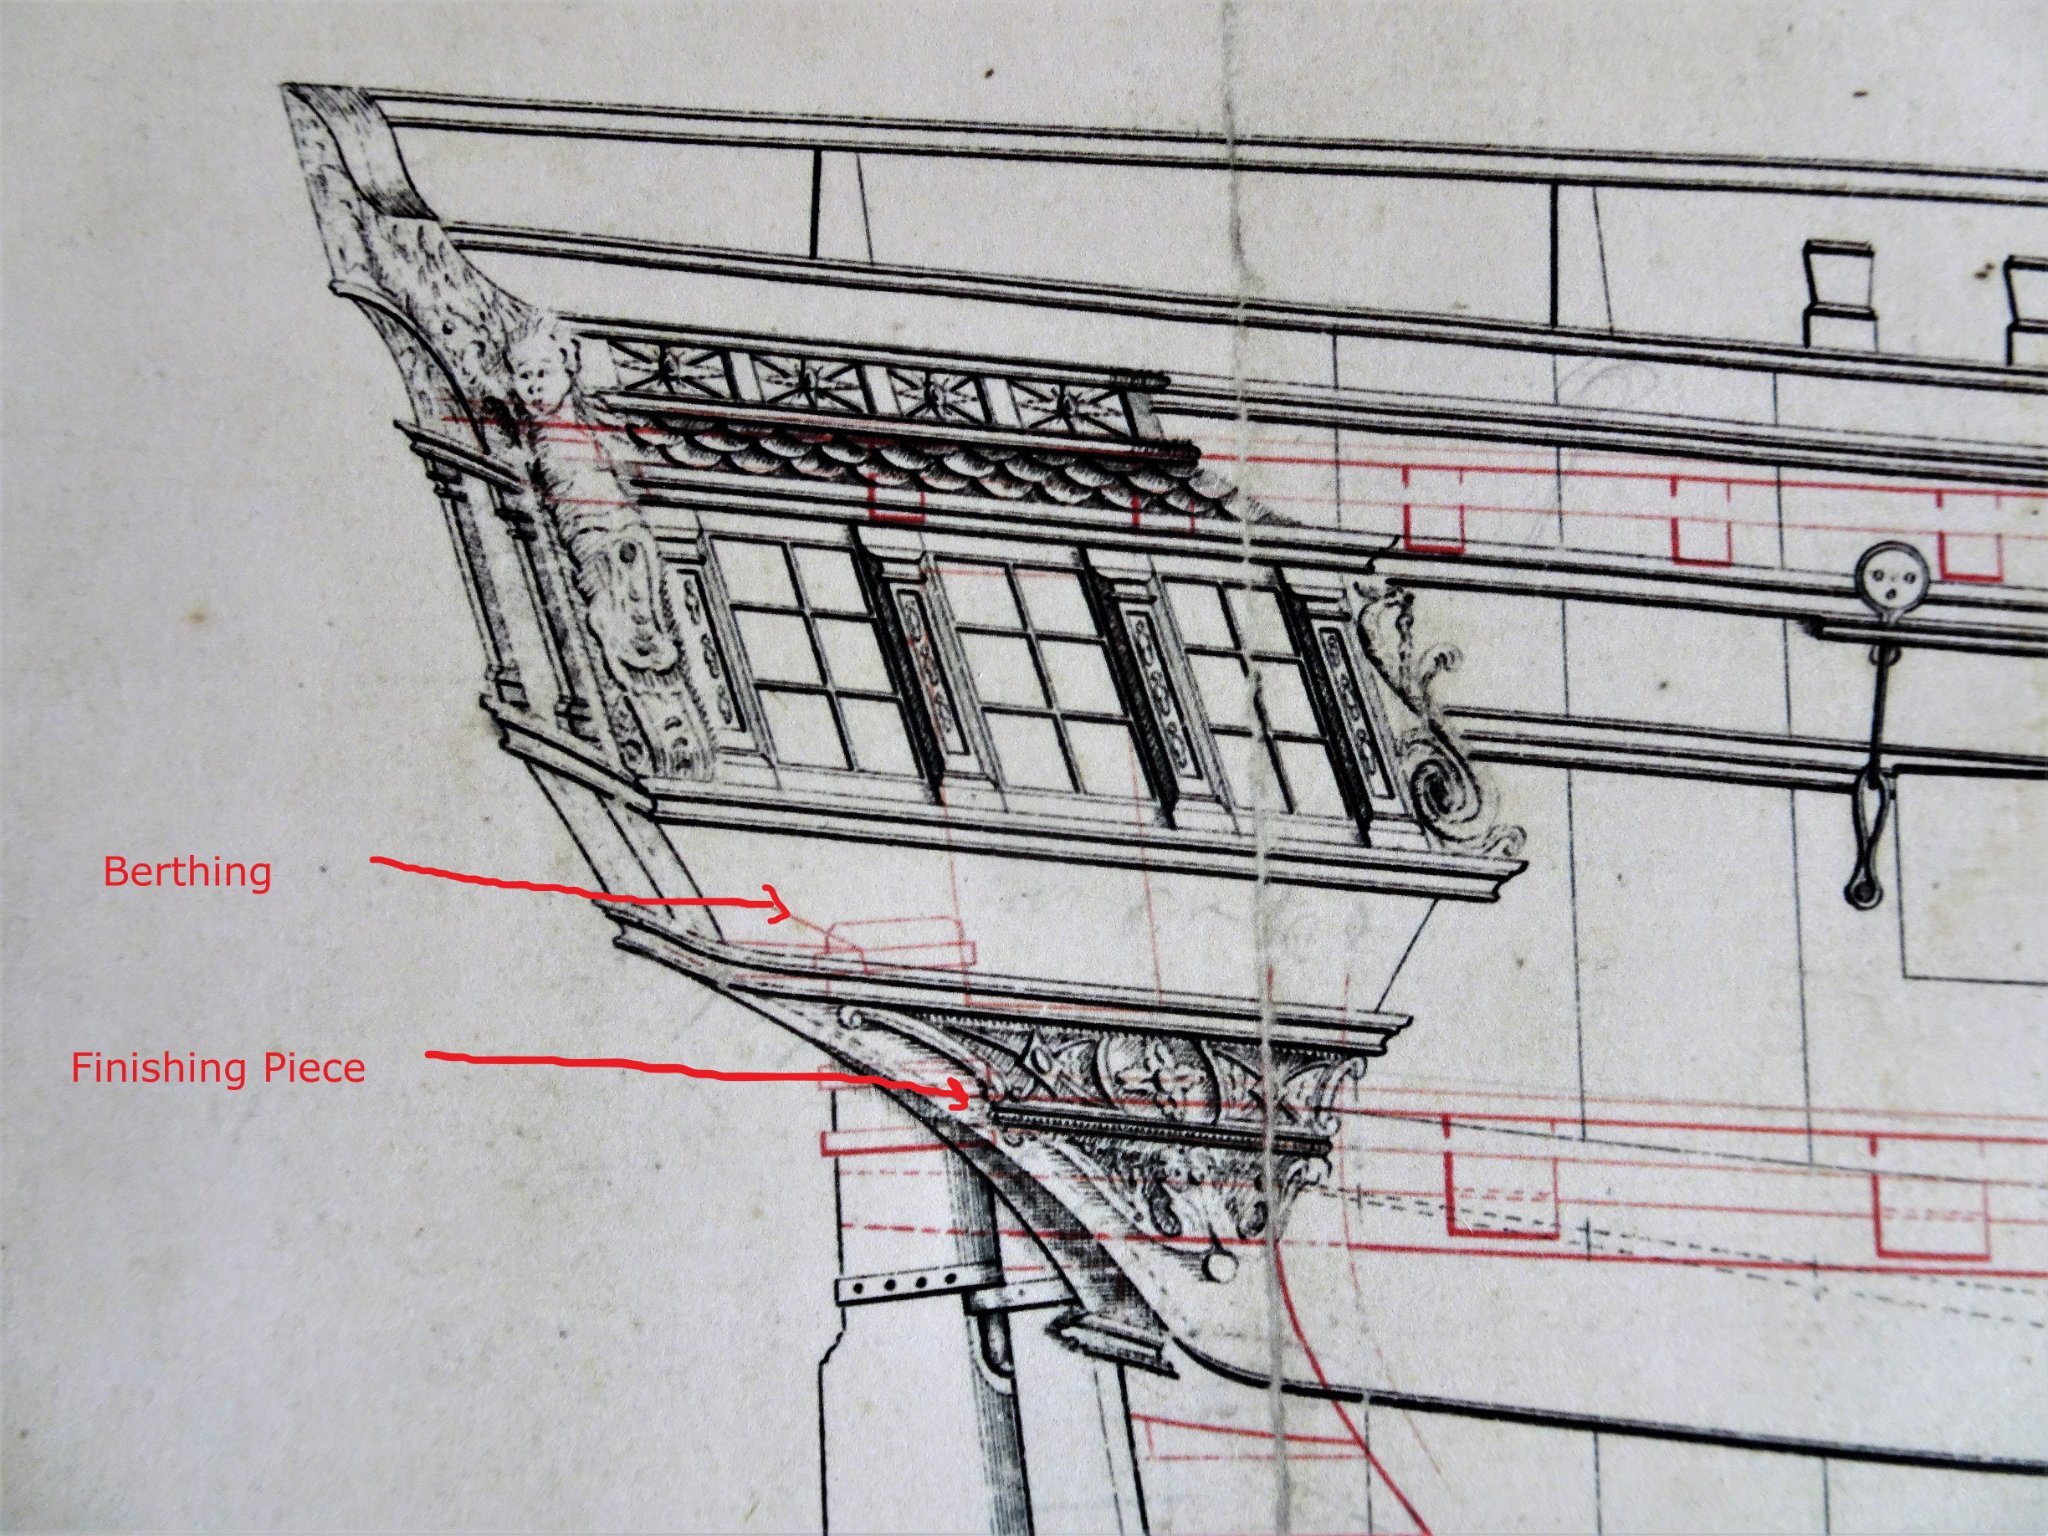
Post Forty-eight Gallery – Part Three At this point I have to attend to forming the Finishing piece. Not an easy task I think with multiple angles and subtle curves. No comforting pre-worked piece from Chris here unless you include the blocky patterns that make up the piece. On this detail from the original Admiralty plans the finishing piece sits just forward of the wale end with the forward edge following the angle line of the Berthing. 1586 Gallery detail from the beautifully drawn plans by Chris Watton. 1601 Part 29 which is the top of the finishing piece is effectively the floor of the gallery so a frame is required to sit atop this to replace part 45a as the bottom fixing point for the Berthing pattern. Confused yet? I know I am.🤔 A Boxwood frame is made to replace part 45a. 1591a The frame is pinned and glued into place. The block Finishing piece is held in place tight against the part 45a frame to ensure a good fit. Shaping of the Finishing piece can now begin A bit tricky deciding where to start with the shaping, and how to hold it during shaping. As it happens I didn’t find it too difficult on either count. The blurb indicates leaving the back edge of the piece untapered, sanding the forward part to a fine edge. The back edge needs to be bevelled downwards to follow the aft edge concave curve of the wale. I start by sanding the back edge of the piece to match the aft curve of the wale. Fortunately the mdf is soft so is easy to form. The biggest danger is getting too enthusiastic and take too much off or damage the shape. Soft hands, small strokes, and constant fit checks are the order of the day. 1619(2) 1608(2) Shaping in progress. This is one of those tasks that is difficult to describe, but hopefully as you get into it you start to see the shape emerging and get an appreciation of where to go. 1634 1631 1627 The Finishing pieces are glued to the hull and frame 45a. The final finishing of these pieces will be done once the Berthing pattern is in place. A seat of ease will now be added to the Portside gallery. B.E. 06/12/21


.thumb.JPG.5f37c0063353d20990fe3eedac208626.JPG)
.thumb.JPG.c3ec717e5294bd00f520577a94e83693.JPG)


- 857 replies
-
- 19
-
-
- Sphinx
- Vanguard Models
- (and 1 more)
-
Intriguing, a two masted Sloop, pre 1750 by the double wales, 12 guns, I'd take a punt at Speedwell. B.E.
- 1,784 replies
-
- 5
-
-
- winchelsea
- Syren Ship Model Company
- (and 1 more)
-
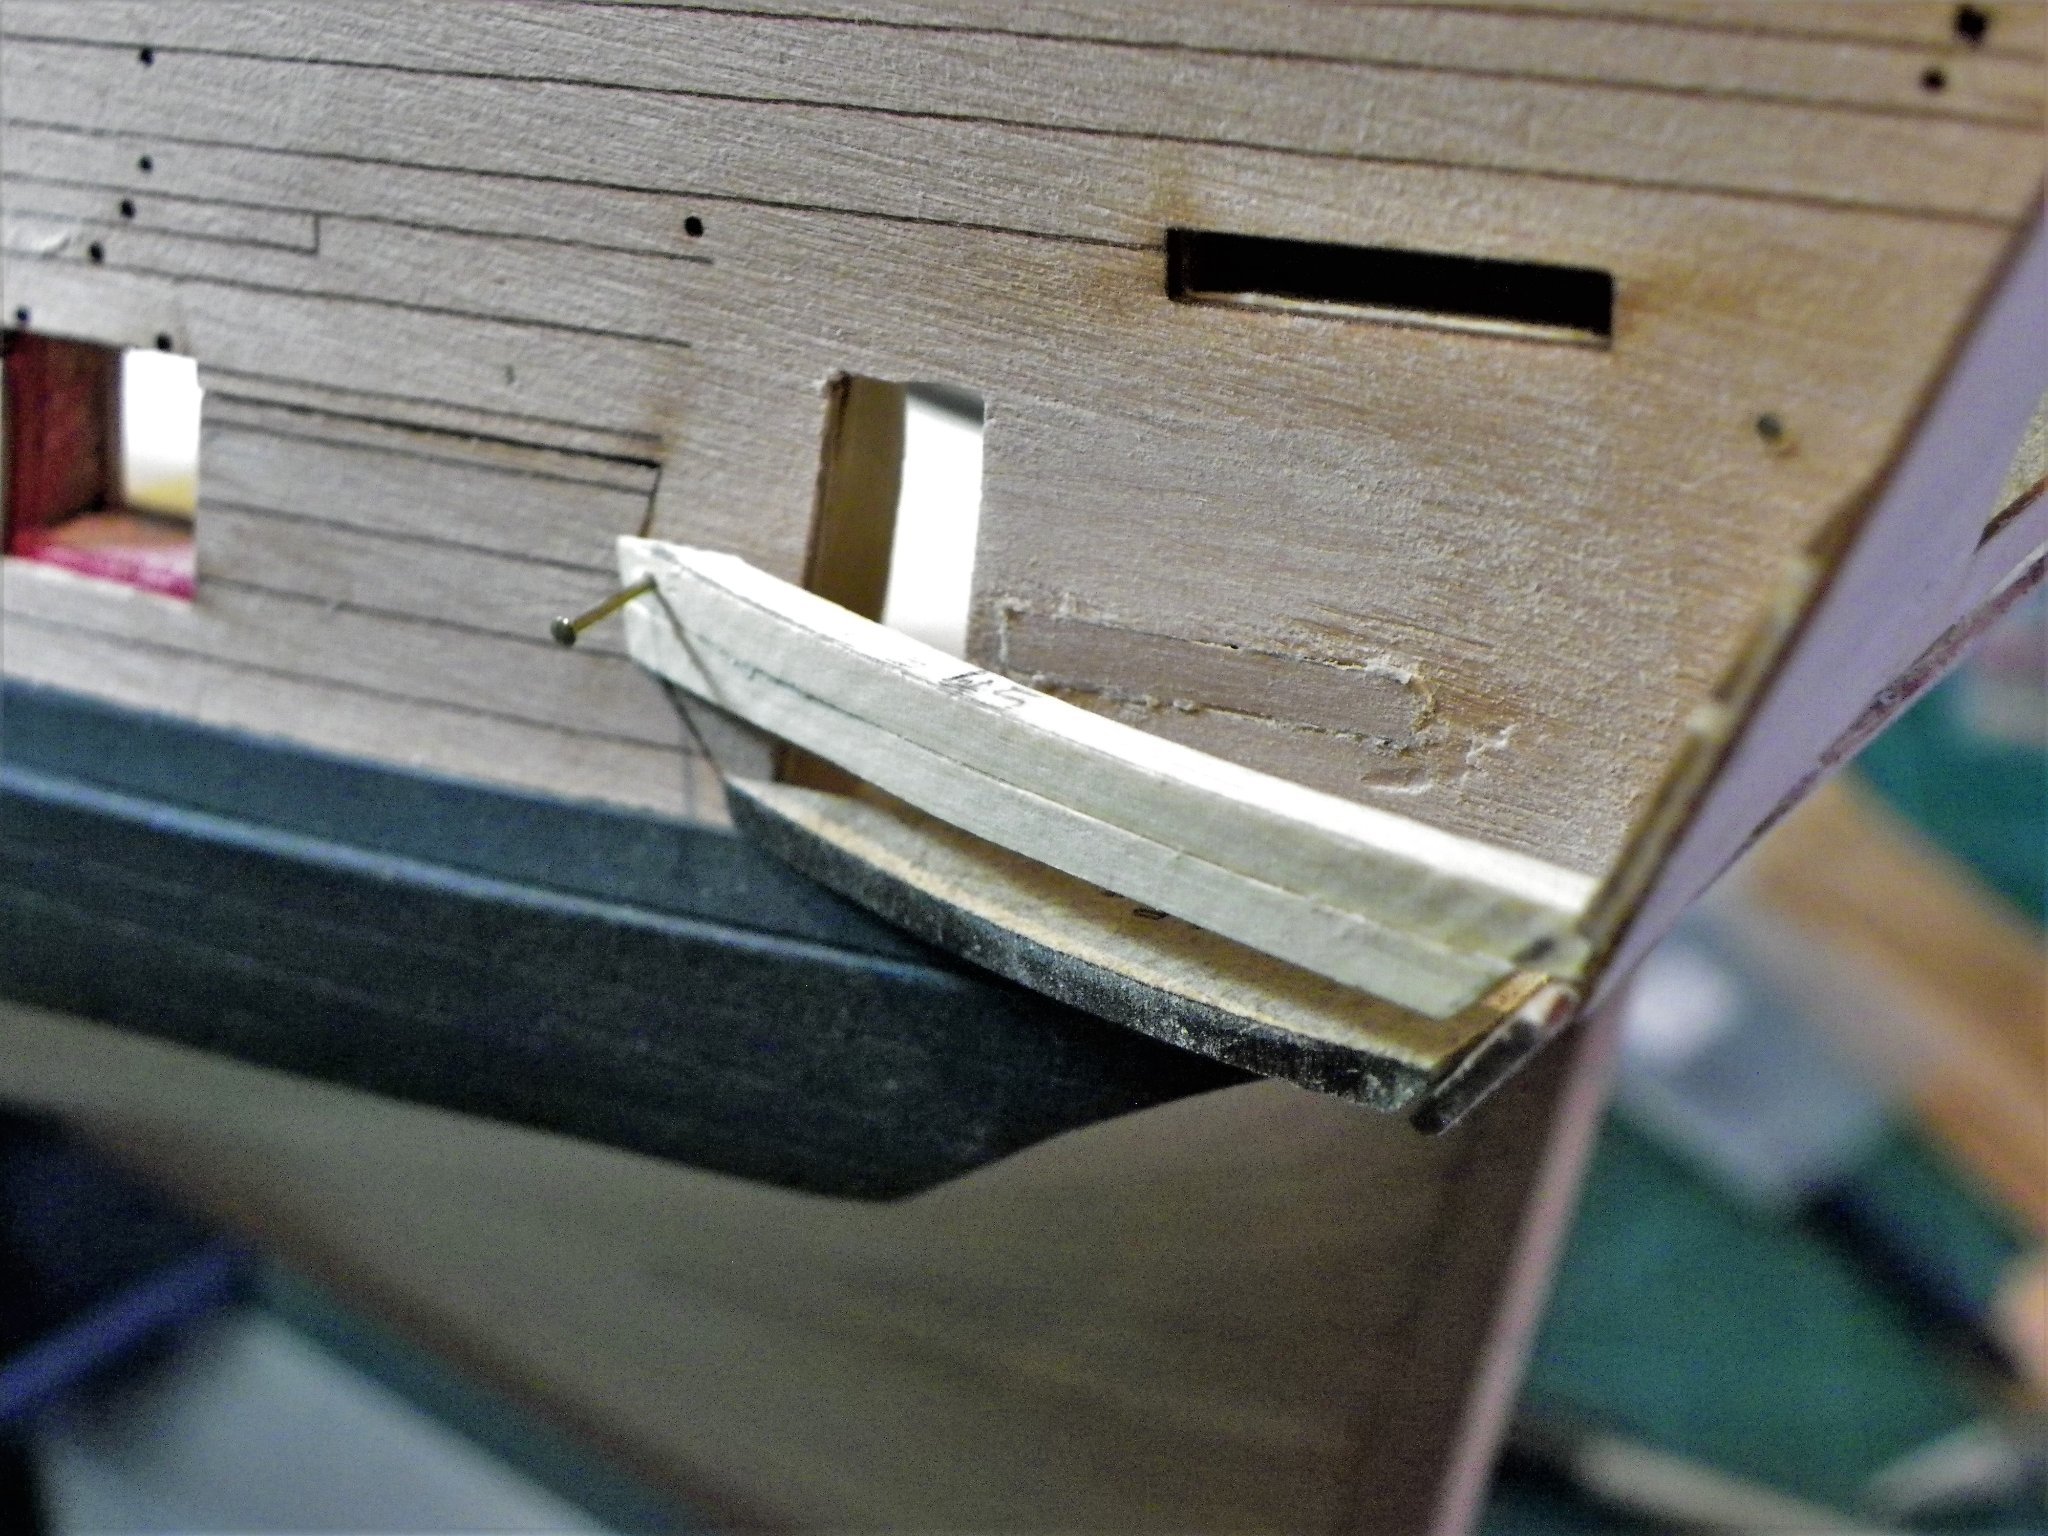
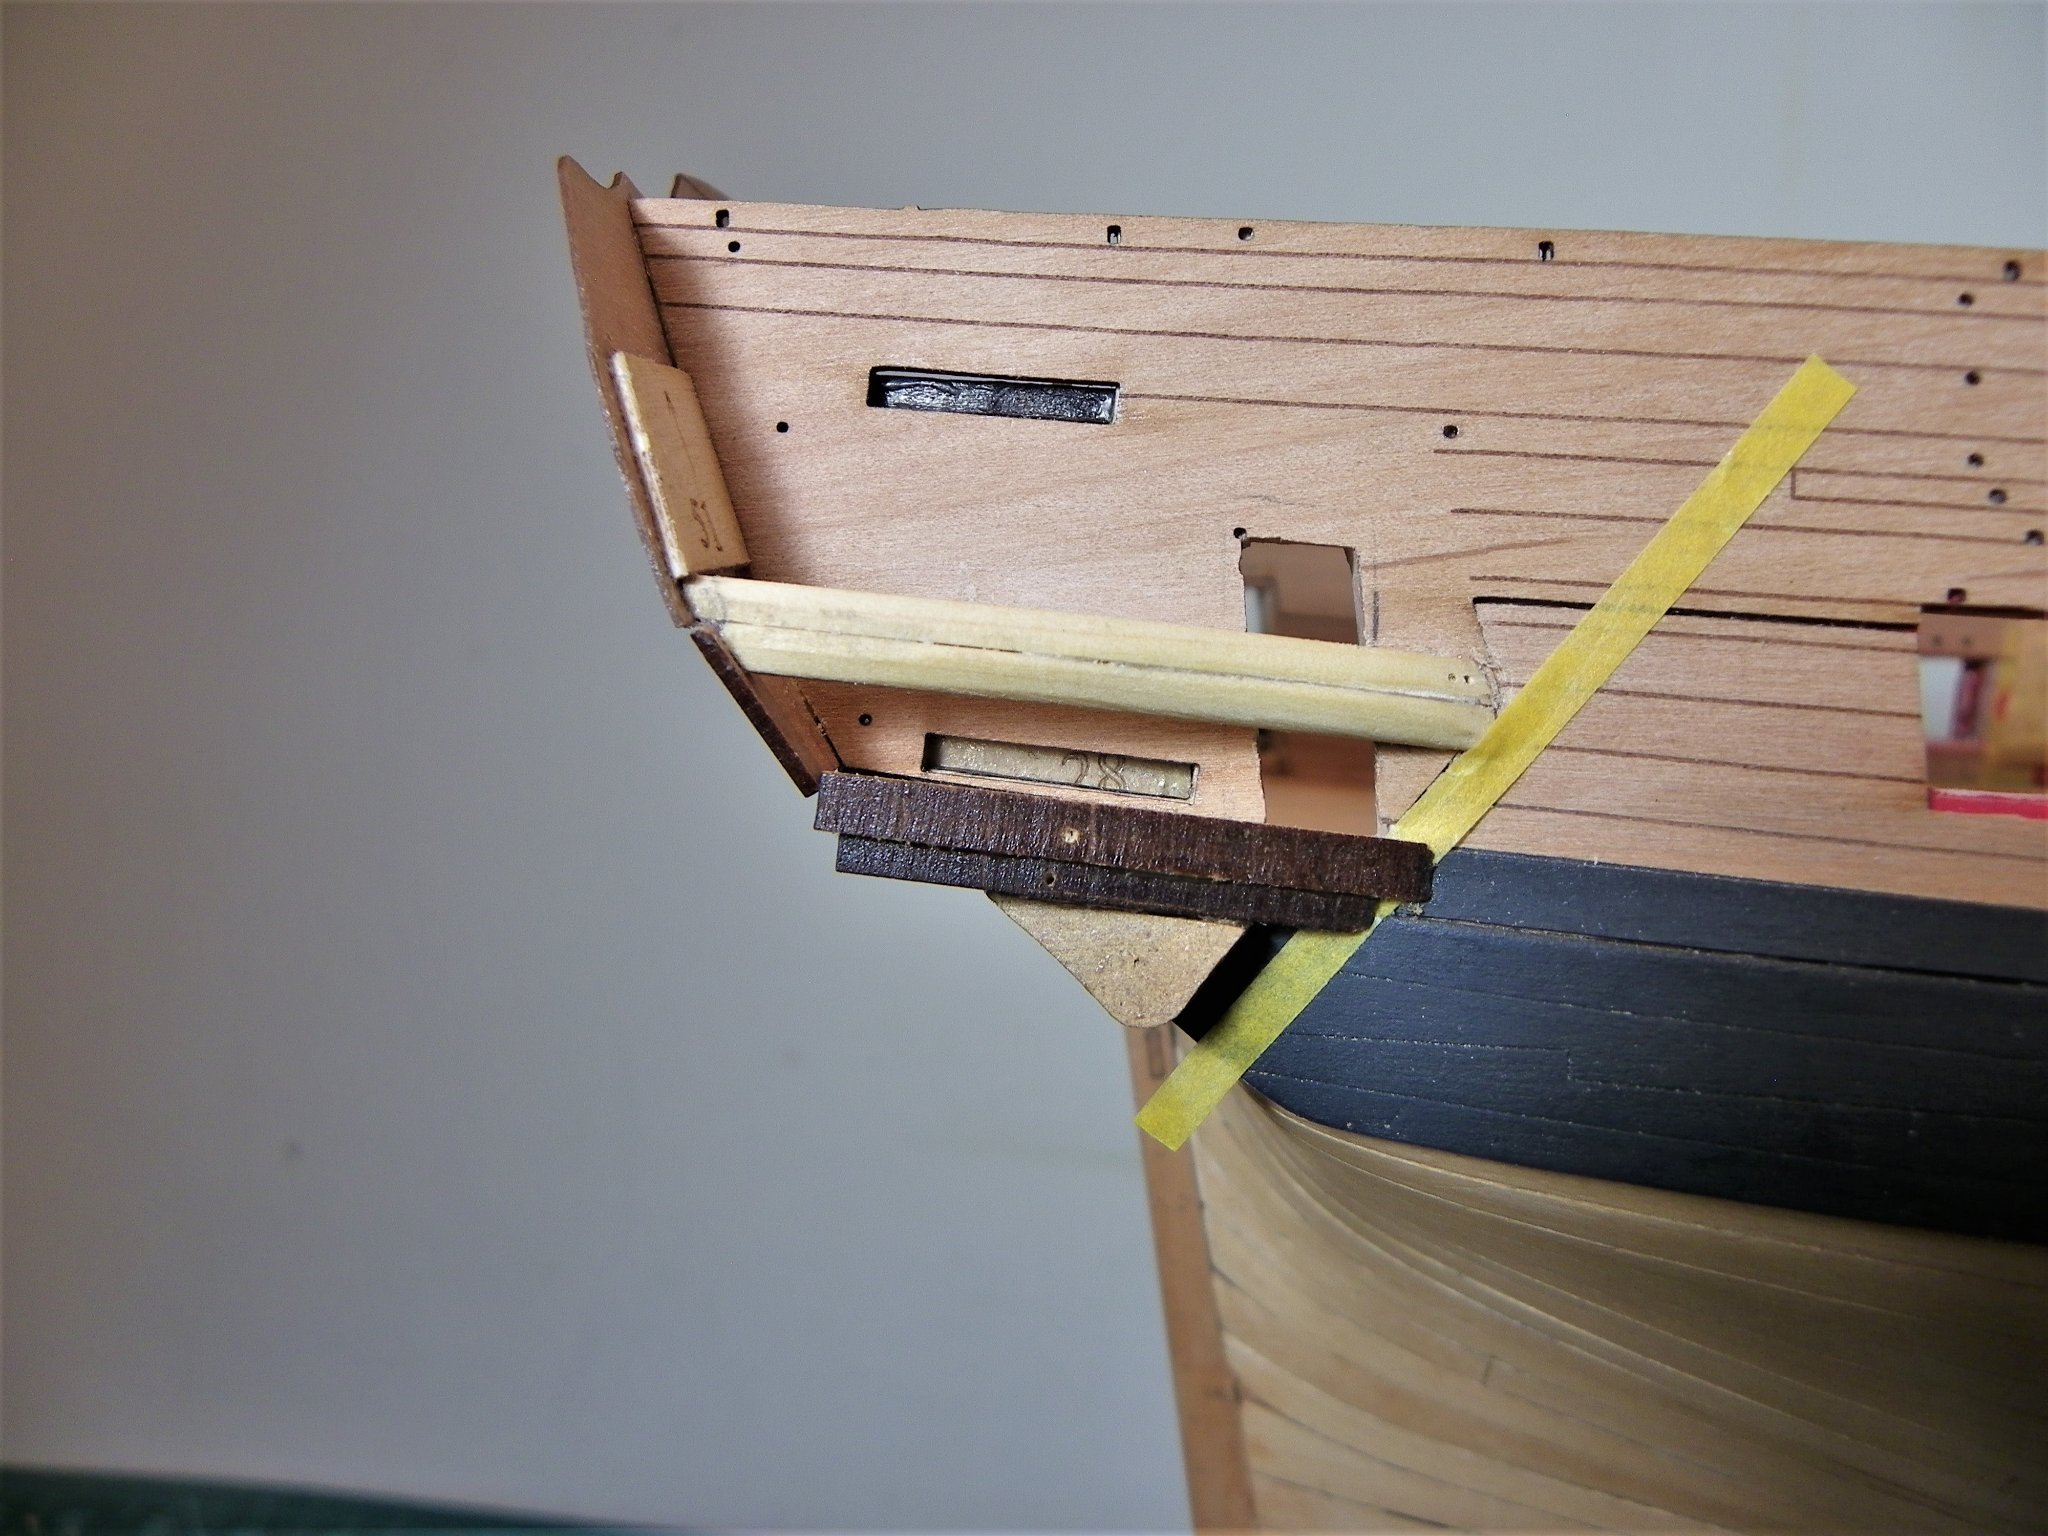
Post Forty-seven Gallery -Part Two I have replaced the middle gallery pattern (Part45) with a replacement Boxwood Frame. 1528 The lower pattern (45a) and its lower slot sits too high to represent what would be the floor of the gallery so this too will need modification at some point. The problem is compounded by the later insertion of another filler piece (45c) between the middle and lower parts 45 and 45a which would block off the gallery opening below the window level. Parts 45c and 45a provide the formers against which the berthing pattern (159) is glued below the window pattern. I concluded the issue could be resolved by doubling the depth of the middle frame to incorporate what would be part 45c. A frame was cut to match Part 45c which was glued to Frame 45. 1561 The combination frames pinned into place. 1565 The part 45a as shown here will not be fitted. 1573 Before fitting, the frames will require bevelling to suit the fit of the Gallery window pattern and Berthing pattern. 1570 To create a gallery in this style effectively means working from middle/bottom up rather than middle/top down as per the kit instructions. Fitting a seat of ease is required to be done before I fit the gallery window pieces and gallery top, but after the finishing piece is installed, as this will provide the floor. Any painting/varnishing of the gallery interior will also need to be done at this point. The finishing piece comprises four parts (29,45b,46) 1580 To assemble the finishing piece I used double sided tape to secure part 29 to the hull, it effectively runs along the top of the Black strake below part 45a the slot for which can be seen. The other parts were glued to part 29 insitu on the hull. The lowest part of the finishing piece follows the angle as indicated by the yellow tape. 1558(2) Finishing piece assembly, Starboard side. Note the angle of the two lower pieces(46) of this assembly. Shaping and fitting these will be the next task. B.E. 04/12/21

.thumb.JPG.789fa7c492e47eed852f815159e2181d.JPG)


- 857 replies
-
- 23
-
-
- Sphinx
- Vanguard Models
- (and 1 more)


.JPG.38803490b18c9d56ba475dcb1afdfa1e.JPG)


.JPG.1f2e0fadf825c78abd5e75e4872bba99.JPG)

.JPG.9e2263e2eab5960fc72517d7685a5b71.JPG)

.JPG.2e26ad0657a8394fcd7ac16d5c5dcd4d.JPG)
.JPG.64fe1ae38f77b8a1b6d0a6f2083adaad.JPG)
.JPG.3e857c2f89fe3540ca88ba38f081b3a6.JPG)
.JPG.5b085a9c2df75d851d914cd31ae06329.JPG)


.JPG.35216e035a2f3a0ff73f82f534399dc9.JPG)

.JPG.a8da7d8b05e5556cbfcd9be13fb19b4a.JPG)


.JPG.8ab8de6965c0157b124be1e871f68f22.JPG)
.JPG.f1e102d73dc6c4c313a453fb0184311f.JPG)


.JPG.4f07a88fd9bf7aa8ca00dbc266ed5be8.JPG)