


SawdustDave
-
Posts
1,770 -
Joined
-
Last visited
Content Type
Profiles
Forums
Gallery
Events
Posts posted by SawdustDave
-
-
-
-
Here's a little tip that may be helpful to anyone faced with trying to get a strong "butt-joint" of two really thin planks.
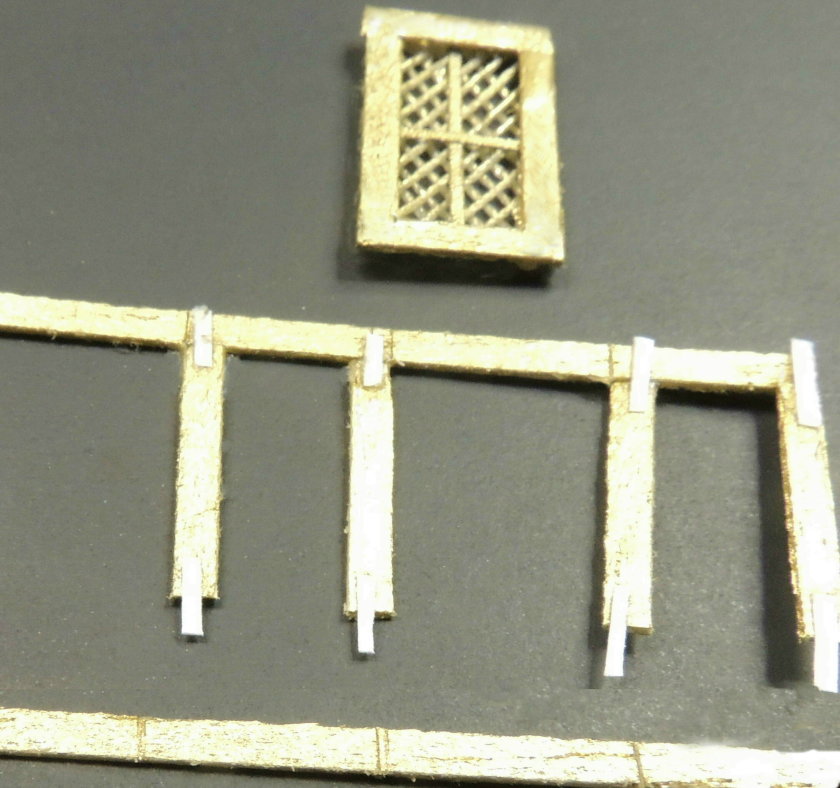
The lantern housing is an octagon shaped fixture with window units on each of the eight sides. Each window frame must be very precise in height and width, and is constructed of planks less than 1/2cm thick.
The biggest problem is the butt-joints. I simply glue a small paper tab to the end of each of the side rails.

Note: The top and bottom planks have been carefully marked to insure exact spacing of the side pieces. They will be cut into individual units after the side pieces have been carefully aligned and glued.
- GLakie, Ryland Craze, mtaylor and 9 others
-
 12
12
-
I received a question about the shape of the beak cross members..... it reminded me that I had not yet stained the underside of those beams. Anyhow, I might as well take a quick shot of the construction whilst she was flipped over on the bench.
Leaving the black poster board used to form the patterns for the planking seen from above. Since they are not visible, they will be left because it seemed a little risky to try to dig them out at this point.
-
Thanks again for the many visits, and especially for the supporting comments from the usual SOS crew members.... Goerge, Mark, Greg, Patrick, and Piet.
Also, it is a real treat to see Shipwright Bill Short drop in, since his scratch build of the SOS (still in progress) was my personal inspiration to undertake this project from the beginning.Great to see him back on the bench after a long break.
As far as I'm concerned, his incredible SOS is the standard by which any other SOS model must be measured by.
Just hoping my effort might eventually earn at least a C+ in the eyes of fellow modelers on that standard.Cheers all
-
Dave,
It sounds like what you need is one of those little tabletop/countertop convection type ovens. When you're not drying the carvings, you can make yourself pizza.
Great suggestion Mark.... Actually, I have one of those, and that's mostly what I use when I do the pre-heating. The admiral likes her big kitchen stove oven and I do not argue with her on that issue.

-
-
Transom update....
All of the major sculptings for the transom are now completed and fitted to the off ship module.
At this point, there remains about thirty more figures to complete before I will be fitting the module to the stern.
Needing a little break from sculpting, I think I will now begin working on the beautiful lantern housing that fits in the center of the cap rail.
I've been really anxious to do that piece forever.
- EJ_L, GLakie, CaptainSteve and 15 others
-
18
-
Bill, in my close examination of your bulkhead (considering whether or not to re-do mine), I did note your clever "illusion".... and absolutely love the look. Incredibly beautiful indeed.
Another issue I find, in my case, is that the location of the companionway on the half deck is just too close to the bulkhead to achieve that design. I may, however add the port side steps from the half deck to the poop deck.... just not right now, as I am focused on the formidable task of transom sculpting.
Dave
-
Thank you Bill.... I must apologize.... If I had studied your posting closer, I would have realized it was the poop deck bulkhead you were building, which is indeed depicted with a straight configuration. I think I was thrown off by the beautiful windows and the center doorway.
As much as I like it, .unfortunately, I cannot correct my model at this point as there is not enough difference in the deck levels to create that configuration.The very old Italian plan sheets I was using to begin this project turned out to be so terribly flawed, I have long-ago abandoned them and have relied completely on your build log as well as the beautiful job Doris has provided.
Thanks again.
Dave
- CaptainSteve and mtaylor
-
2
-
Bill.... Beautiful bulkheads.
I am confused by the different configurations of the three weather deck bulkheads. Some models I found were straight, as in your case, while others have three radius shapes.... which I went with.
I would be interested in your comments on this design difference.... too late for me to change at this point.Thanks
Dave
- edmay, mtaylor and CaptainSteve
-
3
-
-
-
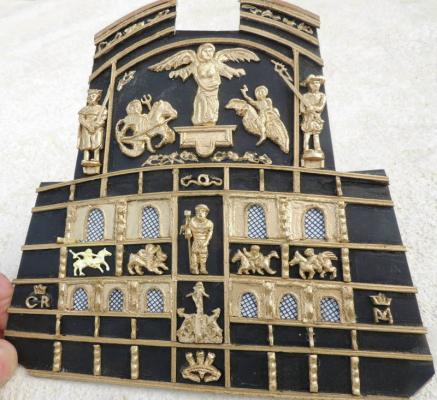
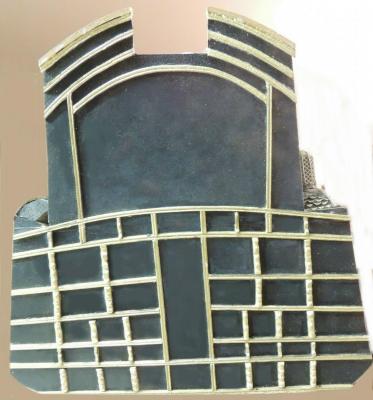
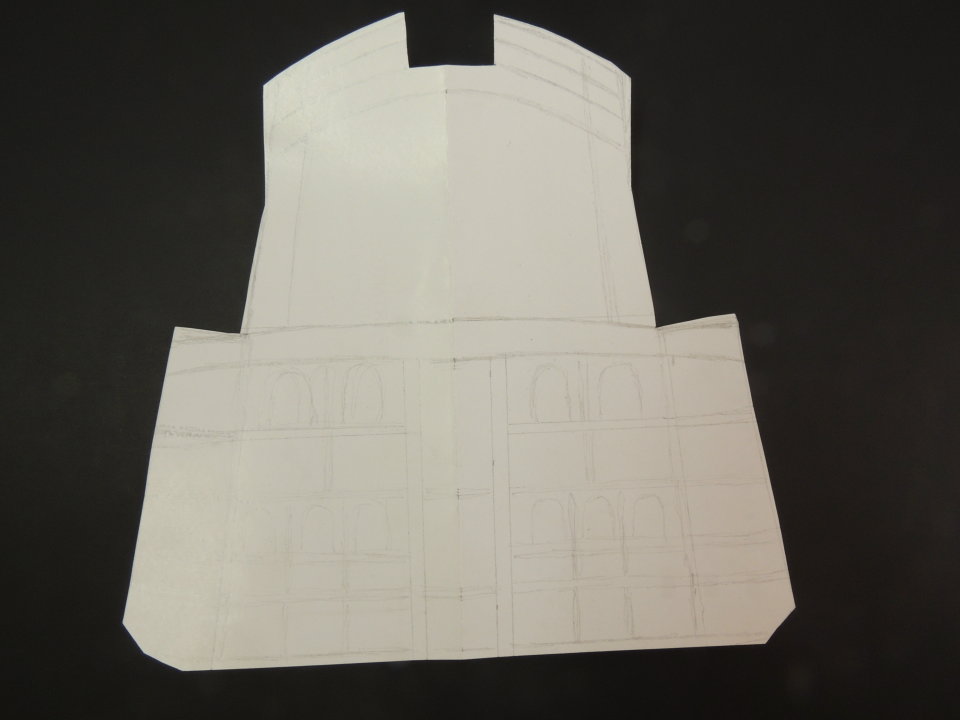
Transom layout completed....
It took over 60 pieces of shaped and scraped trim moldings to do the panel layout for the transom.....not counting the outer edge trims, which will be sculpted figures of some sort.
Here, the finished layout is lightly tacked to the stern temporarily, in order to study and work out the fitting of all the edge trims.
I'll remove the module and begin creating the ten window units next. Then begin the beautiful lantern housing sitting atop the transom. All this will be done off ship.
The counter and rudder will necessarily be the last structures to be created only after the transom is finally fitted and trimmed out.
-
-
That's the spirit Nenad.
Life goes on, and all we can do is make the best of what precious little time we all have here on earth. In a blink of the eye, it's all over.
As for me personally, when my time comes, I plan to be completely warn out from being as active as I possibly can be for as long as God blesses me with the strength and good health to do so.
- CaptainSteve, mtaylor, Jack12477 and 3 others
-
6
-
It is always a special treat to come and play catch-up on your Surabaya Piet. You are clearly having fun at this art far beyond most modelers. I also enjoy your dialogue almost as much as I your work. It may mean more to me personally, having had the pleasure of spending time with you and coming to understand what an amazingly deep character you are. Love ya mate.
-
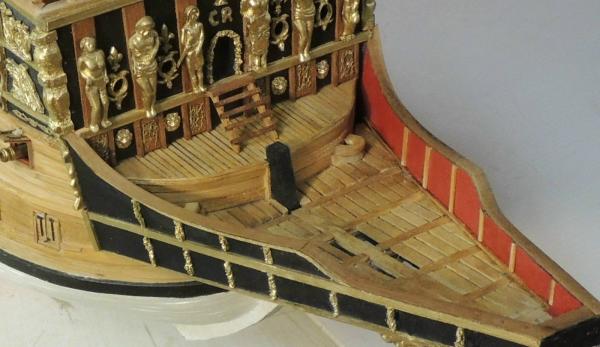
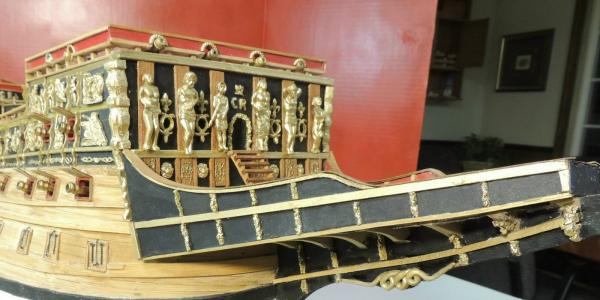
The most challenging phase begins....
Working a little each day on finishing out the gun ports for the port side, I decided to begin working toward the very essence of the SOS.... her magnificent stern.
I consider the stern structure, with all the ornate carvings / sculpting, to be the most challenging part of this project. Even as I begin the process of laying out and fitting the large stern panel, I am a little intimidated by the complexity and beauty of the decorations as depicted by a number of very fine artists.
As with every other process, I have begun with the usual....another rip-out and re-do.... not too bad this time.
I've known for quite some time, the aft ends of the poop deck railings were cut off too short and would not properly flush up with the stern bulkhead because I did not account for the rake of the stern plate at the time. After considering a possible "patch in" section, I decided against that option due to the clear visibility of this part of the structure.
So I began last night by ripping off the original railings, along with the stanchions. Luckily, no major damage
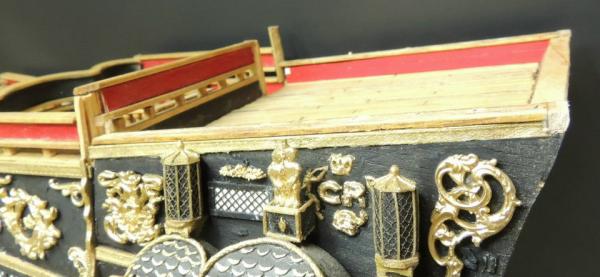
Spent last evening and this morning, building and fitting the new rails....
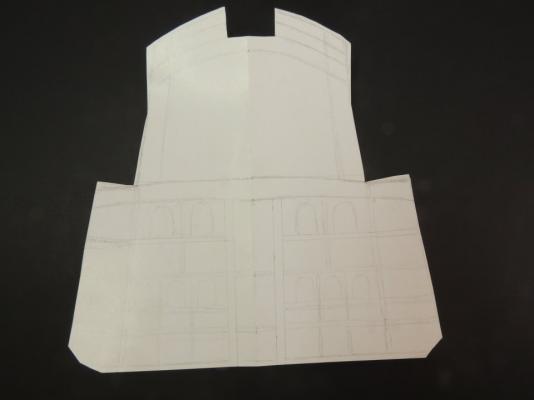
This is the pattern layout for the stern plate I will primarily trim out and decorate off ship.
The lantern housing that fits atop the stern railing looks like a ton of modeling fun.
- pete48, JesseLee, Ryland Craze and 9 others
-
12
-
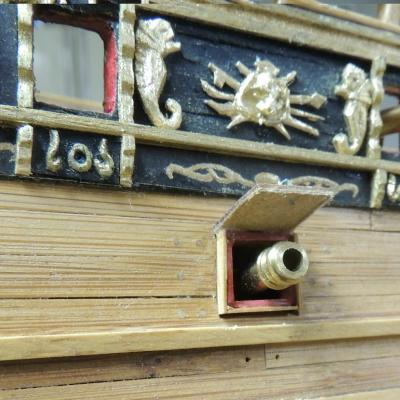
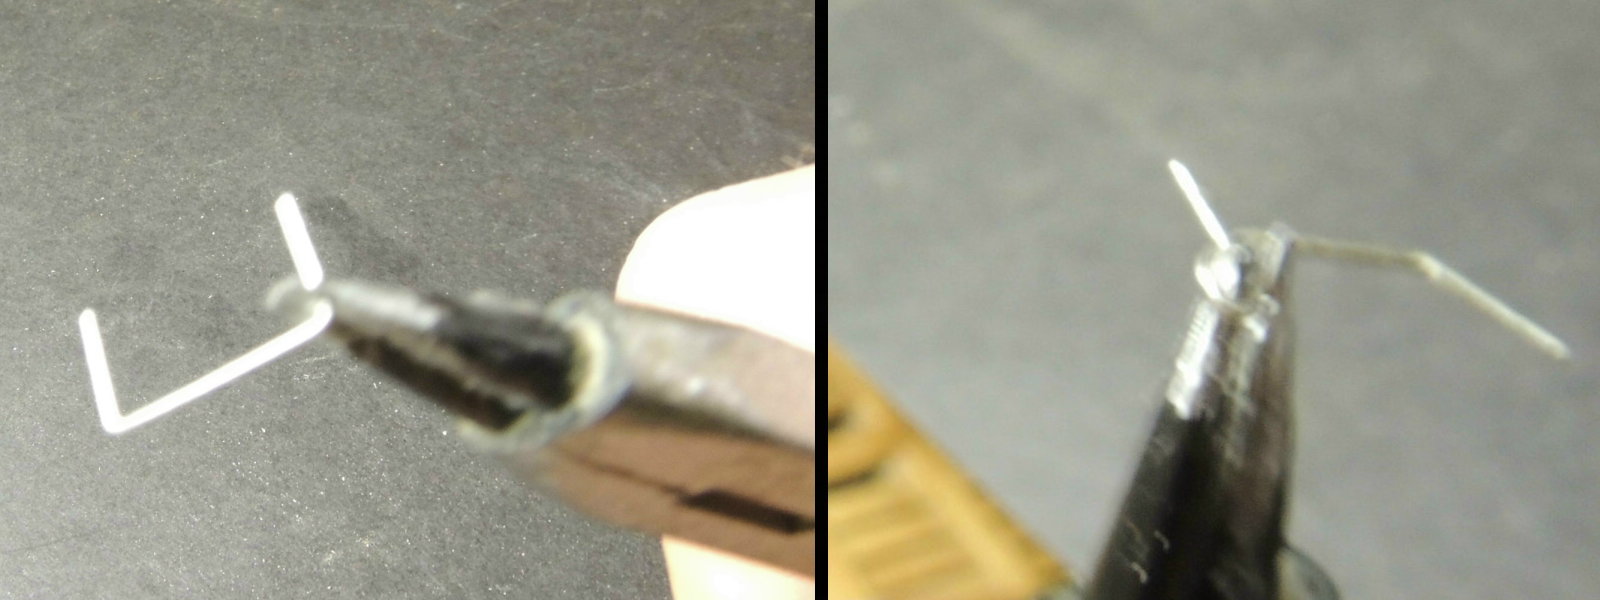
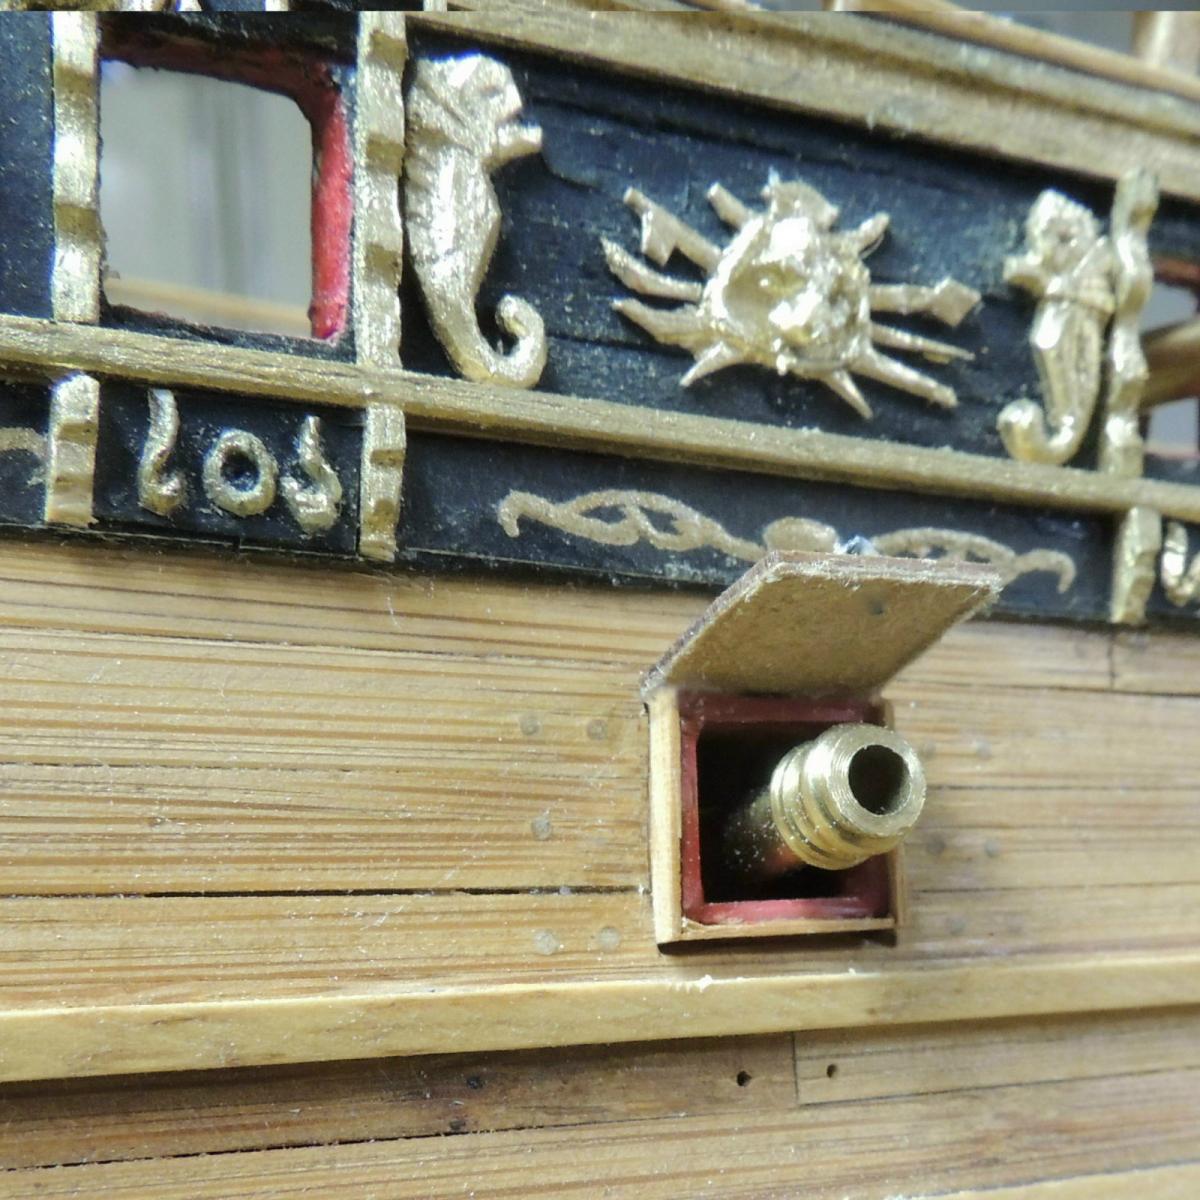
Re-sizing port side gun ports....
Before proceeding with the beak-head ornamentation, I decided to turn my focus to the twenty four unfinished gun ports on the port side.
The last five days have been spent building the frames and lids that must be retro-fitted into the openings originally cut according to the plan sheets. Again.... after discovering the scaling issue with each.
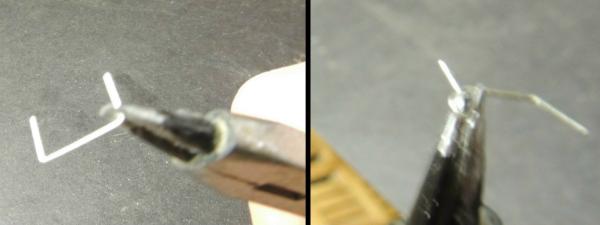
The first two pics showing the creation of very small lid rings from staples....
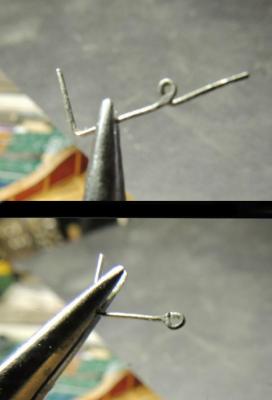
Construction of the closed lid module (left) and the open lid module (right) ....
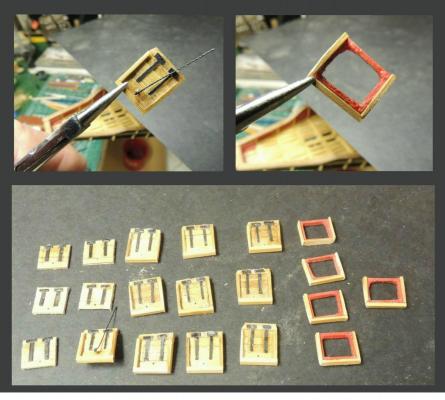
Carefully measured re-sizing of each port opening....

- marktiedens, GLakie, mtaylor and 14 others
-
17
-
Morning sunshine (actually a little overcast in our part of NC)
I am glad everything is working out Dave.. Has your hearing been affected any?
David B
Lost about 70% in that ear DaveB.... should get a good bit of that back after repair surgery. It's been so long now, I hardly notice it during the day.
- JesseLee, Omega1234, CaptainSteve and 5 others
-
8
-
Hi Frank, George, Mark.... good to be back in the shop this evening for sure.
Good to hear the good news Dave! Fixing that hole in your ear drum is a piece of cake, a small piece of catgut and CA and presto, a new eardrum

Cheers,
Tried that one Piet.... began growing long whiskers and licking my paws. Pretty sure it had something to do with the cat gut plug. Also tried to plug it with a dowel....didn't work either, just made the hole bigger. Guess I'll have to go with my hero Dr. P on this one.
-
About to leave Dr. Pillsbury's office.... All good news. Now talking about repairing the hole in my ear drum in a couple of months.
Thanks for dropping in guys, and for all the personal good wishes from my MSW family of friends.
Three hours (drive time plus lunch stop) from now, I can be back in the ship yard.
- CaptainSteve, Canute, Omega1234 and 9 others
-
12
-
Can't do my normal early morning shop time tomorrow..... Trip to Chapel Hill for a follow-up appointment with Dr. Pillsbury. He still has to repair the big hole in my left ear drum. Beginning to think this ear thing will never end. But then I'm just greatful to still be above ground, under the circumstances.
Later mates.
Dave
-
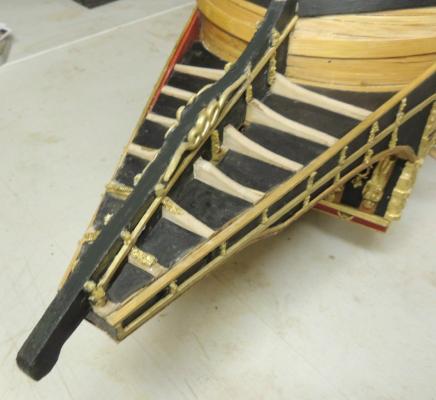
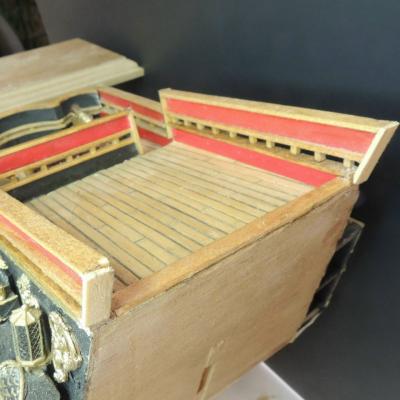
Beak-head construction....
A number of new developments over the last three days. Stained the deck and catwalks.... added the bulwark cowlings and trimmed out the inboard side.... added the railing caps.... and finally, added the outboard panel moldings.
Note....The two corner carvings above the cowlings were tricky as heck and had to be done over two or three times to get them acceptable.
So I finally got to see this beast with a fully formed beak-head.... ready for ornamentation.

- Canute, marktiedens, dgbot and 16 others
-
19


Sovereign of the Seas 1637 by modelshipwright (Bill Short) - Sergal - 1:78 - Port "as built", Starboard "as presented to King Charles I for approval"
in - Kit build logs for subjects built from 1501 - 1750
Posted
Bill, will your model have a small short deck level above this level of planks.... butting into the bulkhead?