


SawdustDave
-
Posts
1,770 -
Joined
-
Last visited
Content Type
Profiles
Forums
Gallery
Events
Posts posted by SawdustDave
-
-
I don't recall mentioning that I began attending a very active scale modelers club in Fayetteville, NC several months ago. The Lafayette Scale Modelers is a chapter of IPMS, which I originally thought was comprised strictly of plastic model kit assemblers,,,, mostly military stuff - ships, planes, troop carriers, and such. Turns out, these folks invited me to join them and start up a special group for members interested in building wooden tall ships....which is coming along very nicely.
The reason for me mentioning this today is that I just learned a couple of weeks ago that the IPMS Nationals will be held this year in Columbia, S.C..... less than three hours drive from my home. This huge annual event is usually in major cities like Chicago, San Diego, New York, and the likes.
The club members insisted that I must take the SOS as an entry in this year's competition.
So....after confirming with the IPMS officials that my wooden scratch build in progress would be allowed as a contest entry, I have decided to attend the show. In fact I will be taking four of my models.... Confederacy, Mayflower, and my Mini-Vic in addition to the SOS.
As you can imagine, I've really got my foot to the floor trying to bring the SOS as far along as possible with only ten days remaining before the big show.
This should be a real blast! I'm really looking forward to it!
Cheers
-
Here's a few pics to play a little catch up on this build log....
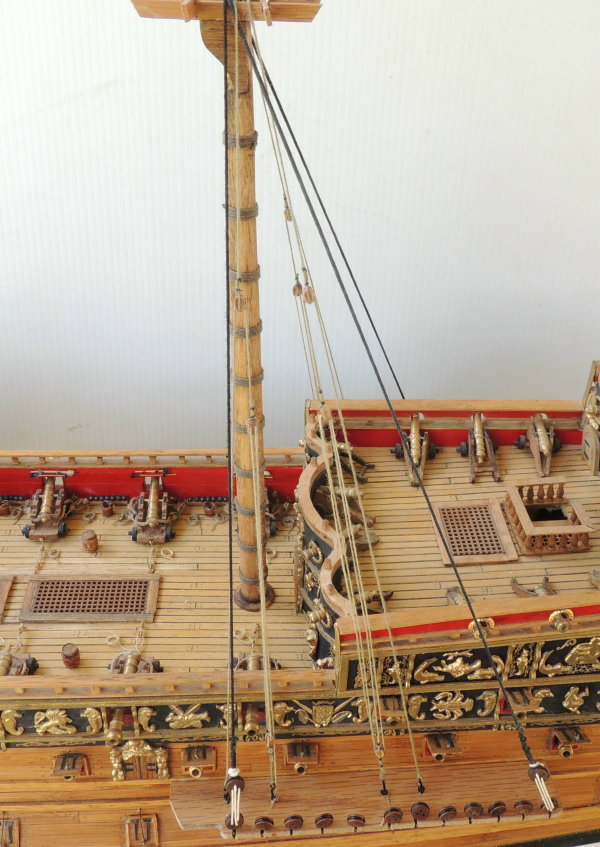
The addition and rigging of the bowsprit....
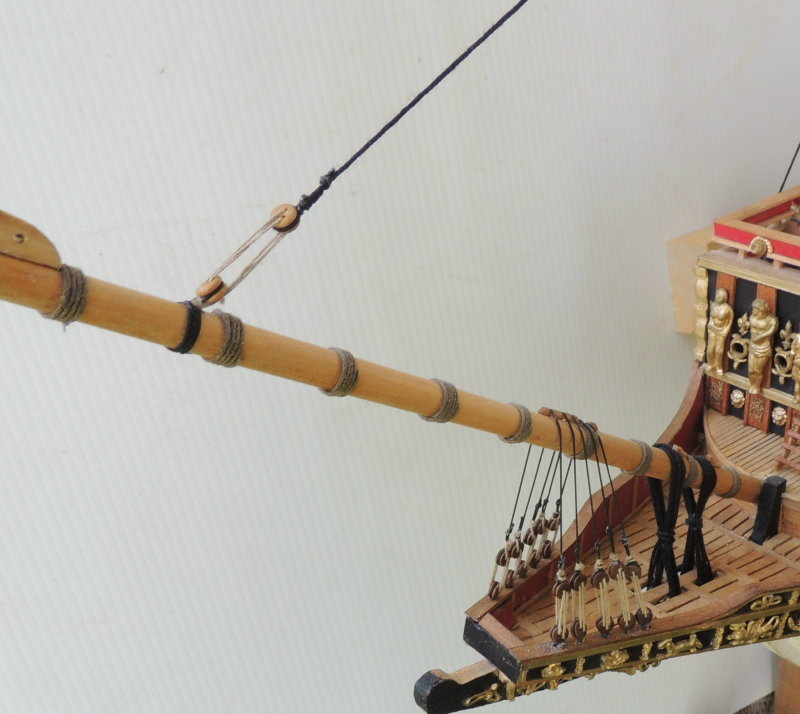
The channels and lower dead eyes have been added to both sides....Note the rigging of the bracing tackle for the fore and main masts. Also, the rigging of the fore and aft shrouds for each channel.
The fore channels....
The main channels....
Broad side view....
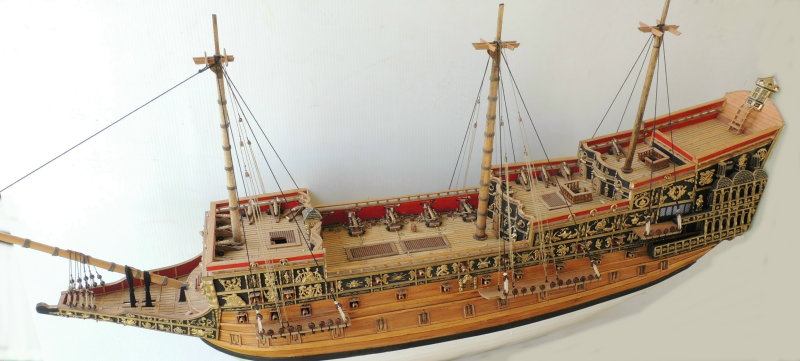
I will now set about adding all of the lower shrouds.
I am also currently working on the four lower tops for each mast (counting the bowsprit)
Good to be back at the bench.
- zoly99sask, BANYAN, Piet and 16 others
-
 19
19
-
Been a while since I've been able to post here....sorry mates.
Took a couple of weeks needed vacation, then got in some travel golf with a group of friends.
Finally, back in the shop and hard at work.
Hope to take a few pics sometime this weekend....quite a bit of progress to report.Cheers.
- WackoWolf, modelshipwright, Canute and 5 others
-
8
-
Thanks for dropping in John. We've been taking some much needed vacation time....still another week or so before I'll get back to the ship yard.
Seems like forever since I have sat down to the big lady.
- CaptainSteve, JesseLee, mtaylor and 4 others
-
7
-
-
Only three of my ships are in glass cases David. I use a compressed air can and a makeup brush, couple of times per year, to keep the others clean. Too much trouble removing them when I occasionally take them to show.
- WackoWolf, mtaylor, Mike Dowling and 3 others
-
6
-
Thanks so much to each of you for your visits and nice comments.
Slowly getting back to the shop after taking several days to allow some healing after my last surgery. Turned out to be a little more extensive than I anticipated.
Glad to report all is going quite well.
For a little change of pace, I spent the last couple of days turning and dry fitting the three masts and the bowsprit. I plan to work on the tops, beginning today.
Cheers all
Dave -
Really love the slight radius in the bulkheads Bill. Can you show a direct overhead shot of the beak head at this point?
- CaptainSteve and mtaylor
-
2
-
Dear friend Piet.... As with every thing else you do, I am quite sure your carvings will turn out great. Good advise you gave on getting Bill Short's book. A true master of the art, and a wonderful person.
Another suggestion for our friends..... Get some modeling clay.... Not only more effective than drawings for visualizing 3 deminsional objects, but also very effective for getting the right scale. Can't tell you how many "pretty good" carvings I had to discard due to tiny scale issues. Most folks don't realize how much a carving that is a single mm over/under scale jumps out at the eye after being fitted in place.
Can't wait to see your finished piece.
Regards to Gwen.
Dave
- CaptainSteve, Piet, JesseLee and 2 others
-
5
-
Alright "Pete".... Enough with the dilly-dally..... Let's get on with some "rat killin" here.
You and me....you and I.....either way, we both be old and weathered. If we sit too long, and get all comfortable, we fall asleep and waste another precious hour of what remaining time we have.
So.... Enough with the yard work, the bikes, and all the other stuff.... It's SHIP BUILDING TIME
- Omega1234, mtaylor, CaptainSteve and 3 others
-
6
-
Hey Dave, there is no one definitive answer as to how a model of the Sovereign should look. I have seen many representations of her in my travels and on the Internet and can say that they are all different. It is up to the modeller to determine what makes them happy with their build and you should be proud and happy with yours. Thanks for your comments.
Regards,
Bill
Guess that is what brings us all to love this unique form of art, huh Bill?
-
Beautiful job on the cat heads Bill.
Another example of your dedication to accuracy and detail that truly sets your work apart from all others.I must say, since your build log was my sole inspiration to attempt this special ship over a year ago, I only regret that I wasn't smart enough to completely follow each and every step of your log without deviation.... (would have saved me a lot of re-working the errors created by the old plans I tried to use)
So now that you've gone back to work on her, I have this great resource for making important improvements to my own humble efforts.
Can't thank you enough my friend. -
Thanks Bill, Patrick, Mark, and those who dropped in for a visit.
Quick personal up date ....On Tuesday of this week, I underwent a long awaited surgical procedure to repair the large hole in my left eardrum.
The good news is, it was a complete success and my hearing has finally been restored in that ear.Feels great for the first time in over a year.
- Kevin, marktiedens, CaptainSteve and 9 others
-
12
-
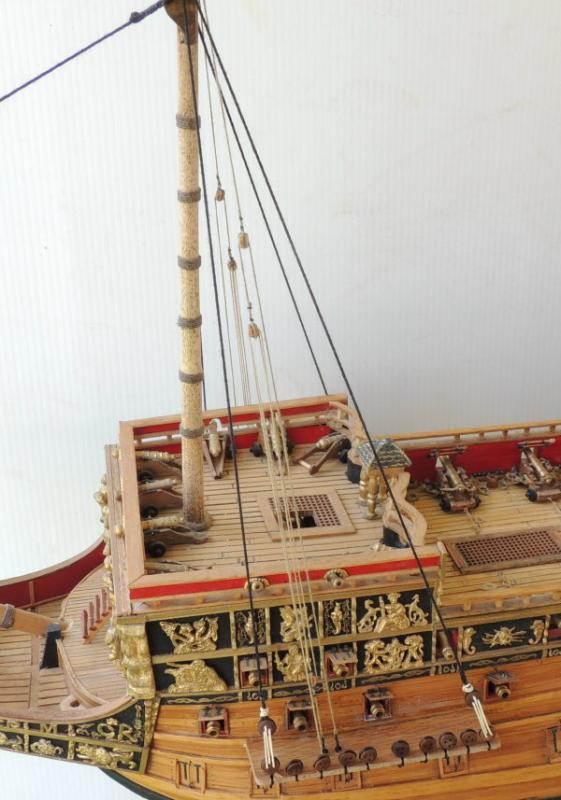
Update....Beak carvings completed....
After several months of carving and sculpting, finally able to post photo update with essentially all carvings done. I only say it that way because there are still several ornamental carvings that fit into rail corners, and atop the transom cap rails.
Also, not forgetting the most challenging of all the carvings.... the full three dimensional beak head figure of King Chuck mounted on his mighty steed. Think I'll save that one for last.
Or.... if I could talk my friend Mr. Short into knocking that one out for me and dropping it in the mail.... (I somehow doubt that will ever happen)
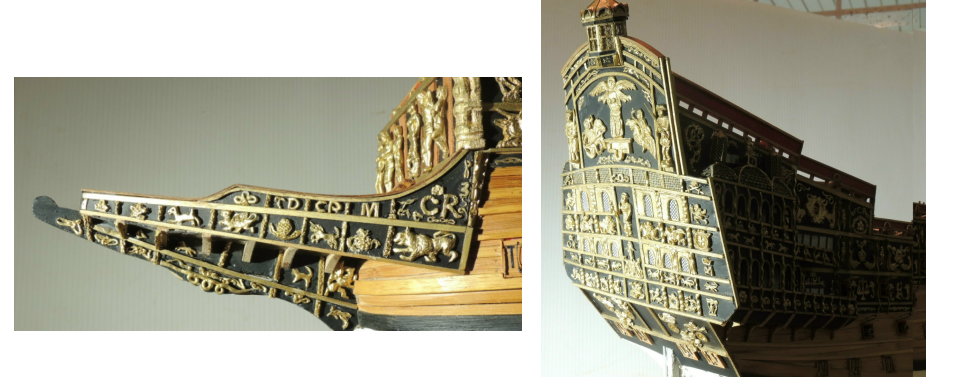
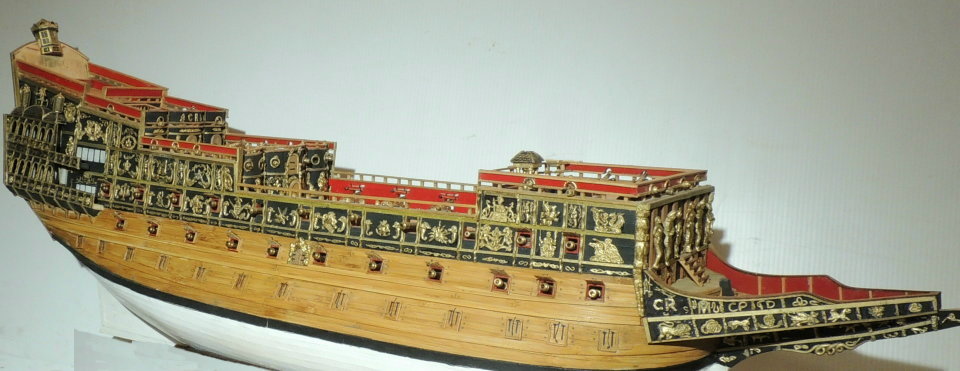
There is plenty of inboard work to turn to now.... all fun stuff.
Still seems a long way from the final rigging stage, which I am still completely undecided on.
Right now, I am leaning strongly toward rigging her to the lower tops with no spars, simply because I have no space left in my home to display another fully rigged model of this size.
Admiral has ruled against adding another room onto the house dedicated to model ship displays.
-
-
-
-
-
-
I keep trying to imagine what it would be like.....
Picture this....You're the Captain of a fairly small pirate ship, sailing along in the open sea, and you hear from above "AHOY CAPTAIN!...yonder ship!."
Pulling out your telescope to scan the faint speck on the horizon, you see something like this....in range and already turned broadside!
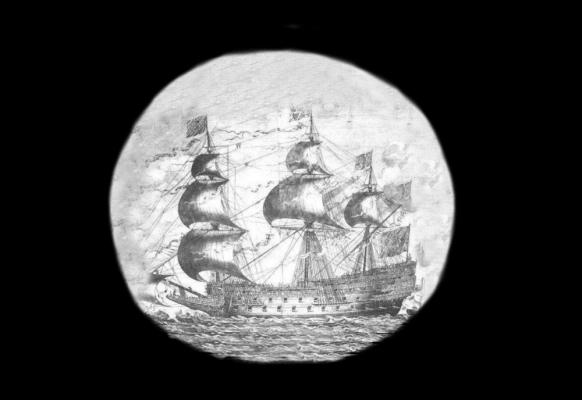
So what is your command!


- GLakie, marktiedens, Canute and 7 others
-
10
-
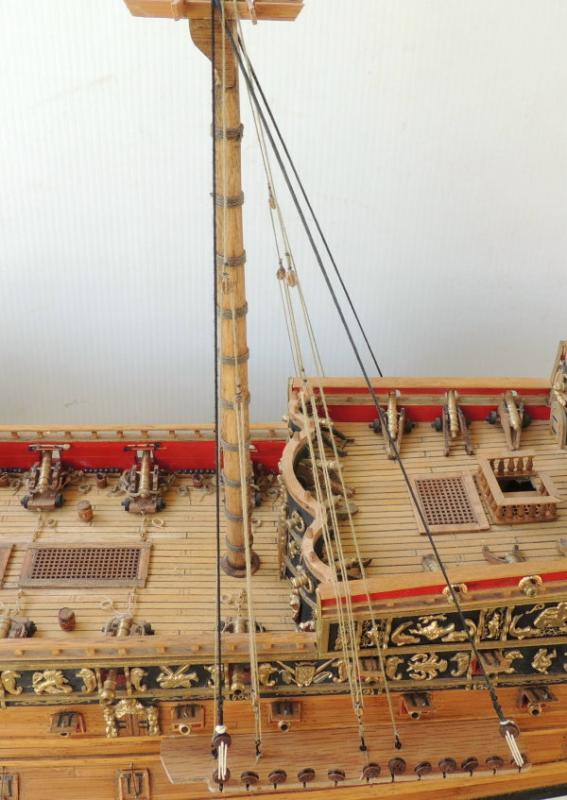
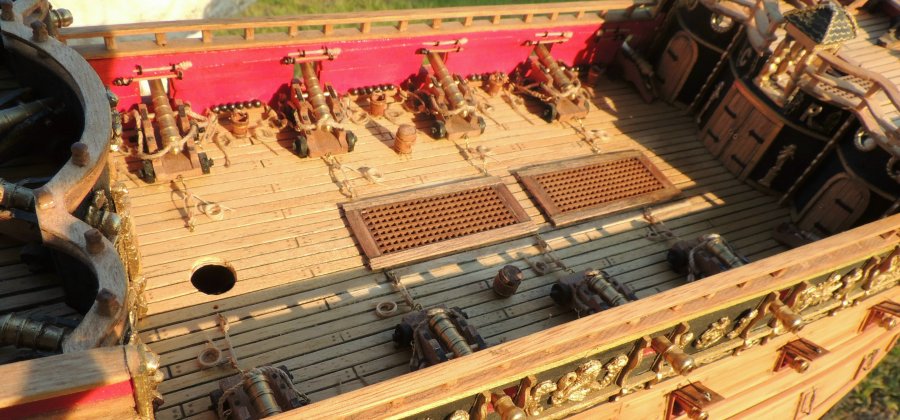
Main deck guns ready for action....

Pretty much done with the main deck guns.
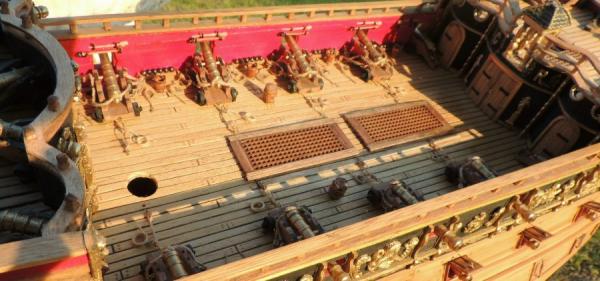
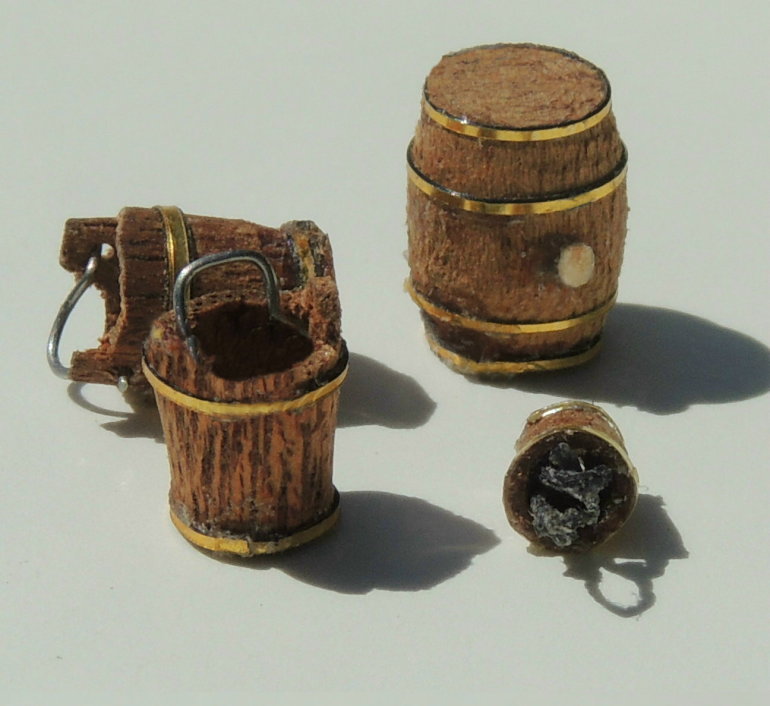
Decide for yourself whether the kegs are filled with gun powder or rot gut rum.

-
G'day Dave
This might not be correct for you, but when I was on the replica of the Endeavour in Sydney, I was told that the power was in a small bag that was left under the boats on the decks along with all the other tools for the canons. The historian guy told me that the keg was never on the deck except when they were in port to get new powder.
I would assume that woud be the case for every ship.
Great job on all of the buckets. You could change the powder barrel to a rum barrel and havadrink on me!
Havagooday mate
Greg
Hmmmm....
We now have two kegs of the finest rum! YaHooo!
- Canute, Omega1234, Greg.Ashwood and 4 others
-
7
-
Dave, I've read in some journals that the powder barrels were stored on their sides. I suppose they used gravity to interlock the barrels. And the barrels were bound with copper bands; no sparks in magazines.


Wondering if they would have been upright on deck, while in use? All photo's I'm finding depict them upright.
Obviously, if used on their side, they would have been chocked or cradled, to prevent them from rolling around.
- Greg.Ashwood, GLakie, Piet and 2 others
-
5
-
The powder kegs are traditionally barrel-shaped and noticeably larger than the swab buckets.
Also, having four banding straps and a wooden peg in the center of one side of the keg.
Note, the smaller bucket seen here will be used on the upper decks around the dime-cannons.
Question.... Would the powder keg have been used laying on it's side in some type of cradle or with simple chocking blocks?


Sovereign of The Seas by SawdustDave - FINISHED
in - Build logs for subjects built 1501 - 1750
Posted
August 4,5, and 6th WW.
I'll definitely have my camera with me.