Landlubber Mike
-
Posts
4,544 -
Joined
-
Last visited
Content Type
Profiles
Forums
Gallery
Events
Everything posted by Landlubber Mike
-
 Hi John, looks really great so far. Am glad to see that you posted a build log on here. Look forward to following your progress!
 -
Very nice work Kester, your work is so crisp and clean. I love the crew figure - the way you addressed the rope issue looks very natural, well done! Sorry to have missed your earlier reply from March. I think you have seen that I'm working on the Unicorn at the moment. Still not sure whether I want to tackle the Morgan or the Pegasus. I was intending on the former, but I'm thinking maybe of doing the Pegasus instead (though I wonder if I'll be bored of working on two similar ships that both have mythological creatures for namesakes)
-
Hi Kester, thanks for stopping by. This kit was supposed to be my stepping stone to build the Amati Pegasus. But now going through all the modifications, it's almost like I'm scratch building it, though modifying it off of independent research and guesses, rather than fully accurate plans. I think ChrisLBren is right when he says that kit bashing is harder than scratching off of good plans This clearly wasn't my intention, but I've sorta gone down this path with Ian as together we are helping each other build a more accurate model. It's been a great learning experience and a lot of fun working alongside Ian, so I'm not complaining at all. For my next build, I still maintain that I'm going to build the Charles Morgan alongside this kit, but who knows I don't know if I'm at the scratch building stage yet, but I have the Euromodel Friedrich Wilhelm zu Pferde on the shelf that I really want to build. The FWZP, along with the Charles Morgan, offer lots of opportunities to improve the kit through scratch building many details, so I think those will be good models to go through before fully embracing the dark side. I just wonder where the Pegasus fits in these plans, as you really can build a gorgeous model out of the box because of the great kit components, plans, and detail pieces. I might build it alongside the Unicorn just because it is very straightforward and will need a lot fewer modifications than the Charles Morgan, but I wonder about getting bored of working on two ships at the same time that are very similar (and both with mythological creatures for namesakes). I suppose there are some efficiencies in working on similar ships at the same time. Maybe I'll just flip a coin
-
Hi John, thanks for looking in. The Unicorn is probably more on the basic side of the kit difficulty section than the expert side, so I'm quite ok with some of the simplifications and other modifications to keep the kit at that skill level. The folks at Corel are actually very nice as well, where they sent me free of charge, a dozen extra portholes in response to my request to buy extras. I think where I'm most frustrated with the kit is on the plans, where the size of parts on the various plan sheets do not agree with each other, nor do they actually match up with the actual parts themselves (see my earlier post on where there are three sizes relating to the keel former between the two plan sheets and the kit part). That to me seems a bit sloppy and not too much to ask for, whether you are building an expert kit or a beginner kit.
-
Thanks very much Ian. I think the new position does give it a more robust feel - not sure about ramming other ships, but maybe to ram the walls of my house if it should happen to get thrown across the room in frustration Thanks also for the link to Dan's work. Well, I'm not sure whether to thank you or curse you for now giving me nightmares about adding the headworks to my build All kidding aside, Dan's log is going to be of big help to me at that stage (and others of course). One interesting note about the Unicorn that I've come across in my research regarding the relationship of the cheeks to the wale. In most models that I've seen, the upper cheek sits above the wale, while the lower cheek sits on the wale. From Chapman's plans of the Unicorn, the upper cheek sits on the wale, while the lower cheek sits below the wale. It's almost like the wale on the Unicorn sits considerably higher than other similar vessels. Ian, while I'm on the topic, one other modification I'm planning relates to the wale. The Chapman wale seems considerably thicker than the kit plans. It's probably a bit hard to see in the pictures two posts ago, but I'm planning on extending the height of the wale by the plank above and the plank below. In the pictures, I've shaded the area for the new wale in pencil. That seemed the simplest way of conforming the kit to the Chapman plans. Going that route, however, leads to an interesting question about what to do with the hawse holes. The area above the wale will be very narrow if I extend it, so the question I need to answer is whether the hawse holes would ever have been located on the wale itself. More to research I suppose
-
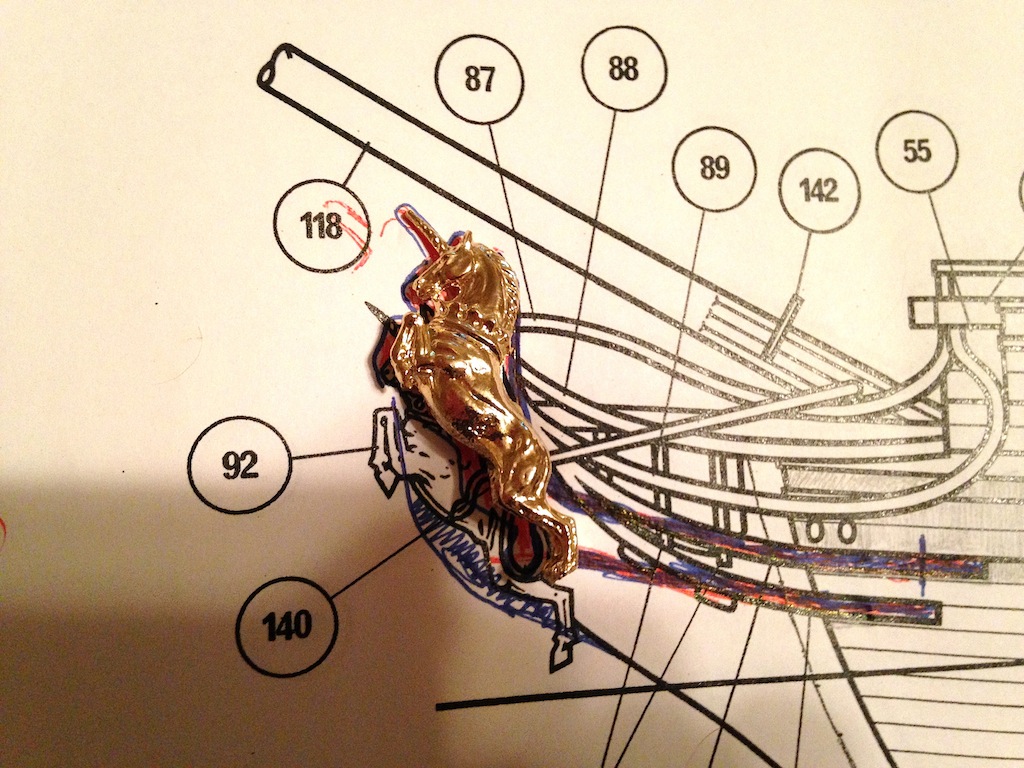
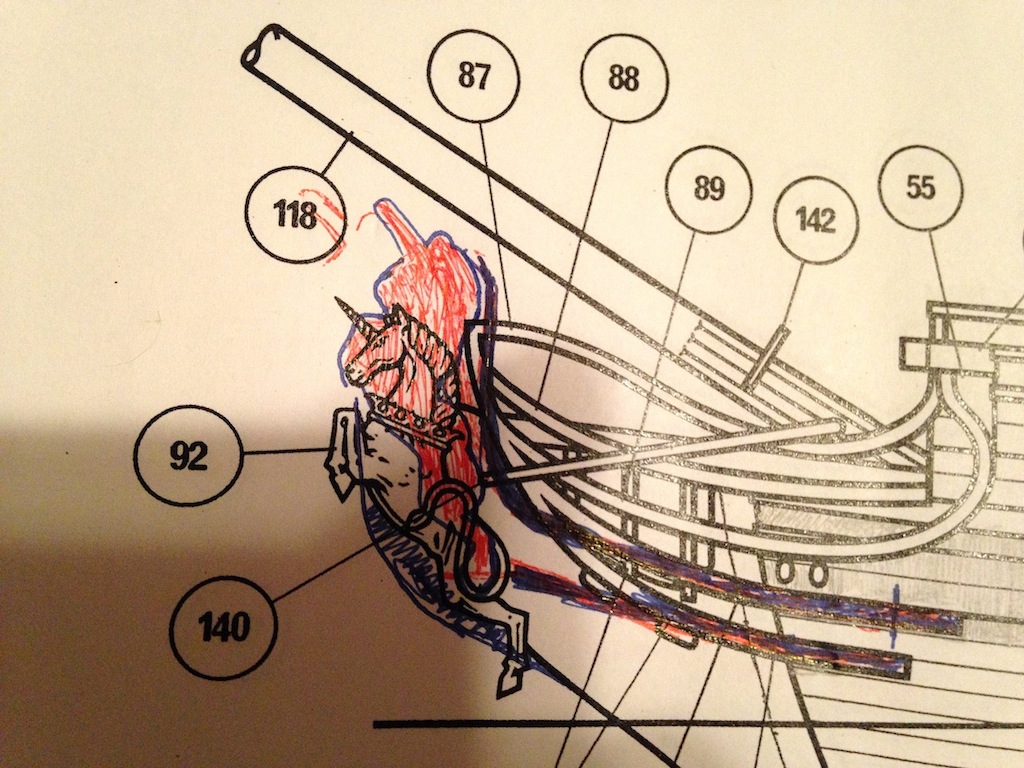
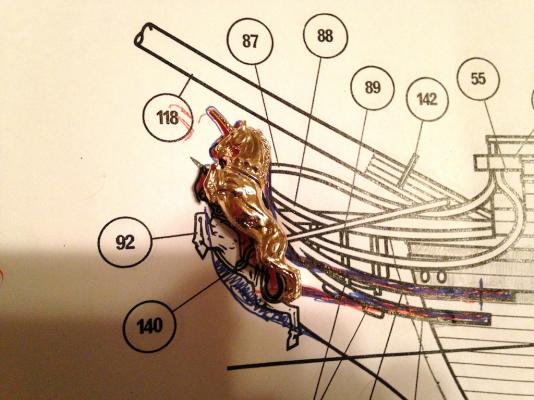
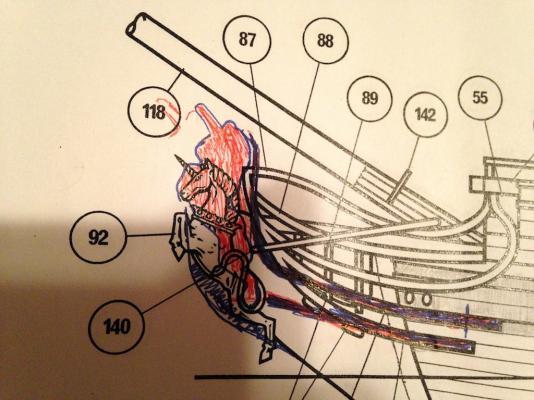
Happy Father's Day to all my friends out there! I did a little more work this weekend. The keel looked a tad too thick to me, so I shortened it from about 10mm in height to about 7mm or so. I think it looks a lot better, particularly since I plan on adding the false keel which is at about 2mm in thickness. I also did some more thinking and planning on the stem. The figurehead seems to sit a bit low on the Corel plans, not only relative to Chapman's plans, but relative to most other similar vessels. So, I started sketching the new position for the figurehead as seen in the pictures below (the second photo shows the outline of the figurehead in red): Chapman has a different configuration for the hair and lower cheek brackets (which I've tried to outline in blue on the diagrams), as well as the headrails. The configuration in Chapman is consistent with the configuration for other similar vessels like the Blandford and the Pandora (from the AOTS books I have), so I'm going to go off script and try to construct them the Chapman way. I need to study plans a little more to figure out what shape the stem should take. I looks like the countours of the top edge (and edge that runs into the back of the figurehead) of the stem should match up with the hair bracket. I think the hair bracket sits along the edge of the stem? Also, from what I can tell, the stem itself will also need a slightly different shape, with a slightly more rounded section just under the figurehead (extra material seen in the blue shaded area just under the plan's figurehead). I need to sleep on it a bit, but I think this is generally on the right path. The lower cheek bracket probably needs to come down a bit, as the gammoning slot fits in between the lower cheek bracket and the hair bracket.
-
Hi Gerald, thanks again for posting this log. I have the Morgan on my shelf that I plan on building alongside the Unicorn. I'm also thinking of weathering the ship, so your log is a real inspiration!
-
Hi Ian, thanks very much. A few options that maybe you can think about for your build. One would be to insert a pin at the end of the bowsprit, and pre-drill a hole into the bulkhead at the right angle. Another option might be, in lieu of using a pin, to turn down the end of the bowsprit to a width of 2-3mm or so, and then pre-drill a hole into the bulkhead at the right angle. Both options would add more stability and help with alignment, with the latter option probably a bit stronger (though, it would take a little more work to execute). I did the pin method on my Badger and it worked fairly well. I had no problems with the bowsprit, either with alignment or with it subsequently getting loose. The difference there, however, was that the bowsprit was run through the stem section of the hull, so you had a point further along the bowsprit that provided a good amount of lateral and downward stability. For the Unicorn, I don't think you have any other contact points aside from the end where it sits against the deck and bulkhead 1. Given the number of times I banged into my Badger's bowsprit and popped the rigging off, I was a bit concerned that not only would I pop the rigging off, but that I would run the risk of the bowsprit detaching. The model gets considerably longer when the bowsprit is attached, and it doesn't help when my sausage fingers, elbows, etc. get in the way For what it's worth, I also used the pin method for the spars, where I was attaching the cylindrical end pieces to the octagonal center pieces. I experienced some issues there, where the pieces got loose at the pin connection sites, or the pieces didn't line up perfectly. For the latter issue, it was probably because I wasn't careful enough drilling the holes for the pins, where the holes/pins were probably not centered perfectly (drill bit may have walked, etc.). That probably could have been avoided if I had the right components for my lathe, rather than trying to do it by hand. So, going forward on spars, I probably will shape them from a solid piece of rectangular stock. As I'm writing this, another thought comes to mind to help with stability issues. Have you considered adding a stem extension? You could always build one and pin it to the deck. That would give you a second point of contact. You could also make the stem extension wider and taller, so that it forms more of a cradle around the bowsprit to provide lateral stability. See SLR0461 and SLR0475 from the Royal Maritime Museum below for an example of where this was done for frigates with beakhead bulkheads: As another option, you could add separate knighthead looking pieces just behind the stem extensions like in SLR0397, another frigate with a beakhead bulkhead: Hope those ideas help!
-
I've made a little more progress. I sanded in a bearding line, and chiseled out the rabbet by building off the rebate from adding the thin piece of strip wood along the outside of the keel former. I also glued on the keel pieces, and constructed the gripe (lower left part of the stem area) and the stern post (not glued yet). Ian and John, you can see how adding the stern post and pushing out the angle of the fore side of the stern post seems to help align the stern area a little better for consistency with Chapman. In Chapman's plans, the stem extends above deck level to serve as a post for the bowsprit to sit on top of. I went ahead and did that, as well as drill a hole into bulkhead 1 and sand the corner of the keel just in front of bulkhead 1 so that I can run the bowspirit through the bulkhead. Two reasons for this - first, I think the joinery of the bowsprit will look a lot better than trying to shape the end of the bowspirit to sit flush against the deck and bulkhead in the beakhead area as the kit instructs. Second, with three points of contact (the stem, the bulkhead, and the deck/keel just behind the bulkhead, I hopefully will have an easier time aligning the bulkhead properly For what it's worth, I think the bowsprit was at about a 28 degree angle from the bottom of the keel. I spent a little time tonight plotting out the remaining items of the bow area. I think the figurehead sits a bit too low, so I'm planning to raise the figurehead a bit so that it is sitting closer to the bowsprit. All this is easier said than done, particularly since I'm planning to add rails more like Chapman's plans, and I'm not sure yet whether I will use the cast bronze figurehead, or possibly construct my own. I'm thinking that I will build the remaining six or so pieces, but not install the piece the figurehead sits on - that I can easily add later, with the advantage of customizing it off the ship to fit the figurehead. Thanks for looking in!
-
Joe, the deck turned out very nice. The maple in the kit is beautiful - I would have preferred that over the tanganyika in my Badger kit.
- 302 replies
-
- 1
-

-
- granado
- caldercraft
- (and 1 more)
-
Hi Ian, Painting the decoration a "boxwood" color would work out nicely as well. I thought about that after my earlier reply. ChrisLBren has a good demonstration of the technique on his Confederacy I believe - I recall that he painted the brass Caldercraft ship's wheel and I believe the figurehead using Chuck's technique. Thanks also for the information on the hawse holes and for pointing out the various items on the Chapman plans. I am glad the ship's stove is on the lower deck, as if it was one deck higher, I would have embarrassed myself putting one together next to your stove On finishing the exterior of the ship before installing the cannons, I tended to work with my Badger in my lap often times, which accounted for a lot of my cannon issues. If one is a little more careful around the model, then one probably wouldn't have as many issues
-
Hi Ian, I really like the modifications that you made with the arches, pillars and sills. The stern looks very much improved. I like how you covered up the top arches on the middle windows. I'm thinking of doing something similar on my build On your question about whether to paint or gild the transom decoration: I think either would look very nice, but if it were me, I think the answer would depend on how much paint you used in other areas of the ship. If you are not planning on using paint on other areas of the model (or use it very sparingly), I would gild the decoration for more consistency. If you plan on painting the figurehead and use paint throughout other areas of the ship, then painting would be a nice option (for example, if you were going to paint white stuff on the hull, the figurehead, the cannons and some of the deck items). Just my thoughts, and I bet whichever route you choose it will come out nicely.
-
Hi Frank, coming along really nicely. I'll have to take a look at the spiling method of planking, looks like a good way to do it.
-
Thanks Frank! With the tools I have now, I have no excuses for not turning out better work, right? Thanks very much Ian. I think I managed to get the stern post angle and overhang a little closer to Chapman. It's going to take a little planning on how to modify the stern counter. WIth all the curves in three dimensions, I want to take my time to make sure I don't end up with a funny duck at the end. On chopping out a piece of the keel, do you mean opening up some of the hull planking to show the lower deck? I wasn't really planning on doing that at this point, as I dont have plans to work from and it's been hard enough figuring out how to modify the line of the upper deck and quarterdeck I'll have to think about that a little more. I suppose I can study the Pandora plans and come up with something though.
-
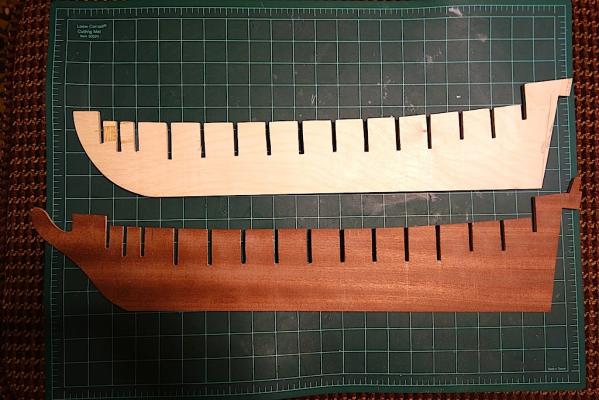
Hi folks, a bit of radio silence over the last week and a half, but I have been busy. I cut the pieces for the keel, false keel, stern post and stem out of swiss pear from Hobbymill. I've been using Jim's table saw and my Dewalt scroll saw to cut pieces out, and Jim's disc sander to shape and finish pieces, along with a sanding band on my Dremel for finishing inside curves. So far, all my appendages are intact From there, it's a lot of hand work with sanding blocks and needle files to work out the joints. The scarph joint for the two stem pieces in particular took me forever (as well as a couple of attempts) to try and get a halfway decent result. As with almost everything, making these pieces was a lot harder than it looks I also used Jim's thickness sander to slim down the keel, as the plywood I used was about 5.75mm in thickness, whereas the kit pieces and the pear I'm working with are 5mm. Jim's tools have been a real pleasure to work with. In particular I am in love with his disc sander, as I never could seem to sand straight lines by hand. The pieces aren't fully finished yet, but are reasonably close. Before I glue the pieces to the keel, I am going to finish the rabbet joint and sand along the bearding line (which, I'll need to guess at as the kit instructions did not seem to include one). I'll glue the stern post after the second planking, just to ensure a smooth joint. I have to say that working with Jeff's pear really is a fantastic experience. It machines and sands very well, and is world's better at holding an edge over the walnut in the kit wood that I had with my Badger. The upper stem piece looks like a lollipop at the moment, as I wanted to leave a little extra material to finish it. From what I can tell from the Chapman plans and other similar vessels, the stem rose above the beakhead area to support the bowspirit. It looks like the bowspirit was at a 25 degree angle or so, so not only will I need to angle the very top of the stem piece, but will also need to groove it a bit since the bowspirit is a cylinder sitting on a rectangular piece. I need to construct six more pieces for the stem. I'm using the AOTS Pandora book as a model for what the pieces looked like. I think at this stage I'm going to start building in brackets in the keel for the masts and bowspirit to help secure and position them. The kit has you insert the masts through holes in the foredeck and quarterdeck, and then sit on the upper deck. I'm sure I could get away with doing that, but I liked how the Badger kit had pre-cut slots in the keel for the masts to sit in. Anything I can do now to get the masts more easily positioned is probably well worth doing.

-
I had a similar problem on my Byrnes saw. New to table saws, I couldn't figure it out so I spoke with Jim. He suggested when tightening down the fence, to push the rear of the fence slightly away from the blade when tightening it down. That seems to have helped my problem.
-
Jeff, I greatly appreciate you posting these surveys to better understand your customer base and their needs. Even if these surveys fail to meet rigorous statistical standards, I still think you can get some ideas from new and existing customers that help both sides of the relationship. Seems like business 101 principles to me I'm new to scratching my own parts and working with high quality woods, but after working with your swiss pear over the past week, I am a very happy customer and not sure that I'll ever be able to go back to kit wood. I personally was fine with the lead time on my order, as I just submitted it earlier than I might otherwise have. On the video thing, I think it would be incredibly helpful for those of us new to these types of power tools to see how the experts work with them. I recently bought the set of Byrnes tools, and while I can figure out the disc and thickness sanders, the table saw has me pretty nervous. I know that you are very busy on things, but a few of us (and our appendages) would be eternally grateful if someone put out a video how-to on using the Byrnes table saw - using the rip fence and cross-slides, using the taper gauge, general use of feather boards and push sticks, potential dangers, etc.
-
Very nice work Joe - you'll have this built by the end of the year at this pace
- 302 replies
-
- 1
-
-
- granado
- caldercraft
- (and 1 more)
-
Pin pushers for planking?
Landlubber Mike replied to Landlubber Mike's topic in Modeling tools and Workshop Equipment
Thanks everyone, this is very helpful! I really appreciate it. -
Pin pushers for planking?
Landlubber Mike replied to Landlubber Mike's topic in Modeling tools and Workshop Equipment
Hi guys, thanks for the replies, I really appreciate it. A few follow up questions if you don't mind. Ken, are you able to push the map pins all the way to the hilt? I found at least on my Badger that the bulkheads were too firm to just manually push the pins all the way in without pre-drilling holes. Dave, do you remember where and what model your pin pusher is? Tom, I saw those pliers last night and wondered if they were any good. Thanks for the suggestion. Micromark seems to offer three sizes in nails - do you recall which you use? -
Hi everyone, To start pins for the first planking on a double-planked hull, any recommendations on a good pin pusher? I used the Latina (or maybe Amati) Nail Nailer on my Badger, which worked fairly well. It pushed nails into the plywood bulkheads just enough to hold the glued plank to the bulkheads, but not all the way in which made removal very easy. I pulled mine out of storage this afternoon, and it looks like it's bent and no longer usable. It wasn't built of the sturdiest construction, so I'm looking to see if there are any other options that people are happy with. In the alternative, are their other preferable ways to pin the first planking to bulkheads? I didn't particularly have much luck with hammering nails in with a ball peen hammer. I thought about maybe using a Dremel to pre-drill holes, but the pin pusher seemed much easier. I also saw that there are things called "T-Pins" out there, but not sure if they are all that helpful for planking work. Thanks very much!
-
Looking forward to following this build Hamilton. I bet working at 1:53 will seem like you're working with gigantic parts after working at 1:100 On the keel, is it worth cutting out a new one? I cut out a new keel for my Unicorn using a scroll saw and it wasn't all that hard to do so. My keel was also warped, though not as bad as yours it sounds. It made me feel more comfortable working with flat stock rather than hoping that clamping and other steps ended up working.
- 69 replies
-
- 1
-
-
- fair rosamund
- occre
- (and 1 more)
-
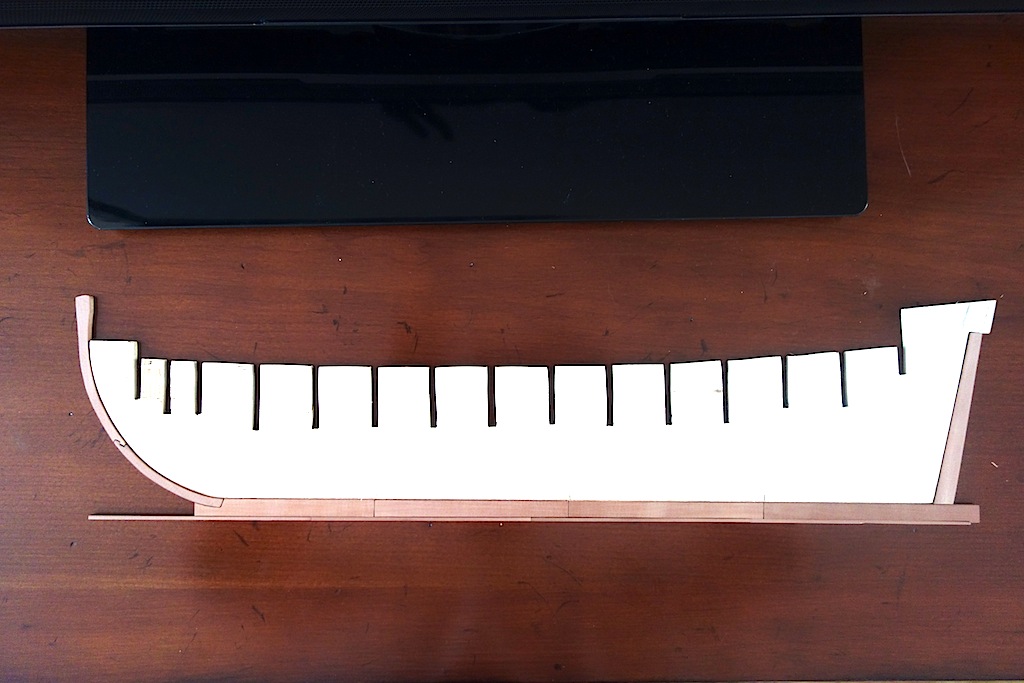
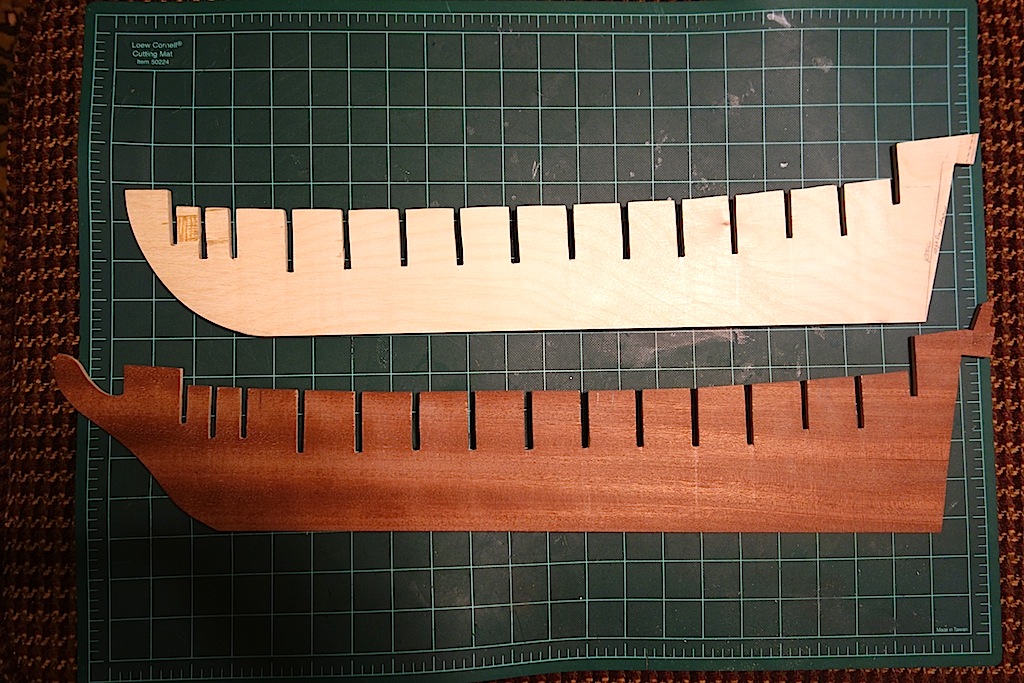
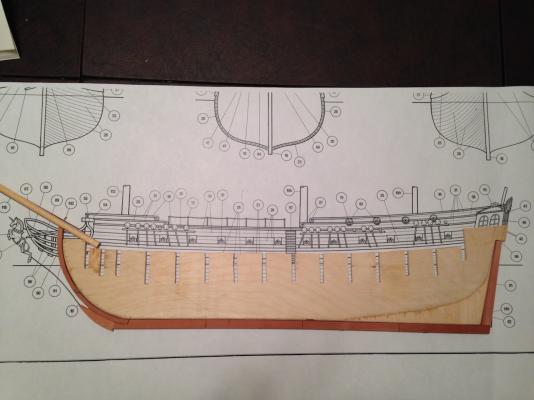
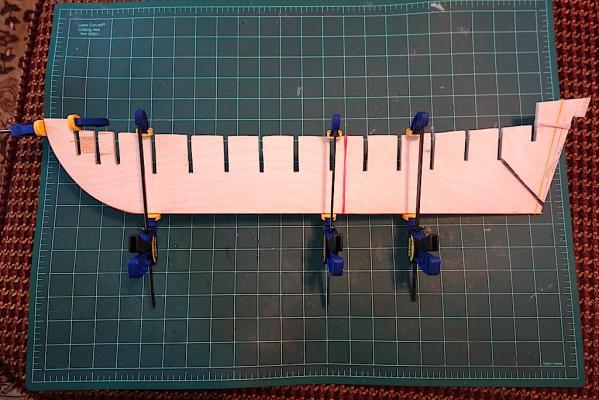
Quick update on where I am, as I actually started construction, rather than talking about it Since I'm planning on using pear for the exposed pieces of the stem, keel and stern post, I could either cut those sections off the kit keel, or cut out a new one that didn't include those areas. The choice was easy for me as the kit keel was warped. So, I went ahead and cut out the modified keel using my scroll saw, touching it up in areas with my new Byrnes disc sander which is an amazing machine. I can't seem to manually sand anything straight, and this tool really made work easy. I also added a 3mm x 1mm or so strip along the edge of the keel to add a pre-made recess for the rabbet. I wish I could take credit for it, but the idea came from Chuck's practicum on the Syren. Thanks Chuck! Next up is to start cutting out the stern post, keel and stem pieces. I'm taking a little time to learn how to use the Byrnes table saw, as I had a few issues from the beginning -- all user error of course, but a huge thank you to Jim Byrnes for calling me during yesterday's holiday to walk me through things and get me on the right track (talk about customer service!). So, just a little more practice and I should start cutting out the other pieces in the next day or two. I told Ian that I didn't want to have to change my alias on here to "9-Fingered Mike," so learning how to operate the saw safely is step 1.
-
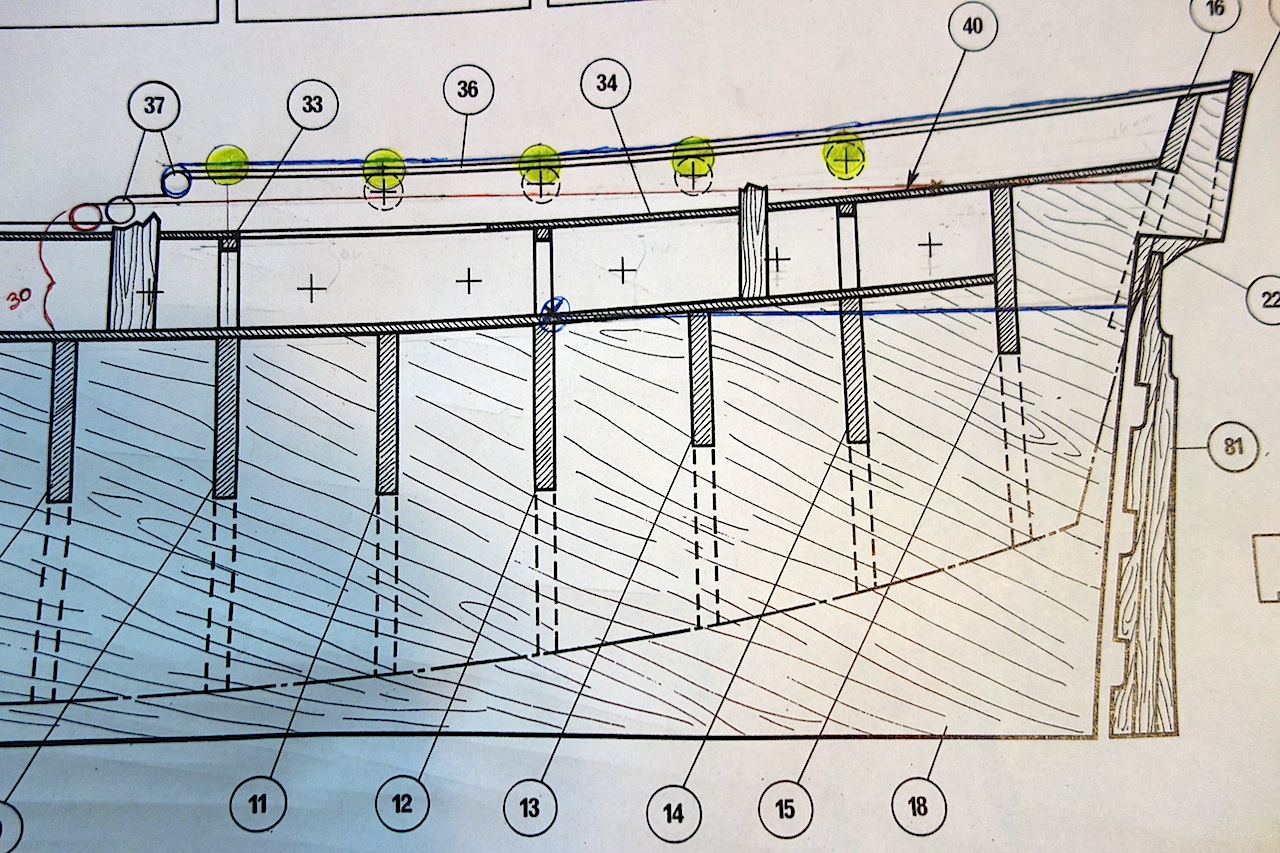
Here is a repost of what I posted on Ian's log in response to his thoughts on the revised lines of the quarterdeck and upperdeck which can be found here: http://modelshipworld.com/index.php?/topic/515-hms-unicorn-by-ianmajor-corel-scale-175-1748-to-1771/?p=202353 Looking at the Chapman plans versus the Corel plans, I think Ian is spot on as usual with respect to the line of the quarterdeck and upper deck. A few other differences I noticed from the Corel plans: 1. The height of the bulwark area of the quarterdeck section on the Corel plans gets narrower as you move forward. From Chapman, the height seems to stay the same. 2. The bottom decorative moulding at the end of the railing along the quarterdeck on Chapman seems to be a bit forward from where the Corel plans show it, as well as it should be a tad lower. 3. The quarterdeck on Chapman seems to end right at the top of the decorative moulding in (2) above. 4. The quarterdeck and the upper deck on Chapman seem to run parallel to one another. With these things in mind, I've modified the Corel plans as seen below: Hopefully the changes are fairly clear: 1. The top blue line at the quarterdeck bulkwark tops is the readjusted height of the bulwarks so the area stays at a consistent height (addressing observation #1 above). It worked out to a slight slope of 1.5-2mm in added height at the fore area. This is easily addressed on the model (I think!) because you can just use full, untapered planks to achieve the consistent height. 2. The red circle on the far left is roughly the new position of the decorative moulding (addressing observation #2). It's a tad lower, and the difference between the top of the moulding and the top of the upper deck below is about 30mm. 3. The modified upper deck line is marked as the blue lower line. It seems to intersect at about bulkhead 12. Working from the top of the moulding marked in red, I sketched the new quarterdeck line in red keeping a consistent 30mm height between the two decks. 4. The yellow circles are the portholes, which include an additional a fifth additional one at the front of the quarterdeck. Using the modified quarterdeck level and upper bulwark line, the portholes seem to open up fairly consistently with Chapman. Taking a step back and looking at the plans, I think the upperdeck and quarterdeck lines should sweep up a little higher at the stern. So, for the quarterdeck, I think I'm going to follow the line of the Corel plans starting around the area of the last upper deck gunport. I'll make a corresponding change to the upper deck line as well. I think if you really wanted to be consistent with Chapman, you probably would need to reduce the bulkhead height just above the upperdeck gunports. I thought about doing that, but that would take a lot more rejiggering of the plans, and I think I'm planning on changing them enough at this point. Changing the bulkheads is tricky business, so I'm trying to minimize them as much as possible.
-
Hi Ian, thanks very much for sharing your work on this. Looking at the Chapman plans versus the Corel plans, I think you're spot on as usual with respect to the line of the quarterdeck and upper deck. A few other differences I noticed from the Corel plans: 1. The height of the bulwark area of the quarterdeck section on the Corel plans gets narrower as you move forward. From Chapman, the height seems to stay the same. 2. The bottom decorative moulding at the end of the railing along the quarterdeck on Chapman seems to be a bit forward from where the Corel plans show it, as well as it should be a tad lower. 3. The quarterdeck on Chapman seems to end right at the top of the decorative moulding in (2) above. 4. The quarterdeck and the upper deck on Chapman seem to run parallel to one another. With these things in mind, I've modified the Corel plans as seen below: Hopefully the changes are fairly clear: 1. The top blue line at the quarterdeck bulkwark tops is the readjusted height of the bulwarks so the area stays at a consistent height (addressing observation #1 above). It worked out to a slight slope of 1.5-2mm in added height at the fore area. This is easily addressed on the model (I think!) because you can just use full, untapered planks to achieve the consistent height. 2. The red circle on the far left is roughly the new position of the decorative moulding (addressing observation #2). It's a tad lower, and the difference between the top of the moulding and the top of the upper deck below is about 30mm. 3. The modified upper deck line is marked as the blue lower line. It seems to intersect at about bulkhead 12. Working from the top of the moulding marked in red, I sketched the new quarterdeck line in red keeping a consistent 30mm height between the two decks. 4. The yellow circles are the portholes, which include an additional a fifth additional one at the front of the quarterdeck. Using the modified quarterdeck level and upper bulwark line, the portholes seem to open up fairly consistently with Chapman. Taking a step back and looking at the plans, I think the upperdeck and quarterdeck lines should sweep up a little higher at the stern. So, for the quarterdeck, I think I'm going to follow the line of the Corel plans starting around the area of the last upper deck gunport. I'll make a corresponding change to the upper deck line as well. I think if you really wanted to be consistent with Chapman, you probably would need to reduce the bulkhead height just above the upperdeck gunports. I thought about doing that, but that would take a lot more rejiggering of the plans, and I think I'm planning on changing them enough at this point. Changing the bulkheads is tricky business, so I'm trying to minimize them as much as possible. If you don't mind, I think I'm going to add this to my build log just for completeness. Hope I didn't hijack your log too much