Landlubber Mike
-
Posts
4,547 -
Joined
-
Last visited
Content Type
Profiles
Forums
Gallery
Events
Everything posted by Landlubber Mike
-
 Wow, very nice indeed! Is that the Yahagi? You has asked about the Tamiya turntables. I finally got my order in. There’s a small one with two spring bars that hold your parts. The larger one comes with clips and holes (for example, that can hold those alligator clips on a stick things) for a lot of versatility. I can see getting a lot of use out of them for vehicle and Gundam work. I do think they can come in handy for doing ship assemblies and even for holding the ship’s hull.
 -
Nice Kevin! I was thinking of bidding on that auction but went with the Shimakaze as a slightly easier first start. Nice choice!
-
Absolutely amazing work. I have to say, you're one of the best builders on this site. Your lines, etc. are just so clean and precise. I'm very jealous
-
I'm in for this one too. Looks like you're good to go and the extra details will make for a fantastic build!
-
Cornwall Model Boats has a really good selection.
-
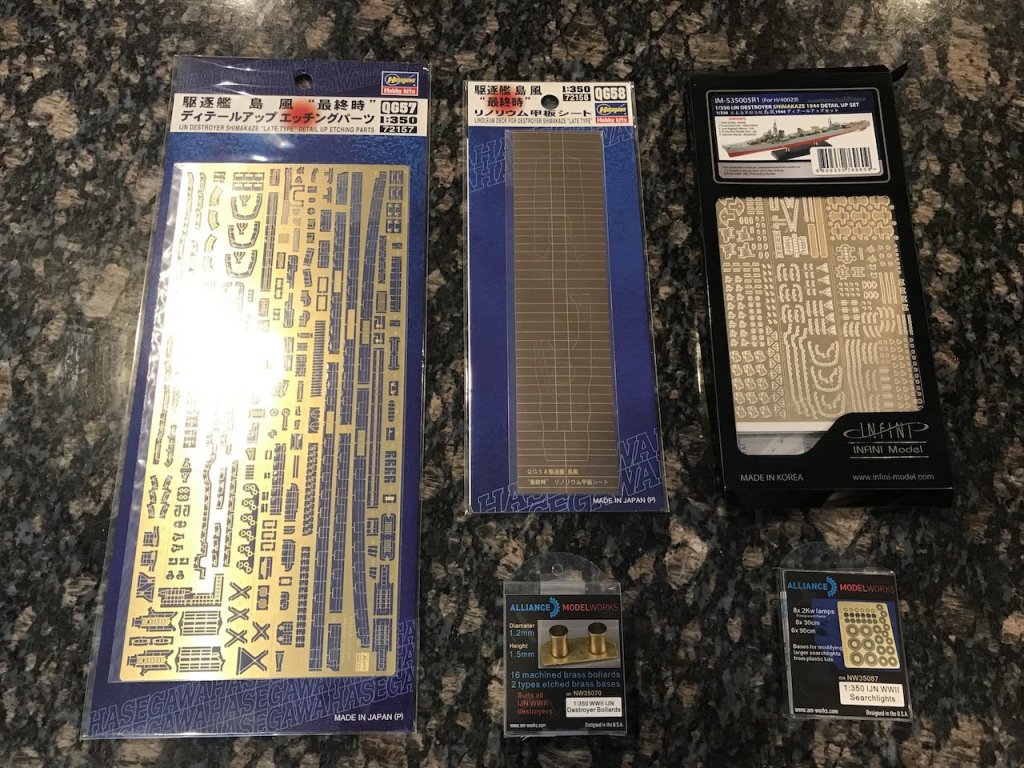
It doesn't look like the Infini set provided anchor chains. The look pretty good to me, but I wonder if having actual chains would just look a little better. Would take some work for sure to replace the kit chains. Another thing I might replace is the bollards. They seem to be in scale, but don't have a bottom plate. I got some from Alliance Model Works that might fit the bill. I might try painting to see if I like them. I almost feel it would be easier to remove, paint the deck, then add new chains. Not sure if I'll be able to paint the chain cleanly at such a small scale. Big thank you for the heads up on the life boats! Hey Jeff! With Kevin, you and me, it looks like we will have the IJN Destroyer Club ready to go. 😁 Not sure I'd follow my lead as I haven't done a plastic kit in probably 35 years, aside from a quick snap-together kit with my daughter a year ago. If you're looking to get a detail add-on set for the Shimakaze, the Infini is a really nice one. I forgot where I ordered it from, but it might have been from a place in the UK as I couldn't locate one here in the US. As I mentioned above, if you get the Infini, the Hasegawa detail set is pretty much unnecessary. The Infini is more expensive than the Hasegawa, but also more expansive. And where Hasegawa uses PE to enhance the already good kit plastic parts, Infini in some cases (like some of the gun platforms and guns themselves) just replaces the kit plastic part with something entirely from PE. Also, when it comes to the linoleum deck, Infini makes the brass bars that can be applied to the kit deck (they prepped each bar individually). If you're ok with that, you won't need the Hasegawa linoleum deck add-on. I'll probably go with Hasegawa add-on because it already includes the brass bars and is in the linoleum color (it looks like a appliqué). Plus, at this stage, I don't know if I'm masochistic enough to glue those tiny Infini bars to the kit deck.
-
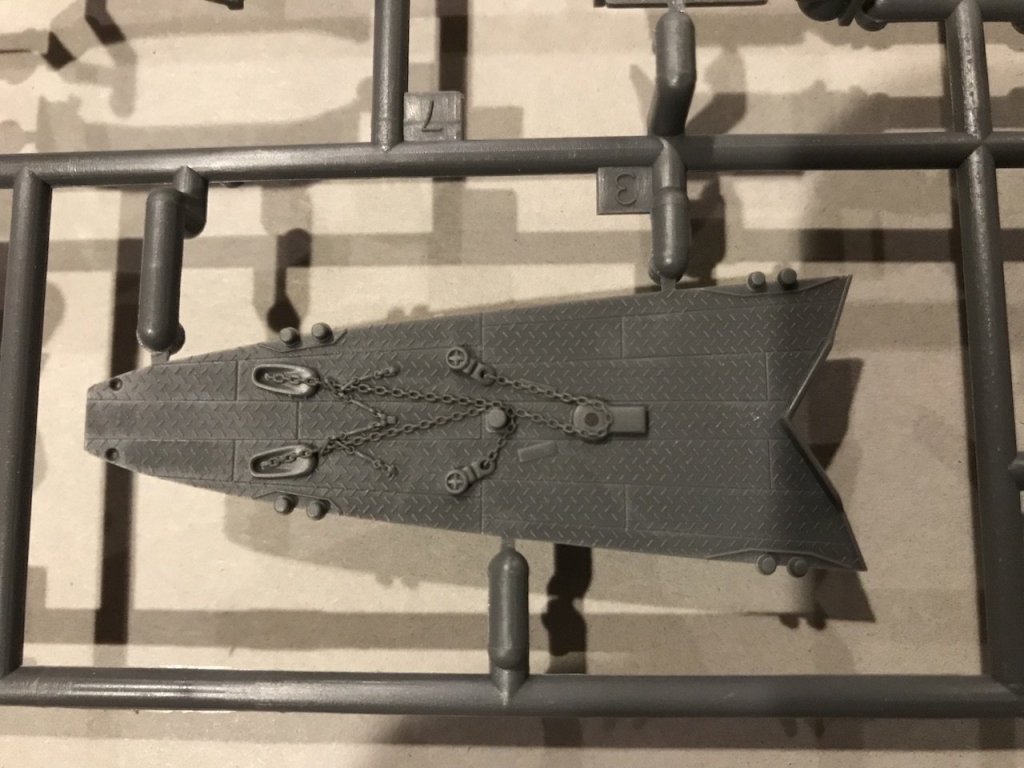
Here's a picture of the deck at the bow - the chains are pretty nicely done, but I'm wondering about painting them. Is it possible to replace them with actual chains, and if so, is it even worth it? Might be easier to paint/weather chains separately off the model than try to paint them as part of this piece. For reference, this part is probably only 2 inches long 😳
-
For those that like 3D views, this is pretty interesting (might be what is used in the World of Warships game): https://sketchfab.com/3d-models/shimakaze-db0b385733e544cd831200879a45ae44
-
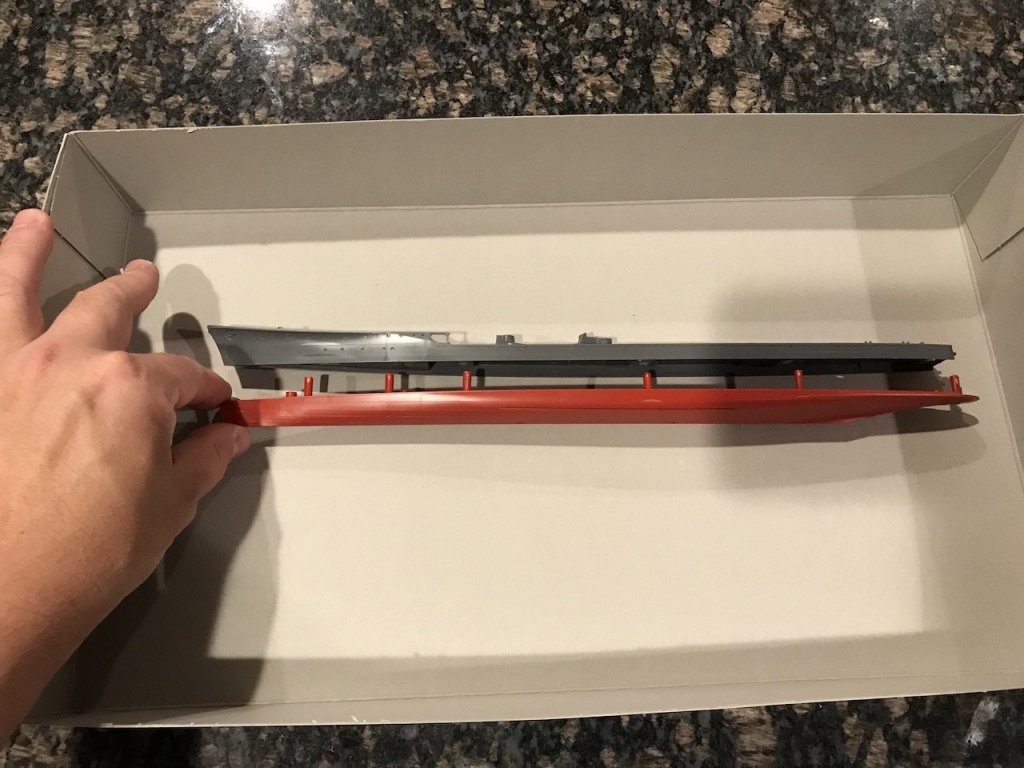
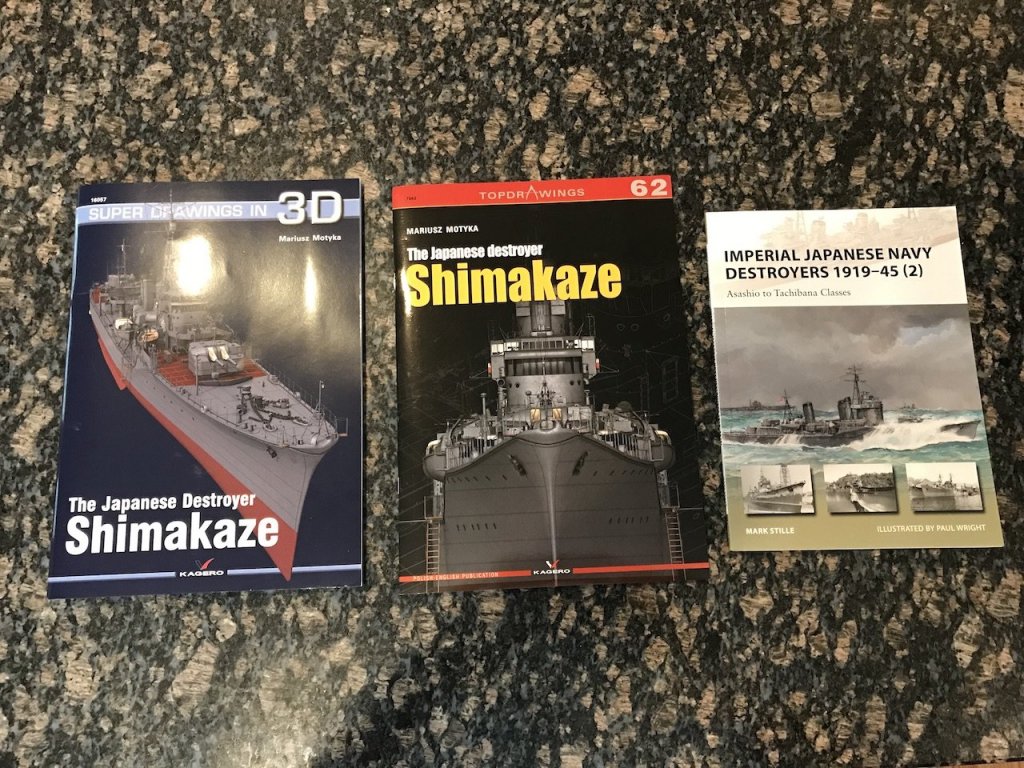
Hey Kevin, the Vanguard book is pretty good. It's not particularly long at 48 pages, but it's organized pretty nicely and goes through each class of destroyers. I'd say it's a good compendium of a little more detail per ship than you would find on Wikipedia, with background information that ties everything together. It also has waterline profiles and some overhead profiles of a number of the destroyers covered by the book, so you can quickly flip through and compare ships quickly to see if there was a subject you might be interested in. It's been interesting flipping through and seeing the differences in design, armament, rigging, etc. in this line of ships. FYI, Yukikaze is covered in this volume. I'd say if you're looking for general information across the class, with pictures of members of the class, then these books are pretty good. If you're looking for very detailed information on a particular ship (for example, to build as a model), then the Top Drawings and Super Drawings in 3D would be better. Hey Mike, thanks for looking in. There are a ton of sprues for this kit - rather than take photos and upload them, a better place to get an idea of them is this review from Modelwarships.com. The reviewer posts photos of each sprue and gives pros and cons. Of course, if you'd like specific pictures, I'd be more than happy to take some. http://www.modelwarships.com/reviews/ships/ijn/dd/shimakaze/350-has/index.htm Seems to have left a pretty favorable impression, part of the reason I went with the kit. I had been looking at the Yukikaze that Javlin/Kevin is working on, but went with this one based on reviews and the Infini upgrade, as well as the fact that Hasegawa offered a linoleum deck upgrade. It works out to about 14.5 inches. Pretty reasonable size if you are looking for a small model. Hence why the PE is so tiny! I can't imagine doing the ship as a 1:700 model. From what I recall, a bunch of the Hasegawa 1:700 models can be built as waterline models. This one at 1:350 divides the bottom and upper hull at the waterline. I'm thinking that I might pre-paint the upper and lower hulls prior to assembling them together. That would save me from having to mask once assembled. As you can see from the picture, the lower hull is fairly short, so setting it in a waterline diorama shouldn't be too bad. The sprues are colored so that one can assemble it out of the box without painting. I plan to paint it once I figure out how to use my airbrush.
-
I forgot to mention that I'm going to go full bore and model the ship in a diorama setting. I have the Waterline Dioramas book from Seawatch Books and always wanted to try one. I've wanted to do a diorama scene with a wooden ship, but it seems tricky to reduce the hull below the waterline (or at least I haven't had the foresight to do so). I know some reduce the plastic kit hull below the waterline for dioramas, but this particular model has a lower hull of only about an inch, which should make it fairly simple.
-
Hey Joe, thanks for looking in. I really had no interest in plastic when I thought it was like the models I did as a kid - insert tab A into slot B, paint with testor's enamel, etc. Now with the PE detail kits, airbrushes, all the weathering products, and books on the subject matter, it's a whole different ballgame. The detail you can get with PE is amazing relative to the standard plastic parts. That's awesome! It's really rewarding doing something like that together.
-
I've largely tooled up for plastic parts, including picking up an airbrush. I'm waiting on a few items of primers, paints, and weathering supplies, but in the meantime will probably start doing some of the assemblies and practicing on the airbrush and with the PE. I spent a few hours yesterday going over the add-on kits, marking up the kit instruction manual where add-ons might come in. The improvements from the Hasegawa add-on are nicely referenced in the kit instruction manual in the various assembly stages. As I mentioned before, the Infini add-on set is considerably more detailed than the Hasegawa add-on. There seemed to only be a few minor areas (mostly hidden) that Infini didn't tackle. I'm a little annoyed because on another forum, I asked in a thread about the Infini add-on whether it largely duplicated and made buying the Hasegawa add-on irrelevant. The moderators deleted my post for being off-topic -- say what? I'm a bit annoyed because it would have saved me some money buying the Hasegawa set, but it is what it is. If anything, I can practice working on PE with the Hasegawa before trying the Infini set. The Infini set is fantastic by the way. The parts are incredibly detailed. I'm glad I bought an Optivisor (thanks again to those who made recommendations on an earlier thread I posted) as it looks like I will need it!
-
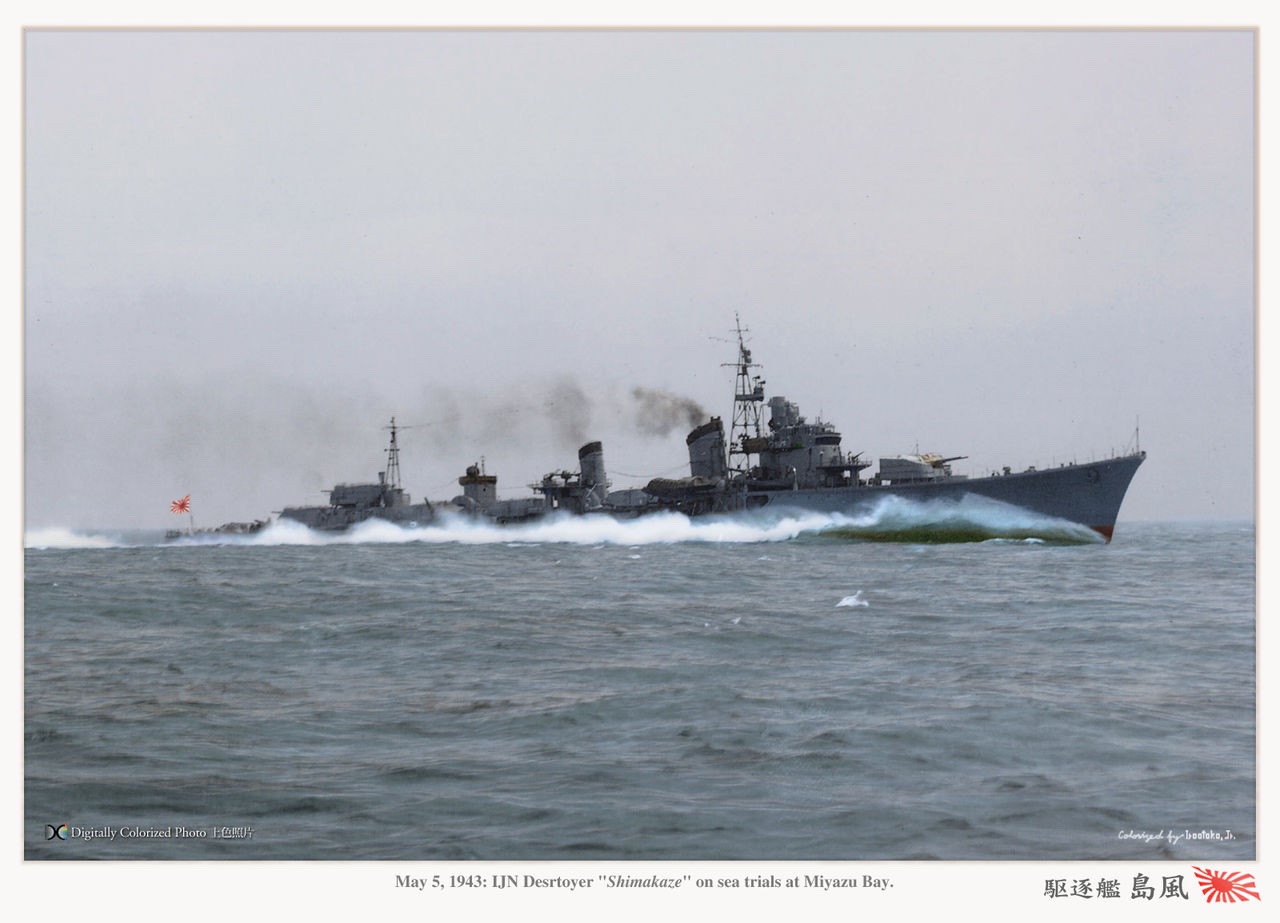
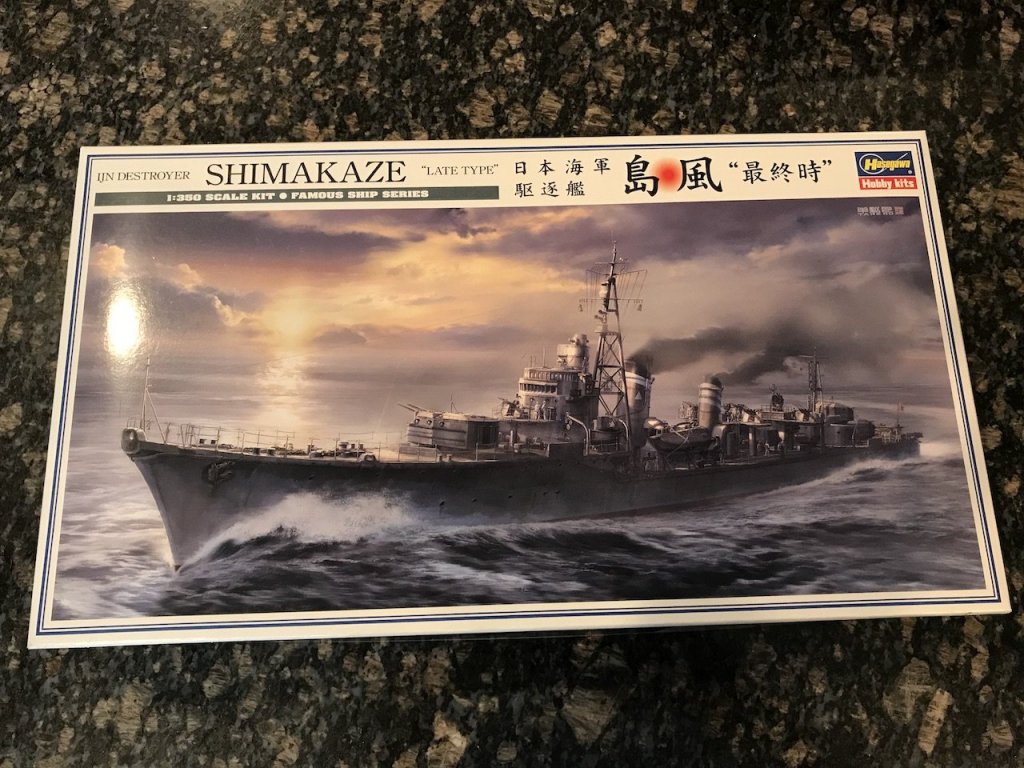
Seems like most of the action these days on MSW is with the plastic kits, so I decided to join the crew with the Hasegawa Shimakaze kit. I ended up buying a couple of more advanced plastic kits from a MSW member (noted in my signature), but wanted to start out with something a little easier. Good timing, as my nine-year old daughter wants to work on a Revell 1:48 F/A-18E kit she picked out a couple of years ago when we were at Michael's. So, I figured I can learn on the Shimakaze and hopefully impart some experience and skills to her when she builds her model. History. The Shimakaze is an interesting ship. She was laid down in August 1941 and completed in May 1943. She was based on the Yugumo-class, but included a third quintuple torpedo mount -- the largest torpedo broadside of any WWII destroyer (to accommodate, the hull was lengthened an additional 25 feet). She also had a new boiler and turbine system that provided for very high speeds (40.9 knots) among the fastest of any WWII destroyer, and was also one of the first Japanese destroyers to be outfitted with the newer Type 22 radar. Fairly unremarkable service though, and she was sunk in Ormoc Bay in November 1944. She was the only one of its class to be built - known as the Type C destroyer - as part of Japan's 1939 Program. An additional 16 Type C destroyers had been planned, but were cancelled when the resource strains during the war caused Japan to turn from new or more complicated designs to more established and simple ones. Kit. The kit is one of the newer Hasegawa kits, and seems to have had pretty favorable reviews. I bought the Hasegawa PE and linoleum deck add-ons, and also bought the Infini detail pack. The Hasegawa PE add-on appears like it will be mostly duplicated by the more expansive Infini kit. I also have some other detail add-on kits like the ones below that I might use. Resources. I picked up the following resources that seem to provide quite a lot of detail: In case anyone is interested in picking up a plastic kit, Scalemates.com is a great resource that consolidates reviews, after market accessories, resources, build logs, etc. for kits. The one for the Hasegawa Shimakaze kit is here: https://www.scalemates.com/kits/hasegawa-40029-ijn-destroyer-shimakaze-late-type--995983
- 154 replies
-
- 16
-

-
I ordered one of those Tamiya turntables (actually, a pack of two) from Amazon - not sure if I'll get them as Amazon emailed me that the seller didn't provide them with shipping info. They are supposed to be here by the end of the month, but if not, I might have to reorder.
-
Nice approach Javelin. I was wondering what to do about adding exterior PE to the hull earlier in the build so I can prime and paint at same time. Maybe I should rethink that. I’m a bit clumsy around my builds. 🙄
-
I see I’m not the only one that realizes there is only one logical way TP rolls should be installed. Can you talk to my wife?
-
Looking good. For the planksheer, I believe I sanded it flat with the first planking. For the second planking, I’m using a thicker plank. It seemed impossible to keep planksheer extended past the hull an even amount along the full hull.
-
Looks great Javelin! Colors look fantastic. Your experience with the PE makes me a little nervous. I started going through the kit this morning, and am marking where there is duplication between the Hasegawa PE and the Infini PE. Will probably practice on the duplicate parts to get a handle on this PE stuff.
-
Finishing a silkspan sail
Landlubber Mike replied to Kevin Kenny's topic in Masting, rigging and sails
It might be sold under the name "Modelspan" too - my limited understanding is that modelspan and silkspan are pretty much the same thing. -
Thanks Harley, great advice. Well, I have everything ordered so should be able to start soon. Just need to clear out some other projects I've been working on, and then can start working on the Shimakaze. Just wanted to thank you all again for your tips and insights. Members here are so great about helping beginners move up the learning curve quickly (and better yet, start higher up on the curve). Really appreciate it!
-
Research, learning about plastic kits after not working on one in the last three decades, acquiring supplies, etc. Amazon and eBay tell me I have a lot of goodies waiting for me when I get home from work. Actually I’ll probably start this weekend (I’m building the Hasegawa Shimakaze 1:350 with Hasegawa and Infini upgrades). Not sure if I’ll do a build log as it might be littered with frustration and bad language. 😐
- 345 replies
-
- 6
-
-
- graf zeppelin
- trumpeter
- (and 2 more)
-
It’s logs like this that made me want to try plastic models. Incredible job!
- 345 replies
-
- 6
-
-
- graf zeppelin
- trumpeter
- (and 2 more)
-
Thanks! I ended up going with Tamiya. I’ll have to check out that resource.