


Landlubber Mike
-
Posts
4,543 -
Joined
-
Last visited
Content Type
Profiles
Forums
Gallery
Events
Everything posted by Landlubber Mike
-

IJN Maya by Javlin - Aoshima - 1/700
Landlubber Mike replied to Javlin's topic in Plastic model kits
Looks great! -
Guys, thanks very much for all the information. Really appreciate it! Like all tools, just want to make sure I go for quality, and these tips and resources are invaluable. It's funny, I went to painting with wood on my wood models because I hate painting, but doing plastic it looks like painting is necessary. So, maybe I'll go back to painting my wood models - it takes a lot to paint with wood, particularly when the color scheme is more complicated. Thanks again!
-
It looks like I'm going to do some plastic kits with my daughters, and of course in looking at the logs on here and the various kits out on the market, I'm thinking of doing a kit or two myself. So, I'm looking to get an airbrush set - any recommendations? I don't mind spending a little more money on a good one that will last. I've been watching videos and looking at airbrushes, but I figured I would see what folks here are using. Something good quality, not as noisy, etc. Thanks in advance!
-
I’ve dealt with Euromodel twice, and they have been nothing short of fantastic. The first time was to buy one of their lion figureheads because I was building the Lyme using the Corel Unicorn kit. The second was to ask them about replacing a missing plan sheet and warped keel on a used La Renommee kit that I had picked up on eBay. Not sure if he is still there, but Massimo was such a nice guy to deal with. Just be aware that they are shut down in August believe for the Italian summer holiday. I wouldn’t hesitate to buy from them. I agree with Mark that the Euromodel plans are among the best out there, very detailed. And Pete’s built notes are an invaluable resource.
-
Hey Martin, your Fly looks fantastic! For what it’s worth, I would go with a more rounded quarter badge. I just personally prefer that look to a flat one. Also, it seems with all the enhancements you made to the stern, a flat quarter badge would look out of place. If you had done the stern with the built up kit PE pieces, then the flat quarter badge would give a consistent look. With a more rounded stern, I’d think a more rounded quarter badge would look better. All that said, a rounded quarter badge will take a lot more work. I started building the pieces for my Pegasus, but got a little stuck trying to figure out how to do the top part and incorporate the two dogfish design. But I have faith in you - if you can do the stern as great as you did, the quarter badge will be no sweat for you.
- 467 replies
-
- 1
-

-
- fly
- victory models
- (and 1 more)
-
Miniature Russian carving tools
Landlubber Mike replied to druxey's topic in Modeling tools and Workshop Equipment
My set from Mikhail arrived this week. Got stuck in customs and took about 6 weeks, but well worth the wait: As everyone said, they are really well made and at a nice price. I bought some micro gouges and other tools from Dockyard years ago, but these are much higher quality. As you can see, I opted for the more decorative handles and glad I did so. The tools are almost too beautiful to work with and dirty. Mikhail is a very nice guy, and google translate worked very well for our communications. He stayed on top of the delivery to make sure that the package got to me and periodically checked in. I’m sure some may have misgivings about communicating in a foreign language with someone halfway around the world, but it was a very smooth process, customs delay aside. I believe he makes batches of these twice a year, so if you are interested, it’s best to contact him sooner rather than later. Mine was the last set for this batch, otherwise I would have had to wait until the fall. Thanks Mikhail!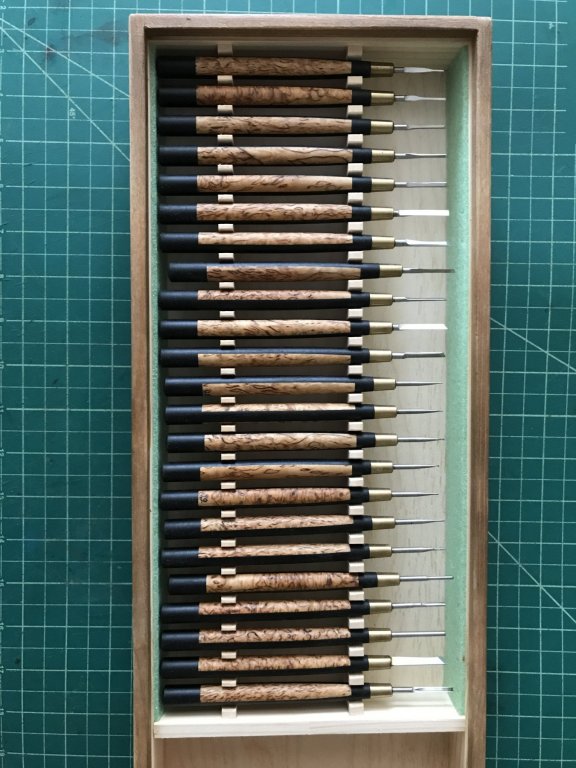
- 73 replies
-
- 10
-
-
To get the hang, I added a weight to pull the slack down. I forget what I used - it might have been a toothpick or a pin - something heavy enough to pull it down yet light enough so the rope would naturally hang without looking sharply angular at the nadir. Then a couple of coats of well diluted PVA to set things.
- 714 replies
-
- 3
-
-
- lady nelson
- victory models
- (and 1 more)
-
Those anchor buoys are looking awesome. Not at all easy making that rope basket - I had a lot of choice words when trying to get them on the buoys for my Badger.
- 714 replies
-
- 2
-
-
- lady nelson
- victory models
- (and 1 more)
-
I think there are already a lot of Chinese GRS knock-offs on eBay.
- 714 replies
-
- 1
-
-
- lady nelson
- victory models
- (and 1 more)
-
Pear takes stain very nicely I've found.
-
Yeah, I would definitely tie them to the ring bolts and then insert the ring bolts into the bulwarks. Not sure I see doing it any other way. Use the one you have now to test out lengths of the breaching rope to get to the proper length to have adequate sag, etc.
- 714 replies
-
- 2
-
-
- lady nelson
- victory models
- (and 1 more)
-
A beautiful gift! Really kind of you. Hard to tell which looks better - your LN or the knife. Both are works of art. 👍
- 714 replies
-
- 2
-
-
- lady nelson
- victory models
- (and 1 more)
-
Hey Mark, sorry to hear about things. Hope 2019 is treating you a little better. Everyone is different, but for me, having multiple projects going on of various lengths works. I find I get excited by a project, then eventually that enthusiasm dwindles, or I get stuck or feel overwhelmed. Then things stop being fun and the project turns into a chore. Having something else to turn to, even if it is a different pursuit, keeps my spirits elevated and i’m in a much better state of mind approaching whatever it is I’m working on. These long projects that run years do require a particular personality and mindset to get through I think. That’s why having some short projects in the mix where the finish line is measured in days or weeks really helps. I just started playing around with turning pens and am having a blast. Turned a few pencils for my girls and I’m a hero to them. I’ve also started looking at other things, including ships in bottles which take significantly less time to complete and you don’t have to worry about absolute perfection at such a small scale (especially when the glass provides some distortion). I also think that coming to MSW and seeing the incredible artistry is mostly a blessing, but sometimes is a bit of a curse. I get inspired for sure, but there are times when I feel like it becomes a lot of self imposed pressure to build the model at a high level. For me it’s not that I would feel embarrassed to post my work, just that you come here and see what can be done and want to do the same. In some ways it would be nice to just open a kit and build it from the box without really mentally torturing myself to get things perfect, historically accurate, etc. Anyway, sorry for getting philosophical on this. Take care of yourself my friend. Looking forward to seeing whatever you end up doing.
-
That's really beautiful work. Wow, very impressive! Funny about gluing brass - if you find a solution, I'm all ears. Gluing brass on my first model led to a lot of nasty words and visions of testing it out as a glider by throwing it out the window. 😳
- 714 replies
-
- 2
-
-
- lady nelson
- victory models
- (and 1 more)
-
Welcome back! Your Pegasus was one of the builds that inspired me to start this kit. Coppering looks great!
- 161 replies
-
- 1
-
-
- pegasus
- victory models
- (and 1 more)
-
Funny, I actually prefer a darker wood hue on models. To me, looks more realistic and more "patina'd" than something in very light woods. Very light woods like using holly for decking just seems to almost impart a painted plastic look. Certainly nice, but not my taste. All that being said, I think offering upgraded wood options is a great idea. I wish more kit makers would do that. It's why I have bought my last few kits second-hand for substantial discounts off of retail (since I would replace the visible wood anyway) rather than purchasing direct from the manufacturer.
-
Welcome! This site is a friendly place with great people with lots of knowledge and experience. I believe there are a few threads on here asking about good first kits. Different manufacturers have different reputations when it comes to kit wood, kit fittings, instructions, historical accuracy, etc. Spend a little time asking questions and looking at various build logs to see what mix works for you. Depending on your comfort level, I'd start with something with decent instructions as a first kit to build. The Model Expo/Model Shipways kits are usually pretty good when it comes to instructions, but the fittings are pretty rough. I started with the Caldercraft Brig Badger, which had a 60-page manual, with great fittings and for the most part, really good wood in the kit. Good luck!
-
Looks great Bob. Might have been a poor kit, but sure turned out to be a beautiful model in your skilled hands. Hope 2019 treats you better
- 359 replies
-
- 4
-
-
- prince de neufchatel
- model shipways
- (and 1 more)
-
Very cool work Dave. Love the enhancements and following all your creativity! I saw you mentioned you build the Wanderer in wood. Do you have a picture of that one? I'm working on the Morgan at the moment, but have thought about scratch building another whaler like the Wanderer once I'm through the kits on my shelf.
-
Beautiful work Vince!
