Landlubber Mike
-
Posts
4,543 -
Joined
-
Last visited
Content Type
Profiles
Forums
Gallery
Events
Everything posted by Landlubber Mike
-
 Hi Max, coming along really nicely. Look at the size and shape of the stem on the FWZP! I agree with you and Pete on Euromodel kits. I'm currently working on the La Renommee, and the plans are so detailed you have the ability to choose along a long spectrum of whether to build the kit from the box to almost a scratch build to somewhere in between. It's been fun and a great learning experience working on my kit so far.
 -
Lighting the Work Area
Landlubber Mike replied to Richmond's topic in Modeling tools and Workshop Equipment
I added new LED 4’ fixtures to my workroom. Amazing difference! My fluorescent was starting to go, and I noticed I was straining to see what I was working on. Having good light is very important! I tend to agree about having bright white light for a work area, versus softer whites for the rest of the house. When playing with woods and finishes though, I like to bring them to a room with natural sunlight/softer white lights. -
Thank you Popeye, Santa was very good to us. I even got a few nice gifts this year. Hope you and your family had a wonderful Christmas as well! Mark, that's what I did - though, I usually use my kids' Legos 🙈
-
Thanks guys. So assuming I go with the lids, is it more correct to go the TFFM way of planking the inner hull (where the planking covers the edges of the port sills) or zu Mondfeld? The cleanest I think would be the TFFM way, so that's what I was planning but open to doing it differently if there's a more correct way. Reason why I'm asking is that under the TFFM way, I'd line the gunport now after the first planking. Under zu Mondfeld, I'd have to run the second inner hull planking, then cut the gunport. Thanks!
-
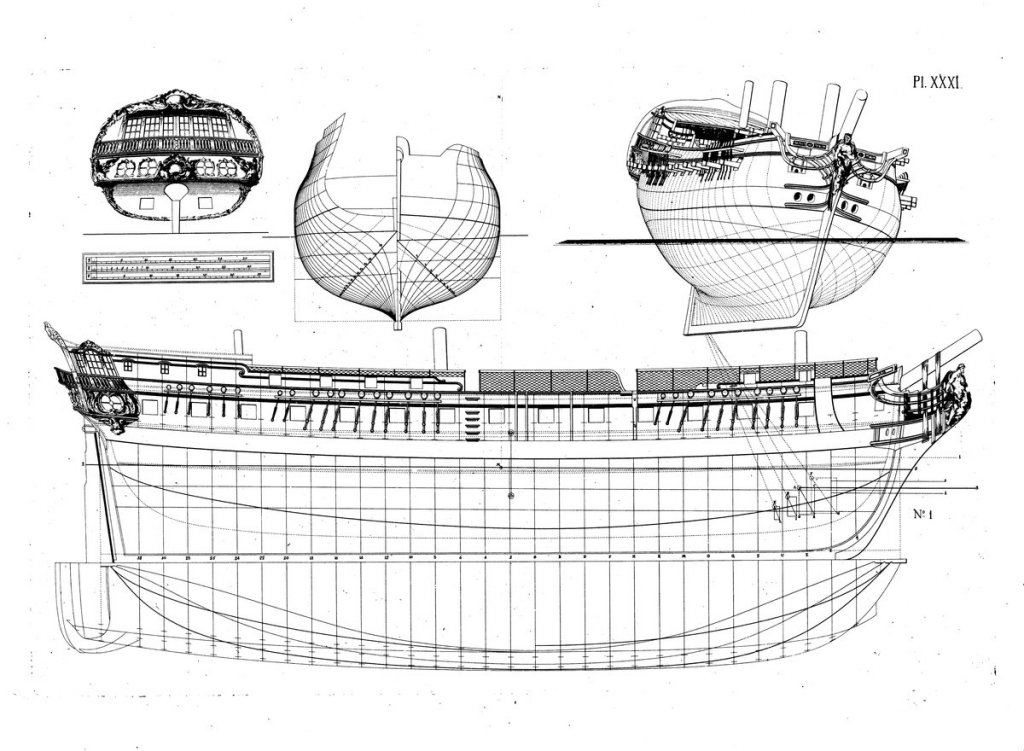
Thanks guys, really appreciate the help. So, I'm still not quite convinced that the ship represented by the kit is French (I have an extensive discussion about this on my build log). It clearly is taken from Chapman's Architectura (Plates 31 and 32), but there has been some research that Admiral Paris in his book miswrote a description and mistakenly ascribed the Chapman drawings to the French ship La Renommee. It clearly is a different ship from the one in the Ancre monograph (the dates also don't line up). My guess (and others as well, including zu Mondfeld) is that it is a Swedish ship as it shares many of the same design elements as Chapman's Venus: Looking at the Venus, there are gunport lids. The kit plans show gunport lids, and I took a look at a number of other builders of the Euromodel kit (or builders off its plans), and every one includes lids except for the one from Kenji Nakajima interestingly: https://www.euromodel-ship.com/eng/la-renommee-2.html Not sure if this is dispositive, but Chapman plate 32 shows the bridle ports with closed lids - does that mean if the bridle ports had lids, the rest of the gunport did as well? So, I'm not exactly sure what to do. I'm leanings towards adding lids I suppose given that Chapman's Venus plans clearly show lids. If a ship did have lids, I imagine there would need to be a sill?
-schematics.jpg.742386dfdce2b975a69ebe82de0dbdea.jpg)

-
I’m at the stage in my La Renommee build where I need to think about the gunports. I’ve completed the first planking, and will add not only a outside hull planking but an inner hull/bulwark planking as well. The question I had was on how the inner hull planking lines up with the port stops. TFFM says that the upper edge of the spirketting lines up at the same level as the tops of the lower sill stops, and that the quickwork is flush to the inner sides of the stops at the sides of the port. Zu Mondfeld’s picture doesn’t show the quickwork, but suggests the upper edge of the spirketting lines up with the bottom edge of the lower sill stop. I’m assuming TFFM is correct, so was thinking my construction sequence would be as follows: 1. Cut out gunports with an extra 3-4mm or so per side to account for gunport frames with sills using 1.5-2mm material. 2. Add the gunport frames, and sand them back to contours of outer and inner hull curvature so they line up flush on both sides of the first planking. 3. For the inner hull planking, run the planks so that the sills are overlapped (planking runs to edge of inner edge of sills). 4. For the outer hull planking, run the planks so they only slightly overlap the port frames to end up with the port sills equal to that on the plans. Does this seem like a reasonable approach? If zu Mondfeld was correct, I would probably change things be planking the inner hull planking first, then cut out the gunports, then finish with the outer hull planking. I’m hoping TFFM is correct because I think the construction process will be a lot easier and cleaner in the end. Thank you in advance for any advice. Merry Christmas and Happy 2019 to all my friends on here!
-
Sorry I was referring to the Wallace Mark. But I tend to agree with you too Mark on the use of spacers.
-
Thank you very much Robert, Nick, Pete and Mark. Really appreciate the kind words! Mark, I’m wondering about using spacers and braces between bulkheads. I’ve always been concerned that there might be some flex depending on the what the bulkheads are made of. For example, if basswood, there probably will be some flex. On the other hand, my Amati Pegasus used MDF, and there was zero flex. When I installed the spacers/braces, I was very careful to use Legos on the opposite sides of the bulkheads to keep them square. But, if your braces/spacers are slightly too short or too long, it seems to me that you end up pushing or pulling the bulkheads out of alignment. Is it just better to include square blocks in the corners where the bulkheads meet the keel? I don’t know. I guess you do your best, and make any adjustments when the skeleton is glued.
-
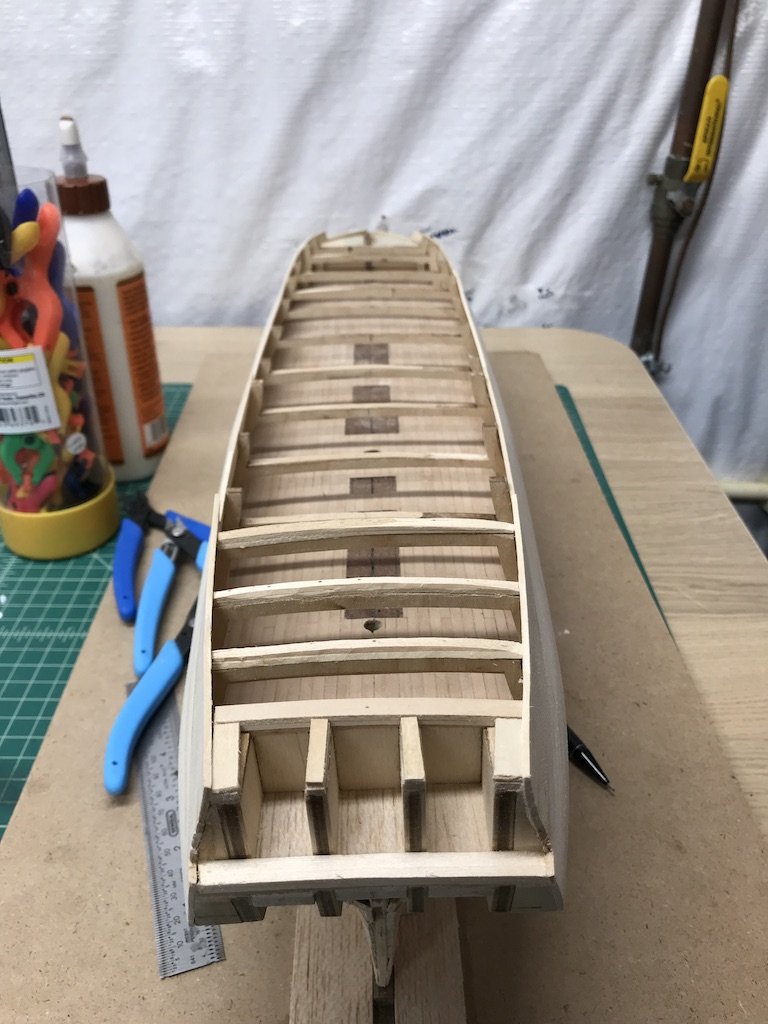
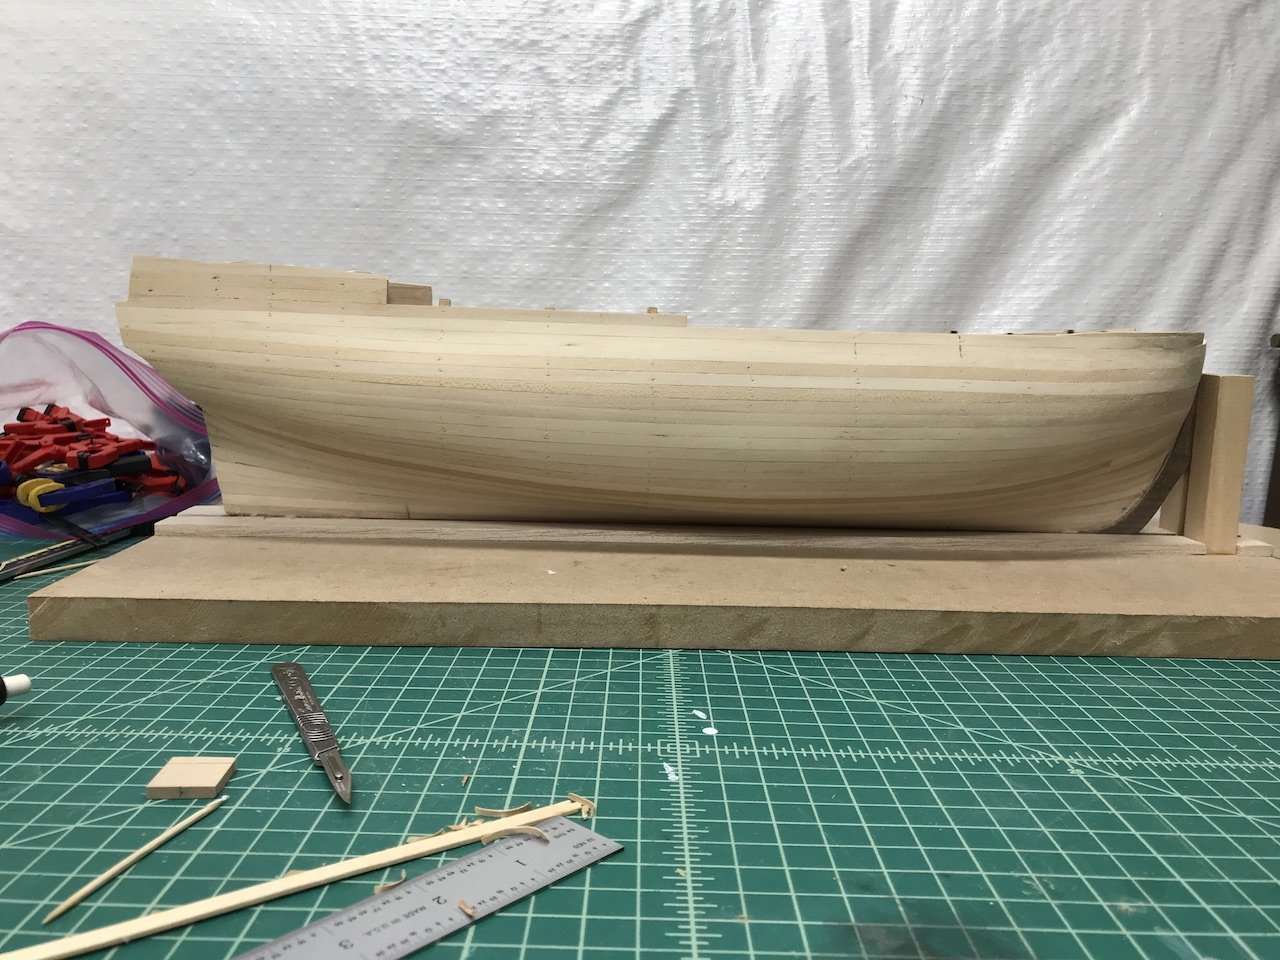
So I've finally had some free time and completed the first planking (I also installed some new overhead LED lighting which are making a world of difference in lighting up the workshop). I used my palm orbital sander to sand the hull down - it's a great tool that makes sanding much easier and quicker for jobs like these. I need to do some touch ups and finalize the heights of the bulwarks, but figured I could do that once I had a better idea of how things were lining up with the gunports, rails, etc. Wont need much filler at all, but I want to take another look at the top area near the stem, where the bulkheads seem to suggest a more vase-like curvature: Before doing all that, I spent considerable time measuring and adjusting the bulkheads. Part of the issue is that the replacement keel Euromodel sent me to replace the kit's warped keel was itself slightly warped with a very tiny twist beginning near the eighth bulkhead. I thought I had largely resolved it (using blocks and wood brackets between the bulkheads), but when looking at the stern directly from the back I noticed that there was a slight lean about 2mm towards port. That meant that the starboard side was too high and too far to the midline, and the port side was too low and and a touch too far to port. So that required hours of measuring, adding/subtracting material, etc. Everything now looks much more symmetrical and square. It was a pain, but I'm glad I took the time. I also had to make some adjustments to the quarterdeck area bulkhead tops. As PiratePete notes in his very helpful build notes, BH 14 needed extra material. I also ended up having to add material to BH 11 - BH 13 to varying degrees to get the proper slope to the quarterdeck. I noticed, however, that one of the plans has the quarterdeck more level while another plan has it more on an incline. I went with the latter and will deal with it once I am closer to installing the quarterdeck. I also added material to the ledge where the rear balcony sits (just aft of the stern extensions in the picture below). In part I needed to adjust for the twist in the keel. The plans also suggest that the balcony is a touch higher than where the kit parts end up, but that might ultimately depend on how I build the balcony. In any event, I can remove any excess height from that area when I figure out what needs to be done. The plans can be somewhat inconsistent with one another which can be frustrating, but they are usually pretty close. Much better than the Corel Unicorn where measurements differed by as much as 5-10mm amongst the plans! I imagine this is one of the issues builders had to contend with when kit bulkheads were/are hand cut and plans hand drawn. New kits probably are a lot more precise and consistent with laser cutting and computerized plans. I'm pretty excited about how things are coming out - it looks more like a ship every day. It's also got a lot of curves and some decorative elements that should make for a nice model. It's been fun in the meantime as this kit, as I understand other Euromodel kits, bridges a little of the gap between pure kit builds and scratch builds. It's also been fun and a big learning experience comparing notes with PiratePete, whose build notes are a real asset for people building this kit or other Euromodel kits. Happy holidays!


-
Really nice Joe. I found I had to modify the pedestals as well for my Badger. The canarywood looks great. I really like it!
- 136 replies
-
- 1
-

-
- caldercraft
- Cruiser
- (and 2 more)
-
David, really nice work on the deck structures. Coming along really great! Seeing the Morgan in person is well worth it. Makes working on the model all that more special in my opinion.
-
My top 4 most useful tools
Landlubber Mike replied to Tim Moore's topic in Modeling tools and Workshop Equipment
This is a stupid question, but can I ask how you use your plane? I have the mini plane and mini chisels, but haven’t figured out what ways they can be used (and even more basically, how to use them. -
Sherline has an option of converting their lathe into a mill. That could be an option.
-
Your work and experimentation are inspirational. Thank you for sharing your efforts!
- 2,699 replies
-
- 1
-
-
- heller
- soleil royal
- (and 9 more)
-
Amazing! That last shot looks like it could be taken off the box cover! Looking forward to your barge build!
- 1,351 replies
-
- 2
-
-
- constitution
- model shipways
- (and 1 more)
-
Looks great Nick. The colors are all complementing each other nicely. Fantastic!
-
Max, looking forward to following your work on this kit. I have it on the shelf and agree that it’s a really fantastic kit of a beautiful subject.
-
Beautiful work Marsalv! Thank you for sharing your build progress and techniques! I bought the monograph off eBay years ago when it was listed for a great deal, and have always wanted to build it once I gained more skill and experience. It's a relatively plain ship compared to some of the other Ancre subjects when it comes to ornamentation, but I think it's a beauty.
-
I would never have guessed that’s what you did, but have to say I really like the results! Very nice and realistic looking. I meant to also thank you for testing out thread in the skylight. I am using yellowheart for the yellow ochre areas on my Morgan, and was wondering if I could run the wood through a drawplate to get skinny rods like that (yellowheart is very splintery at times). I considered using brass rod as a fallback, but thread looks to work really nicely.
- 145 replies
-
- 1
-
-
- model shipways
- charles w. morgan
- (and 1 more)
-
David, great work! Coming along very nicely! I like your deck - can I ask what wood and finish you used? Looks very natural and close to the real thing.
-
Thanks Pete! Hubac, thanks for looking in. I’ve thought about taking that approach, but worry about whether the structural integrity will be weakened. The gun deck is almost completely obscured by the main deck save for a small opening between the main and fire masts. In addition, I don’t think I can achieve complete historic accuracy of the gun deck level as the plans don’t show the locations of the hull runs (i dont think that the bulkheads completely match up with them). What I might do is frame the gunports in redheart but paint the inner bulwarks red ochre. Not sure if anyone will be able to distinguish the painted areas from the use of redheart. That will save some money on the redheart which I can use in the more visible areas (like main deck bulwark planking, main deck gun carriages, etc.).
-
Thanks for sharing the results of your experiments. Very informative! One thing that has bothered me with paint on models is the contrast of the painted areas against wood that is unpainted but finished with oil, wipe-on poly, etc. The unpainted wood will look like it’s aged, has patina, has 3D character of shadows and depth, etc. The painted areas on the other hand look plastic-y (lack of a better word), leading to a bit of a clash to my eye. That’s why I’ve been trying to paint with wood on my current builds - essentially to get a consistent “look” throughout the full build. That being said, using washes, highlights and lowlights, etc. like the Herbert models show how you can very nicely get a similar look to painted areas. His models are gorgeous!
- 2,699 replies
-
- 2
-
-
- heller
- soleil royal
- (and 9 more)
-
Hobby/micro drill press suggestions
Landlubber Mike replied to bigcreekdad's topic in Modeling tools and Workshop Equipment
I have the Dremel workstand and as others have said, it's a bit wobbly and imprecise. You can make it work unless you are looking for absolute precision. In addition to the other suggestions here, have you considered looking at mills? If you are thinking of eventually purchasing a mill, then it might be worth thinking about pulling the trigger on a mill instead which can also function as a drill press. I have one of the Sherline mills and have used it more than a few times to drill holes. They aren't inexpensive, but they will last a lifetime as they are built like tanks.