Landlubber Mike
-
Posts
4,543 -
Joined
-
Last visited
Content Type
Profiles
Forums
Gallery
Events
Everything posted by Landlubber Mike
-
 Beautiful work! Very clever idea with the picture frames.
 -
I bought them when they were on sale - haven't used them yet, but I think when I get copper plates on my models, I'll be more inclined to use the foam cradles rather than the kit ones.
-
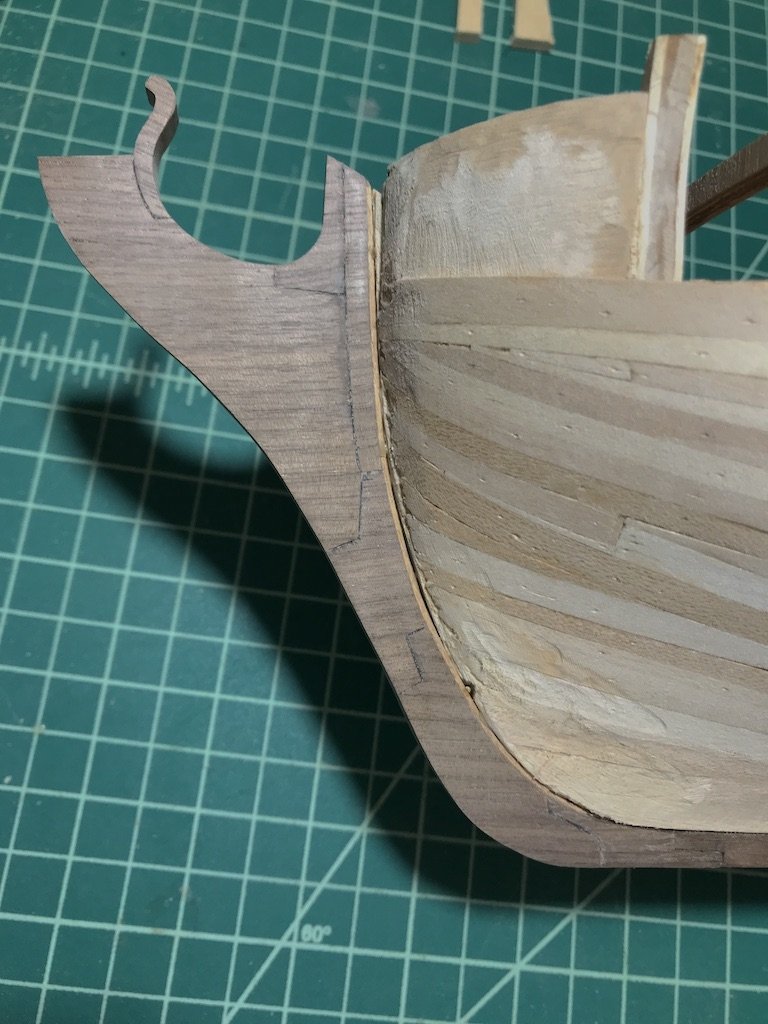
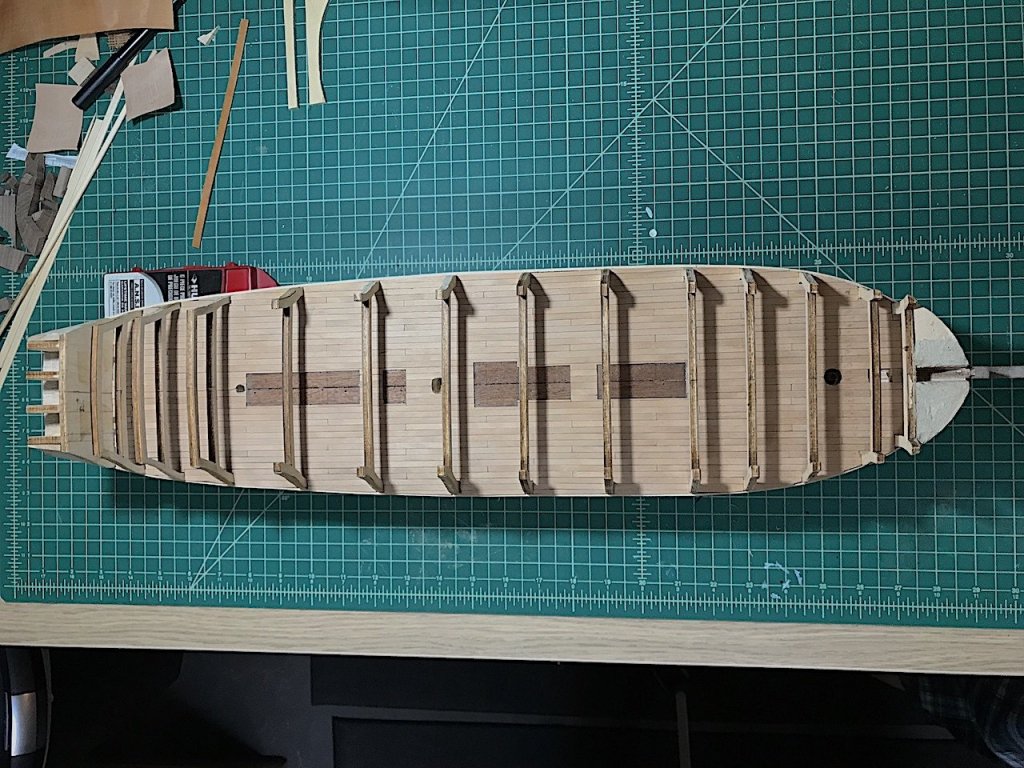
It's been a while, but I'm finally at a point where I can show more progress on my build. As I mentioned before, I wasn't too happy with the different colored wood for the stem and keel pieces. I thought maybe I'd be ok with it, but the color disparity kept bothering me so I replaced the stem and keel with walnut from Crown Timberyard. It was a bit tricky in that I had epoxied brass rod through the keel for added strength, as well as from the fact that I had drilled holes in the keel for the pedestal screws, but all seems to have worked out ok in the end. I also took the opportunity to build the stem in seven pieces according to the plans. I need to do a little cleanup, including sanding taper into the stem and keel, but I'm pretty happy how things turned out. The walnut is actually pretty dark - the lights in my workshop washed out the color a bit. I also finally finished planking the gun deck. Most of the gun deck will be covered so I didn't attempt to make it pristine, but I went ahead and planked the full deck as a practice run for the main deck and quarterdeck. It should work nicely against the new walnut I'm using from Crown. For the deck, I ended up using some light cherry veneer that I found from Woodcraft. The veneer was a little tricky to use because the sheets were a bit wavy (probably from the cutting process). The sheets were thicker than I needed, so I just ran them through the thickness sander to get to the thickness I needed, which helped cure the waviness issue. I was originally hoping to do both the deck and upper hull planking using the veneer, but I likely won't have enough. Thankfully, on a second run to Woodcraft I found another batch of similar veneer which is a touch darker. So, it should all work out. I also picked out some cherry dowels which were on a big sale that I likely will use for the masts to tie the colors together. Next, I'll probably work on the upper hull planking. I need to figure out what to do, however, when it comes to the bulwark planking at the gun deck level. I have the Keith Julier Period Ship Handbook that covers his work on the Renommee, and he just took planking strips across the inner faces of the bulkhead extensions. I'm not sure that is correct, given the aggregate hull thickness at the gun deck level would exceed 10mm after two layers of outer hull planking. Running bulwark planking between the bulkhead extensions would give you the 5mm or so thickness that matches the plans. I'm still thinking about whether I will be painting the bulwarks (and cannon carriages, etc.) in red ochre, or using redheart to paint with wood, which I will need to figure out sooner rather than later. It may not matter much for the gun deck bulwarks given that these are almost impossible to see.

-
That would make it much easier, sure, but time consuming.
-
Looks great Jason, one of my favorite logs on this site. How did you do the scuppers? Does the kit come with rings that you just glue on? My Caldercraft Badger kit had rings for the scuppers - they drove me a bit nuts because they kept brushing off the hull. I bought some kind of product that is used in electrical applications that is like a metal tube with a flange on the end (forget what it's called). So, I'm thinking that using those will have more stability because I can insert them into the hull.
-
Coming along nicely! Frankly, I'm not sure what the pins are for. I know some people like to hammer the planks in with pins. I think if you have good wood glue (personally, I'm not a big fan of CA/super glue), you just need some method to keep the planks in place while the glue dries. For me, the pliers are a quick and easy way to keep the planks against the bulkheads while the glue dries. Then when done, I just pull the pins out. You don't have to push the pins in very far as you can see from my LAR build: I've also tried these planking screws from Micromark. They do the job, but are really hard on the fingers (the knurled knobs are rough, especially when trying to screw them into tough bulkheads). Others have made their own based on similar design principles. https://www.micromark.com/Planking-Clamps-10
- 87 replies
-
- 1
-

-
- scottish maid
- artesania latina
- (and 1 more)
-
Welcome! The Terror looks like a nice kit, I think I speak for many when I say it would be great to see a build log
-
Cool idea. Thanks for sharing Geoff!
-
Dave, This is what I use. Much easier than those pin pushers (I feel like I've tried them all): https://www.micromark.com/Spike-Insertion-Plier Much more control over the pin, and super quick and easy to install the pins and remove them. For my first planking, I use this to push the pins just enough into the bulkhead to hold the plank in place while the glue dries. You don't have to push them all the way in. Often times, you can re-use the pins too which is nice.
-
I usually plank my hulls in my lap. I feel that with the angle, and the force needed to insert pins into the plywood bulkheads, it's much easier to do so in my lap. I also don't hammer pins to set the planking. Instead, I use this tool to help set the planks on the bulkheads or filler blocks: https://www.micromark.com/Spike-Insertion-Plier You don't have to push the pins all the way in - just enough to have the plank firmly against the bulkhead while the glue is drying. It's quick and easy, and then you can remove the pins when the glue has dried and use them again. Of course, this is only the approach used for the first planking on a two planking hull.
- 87 replies
-
- 4
-
-
- scottish maid
- artesania latina
- (and 1 more)
-
Wow that Saint Philippe is gorgeous. Might have to add that one to the distant want-to-build list.
-
Hey John, good to see you back. Looking great!
-
Very nice work Clare on a unique, and interesting subject! Congratulations!
-
Not to clutter Ponto's log, but to add to what Pete said, the kit is actually very nice. And the kit is designed to match the frigate in the Chapman plates - which is a completely different ship from the Renommee that is the subject of the Ancre book. In fact, I think the Chapman plates actually represent a Swedish frigate named the Jupiter (hence, the Jupiter figurehead). As Pete said, the plans are very detailed. Unfortunately, it is true that some of the plans don't line up with each other to be perfectly honest. But, it's not an issue. The kit wood and components are well done. Cast metal is never great in kits, but it's pretty good here. The kit provides the cast metal detail pieces as a way to more simply build the ship, but you can always scratch those details like I plan to do.
-
Thanks Popeye for the kind words. I'm slowly plodding along planking the gun deck at the moment, which I have just about completed. I'm planning to spile the upper hull planking which should be interesting. It's a curvy lady! I've also started working on a new stem. I wanted to use wood of a consistent color and grain, and unfortunately the kit walnut differs. So, I'm going to replace the stem and laminate over the keel using some nice dark walnut from Crown Timberyard (as well as plank the lower hull with it). The nice thing about replacing the stem is that I can build it in pieces per the plans, rather than a solid piece.
-
Allatum, I just saw your post. I hope you purchased the kit (or at a minimum, the plans) - it's not fair to the nice folks at Euromodel if you are attempting to build it from scratch using proprietary information owned by Euromodel.
-
Byrnes Table Saw Tips (requested)
Landlubber Mike replied to Matrim's topic in Modeling tools and Workshop Equipment
Dave that's a nice solution. What I've done is set the front lock first, then push out the back side of the fence a bit to the right to help avoid the binding. I believe Jim told me to do that and it works very well. I'm wondering if another solution would be to have a shorter fence that does not run the full length of the table - I'm wondering if a fence that stops a bit past the blade would help alleviate the issue. I have to say, first time I used the table saw and had the binding issue really freaked me out. -
Kevin, love your log. Very nice work! Just out of curiosity - in the picture you posted above, for the octagonal section of the yards, did you use planking strips? Looks really great!
- 1,319 replies
-
- 6
-
-
- caldercraft
- Victory
- (and 1 more)
-
Oh, and congratulations on your upcoming retirement. That's fantastic, I'm jealous
- 467 replies
-
- 1
-
-
- fly
- victory models
- (and 1 more)
-
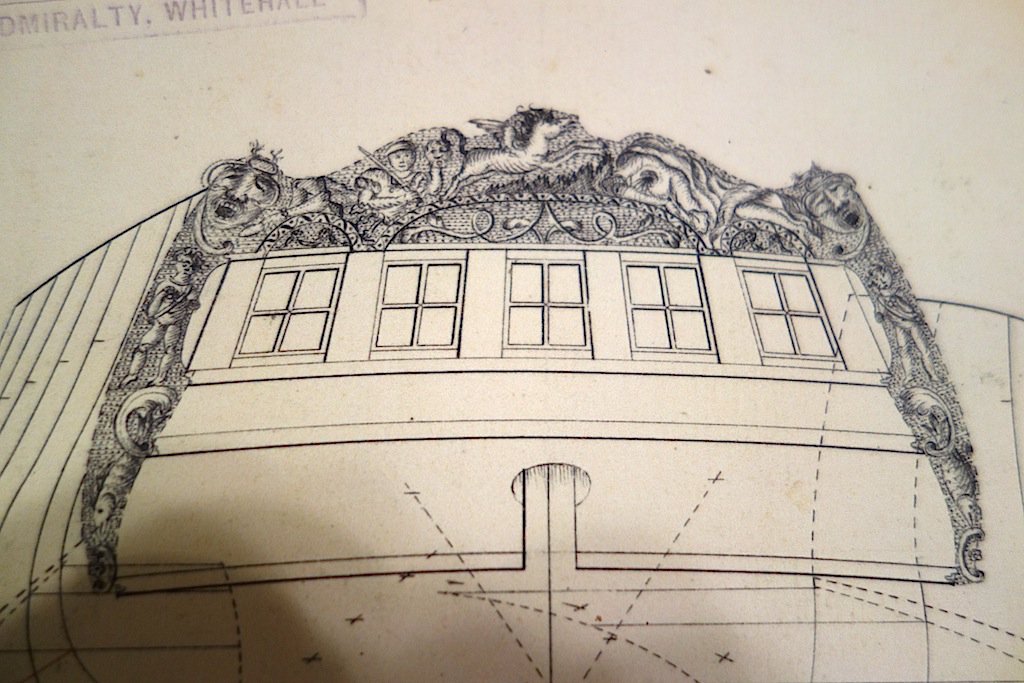
Hi Martin, your stern is really coming along nicely. Great job! I'm planning to carve the items as well. The PE pieces are fantastic, but I think carvings not only provide more of an accurate 3D representation, but also add a lot more charm and character to the build (at least they are for your Fly - we'll see what happens when I get to carvings on my Pegasus). The quarter pieces are what scare me. Do you know if those face outwards at a 45 degree angle? I haven't exactly figured out how to set them along the stern. All I know is that the hanging quarter pieces is the one glaring error of the Amati kits. That being said, I like the quarter pieces and other stern details for the Fly a lot better than those of the Pegasus - going to be hard to carve a beheaded Medusa. The NMM plans are a little incomplete too when it comes to the pilaster ornamentation. I might have to borrow from the Fly plans to fill out the rest of the ornamentation.
- 467 replies
-
- 1
-
-
- fly
- victory models
- (and 1 more)
-
That looks absolutely fantastic Dowmer. Very nice! Any good sources on where to buy AYC? As someone mentioned above, it looks like a really nice way of getting yellow ochre by painting with wood.
-
Coming along really nicely! Are you planning to have one of the models show the cutting station? I've been thinking about whether to show the cutting station or add sails to my model. This may be incorrect but my guess is that many of the sails would be furled with the cutting station in operation, so I think showing the ship in full/close to full sail would be incompatible with showing the cutting station.
-
Very cool, hope you don't mind me following. I think whalers are very interesting as well (I'm working on the Charles Morgan).
-
Looks great David. You've gotten through some of the trickier parts of the build. For the planksheer, I also took John's approach of sanding it flat and then adding a small strip to it to ensure an even extension throughout the hull.
- 145 replies
-
- 1
-
-
- model shipways
- charles w. morgan
- (and 1 more)