Piet
-
Posts
3,568 -
Joined
-
Last visited
Content Type
Profiles
Forums
Gallery
Events
Everything posted by Piet
-
 Hoi Patrick, just caught up and when reading that unfortunate incident with your magnificent Majellan my heart skipped a beat. However, from what you reported the damage is not unrepeatable. I know with certainty that with your skills Majellan will rise just as majestic as she was before. Cheers,
 -
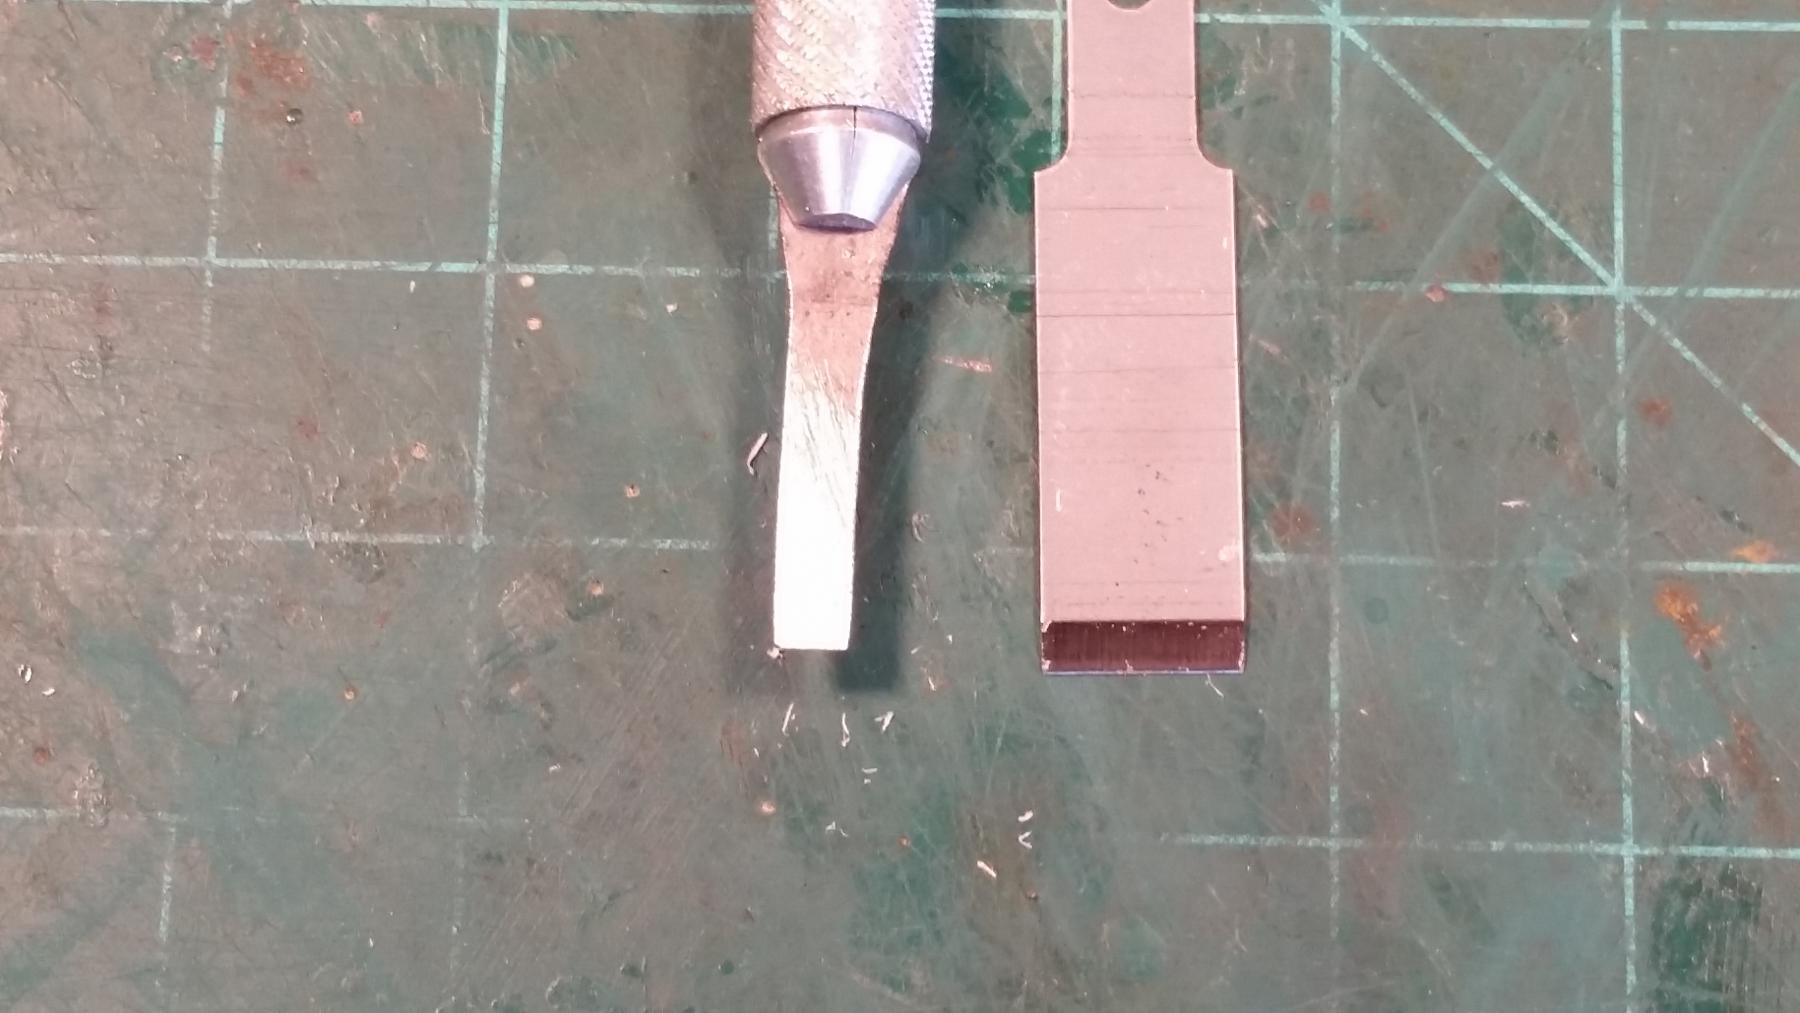
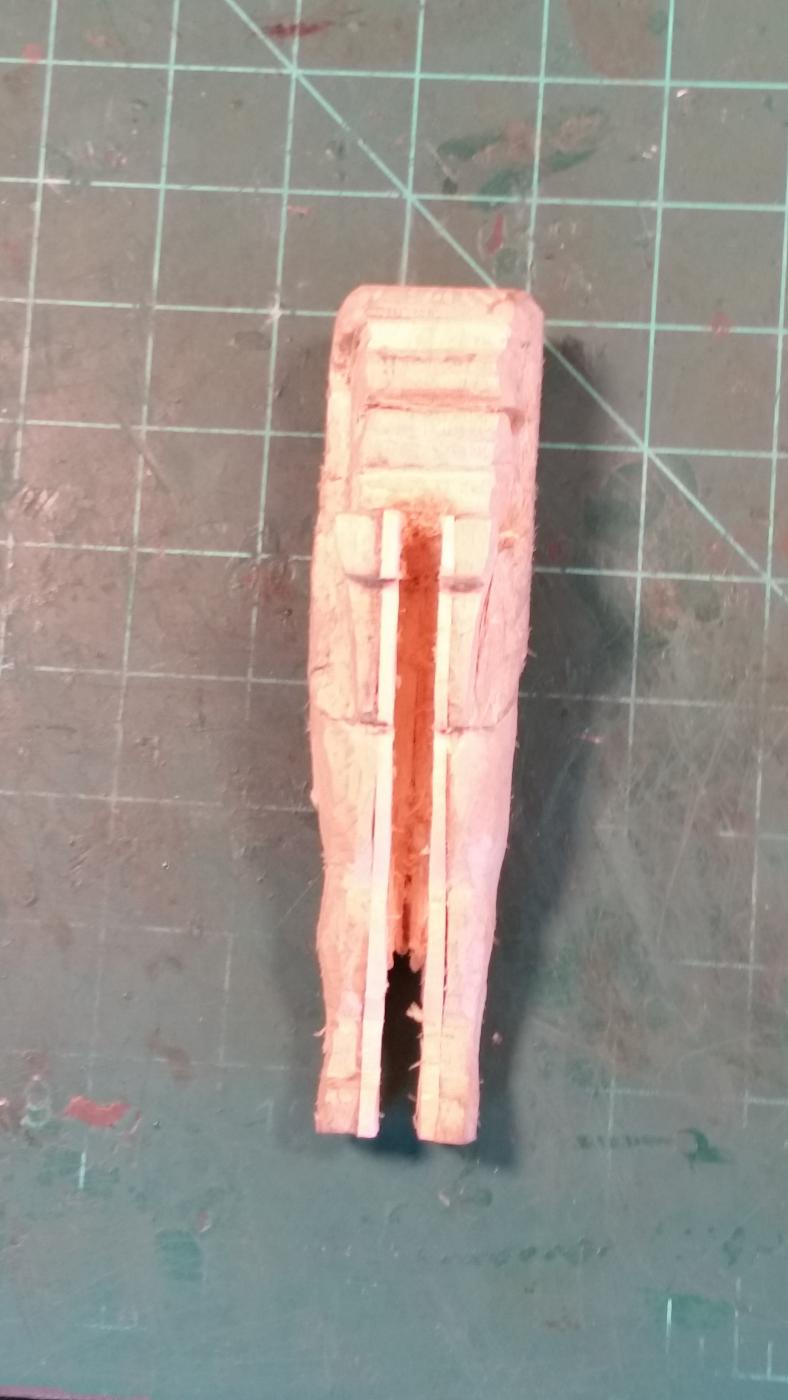
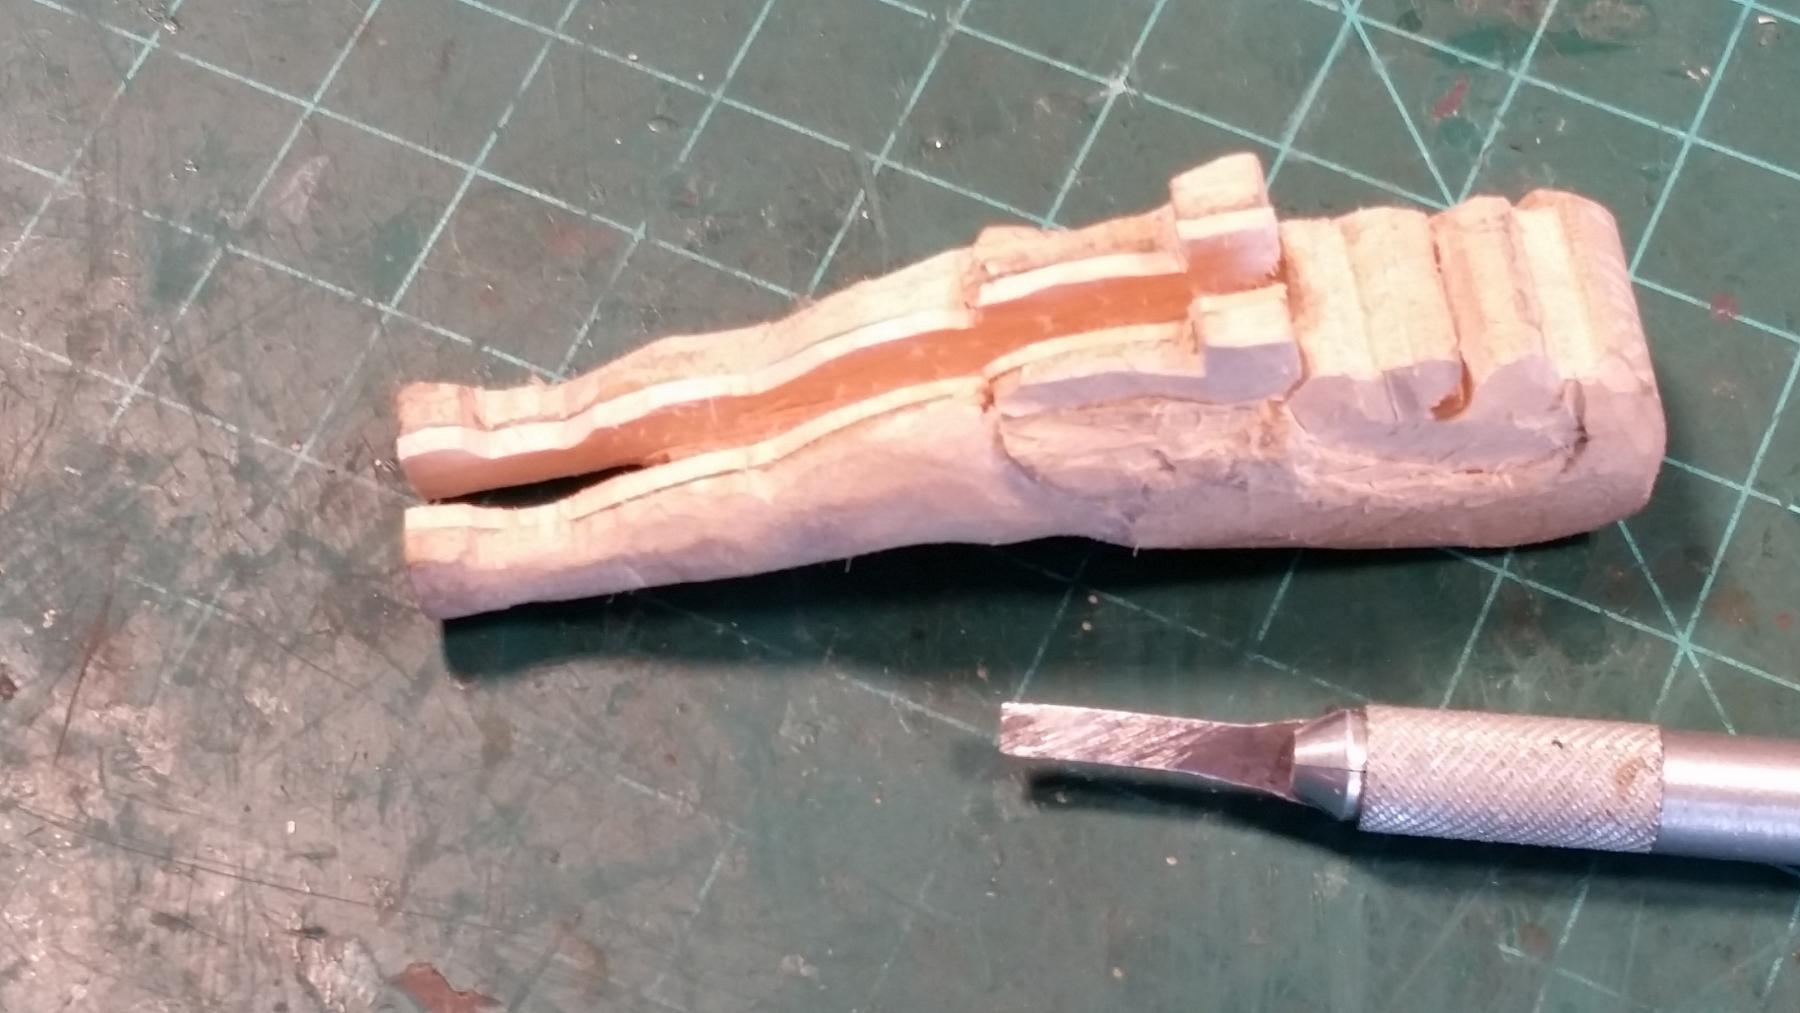
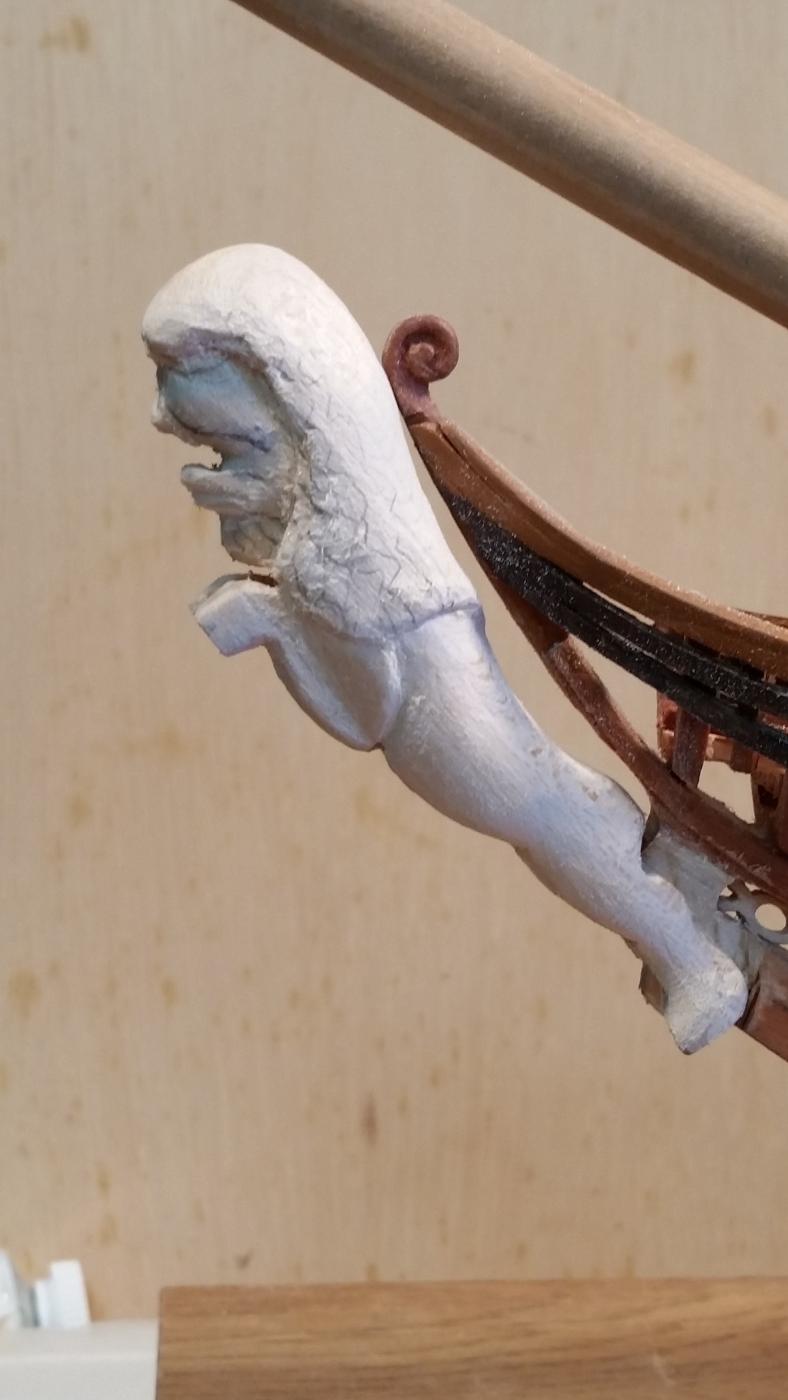
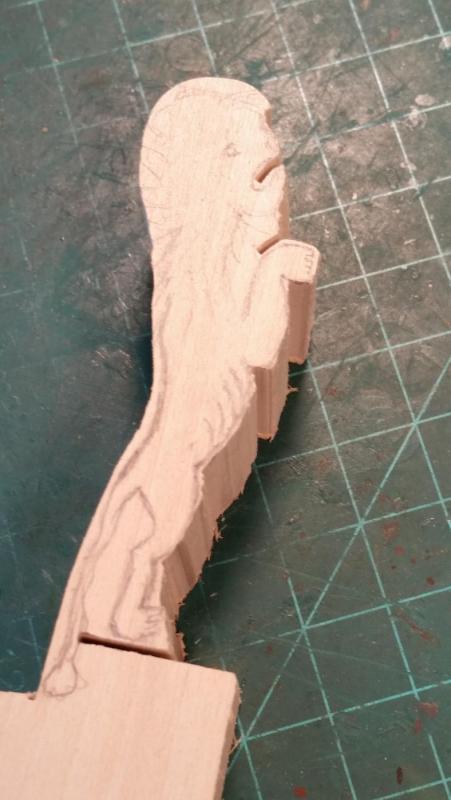
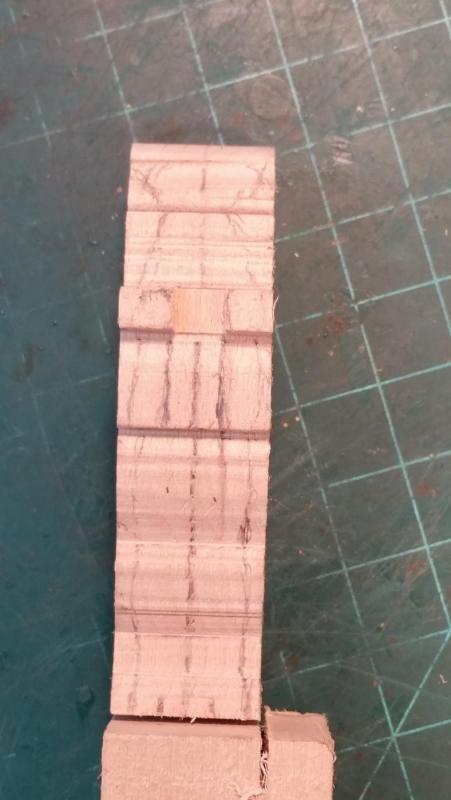
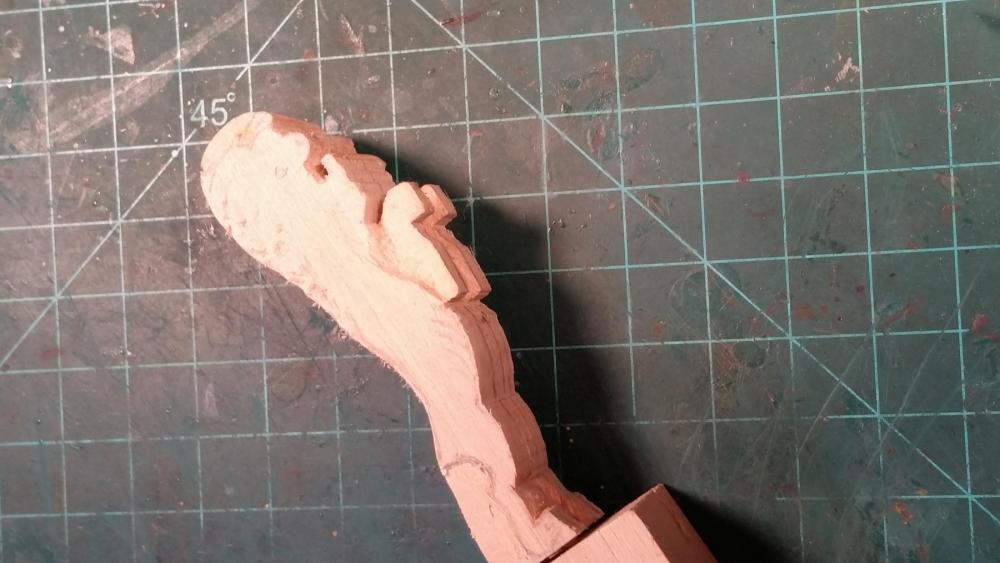
Thanks for the praise Patrick but helping people is part of my beliefs and I really enjoy doing it. Weather has been rather warm the last week or so with a tropical storm thrown in. Temps are now near 95 F or 35 C, in the shade You can imagine how hot my shipyard, aka garage, is. I love the heat but sitting there at the bench dripping in sweat is not particularly enjoyable. However, even with all that I did manage to do a little more on the bow lion carving. That basswood is really giving me a fit. I don't like working with it and am almost to the point to start with the boxwood. But I'll continue stumbling along with it for the simple reason to see how it's going to look on the ship. As noted in my previous post I had to remove some wood from the sides of the cut-water, which necessitated closing the large groove in the underside of the lion. Next was to make a chisel to carve the new groove. I used a #17 Excel chisel and ground the sides down till I had a 3.5 mm chisel. This had to be sharpened and honed on 1000 grit and 3000 grit stones. Re-cutting the groove was easy and quick and I could now concentrate on shaping the lion. I removed quite a bit of wood from the sides making it much leaner. I even started to shape the muscles in the lion's legs, which are beginning to look a little better. Next I moved up and started work on the head, much more difficult with this crappy wood and will most likely have to use some wood filler. Well, that's about as far as I got yesterday when I threw in the towel and called it quits. Showered and changed into some dry comfy duds, just a pair of shorts. Had a cup of Rooibos tea and two gingersnap cookies, yummo Here are a few pics of my efforts. This shows my narrower chisel I made from a #17 Excel blade. Held between a pair of Vicegrips and slowly grinding the sides down with intermediate dunking it it cold water to prevent loosing the temper. Here it's not yet sharpened. This shown the new 4 mm groove in the underside of the lion. Everything is still in a rough state. A 3/4 side view of the lion. This shows the bow lion temporarily stuck on the cut water. Cheers,


-
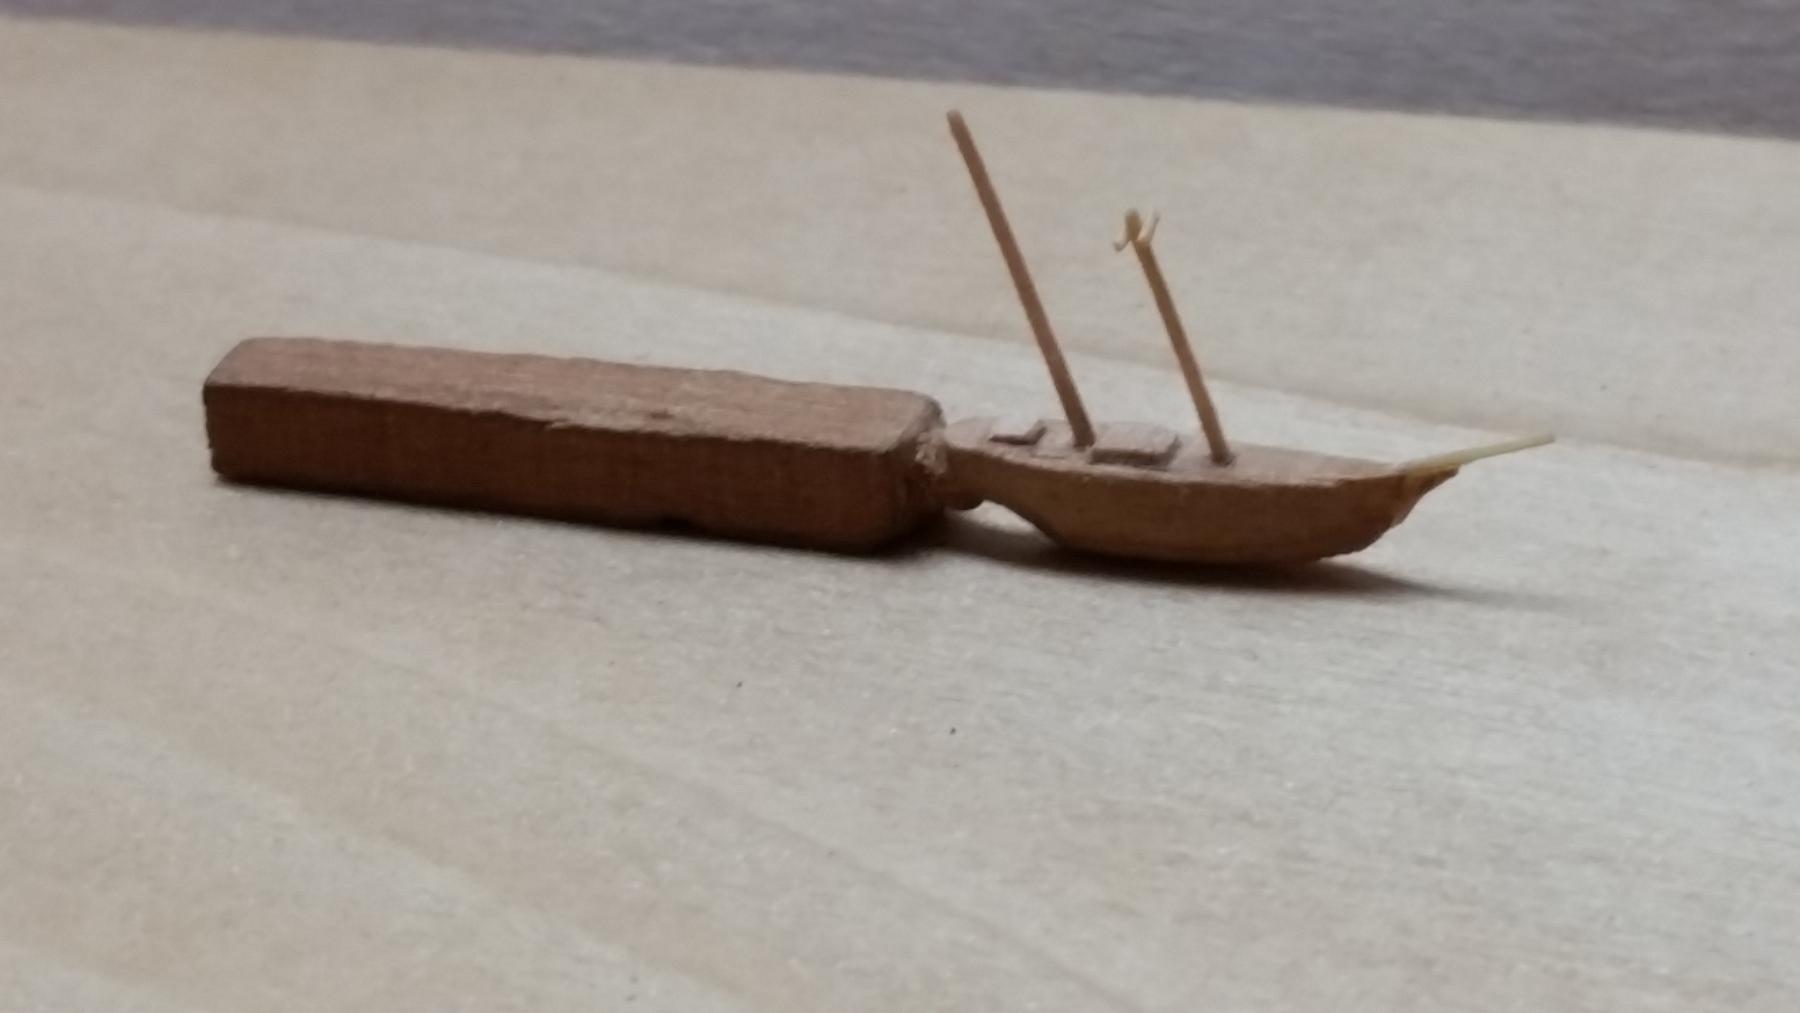
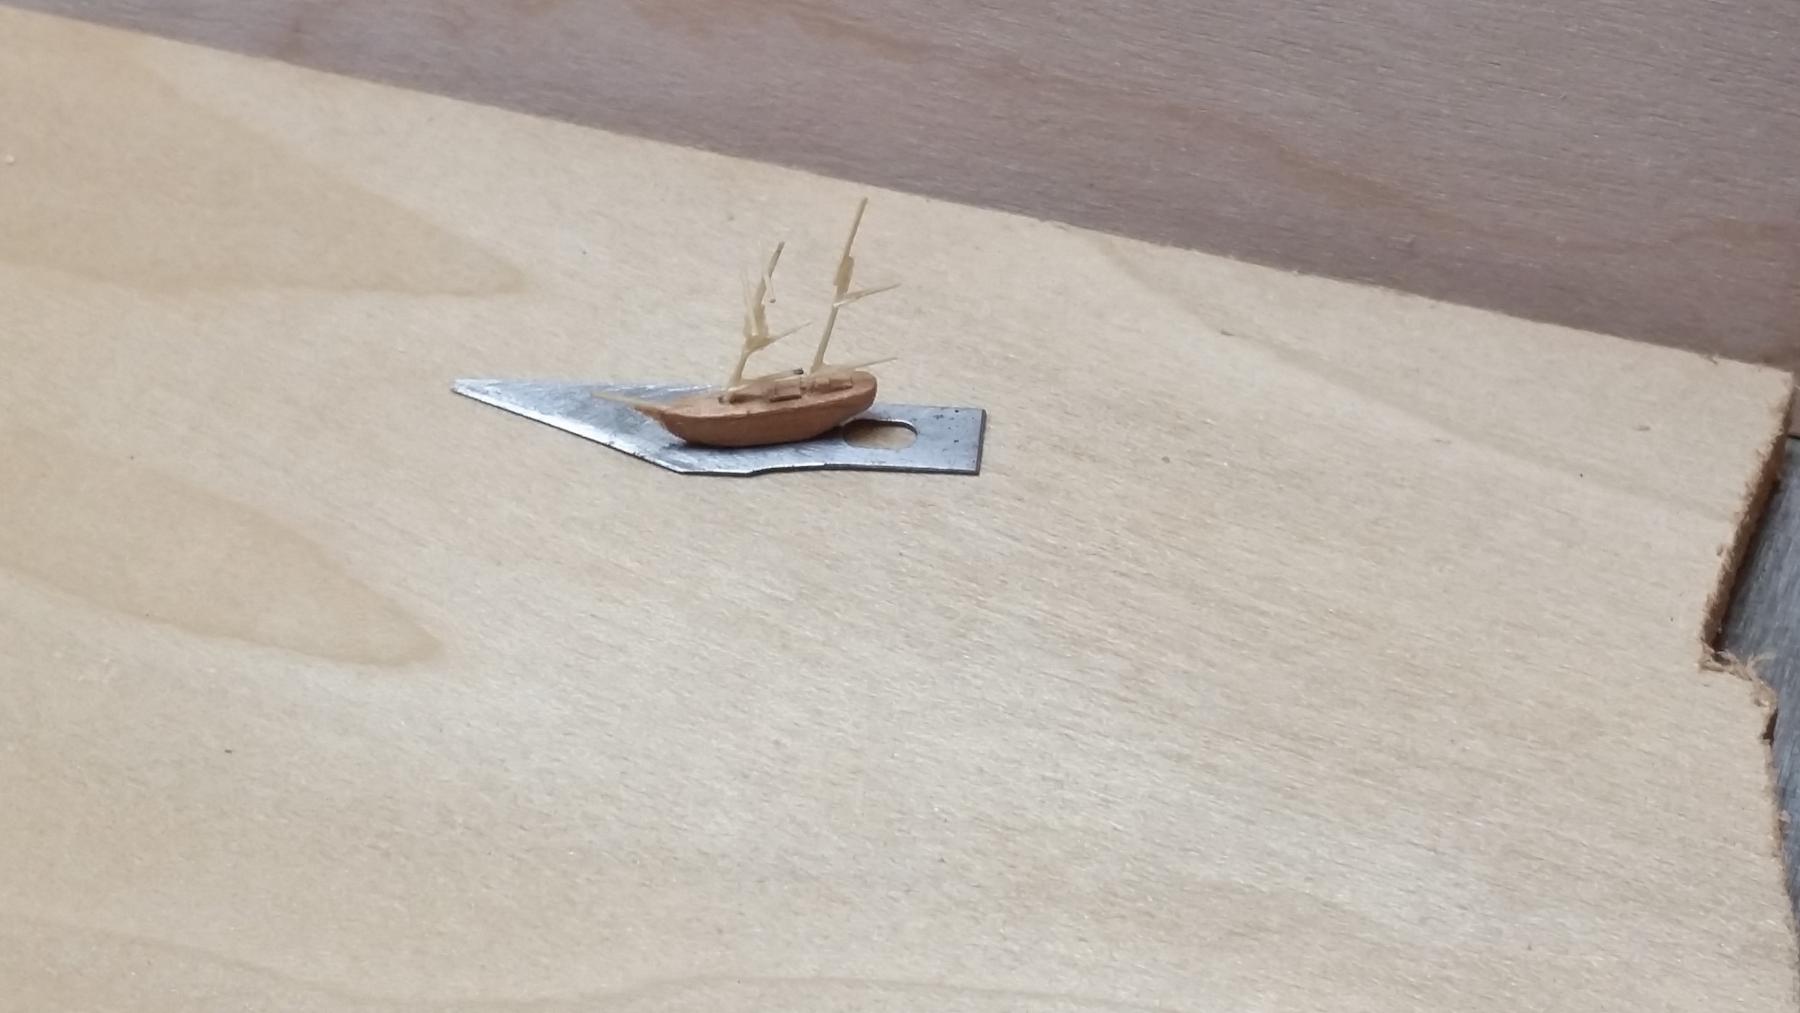
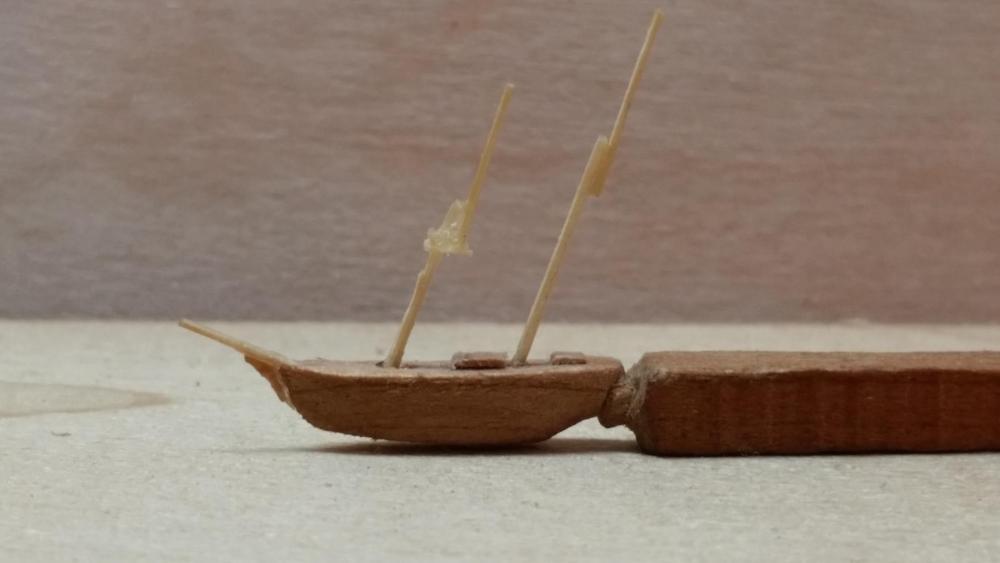
Thanks to all for visiting my micro shipyard and to all who clicked the like button - thanks. Yup, it's tiny alright and pretty close to my limits of tiny or not . Hmmmm, who knows what lurks in the Flying Dutchman's grey matter. The next step was making the masts, installing them and see how the shape of the hull would look. I left the hull intentionally a little wide in the beam for handling. Everything is still in the trial stage here and I have full intentions of shaping the hull a little more. Not happy how the bow came out. It may look a little bulky but she'll be sitting on the slipway, thus out of the water. Just to be stubborn, no surprise here - being a Dutchman - I wanted to try by making all the round work from boxwood. This was about the thinnest I could make them. I did try shaping them thinner but had no strength in them. As you can see they are much too thick for the 1:2000 scale. Yeah, yeah, I know, use bamboo dummy. But I had to try it. I made and cemented the topmasts to the lower masts, all with CA. Now I began to notice that no matter how little CA I used it showed up much too gloppy. I figured I could carefully remove it with my #11 blade. after the CA had set up. No such luck The masts were just not strong enough to handle the stress. Fortunately I only ruined the aft mast and had to make a new one. Next I made the booms and gaffs with the jaws cemented to the ends. Yes, they are still way out of scale but I again figured to shave them down after the CA had set up. It kinda worked but still looked too bulky for this scale. That's what I first wanted to see if this project could be done. Trying different approaches and materials. As we progress you'll see the things I encountered and how I managed them. Here are a few pics that explain what i have mentioned above. This shows both lower masts cemented into the hull. I have also cemented the cross trees to the fore lower mast. Both top masts are cemented on I made the booms and gaffs also from boxwood as well as the jaws. In my zeal to make things as close to reality does not work out well at this scale. I did manage to shave the jaws much thinner but everything was way too bulky. I stubbornly continued with cementing the booms and gaffs to the masts. I also made and cemented both yards to the fore topmast. If you stand back 10 feet feet it doesn't look too bad, actually you can't even see the ship ] Here is what I mean, a few feet away and if you don't click on the pic it looks kinda okay. Cheers,


- 159 replies
-
- 19
-

-
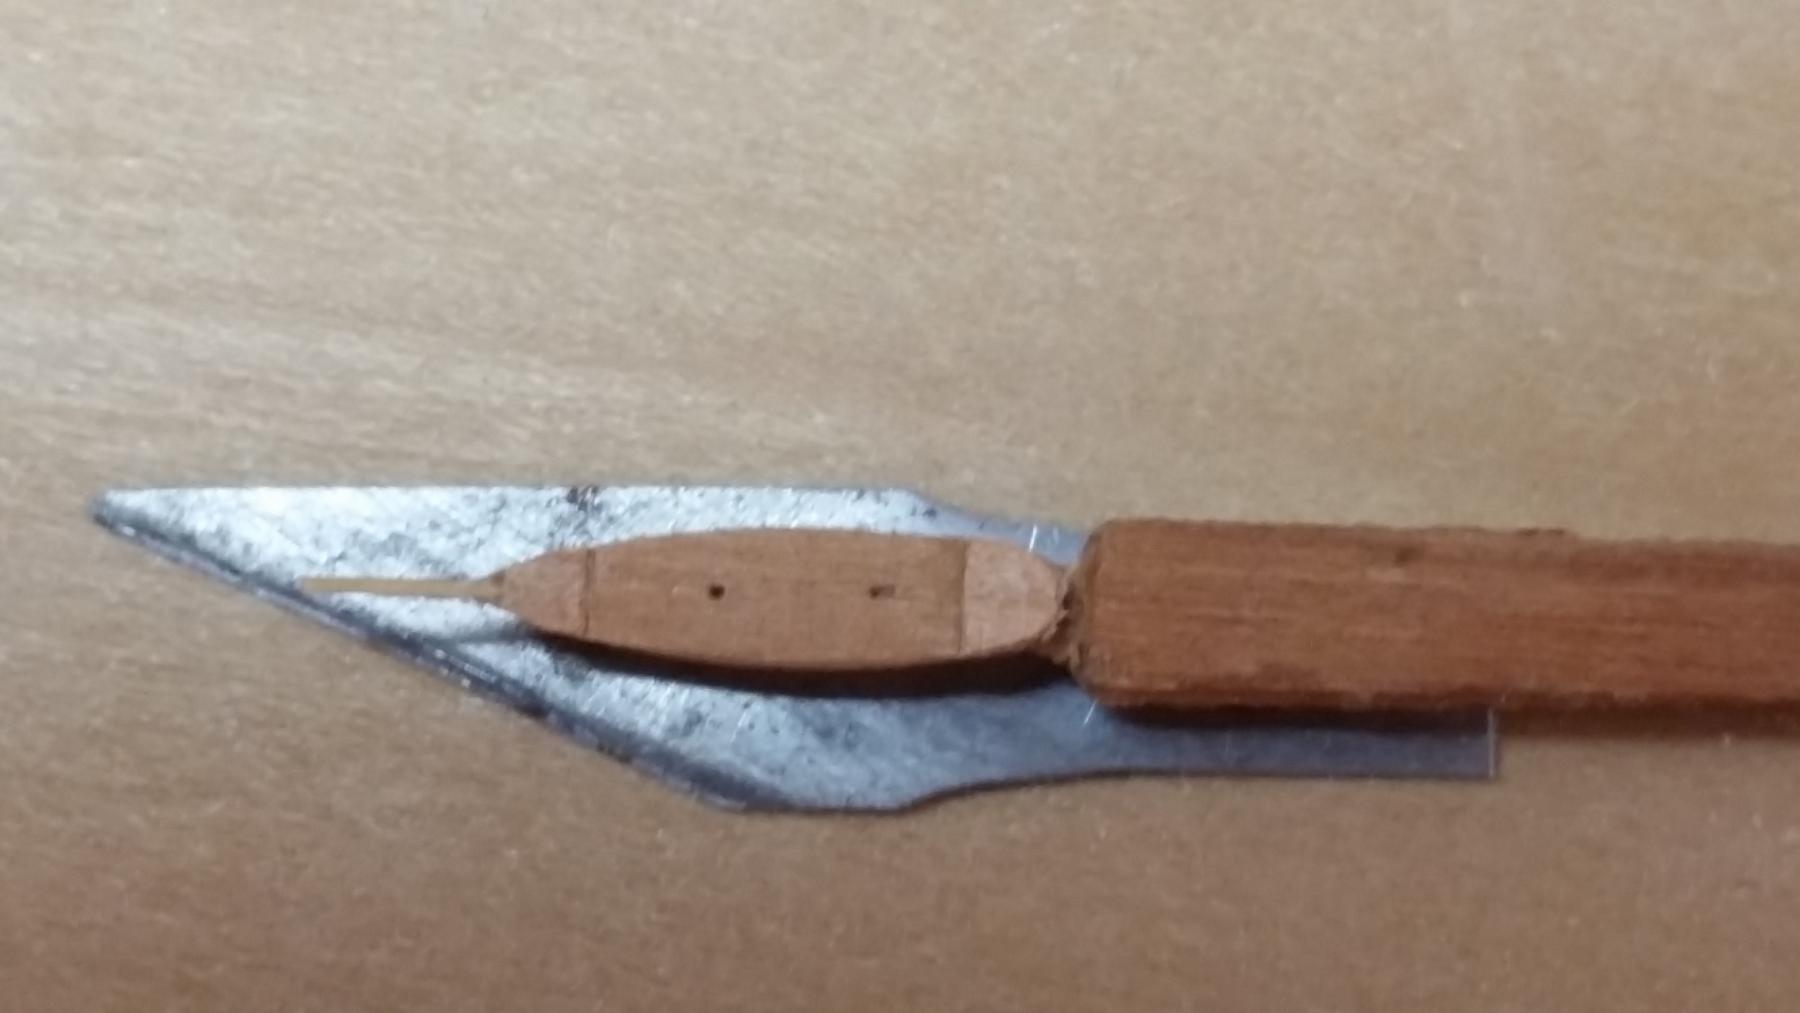
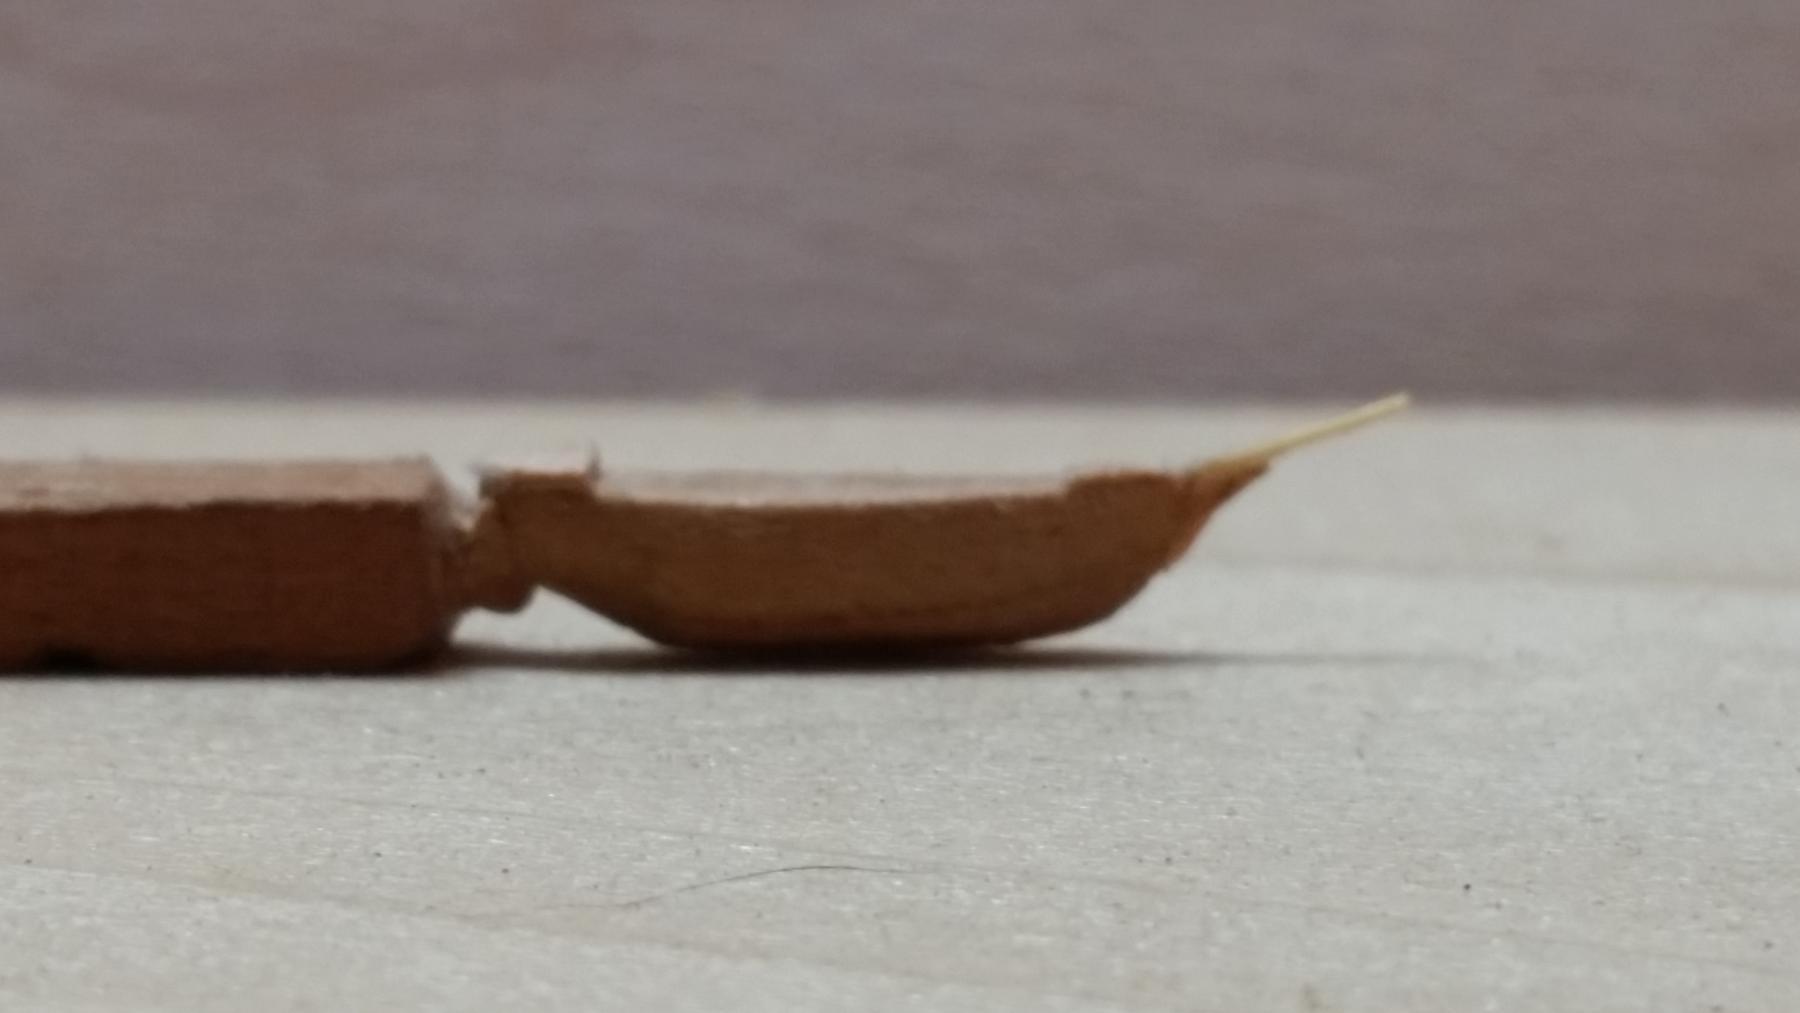
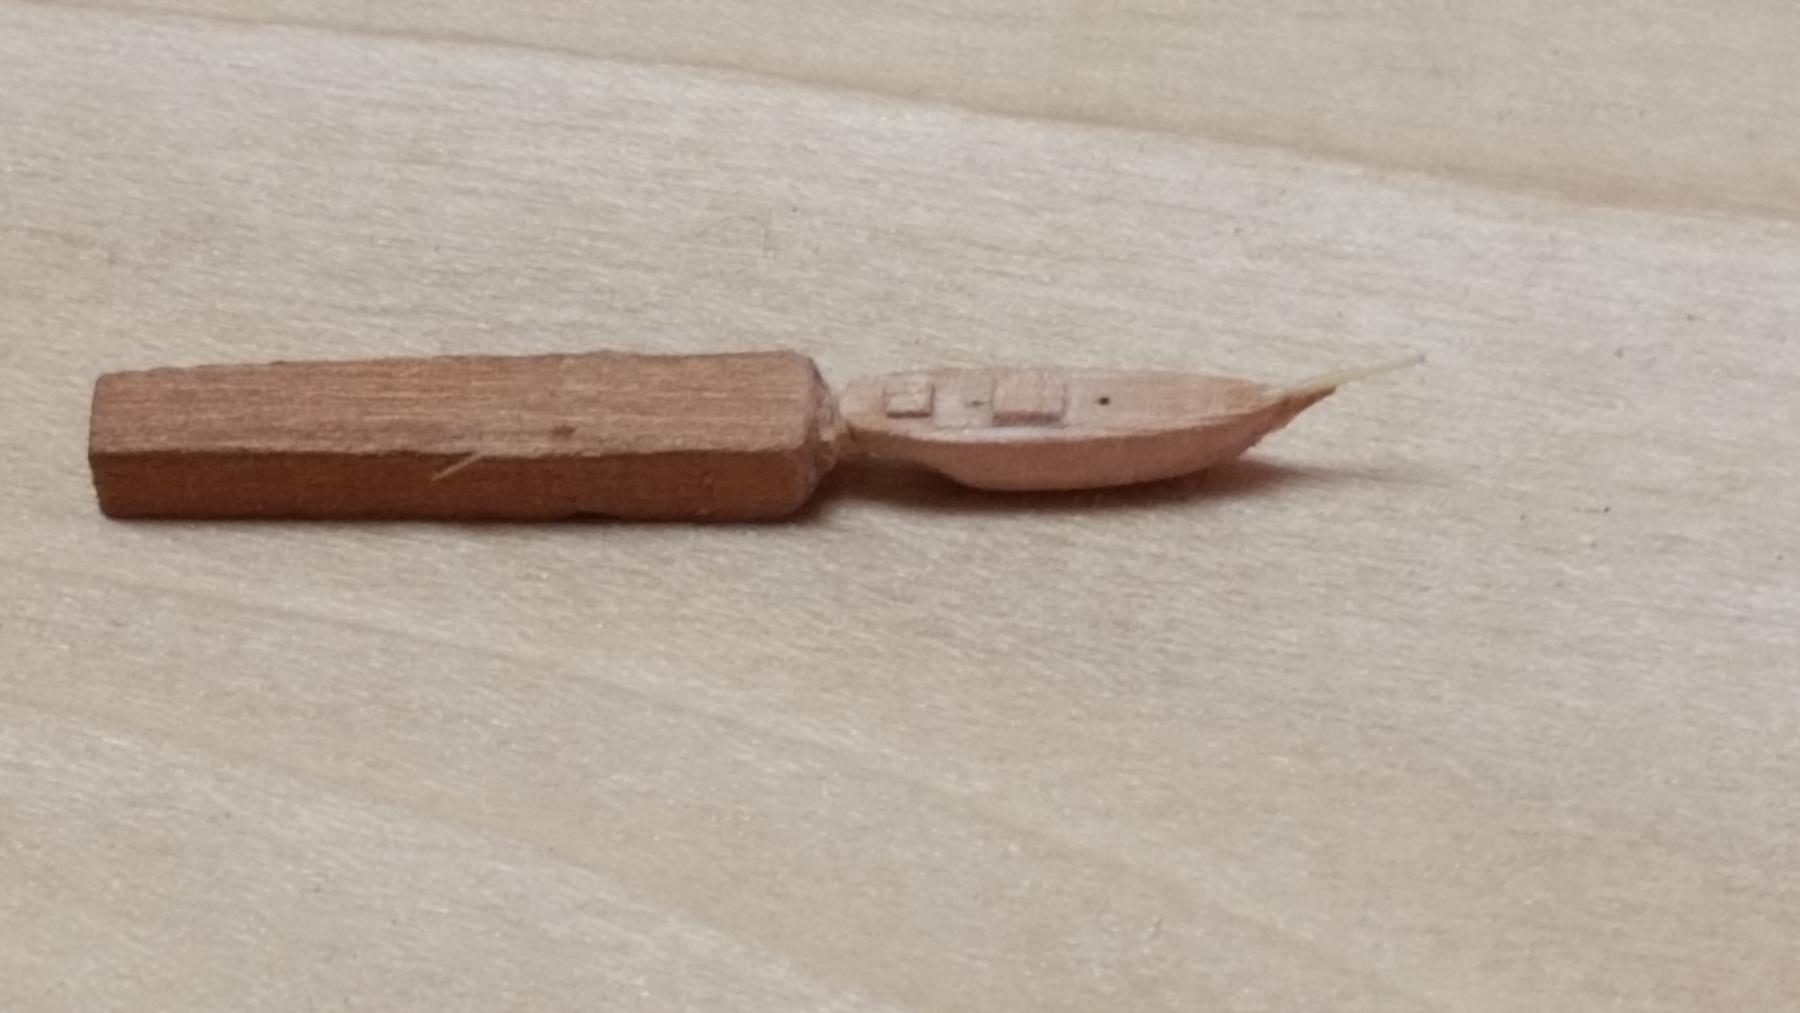
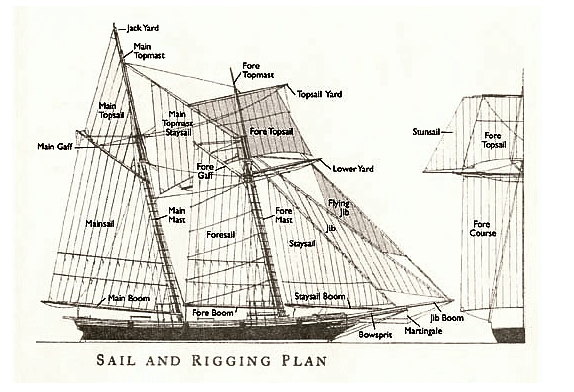
Oooooh, all yuns are just too impatient But thanks for the admonitions, I try. Just too many things get in the way of having fun. Like yesterday I spend most of the day repairing my neighbor's aluminum stepladder. Had to run to the store to but material and hardware. Besides, i had to do it outside in the sun at 90 degrees F or around 32 C. The garage aka shipyard was 102 F or 38 C. Not that keeps me out but after a shower I was not going back into the garage. Day before yesterday I attempted to upgrade my old iMac to the latest Mac OS, ElCapitan. That took most of the day. When I wanted to drag a few pics of the Topsail schooner to the desktop I couldn't find the entire file of all my photos. ElCapitan did not transfer all my folders over to the new photo thingy. Now I was really afraid of having lost hundreds of pics, many irreplaceable. Even my external hard drive , which I disconnected prior to, updated itself as soon as I plugged that hummer in. After a lot of clicking here and there I found it and managed to drag it to the desktop pffffffffffhhhh - a sigh of relief Okay, so now for an update with pictures!! The first order of business was to find an example of a topsail schooner I can use, with rigging. No, I was not going to put sails on it because the idea was to show her on the slipway ready for launch. I found a drawing that has no copyright on it and in public domain. I rummaged through my small wood scrap wood pile and found a small block of cherry of about 5 mm square and 50 mm long. This seemed to be enough to get at least one schooner out of it. With a LOD of 90 feet I needed 14 mm and a width of 3 mm. Carving the hull proceeded quite nicely and got a rather good looking hull shape. I purposely left it a little wider and not quite finished till after I had mounted the bowsprit. I could then shape the "clipper bow." As it turned out I lost some through drilling the bowsprit hole but figured to cement a small piece of wood to the bow under the bowsprit. All went rather quickly and I figured, well, why not making the deck housing. One for the stern and one for the main deck and the forecastle. At this stage of the project I only managed to make and cement the stern house and main deck house. I also marked and drilled the holes into the top for the two masts and the bowsprit. That one I made and cemented into a hole I drilled for it, ruining the clipper bow in the process. As mentioned in my previous posts I tried making them from boxwood, the bowsprit worked fine, at least for now. Yeah, there is more to the story to come later. So far things started to look okay and was encouraging enough to proceed with the next step(s). Here are a few pics yuns have been clamoring for This is the drawing I found to work with. It includes the sail plan and a good enough profile shape the hull. Yes, I also looked a few photos of topsail schooners but didn't find it necessary adding them to this post. Besides, they might just be copyrighted. This is the top view with the model well on the way even with the bowsprit cemented on. I have crudely indicated where the stern cabin and the forecastle are to be located. The mast holes have also been drilled with the proper rake for the masts. The length from the stern to where the bowsprit enters the hull is 14 mm. This shows the profile with the stern cabin already cemented on. In this attempt I had to cement an extra piece to the bow to make the clipper bow look. The width the hull is here 4 mm Here I have cemented the main cabin to the center deck area. Cheers,


- 159 replies
-
- 17
-
-
Okay, a very small and miner update, if that's what you can call it. With all the extra curricular activities there just isn't much time for ship building or carving. Like yeasterday I spend most of the day repairing a broken aluminum ladder for our neighbor. The gardener she hired to trim her hedge managed to fold one of the main legs over, ruining her ladder. He's just a wild man and not careful with equipment he borrows. Well, at least I had fun working with metal, aluminum too. However, I do sneak in a few minutes here and there. After I made the center slit in the lions belly to slip over the cut water I determined the cut water to be too wide making the lion too fat and the head proportionally too small. I removed quite a bit of wood from the sides of the cut water and glued some wood strips into the groove of the lion to thin him out. That's what a trial carving is good for. Yes, I could have used Skulpy but would have encountered the same problem with the thick cut water. So, that's where I am at the moment, carving a new and narrower groove in the lion to match the thinner cut water. Then I can proceed with the further carving of the lion. Cheers,
-
Hello friends and thank you for visiting and also thanks to all who clicked the like button. Thanks Dave for the added advice. Yes, scale is always THE important issue when dealing with carvings. Modeling clay such as Skulpy can be a boon to all without "wasting" valuable time with wood. After you have hand molded a reasonable "carving" you can proceed with duplicating it in wood. I decided to jump right in using wood. Problem is that I don't like working with soft wood, at least not in this small scale. @ Kevin: No prob my friend, thanks for dropping buy, always good hearing from you. Keep up the good works with your Vic, she's looking impressive. @ Kees: Thank you Kees for stopping by, good seeing you here. The carving is going slow, too may house and yard projects going on. My next build? Let me first finish the Surabaya then I'll decide. Could very well be the Musi, who knows. @ Sjors: Hey buddy, good to see you here as well. Talented? Nah, you're too kind. I was not aware that they had already carved the bow lion for the Delft. I am using examples from the Batavia, the 7 P and the staten jacht Utrecht. Jan send me a few nice pics some time ago. Most of it will evolve as I'm removing wood. @ Remco: Thanks my friend. Yes, Marianne has features of Gwen's dad but also from my part of the family. Strange things these genes. Also thanks for showing a pic of your grandmother and yes, there is a resemblance, lucky you. She sure was quite a nice looking young lady. Cheers,
-
Now you have done it Patrick, my mind is boggled, which is not a good thing for an old man Enough detail will come when you'll say "enough." In the meantime keep adding. Cheers,
-
Is there still a spot left for this old Dutchman (cupping an eye, looking around), ah yes, next to Mark. Oh sorry Mark, I didn't mean to poke in the ribs Wow, Sjors, what ambition - - building such a complicated ship. Looking like you have a great start. Cheers,
-
Happy birthday Andy. Cheers,
-
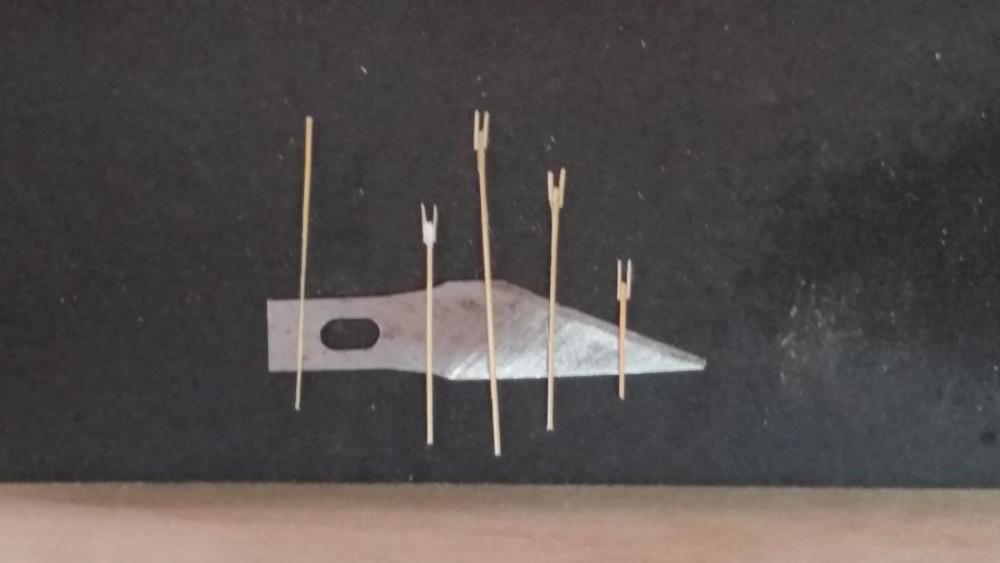
Hello all, I tried to add an update today but stuff got in the way. Maybe tomorrow. Yeah John, everything is tiny but rather fun to do. Yes, Igor, I picked the cherry because I had a few small pieces left over from the Surabaya hull planking. I don't need much at this scale. In the end I did wind up using bamboo for the masts and spars. To reiterate, the actual build is much further ahead then I am showing here. I wanted to first make sure it was doable before i start a build log. There were quite a few trials and do-overs till i found a satisfactory solution. And yes, I'll tell all y'all about the things that didn't work. I'll be adding updates whenever I have the time and all will be work already done months ago. When I get caught up I'll tell all yuns. Cheers,
-
Superb planking job Nils, especially so using such narrow slats. Agree with the bow shot, impressive. Cheers,
- 2,625 replies
-
- 3
-
-
- kaiser wilhelm der grosse
- passenger steamer
- (and 1 more)
-
Truly marvelous work Dave. Cheers,
- 962 replies
-
- 6
-
-
- sovereign of the seas
- ship of the line
- (and 1 more)
-
Fantastic looking dead eyes Nenad! Cheers,
- 4,152 replies
-
- 4
-
-
- cutty sark
- tehnodidakta
- (and 1 more)
-
ancre La Salamandre by tadheus - 1:24
Piet replied to tadheus's topic in - Build logs for subjects built 1751 - 1800
Masterful work Paul, what a pleasure to look at. Cheers, -
Hoi Kees, my thoughts and best wishes for a successful treatment and recovery. Fantastic work on the build. Cheers,
- 434 replies
-
- 4
-
-
- pelikaan
- beamtrawler
- (and 2 more)
-
Phhhfff, just caught up and lout of breath. Marvelous work on the windows Mark and prepping for carving. You'll do just fine, based on your work I would venture to say, great. Lovely work overall. Cheers,
-
My sincere thanks to all who visited my shipyard and your likes, it's always very much appreciated. You Carl, there is a lot to say about using wood for carving instead of marble. With wood we can fudge - - - a lot. We can add wood putty when we remove too much. With marble, well what can I say - buy another block. I hope i wont have to add wood putty but this'll be a trial piece and if I have to I will. @ Mark: Yeah, house and yard work are one of the necessary things one must do when owning a home. Especially in Florida during the spring season when we have had a lot rain and now a lot of sunshine. Plants grow fast and if you stay away from tending to them, even for a week, then it's catch-up time. And now that Gwen will be needing more of my help bench time will be shorter yet. @ Brian: We are in the same boat so to speak. This bow lion will be the third carving I have ever done in my 82 years of life. The first two, that actually entailed one trial carving, for the counter, was my very first. Now, I did obtain a book on carving and read it several times to get a feel for it. Like you, I understand the principals of it all but the actual doing it and making it look like something presentable is a whole other thing. I am also a self taught artist and can switch brain halves in an instant. This helps tremendously in visualizing the subject appearing out of a chunk of wood. First thing is to make an accurate drawing of your subject, both profile, top view and bottom view. The profile is rather easy, may examples around but now come the top and bottom of the lion, like in this case. I don't have any drawings of that so I had to kinda guess at it. We do have a cat and taking a few pics her is one way to to do it. One of my 14 or 15 certificated trades is machine draftsman and illustrative draftsman, you know the guy who draws a machine in three D as if blown apart? I guess drawing comes to me as second nature but I do rely on photos and drawings or paintings, which I also have. When you carve the drawing away just redraw it again. My advice is to purchase the book from Bill Short, "The New Carving Ornamentation for Ship Models." I believe it's still available through MSW, check the log-in page. You can also e-mail him at modelshipright@sympatico.ca There is plenty of very good advice and illustrations in it for the novice carver such as me and you. Also the tools you'll need. I do not have all the tools I would like to have but a small scalpel or at least a #11 Execto and the Execto chisel blade is almost a must and keep them sharp. Small gouges are also very helpful, of which I don't have any, at least not the good ones. I'll have to make them I guess, the good ones are not cheap. Next ask you dentist for his worn out burs and get a small rotary tool or flex shaft with collets that fit on a Dremmel type tool. I find that these are not as easy to use on soft wood like basswood but still a worthwhile tool to have. That's why my final carving will be from boxwood. The rest is trial and error. Go slow and keep comparing with your drawings. You'll be surprised what you can do. Jump in, the water is great. Good luck my friend and Cheers,
-
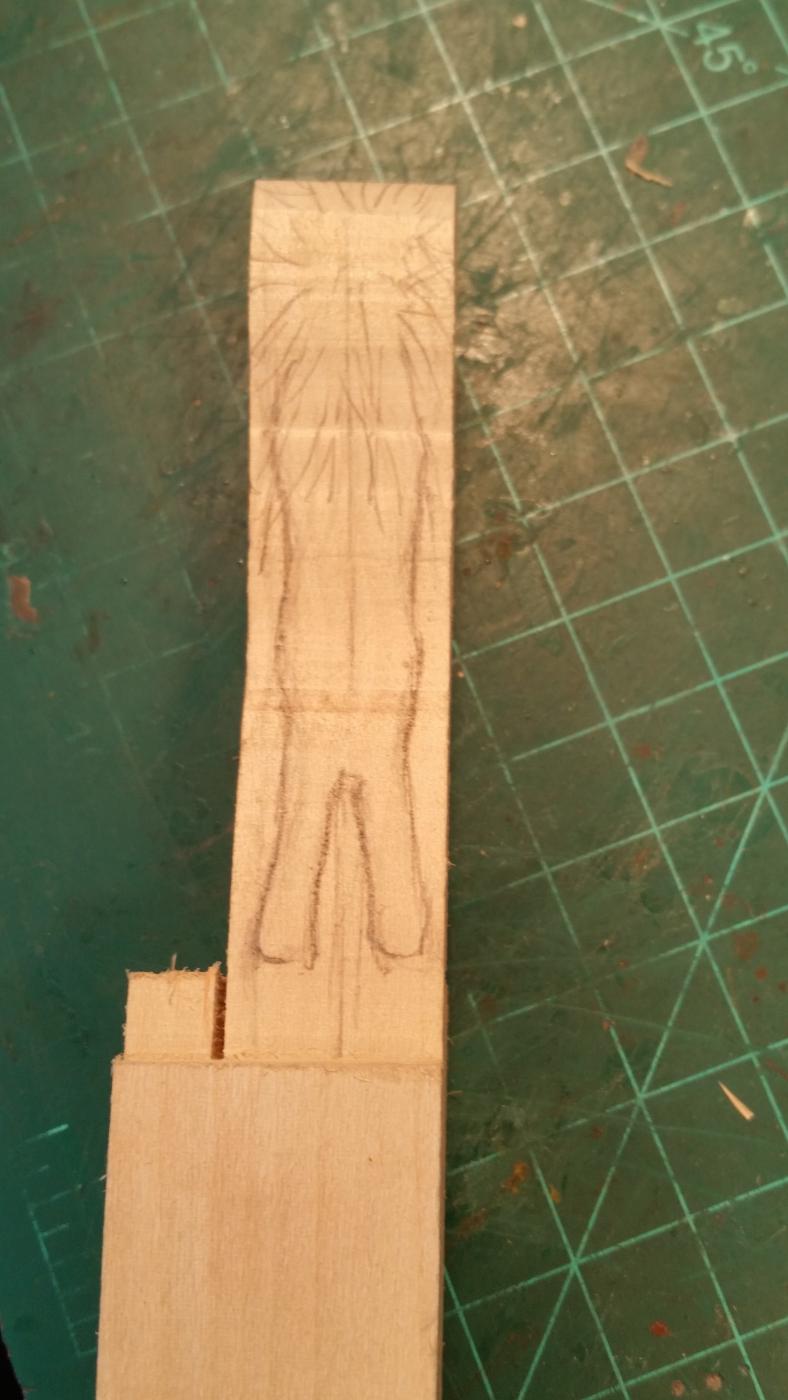
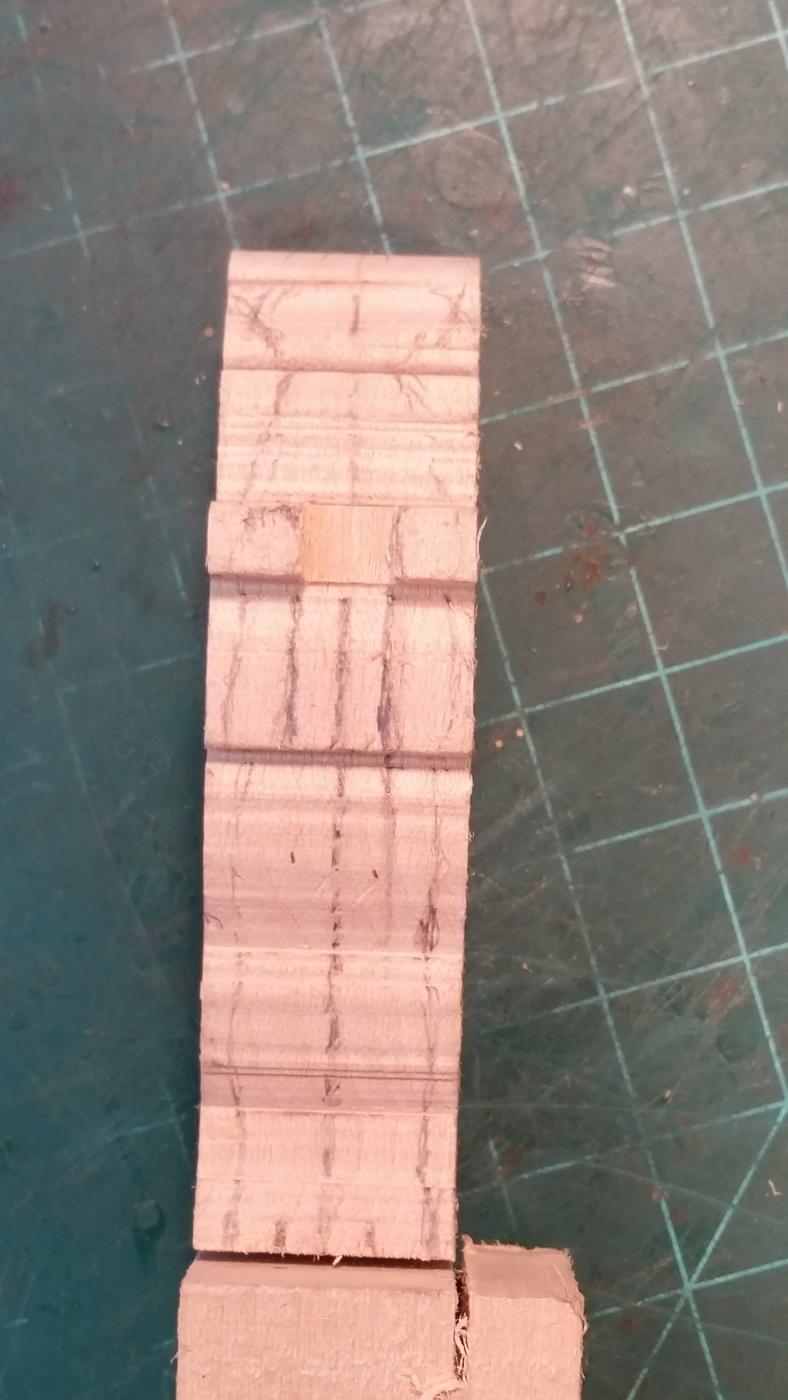
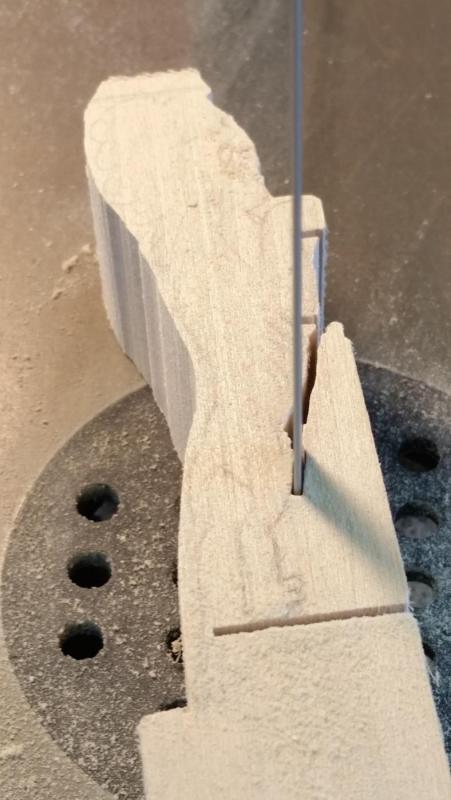
Okay, okay already - - - As things grow here in Florida I have to keep somewhat active with the yard otherwise it'll be more difficult to get it back in somewhat of an order. However, I managed to start with the bow lion. I bought a block of basswood to carve a trial piece before I tackle the "real" one from castello. Now I have divide my attention between the Surabaya, the Diorama, yard work and drawing. Then two of my neighbors are asking for help with a few minor projects and Gwen's hands are really giving her a fit. After her carpal tunnel operation, now a year and half ago, she has what's called "trigger finger." It is painful and has almost no power in here hands to hold much of anything. I am now also having to cook more, which I like to do, but it takes time away from shipbuilding. At least the basswood is easy to carve but found out that it as also very easy to split small parts off at the grain line, if one is not careful. So, I don't have much new to report but at least it's something and not very exiting. Here you see me cutting the bow lion out of that piece of basswood. I figured it being easier to do it on the band saw rather then on the Proxxon jig saw. This shows the roughly cut out bow lion. Here I have penciled in the lion outline looking down on it's back Here I have penciled in the lion outline looking up at its belly. This shows the beginning stages of the carving. Cheers,

-
Thanks again fellows for visiting and your likes. Yes, I would really like to start the build of that little ship. Gwen does not have many momentous of her dad and this would give her something to connect. Jan, again many thanks for your efforts in finding things for me. I have scoured Maritiem Digitaal and didn't find some of the things you have come up with. Hoi Hans, I really appreciate your comments. Ah yes, the old days, some good most not so good, at least not for us. It was quite an interesting story in how master van Vulpen became captain but that'll have to wait till i post the introduction to the Musi build log. The photo is the whole family, his wife three daughters and one son. Gwen is the fourth of the clan, so yes, she ultimately became my wife. I did have the pleasure knowing Mr. van Vulpen when I lived in the next village over. According to Gwen he did take a liking to me and I like to think that he would be pleased having me as his son in law. Okay, let's move on to building ships. Cheers,
-
Thanks to everyone for joining in on the fun and your likes. Yes Igor I know about the glass of these light bulbs. I'll be extra careful. The wood for the topsail schooner hull will be from cherry, solid. No frames and planking, not at this scale. The base is poplar and I thought of making the round works (masts, spars and bowsprit) from maple but as the work progressed things didn't work out that way. You'll see as this log gets underway. That's the problem with doing a build log after the fact, when part of the work is already done. Captain Bob, yes, that was also my thinking at first to take the easy way out as a last resort. However, I first wanted to try and make everything myself as a true scratch build, including cutting a lamp bulb to fit the base. This project was meant to be my challenge and to improve my physiology. The next post we'll go into the nitty gritty and show the trials and errors I encountered. The first thing I wanted to see if I could carve a good enough looking hull at 14 mm length to look like a schooner. That first attempt I'll share with yuns next time. Cheers,
-
Thanks everyone for joining in on the fun with this very trying little project. Yeah, Jan, it's a topsail schooner that's not for sale Dyslexia of the finger and I'm going to stick with that excuse. I'll try to fix it - - whenever. True, that Durgerdam diorama is very attractive and as my signature shows, there is a ship in a lamp listed. I put "Staten Jacht" there but I chnaged my mind and do a Botter or Kotter or some other Zuiderzee fishing boat. Actually I have more affiliation with Amsterdam then Rotterdam though. Just because I lived for one year in Vlaardingen but my whole family is from Amsterdam. I would love to delete the other post if I only knew how. Anyone can give me some help? A moderator perhaps? You know Texxn5 John, this diorama will fit on the O19 display board with room to spare. Good to have you join the crowd here. I did spend some time on this little project this morning. Tried to shave some wood off the - - ummm, sorry can't say it yet. That's a part further down into the build. Why? As I was progressing and kit looked like it was doable I made some changes and additions to the layout. I like to show this project from the start and walk through it as it was developing with the tries and failures. Hope yuns don't mind. I mentioned to Remco in a PM that most of us "older" folks tend to gravitate to large® scales and here I am at 82 going the opposite direction. Yes, I do use an optivisor but I do that also for the Surabaya model and the O19 model. This may sound strange but it's also a physiological challenge, to force the eyes and muscles to do what the brain commands. So far it seems to work. Oh yeah, there are times when I miss the heart rhythm and my hand with the scalpel makes an unauthorized move. We then you'll hear an expletive such as "oh shoot." And I cant spell either, as Jan already noticed and have to make the part again. Did some shopping at the art and craft store this pm and found some stuff that could work for grass and shrubs or trees. Hmmmmk, I need reeds at the water's edge - - - - - See y'all on the rebound and cheers,
- 159 replies
-
- 10
-
-
Hello all, A few months ago I got the urge to try something I have been thinking about of doing for a long time. I have always been very intrigued with dioramas. It adds to the realism of our models but making a diorama with large models is not an option for me, space wise. So, what size should my diorama be and how to protect the diorama from dust and possible mishaps while on display. What subject should I choose? In my frequent visits to the Dutch website "Maritiem Digitaal" I found a few paintings of ships in a shipyard. Being also an artist I love to accumulate copies of art, just to look at. So, the idea is basically making a diorama of a small shipyard like they used to have in the cities around the former Zuider Zee, now Ijsel Meer. In one of my many books about the Netherlands I came across a photo of just one of those real small shipyards. Ah, Pieter thought, that would look great. Well, as time went by and I felt a strong urge to start with this project the subject was changed from a Dutch fishing boat to an American build topsail schooner. Oh, the Dutch fishing boat is still in the back of my mind but I'll reserve that for later and hope to actually make a diorama in a bottle. After I saw JesseLee's ship in a Christmas ornament globe I thought that would really be a challenge making something that small as a diorama. But alas, that idea was promptly rejected because of the difficulties involved, i.e. improbabilities. Then I read about small dioramas under a wine glass. So, did a Google search and they looked very nice with real probabilities. Problem was that Gwen would not part with one pf her crystal glassware, her wedding gift. A good thing though because in retrospect the stem would be too distracting. A further search for ideas got me to those "snow globes." Eureka! Pieter shouted. That would work and also look nice. These snow globes are rather small and can be held in the palm of your hand, just what I had in mind. Okay, what do I use for a globe? Christmas tree ornaments are too delicate for this purpose. So my dear wive Gwen why not use a lamp? I rejected that idea already at the beginning because I did not see any way doing all this through that small opening after you remove the filament. But then the light went on - - - I'll just cut the lamp to fit on my diorama. I now had the subject, the diorama globe and the material to use (wood). Next was to determine how big that schooner should be to fit nicely inside a 75 Watt lamp that's cut down to have a 5 inch opening. The schooner is supposed to be 90 to 95 feet long or 27,432 mm or 28, 956 mm. My diorama can only have a model of about 14 to 15 mm length on deck. Well, that works out to a scale of 1:2000. This is the reason for me wanting to try it first to see if I can actually make a 90 foot two masted ship at 14 or 15 mm. The masts and spars should close to scale rather than clunky. The rest would follow easier, me thought Okay then, here are a few pics of everything that preceded the actual build process. Old ship's warf of Dirk Pauw at Durgerfam Original idea for shipyard diorama Bird's eye view of original idea Cordial glass that came closest to the size I wanted, 5 inches A 75 watt lamp that will eventually be cut to the 5 inch diameter point. Cheers,
- 159 replies
-
- 18
-
-
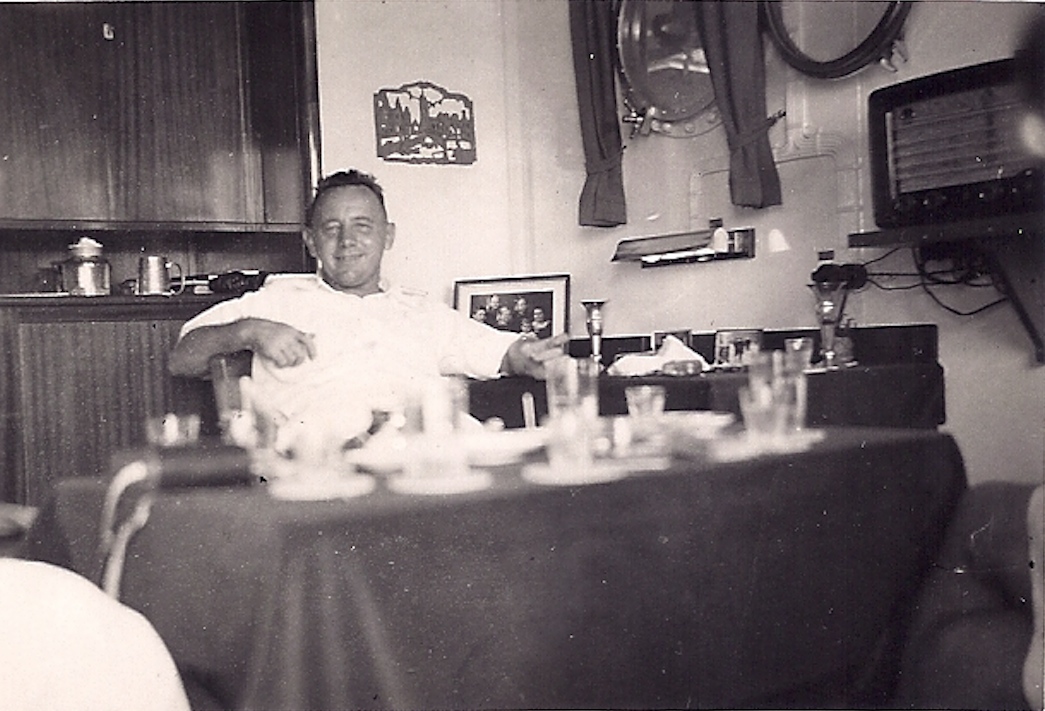
Thanks fellows for staying with me and your patience. The "Surabaya" is still on the bench but right in front of her build dock sits my special project. First of all, my thanks to Jan for the stuff on the Musi from the Archive in Rotterdam. I did go there a year ago but could not find anything. Remco contacted the Rotterdam Maritime Museum and got to talk to one of the curators who sold me the line drawings and the deck-layout. I am really surprised that no building pics or drawings exist of this ship in the archives. I appreciate your additional info on this nice little ship Jan, even a few pics I don't have. As yuns see in my signature, this ship is on the "to do list" in a scale of 1:50. Yes, I'm anxious to start with it but seem to get distracted with other fun projects like this "mystery" build. For the non Dutch speakers here, the name is pronounced as "Moosy." In the Indonesian language the u is sounded out as an oo like in book. Having been born and raised in the Dutch East Indies I still remember many words, can't speak in anymore though. This ship was build as a fuel tanker for gasoline and kerosene in steel drums. Special care had to be taken to prevent static build-up and fire protection. Long story involved and whenever I start the build I can elaborate on it. I may have posted a pic of Gwen's father as captain on the Musi but here he is again in his cabin. Capt. Jan C. van Vulpen on board M.S. Musi, 1951 Okay Jan, here is a hint - my special project will be small, ummm, very small. It'll be all wood, has at least one ship, a two master no less. If I keep jabbering any longer I'll run out of time to start the build log. Soooh, I'm signing off here. Y'all have a great rest of the day and happy modeling. Cheers,

-
Great stuff Nenad, I love history. Enjoy. Cheers.,
- 4,152 replies
-
- 5
-
-
- cutty sark
- tehnodidakta
- (and 1 more)